[NC] 7.5lbs per HP build thread / xpost from M.Net
 03-29-2016, 08:42 AM
#81

It was absolutely not a cost cutting measure, in fact we made it a point to consider cost one of our last priorities. Premium is premium and if it reflected in the cost, so be it. Fortunately for us, we've produced the best option out there with pricing whithin the ball park of existing solutions.
Secondly, ask Albuquerquefx in about a week how he'd feel about installing hardware in the same position. It allowed us to have the only manifold on the market without an awkward collector. It's a true, full flowing 4-1 merge collector, none of these jumbled runners coming in at all directions.
.85 is intentional and no limiting factor on an EFR and certainly not on an NC cylinder head. These things breathe like a proper engine. Something we couldn't say previously about our BP engines. Having a complete NC running this kit I can tell you the power band leaves nothing to be desired. Our stock 2.0 has gobs of power everywhere and it's currently on wastegate pressure until the body work is completed on the flares. Due to the squat and clearance under accelleration we chewed up a set of rather expensive 285 drag radials on one of our first test drives with fender contact.

Reply
 0
0

0
03-29-2016, 10:11 AM
#82
Junior Member
Thread Starter

Join Date: Sep 2015
Location: Memphis, TN
Posts: 199
Total Cats: 31
 (j/k)
(j/k) It appears to me, naively, the NC transmissions hate life as torque exceeds 300lb/ft. The theory could be: if I can keep the torque flat and continue spinning the motor, 350++HP should be easily attainable without (serious worry of) fragging the trans. It's all theory now, and would require A: a bit of boost management and B: a bit of tuning finesse.
The 2.5L is naturally going to gravitate to a higher torque number, which means you're probably MORE (moAR?) likely to make a bunch of metal gravel when you dial in ALLOFIT. Perhaps consider giving it only SOMEOFIT? Blasphemy, of course
Also, the overheated engine? I don't see him mention anywhere an oil cooler. The death of these motors doesn't appear to be water temperature at all; I replaced my radiator simply as part of due diligence, however the oil temperature seems to be a very critical component of the NC's lifespan. If I needed to pick and choose, the oil cooler would have come first on mine. I'm gonna go over there and ask now that I think of it.
Which, by the way, I do not have the SETRAB I ordered in my garage parts pile yet. Still working with Bryan to figure out how best to get it integrated...
Reply
0
0
03-29-2016, 12:58 PM
#83
Junior Member
Thread Starter
Join Date: Sep 2015
Location: Memphis, TN
Posts: 199
Total Cats: 31
Dang, didn't even see that Bryan responded to my build thread. I feel loved 
And yeah, vBand for me all day err' day, kthx. Jerking around with T25 flanges and studs and nuts and lock washers and gaskets can suck it.
Starting tonight, the Miata is getting the night shift from me. I have a loving wife and two fantastic kids, none of which I would ever trade for the world, and after I'm gone from 7am to 6pm they all need attention. Still, I've made basically ZERO real progress on anything, which is irritating to say the least :(
Reply
0
0
04-03-2016, 10:25 PM
#84
Junior Member
Thread Starter
Join Date: Sep 2015
Location: Memphis, TN
Posts: 199
Total Cats: 31
Bucktooth Miata sneak peek... 
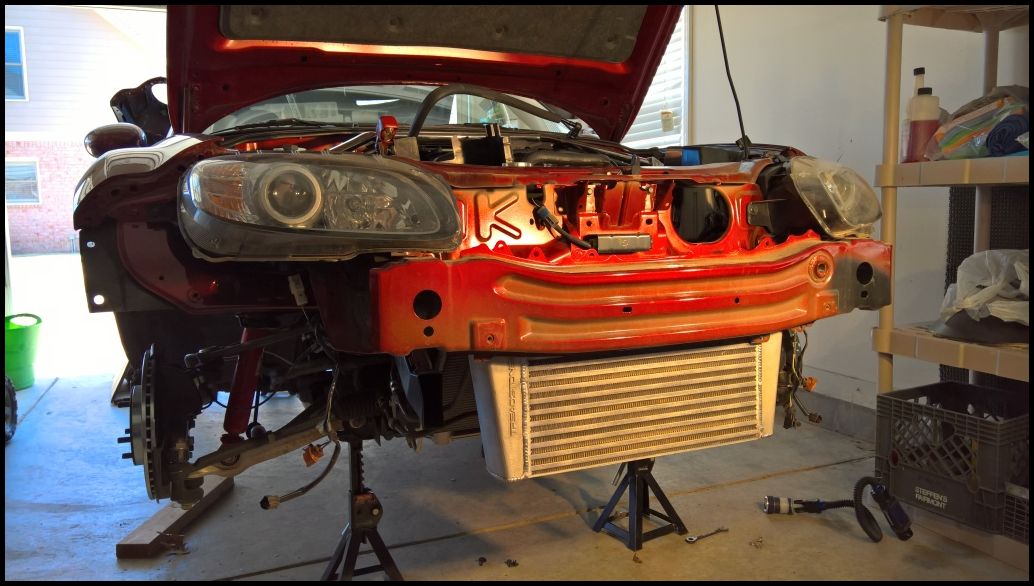
This was noon today. Radiator is replaced, injectors are in, working thru the clutch now. When that's done I will finish the fuel pump stuff, then gut the center stack and begin working the gauges.
Plenty more to do...
This was noon today. Radiator is replaced, injectors are in, working thru the clutch now. When that's done I will finish the fuel pump stuff, then gut the center stack and begin working the gauges.
Plenty more to do...
Reply
0
0
 04-11-2016, 10:42 AM
#86
Junior Member
Thread Starter
Join Date: Sep 2015
Location: Memphis, TN
Posts: 199
Total Cats: 31
Been focused on getting work done rather than taking pictures, sorry :(
Stock exhaust removed.
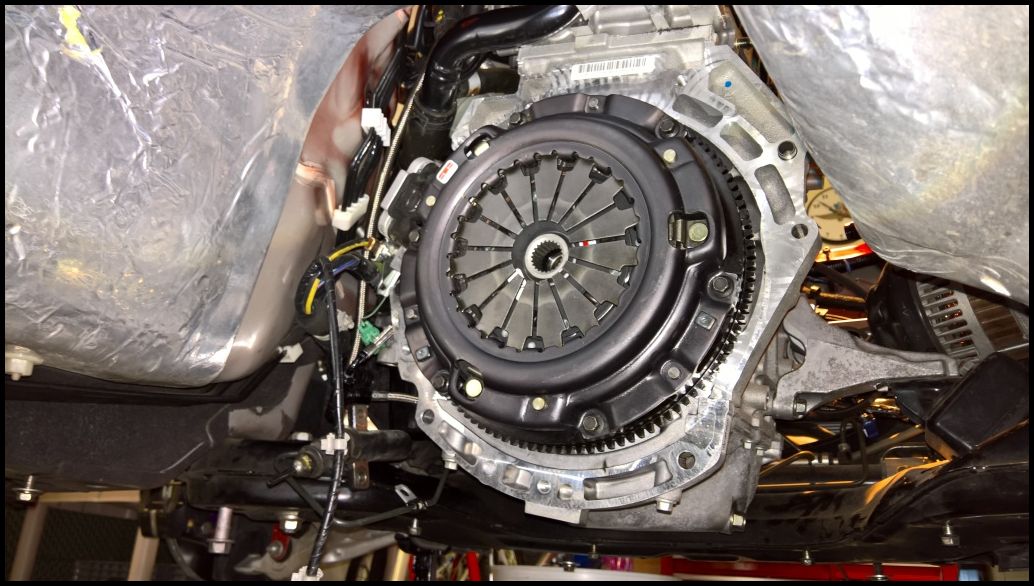
Clutch and flywheel are in.
Did I mention I don't have air tools at the moment? You know what's great about removing this **** without air tools? F*$( YOU, THAT'S WHAT
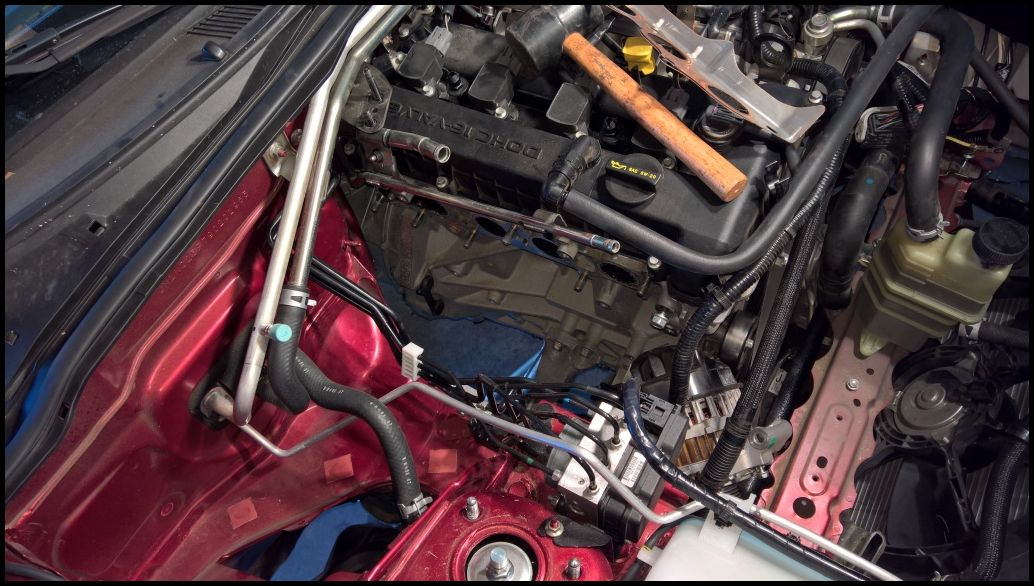
While the bellhousing is off, the oil sending unit (which is used for the turbo oil feed) is immediately accessible on the driver's side. I took the opportunity to get the plumbing in for that side. Also got the coolant lines spliced and ready. Also performed the minor modifications required for the passenger side engine mount (redrill the mounting holes to 1/2", and shave down the upright stud to clear the cold side.)
I'm having a challenge finding a stubby 9/16" bit to perform the block tap. I'm going to try tonight with a normal length bit; I feel like I have enough room to make it work.
Also not pictured, I have the dash entirely apart and ready to begin pulling wiring for the gauges.
Stock exhaust removed.
Clutch and flywheel are in.
Did I mention I don't have air tools at the moment? You know what's great about removing this **** without air tools? F*$( YOU, THAT'S WHAT
While the bellhousing is off, the oil sending unit (which is used for the turbo oil feed) is immediately accessible on the driver's side. I took the opportunity to get the plumbing in for that side. Also got the coolant lines spliced and ready. Also performed the minor modifications required for the passenger side engine mount (redrill the mounting holes to 1/2", and shave down the upright stud to clear the cold side.)
I'm having a challenge finding a stubby 9/16" bit to perform the block tap. I'm going to try tonight with a normal length bit; I feel like I have enough room to make it work.
Also not pictured, I have the dash entirely apart and ready to begin pulling wiring for the gauges.
Reply
5
5
04-12-2016, 01:29 PM
#88
Junior Member
Thread Starter
Join Date: Sep 2015
Location: Memphis, TN
Posts: 199
Total Cats: 31
Got stuck on the transmission last night. I can get the bellhousing nearly to the dowel pins, but it stops about 1/4"-1/3" away from properly mating. I'm wondering if somehow I've misaligned the clutch with the pilot bearing; gonna pull it back apart tonight and retry my hand with the clutch alignment tool.
I also ended up missing a pair of M14/4AN water fittings for the turbo somehow. I'm gonna hit up my local dyno + speed shop on the way home to grab the requisite parts, if they have them. (Corrected size, thanks Bryan ) The rest of the cooling system is all connected and ready now.
Going back through the parts (looking for the water fittings) I found my spark plugs and got those put in. I've also got a place on the radiator wall marked up for cutting tonight. I'm stupidly close to getting this thing started for the first time...
I also ended up missing a pair of M14/4AN water fittings for the turbo somehow. I'm gonna hit up my local dyno + speed shop on the way home to grab the requisite parts, if they have them. (Corrected size, thanks Bryan
) The rest of the cooling system is all connected and ready now.Going back through the parts (looking for the water fittings) I found my spark plugs and got those put in. I've also got a place on the radiator wall marked up for cutting tonight. I'm stupidly close to getting this thing started for the first time...
Last edited by albuquerquefx; 04-12-2016 at 01:42 PM.
Reply
0
0
 04-19-2016, 10:55 AM
#90
Junior Member
Thread Starter
Join Date: Sep 2015
Location: Memphis, TN
Posts: 199
Total Cats: 31
For those who are looking to do the Fab9 kit as a DIY kit, which is entirely feasible, make sure to take Bryan's offer for the loaner drill and bit:
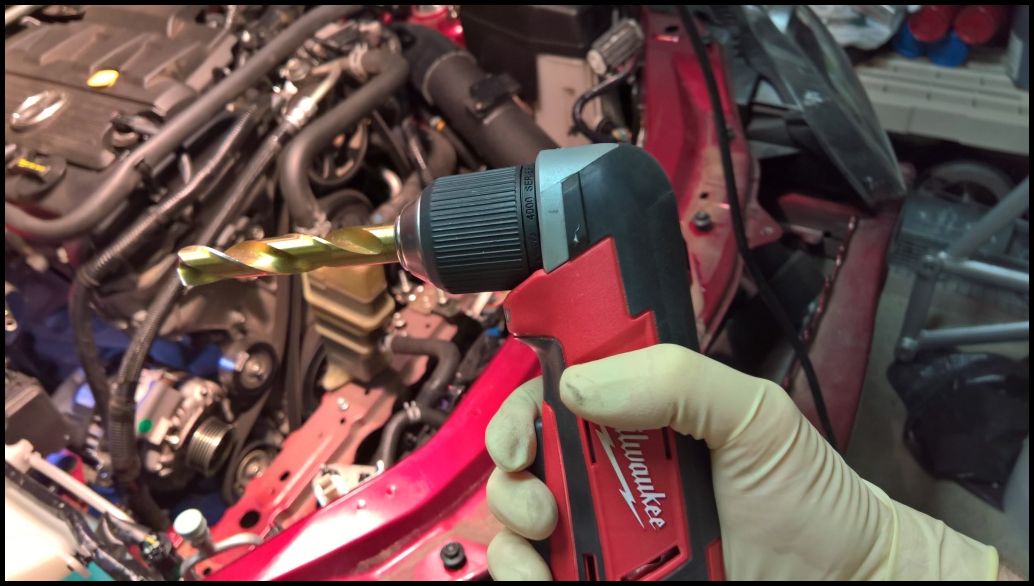
You aren't going to find a stubby 9/16" anywhere, he tossed a normal-length bit on a lathe and shrank it to size. The Milwaukee 90* drill also makes it worlds easier than trying to get to the same spot via removing the passenger motor mount and tilting / dropping the engine.
I found it easiest to start with smaller bits (I began with a 3/16") as a pilot hole and worked my way up. If you go straight for the big boy, it walks all over the side of the block. Dont go nuts with the smaller ones, just use them to get the hole started and then partially enlarged enough so the big bit drilling trajectory is controllable
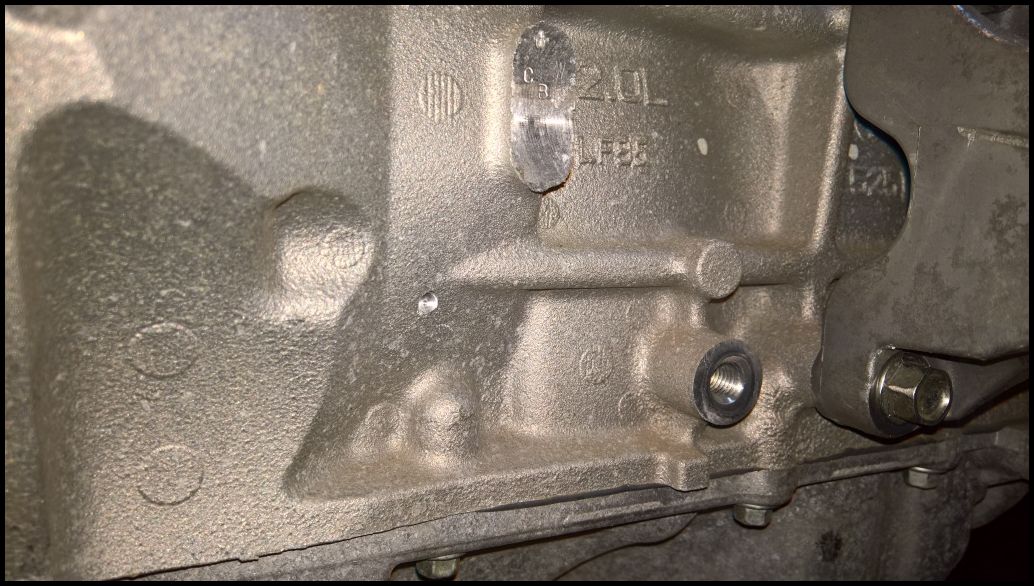
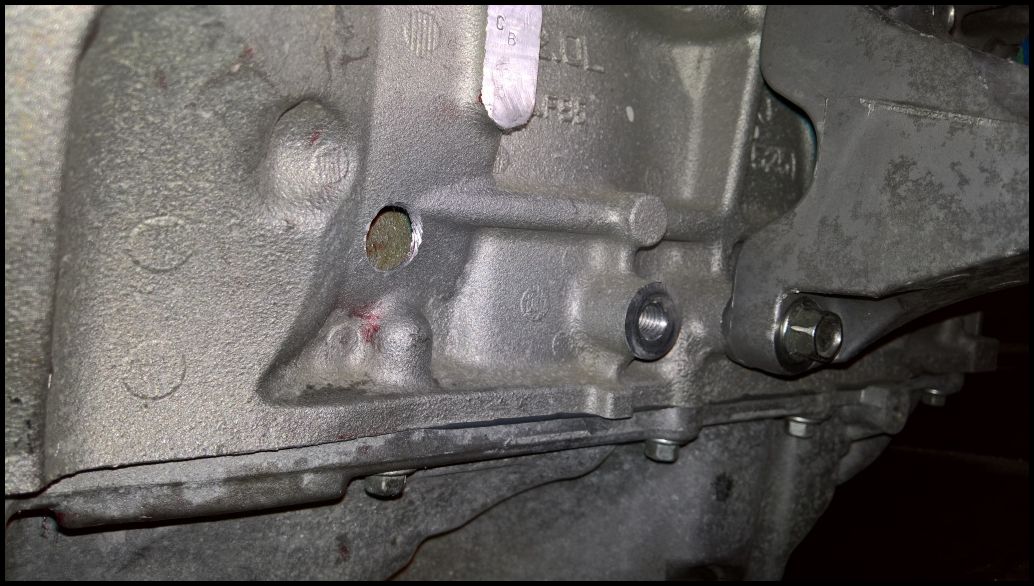
There's my little 3/16" pilot hole. From there I went several larger increments, before arriving at the final 9/16".
Now, this next part is a bit worrisome to me... The last time I tapped a pan for an oil return, I had the pan completely off the car so I could easily clean out the shrapnel. I also didn't have to worry about later tapping the hole I just drilled for proper pipe threads.
This is not the pan, it's the engine block. It's soft aluminum, there's no perfect way to get contorted under the car to drill it comfortably, and the only real way to control metal shrapnel is to keep a fat wad of bearing grease on the end of the bit and around the hole. So I went a bit OCD with it -- I'd drill (slowly!) for fifteen or twenty seconds, I'd remove the bit, clean it off thoroughly, re-glob it with a huge booger of bearing grease, and drill slowly for another fifteen or twenty seconds. It took me probably ten minutes, easily, to finally get to the point where I was through the block.
Even after that, I used a heavy smear of bearing grease on my pinky and then rubbed my finger around the inside edge of the hole I just drilled. Somewhat to my OCD dismay, there were several small aluminum granules on the inside which I removed with my greased pinky finger.
Then to add to the worry, you have to TAP those holes with an 3/8" NPT tap. I know how to use a tap, I've done it multiple times, and the first concern is always to make sure you keep the approach angle consistent as to not jack up the threads you're trying to create. Egads! Apply bearing grease in glob form, tap about 2/3rds of a turn, back out, clean grease, apply grease, tap another 2/3rds of a turn, back out, apply grease...
Chunklets of your source material always come out with a tap, which takes my worry to the next level. Gloved pinky finger was all up in there trying to keep the shrapnel on the OUTSIDE of the block. Eventually I finished, but I then discovered my Permatex high-temp thread sealant was old and seems to have been open, so I need to go buy more before I can finish this...
Unrelated to the pictures, I got my PPF aligned properly, got the driveshaft in and torqued properly, also got the alternator put back in (after removing the heat shield) and the belts back in. Should be install the manifold and hang the turbo tonight
You aren't going to find a stubby 9/16" anywhere, he tossed a normal-length bit on a lathe and shrank it to size. The Milwaukee 90* drill also makes it worlds easier than trying to get to the same spot via removing the passenger motor mount and tilting / dropping the engine.
I found it easiest to start with smaller bits (I began with a 3/16") as a pilot hole and worked my way up. If you go straight for the big boy, it walks all over the side of the block. Dont go nuts with the smaller ones, just use them to get the hole started and then partially enlarged enough so the big bit drilling trajectory is controllable
There's my little 3/16" pilot hole. From there I went several larger increments, before arriving at the final 9/16".
Now, this next part is a bit worrisome to me... The last time I tapped a pan for an oil return, I had the pan completely off the car so I could easily clean out the shrapnel. I also didn't have to worry about later tapping the hole I just drilled for proper pipe threads.
This is not the pan, it's the engine block. It's soft aluminum, there's no perfect way to get contorted under the car to drill it comfortably, and the only real way to control metal shrapnel is to keep a fat wad of bearing grease on the end of the bit and around the hole. So I went a bit OCD with it -- I'd drill (slowly!) for fifteen or twenty seconds, I'd remove the bit, clean it off thoroughly, re-glob it with a huge booger of bearing grease, and drill slowly for another fifteen or twenty seconds. It took me probably ten minutes, easily, to finally get to the point where I was through the block.
Even after that, I used a heavy smear of bearing grease on my pinky and then rubbed my finger around the inside edge of the hole I just drilled. Somewhat to my OCD dismay, there were several small aluminum granules on the inside which I removed with my greased pinky finger.
Then to add to the worry, you have to TAP those holes with an 3/8" NPT tap. I know how to use a tap, I've done it multiple times, and the first concern is always to make sure you keep the approach angle consistent as to not jack up the threads you're trying to create. Egads! Apply bearing grease in glob form, tap about 2/3rds of a turn, back out, clean grease, apply grease, tap another 2/3rds of a turn, back out, apply grease...
Chunklets of your source material always come out with a tap, which takes my worry to the next level. Gloved pinky finger was all up in there trying to keep the shrapnel on the OUTSIDE of the block. Eventually I finished, but I then discovered my Permatex high-temp thread sealant was old and seems to have been open, so I need to go buy more before I can finish this...
Unrelated to the pictures, I got my PPF aligned properly, got the driveshaft in and torqued properly, also got the alternator put back in (after removing the heat shield) and the belts back in. Should be install the manifold and hang the turbo tonight
Reply
1
1
04-20-2016, 10:42 AM
#91
Junior Member
Thread Starter
Join Date: Sep 2015
Location: Memphis, TN
Posts: 199
Total Cats: 31
Continued progress, engine bay mostly back together:
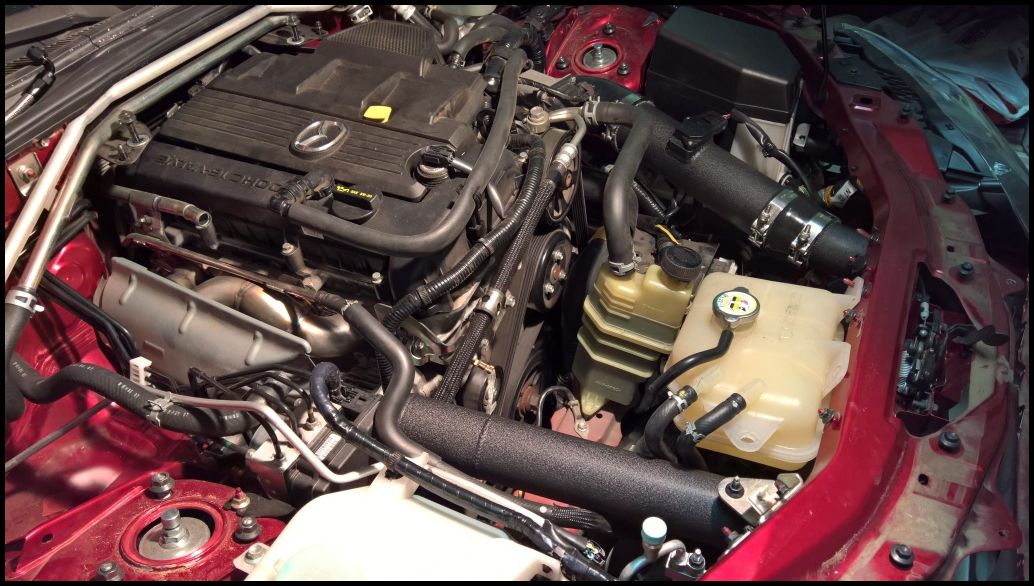
Turbo isn't hung, that thing is a PITA. First, to get it UP into the engine bay properly, I removed the wastegate actuator and loosened the vband locking the coldside so I could clock the intake at will. I only figured this out after fighting it for five minutes, mostly making me the dumbass.
I got the turbo all up in there, but the damnable vband clamp which holds the hotside to the manifold must be loosened to the point of taking the nut OFF. In the fully assembled state, this sizing is optimal. For getting the damn thing hung and connected? Expletives abound. I sounded like the bastard child of the unholy union of Louis CK and Lewis Black.
Also got the permatex which allowed me to get the oil drain fitting in the block.
Reply
0
0
04-21-2016, 09:51 PM
#93
Junior Member
Thread Starter
Join Date: Sep 2015
Location: Memphis, TN
Posts: 199
Total Cats: 31
Baller kit is right though; every part he's sent me has been top notch. Obviously you've seen the welds and the intercooler + tanks from the pics which are both fantastic; he's also using all-Vibrant v-bands and t-bolt clamps, I think it's 6-ply for the silicon sleeves. Even the coolant "tees" are in-house milled aluminum parts which are gorgeous.
The whole thing looks as professional as you could possibly get with aftermarket; hell an OEM setup wouldn't even likely use parts this good.
The whole thing looks as professional as you could possibly get with aftermarket; hell an OEM setup wouldn't even likely use parts this good.
Reply
0
0
04-25-2016, 10:15 AM
#94
Junior Member
Thread Starter
Join Date: Sep 2015
Location: Memphis, TN
Posts: 199
Total Cats: 31
The good news: Car is rapidly approaching completion. All the wheel well splash guards and plastic radiator / AC condenser ducting are back in. I'm ONE part away from putting the nose back on. Got the ignition turned on last night, long enough to test the new fuel pump and associated wiring. And it works!
The not-as-good news: the oil drain fitting must be installed onto the turbo before getting it hung; t isn't feasible to get it in around the engine mount post-install. My dumb self didn't think about this; I had it hung and tightened, I had charge pipes attached, I had water and oil feeds connected, and then realized I couldn't get the oil drain in. So I thoroughly enjoyed taking it all back apart again.
That last sentence was a lie
I'm waiting on three parts to come in, and perhaps another hour or two of labor. Then I need to test ensure the oil feed is actually getting oil, then I need to load up Joe's ECU tune, and I can take it for a short test drive. Yissssssssss....
Reply
0
0
04-25-2016, 12:54 PM
#95
Junior Member
Thread Starter
Join Date: Sep 2015
Location: Memphis, TN
Posts: 199
Total Cats: 31
Secondly, ask Albuquerquefx in about a week how he'd feel about installing hardware in the same position. It allowed us to have the only manifold on the market without an awkward collector. It's a true, full flowing 4-1 merge collector, none of these jumbled runners coming in at all directions.
Also, the loose-but-still-connected vband allowed me to "clock" the turbo respective to the manifold, which was VERY useful for connecting the oil and water feed lines.
I'm now a fan, after I realized my error. After both of my errors, the second of which was the oil drain fitting. Derp!
Reply
0
0
04-26-2016, 10:12 AM
#97
Junior Member
Thread Starter
Join Date: Sep 2015
Location: Memphis, TN
Posts: 199
Total Cats: 31
LOL, well that's one more person than I would have guessed
Minor change to plans: I'm ordering a set of the 70 durometer engine mounts and a set of Hella Supertones while I have the front end apart. I also ordered the necessary pigtail to leverage the integrated boost control solenoid on the turbo. It isn't here until Thursday, so I might as well use the extra downtime to my best advantage
Minor change to plans: I'm ordering a set of the 70 durometer engine mounts and a set of Hella Supertones while I have the front end apart. I also ordered the necessary pigtail to leverage the integrated boost control solenoid on the turbo. It isn't here until Thursday, so I might as well use the extra downtime to my best advantage
Last edited by albuquerquefx; 04-26-2016 at 11:05 AM.
Reply
0
0
05-13-2016, 12:40 AM
#98
Junior Member
Thread Starter
Join Date: Sep 2015
Location: Memphis, TN
Posts: 199
Total Cats: 31
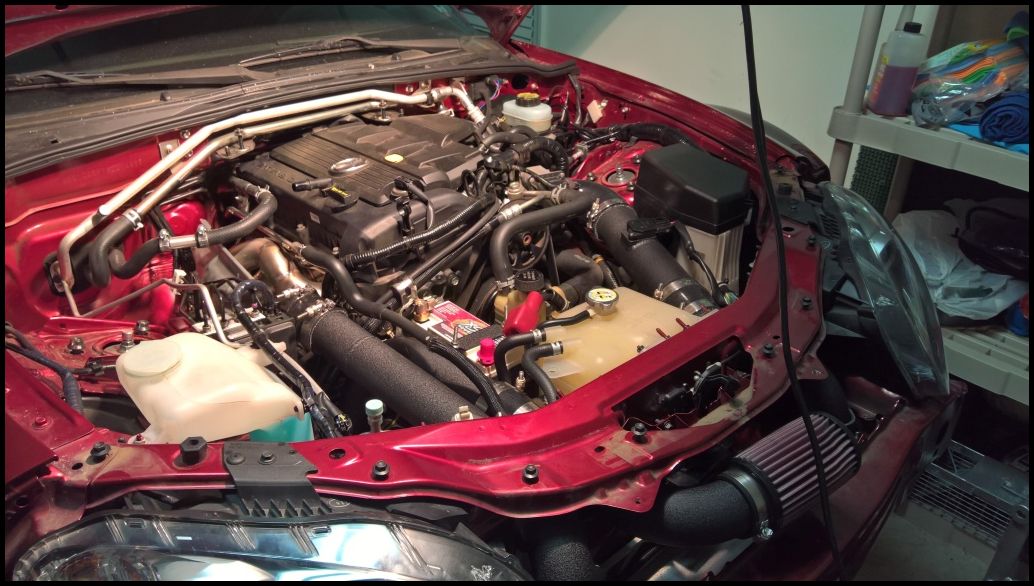
Been a while since I've posted an update, so... A few weeks ago I found and ordered the proper Borg Warner boost control solenoid wiring pigtail so I may use it with my Innovate SCG-1 controller / gauge. Since it took a few days to come in, I decided to burn the wait time by installing a set of 70 durometer engine mounts and upgrade the shitty "meep meep" factory horn with a pair of Hella Supertones. First is the Hella horns installed alongside the intercooler. Had to build a small wiring harness for the upgraded power and ground feeds, but the horns bolted straight into the factory horn locations -- yes, plural for locations, because despite only coming with ONE horn from the factory, there were matching locations on both sides.
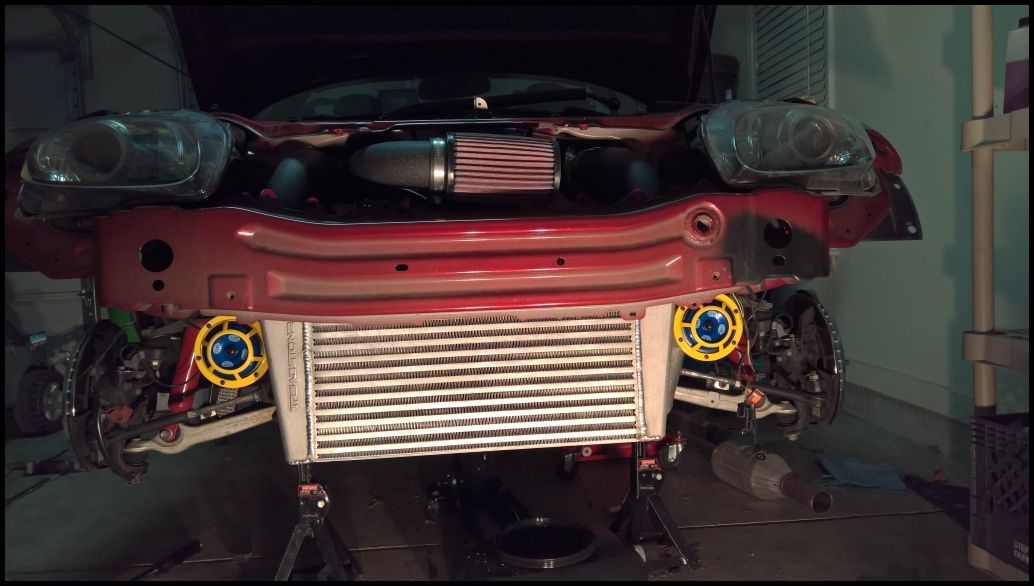
Finished engine bay, sans my aftermarket Cobalt shock tower brace, right before I put the nose back on. You can see the 3 bar MAP sensor wiring in the far background, I later cleaned it up a bit with some proper black loom, tape and zipties. Check out the factory exhaust manifold heatshield keeping the brake line temperature in check...
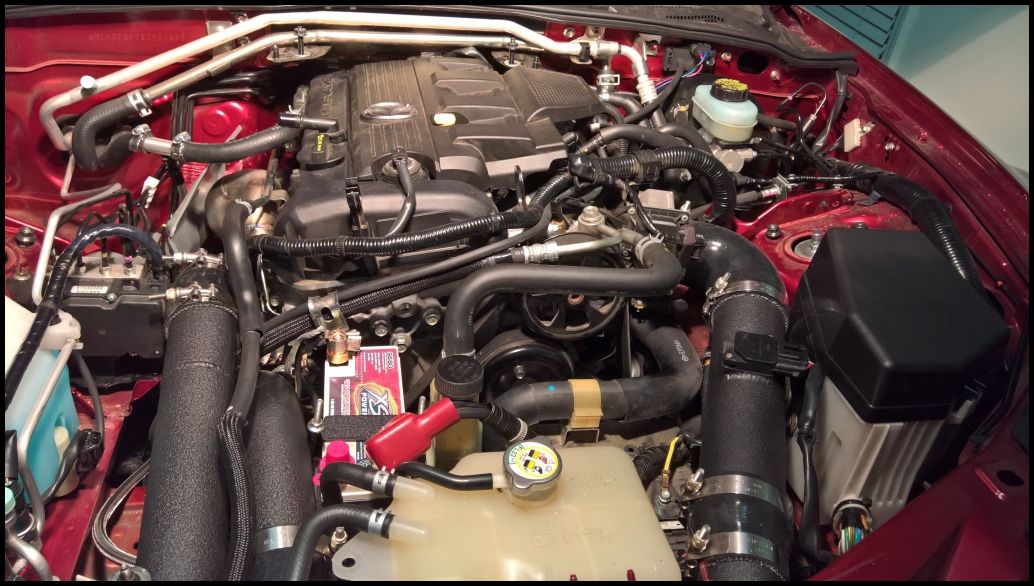
A different angle...
And the nose is back on!
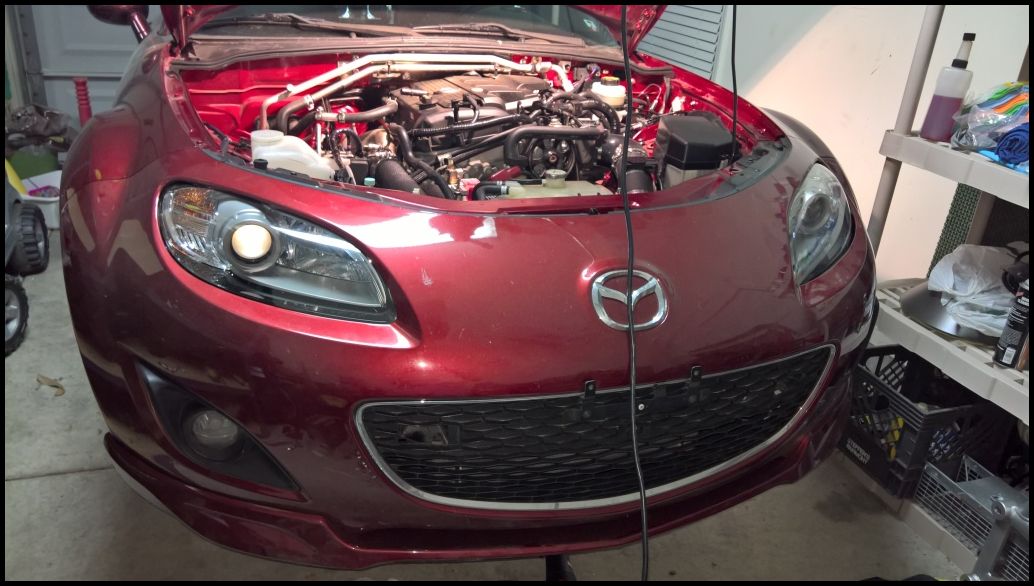
I've had it running long enough to get the coolant refilled and burped and to discover a tiny oil leak. Turns out the leak is coming from the small stack of brass tees I installed to run my dual-function oil pressure + temp gauge. They're NPT fittings so I'm not sure how they're leaking, but whatever -- permatex to the rescue there. I need to go take more, but this should hold everyone over for now.
Fab9's 3" turboback exhaust is ordered and should be at my office waiting when I return from my 11 days of upcoming travel.
Finished engine bay, sans my aftermarket Cobalt shock tower brace, right before I put the nose back on. You can see the 3 bar MAP sensor wiring in the far background, I later cleaned it up a bit with some proper black loom, tape and zipties. Check out the factory exhaust manifold heatshield keeping the brake line temperature in check...
A different angle...
And the nose is back on!
I've had it running long enough to get the coolant refilled and burped and to discover a tiny oil leak. Turns out the leak is coming from the small stack of brass tees I installed to run my dual-function oil pressure + temp gauge. They're NPT fittings so I'm not sure how they're leaking, but whatever -- permatex to the rescue there. I need to go take more, but this should hold everyone over for now.
Fab9's 3" turboback exhaust is ordered and should be at my office waiting when I return from my 11 days of upcoming travel.
Reply
0
0


