93' Miata stolen and flipped build thread

 10-02-2014, 11:11 AM
#3002

About a template... I can attempt to measure and draw this up in CAD when I get mine. I'll post the file for everyone to download (if I can indeed draw it up). It would be a HUGE file, dimensionally, and pretty expensive to have plotted out at a retail place like Staples, but at least folks would have measurements.

Reply
 0
0

0
10-02-2014, 11:28 AM
#3003

Fedex stores will do 3ft wide plots at something like $0.50 per linear foot + ink.
I use them for my ski templates and it usually ends up being about $6 per print. My templates don't use much ink but I can't see it climbing much higher than $10 if you can keep it under 3ft wide.
I use them for my ski templates and it usually ends up being about $6 per print. My templates don't use much ink but I can't see it climbing much higher than $10 if you can keep it under 3ft wide.
Reply
0
0
10-02-2014, 05:43 PM
#3004
Elite Member

Join Date: Oct 2013
Location: Cedar City, UT
Posts: 2,764
Total Cats: 951
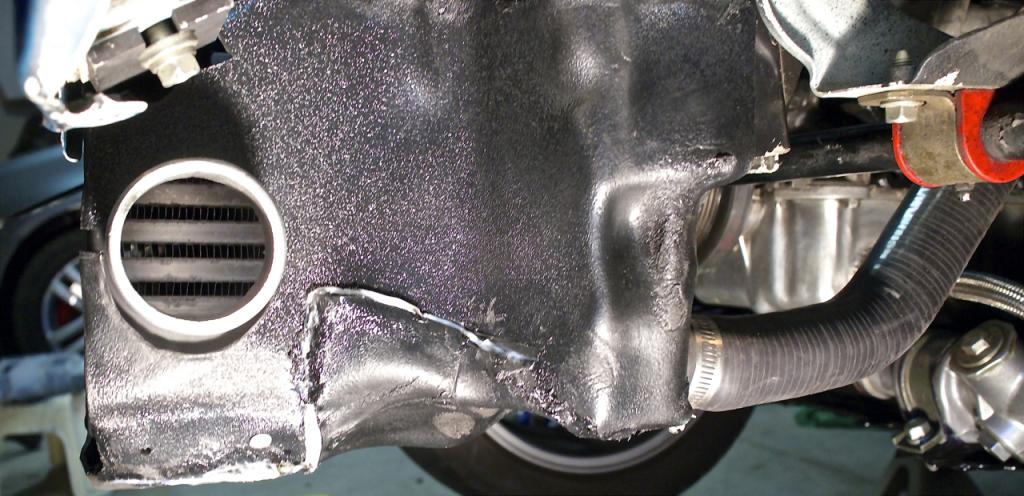
As long as I simplify the amount of curves I don't see an issue, I went hog wild on the form fitting and made it really complicated, yet really really perfect.
Ignore the shitty plastic welding. It looks messy, but it is solid as a rock. I forgot to take pictures after I used my dremmel to sand down the edges properly. Plus, I heated the plastic just a touch to much hence my gloves leaving indentations in the plastic.
Honestly though? Who cares about the superficiality of the piece, or the "bling" factor of it. It is the most functional you can get with out creating custom mounts for the radiator, which I plan to do. So much unnecessary metal in the radiator/condenser piece that holds the vertical radiator bars to the radiator, I can easily envision a much more simple mounting system for the radiator and ac condenser which alleviates all the air cracks and shapes you have to work around. For those that don't want to spend the time to do it/don't care, I can see your point of view, but after making this piece it is a bitch to seal it 100%.
I'm pretty proud of this rear section and how it bolts & tensions the rear of the cowling to the bottom of the radiator/fans. This is the ONLY place that physically bolts to the car. The bolts tension the intercooler holes so tight I can't even physically move the piece.
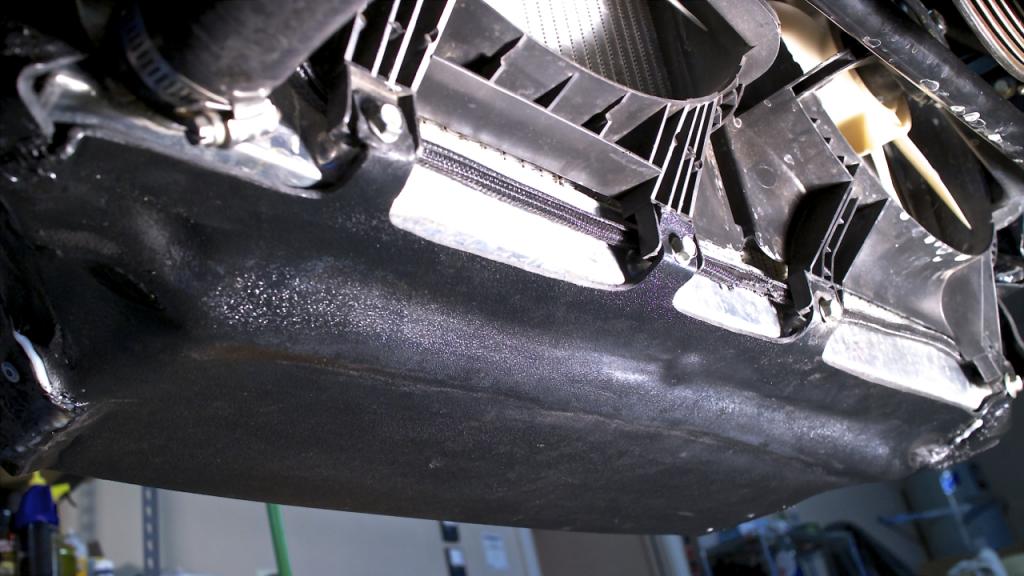
See how I molded the plastic into the vertical radiator support bars? That was a bitch to get right, but it ensures no air flow around the radiator.
I could have done the plastic welding in a much cleaner fashion, but considering this was my "test piece" I did all the plastic welding and forming while it was mounted on the car.
Revlimiter's radiator will get the professional looking piece, since I have exact dimensions to utilize now.

Reply
3
3
10-03-2014, 05:26 PM
#3005
Junior Member

Join Date: Aug 2009
Posts: 186
Total Cats: 2
Finally caught up on this entire build, have been reading it closely and taking notes like everyone else has. I don't think I've ever followed a build thread this closely, esp one that is 150+ pages! Love the meticulous attention to detail and that is an understatement. My gf's Tahoe just got rear ended so she's driving a Jetta. Curiousity got me under the hood and the plastic battery case reminded me of your work with the radiator shroud... except yours looks much more precise in fitment! loll Keep up the good work!
Reply
0
0
10-04-2014, 09:26 AM
#3006
Elite Member
Join Date: Oct 2013
Location: Cedar City, UT
Posts: 2,764
Total Cats: 951
Finally caught up on this entire build, have been reading it closely and taking notes like everyone else has. I don't think I've ever followed a build thread this closely, esp one that is 150+ pages! Love the meticulous attention to detail and that is an understatement. My gf's Tahoe just got rear ended so she's driving a Jetta. Curiousity got me under the hood and the plastic battery case reminded me of your work with the radiator shroud... except yours looks much more precise in fitment! loll Keep up the good work!
-
-
-
-
OK, so Hornet, you requested some logs to help me figure out why my car is sputtering when I hit full boost, and killing my power, so here they are. I can't figure out what the issue is from the data but maybe those smarter than me can pinpoint it. Also posting my current tune in case it is a setting issue.
If anyone doesn't mind taking a look, I'd appreciate it.
I have to wait until next week for my -6an to 5/16 barbed hose fittings to show up before I can install my AFPR. I totally forgot to order some from Bryan at Fab9.
 Almost tried to use NPT fittings, luckily I didn't thread them and cause damage to the AFPR!
Log 1
Log 2
Log 3
Current Tune
Last edited by Jeffbucc; 10-04-2014 at 10:00 AM. Reason: Hyperlink stupidity
Reply
0
0
10-05-2014, 01:40 AM
#3007
Elite Member
Join Date: Oct 2013
Location: Cedar City, UT
Posts: 2,764
Total Cats: 951
My brother and I were brainstorming things and I think we've got it pinpointed. What I'm looking at I believe is wastegate flutter/surge. Now that it is staring me in the face I think I know why this might have happened. When I was filing down the wastegate rod, I also enlarged the hole a little to get it down far enough to be able to fit the E-clip properly. What I forgot to do was increase the preload due to losing that little bit of tension.
I love lightbulb moments. Will be testing this tonight.
This video of an STI is EXACTLY what my car is doing.
I love lightbulb moments. Will be testing this tonight.
This video of an STI is EXACTLY what my car is doing.
Reply
0
0
10-05-2014, 02:04 AM
#3008

I'm not sure what problem you're looking for (maybe I missed it) but that STI vid you've linked demonstrates what a 3port solenoid in interrupt mode will make an external gate do at full boost. it sounds like flutter, but doesn't affect power in any way, just makes the operation of the wastegate a lot more obvious.
Reply
0
0
10-05-2014, 02:07 AM
#3009
Elite Member
Join Date: Oct 2013
Location: Cedar City, UT
Posts: 2,764
Total Cats: 951
Basically when I hit full boost I get the exact same sound as the STI in the video, and an interruption in power. It isn't a strong interruption in power, just a "wall" that keeps me from holding the boost limit. Only topping out at 270kpa, no spark blowout.
Reply
0
0
10-05-2014, 02:15 AM
#3011
Elite Member
Join Date: Oct 2013
Location: Cedar City, UT
Posts: 2,764
Total Cats: 951
Then I'll either plastic weld it or connect it with dzus fasteners so that it will be easy to remove.
Thanks for the compliment, I think it is pretty damn ugly myself, but its functional so I'm making myself be ok with it.
Reply
0
0
10-05-2014, 02:16 AM
#3012
your logs don't show the boost fluctuating though.
also I hate it when people post logs of the weirdest crap and you have to dig through it to find the WOT pull. 2k rpm, start log, WOT, redline, stop log. DONE.
No offense
(though yours aren't even that bad, I'm just ranting lol)
also I hate it when people post logs of the weirdest crap and you have to dig through it to find the WOT pull. 2k rpm, start log, WOT, redline, stop log. DONE.
No offense
(though yours aren't even that bad, I'm just ranting lol)
Reply
0
0
10-05-2014, 02:23 AM
#3013
Elite Member
Join Date: Oct 2013
Location: Cedar City, UT
Posts: 2,764
Total Cats: 951
No I totally felt bad posting those long *** logs. I just don't like messing with it while I'm driving so I leave it running.
True, boost fluctuation is pretty tiny, but seriously what else could it be? plugs look fine, if even burning a little hot(white), my injector data is straight from ID's Megasquirt settings.
The only other thing I can consider is somehow my FPR is malfunctioning due to the 255. But then I'd see a really rich/lean spike in the area in full boost.
Reply
0
0
10-05-2014, 02:25 AM
#3014
Elite Member
Join Date: Oct 2013
Location: Cedar City, UT
Posts: 2,764
Total Cats: 951
One thing, of which I don't know is related or not. But bring up the RPMdot/TPSdot plots, and you'll see a lot of spikes in the same area.
Also, should my fuel pump duty be at 100%?
Also, should my fuel pump duty be at 100%?
Reply
0
0
10-11-2014, 04:41 PM
#3016
Elite Member
Join Date: Oct 2013
Location: Cedar City, UT
Posts: 2,764
Total Cats: 951
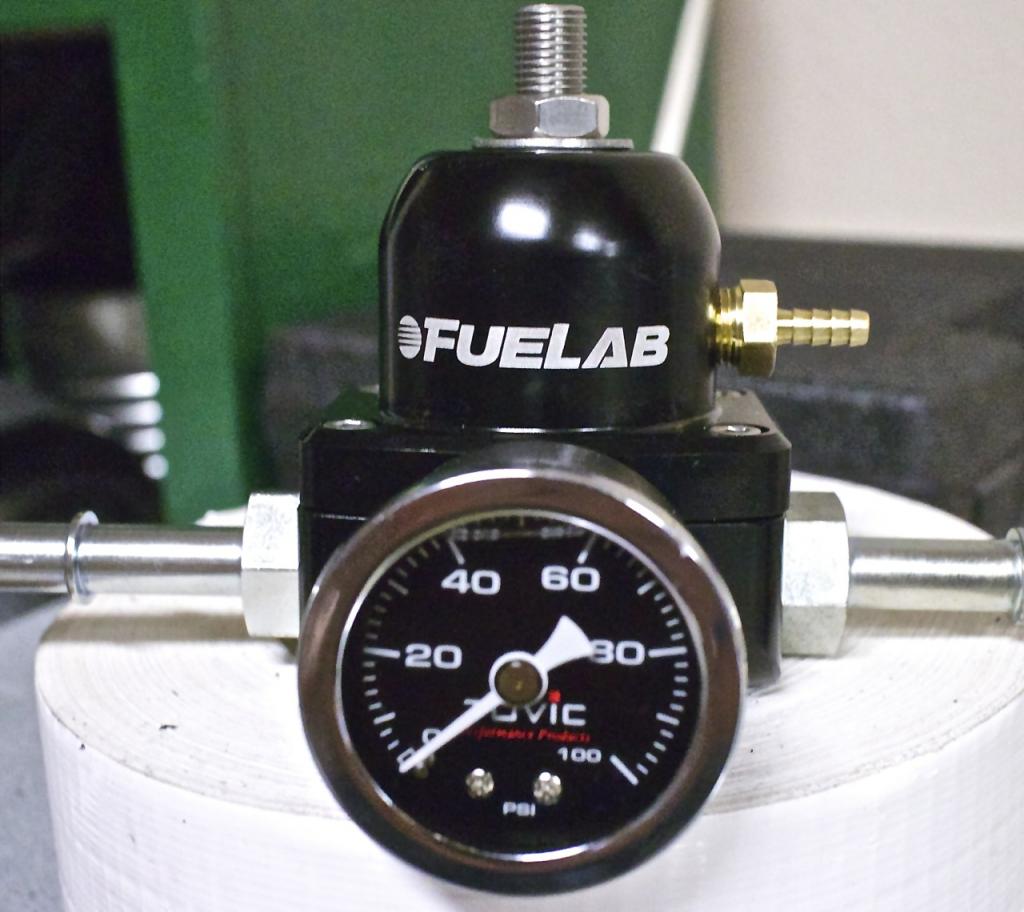
Installed the Fuelab 515 AFPR from Byran @ Fab9. Quite pretty for a FPR. After I tracked down the correct -6an connections I was able to cobble it together.
The return from my fuel rail goes to the inlet, and the outlet goes to the fuel return hardline. Vacuum is pulled from your OEM line. To dial in your pressure, start your engine, disconnect the vacuum line and plug it(engine will stall). Then adjust your static rail pressure to whatever you'd like(58 psi/4bar for me). Tighten down your locking nut and reconnect your vacuum like.
Then, change all your required settings on your fuel injectors to reflect them now outputting more flow(Flow,deadtime offset @ 13.2V, high & low deadtimes) and start autotuning your VEAL so you aren't running pig rich!
Still working on my VEAL map before I see if it helped my current issue. Don't want to run the risk of being to rich/lean in full boost.
The install was easy, more of a pain to find a spot to put it. I had to remove my oil separator and move it over to the left more, and then bend my clutch hardline a little but it is now out of the way. Looks like it is at a slight angle, but it is just the curve of the panels throwing you off...
The left -6an was replaced with a plug as it wasn't necessary.
relocated oil separator
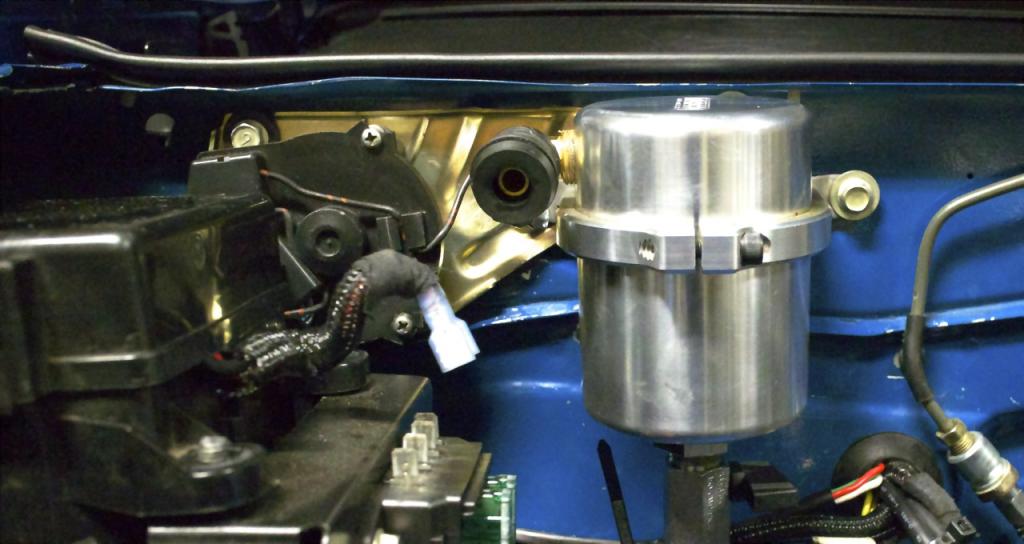
all finished up. I need to use a little touch up paint here and there.
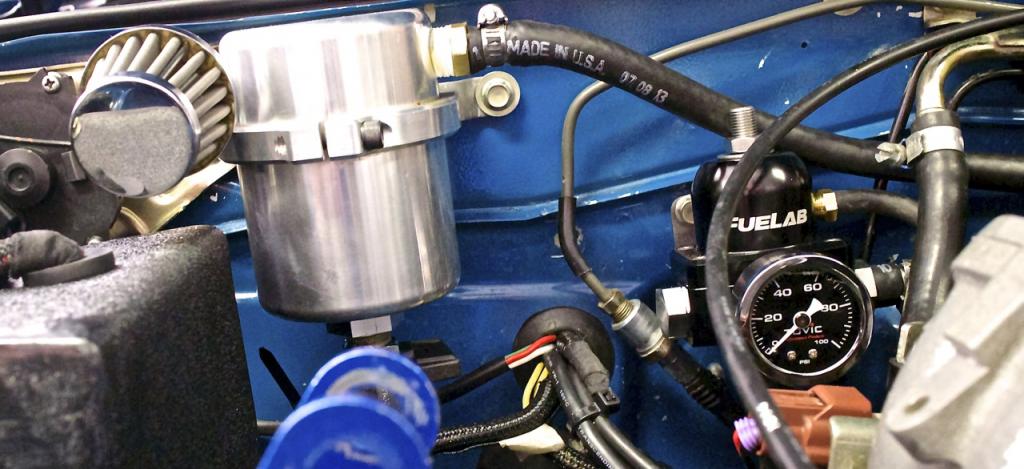
This should be a fun project for this weekend too. I was going to powdercoat it but I think I'll just hit it with some caliper paint, which is pretty tough stuff.
The return from my fuel rail goes to the inlet, and the outlet goes to the fuel return hardline. Vacuum is pulled from your OEM line. To dial in your pressure, start your engine, disconnect the vacuum line and plug it(engine will stall). Then adjust your static rail pressure to whatever you'd like(58 psi/4bar for me). Tighten down your locking nut and reconnect your vacuum like.
Then, change all your required settings on your fuel injectors to reflect them now outputting more flow(Flow,deadtime offset @ 13.2V, high & low deadtimes) and start autotuning your VEAL so you aren't running pig rich!
Still working on my VEAL map before I see if it helped my current issue. Don't want to run the risk of being to rich/lean in full boost.
The install was easy, more of a pain to find a spot to put it. I had to remove my oil separator and move it over to the left more, and then bend my clutch hardline a little but it is now out of the way. Looks like it is at a slight angle, but it is just the curve of the panels throwing you off...
The left -6an was replaced with a plug as it wasn't necessary.

relocated oil separator

all finished up. I need to use a little touch up paint here and there.

This should be a fun project for this weekend too. I was going to powdercoat it but I think I'll just hit it with some caliper paint, which is pretty tough stuff.

Reply
2
2
10-16-2014, 12:46 AM
#3017
Elite Member
Join Date: Oct 2013
Location: Cedar City, UT
Posts: 2,764
Total Cats: 951
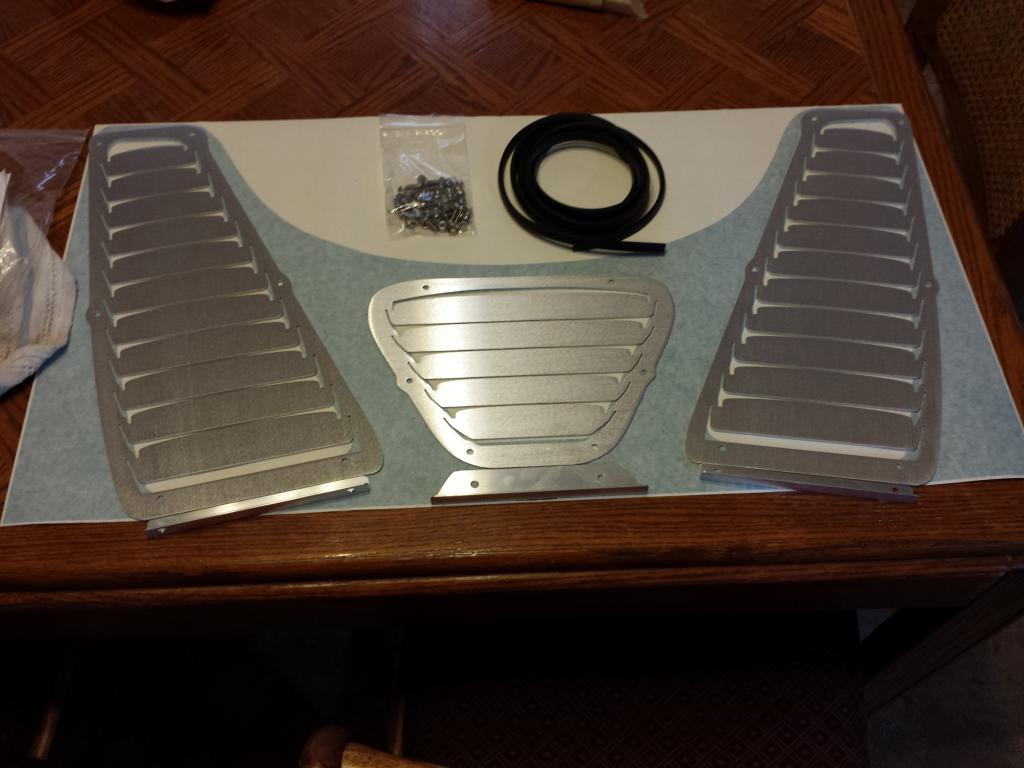
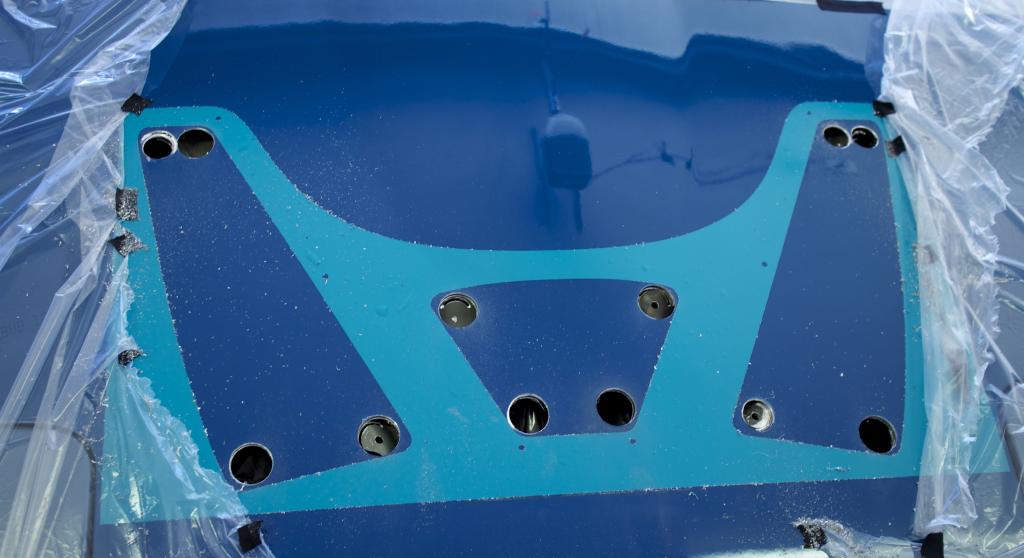
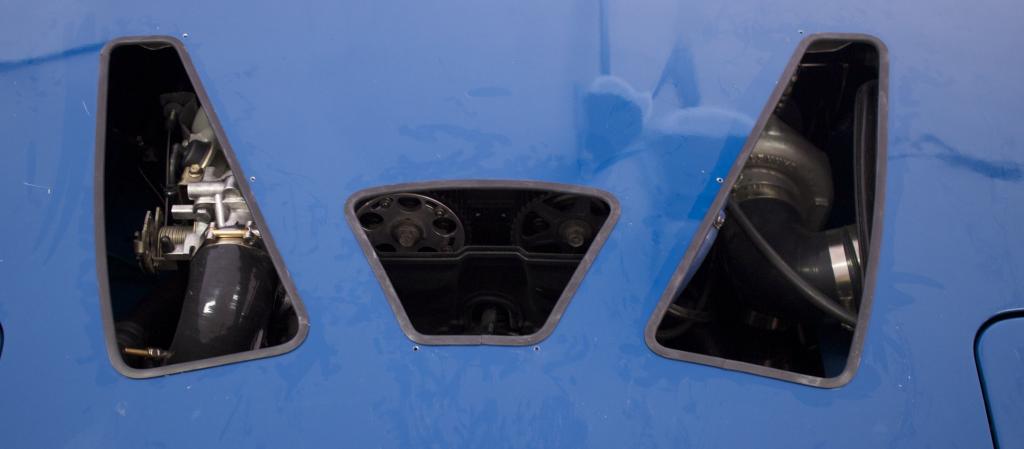
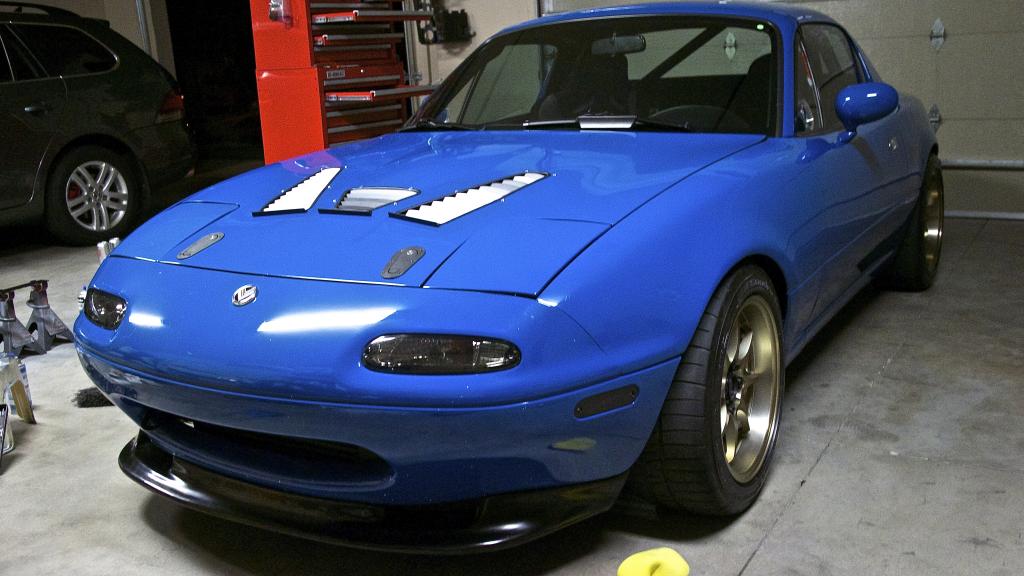
Finished up my Singular Hood Vents finally. Turned out really good. Didn't have time to pick up some black zinc hardware so the stainless looks a little out of place, but I can ignore it for now.
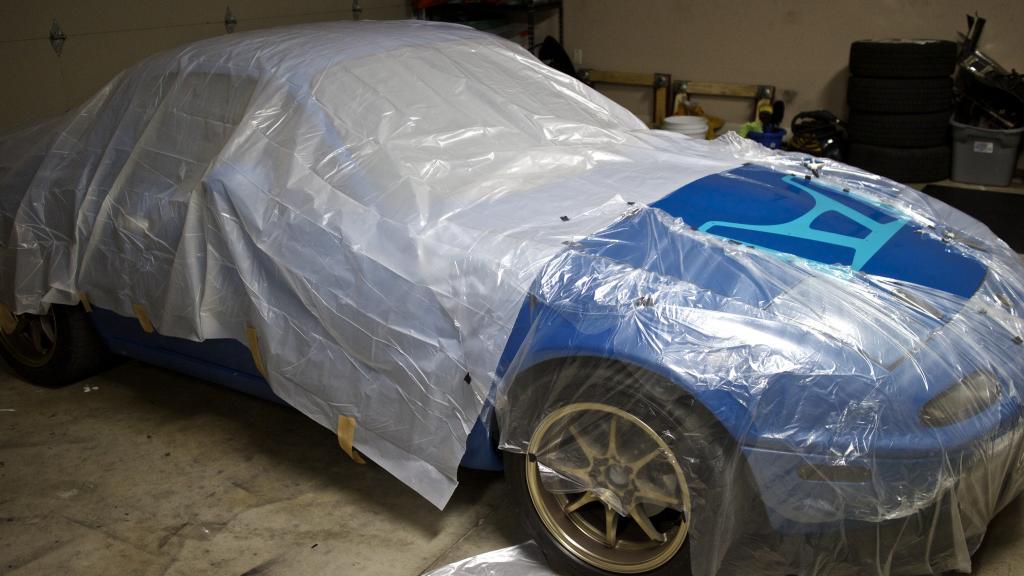
Carefully cover as much of your car as you can. Especially the engine bay. Tape up your seams! Or, if I had to do it again, remove your hood and do it outside. much easier cleanup.
Used a christmas tree bit to cut the holes. Cut them as close to the corners as you can. I had to do a lot of sanding which, being aluminum, ate through my barrel sanders like crazy.
Angle grinder out the straight sections and cut the 2nd/3rd skin 3/4 of an inch farther back than the main hole. Sand until happy with your curve/it fits.
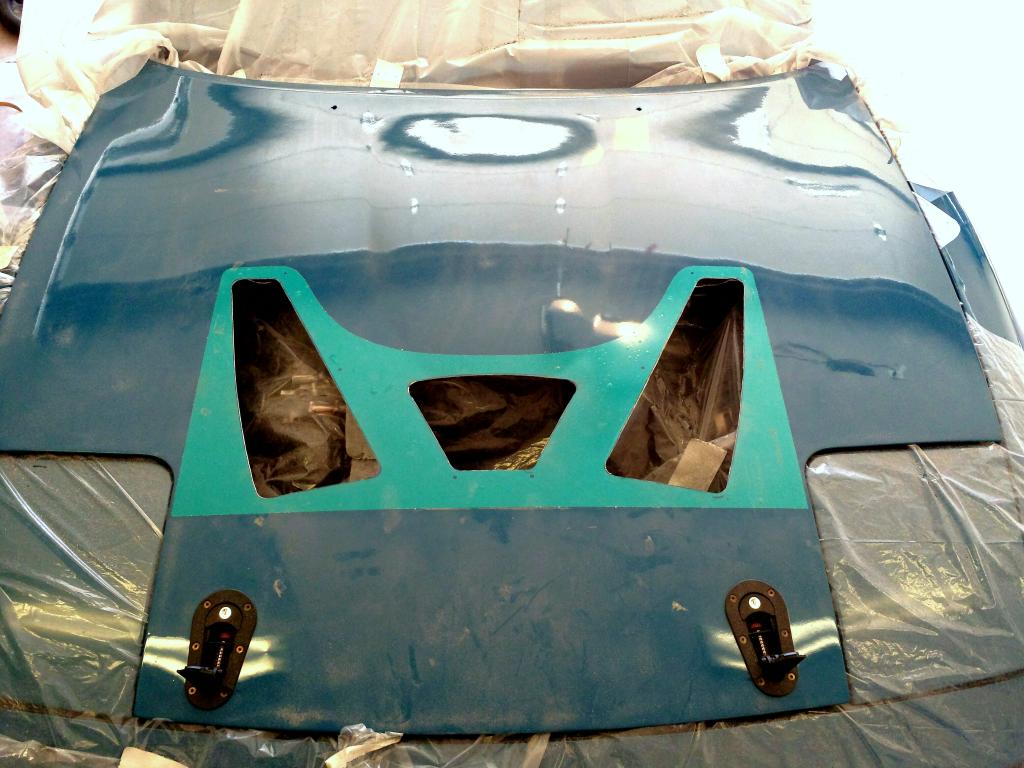
I used the really nice rubber included in the kits to prevent the paint from chipping.
Self etching primer
filler primer
Wet sanded
Primer sealant
Semi-gloss black engine enamel
Really nice finish with the semi-gloss.
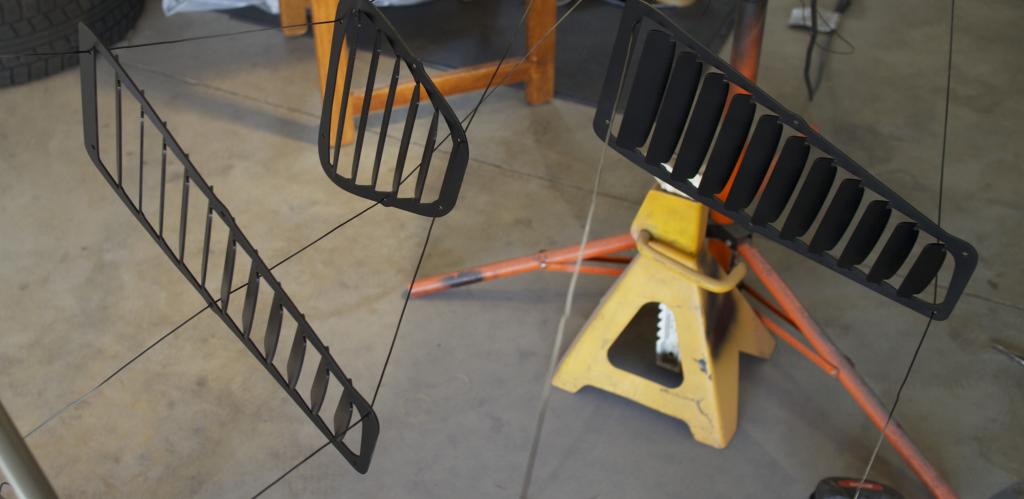
Final result. Quite happy with it.
Carefully cover as much of your car as you can. Especially the engine bay. Tape up your seams! Or, if I had to do it again, remove your hood and do it outside. much easier cleanup.

Used a christmas tree bit to cut the holes. Cut them as close to the corners as you can. I had to do a lot of sanding which, being aluminum, ate through my barrel sanders like crazy.

Angle grinder out the straight sections and cut the 2nd/3rd skin 3/4 of an inch farther back than the main hole. Sand until happy with your curve/it fits.

I used the really nice rubber included in the kits to prevent the paint from chipping.

Self etching primer
filler primer
Wet sanded
Primer sealant
Semi-gloss black engine enamel
Really nice finish with the semi-gloss.

Final result. Quite happy with it.

Reply
0
0


