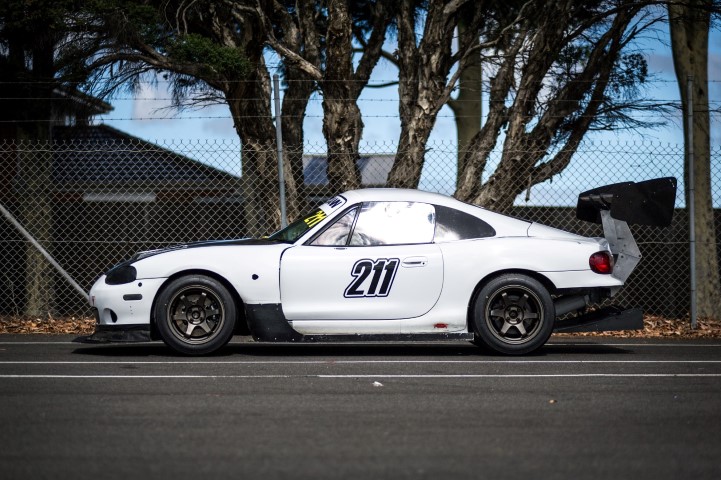
BEAVIS' White NB Turbo Track Car
 01-02-2017, 03:34 AM
#82
Junior Member
Thread Starter

Join Date: Mar 2011
Location: Melbourne, Australia
Posts: 212
Total Cats: 66
Did you forget about the Fastback?
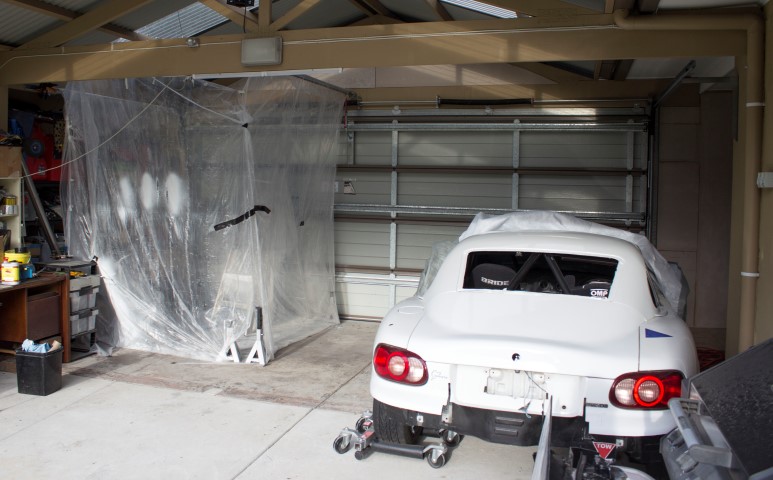
Last time with the roof I had finished painting but it still needs a few finishing touches. Windows for the side and back, some foam rubber seals to get the roof sitting nicely on the body of the car and some fixings to bolt it down.
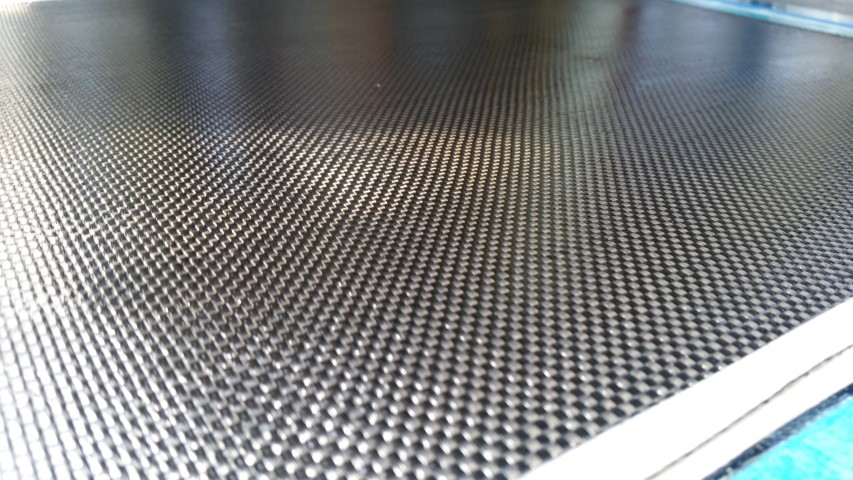
Here's the style shot of the couple of layers of carbon cloth drenched in resin. This is hand laid and squeegeed to try get the resin out. Not the lightest or strongest way to do carbon... it's mostly just for looks, and to keep the wind out.
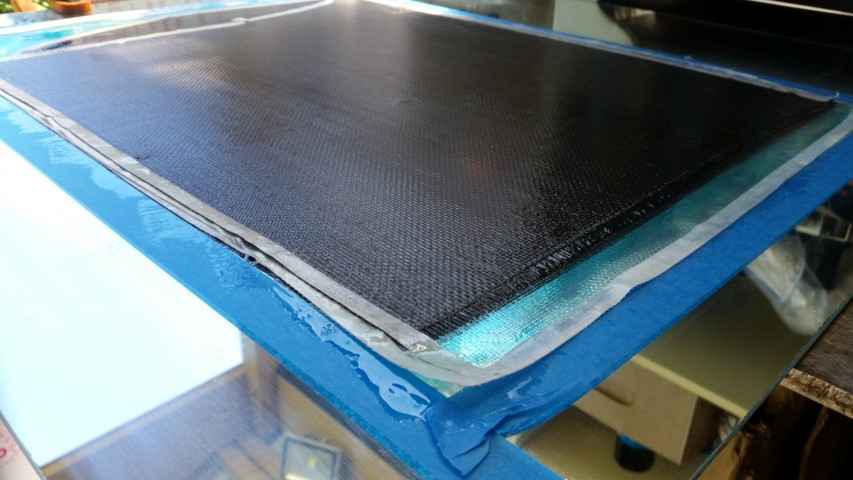
I have an old bathroom mirror that's handy for doing nice smooth flat sheet like this. PVA release is brushed on the glass first to ensure this stuff comes away easily when it's set. The masking tape is good for keeping the mess contained and aids cleanup.
Once cured, the window shape was cut with an angle grinder and sanded smooth before being glued (sikaflexed) in place.
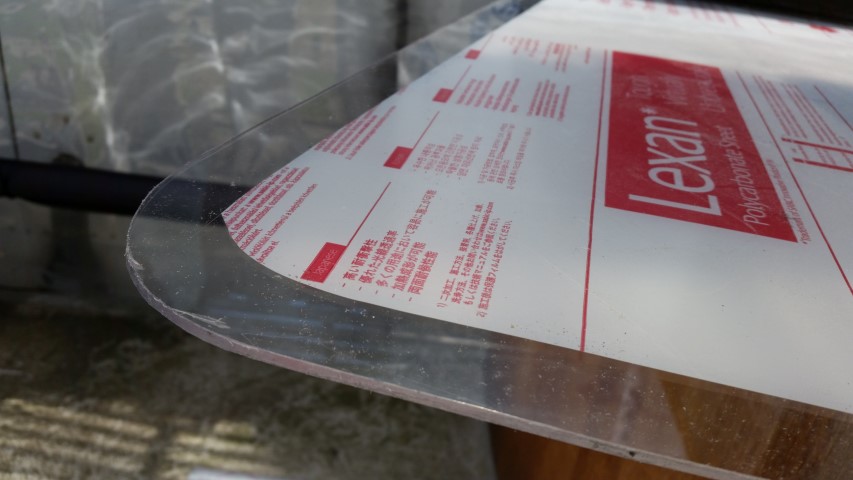
For the rear window, I'd tossed up the idea of running no back window, or a louvered window Lambo Huracan style. But, ended up going for a plain clear lexan window for best visibility.
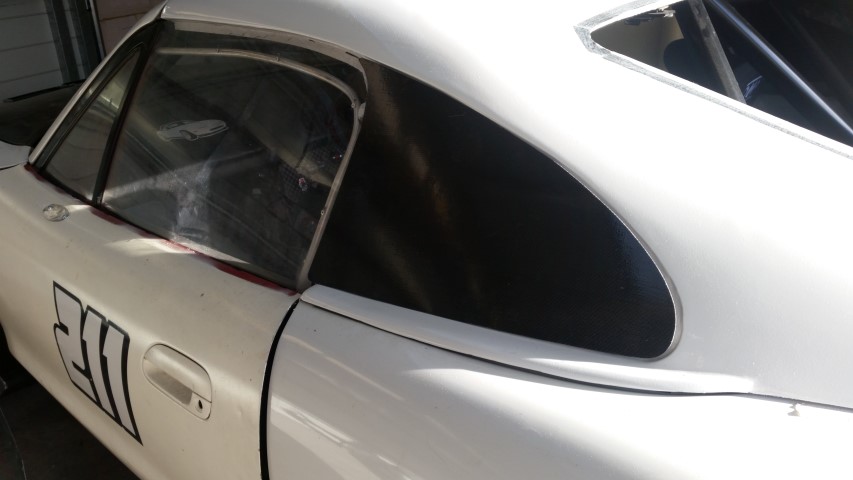
A black border is painted around the permiter of the window to hide the glue, and the window is glued and clamped down.
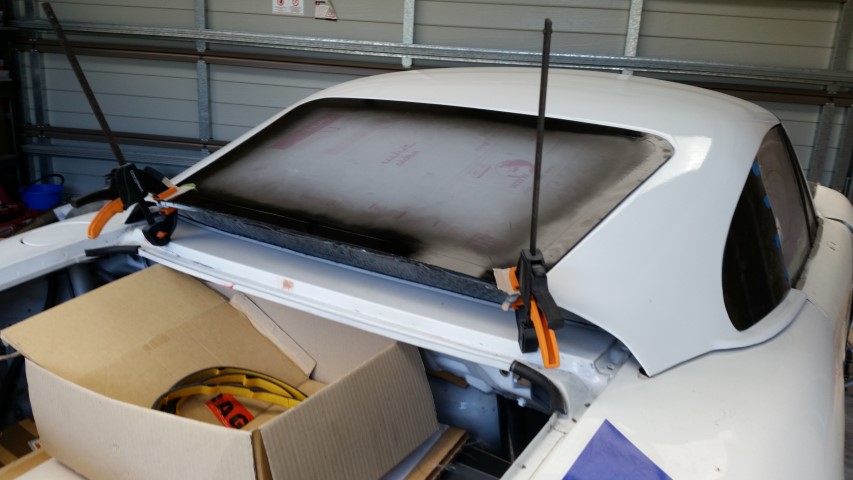
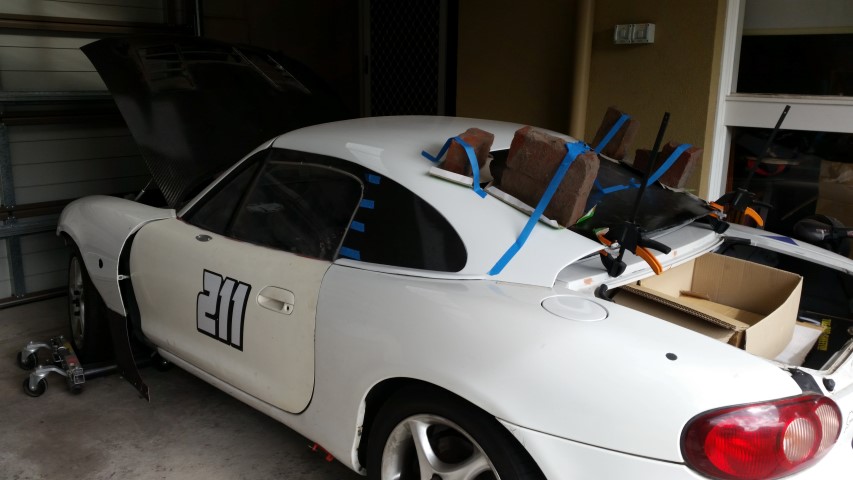
So to make sure the rear window really stuck down properly and followed the slight curve of the rear section of the fastbacnk, it needed to be weighed down.
You can see here how ugly and yellow the doors look now. The rattle can 'appliance white' paint has not worn well. I've decided they really need to be sanded back and painted properly. But that will be a future update...
Last time with the roof I had finished painting but it still needs a few finishing touches. Windows for the side and back, some foam rubber seals to get the roof sitting nicely on the body of the car and some fixings to bolt it down.
Here's the style shot of the couple of layers of carbon cloth drenched in resin. This is hand laid and squeegeed to try get the resin out. Not the lightest or strongest way to do carbon... it's mostly just for looks, and to keep the wind out.
I have an old bathroom mirror that's handy for doing nice smooth flat sheet like this. PVA release is brushed on the glass first to ensure this stuff comes away easily when it's set. The masking tape is good for keeping the mess contained and aids cleanup.
Once cured, the window shape was cut with an angle grinder and sanded smooth before being glued (sikaflexed) in place.
For the rear window, I'd tossed up the idea of running no back window, or a louvered window Lambo Huracan style. But, ended up going for a plain clear lexan window for best visibility.
A black border is painted around the permiter of the window to hide the glue, and the window is glued and clamped down.
So to make sure the rear window really stuck down properly and followed the slight curve of the rear section of the fastbacnk, it needed to be weighed down.
You can see here how ugly and yellow the doors look now. The rattle can 'appliance white' paint has not worn well. I've decided they really need to be sanded back and painted properly. But that will be a future update...

Reply
 0
0

0
01-09-2017, 07:39 AM
#83
Junior Member
Thread Starter
Join Date: Mar 2011
Location: Melbourne, Australia
Posts: 212
Total Cats: 66
Another exciting thing to happen in the BEAVIS world of MX-5's recently:
Coolant Hose Fail on the VVT Supercharged NA
So the story on this one goes... I was driving the car to work and thankfully I had the Torque app running on the headunit which is hooked into the car via an OBD2 bluetooth dongle. It kicks up an alert as the coolant temp hits 100degC (212degF)
Immediately I'm perplexed as its never hit that before. At first I suspected it was a result of the weather as it gets toasty here in Melbourne around December/January. When moving, the temp would return to ~95deg, but when stationary it would return to as high as 105deg
So, there is little I can do as I need to get to work, after work i start the car and begin the drive home, thankfully there isn't too much traffic but the symptoms eventually return as the car warms up. I cruise home cautiously trying to keep the temp under 100ish as best I can.
As soon as I pull into the driveway and kill the motor I can hear a hiss and fear the worst. Busted Rad? Boiled Coolant? Head Gasket? ???
I pop the bonnet and the hissing is coming from around the intake manifold, I suspect perhaps one of those smaller coolant hoses that runs to the throttle body and oil filter may have failed?
I poke around and I can see coolant, but cant find a source.
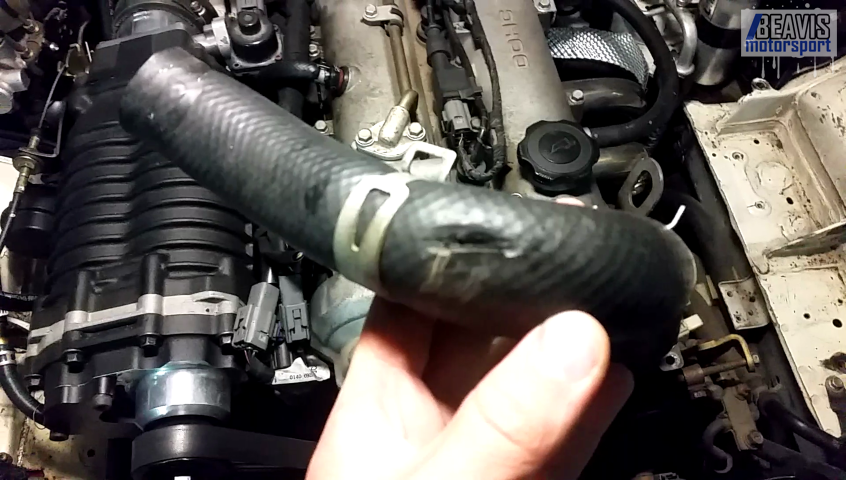
Then, I squeeze the top radiator hose, no pressure at all and a splooge of coolant comes out the side of it. Well there's my problem. And the cause is immediately obvious.
The hose has been ever so slightly rubbing on the supercharger drive belt. The belt has carved a hole out of the hose, only tiny, but enough for the coolant to spray out at a high level of force.
So, a quick hose swap and some length adjustment and the issue is gone Phew
Phew
Here's a video of that endeavor:
Coolant Hose Fail on the VVT Supercharged NA
So the story on this one goes... I was driving the car to work and thankfully I had the Torque app running on the headunit which is hooked into the car via an OBD2 bluetooth dongle. It kicks up an alert as the coolant temp hits 100degC (212degF)
Immediately I'm perplexed as its never hit that before. At first I suspected it was a result of the weather as it gets toasty here in Melbourne around December/January. When moving, the temp would return to ~95deg, but when stationary it would return to as high as 105deg
So, there is little I can do as I need to get to work, after work i start the car and begin the drive home, thankfully there isn't too much traffic but the symptoms eventually return as the car warms up. I cruise home cautiously trying to keep the temp under 100ish as best I can.
As soon as I pull into the driveway and kill the motor I can hear a hiss and fear the worst. Busted Rad? Boiled Coolant? Head Gasket? ???
I pop the bonnet and the hissing is coming from around the intake manifold, I suspect perhaps one of those smaller coolant hoses that runs to the throttle body and oil filter may have failed?
I poke around and I can see coolant, but cant find a source.
Then, I squeeze the top radiator hose, no pressure at all and a splooge of coolant comes out the side of it. Well there's my problem. And the cause is immediately obvious.
The hose has been ever so slightly rubbing on the supercharger drive belt. The belt has carved a hole out of the hose, only tiny, but enough for the coolant to spray out at a high level of force.
So, a quick hose swap and some length adjustment and the issue is gone
PhewHere's a video of that endeavor:
Reply
0
0
01-23-2017, 06:59 AM
#84
Junior Member
Thread Starter
Join Date: Mar 2011
Location: Melbourne, Australia
Posts: 212
Total Cats: 66
So lots of work has been happening lately, and I've neglected to keep the forum up to scratch, but in summary....
Yep, I finally got around to nipping up the last of the bolts and giving everything a quick once over to start it and fire it all up. After some delays due to a swap around of the LS coil firing order, it started right up. A brief video to summarize where things are at with the car:
http://www.youtube.com/watch?v=KdOsDYMaUq4
And, the other exciting news is that I was able to get the car out to Sandown Raceway for the MX-5 Fan Fest.
With the 1,000,000th MX-5 on show, Mad Mike in attendance, and some 670 or so fellow MX-5's... we and had a great day in the hot Aussie sun.
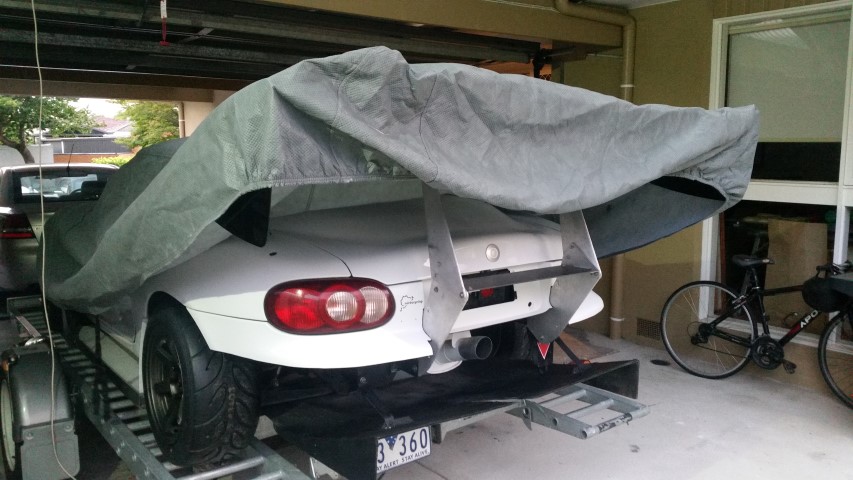
The car loaded on the trailer for the first time in 18 months....
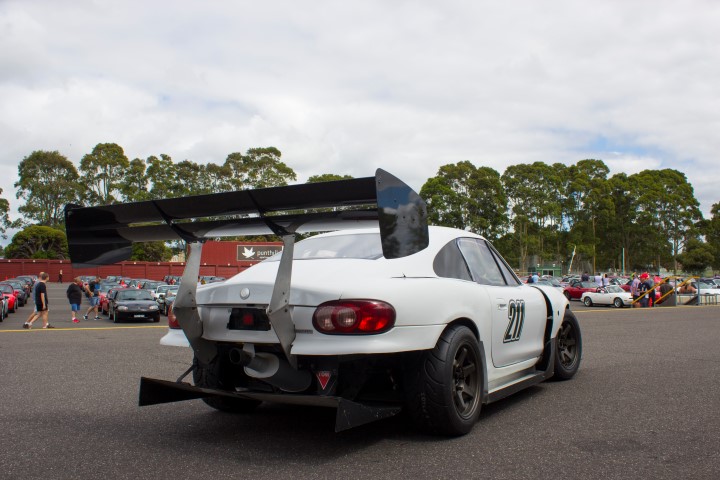
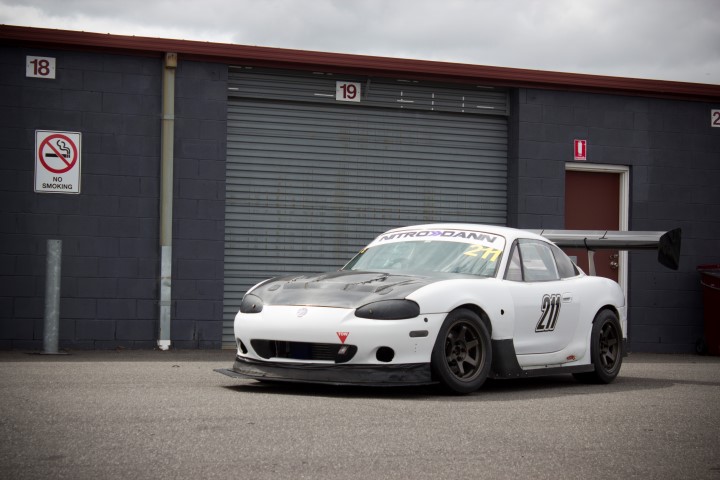
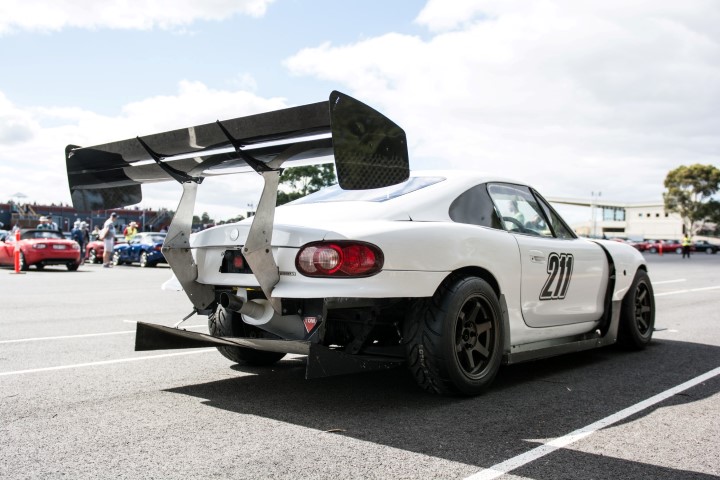
Really happy to see the car out again and fully dressed. It's been a long time since it's had all it's body panels mostly installed.
That's it for now, I'll post some individual updates of all of the little changes that have been happening to the car in the coming days with pics detailing what I've done.
Next step is to properly tune the car and then, aero/bodywork upgrade is in order.
Cheers,
Brendan
- I've worked on getting the doors painted so now they almost match and are much more sturdy than the old rattle can paint.
- The brake duct mockup has translated into version 1 of aluminium brake ducts. Liken them to home made singular motorsport items.
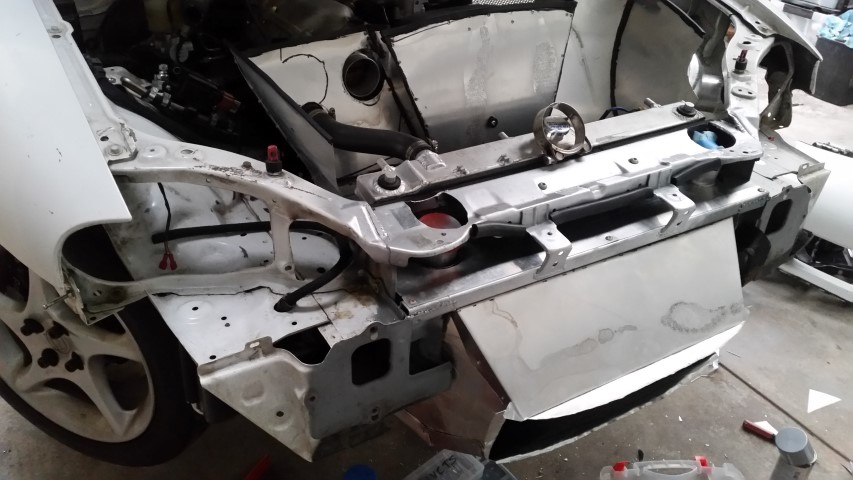
- The oil cooler has been moved to a better spot - although not yet plumbed in.
- The front duct work from the bumper to the radiator has been completed.
- The front bumper has been cleaned up and painted.
Yep, I finally got around to nipping up the last of the bolts and giving everything a quick once over to start it and fire it all up. After some delays due to a swap around of the LS coil firing order, it started right up. A brief video to summarize where things are at with the car:
http://www.youtube.com/watch?v=KdOsDYMaUq4
And, the other exciting news is that I was able to get the car out to Sandown Raceway for the MX-5 Fan Fest.
With the 1,000,000th MX-5 on show, Mad Mike in attendance, and some 670 or so fellow MX-5's... we and had a great day in the hot Aussie sun.
The car loaded on the trailer for the first time in 18 months....
Really happy to see the car out again and fully dressed. It's been a long time since it's had all it's body panels mostly installed.
That's it for now, I'll post some individual updates of all of the little changes that have been happening to the car in the coming days with pics detailing what I've done.
Next step is to properly tune the car and then, aero/bodywork upgrade is in order.
Cheers,
Brendan
Reply
2
2
01-28-2017, 07:15 AM
#85
Junior Member
Thread Starter
Join Date: Mar 2011
Location: Melbourne, Australia
Posts: 212
Total Cats: 66
So the car's been on the dyno and after a few niggles, finally got things settled and working.
It's running around 180rwkw and a safe level of torque so as to not blow the little MX5's standard motor or gearbox.
It's running around 180rwkw and a safe level of torque so as to not blow the little MX5's standard motor or gearbox.
Reply
0
0
02-04-2017, 02:33 AM
#86
Junior Member
Thread Starter
Join Date: Mar 2011
Location: Melbourne, Australia
Posts: 212
Total Cats: 66
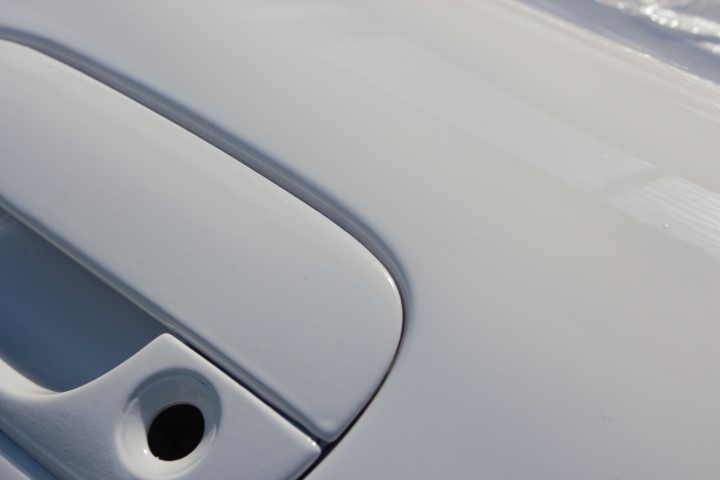
Painting Doors
The doors on this car were hand me downers, very rough and I'd previously painted them with rattle cans in a mismatched white.
Since I'd gone to the effort of painting the roof, it didn't seem like much more work to get the doors painted too.
Well, that was until I got a little closer to them.
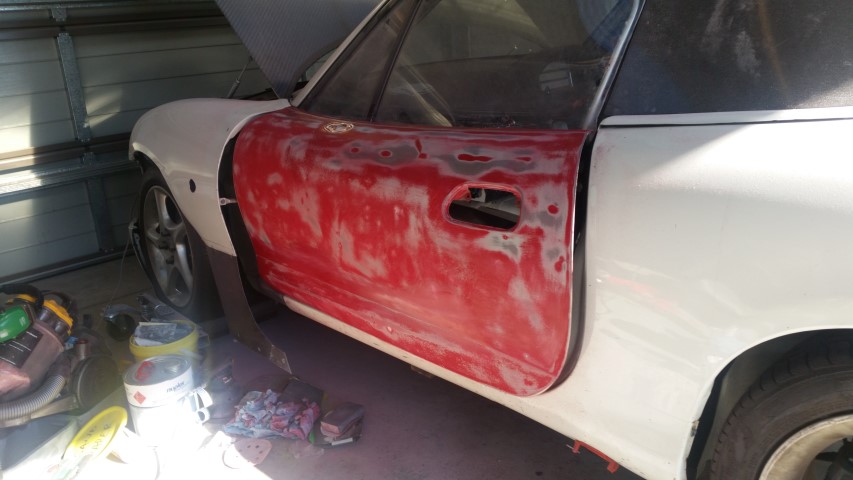
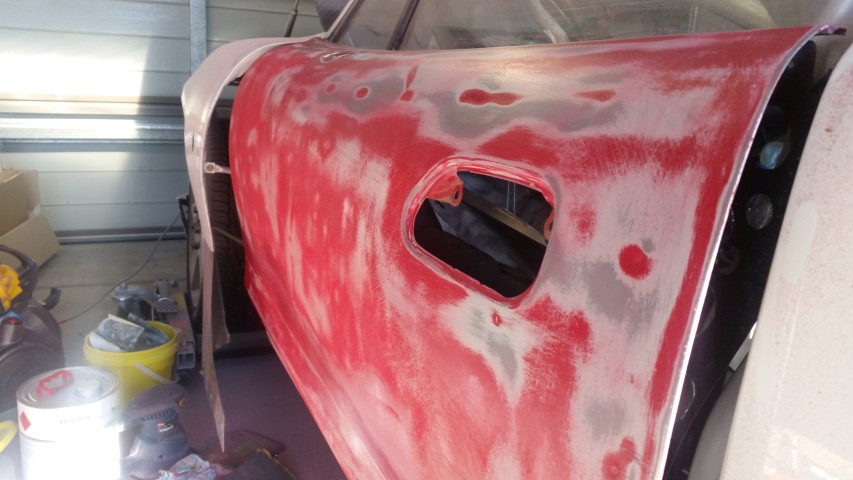
One door in particular was really battered up, dents and wrinkles and layers of paint that just made me cry. I sanded away the old flaked and poorly adhered paint and prepped them for a fresh coat.
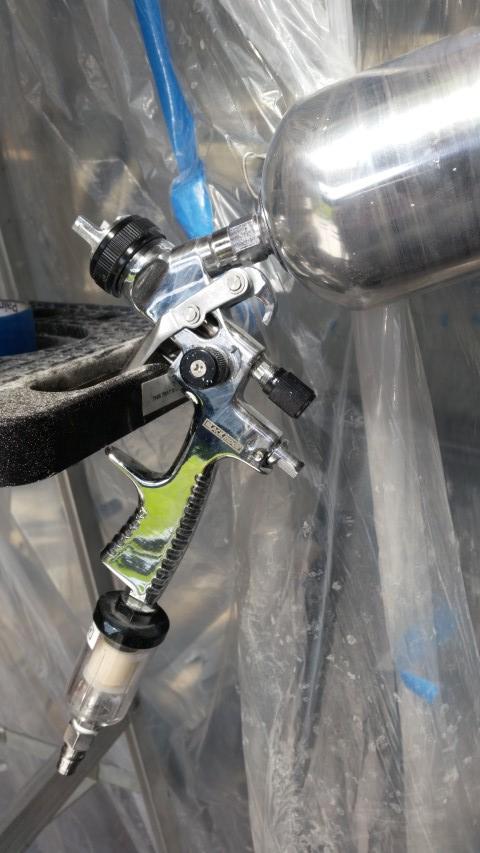
My el-cheapo paint gun I bought for under $100. Actually worked alright for a super budget job. (and ghetto paint booth behind)
After filling the bad bits, the doors got a couple of coats of primer and the odd bit of filler again to neaten up the areas that needed more attention.... then, some paint went down.
The colour came out nicer than it did on the fastback, I think I've gotten better with the painting method and working with the settings on the paint gun.
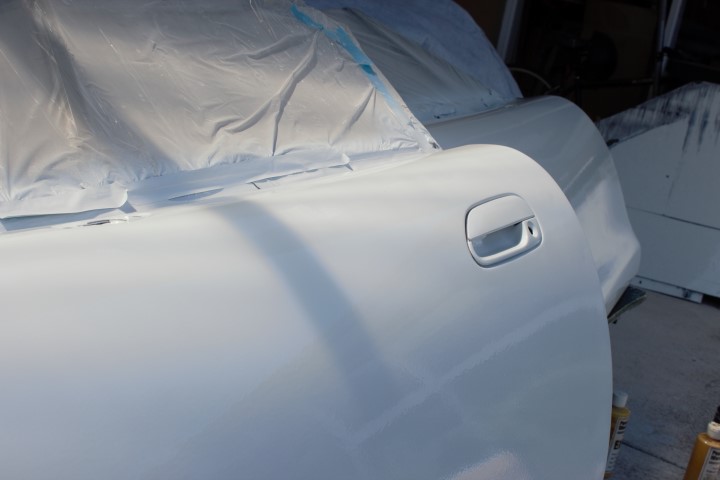
This is a bit of a 'money shot'. I think this shot perhaps flatters my success with the paint more I deserve. But it does look nice and shiny here. Oooooohhh
You can see the beginnings of a run in the corner of the door handle.
The doors on this car were hand me downers, very rough and I'd previously painted them with rattle cans in a mismatched white.
Since I'd gone to the effort of painting the roof, it didn't seem like much more work to get the doors painted too.
Well, that was until I got a little closer to them.
One door in particular was really battered up, dents and wrinkles and layers of paint that just made me cry. I sanded away the old flaked and poorly adhered paint and prepped them for a fresh coat.
My el-cheapo paint gun I bought for under $100. Actually worked alright for a super budget job. (and ghetto paint booth behind)
After filling the bad bits, the doors got a couple of coats of primer and the odd bit of filler again to neaten up the areas that needed more attention.... then, some paint went down.
The colour came out nicer than it did on the fastback, I think I've gotten better with the painting method and working with the settings on the paint gun.
This is a bit of a 'money shot'. I think this shot perhaps flatters my success with the paint more I deserve. But it does look nice and shiny here. Oooooohhh
You can see the beginnings of a run in the corner of the door handle.
Reply
0
0
02-11-2017, 12:50 AM
#87
Junior Member
Thread Starter
Join Date: Mar 2011
Location: Melbourne, Australia
Posts: 212
Total Cats: 66
Oh I should mention, I took some video of a friends car recently. A turbo NA6 with a collection of both interesting and unusual mods.
First time I've done a more artsy video like this really... so apologies in advance for my lack of video making skill, I tried to polish a turd (the turd being my poor recording skills) by doing the best I could via post processing in Adobe Premiere.
https://www.youtube.com/watch?v=OA133VLk9H8
First time I've done a more artsy video like this really... so apologies in advance for my lack of video making skill, I tried to polish a turd (the turd being my poor recording skills) by doing the best I could via post processing in Adobe Premiere.
https://www.youtube.com/watch?v=OA133VLk9H8
Reply
0
0
02-20-2017, 05:57 PM
#88
Junior Member
Thread Starter
Join Date: Mar 2011
Location: Melbourne, Australia
Posts: 212
Total Cats: 66
Soo... onto some of the other things that I had managed to finish (or in some cases, half finish) before the MX-5 Fan Fest event I mentioned a few posts ago.....
Oil Cooler
First up, the oil cooler has been moved to a better spot, plenty of airflow here - although it's clearly not yet plumbed in.
On the pondering list is, exactly what sort of lines I will run, and where/how I till run them. Need to prepare the wallet first, hose fittings aren't cheap.
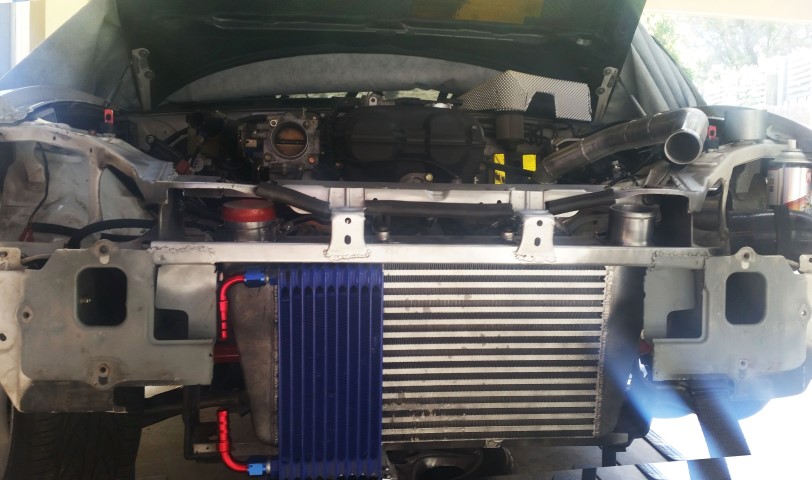
Rad Duct
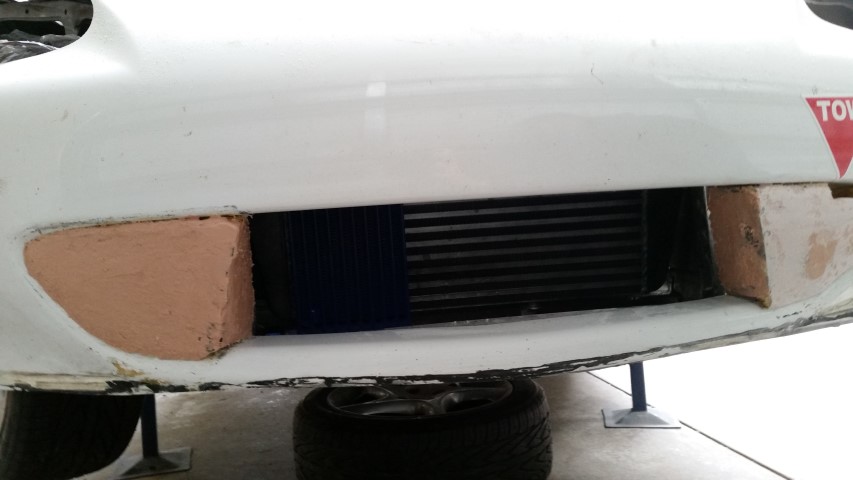
And with the oil cooler in place, I needed to work out the front duct work between the bumper and the radiator(s).
This is a reasonably simple aluminium box which bolts to the front of the car and is almost a perfect seal around the radiator, and also seals on the bumper opening.
This angle kinda helps to visualize the airflow.... in the front, through the heat exchangers, out the vented hood.
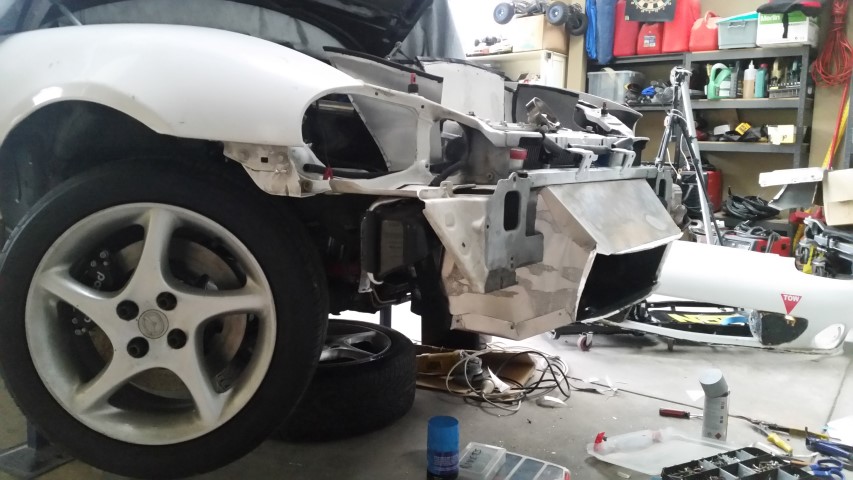
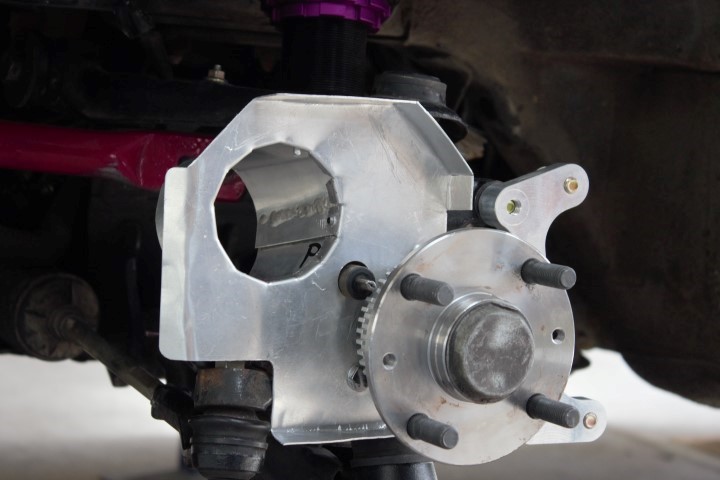
Brake Duct
Aluminium brake duct mockup version 1. I'm not sure if these will stay as is, and whether I will leave them as aluminium. Still pondering that one.
I guess you can liken them to home made singular motorsport items. On the to do list is to run a hose of some form to them, and make an inlet in the front ductwork.
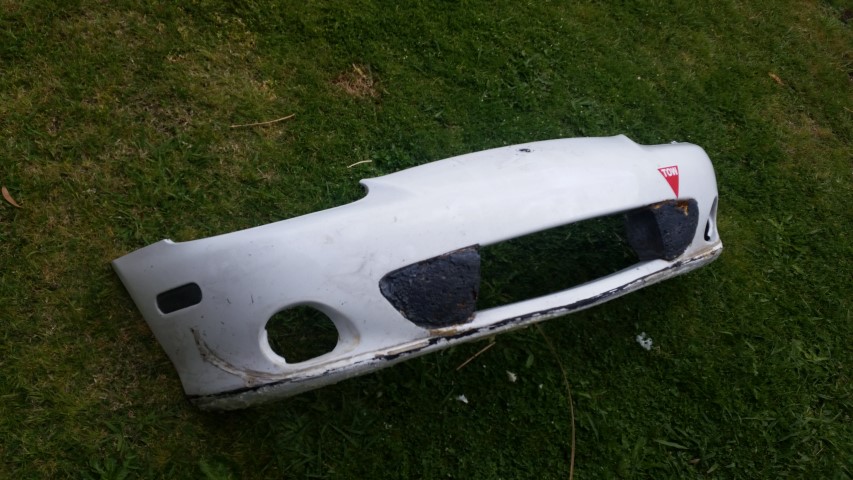
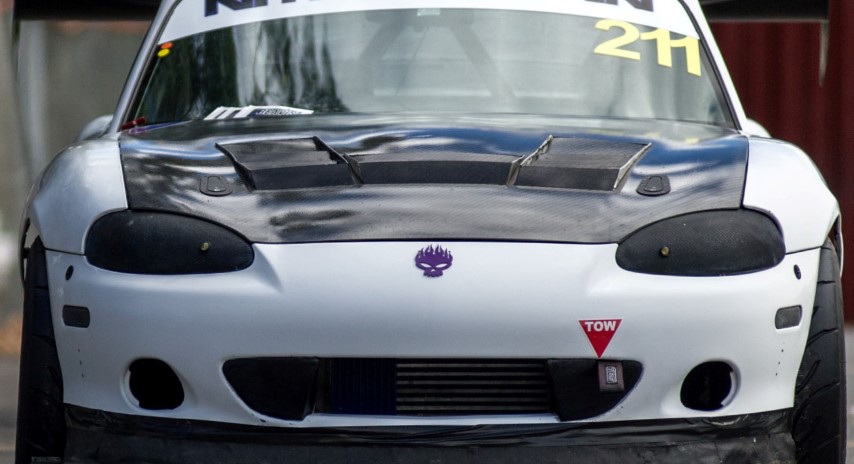
Front bumper
Lastly, the front bumper has been cleaned up and painted... The difference between the before and after is quite satisfying.
Here it is looking very sad for itself after I separated it away from the old splitter.
It got a good share of body filler and sanding around the front.
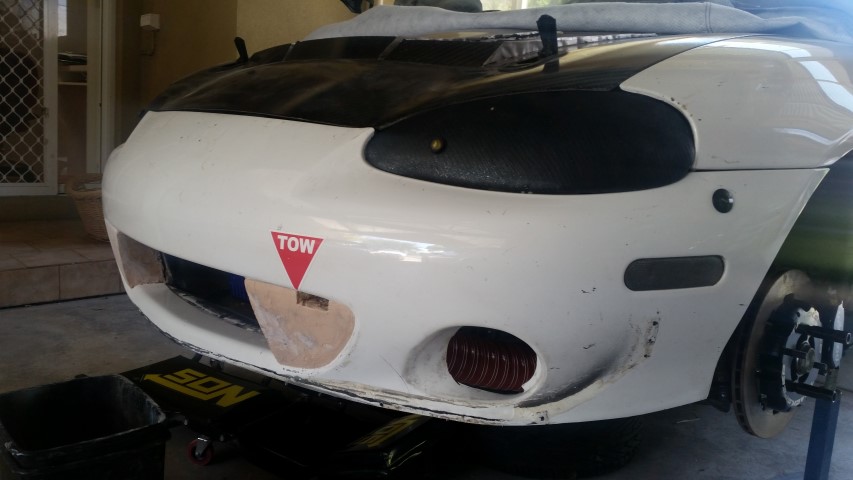
And after a good clean, removing a lot of old glue and some fresh paint, this was the much less crap bumper. Ah and I 3Dprinted myself a new front badge.
This angle also shows how critical some front wheel spats/canards are to clear air from the front wheels.
Oil Cooler
First up, the oil cooler has been moved to a better spot, plenty of airflow here - although it's clearly not yet plumbed in.
On the pondering list is, exactly what sort of lines I will run, and where/how I till run them. Need to prepare the wallet first, hose fittings aren't cheap.
Rad Duct
And with the oil cooler in place, I needed to work out the front duct work between the bumper and the radiator(s).
This is a reasonably simple aluminium box which bolts to the front of the car and is almost a perfect seal around the radiator, and also seals on the bumper opening.
This angle kinda helps to visualize the airflow.... in the front, through the heat exchangers, out the vented hood.
Brake Duct
Aluminium brake duct mockup version 1. I'm not sure if these will stay as is, and whether I will leave them as aluminium. Still pondering that one.
I guess you can liken them to home made singular motorsport items. On the to do list is to run a hose of some form to them, and make an inlet in the front ductwork.
Front bumper
Lastly, the front bumper has been cleaned up and painted... The difference between the before and after is quite satisfying.
Here it is looking very sad for itself after I separated it away from the old splitter.
It got a good share of body filler and sanding around the front.
And after a good clean, removing a lot of old glue and some fresh paint, this was the much less crap bumper. Ah and I 3Dprinted myself a new front badge.
This angle also shows how critical some front wheel spats/canards are to clear air from the front wheels.
Reply
0
0
02-27-2017, 05:17 AM
#89
Junior Member
Thread Starter
Join Date: Mar 2011
Location: Melbourne, Australia
Posts: 212
Total Cats: 66
Ahh so I am pleased to say I have a new episode out on my YouTube channel with some updates on the car
This video details how I made up the aluminium sheet radiator ducting.
https://www.youtube.com/watch?v=LHNOPzr67Ps
This video details how I made up the aluminium sheet radiator ducting.
https://www.youtube.com/watch?v=LHNOPzr67Ps
Reply
0
0
02-27-2017, 05:19 AM
#90
Junior Member
Thread Starter
Join Date: Mar 2011
Location: Melbourne, Australia
Posts: 212
Total Cats: 66
Ahh so I am pleased to say I have a new episode out on my YouTube channel with some updates on the car
This video details how I made up the aluminium sheet radiator ducting.
This video details how I made up the aluminium sheet radiator ducting.
Reply
0
0
03-19-2017, 07:33 AM
#91
Junior Member
Thread Starter
Join Date: Mar 2011
Location: Melbourne, Australia
Posts: 212
Total Cats: 66
So not a lot has been happening with the Track car lately, in fact it's literally just sat in the corner for the last month and a half. But I've started back on the car this week hopefully it will be in good running form within a few weeks with the last of the mechanical pieces buttoned up.
In the meantime, I've fettled with the NA a little which excitedly includes taking it to Broadford for a track day with the Local Nissan Skyline Car Club.
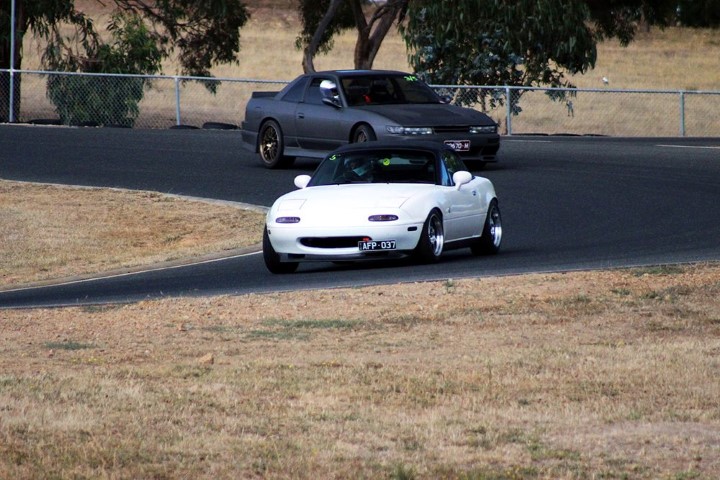
Had a blast running around on the track, it's been way too long. And while the car had some random chinese hard tyres and generic brake pads, it was till great fun.
A track day on a 'street' car is sure to find the weak links in the chain... in this case, the generic spark plugs suffered under the stress, the stock upper radiator hose got all fat and ballooned, and the supercharger belt was stretched and rubbing itself away, there was a buildup of rubber gunk under the bonnet as a result.
So, some new plugs, belt and hose and the car is good as new.
I actually entered to get my brother to come along for his first on track event. He managed to work down from a 1:22 to eventually a best time of a 1:17 in a completely stock Toyota 86. I had a go for a session and did a 1:15 in his car so we have a bit of a benchmark.
A short clip of my brother with me in the passenger seat giving some instruction.
In the meantime, I've fettled with the NA a little which excitedly includes taking it to Broadford for a track day with the Local Nissan Skyline Car Club.
Had a blast running around on the track, it's been way too long. And while the car had some random chinese hard tyres and generic brake pads, it was till great fun.
A track day on a 'street' car is sure to find the weak links in the chain... in this case, the generic spark plugs suffered under the stress, the stock upper radiator hose got all fat and ballooned, and the supercharger belt was stretched and rubbing itself away, there was a buildup of rubber gunk under the bonnet as a result.
So, some new plugs, belt and hose and the car is good as new.
I actually entered to get my brother to come along for his first on track event. He managed to work down from a 1:22 to eventually a best time of a 1:17 in a completely stock Toyota 86. I had a go for a session and did a 1:15 in his car so we have a bit of a benchmark.
A short clip of my brother with me in the passenger seat giving some instruction.
Reply
1
1
03-19-2017, 07:34 AM
#92
Junior Member
Thread Starter
Join Date: Mar 2011
Location: Melbourne, Australia
Posts: 212
Total Cats: 66
And a couple of laps in my car while it was still healthy, plenty of fun tassling with the likes of a Porsche Cayman GT4 and a Nissan GTR. The porsche was running what appeared to be slicks :-O
Reply
0
0
03-19-2017, 08:10 AM
#93

And a couple of laps in my car while it was still healthy, plenty of fun tassling with the likes of a Porsche Cayman GT4 and a Nissan GTR. The porsche was running what appeared to be slicks :-O
https://www.youtube.com/watch?v=1MHZ_pI1GZA
https://www.youtube.com/watch?v=1MHZ_pI1GZA
Reply
0
0
03-22-2017, 06:28 AM
#94
Junior Member
Thread Starter
Join Date: Mar 2011
Location: Melbourne, Australia
Posts: 212
Total Cats: 66
It's actually a pretty amazing track to drive. Turn 1 has a huge rise in elevation so you can brake very late, the straights are only short so you spend the whole lap focused on getting everything right...
Reply
0
0
03-22-2017, 09:22 AM
#95
Junior Member

Join Date: Jun 2015
Posts: 278
Total Cats: 22
Ahh so I am pleased to say I have a new episode out on my YouTube channel with some updates on the car
This video details how I made up the aluminium sheet radiator ducting.
https://www.youtube.com/watch?v=LHNOPzr67Ps
This video details how I made up the aluminium sheet radiator ducting.
https://www.youtube.com/watch?v=LHNOPzr67Ps

I love the work however!
Reply
0
0
03-26-2017, 08:49 AM
#96
Junior Member
Thread Starter
Join Date: Mar 2011
Location: Melbourne, Australia
Posts: 212
Total Cats: 66
Ahhh yes, it certainly requires some care or those little pointy edges that the snips create can get you good. I probably really should wear the welding gloves when I'm doing that sort of stuff.
Reply
0
0
05-11-2017, 03:31 AM
#97
Junior Member
Thread Starter
Join Date: Mar 2011
Location: Melbourne, Australia
Posts: 212
Total Cats: 66
So it has been a long time between updates (as usual really).
Progress on the Track car has been slow, sometimes it seems like it is the lowest on the priority list after all the other things in life.
But with that said. lots of things have been happening.
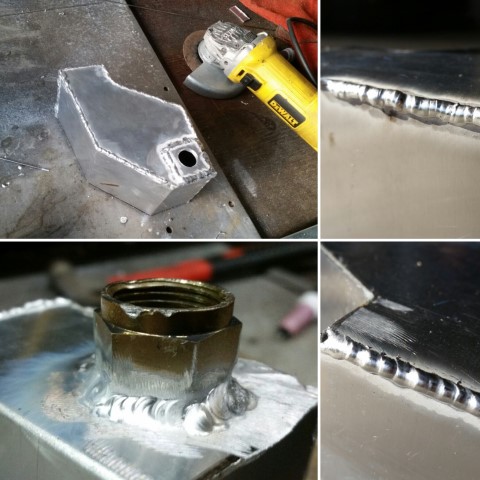
I've spent some time fiddling with the idea of a water sprayer for the intercooler, and have made up a little Alu reservoir bottle which supports the factory windscreen washer bottle pump. A good opportunity to put my welding skills to the test as this was very thin aluminium.
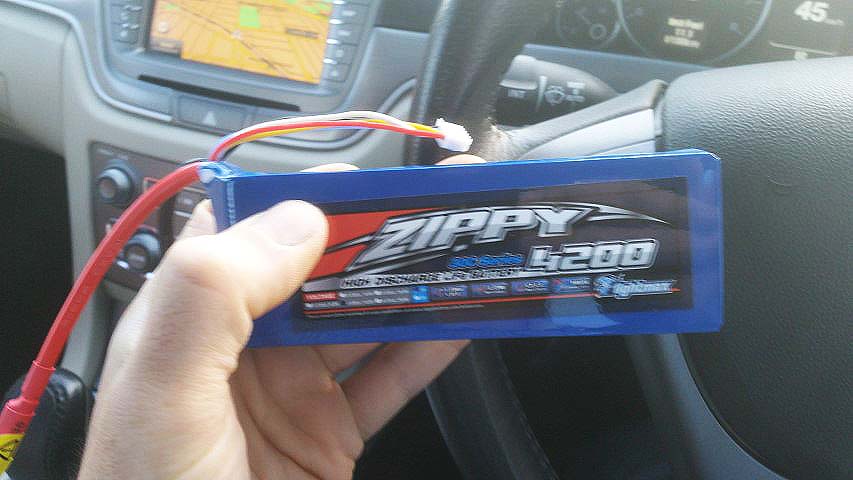
And for an experiment, here's the new battery that's going in the car. I bought two for redundancy purposes, but I'm crossing my fingers that just the one will suffice.
They are LifePo4 batteries, and as such are considered to be safer than typical RC LiPo's but still offer many of the power output and weight benefits. They were about $60ea I think so pretty good value if they hold up, or an expensive paper weight if I blow them up.
The car used to run a strut tower brace - in my opinion they don't do a whole lot. But the reason I ran it was for the big bolt I used as a brake master cyl stopper.
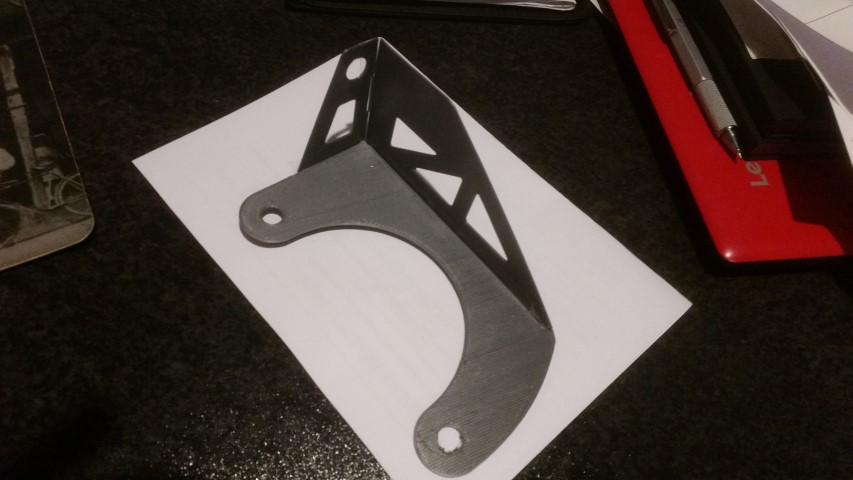
So, I designed up my own brake master cyl stopper which is with the laser cutter at the moment which will allow me to leave the strut brace off completely. This is a pic of a 3dprint prototype to confirm my dimensions and I was pleased to find it all lined up mostly perfect. Next step is to make the steel version.
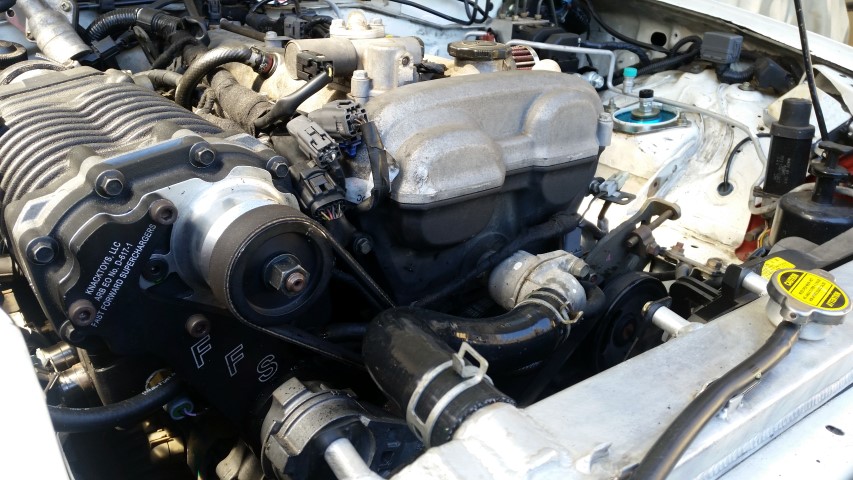
Onto the supercharged NA, as I mentioned in the previous post, the car got a new upper radiator hose which was a generic silicone job off ebay. A new SC belt - they are super easy to find as the part numbers are generic, I think this new belt is off a Mazda CX-5. And some fresh spark plugs.
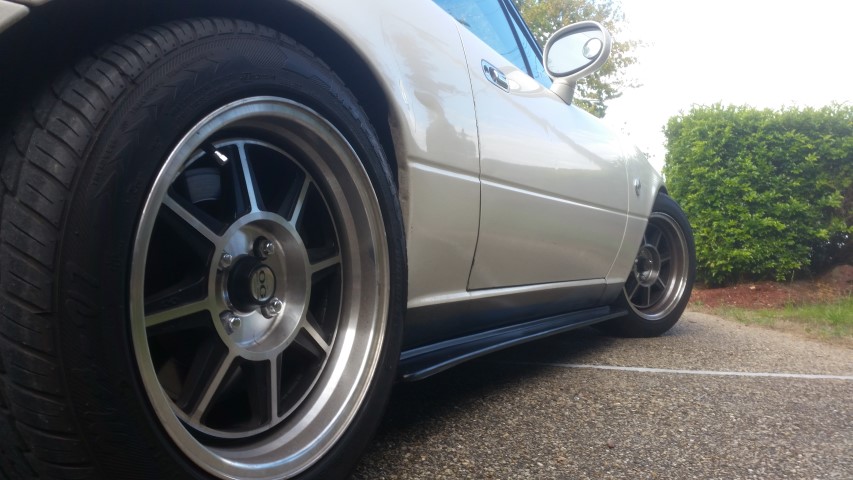
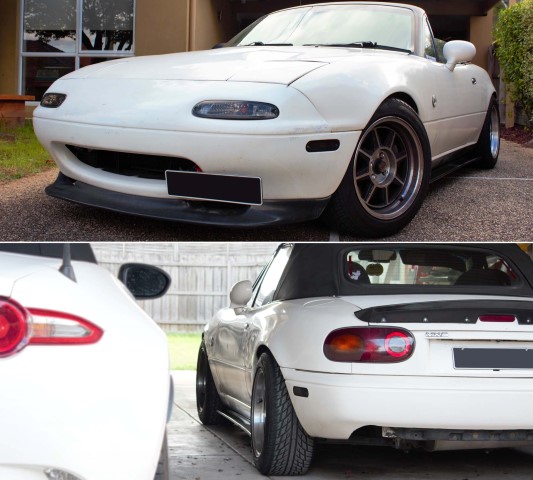
Another thing which got me a little bit excited, installed some of these side skirts on the car. Big fan of the look, I think they really make the car look lower and more agressive.
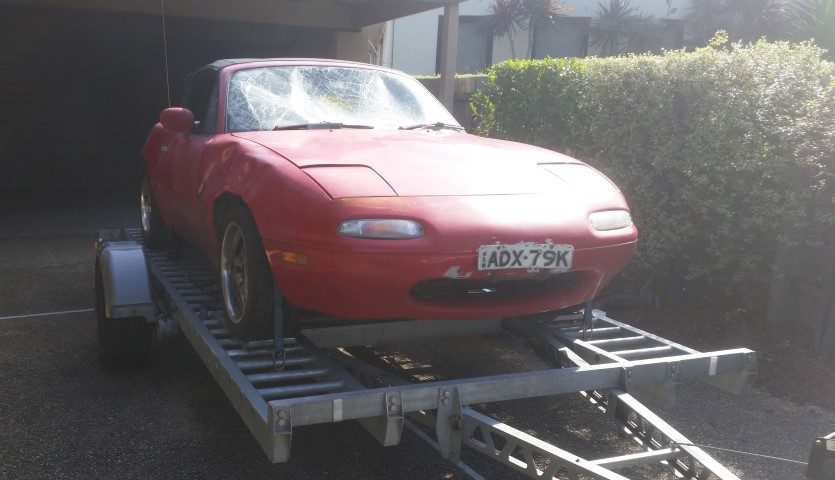
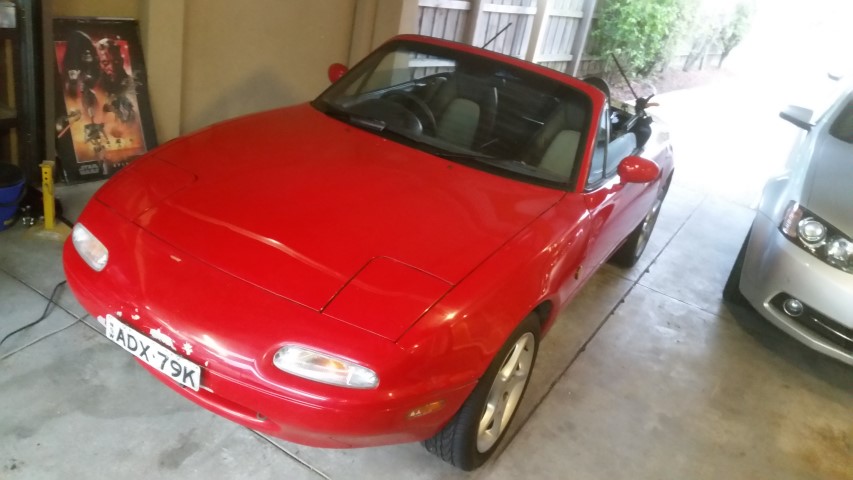
We've got ANOTHER car in the garage... This rather sad looking NA6 has arrived for some much needed TLC. I've already got to work on it and made a lot of progress as you can see from the pictures below.
It needed all new glass, a variety of mechanical attention, a whole lot of cleaning, and some mild panel beating among other things.
More details on what I did, and what the plans are for the car are yet to come, but rest assured it will get the same treatment as all the BEAVIS cars - that being lots of love but thrashed at the track!
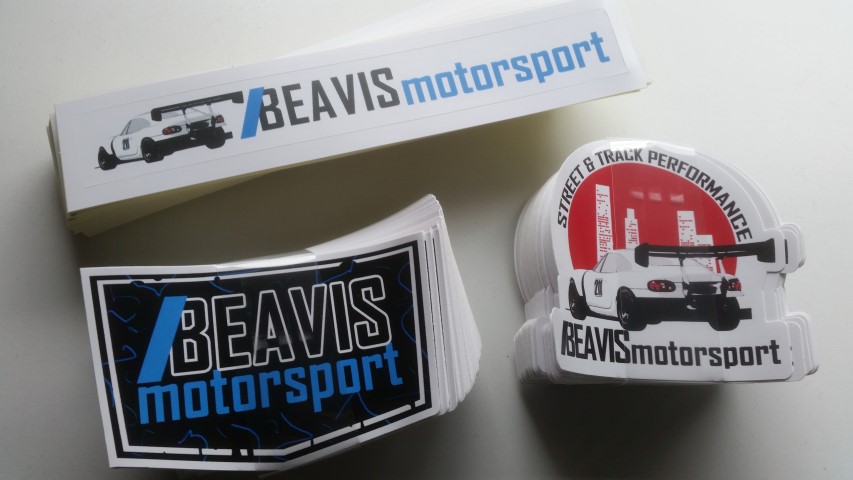
And, lastly, a litte bit of a plug... super excited because I've gotten some new PVC stickers made! I designed them up myself using my limited Photoshop skills.
These things are perfect for bumpers/windows/external use, and if you are keen for one (please buy one and support me!), please visit my web store: BEAVIS Motorsport
Progress on the Track car has been slow, sometimes it seems like it is the lowest on the priority list after all the other things in life.
But with that said. lots of things have been happening.
I've spent some time fiddling with the idea of a water sprayer for the intercooler, and have made up a little Alu reservoir bottle which supports the factory windscreen washer bottle pump. A good opportunity to put my welding skills to the test as this was very thin aluminium.
And for an experiment, here's the new battery that's going in the car. I bought two for redundancy purposes, but I'm crossing my fingers that just the one will suffice.
They are LifePo4 batteries, and as such are considered to be safer than typical RC LiPo's but still offer many of the power output and weight benefits. They were about $60ea I think so pretty good value if they hold up, or an expensive paper weight if I blow them up.
The car used to run a strut tower brace - in my opinion they don't do a whole lot. But the reason I ran it was for the big bolt I used as a brake master cyl stopper.
So, I designed up my own brake master cyl stopper which is with the laser cutter at the moment which will allow me to leave the strut brace off completely. This is a pic of a 3dprint prototype to confirm my dimensions and I was pleased to find it all lined up mostly perfect. Next step is to make the steel version.
Onto the supercharged NA, as I mentioned in the previous post, the car got a new upper radiator hose which was a generic silicone job off ebay. A new SC belt - they are super easy to find as the part numbers are generic, I think this new belt is off a Mazda CX-5. And some fresh spark plugs.
Another thing which got me a little bit excited, installed some of these side skirts on the car. Big fan of the look, I think they really make the car look lower and more agressive.
We've got ANOTHER car in the garage... This rather sad looking NA6 has arrived for some much needed TLC. I've already got to work on it and made a lot of progress as you can see from the pictures below.
It needed all new glass, a variety of mechanical attention, a whole lot of cleaning, and some mild panel beating among other things.
More details on what I did, and what the plans are for the car are yet to come, but rest assured it will get the same treatment as all the BEAVIS cars - that being lots of love but thrashed at the track!
And, lastly, a litte bit of a plug... super excited because I've gotten some new PVC stickers made! I designed them up myself using my limited Photoshop skills.
These things are perfect for bumpers/windows/external use, and if you are keen for one (please buy one and support me!), please visit my web store: BEAVIS Motorsport
Reply
3
3


