Curly's car's cupgrades.
 06-15-2009, 02:57 PM
#1
Cpt. Slow

Thread Starter
iTrader: (25)
Join Date: Oct 2005
Location: Oregon City, OR
Posts: 14,175
Total Cats: 1,129
Decided to start my own build thread, as I am currently doing numerous projects at once, and thought others might benefit from hearing about my approach. Plus I know people get bored and want pictures  I'll also have plenty of questions for those who have already done this, so bare with me.
So in the next few weeks I'll be finishing up my coolant reroute, starting in on my oil cooler, installing NACA ducts either in both side windows or one for the oil cooler, and properly mounting my 5/6th point for my harness. I also hope to get my COPs installed once someone builds me a harness, since I don't have the skills or tools to make one I'd be satisfied with myself. No doubt somewhere along the line I'll add more projects to the list, as everyone knows a project car like this is never "done"
I'll post up pictures tonight once I upload them of my modified BEGI coolant reroute spacer and my oil sandwich plate, stay tuned.
I'll also have plenty of questions for those who have already done this, so bare with me. So in the next few weeks I'll be finishing up my coolant reroute, starting in on my oil cooler, installing NACA ducts either in both side windows or one for the oil cooler, and properly mounting my 5/6th point for my harness. I also hope to get my COPs installed once someone builds me a harness, since I don't have the skills or tools to make one I'd be satisfied with myself. No doubt somewhere along the line I'll add more projects to the list, as everyone knows a project car like this is never "done"
I'll post up pictures tonight once I upload them of my modified BEGI coolant reroute spacer and my oil sandwich plate, stay tuned.

Reply
 0
0

0
 06-15-2009, 03:58 PM
#3
Cpt. Slow
Thread Starter
iTrader: (25)
Join Date: Oct 2005
Location: Oregon City, OR
Posts: 14,175
Total Cats: 1,129
yes I did, to go along with the theme of C's from "curly's car". Your post, which no doubt took some time to write, has once again out shone me completely, which is why I'll have to kill you.
Back on topic however. I would like to test fit my oil sandwich plate, but I'd like to avoid draining the oil. Anyone know if there's oil up to the filter before draining it? Seems like there wouldn't be but id like to know for sure before I spill it all over the driveway.
Back on topic however. I would like to test fit my oil sandwich plate, but I'd like to avoid draining the oil. Anyone know if there's oil up to the filter before draining it? Seems like there wouldn't be but id like to know for sure before I spill it all over the driveway.
Reply
0
0
 06-15-2009, 08:35 PM
#5
Cpt. Slow
Thread Starter
iTrader: (25)
Join Date: Oct 2005
Location: Oregon City, OR
Posts: 14,175
Total Cats: 1,129
Pictures, as promised! I apologize for the crappy iPhone pictures, that's all I have available at the moment. And don't blame me for the ugly welds, they're plenty strong, water tight, and I didn't do them. It's a wire feed TiG welder which doesn't produce as 'pretty' of welds as a normal TiG welder would, or so I've been told.
Your guy's engine bays look like this when you do a reroute, right?
Unmodified
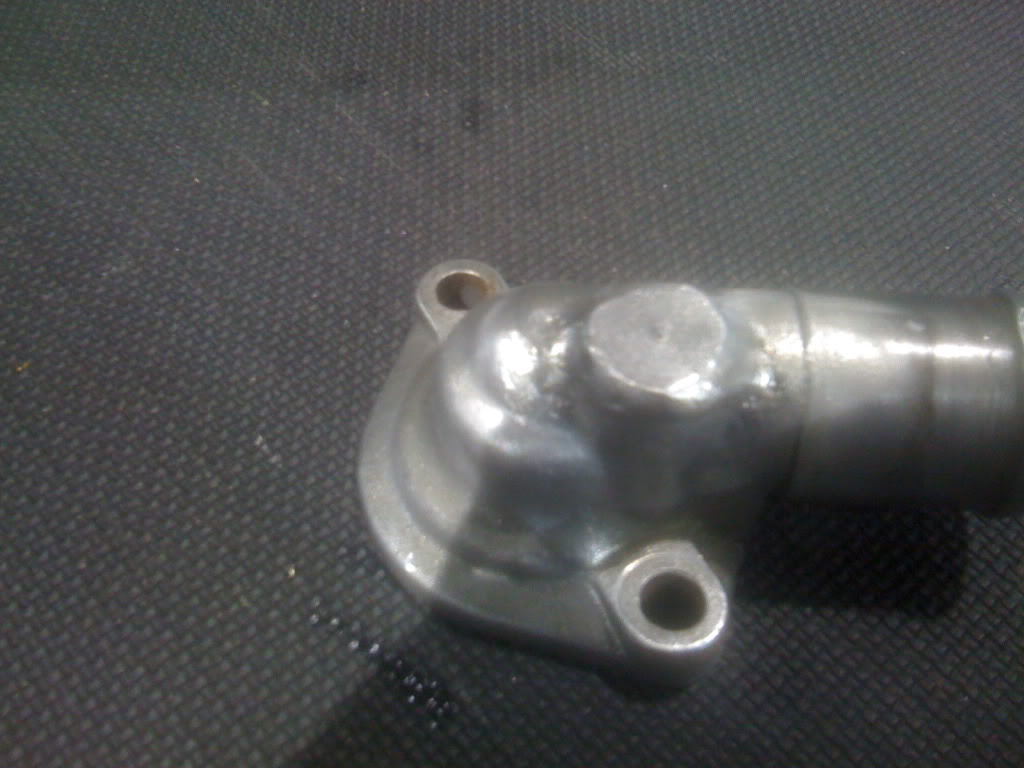
Stock water neck milled and welded for clearance
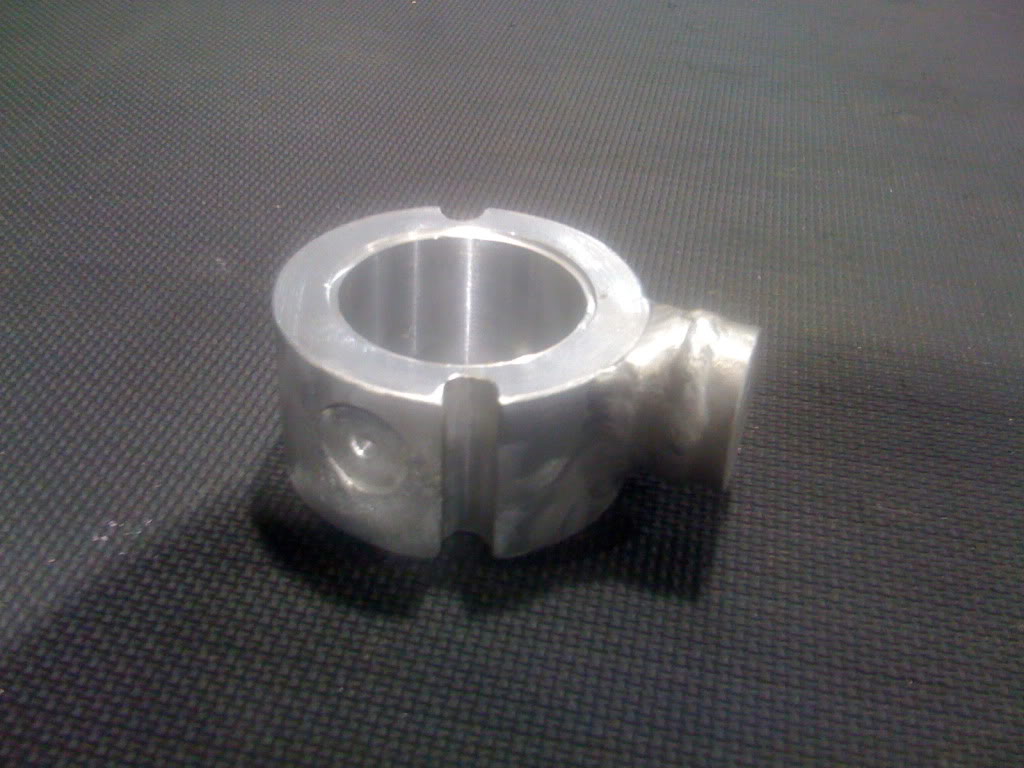
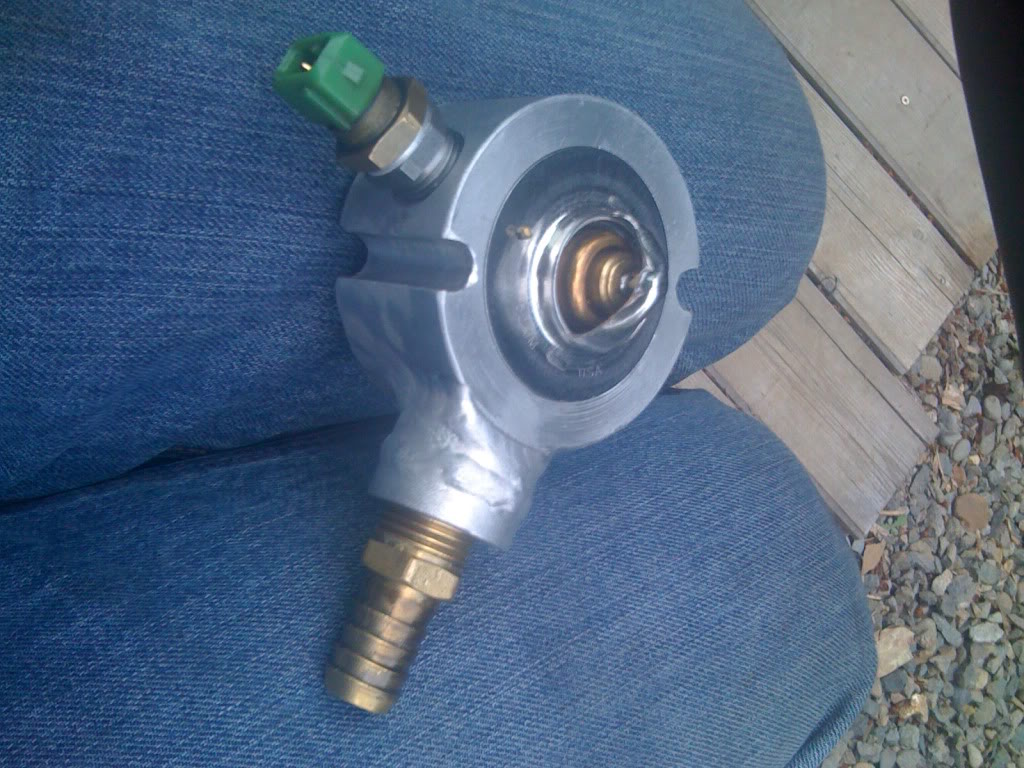
Large pipe was cut off and welded closed, it'll be drilled and tapped with 1/2-14npt threads for a 5/8" hose barb for the heater core inlet. The spot face is where a little aluminum spacer will be welded, drilled, and tapped for the coolant sensor. Reroute spacers would be much easier if that damn sensor wasn't so long. I also milled the little groove you see for thermostat, some how the earlier BEGI design didn't incorporate one.
Freeze plug installed. It was being an absolute bitch to install. Left it alone and came back to it the next day and it went right in. Only thing I changed was going from a regular hammer to a little 5lb sledge, and putting a little RTV on it, which might possibly of lubricated it enough to slide in along with the little bit of extra force provided by the sledge.
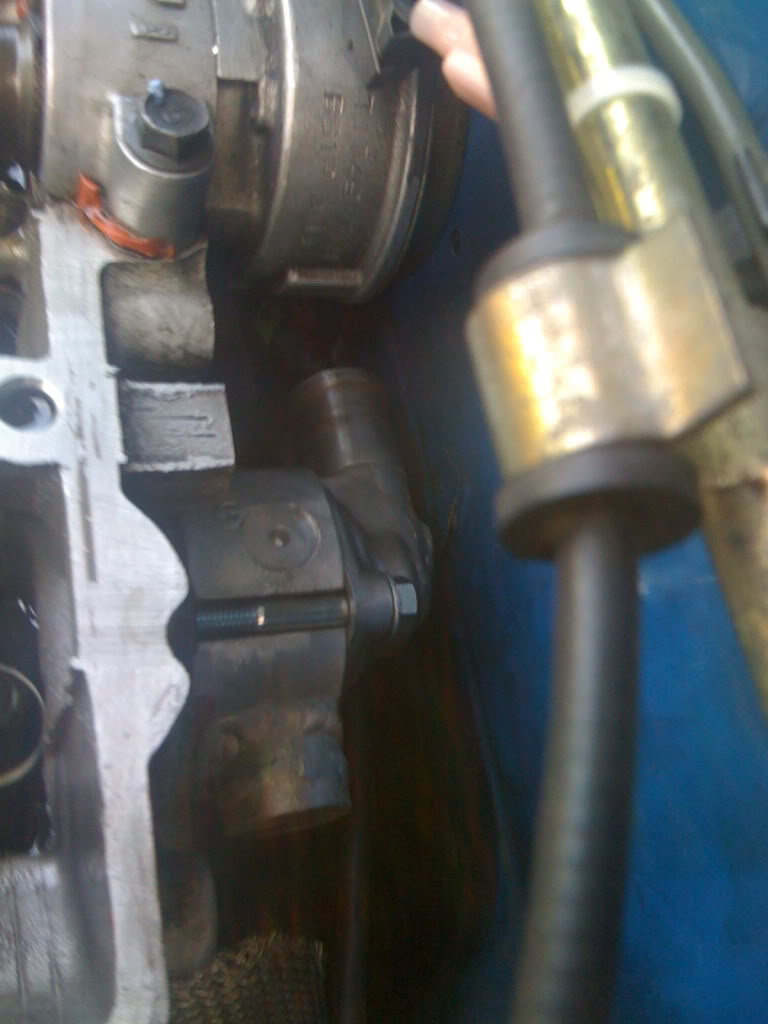
The spacer/water neck assembly in for test fitting. Wouldn't fit at all with the speedometer cable bracket, so I just bent it straight down. I have no idea how I'm going to get it all in and my massive forearms below it with a wrench to tighten the bottom bolt, I'll get there when I get there. I still have to clean the old gasket off the back of the head, that's going to be hard enough.

Your guy's engine bays look like this when you do a reroute, right?
Unmodified
Stock water neck milled and welded for clearance
Large pipe was cut off and welded closed, it'll be drilled and tapped with 1/2-14npt threads for a 5/8" hose barb for the heater core inlet. The spot face is where a little aluminum spacer will be welded, drilled, and tapped for the coolant sensor. Reroute spacers would be much easier if that damn sensor wasn't so long. I also milled the little groove you see for thermostat, some how the earlier BEGI design didn't incorporate one.
Freeze plug installed. It was being an absolute bitch to install. Left it alone and came back to it the next day and it went right in. Only thing I changed was going from a regular hammer to a little 5lb sledge, and putting a little RTV on it, which might possibly of lubricated it enough to slide in along with the little bit of extra force provided by the sledge.
The spacer/water neck assembly in for test fitting. Wouldn't fit at all with the speedometer cable bracket, so I just bent it straight down. I have no idea how I'm going to get it all in and my massive forearms below it with a wrench to tighten the bottom bolt, I'll get there when I get there. I still have to clean the old gasket off the back of the head, that's going to be hard enough.
Reply
0
0
06-15-2009, 09:07 PM
#6
Cpt. Slow
Thread Starter
iTrader: (25)
Join Date: Oct 2005
Location: Oregon City, OR
Posts: 14,175
Total Cats: 1,129
And here's my start for the oil cooler project.
One of these two ports will be blocked off, with the other one serving as my new oil temp sensor location.
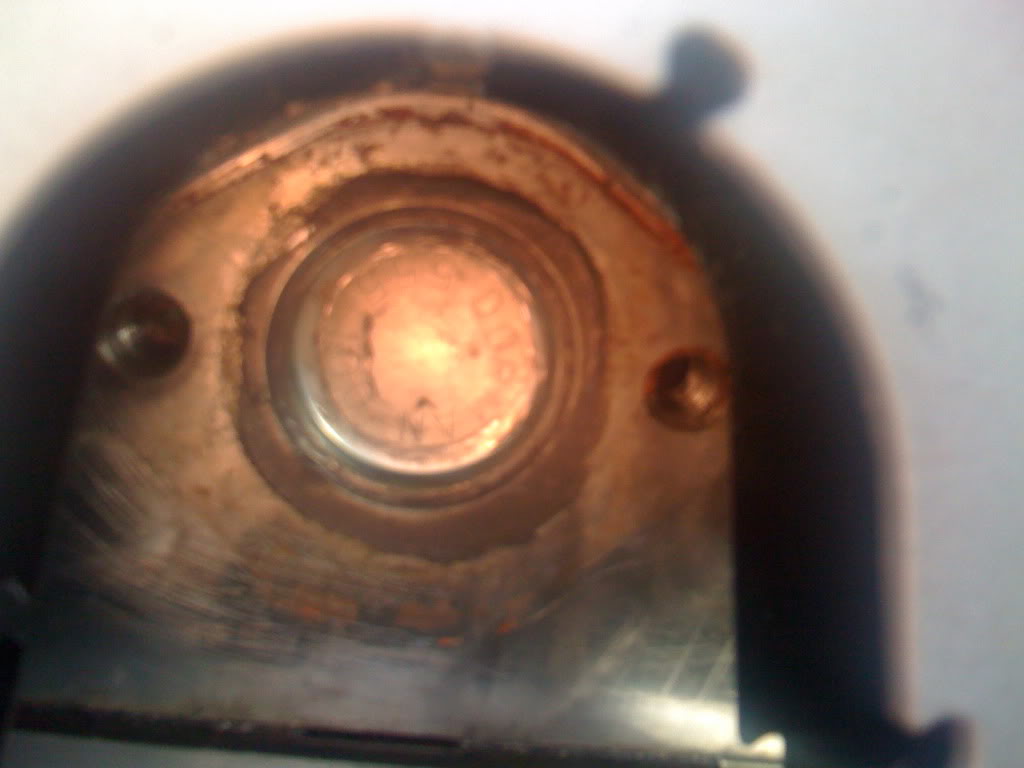
can anyone identify this spacer? I can get the oil filter to seal on the flat side, but just barely. I'm thinking it's made for a 1.8 filter, are they larger in diameter? The other side, as pictured, has a groove in it, so I know I need some type of o-ring, but it looks like the oil filter sits in a bit of a cavity, so I'm not sure I have any room around it, I may have to mill it down at work.
I haven't done too much to it, just tapped the single hole side with 1/2-14npt threads so I can put a 3/4" hose barb there. That will be the feed, with the return being the plugged hole in the same side of the block, where the greddy turbo drain usually goes. It's pressurized, so it doesn't need to be constantly pointed down like a turbo drain, correct?
I haven't actually sourced an oil cooler, or figured out exactly where I want to mount it, but I figured I'd get the feed for the cooler figured out first. I might end up with a short and long cooler down by the steering rack, or a square one in front of the tire with a naca duct feeding it, or mounted to the inside of the bumper with holes cut in the bumper to feed it, or, or, or...ideas are welcome!
One of these two ports will be blocked off, with the other one serving as my new oil temp sensor location.
can anyone identify this spacer? I can get the oil filter to seal on the flat side, but just barely. I'm thinking it's made for a 1.8 filter, are they larger in diameter? The other side, as pictured, has a groove in it, so I know I need some type of o-ring, but it looks like the oil filter sits in a bit of a cavity, so I'm not sure I have any room around it, I may have to mill it down at work.
I haven't done too much to it, just tapped the single hole side with 1/2-14npt threads so I can put a 3/4" hose barb there. That will be the feed, with the return being the plugged hole in the same side of the block, where the greddy turbo drain usually goes. It's pressurized, so it doesn't need to be constantly pointed down like a turbo drain, correct?
I haven't actually sourced an oil cooler, or figured out exactly where I want to mount it, but I figured I'd get the feed for the cooler figured out first. I might end up with a short and long cooler down by the steering rack, or a square one in front of the tire with a naca duct feeding it, or mounted to the inside of the bumper with holes cut in the bumper to feed it, or, or, or...ideas are welcome!
Reply
0
0
06-16-2009, 01:18 AM
#7
Cpt. Slow
Thread Starter
iTrader: (25)
Join Date: Oct 2005
Location: Oregon City, OR
Posts: 14,175
Total Cats: 1,129
I've done a little searching about this, but can't seem to find the answer. What are your guys' opinions on shock tower braces? I've seen a lot of cars that I consider very well sorted cars (handling wise) without them, this logic makes me think they're worthless. The only thing I can think of is to keep it until I have a cage, which will most likely dwarf any stiffening effect of a shock tower brace.
Reply
0
0
06-16-2009, 01:24 AM
#8
Elite Member
iTrader: (7)

Join Date: Jan 2007
Location: Renton Washington
Posts: 1,731
Total Cats: 4
I believe "shock tower" braces are actually strut braces. As you know our cars dont have struts so there pretty much useless unless there 3 point and connect to the firewall. As you see there are ones on ebay that are super cheap ( 20$ )
Reply
0
0
06-16-2009, 01:31 AM
#10
Cpt. Slow
Thread Starter
iTrader: (25)
Join Date: Oct 2005
Location: Oregon City, OR
Posts: 14,175
Total Cats: 1,129
Yup, that $20 is the one I have! Don't look at me, it was a gift. That's another reason why I'm not sure that it's doing anything, it's fairly cheap.
Strut/Shock tower brace does the same thing, it doesn't have to be any different to stiffen up our car, we're just not allowed to call it a strut brace. But if we're going to argue this, we'll need to move over to m.net.
Strut/Shock tower brace does the same thing, it doesn't have to be any different to stiffen up our car, we're just not allowed to call it a strut brace. But if we're going to argue this, we'll need to move over to m.net.
Reply
0
0
06-16-2009, 03:06 AM
#11
Elite Member
iTrader: (1)
Join Date: Feb 2008
Location: Birmingham Alabama
Posts: 7,930
Total Cats: 45
As pointed out before, they make a great hand burner if hot, and a really good prop if its cool enough to touch. Comes in handy when you have to lean over the engine for more than a few seconds. I have the GoMiata one. Paid too much ($80) but it looks nice. If it does so anything, its not much. Maybe a bit of cowl shake reduction and steering response, but again, not much.
Reply
0
0
06-16-2009, 09:17 AM
#12
Boost Pope

iTrader: (8)
Join Date: Sep 2005
Location: Chicago. (The less-murder part.)
Posts: 33,019
Total Cats: 6,587
The 1.6 and 1.8 used the same factory filter. Same one as the Protege, the RX7, and probably half the other cars made by Mazda.
I ran into the same issue when I installed an OEM 1.8 oil cooler on my car. I simply took it to PepBoys and started pulling the o-rings off of various filters until I found one that fit.
Take it to the store and start experimenting.
Am I correctly interpreting that you intend to take oil from a side-port in that plate, pass it through a cooler, and then return it to the engine using the capped nipple on the cold side of the block where the Greddy turbo normally drains to?
This would be a lot of fail, actually.
That hole drains to the pan. So if you do that, you will have pretty much zero oil flow or pressure to the crank, lifters, cams, etc.
The other side, as pictured, has a groove in it, so I know I need some type of o-ring,
but it looks like the oil filter sits in a bit of a cavity, so I'm not sure I have any room around it, I may have to mill it down at work.
That will be the feed, with the return being the plugged hole in the same side of the block, where the greddy turbo drain usually goes. It's pressurized, so it doesn't need to be constantly pointed down like a turbo drain, correct?
This would be a lot of fail, actually.
That hole drains to the pan. So if you do that, you will have pretty much zero oil flow or pressure to the crank, lifters, cams, etc.
Reply
0
0
06-16-2009, 10:41 AM
#13
Cpt. Slow
Thread Starter
iTrader: (25)
Join Date: Oct 2005
Location: Oregon City, OR
Posts: 14,175
Total Cats: 1,129
Well oil would take the path of least resistance and just dump into the pan, so of course I'm not planning to do that. Except I was
Damn I thought the drain was the easy part, where are oil cooler returns generally plumbed? Is my sandwich plate a good idea for feed or should I rethink that as well.
Damn I thought the drain was the easy part, where are oil cooler returns generally plumbed? Is my sandwich plate a good idea for feed or should I rethink that as well.
Reply
0
0
06-16-2009, 12:27 PM
#14
Boost Pope
iTrader: (8)
Join Date: Sep 2005
Location: Chicago. (The less-murder part.)
Posts: 33,019
Total Cats: 6,587
Typically, a sandwich plate is used which does not have big holes cut into it in the middle. There are two fittings, one for send and the other for return. Here is such a device:

This particular one has an integrated thermostat which I can say from experience does not prevent over-cooling on the street.
This particular one has an integrated thermostat which I can say from experience does not prevent over-cooling on the street.
Reply
0
0
06-16-2009, 12:33 PM
#15
Freeze plug installed. It was being an absolute bitch to install. Left it alone and came back to it the next day and it went right in. Only thing I changed was going from a regular hammer to a little 5lb sledge, and putting a little RTV on it, which might possibly of lubricated it enough to slide in along with the little bit of extra force provided by the sledge.
I have a relatively cheap SHOCK tower brace from Cork Sport. There is an obvious difference with it vs. with out. Front is stiffer and turn in feels more positive. I installed it after doing FM's frame rails. The frame rails made almost no noticible difference unlike other peoples experience. The SHOCK tower brace was more noticable. Was this due to the combination of both parts? Don't know but it did help. Does make a nice rest when you are leaning in as was mentioned earlier! Bonus!
Reply
0
0
06-16-2009, 12:40 PM
#16
Cpt. Slow
Thread Starter
iTrader: (25)
Join Date: Oct 2005
Location: Oregon City, OR
Posts: 14,175
Total Cats: 1,129
Well it was getting dark out so I had to stop for the day.
Joe, thanks for your help, I think I'm going to purchase one of those plates with the thermostat, isn't there a $40 unit where the only difference between it and the $80 one is the size of the fitting? Motec if I recall correctly. I am in no way worried about over cooling.
Joe, thanks for your help, I think I'm going to purchase one of those plates with the thermostat, isn't there a $40 unit where the only difference between it and the $80 one is the size of the fitting? Motec if I recall correctly. I am in no way worried about over cooling.
Reply
0
0
06-16-2009, 12:48 PM
#17
Boost Pope
iTrader: (8)
Join Date: Sep 2005
Location: Chicago. (The less-murder part.)
Posts: 33,019
Total Cats: 6,587
You can get them without a thermostat for around $40: Pegasus - Cast Aluminum Sandwich Plate w/ Bypass, 3/8NPT Ports
One thing to know: the Mocal plates have holes which are tapped BSP rather than NPT.
One thing to know: the Mocal plates have holes which are tapped BSP rather than NPT.
Reply
0
0
06-17-2009, 01:11 AM
#18
Cpt. Slow
Thread Starter
iTrader: (25)
Join Date: Oct 2005
Location: Oregon City, OR
Posts: 14,175
Total Cats: 1,129
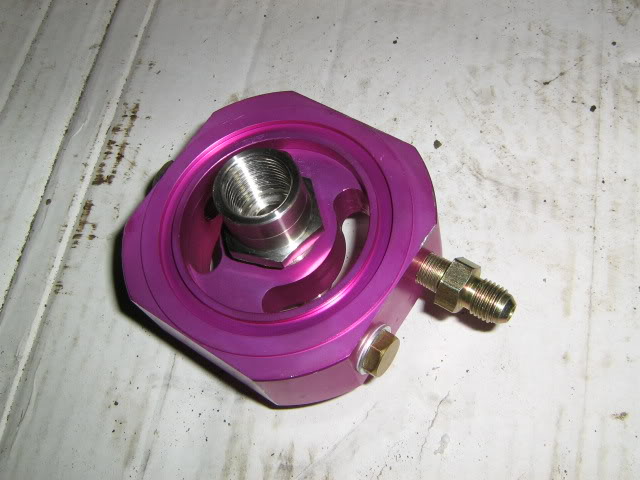
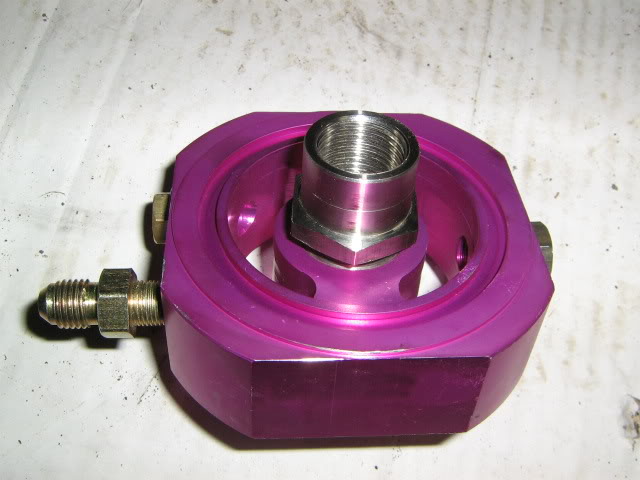
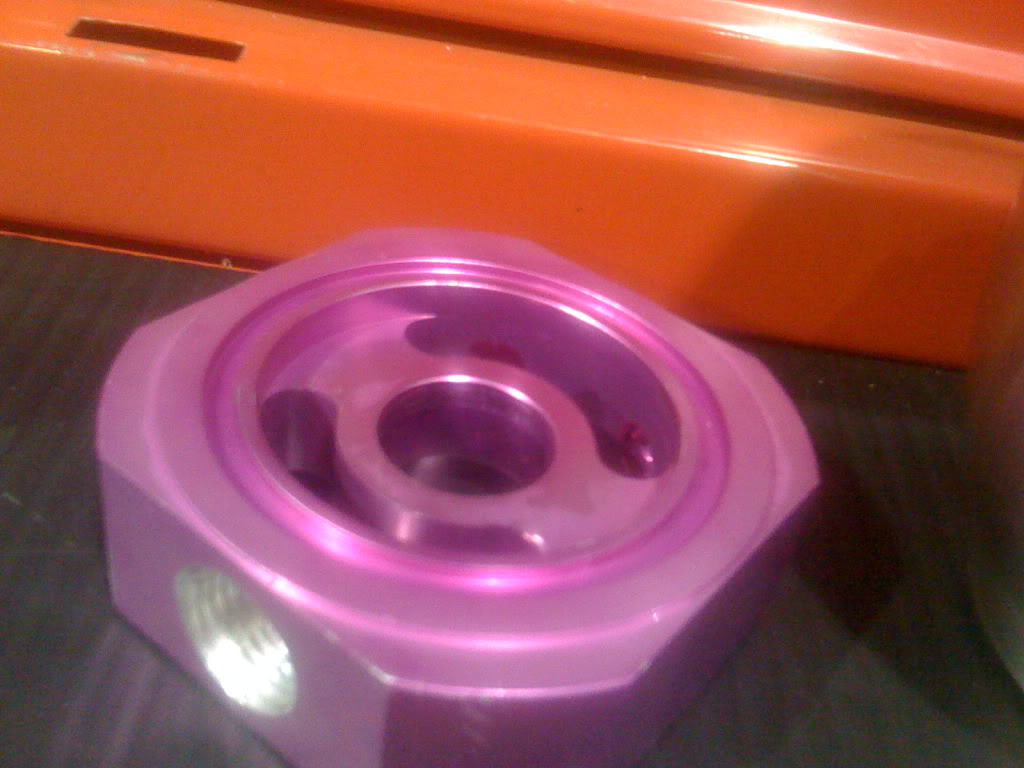
Sweet, I'll measure the threads and buy one of those. Anybody want an apparently worthless purple plate? $5+shipping.
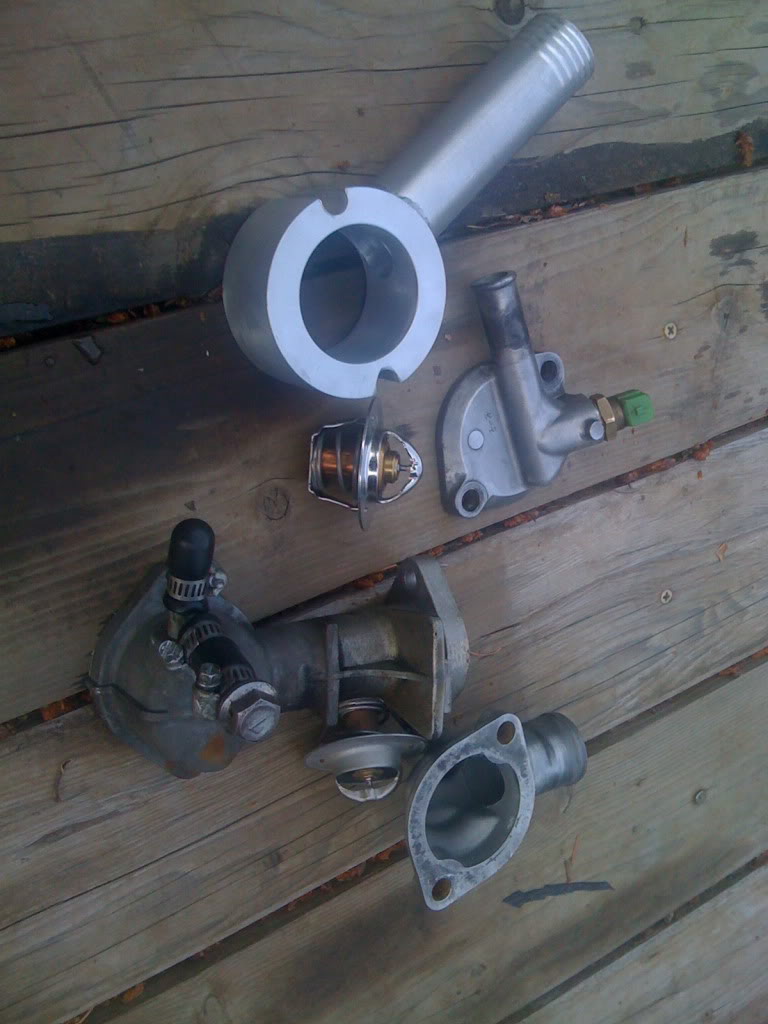
I finished the reroute today, what a pain!
test fitting before I tapped for the fittings, even putting one bolt in was a pain, and it was the easy to reach one.
Drilled and tapped fittings at work today. Apparently our TiG welder at work is way way too strong, and would melt the little bung before it welded it. I don't know how to TiG weld, so don't ask any questions, that's just how it was explained to me. I ended up drilling 3/8-18npt for a 3/8-1/8npt coupler, than drilled and tapped that to m12x1.5 for the coolant sensor. Blah, blah, blah, heres the pic.
All assembled and ready to bolt up, I was taking pictures, cleaning parts, and sealing threads, all to avoid having to install it.
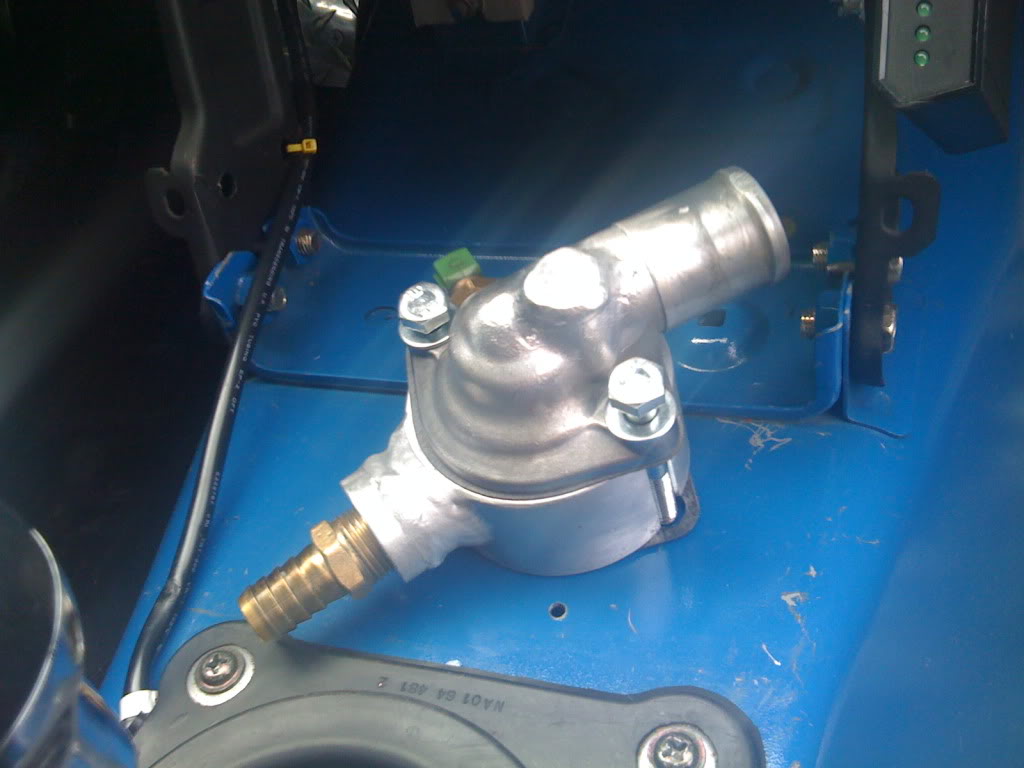
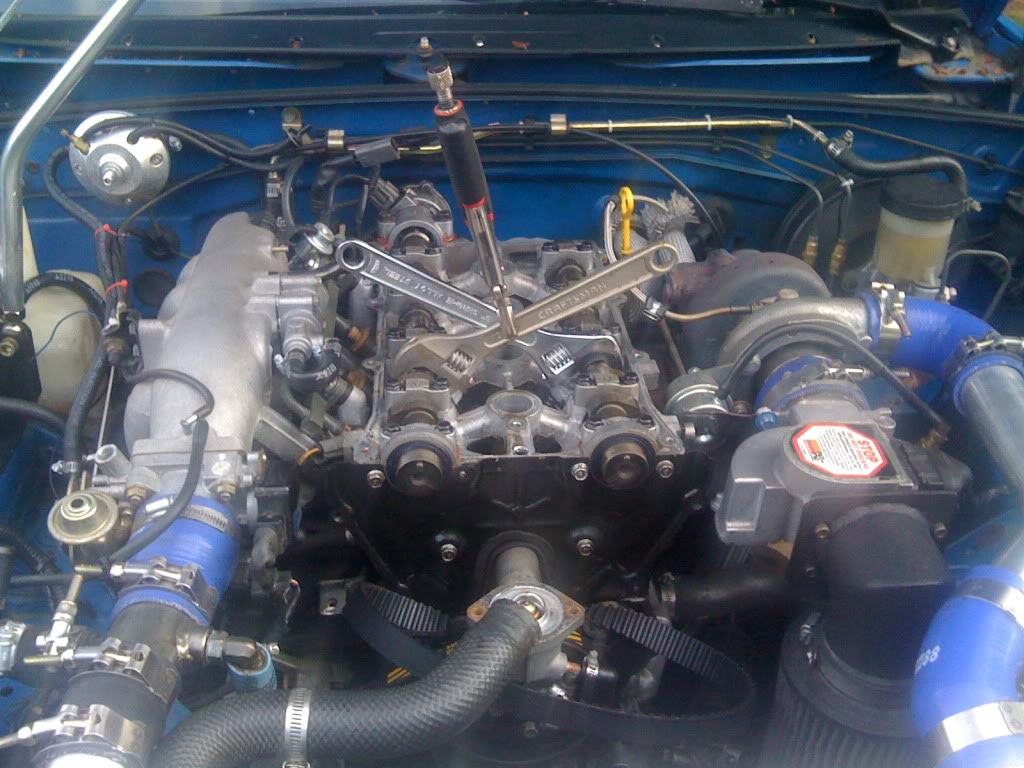
After fortunately no bloody knuckles, but a lot of dirt, grime, and scrapes, it's installed! I tested the "5 degrees between ratcheting" sales pitch of my awesome GearWrenches, and they're what made it possible to tighten them.

And no I didn't do it with the valve cover on, I just placed it there to keep dirt out overnight.
Hopefully I'll get my NACA ducts soon, I'm getting a little tired of this dirty grimy stuff. I still need to seal my valve cover, get that damn fuel line clamp clamped, and get a COPs harness, since I don't think the coil bracket will fit with the coolant sensor where it is now.
I finished the reroute today, what a pain!
test fitting before I tapped for the fittings, even putting one bolt in was a pain, and it was the easy to reach one.
Drilled and tapped fittings at work today. Apparently our TiG welder at work is way way too strong, and would melt the little bung before it welded it. I don't know how to TiG weld, so don't ask any questions, that's just how it was explained to me. I ended up drilling 3/8-18npt for a 3/8-1/8npt coupler, than drilled and tapped that to m12x1.5 for the coolant sensor. Blah, blah, blah, heres the pic.
All assembled and ready to bolt up, I was taking pictures, cleaning parts, and sealing threads, all to avoid having to install it.
After fortunately no bloody knuckles, but a lot of dirt, grime, and scrapes, it's installed! I tested the "5 degrees between ratcheting" sales pitch of my awesome GearWrenches, and they're what made it possible to tighten them.
And no I didn't do it with the valve cover on, I just placed it there to keep dirt out overnight.
Hopefully I'll get my NACA ducts soon, I'm getting a little tired of this dirty grimy stuff. I still need to seal my valve cover, get that damn fuel line clamp clamped, and get a COPs harness, since I don't think the coil bracket will fit with the coolant sensor where it is now.
Reply
0
0
06-17-2009, 01:50 AM
#19

Mazda Miata Parts & Accessories at MiataMania.com
If this is your purple plate i'll definately take it for your $5 shipped with fittings and all
If this is your purple plate i'll definately take it for your $5 shipped with fittings and all
Reply
0
0


