ILoveOffRamps build thread
 05-17-2011, 07:46 PM
#1
Junior Member
Thread Starter
iTrader: (2)

Join Date: May 2007
Location: Tulsa, OK
Posts: 181
Total Cats: 5
Started my discussion here:
https://www.miataturbo.net/engine-performance-56/deciding-parts-buy-my-rebuild-56279/
The car is still a daily driver that was originally being built within the confines of SP rules for AutoX, now I'm doing whatever I want since I'll be in SM2.
Current list of power mods:
-800cc's DW
-Complete FM Intake and Intercooler
-Adaptronic 420
Current build items purchased:
-Wiseco forged turbo pistons (9:1) (+1mm)
-Carrillo Super A rods
-949 Twin Disc Race Clutch
-ARP Head and Main Studs
-Supertech Valve Seals
-M-Tuned Coolant Reroute
-Might add Boundary Oil Pump Gears/Pump to the list
After much browsing and a little posting, I decided to do a build thread to post the findings and questions along the way.
Here are some of the photos from the tear down:
Cam Chip:

Cylinder 2 Marks: Piston Slap?? All of the cylinders looked like this to some extent.


.001-.002 Scratch in Cylinder 3
This mark pretty much honed out. Then I had I had it bored out for good measure

And this is what lazy amateur tuning looks like.


First thing i did today was to put the MSM piston/rod combo on a scale to find out what they weigh. 932 and 921 grams. This includes the piston, pin, clip, rod, rod cap, no cap bolts. They were marginally dirty with some clean up fluid on them. I was weighing them to get a general number. I'd imagine those cap bolts would drive that number up to around 960 or so. I'll probably weigh the bolts when I go back.
The FM page claimed a weight for the Super Rods of 417. I only measured one but it was 427 and FM claims that with the Wiseco's and Super A's its almost 0.25lb per cylinder. I can confirm this is pretty close. Probably somewhere around 0.1875-0.22 . Now the new parts weren't assembled but they measured about 880 once added up.
The difference between the stock MSM clutch assembly and 949 assembly is about 18 pounds using a bathroom scale.
For those in the Tulsa area I'm using Moritz Machine Shop. So far, fair pricing and great customer service. They recommended Clevite P series race bearings and use them in all their motors from twin-turbo monsters to NA screamers. Sounds like they do mainly V8's but I know they are familiar with the Miata.
https://www.miataturbo.net/engine-performance-56/deciding-parts-buy-my-rebuild-56279/
The car is still a daily driver that was originally being built within the confines of SP rules for AutoX, now I'm doing whatever I want since I'll be in SM2.
Current list of power mods:
-800cc's DW
-Complete FM Intake and Intercooler
-Adaptronic 420
Current build items purchased:
-Wiseco forged turbo pistons (9:1) (+1mm)
-Carrillo Super A rods
-949 Twin Disc Race Clutch
-ARP Head and Main Studs
-Supertech Valve Seals
-M-Tuned Coolant Reroute
-Might add Boundary Oil Pump Gears/Pump to the list
After much browsing and a little posting, I decided to do a build thread to post the findings and questions along the way.
Here are some of the photos from the tear down:
Cam Chip:
Cylinder 2 Marks: Piston Slap?? All of the cylinders looked like this to some extent.
.001-.002 Scratch in Cylinder 3
This mark pretty much honed out. Then I had I had it bored out for good measure
And this is what lazy amateur tuning looks like.
First thing i did today was to put the MSM piston/rod combo on a scale to find out what they weigh. 932 and 921 grams. This includes the piston, pin, clip, rod, rod cap, no cap bolts. They were marginally dirty with some clean up fluid on them. I was weighing them to get a general number. I'd imagine those cap bolts would drive that number up to around 960 or so. I'll probably weigh the bolts when I go back.
The FM page claimed a weight for the Super Rods of 417. I only measured one but it was 427 and FM claims that with the Wiseco's and Super A's its almost 0.25lb per cylinder. I can confirm this is pretty close. Probably somewhere around 0.1875-0.22 . Now the new parts weren't assembled but they measured about 880 once added up.
The difference between the stock MSM clutch assembly and 949 assembly is about 18 pounds using a bathroom scale.
For those in the Tulsa area I'm using Moritz Machine Shop. So far, fair pricing and great customer service. They recommended Clevite P series race bearings and use them in all their motors from twin-turbo monsters to NA screamers. Sounds like they do mainly V8's but I know they are familiar with the Miata.
Last edited by ILoveOffRamps; 05-21-2011 at 04:09 PM.

Reply
 0
0

0
05-21-2011, 03:50 PM
#2
Junior Member
Thread Starter
iTrader: (2)
Join Date: May 2007
Location: Tulsa, OK
Posts: 181
Total Cats: 5
I started a little work today on side some side projects. Started cleaning up all the grim, and then moved on to the charcoal canister removal from this thread:
https://www.miataturbo.net/engine-performance-56/what-carbon-can-can-i-get-rid-56510/
**HIS PICTURE**
**MY PICTURES**


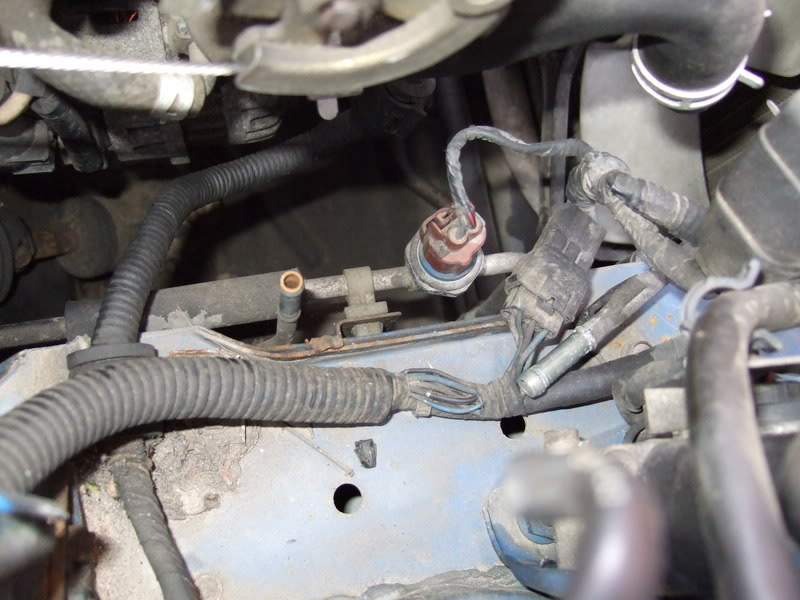
He shows two metal tubes that are able to looped, but I don't see anything like that on mine (MSM). I've got 2 metal tubes- 1 is the fuel rail supply and the other to canister and eventually to the manifold. Is the metal tube that is feeding the cansiter the one I should feed to ATM? My canister does not have an exit on the bottom as shown in the linked thread.
Also, the MSM has 2 "pulsation dampers" on the fuel system. One shown on that gold bracket and one on the fuel rail. Anyone know why that would be?
https://www.miataturbo.net/engine-performance-56/what-carbon-can-can-i-get-rid-56510/
**HIS PICTURE**
**MY PICTURES**
He shows two metal tubes that are able to looped, but I don't see anything like that on mine (MSM). I've got 2 metal tubes- 1 is the fuel rail supply and the other to canister and eventually to the manifold. Is the metal tube that is feeding the cansiter the one I should feed to ATM? My canister does not have an exit on the bottom as shown in the linked thread.
Also, the MSM has 2 "pulsation dampers" on the fuel system. One shown on that gold bracket and one on the fuel rail. Anyone know why that would be?
Last edited by ILoveOffRamps; 05-21-2011 at 04:11 PM.
Reply
0
0
05-22-2011, 07:59 AM
#4

If venting anything to atmosphere I would say it should be the line that feeds the charcoal canister. The lines that are looped in the pic (which is an NA) only go to the charcoal canister, one feeds it and the other is an atmospheric vent tube that goes to the passenger side of the subframe (or something like that). Then you could get rid of all the following lines, plug the port that those lines feed, and have more room in there. I'd hang onto it all though just in case.
Reply
0
0
07-03-2011, 09:26 PM
#5
Junior Member
Thread Starter
iTrader: (2)
Join Date: May 2007
Location: Tulsa, OK
Posts: 181
Total Cats: 5
Pictures to come.
We tried to attach the windage tray and the arp hardware is in the way. The new hardware is about 1/16 taller on the head plus the few threads that are exposed. Has anyone else had this problem? Our solution is to notch the tray to clear bolts.
We tried to attach the windage tray and the arp hardware is in the way. The new hardware is about 1/16 taller on the head plus the few threads that are exposed. Has anyone else had this problem? Our solution is to notch the tray to clear bolts.
Reply
0
0
07-04-2011, 02:18 AM
#8
Elite Member
iTrader: (2)

Join Date: Jan 2007
Location: Los Angeles, CA
Posts: 8,682
Total Cats: 130
Stock turbo, manifold?
The NA evap system is different than yours. Just rip out all the stuff with vacuum lines on it by the fuse box. If you look at my engine bay pic, you can see what's left. The relay/fusebox and ABS unit. I think those pulsation dampers are needed for the "returnless" system. I painted my gold thing black.
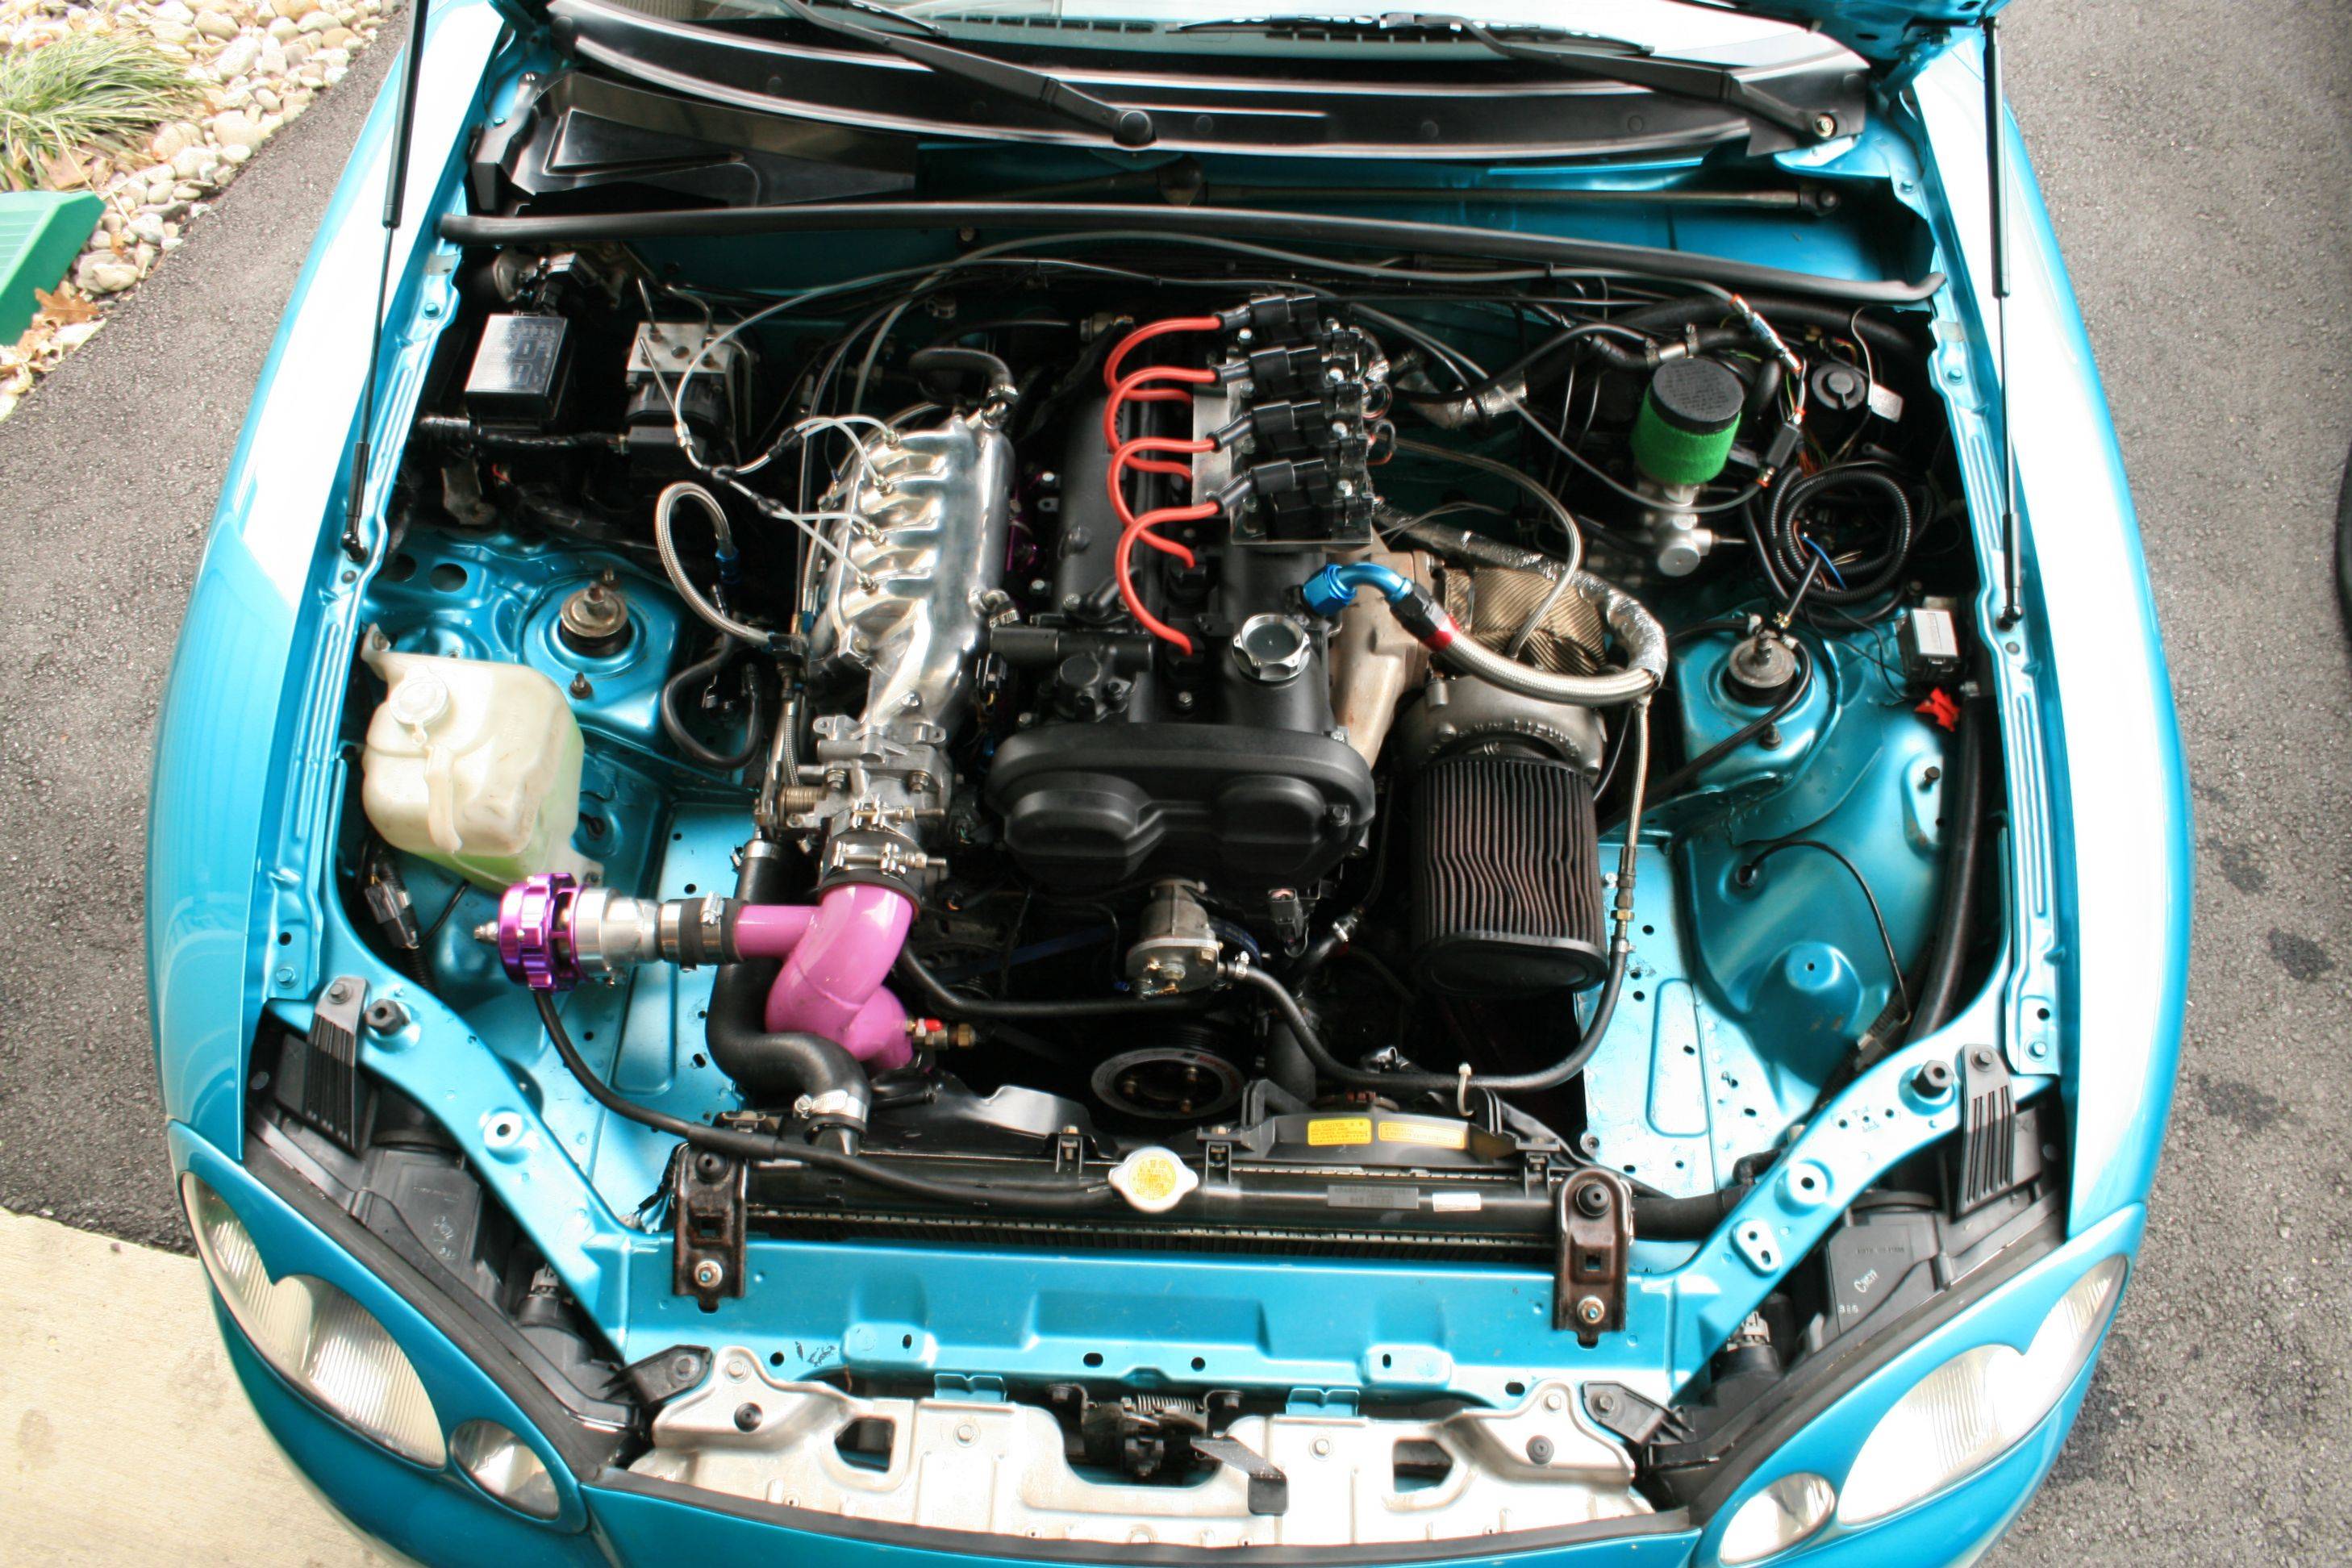
The NA evap system is different than yours. Just rip out all the stuff with vacuum lines on it by the fuse box. If you look at my engine bay pic, you can see what's left. The relay/fusebox and ABS unit. I think those pulsation dampers are needed for the "returnless" system. I painted my gold thing black.
Reply
0
0
07-04-2011, 02:33 AM
#9
Junior Member
Thread Starter
iTrader: (2)
Join Date: May 2007
Location: Tulsa, OK
Posts: 181
Total Cats: 5
we talked about removing the dampers, but couldn't come up with a good reason why to take them out. Your answer makes sense on why to leave them in. I see you run AN from one damper to the other. Did you just weld an AN fitting onto the metal rail on both sides?
(jealous of your clean engine bay)
(jealous of your clean engine bay)
Reply
0
0
07-04-2011, 09:47 AM
#10
Elite Member
iTrader: (2)
Join Date: Jan 2007
Location: Los Angeles, CA
Posts: 8,682
Total Cats: 130
we talked about removing the dampers, but couldn't come up with a good reason why to take them out. Your answer makes sense on why to leave them in. I see you run AN from one damper to the other. Did you just weld an AN fitting onto the metal rail on both sides?
(jealous of your clean engine bay)
(jealous of your clean engine bay)

The FM fuel rail uses a quick disconnect to AN adapter. They're available at summit. I think the factory hard line is 5/16 so you would need something like this one: http://www.summitracing.com/parts/AEI-15117/
Reply
0
0
07-07-2011, 11:29 PM
#11
Junior Member
Thread Starter
iTrader: (2)
Join Date: May 2007
Location: Tulsa, OK
Posts: 181
Total Cats: 5
-Wiseco forged turbo pistons (9:1) (+1mm)

Bottom End together with ARP studs sticking up. Used the 99-00 (BP26-10-271)headgasket for the reroute.

ARP Rod bolts did not clear MBSP! As mentioned earlier, ARP hardware was about 1/8" taller than the factory fasteners. Had to do some triming. Drill bit and a dremel.

FIXED!!

Saw this when reassembling the head. Oil Journals on exhaust cam only. Is the a MSM thing?

Pretty Picture of the Reroute

I have the hot side attached but not torqued (had to make sure I knew where everything went again). Took the butterflies out of the intake manifold so I am waiting to get those holes welded shut. I'll get that back, assemble the cold side, and then stab the motor back in.
Should be getting real close to driving again.
Bottom End together with ARP studs sticking up. Used the 99-00 (BP26-10-271)headgasket for the reroute.
ARP Rod bolts did not clear MBSP! As mentioned earlier, ARP hardware was about 1/8" taller than the factory fasteners. Had to do some triming. Drill bit and a dremel.
FIXED!!
Saw this when reassembling the head. Oil Journals on exhaust cam only. Is the a MSM thing?
Pretty Picture of the Reroute
I have the hot side attached but not torqued (had to make sure I knew where everything went again). Took the butterflies out of the intake manifold so I am waiting to get those holes welded shut. I'll get that back, assemble the cold side, and then stab the motor back in.
Should be getting real close to driving again.
Reply
0
0
 07-08-2011, 07:50 PM
#14
Junior Member
Thread Starter
iTrader: (2)
Join Date: May 2007
Location: Tulsa, OK
Posts: 181
Total Cats: 5
Also, I'm not sure if the MSM piston squirters are longer, but they did not work with the new pistons. I had to plug the holes with bolts. I wanted to keep them, but I would have had to trim them and the machine shop advised against it. At least I'll have higher oil pressure....
Reply
0
0


Thread
Thread Starter
Forum
Replies
Last Post
stoves
Suspension, Brakes, Drivetrain
5
04-21-2016 03:00 PM


