Used Flyin Miata + Megasquirt + 94
 01-05-2014, 02:03 PM
#1
Junior Member
Thread Starter

Join Date: Jul 2009
Location: San Fran
Posts: 95
Total Cats: 6
Bought this used Flyin Miata VoodooII setup from Craigslist. Turns out Ruben is also a member here. Thanks RubenSTI!. This is my first time with anything turbo, so advice is definitely welcome.. 
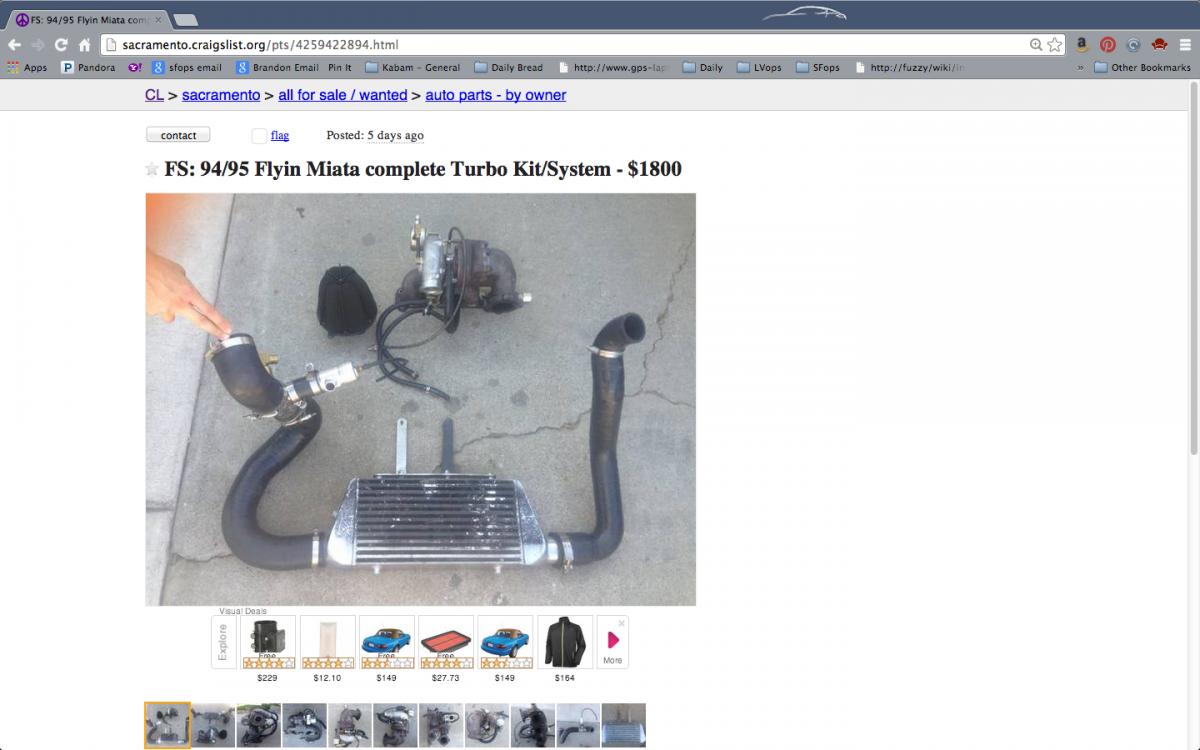
Kit is less
- injectors
- voodooII (thank goodness)
- wideband (friend has a AEM unit for sale)
- boost gauge
- high capacity fuel pump - think I'll get walbro 190 HD
What's not shown is a 2.5" Flyin Miata downpipe + 2.5" exhaust all the way back (catless)
94 is mostly stock engine wise (151K), but setup for track days and around town grocery getter. It does have a Exedy HD Stage 1 + 12lb flywheel, which should hold up to the turbo demands. If it doesn't, I have a backup used Flyin Miata from Ruben as well.

I'm starting the project with building the Megasquirt 1 ver PCB 3.0 today. Haven't soldered in a while, so looking forward to it! Plan to set it up for standalone mode. Thanks Braineack for the writeup!
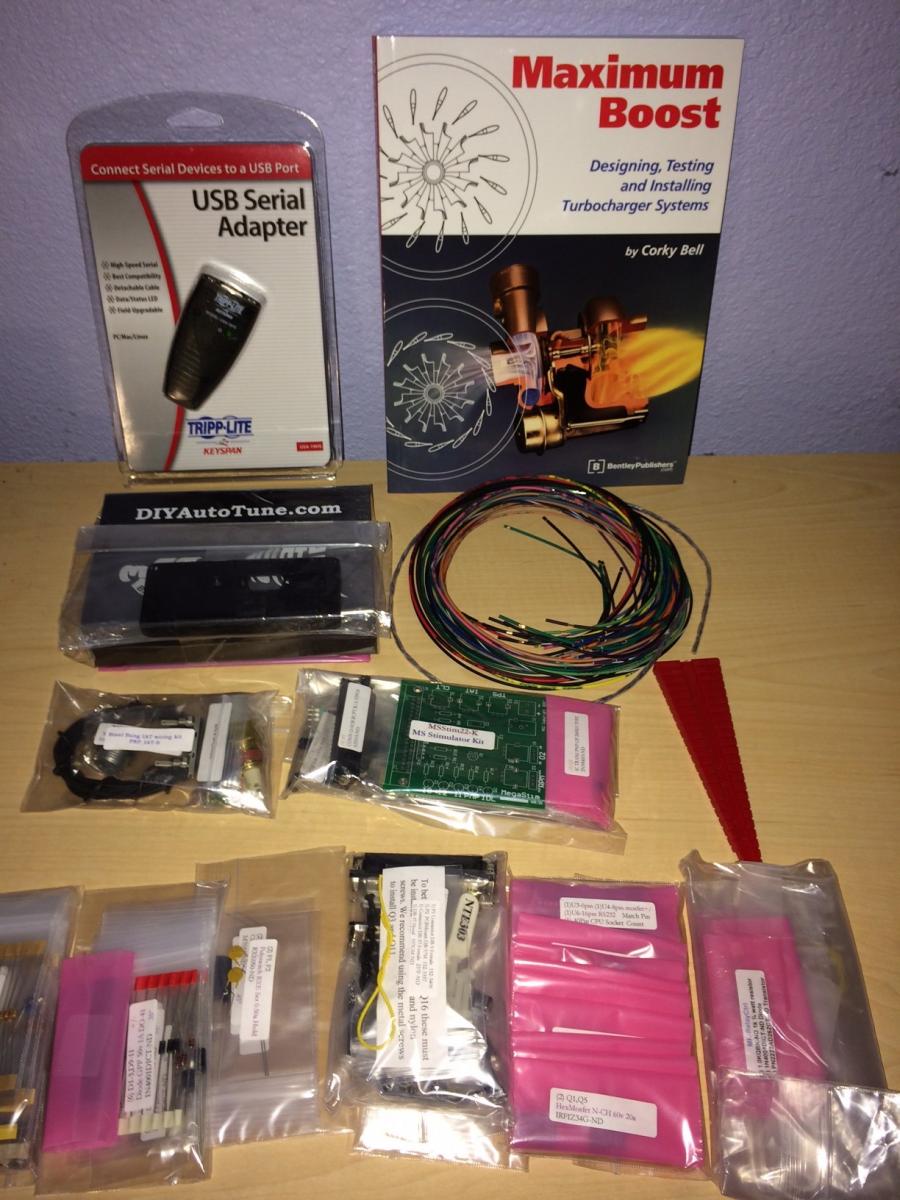
I also bought megasquirt mods: relay kit, boost control, IAT sensor, IAC valve control, stimulator
I found the 64 pin ECU connector on Mouser electronics. No minimum order, so I didn't have to buy 2 of these parts from onlinecomponents.com. $20 out the door
174518-7 TE Connectivity / AMP | Mouser
I guess the only question I have at this point...
I'm thinking of EV14 injectors running at 12psi, so thinking of running with stock injectors at 5-6 psi until I'm comfortable with things, then do a injector swap, re-tune. Does that make sense?
Kit is less
- injectors
- voodooII (thank goodness
)- wideband (friend has a AEM unit for sale)
- boost gauge
- high capacity fuel pump - think I'll get walbro 190 HD
What's not shown is a 2.5" Flyin Miata downpipe + 2.5" exhaust all the way back (catless)
94 is mostly stock engine wise (151K), but setup for track days and around town grocery getter. It does have a Exedy HD Stage 1 + 12lb flywheel, which should hold up to the turbo demands. If it doesn't, I have a backup used Flyin Miata from Ruben as well.
I'm starting the project with building the Megasquirt 1 ver PCB 3.0 today. Haven't soldered in a while, so looking forward to it! Plan to set it up for standalone mode. Thanks Braineack for the writeup!
I also bought megasquirt mods: relay kit, boost control, IAT sensor, IAC valve control, stimulator
I found the 64 pin ECU connector on Mouser electronics. No minimum order, so I didn't have to buy 2 of these parts from onlinecomponents.com. $20 out the door
174518-7 TE Connectivity / AMP | Mouser
I guess the only question I have at this point...
I'm thinking of EV14 injectors running at 12psi, so thinking of running with stock injectors at 5-6 psi until I'm comfortable with things, then do a injector swap, re-tune. Does that make sense?
Last edited by byunique; 01-07-2014 at 04:11 AM.

Reply
 0
0

0
01-05-2014, 02:13 PM
#2

Injector idea makes sense, but what makes even more sense is to install the megasquirt before you install the turbo, tune, install the injectors, tune, install turbo kit...
In my mind I would rather have the headroom afforded by the larger injectors the moment you go turbo just in case.
In my mind I would rather have the headroom afforded by the larger injectors the moment you go turbo just in case.
Reply
0
0
01-06-2014, 03:26 PM
#4
Junior Member
Thread Starter
Join Date: Jul 2009
Location: San Fran
Posts: 95
Total Cats: 6
Started Megasquirt Build
Started with the build on the Megasquirt-1 pcb 3.0 yesterday and have to say this is pretty fun but also quite a bit of work. It took most of a day to probably 75% of the build. Of course, a lot depends on technique and how well you can see. I had to reach for a pair of reading glasses, now that I'm a bit older .
.
I got to the point yesterday with testing via the stimulator and using the Tuner Studio MS lite Free Version. EFI Analytics TunerStudio | tunerstudio.com
The megamanual instructions are very awesome and detailed. I started with the build of the main pcb board, then at a certain point they wanted you to test via the stimulator. The stimulator btw was version 2.2, while the online instructions only referred to version 2.1 (but close enough).
Given that, it's probably a good idea to build the stimulator first. The stimulator is a good practice in soldering as well, and the components are not as tight and since it's not going into the car, less critical sort to speak when it comes to soldering technique. I'd recommend to build that first and took me probably 1.5 hours or maybe less.
I also was soldering with a 35 watt gun initially and was using solder which I had on hand. I found out the solder I had was probably closer to .060 rather than the recommended .030. After I bought some 030, I switched back to a 25 watt iron, and things were tons easier to build and faster.
The whole process is pretty cool, as you build certain parts, like the power supply or usb channel, they then have you test via the stimulator. So nice to have checkpoints in there to give you a confidence this thing is gonna work!!!
I was testing with the TunerStudio MS Lite Free version, but will likely go with the registered version. Standard upgrade is to go the TunerStudio MS version, and wondering if its worthwhile to get the Megalogviewer/Megalogviewer HD version since combo package is a bit cheaper.
Also using a Windows 7 Pc with this hassle free USB Serial Adapter,
Amazon.com: Keyspan by Tripp Lite USA-19HS Hi-Speed USB Serial Adapter, PC, MAC, supports Cisco Break Sequence:
Electronics
Also went to buy a serial cable from Radio Shack, $20 what a rip!, shop first on Amazon!!!
My Advice is if your gonna to do this...
Started with the build on the Megasquirt-1 pcb 3.0 yesterday and have to say this is pretty fun but also quite a bit of work. It took most of a day to probably 75% of the build. Of course, a lot depends on technique and how well you can see. I had to reach for a pair of reading glasses, now that I'm a bit older
. I got to the point yesterday with testing via the stimulator and using the Tuner Studio MS lite Free Version. EFI Analytics TunerStudio | tunerstudio.com
The megamanual instructions are very awesome and detailed. I started with the build of the main pcb board, then at a certain point they wanted you to test via the stimulator. The stimulator btw was version 2.2, while the online instructions only referred to version 2.1 (but close enough).
Given that, it's probably a good idea to build the stimulator first. The stimulator is a good practice in soldering as well, and the components are not as tight and since it's not going into the car, less critical sort to speak when it comes to soldering technique. I'd recommend to build that first and took me probably 1.5 hours or maybe less.
I also was soldering with a 35 watt gun initially and was using solder which I had on hand. I found out the solder I had was probably closer to .060 rather than the recommended .030. After I bought some 030, I switched back to a 25 watt iron, and things were tons easier to build and faster.
The whole process is pretty cool, as you build certain parts, like the power supply or usb channel, they then have you test via the stimulator. So nice to have checkpoints in there to give you a confidence this thing is gonna work!!!
I was testing with the TunerStudio MS Lite Free version, but will likely go with the registered version. Standard upgrade is to go the TunerStudio MS version, and wondering if its worthwhile to get the Megalogviewer/Megalogviewer HD version since combo package is a bit cheaper.
Also using a Windows 7 Pc with this hassle free USB Serial Adapter,
Amazon.com: Keyspan by Tripp Lite USA-19HS Hi-Speed USB Serial Adapter, PC, MAC, supports Cisco Break Sequence:
Electronics
Also went to buy a serial cable from Radio Shack, $20 what a rip!, shop first on Amazon!!!
My Advice is if your gonna to do this...
- Have good lighting
- Make sure you can see up close
- Have a laptop or two so you can read the megamanual and run the Tunerstudio separately
- Build stimulator first since its less critical and know what a good solder joint looks like
- Get the right gun/solder, and component snips
- make your self comfortable since its going to be a while!
- crossreference Braineacks DIY info as well as the megamanual since there's difference when it comes to the Hall Effect part
https://www.miataturbo.net/useful-sa...asquirt-13676/
Reply
0
0
01-06-2014, 04:19 PM
#5
Buy the megalogviewer as well. It isn't that much money overall and at some point in the process you will be glad you have it.
I know that I was confused quite a bit by the megamanual vs the msextra website. Personally I'd stick to msextra for almost everything. The original megamanual had some better board layout pictures but that is it.
ALSO: Host your pics here. It's more convenient and some employers block dropbox so I can't take a look at your stuff at lunch.
Reply
0
0
01-07-2014, 03:59 AM
#6
Junior Member
Thread Starter
Join Date: Jul 2009
Location: San Fran
Posts: 95
Total Cats: 6
Thanks, I went ahead and got the registration for the Megalogviewer + Megatuner. Am sure I will make use of it too, so wise choice.
Yeah, the msextra site does seem more clear, so may use it if I get confused.
Yeah, the msextra site does seem more clear, so may use it if I get confused.
Reply
0
0
 01-07-2014, 10:39 AM
#8
Junior Member
Thread Starter
Join Date: Jul 2009
Location: San Fran
Posts: 95
Total Cats: 6
Oh, right typo!, I ordered not Megatune but Tunerstudio MS
Yeah, Glad its missing the voodoo, since that would severely limit the capabilities of everything and get me on the right track with the Megasquirt!
Yeah, Glad its missing the voodoo, since that would severely limit the capabilities of everything and get me on the right track with the Megasquirt!
Reply
0
0
 01-09-2014, 03:35 AM
#10
Junior Member
Thread Starter
Join Date: Jul 2009
Location: San Fran
Posts: 95
Total Cats: 6
Finished up the build of the Megasquirt tonight. Wow, what a feeling!!! Everything even works according to Megatune and TunerStudio MS. I think I got a total of 15 hours in this. Made a mistake yesterday by soldering a transistor in backwards, then trying to remove it without soldering wick. I ended up breaking the transistor, but good thing I had a extra one from the rest of the parts! Did a bunch of the jumper wires in back of the pcbs which really puts the soldering skills into work! I plan to connect the Megasquirt this weekend to my stock engine and get a feel for things.
I plan to swap out my existing narrowband sensor and install the AEM wideband, and then disable my current MAF, and connect the onboard MAF from the Megasquirt.
Wow, this already this seems like a big step, good thing I'm taking this project a step at a time!
I plan to swap out my existing narrowband sensor and install the AEM wideband, and then disable my current MAF, and connect the onboard MAF from the Megasquirt.
Wow, this already this seems like a big step, good thing I'm taking this project a step at a time!
Reply
0
0
01-14-2014, 05:48 AM
#12
Junior Member
Thread Starter
Join Date: Jul 2009
Location: San Fran
Posts: 95
Total Cats: 6
Megasquirt installed, but car doesn't run. Opened separate thread, https://www.miataturbo.net/megasquir...7/#post1091379
Reply
0
0
02-17-2014, 01:13 AM
#13
Junior Member
Thread Starter
Join Date: Jul 2009
Location: San Fran
Posts: 95
Total Cats: 6
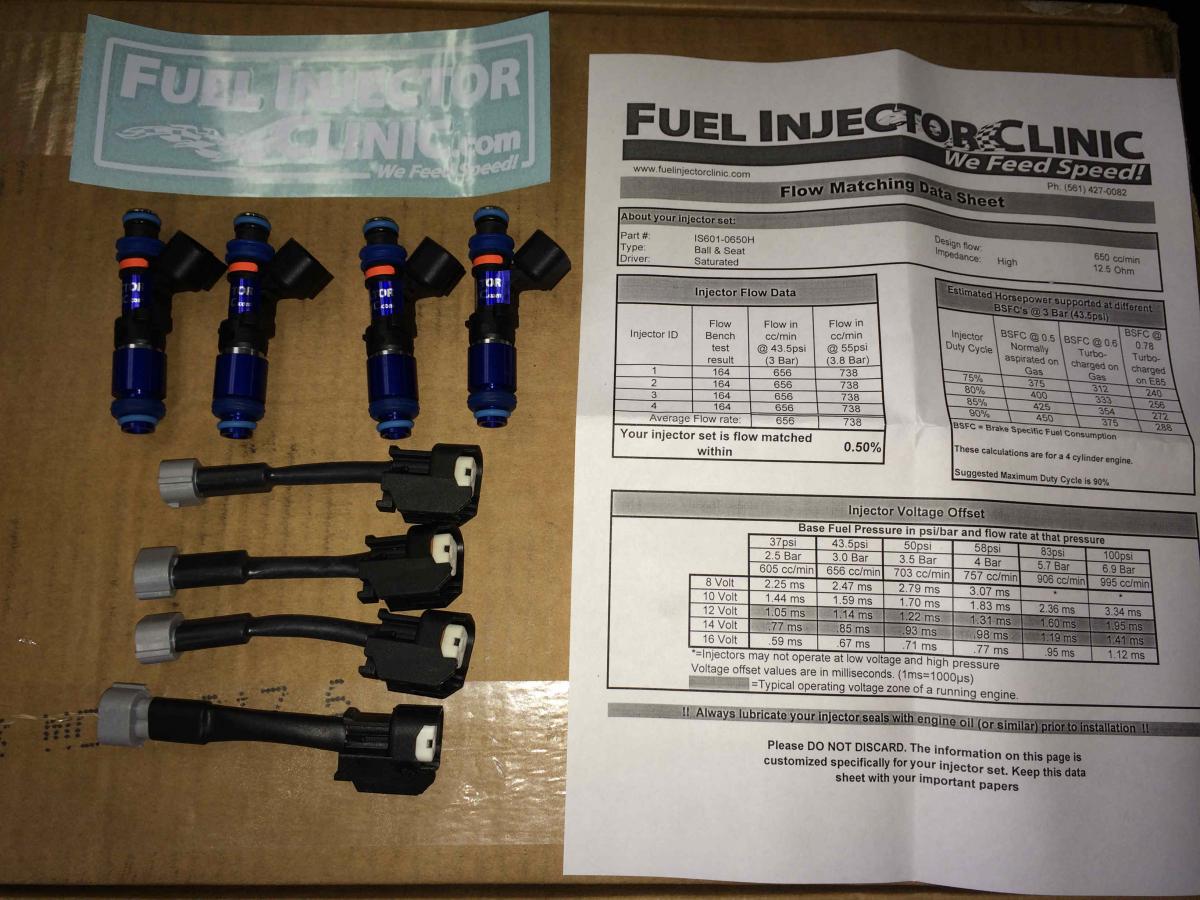
So just a update, the Megasquirt is happily running tonight. I guess it's been a month since I took this on. !!! Took it out for a 15 minute run after fighting with the fan control relay kit mod since it wasn't turning on the cooling fans. Ended up using the alternative fan control mod with using D15/middle LED to control the fan. So simple and who needs a warmup LED anyway Man, this has been a ton of work, but as I said I wanted to learn something new this year If I were concerned about cost effectiveness, I would have just bought a pre-built Megasquirt, but I'm celebrating now with shots of well deserved Cognac! FIC 650 injectors and new Fuel Pump are in inventory. A week of playing with this and will start bolting on turbo mechanicals next
Man, this has been a ton of work, but as I said I wanted to learn something new this year If I were concerned about cost effectiveness, I would have just bought a pre-built Megasquirt, but I'm celebrating now with shots of well deserved Cognac! FIC 650 injectors and new Fuel Pump are in inventory. A week of playing with this and will start bolting on turbo mechanicals next
Reply
0
0
 02-19-2014, 02:46 PM
#16
Junior Member
Thread Starter
Join Date: Jul 2009
Location: San Fran
Posts: 95
Total Cats: 6
What do you guys thinking about removing the A/C system? Don't use it except for a week out of the year. I plan to run the stock somewhat newish Koyo radiator if all possible. Car has always run cool even on track days. Figure the A/C condenser reduces the radiator efficiency for the most part. Weight savings, reduced engine load from spinning the compresssor, and more space for routing would be other benefits.
Reply
0
0
02-20-2014, 01:44 PM
#18
Junior Member
Thread Starter
Join Date: Jul 2009
Location: San Fran
Posts: 95
Total Cats: 6
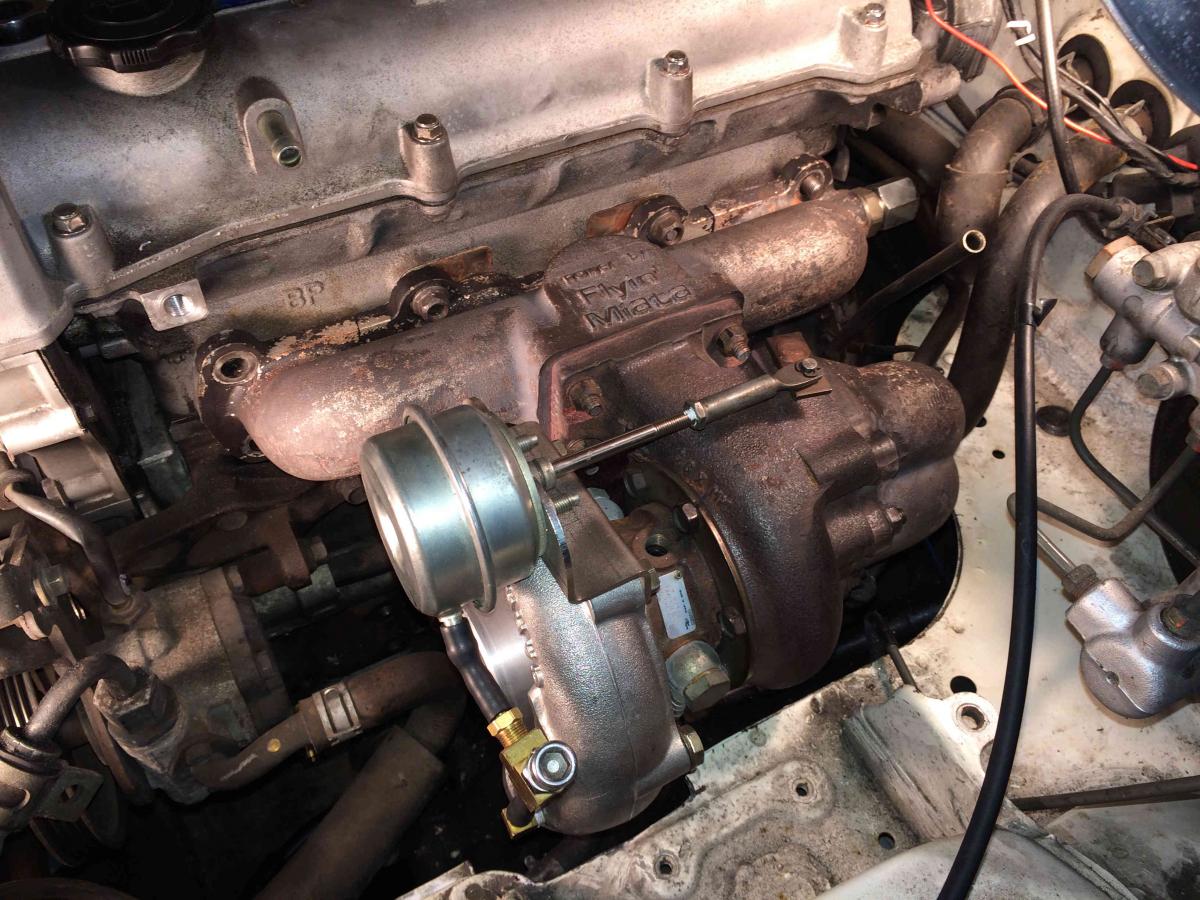
Along with that ordered iconel studs. Hoping to save a big headache down the road with these.
Reply
0
0
03-01-2014, 01:08 AM
#19
Junior Member
Thread Starter
Join Date: Jul 2009
Location: San Fran
Posts: 95
Total Cats: 6
Tried swapping the stock injectors for these babies....
Ran like ****, can't believe it, stumbling... like a missfire
Here's the problem solved
https://www.miataturbo.net/megasquir...1/#post1107543
Ran like ****, can't believe it, stumbling... like a missfire
Here's the problem solved
https://www.miataturbo.net/megasquir...1/#post1107543
Last edited by byunique; 03-01-2014 at 01:19 AM.
Reply
0
0
03-03-2014, 03:07 PM
#20
Junior Member
Thread Starter
Join Date: Jul 2009
Location: San Fran
Posts: 95
Total Cats: 6
Got stuff started this weekend w/ wife being out for 2 1/2 weeks 
Removed the A/C, nice weight savings and just more working room.

Going stealth black on intercooler
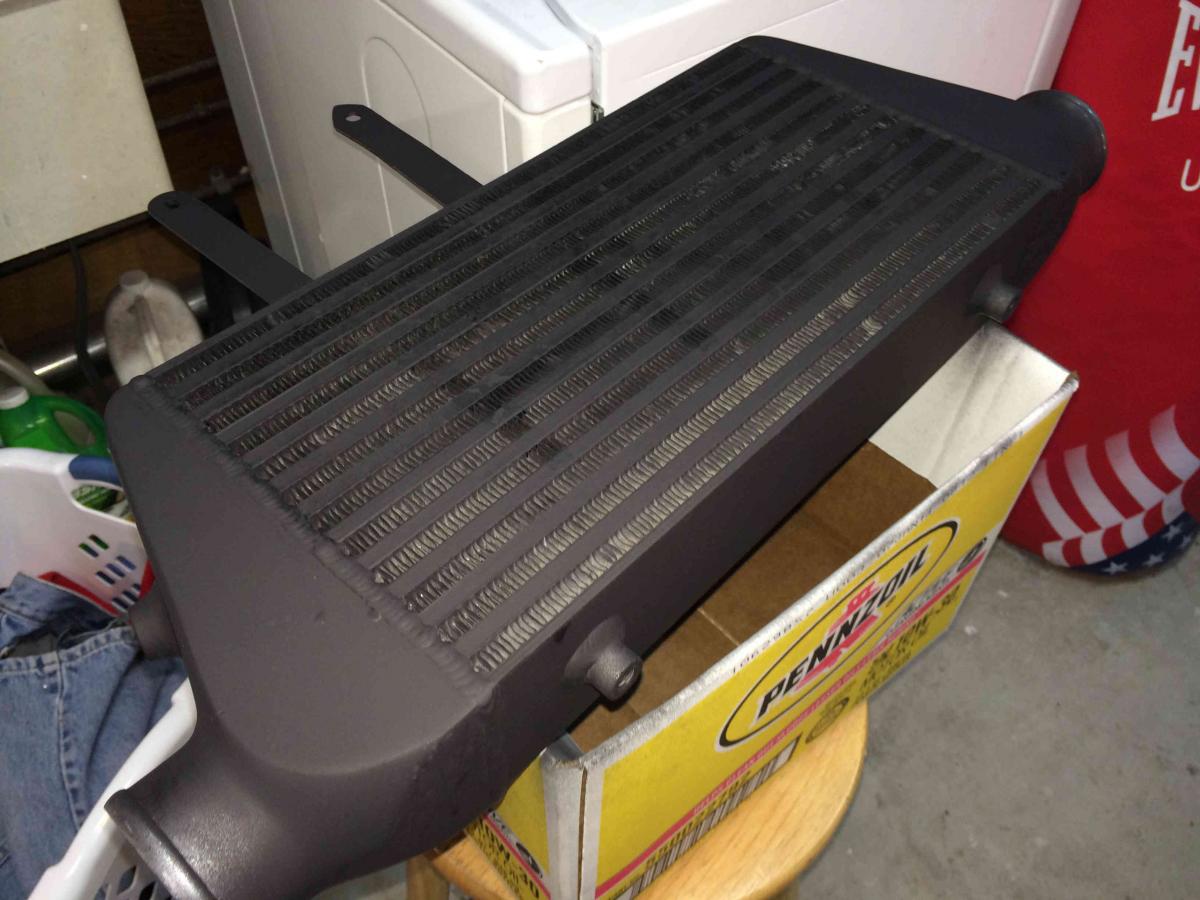
Notching per FM instructions. Going 1" longer for the GT2560 just to make it easier. Ended up removing the flap since every bit of space helped. Dremel tool worked nicely here.

The bit/tap I bought from FM required a 1/2" drive. Should have picked up a bit that was 3/8" drive. Nice to have a 1/2" drill anyway. Could have saved 100 bucks though with better planning.
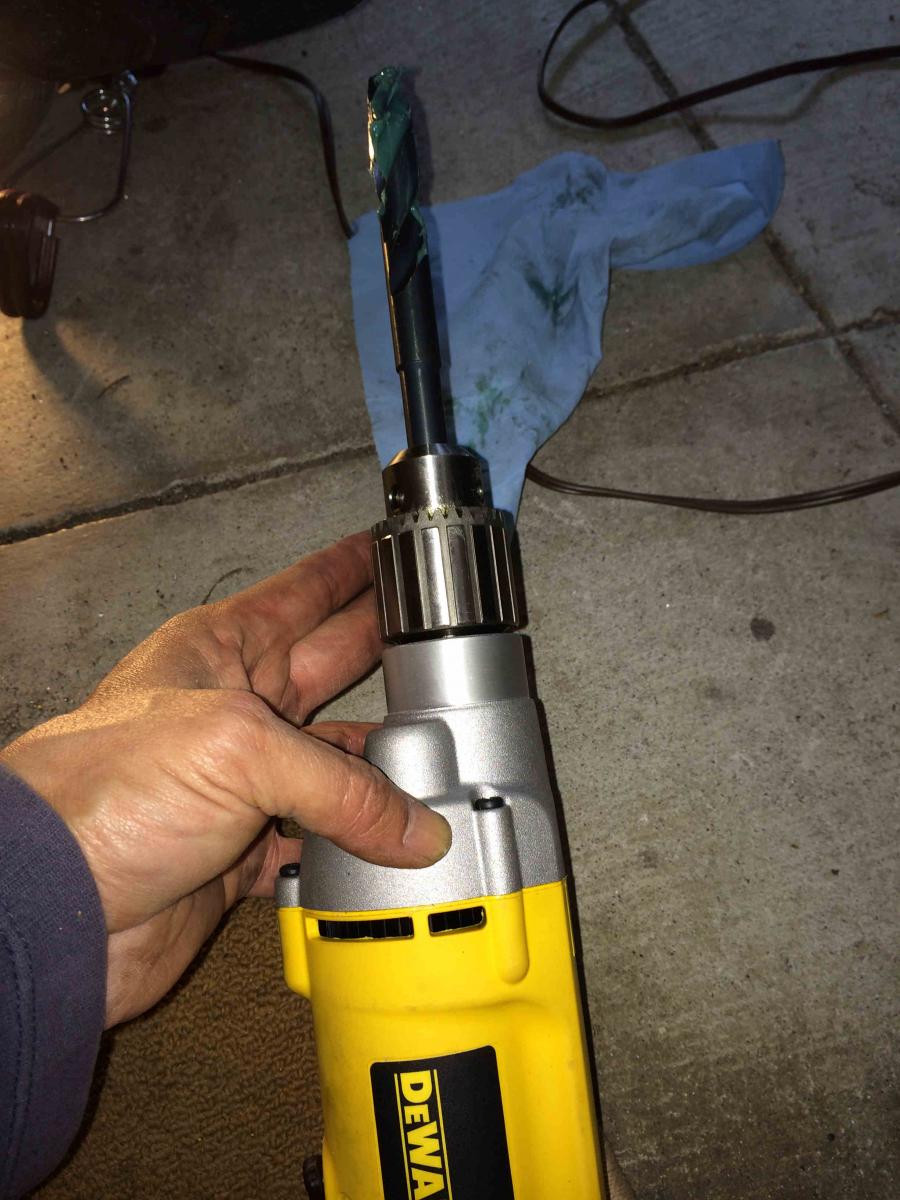
Dirty deed done, nervous like many... These pics were great to reference to no drill w/o knowledge of whats in there. Oil Pan Drilling
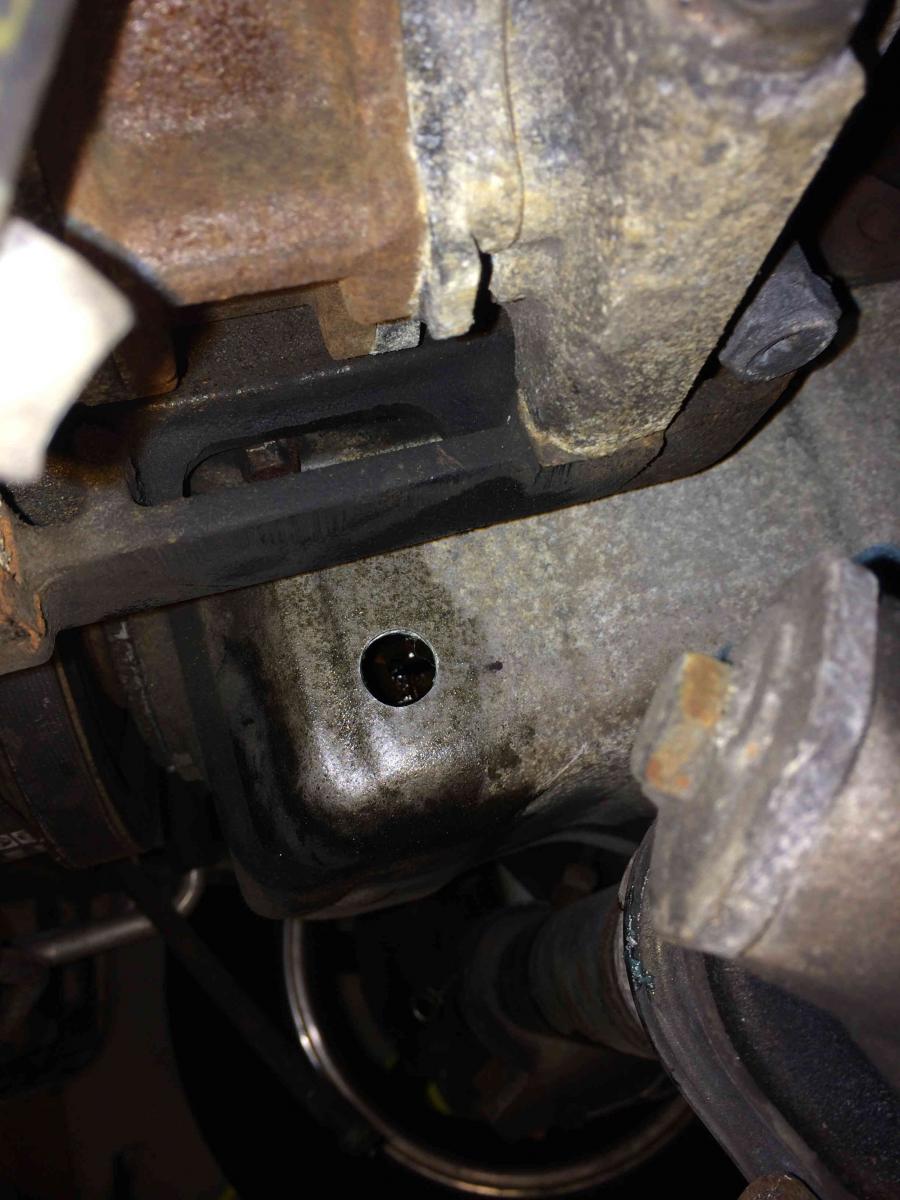 .
.
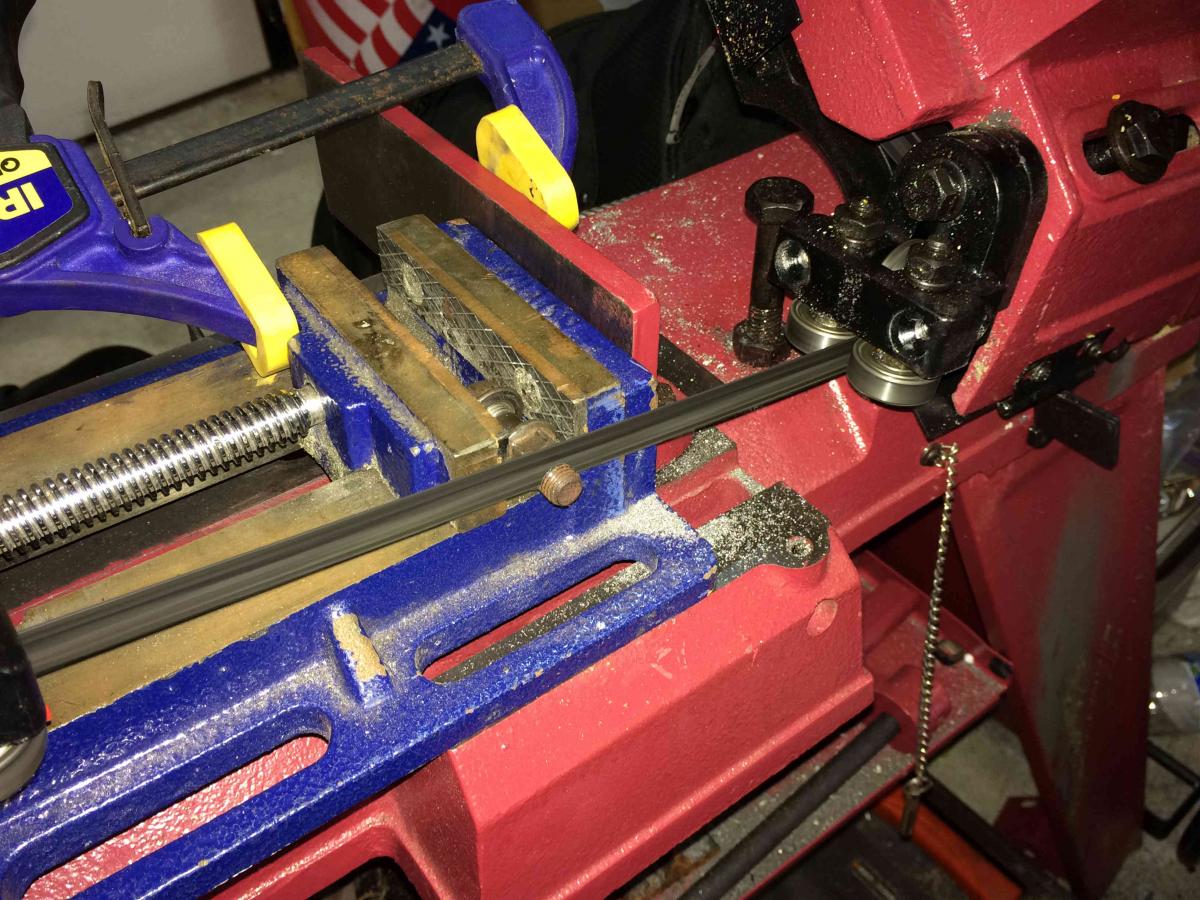
I was wrestling for a while it seems because of clearance issue. I think it was helpful to cut the studs down a bit (4 threads approx). Harbor freight horizontal saw, cut these like butter.

Not the prettiest, but function is all I want for now. May ceramic coat later, etc.
Removed the A/C, nice weight savings and just more working room.
Going stealth black on intercooler
Notching per FM instructions. Going 1" longer for the GT2560 just to make it easier. Ended up removing the flap since every bit of space helped. Dremel tool worked nicely here.
The bit/tap I bought from FM required a 1/2" drive. Should have picked up a bit that was 3/8" drive. Nice to have a 1/2" drill anyway. Could have saved 100 bucks though with better planning.
Dirty deed done, nervous like many... These pics were great to reference to no drill w/o knowledge of whats in there. Oil Pan Drilling
. I was wrestling for a while it seems because of clearance issue. I think it was helpful to cut the studs down a bit (4 threads approx). Harbor freight horizontal saw, cut these like butter.
Not the prettiest, but function is all I want for now. May ceramic coat later, etc.
Reply
0
0


