Mobius's Build - Brotrex and Bromex galore!
 10-24-2011, 07:18 PM
#1
Elite Member

Thread Starter
iTrader: (2)
Join Date: May 2008
Location: Portland, Oregon
Posts: 3,468
Total Cats: 365
We are starting with this. About 6psi, about 165 whp, non-intercooled. Goal is 200whp, track-day worry free.
Purchased and on the way:
a) xede + 550 injectors
b) intercooler: 28x7x2.5 tube&fin ebay special. Black, because I don't like to advertise http://www.ebay.com/itm/28-x-7-x2-5-BLACK-FMIC-TUBE-AND-FIN-FRONT-MOUNT-TURBO-INTERCOOLER-HONDA-/250900064221?pt=Motors_Car_Truck_Parts_Accessories &vxp=mtr&hash=item3a6acf27dd
c) some 2" piping. Compressor --> intercooler will run through the hole behind driver's headlight. 2" on the way to the intercooler since my compressor outlet is 2", I already have some miscellaneous 2" bits, and it will thread through the hole better.
d) FM's intercooler outlet hose, fewer hose clamps = win. I will probably use the middle of my existing crossover pipe to connect between the intercooler outlet hose and the 90 elbow to the throttle body. I won't be needing that pipe, don't know who would want to buy it, and it's got the attachment for my IAT already.
e) FM's crossflow radiator. This will be mated with a 2/3 Cobra's fan shroud and 2 hi-flow Spal fans that I've had for a while waiting to install.
When this is all put together I'll start on ducting. Then I'll figure out where to put the oil cooler.

 0
0
 10-24-2011, 08:55 PM
#3
Elite Member
Thread Starter
iTrader: (2)
Join Date: May 2008
Location: Portland, Oregon
Posts: 3,468
Total Cats: 365
I have fans and a shroud already which will bolt up to the FM unit, and I save weight vs the TrackSpeed unit both in radiator weight and coolant weight.
I would have gotten yours, if I knew for sure I needed it. The FM radiator plus the shroud and fans I have will be tons more effective than stock, and should be enough for my needs for several years.
The TrackSpeed radiator looks to be an awesome piece of kit. If I hadn't already had on hand the shroud and fans I may have ended up with it instead. But since I have them, that's the way I went.
0
10-24-2011, 09:51 PM
#4
Cpt. Slow
iTrader: (25)
Join Date: Oct 2005
Location: Oregon City, OR
Posts: 14,175
Total Cats: 1,129
There's a place to save weight on.
Sav, you need to realize that in order to sell you're going to have to buy a bunch of FM decals and put them on your radiator.
In all honesty he probably doesn't need it though, as long as he doesn't expect to race July-August.
Sav, you need to realize that in order to sell you're going to have to buy a bunch of FM decals and put them on your radiator.
In all honesty he probably doesn't need it though, as long as he doesn't expect to race July-August.
0
10-24-2011, 10:23 PM
#5
Elite Member
Thread Starter
iTrader: (2)
Join Date: May 2008
Location: Portland, Oregon
Posts: 3,468
Total Cats: 365
I would like to track July/August. We'll see. If this one proves insufficient I'll happily replace it with a TrackSpeed unit and sell the FM one.
If I wasn't already into for 300 for shrouds + fans I would have done it. I know Emilio likes the TrackSpeed unit, and that's all the recommendation I need. If both Andrew and Emilio like something I call it done.
If I wasn't already into for 300 for shrouds + fans I would have done it. I know Emilio likes the TrackSpeed unit, and that's all the recommendation I need. If both Andrew and Emilio like something I call it done.
0
10-25-2011, 03:04 AM
#6
Former Vendor
iTrader: (31)

Join Date: Nov 2006
Location: Sunnyvale, CA
Posts: 15,442
Total Cats: 2,099
Gotcha. No hard feelings or anything.  Just curious.
Does FM publish a weight with water for their unit? I know ours is identical to a Koyo55 including water weight, despite being an inch thicker at the endtank.
Just curious. Does FM publish a weight with water for their unit? I know ours is identical to a Koyo55 including water weight, despite being an inch thicker at the endtank.
0
10-25-2011, 07:10 PM
#7
Elite Member
Thread Starter
iTrader: (2)
Join Date: May 2008
Location: Portland, Oregon
Posts: 3,468
Total Cats: 365
I haven't seen a weight. But it's a 32mm core, so I would imagine it's less than a Koyo or PWR 37mm. Keith mentions the core thickness here: http://www.mazda-speed.com/forum2/in...?topic=21653.0
0
11-02-2011, 12:41 AM
#8
Elite Member
Thread Starter
iTrader: (2)
Join Date: May 2008
Location: Portland, Oregon
Posts: 3,468
Total Cats: 365
Radiator has arrived, I'll post pics and weight (dry) tomorrow. I have also received the 99-00 head gasket, as I have decided to go ahead and do the reroute.
Question. I've decided to install a ball valve on my heater core supply. For normal driving and for warmup that will be open and heater core will see coolant flow as normal. Once warmed up for track duty I will close that valve, thus forcing all coolant through the reroute and through the radiator, and no warm coolant entering the mixing manifold. Have I missed anything that makes this a bad idea? The ball valve I have selected is 3/8" full port stainless. I looked at using a 1/2", but the area did not seem appreciably bigger (there was no cross-sectional difference on the 5/8" hose --> NPT adapters for 3/8 and 1/2"), while the physical size of the valves was quite different. So I went with the smaller one.
I have also ordered a delicious dish of TSE Brake Prawns. 2nd question - with my soon-to-be excellent ducting, on a 2500lb car with stock sport brakes at 200hp, am I going to get away with XP8's? That's what I've got on the car now. I used them at my last naturally aspirated track day, but that wasn't any kind of a brake heat test since it was 60degF ambient and raining.
0
11-02-2011, 01:16 AM
#9
Cpt. Slow
iTrader: (25)
Join Date: Oct 2005
Location: Oregon City, OR
Posts: 14,175
Total Cats: 1,129
You'll be fine until you're really racing competitively. ORP is soft on brakes, PIR is a little tougher, with two big braking zones at T1 and T10. Once you get better though, 10 gets easier on brakes, although T1 gets harder I'd say.
The only real issue is you'll be throwing half your pads away due to taper.
The only real issue is you'll be throwing half your pads away due to taper.
0
11-16-2011, 10:57 PM
#10
Elite Member
Thread Starter
iTrader: (2)
Join Date: May 2008
Location: Portland, Oregon
Posts: 3,468
Total Cats: 365
Progress.
I have not measured the wet weight of the FM radiator. Dry it is 10.8 pounds.
Miscellaneous silicone connectors I need for the rotrex --> intercooler tubing arrived today. Hopefully I will have that routed tomorrow, along with the minor surgery to the power steering cooler hoses to get around the edge of the intercooler.
Xede is installed. 550cc injectors going in tomorrow.
0
12-19-2011, 07:34 PM
#11
Elite Member
Thread Starter
iTrader: (2)
Join Date: May 2008
Location: Portland, Oregon
Posts: 3,468
Total Cats: 365
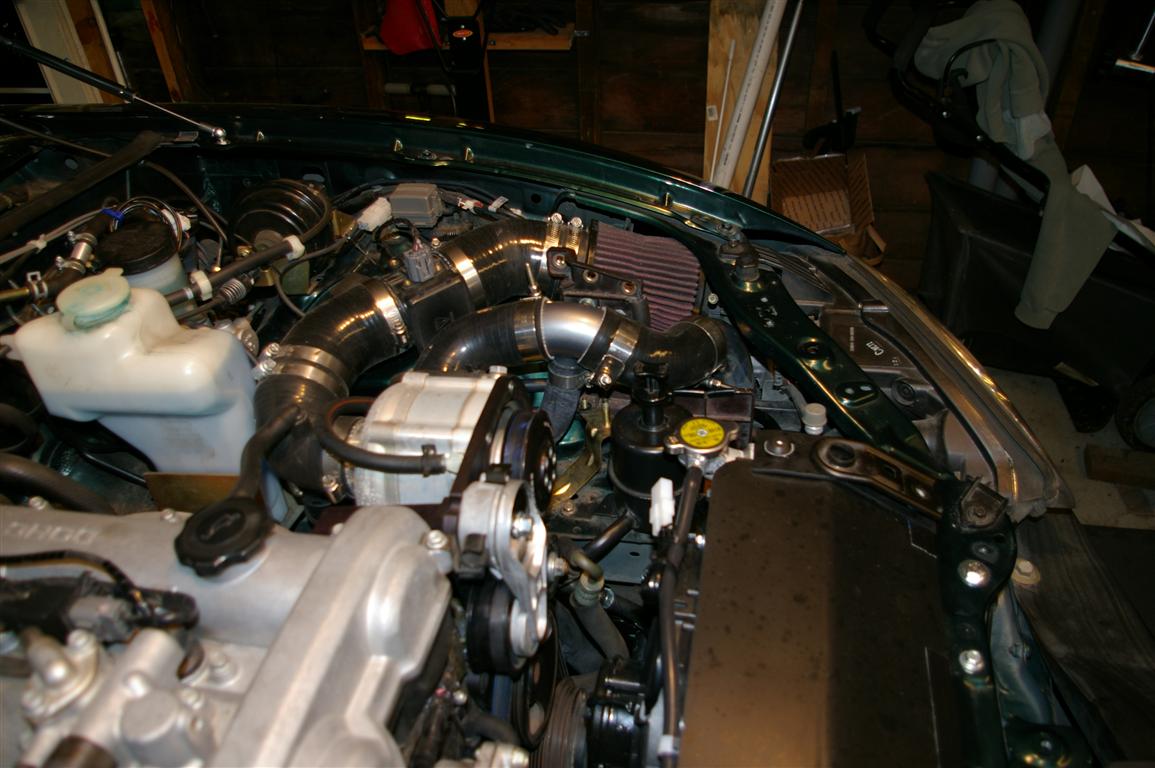
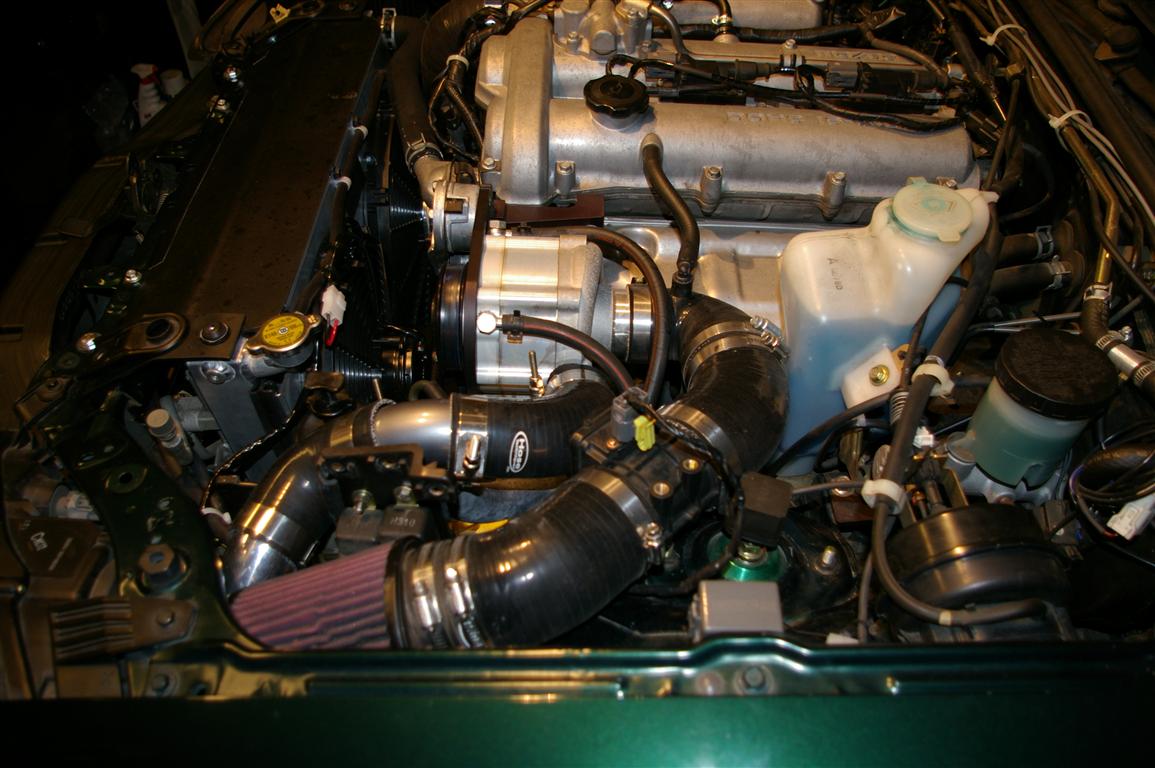
I/C plumbing is finalized and installed. 550cc injectors and xede are installed. Engine has been started but car is still on blocks.
The compressor outlet feeds into:
--> existing silicone elbow piece
--> existing aluminum 60* joiner with the 1" port for the bypass valve hose.
--> 60* silicone elbow
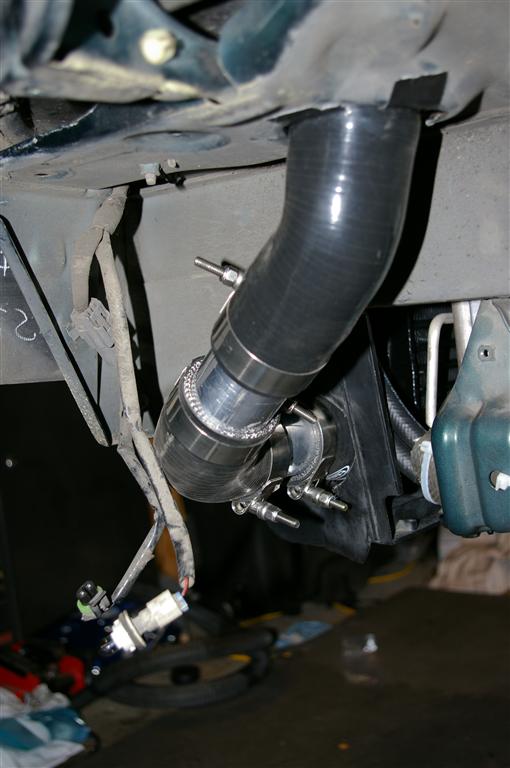
--> 90* aluminum J-pipe which feeds down through the hole behind driver's headlight
--> 45* silicone elbow
--> aluminum pipe joiner
--> 90* sillicone elbow
--> aluminum joiner
--> then to the intercooler via a 2" to 2.5" silicone reducer.
On the intercooler outlet side:
--> FM intercooler outlet hose
--> 6" section of Kraftwerks crossover pipe w/IAT bung
--> 90* silicone elbow to throttle body.
Summary of pieces I used for the new intake plumbing. All new pieces were from Silicone Intakes; I/C is 28x7x2.5 ebay.
PIECES I KEPT FROM KRAFTWERKS
For reference the stock radiator brackets are shown in these pictures resting on the ones that I made, to show how far back the radiator moves with a 1/2" spacer on the AC condenser mounts.
Oh ... and please forgive the messy-looking radiator cover, I discovered during the injector leak fun that gasoline is a solvent for Plasti-Dip. So that will be getting repainted with real paint.
Edit: since someone is bound to ask, the radiator is FM's crossflow radiator, with their shroud, and stage 2 spal fans. The drivers fan just barely clears the Power Steering reservoir hardline as is with the 1/2" spacer on the AC condenser mounts. Leaning the radiator farther back would require moving the PS reservoir as well.
I cannot imagine the cursing that would have ensued had I tried to do all of this with the bumper cover still on the car. It only takes about 15 minutes to take it off and can be done by one person if you're careful.

The compressor outlet feeds into:
--> existing silicone elbow piece
--> existing aluminum 60* joiner with the 1" port for the bypass valve hose.
--> 60* silicone elbow
--> 90* aluminum J-pipe which feeds down through the hole behind driver's headlight
--> 45* silicone elbow
--> aluminum pipe joiner
--> 90* sillicone elbow
--> aluminum joiner
--> then to the intercooler via a 2" to 2.5" silicone reducer.
On the intercooler outlet side:
--> FM intercooler outlet hose
--> 6" section of Kraftwerks crossover pipe w/IAT bung
--> 90* silicone elbow to throttle body.
Summary of pieces I used for the new intake plumbing. All new pieces were from Silicone Intakes; I/C is 28x7x2.5 ebay.
PIECES I KEPT FROM KRAFTWERKS
Pre-rotrex plumbing
NEW PIECES* all pre-rotrex intake plumbing
Post-rotrex plumbing* 90* rotrex outlet silicone elbow
* the 45* or 60* aluminum joiner with the 1" outlet for the bypass valve hose
* the bypass valve, hose, etc. All of that is untouched.
* the part of the crossover tube with the IAT bung
* the 45* or 60* aluminum joiner with the 1" outlet for the bypass valve hose
* the bypass valve, hose, etc. All of that is untouched.
* the part of the crossover tube with the IAT bung
Pre-Rotrex Plumbing:
Modifications made:none
Post-Rotrex Plumbing:* 60" silicone elbow
* 90* J-pipe (I cut it to fit from a larger 90* piece as Silicone Intakes didn't have a Jpipe)
* 45* silicone elbow
* aluminum pipe joiner
* 90* silicone elbow
* aluminum pipe joiner
*NOTE: the above 3 pieces could be replaced by one 90" aluminum tubing piece; I used what I had.
* 2" to 2.5" reducer to connect to I/C
* From intercooler: Flyin Miata Intercooler outlet hose
* 2.5" 90* silicone elbow at throttle body.
* Plastic piece for relays behind driver's headlight : replaced with MSM piece and trimmed to fit (possible to trim existing piece, does not have to be MSM piece)
* Kraftwerks crossover tube: sectioned out the piece with the IAT bung, it is used between FM I/C outlet hose and the 90* elbow to the throttle body. About 6".
* Horn: had to bend the existing bracket somewhat and relocate it to a different bolt a couple of inches away.
* plastic mouth piece: holes cut in sides for I/C tubing. Holes drilled in bottom for the bottom I/C stud bosses to rest in. May put a bolt in there with a fender washer just to make sure the I/C can't move front/back at all.
* fabricated upper radiator mounts - 1/8"x2" bar stock from Home Depot . This was done due to leaning the AC condenser and radiator back using 1/2" spacers on the AC condenser mounts. They were leaned back to give more fore/aft clearance up front for the intercooler. My rotrex oil cooler is still mounted as before on the front of the AC condenser.
* fabricated intercooler mounts - 1/8" x 1" bar stock from Home Depot
* on passenger side, trimmed some sheet metal by the radiator to allow more clearance for rotrex oil hoses in front of A/C condenser. This was not required specifically for this project but was something I had been meaning to do for a while.
* removed hood prop, installed TDR / IL Motorsports hood lifters.
* Power steering hard lines: This was somewhat of a PITA. I ended up only keeping the loop of hard line that mounts under the hood latch. I eliminated the middle part and replaced with hose to clear the intercooler. I tried bending them but was dissatisfied with the results. For anyone else doing this, just go ahead and cut it and re-connect with hose rather than trying to bend them.
On the post-rotrex plumbing all worm drive clamps have been replaced with T-Bolt clamps. On all aluminum tubing that I had to cut to fit, which was most of it, I put on a small lip of JB weld to make sure there's some mechanical grip other than friction for the silicone tubing to grip on to the aluminum tubing. JB weld was the only easy-to-find epoxy I could find that had a high enough rated temperature capacity (600* F) for my liking. Most household epoxies aren't rated above 150*F which is too low inside the engine bay.* Kraftwerks crossover tube: sectioned out the piece with the IAT bung, it is used between FM I/C outlet hose and the 90* elbow to the throttle body. About 6".
* Horn: had to bend the existing bracket somewhat and relocate it to a different bolt a couple of inches away.
* plastic mouth piece: holes cut in sides for I/C tubing. Holes drilled in bottom for the bottom I/C stud bosses to rest in. May put a bolt in there with a fender washer just to make sure the I/C can't move front/back at all.
* fabricated upper radiator mounts - 1/8"x2" bar stock from Home Depot . This was done due to leaning the AC condenser and radiator back using 1/2" spacers on the AC condenser mounts. They were leaned back to give more fore/aft clearance up front for the intercooler. My rotrex oil cooler is still mounted as before on the front of the AC condenser.
* fabricated intercooler mounts - 1/8" x 1" bar stock from Home Depot
* on passenger side, trimmed some sheet metal by the radiator to allow more clearance for rotrex oil hoses in front of A/C condenser. This was not required specifically for this project but was something I had been meaning to do for a while.
* removed hood prop, installed TDR / IL Motorsports hood lifters.
* Power steering hard lines: This was somewhat of a PITA. I ended up only keeping the loop of hard line that mounts under the hood latch. I eliminated the middle part and replaced with hose to clear the intercooler. I tried bending them but was dissatisfied with the results. For anyone else doing this, just go ahead and cut it and re-connect with hose rather than trying to bend them.
For reference the stock radiator brackets are shown in these pictures resting on the ones that I made, to show how far back the radiator moves with a 1/2" spacer on the AC condenser mounts.
Oh ... and please forgive the messy-looking radiator cover, I discovered during the injector leak fun that gasoline is a solvent for Plasti-Dip. So that will be getting repainted with real paint.
Edit: since someone is bound to ask, the radiator is FM's crossflow radiator, with their shroud, and stage 2 spal fans. The drivers fan just barely clears the Power Steering reservoir hardline as is with the 1/2" spacer on the AC condenser mounts. Leaning the radiator farther back would require moving the PS reservoir as well.
I cannot imagine the cursing that would have ensued had I tried to do all of this with the bumper cover still on the car. It only takes about 15 minutes to take it off and can be done by one person if you're careful.
0
12-19-2011, 07:56 PM
#12
Elite Member
Thread Starter
iTrader: (2)
Join Date: May 2008
Location: Portland, Oregon
Posts: 3,468
Total Cats: 365
I found these velocity stacks on ebay frrom Ross Machine Racing : Round 2 Inch Velocity Stack RMR-044-2.00 Aluminum 6061 Made USA. I haz mounted them into my foglight holes.
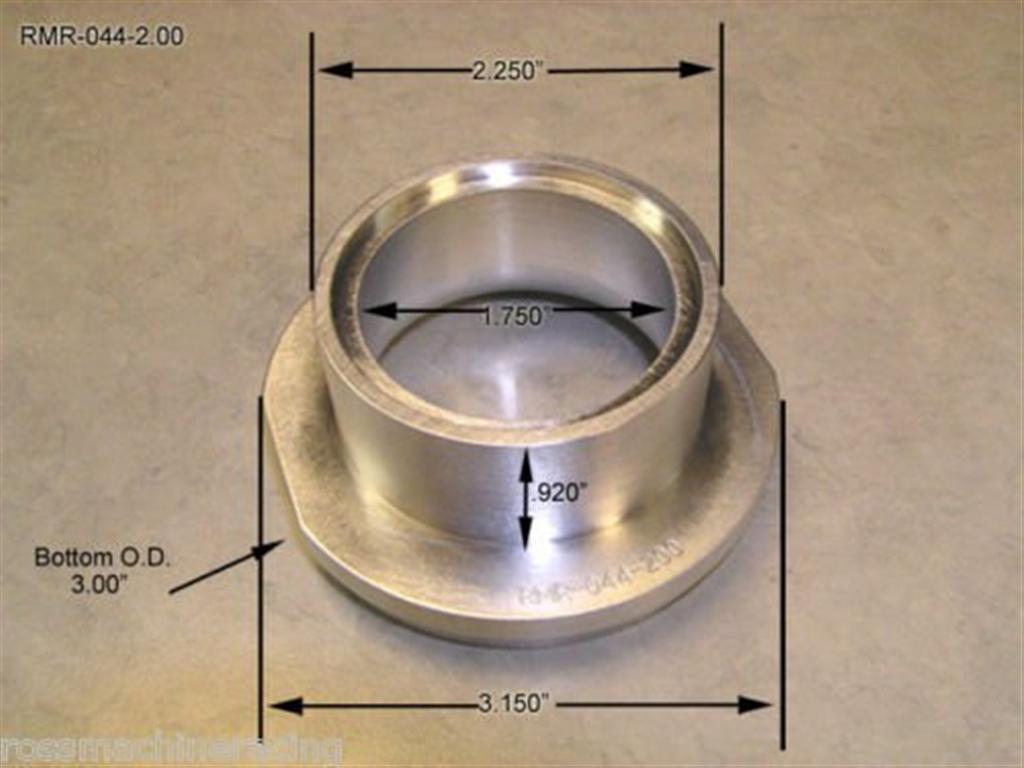
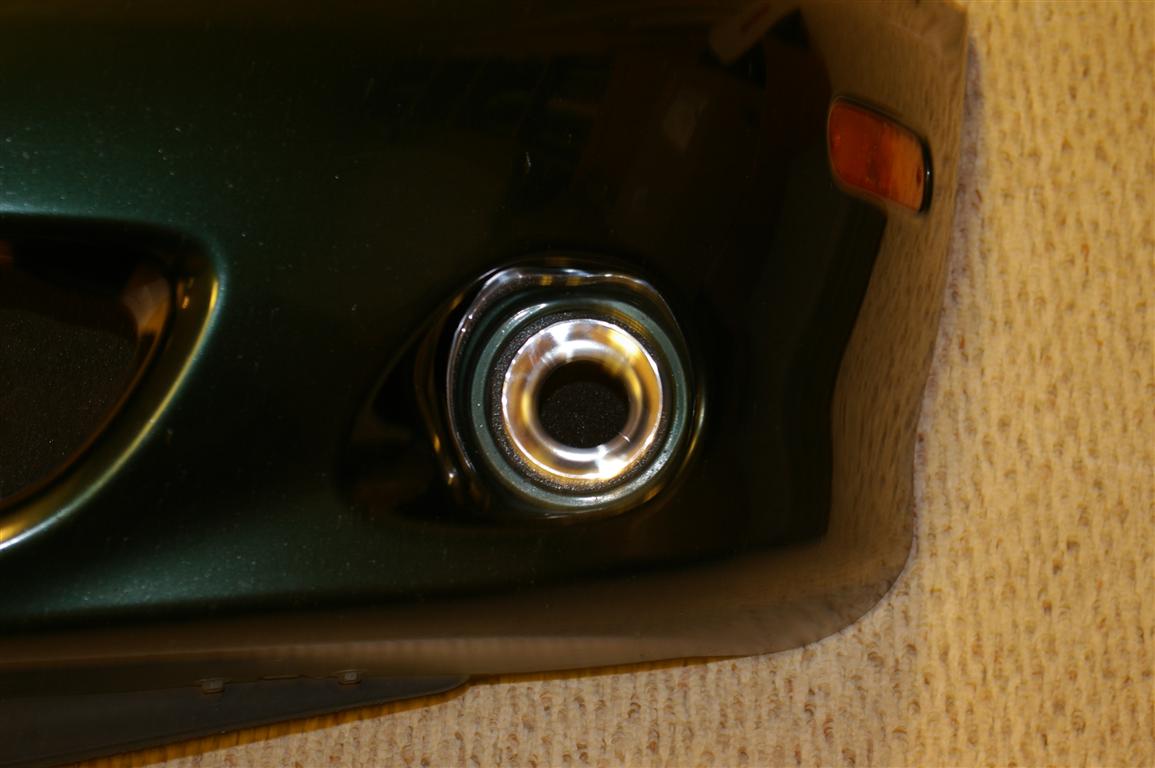
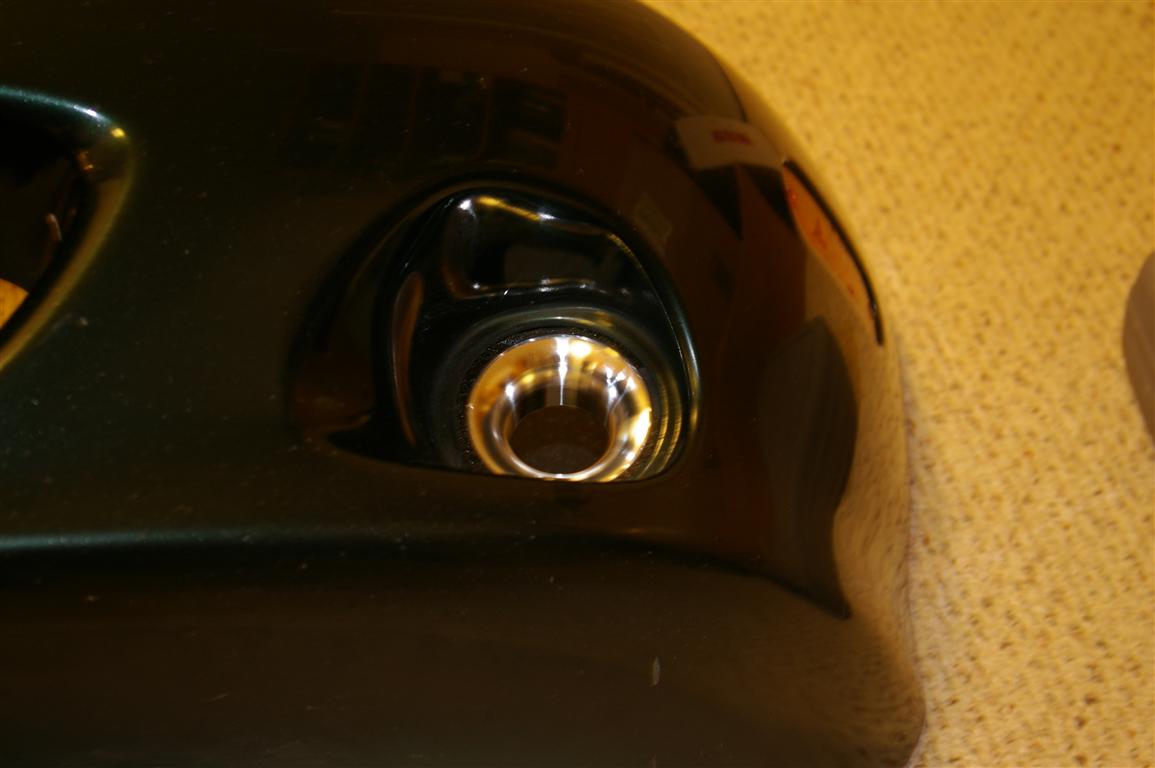
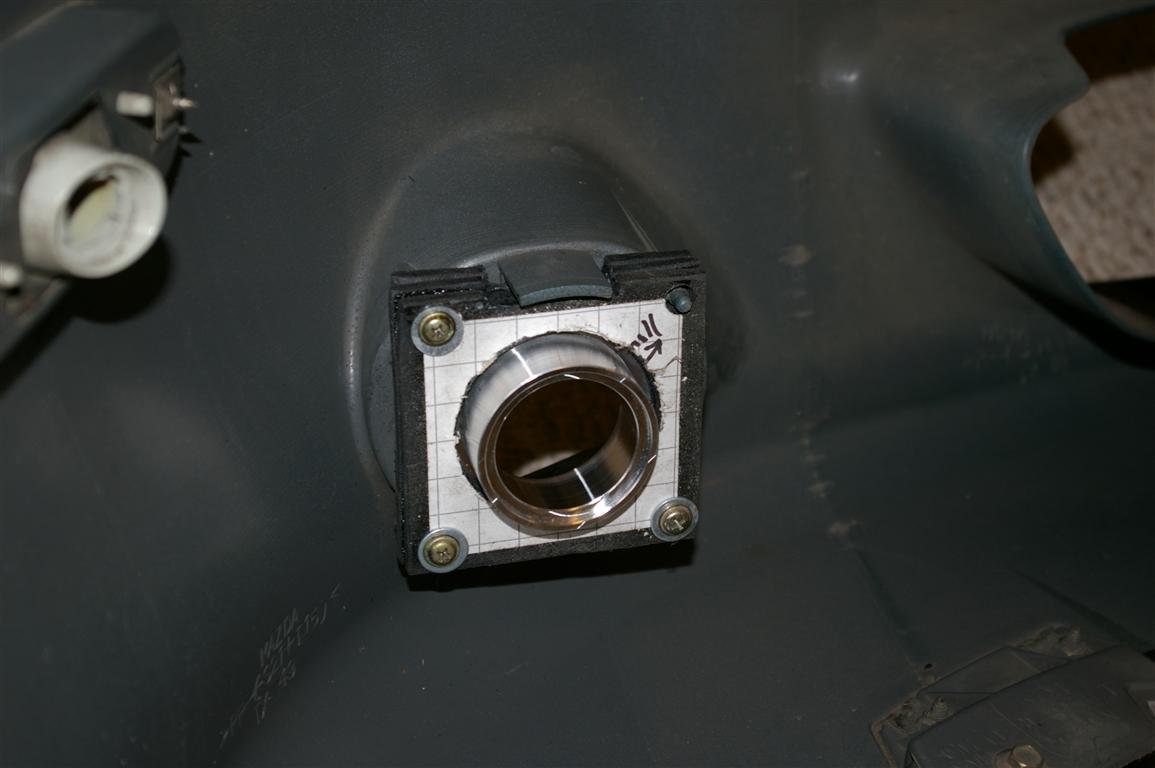
I went to my local Tap Plastic and got some 1/4" scrap for $5. I am using the stock foglight screws. I cut 3 squares 3.75" wide, and drilled the mounting holes. Each square has a different size mounting hole for the velocity stack cut with a holesaw: 3", 3.25", and 2.25". The 3" hole needs to be a precise fit, as it's the one visible from the front. The others can have some slop.
Useful to know: the OEM foglight mounting screws are on a 3" square. I printed a grid, and tack-glued it to the back piece as a template (visible in the photo).
I will use some sort of glue to tack the plastic together but allow removal of the stacks if I need to for some reason.
I will be using some of my intercoolor piping scraps to make the joiners between the trumpets and the hose.
Edit: for future searchers NB foglight, foglight brake ducts, brake ducting, foglight ducting, foglight holes
Edit2: 1/4" thick material is the material of choice for doing this. The material depth will line up exactly on the trumpets and the total of 3/4" is just right for the foglight screws.
Last edited by Mobius; 12-29-2011 at 01:35 PM. Reason: fixed picture links
0
01-04-2012, 10:33 PM
#16
Elite Member
Thread Starter
iTrader: (2)
Join Date: May 2008
Location: Portland, Oregon
Posts: 3,468
Total Cats: 365
I'm on the short list now for getting the car back on the road. Just need to put the short shifter in, put the hitch in, put the bumper back on, and verify the base tune of the Xede. Spent an unexpected 3 hours today connecting to it to download the current maps; turns out all my usb-->serial converters were crap. Bought the Gigaware one from Radio Shack and all's good.
0
01-31-2012, 04:43 PM
#17
Elite Member
iTrader: (37)

Join Date: Apr 2010
Location: Very NorCal
Posts: 10,441
Total Cats: 1,899
Nice! Clean, sanitary and well thought out build. I enjoy finding folks who are moving forward with the Rotrex stuff, gives me a semi. That FM charge pipe is definitely EZ-Mode, adding it to my shopping list now. I appreciate the pics of the routing and the parts list, I'm definitely copying your work. Picked out a pulley yet?
It appears you have quite the cooler stack now. Are these guys all sealed together? My IC is 1' shorter in height, trying to decide if I should push it back against the AC core or lean it back and duct it under the rad.
Is your inlet ducting to the rotrex hanging in space? Mine has a bracket from KW that bolts to one of the shock bolts. I like yours with the 45�s rather than mine with the 90�s. I may also steal the cowl intake that Hornetball built. We'll see.
Subscribed! Keep us posted!
0
02-01-2012, 12:23 AM
#18
Elite Member
Thread Starter
iTrader: (2)
Join Date: May 2008
Location: Portland, Oregon
Posts: 3,468
Total Cats: 365
Nice! Clean, sanitary and well thought out build. I enjoy finding folks who are moving forward with the Rotrex stuff, gives me a semi. That FM charge pipe is definitely EZ-Mode, adding it to my shopping list now. I appreciate the pics of the routing and the parts list, I'm definitely copying your work. Picked out a pulley yet?
It appears you have quite the cooler stack now. Are these guys all sealed together? My IC is 1' shorter in height, trying to decide if I should push it back against the AC core or lean it back and duct it under the rad.
Is your inlet ducting to the rotrex hanging in space? Mine has a bracket from KW that bolts to one of the shock bolts. I like yours with the 45�s rather than mine with the 90�s. I may also steal the cowl intake that Hornetball built. We'll see.
Last maintenance items have been taken care of - brake/clutch, transmission, and diff fluids all replaced. For the brakes, I alternate between ATE superblue and 200. Trans is Motorcraft XT-M5-QS full synthetic, and diff is Mobil1 75w90 full synthetic.
The newest addition to the car, which was a Christmas score, is the Miata Roadster short shift kit with the tall angled shifter. I haven't taken the car for an extended drive yet, but the initial test drive around the neighborhood today was very encouraging. It goes snick-snick now into gear. My previous slight crunch into second appears to be completely gone.
Tomorrow will be my first long drive. Assuming I find nothing to sort out from it, next week I will pull the restrictor and see how the xede does (have to wait until then due to family ski trip this weekend).
0
02-17-2012, 12:33 PM
#19
Elite Member
Thread Starter
iTrader: (2)
Join Date: May 2008
Location: Portland, Oregon
Posts: 3,468
Total Cats: 365
Dyno time on Tuesday 2/21. Will be tuning with and without restrictor. So far my source for a larger restrictor has flaked on me, unfortunately, so all I have is the stock Kraftwerks one.
0
02-17-2012, 01:51 PM
#20
Elite Member
iTrader: (37)
Join Date: Apr 2010
Location: Very NorCal
Posts: 10,441
Total Cats: 1,899
Viiiiiideo!? Looking like good progress! I'd love to see a dyno chart, preferably with a MAP trace? Would be nice to see what kind of airflow the 88mm is capable of, unrestricted.
I've heard rumor that some of the earlier Rotrex guys were using big *** washers with various sized holes as restrictors, mounted up closer to the air cleaner. Never heard how this turned out. I always thought a mechanical iris and a linear actuator would be a really slick way to do it, but I couldn't find an iris that looked remotely like it could take that much abuse.
Thanks for the update!
0


