My 99's Journey from the dark side to enlightenment.

 08-22-2014, 02:12 PM
#42
Senior Member
Thread Starter
iTrader: (2)

Join Date: Mar 2014
Location: Meridian, Mississippi
Posts: 628
Total Cats: 44
Thanks for the heads up on that!
Keith
PS: Looks like I will just keep the AC. Use it about twice a year, but not purchasing another part to get ride of it.

Reply
 0
0

0
08-22-2014, 03:31 PM
#45
Senior Member
Thread Starter
iTrader: (2)
Join Date: Mar 2014
Location: Meridian, Mississippi
Posts: 628
Total Cats: 44
Looks like I can cut down a bunch of stuff and still have a gap at the bottom of the main fan, or I can stuff foam strips in the gaps, and duct tape around the edge's and call it a day.
Keith
Keith
Reply
0
0
08-24-2014, 06:41 PM
#46
Senior Member
Thread Starter
iTrader: (2)
Join Date: Mar 2014
Location: Meridian, Mississippi
Posts: 628
Total Cats: 44
More pictures!
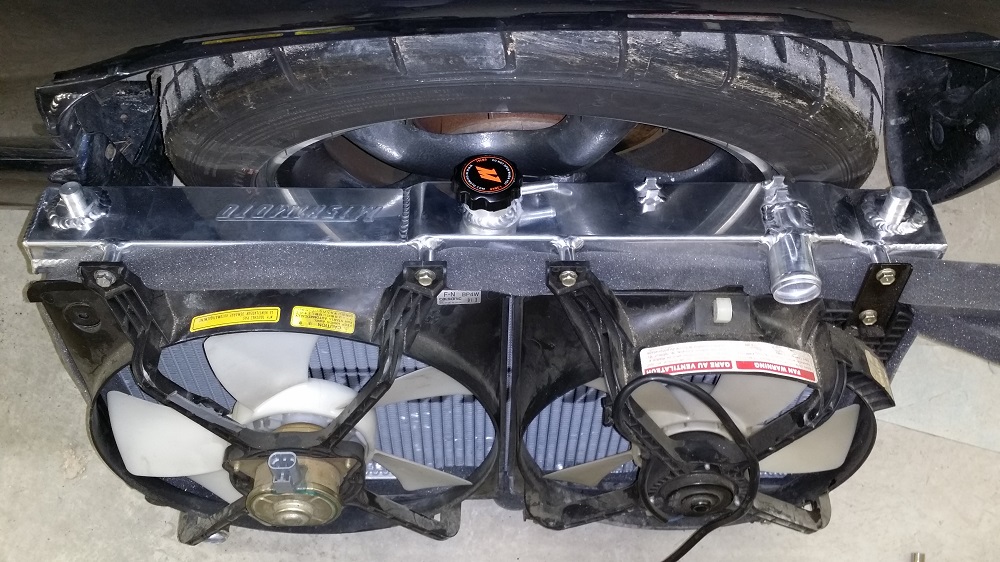
Rather than cutting down and re-tapping the radiator fan mounting points, I purchased two strips of air conditioning insulation foam rubber.
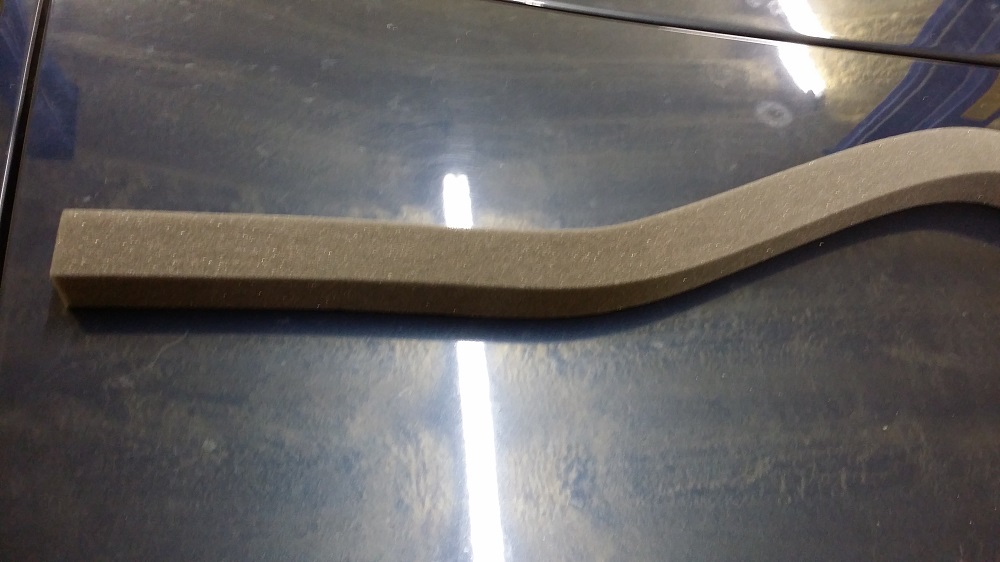
I put this around the entire parimeter of the radiator fans, probably better air flow with this setup than their was stock!
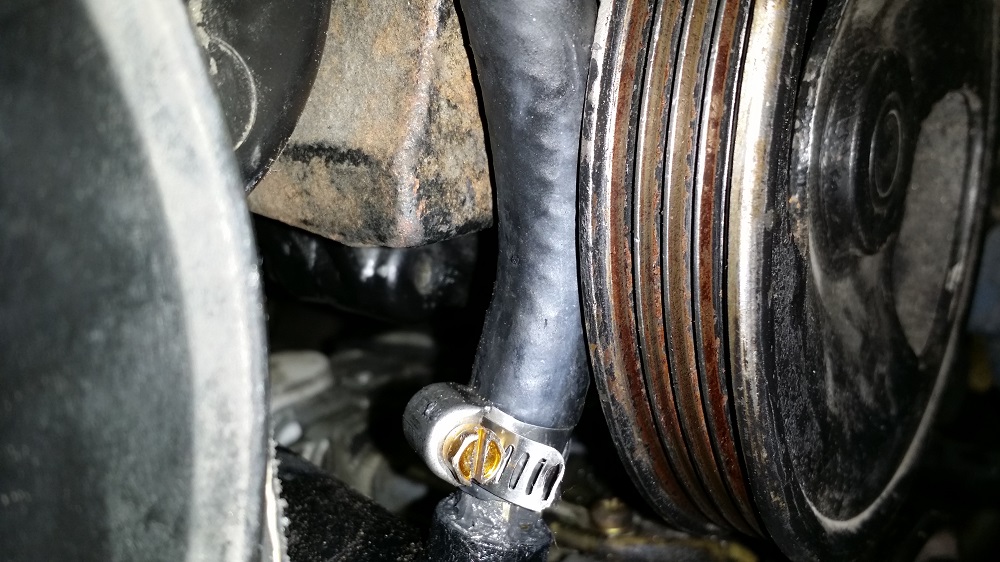
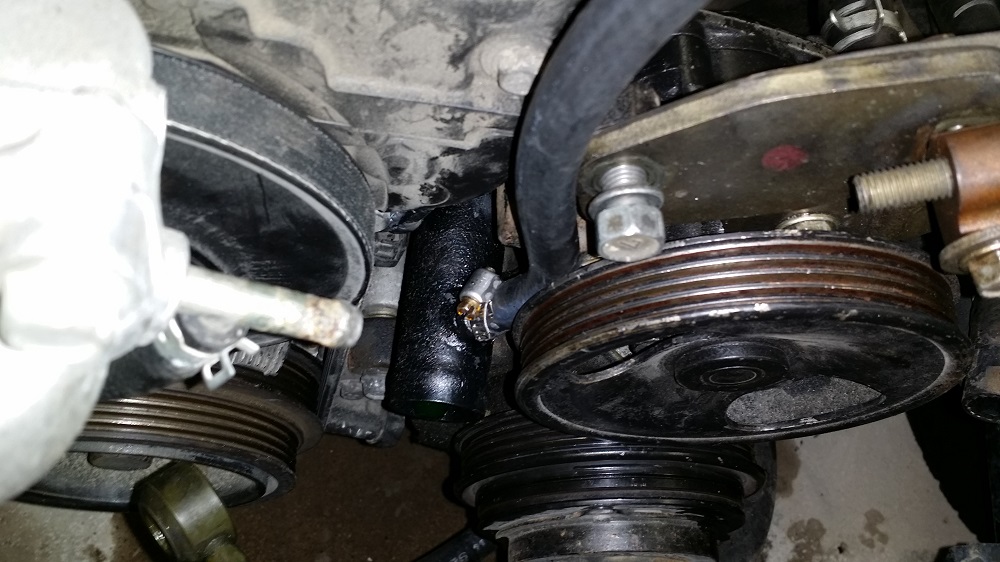
I finally figured out that the hose barb on the lower radiator hose connection at the mixing manifold is for the hose going to the oil / water distribution block for turbo water supply / return. I feel like the hole for the barb fitting was drilled in the wrong place, the barb fitting is pointed directly at the power steering pump, and the rubber hose run right behind the pulley. I don't think it is touching, but it would be hard to slide a piece of paper between them.
I e-mailed Stephanie about it, and expect a response first thing Monday morning... oh wait, no... I mean I will have to call her to get her to open the e-mail and look at the pictures.
Progress is being made!
Keith
Rather than cutting down and re-tapping the radiator fan mounting points, I purchased two strips of air conditioning insulation foam rubber.
I put this around the entire parimeter of the radiator fans, probably better air flow with this setup than their was stock!
I finally figured out that the hose barb on the lower radiator hose connection at the mixing manifold is for the hose going to the oil / water distribution block for turbo water supply / return. I feel like the hole for the barb fitting was drilled in the wrong place, the barb fitting is pointed directly at the power steering pump, and the rubber hose run right behind the pulley. I don't think it is touching, but it would be hard to slide a piece of paper between them.
I e-mailed Stephanie about it, and expect a response first thing Monday morning... oh wait, no... I mean I will have to call her to get her to open the e-mail and look at the pictures.
Progress is being made!
Keith
Reply
0
0
08-24-2014, 07:56 PM
#47
Elite Member

iTrader: (3)
Join Date: Apr 2014
Location: Huntington, Indiana
Posts: 2,885
Total Cats: 616
Originally Posted by Twodoor;
I e-mailed Stephanie about it, and expect a response first thing Monday morning... oh wait, no... I mean I will have to call her to get her to open the e-mail and look at the pictures.
Progress is being made!
Keith

That's another sign that you just need to take the whole pump out.
People who can't handle manual steering in a miata need to exercise their forearms more.

Reply
0
0
08-25-2014, 03:10 AM
#48
Senior Member
Thread Starter
iTrader: (2)
Join Date: Mar 2014
Location: Meridian, Mississippi
Posts: 628
Total Cats: 44
What is your recommended method for depower if I decided to go that route? I only use the AC in the winter to help with de-fogging the windows, so if I do the depower, the AC is coming out as well... but from what I read I need a certain bolt to prevent an oil leak if I pull off the AC compressor.
Keith
Reply
0
0
08-25-2014, 03:27 AM
#49
Senior Member
Thread Starter
iTrader: (2)
Join Date: Mar 2014
Location: Meridian, Mississippi
Posts: 628
Total Cats: 44
More progress made, with some pictures.
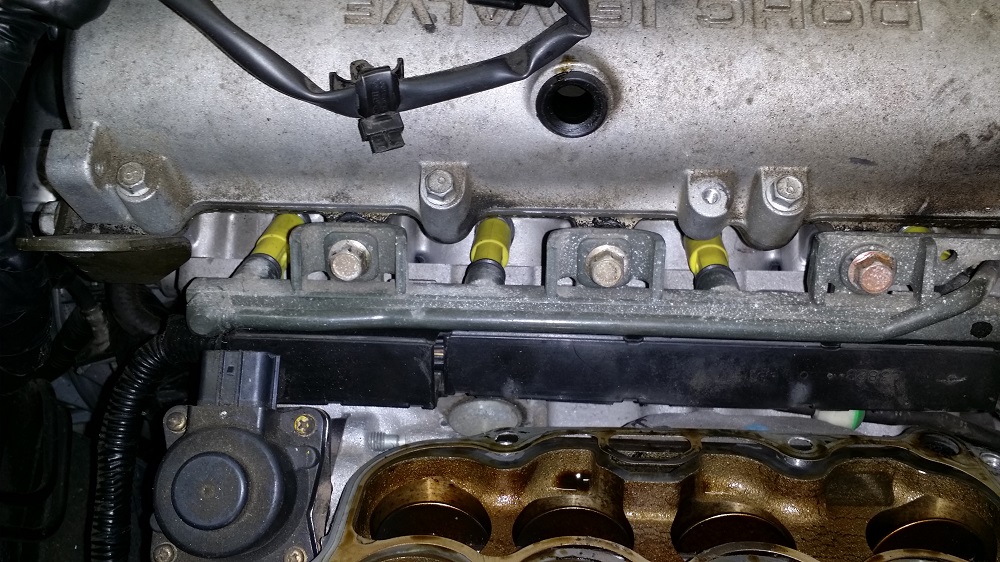
I swapped out the RX8 425cc/min injectors for the 1000cc/min injectors BEGi sells. Came with a flow balance sheet with a crap load of test numbers, including the latency numbers at various battery voltages.
Here are the RX8's about to come out and go up for sale:
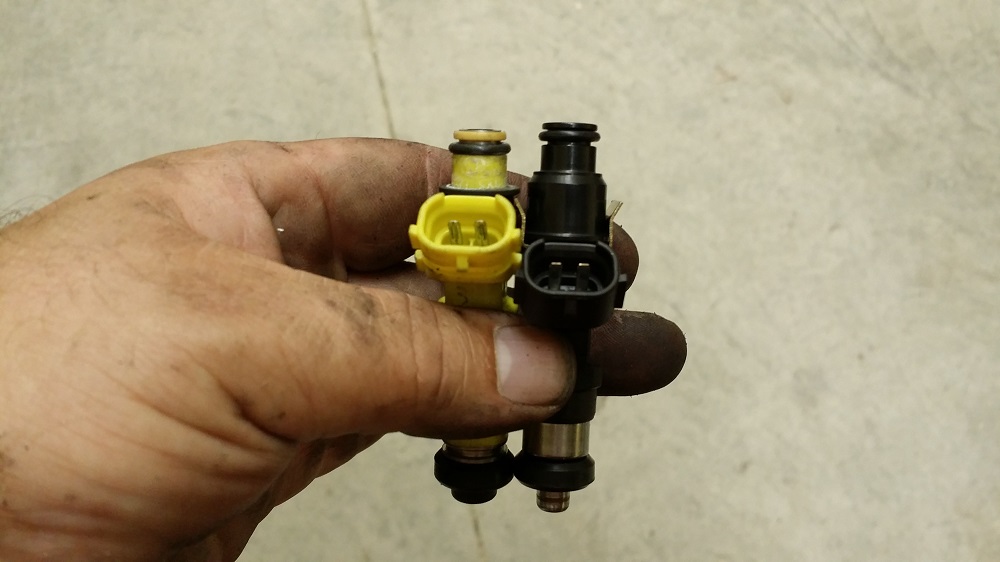
Here is a comparison between the old and new injectors. The new ones have the electrical connection lower down than the old injectors... but I didn't have any trouble connecting them.
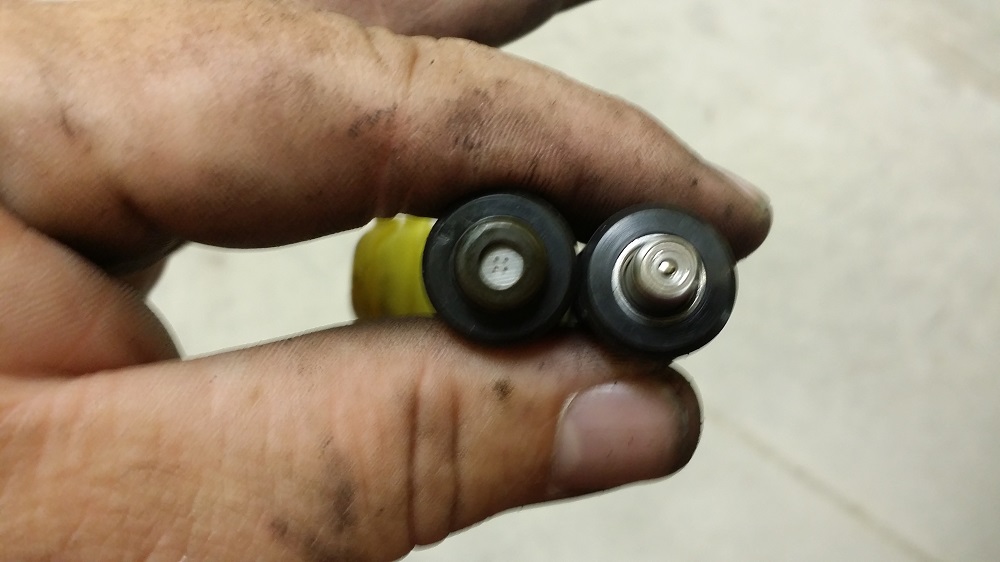
Here is a view of the business end of both. The RX8's have multiple small holes, the new 1000's seem to have one giant pintle.
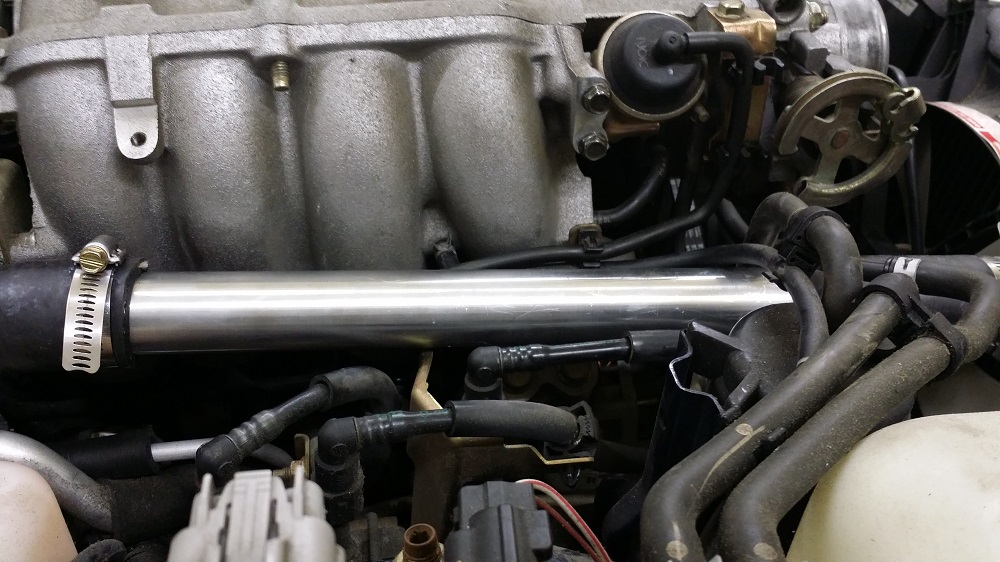
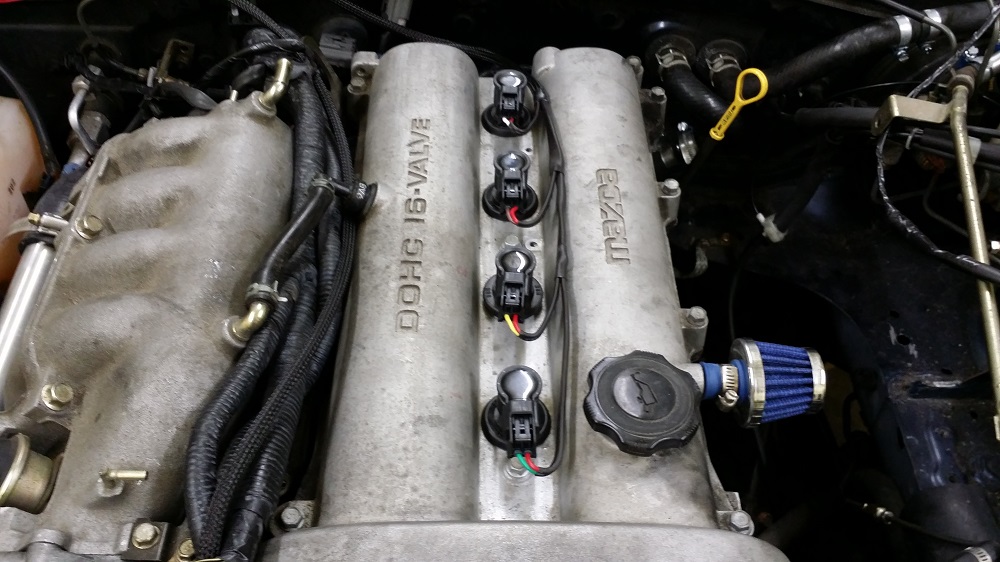
And here are the 1000's in their new home.
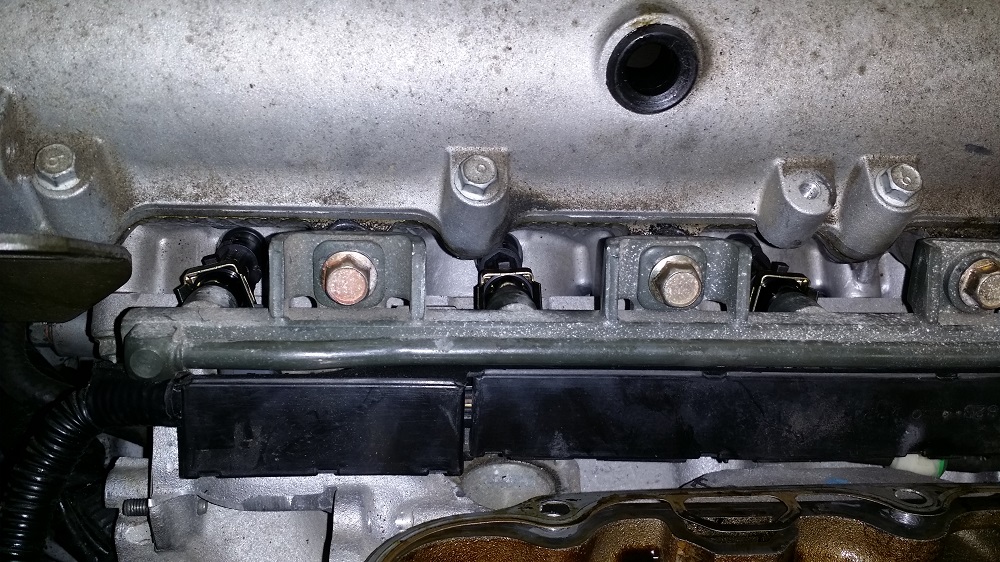
Here is a tip for anyone doing injectors. The first time you do injectors take some RTV and stick the spacers in their correct locations. This makes it easier to get the fuel rail back in place, and the next time you pull the fuel rail there is no chance of a spacer dropping down into the depths of the engine never to be seen again.
Keith
I swapped out the RX8 425cc/min injectors for the 1000cc/min injectors BEGi sells. Came with a flow balance sheet with a crap load of test numbers, including the latency numbers at various battery voltages.
Here are the RX8's about to come out and go up for sale:
Here is a comparison between the old and new injectors. The new ones have the electrical connection lower down than the old injectors... but I didn't have any trouble connecting them.
Here is a view of the business end of both. The RX8's have multiple small holes, the new 1000's seem to have one giant pintle.
And here are the 1000's in their new home.
Here is a tip for anyone doing injectors. The first time you do injectors take some RTV and stick the spacers in their correct locations. This makes it easier to get the fuel rail back in place, and the next time you pull the fuel rail there is no chance of a spacer dropping down into the depths of the engine never to be seen again.
Keith
Reply
0
0
08-25-2014, 05:42 AM
#50
Elite Member
iTrader: (3)
Join Date: Apr 2014
Location: Huntington, Indiana
Posts: 2,885
Total Cats: 616
Yes, you need to stuff a bolt in the hole the bracket leaves in the block. I forget the size. I'll try to find it in a sec. There are a few ways to depower the rack, but it's best to do it the FM way by cutting the seals. Here's their write-up: Flyin' Miata : Tech: 1.8 conversion
Reply
0
0
08-25-2014, 11:01 AM
#51
Senior Member
Thread Starter
iTrader: (2)
Join Date: Mar 2014
Location: Meridian, Mississippi
Posts: 628
Total Cats: 44
Yes, you need to stuff a bolt in the hole the bracket leaves in the block. I forget the size. I'll try to find it in a sec. There are a few ways to depower the rack, but it's best to do it the FM way by cutting the seals. Here's their write-up: Flyin' Miata : Tech: 1.8 conversion
 I am using three sets of instructions downloaded from their site right now, S4 kit on a 99-05, S6 kit on a 94-97, and coolant re-route on 99-05.
I use this car year around, and really don't want to loose the AC for the defogging function. Amazing how much better dry air is at dispelling moisture! So, for now I will leave the hose where it is... Stephanie said she will talk to Corky about it and show him the pictures.
Keith
Reply
0
0
08-25-2014, 11:18 AM
#53
Senior Member
Thread Starter
iTrader: (2)
Join Date: Mar 2014
Location: Meridian, Mississippi
Posts: 628
Total Cats: 44
Having 3500 RPM to 7500 RPM will be an extra 1000 RPM of area under the curve for me 
Keith
Reply
0
0
 08-25-2014, 12:29 PM
#55
Senior Member
Thread Starter
iTrader: (2)
Join Date: Mar 2014
Location: Meridian, Mississippi
Posts: 628
Total Cats: 44
Keith
PS: At first of course it will be limited to the 10ish psi. Then after I vent the block with a busted rod the sky is the limit!
Reply
0
0
08-25-2014, 06:20 PM
#56
Senior Member
Thread Starter
iTrader: (2)
Join Date: Mar 2014
Location: Meridian, Mississippi
Posts: 628
Total Cats: 44
Coolant re-rout complete!
Here is where the re-routed heater core line goes into the new lower radiator hose.
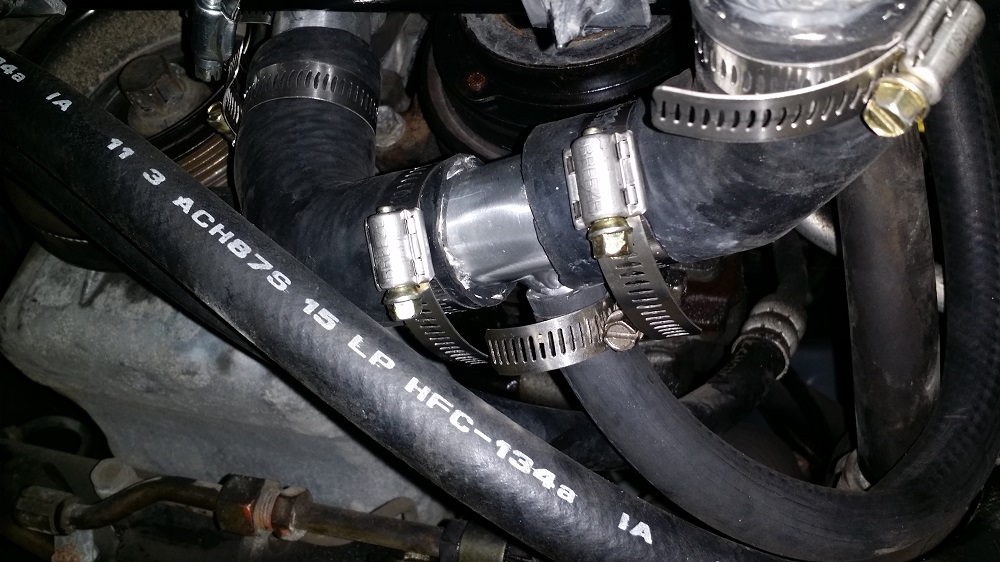
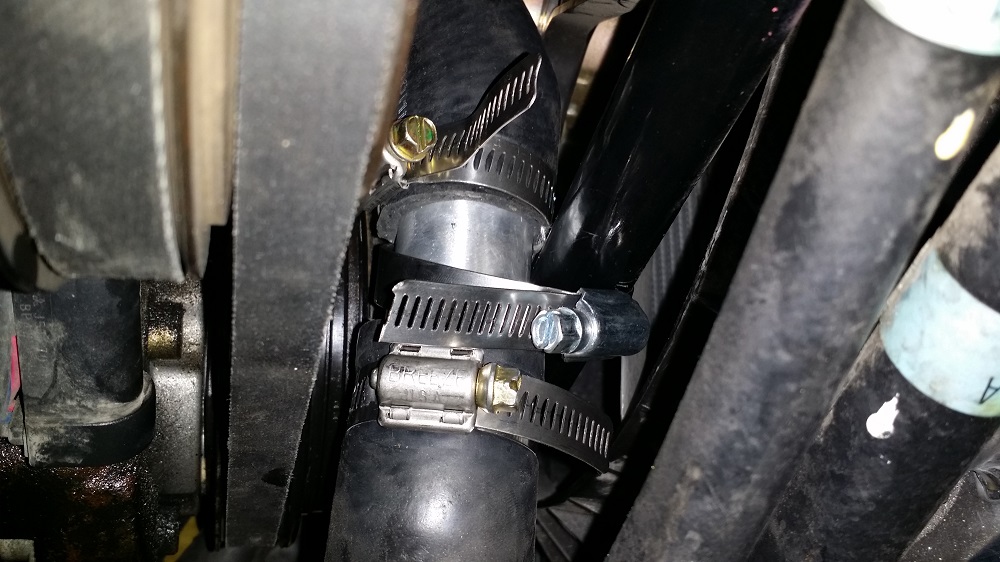
Here is where I hose clamped the lower radiator hose to the swaybar to keep it away from the pulleys and belts.
Here is the rear thermostat housing... got RTV everywhere putting that ************ in place.
Here is the rear section of the upper radiator hose.

Here is the middle of upper hose. Highest point is below radiator cap height. Took a lot of test fitting and cutting to get it low enough. If I pulled the charcoal canister crap out it would have been easier.
And finally the front blockoff and Radiator. You can also see the new lower hose.

Next step is Fab 9 tuning coil on plug system. Looks like this will bethe easiest step in this build!
Keith
Here is where the re-routed heater core line goes into the new lower radiator hose.
Here is where I hose clamped the lower radiator hose to the swaybar to keep it away from the pulleys and belts.
Here is the rear thermostat housing... got RTV everywhere putting that ************ in place.
Here is the rear section of the upper radiator hose.
Here is the middle of upper hose. Highest point is below radiator cap height. Took a lot of test fitting and cutting to get it low enough. If I pulled the charcoal canister crap out it would have been easier.
And finally the front blockoff and Radiator. You can also see the new lower hose.
Next step is Fab 9 tuning coil on plug system. Looks like this will bethe easiest step in this build!
Keith
Reply
0
0
08-26-2014, 09:20 AM
#57
Senior Member
Thread Starter
iTrader: (2)
Join Date: Mar 2014
Location: Meridian, Mississippi
Posts: 628
Total Cats: 44
COP and power steering cooler are done. Pics
Here are the pencil coils installed. Plug gaps on the supplied plugs varried from .038 to .042, so I set them all down to .038 If I have spark blowout I will gap them down in increments until it goes away.
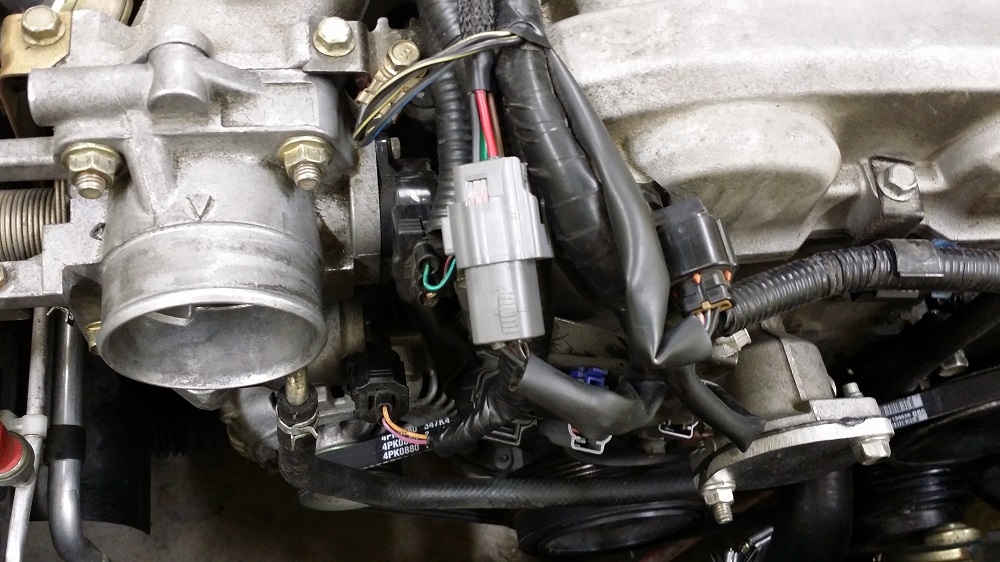
Here is the plug and play connector, it is at the front passenger side on the NB1 cars.
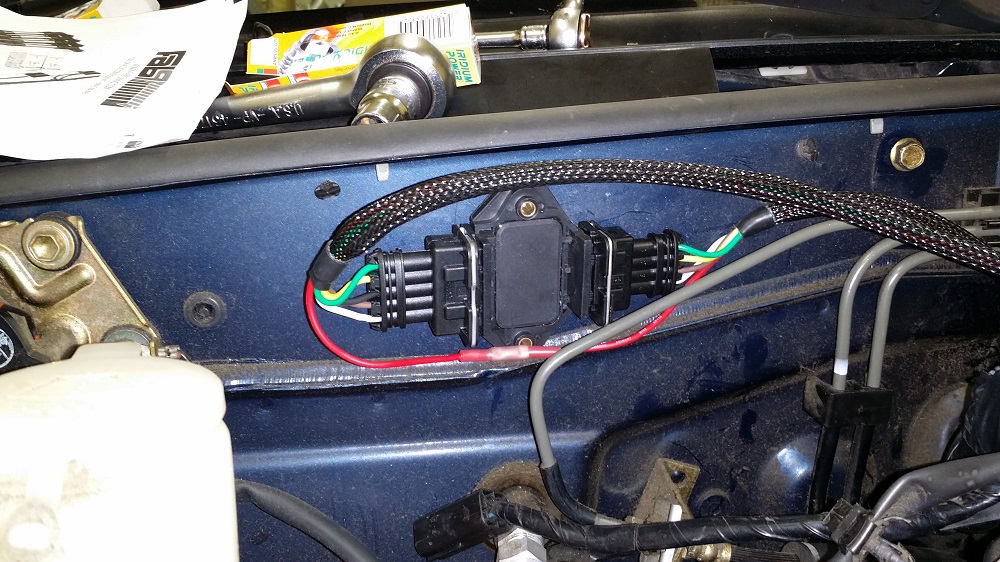
And here is the ignition module mocked up on the firewall. Didn't come with self tapping sheet metal screws, so I have to pick up some this morning to do the mounting. If I had some CPU heat transfer paste sitting around I would slather the heat transfer surface... but I don't and I am not going to order some just for this.
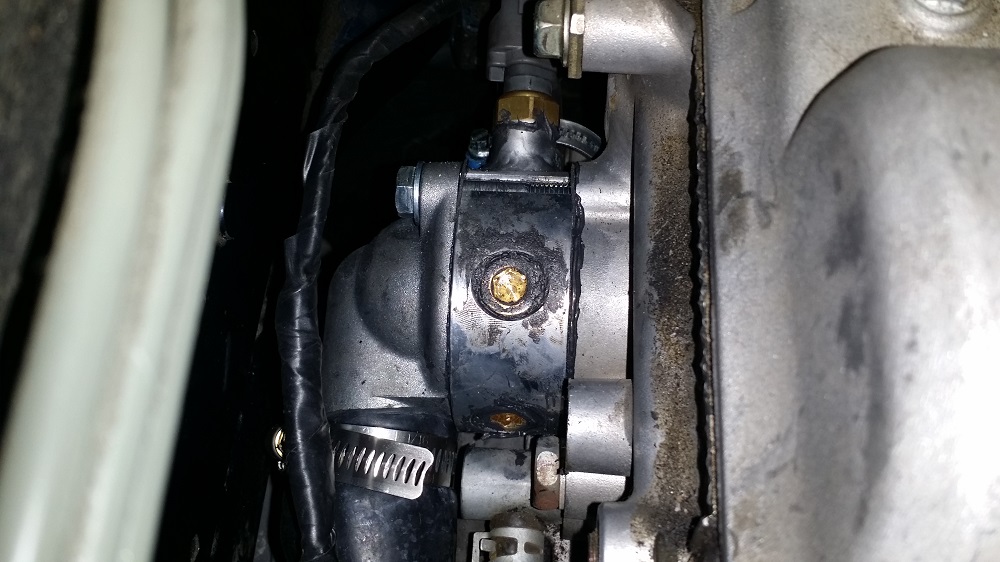
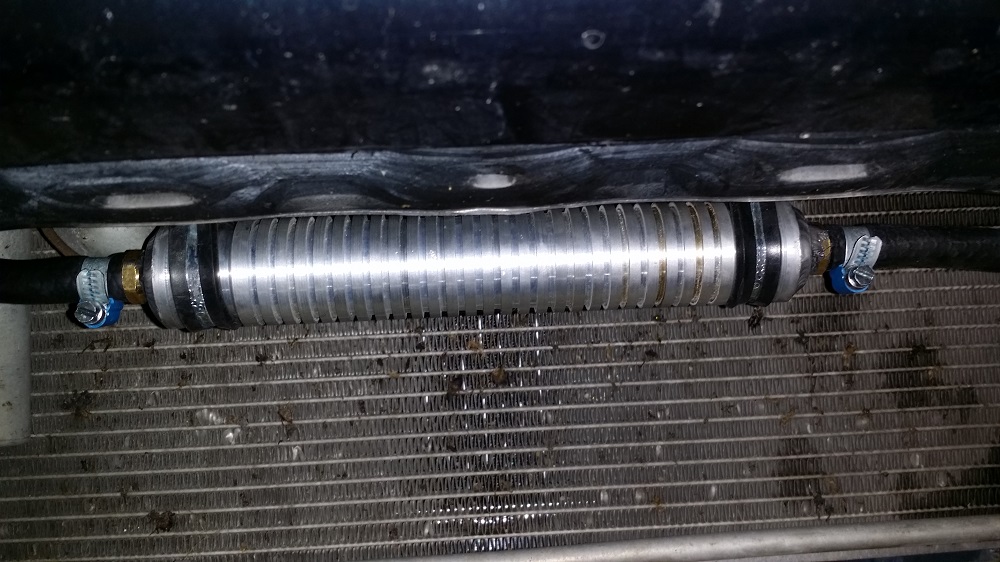
Here is the BEGi power steering cooler mounted up front at the top of the opening in the bumper.
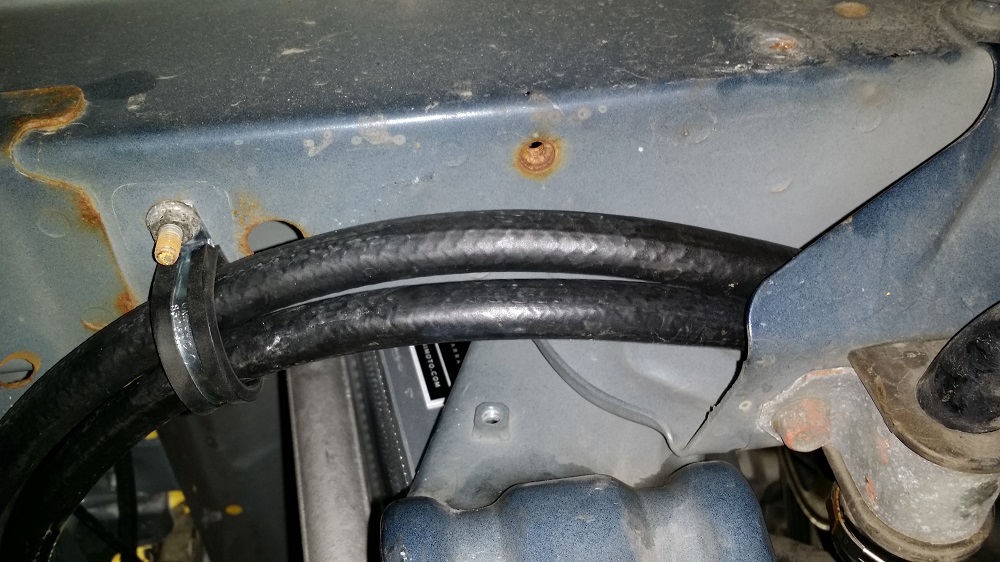
And here in my opinion is the proper routing of the power steering lines for the BEGi power steering cooler. The stud that the rubberized clamp is mounted too is one of the mounting points for the fog lights, and the lines are running in the gap between the frame rail and the mounting point for the front sway bar.
The last of the "fiddly bits" are the oil supply, and oil drain... then it is on to the meat and potatoes of the manifold, turbo, downpipe and intercooler.
Any advice on reaching the oil supply point under the intake manifold? Looks like a real pain in the ***.
Keith
Here are the pencil coils installed. Plug gaps on the supplied plugs varried from .038 to .042, so I set them all down to .038 If I have spark blowout I will gap them down in increments until it goes away.
Here is the plug and play connector, it is at the front passenger side on the NB1 cars.
And here is the ignition module mocked up on the firewall. Didn't come with self tapping sheet metal screws, so I have to pick up some this morning to do the mounting. If I had some CPU heat transfer paste sitting around I would slather the heat transfer surface... but I don't and I am not going to order some just for this.
Here is the BEGi power steering cooler mounted up front at the top of the opening in the bumper.
And here in my opinion is the proper routing of the power steering lines for the BEGi power steering cooler. The stud that the rubberized clamp is mounted too is one of the mounting points for the fog lights, and the lines are running in the gap between the frame rail and the mounting point for the front sway bar.
The last of the "fiddly bits" are the oil supply, and oil drain... then it is on to the meat and potatoes of the manifold, turbo, downpipe and intercooler.
Any advice on reaching the oil supply point under the intake manifold? Looks like a real pain in the ***.
Keith
Reply
0
0
08-26-2014, 09:33 AM
#58
It is. Either jack the car up and remove the passenger wheel, or yank the alternator.
And of course there's always the option of yanking the IM.
Its not too much more difficult than changing the oil filter though, just takes some shoving of hands through crevices that were designed for tiny japanese hands lol.
And of course there's always the option of yanking the IM.
Its not too much more difficult than changing the oil filter though, just takes some shoving of hands through crevices that were designed for tiny japanese hands lol.
Reply
0
0
 08-26-2014, 10:50 AM
#60
Keith... i have a stupid question:
What sort of sorcery are you doing with your heater lines, and why? I have a Begi homebrew re-route to do, with the Escalade hose or whatever the hell, and i don't remember seeing anything about that "T" in the write ups i was looking at.
What sort of sorcery are you doing with your heater lines, and why? I have a Begi homebrew re-route to do, with the Escalade hose or whatever the hell, and i don't remember seeing anything about that "T" in the write ups i was looking at.
Reply
0
0


