My 99's Journey from the dark side to enlightenment.


 08-26-2014, 11:17 AM
#62
Senior Member
Thread Starter
iTrader: (2)

Join Date: Mar 2014
Location: Meridian, Mississippi
Posts: 628
Total Cats: 44
Keith... i have a stupid question:
What sort of sorcery are you doing with your heater lines, and why? I have a Begi homebrew re-route to do, with the Escalade hose or whatever the hell, and i don't remember seeing anything about that "T" in the write ups i was looking at.
What sort of sorcery are you doing with your heater lines, and why? I have a Begi homebrew re-route to do, with the Escalade hose or whatever the hell, and i don't remember seeing anything about that "T" in the write ups i was looking at.
The BEGi turbo kit eliminates the heater line that goes behind the exhaust manifold, and replaces the lower radiator hose mounting point on the mixing manifold. If you want to keep your heater functional you run a line from the firewall to a T fitting in your new lower radiator hose.
It is a real pain in the ***. I think I need a couple feet more line to make it more "neat and tidy" but it is functional for now.
Keith

Reply
 0
0

0
08-26-2014, 11:19 AM
#63

The T is not part of the coolant re-route, it is used for the BEGi turbo kit.
The BEGi turbo kit eliminates the heater line that goes behind the exhaust manifold, and replaces the lower radiator hose mounting point on the mixing manifold. If you want to keep your heater functional you run a line from the firewall to a T fitting in your new lower radiator hose.
It is a real pain in the ***. I think I need a couple feet more line to make it more "neat and tidy" but it is functional for now.
Keith
Reply
0
0
08-26-2014, 11:25 AM
#64
pretty sure they do that on their s4 kits as well. I think the sidemount setups retain the original mixing manifold.
I don't like it either because now you got a bunch of rubber hose dangling behind, under, in front of your turbo hot parts and unless you secure the heck out of it will be bouncing around/rubbing on a bunch of stuff.
I don't like it either because now you got a bunch of rubber hose dangling behind, under, in front of your turbo hot parts and unless you secure the heck out of it will be bouncing around/rubbing on a bunch of stuff.
Reply
0
0
08-26-2014, 12:08 PM
#66
Senior Member
Thread Starter
iTrader: (2)
Join Date: Mar 2014
Location: Meridian, Mississippi
Posts: 628
Total Cats: 44
I think if you have a BEGi kit, you should post about it in the "Do it yourself" forums rather than the "Prefab turbo kit" forum!
Keith
Reply
0
0
08-26-2014, 02:12 PM
#67
Didn't the "racer re-route" have you do something odd with the heater core lines? The instructions from BEGi are so jacked up it isn't even funny. I thought the "racer re-route" attached the heater return line to the upper radiator hose. If that is the case, and you are going to a "real" re-route you take that fitting out of the upper radiator hose and place it in the lower radiator hose and put the heater core line there.
I think if you have a BEGi kit, you should post about it in the "Do it yourself" forums rather than the "Prefab turbo kit" forum!
Keith
I think if you have a BEGi kit, you should post about it in the "Do it yourself" forums rather than the "Prefab turbo kit" forum!
Keith
So... i'm just moving this damn thing in addition to adding the spacer/housing crap on the back?
Sounds awful.
Reply
0
0
08-26-2014, 04:15 PM
#68
Senior Member
Thread Starter
iTrader: (2)
Join Date: Mar 2014
Location: Meridian, Mississippi
Posts: 628
Total Cats: 44
Had to buy tie wire to attach heat wrap to the heater hoses, and I drilled the holes to mount the ignition heat sink to the firewall. I am not going to bother with pics of that though.
Next post will be pics of the contents of the boxes I just received

Keith
Reply
0
0
08-26-2014, 09:52 PM
#69
Senior Member
Thread Starter
iTrader: (2)
Join Date: Mar 2014
Location: Meridian, Mississippi
Posts: 628
Total Cats: 44
Here are the box content pictures!
First picture is my old 01+ manifold I removed, with it's EGR tube, and brand new studs that arrived today.

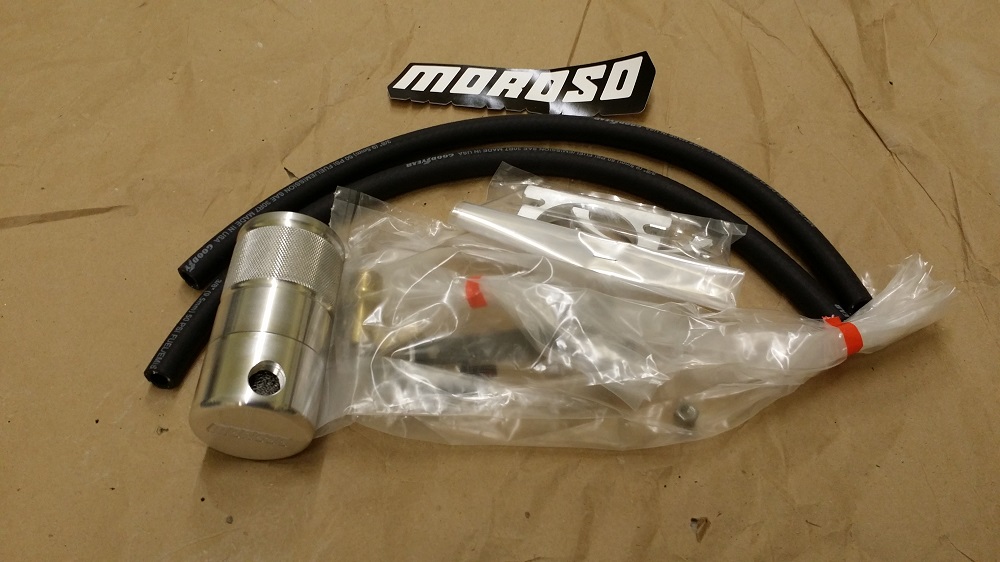
Next is my new air / oil separator.
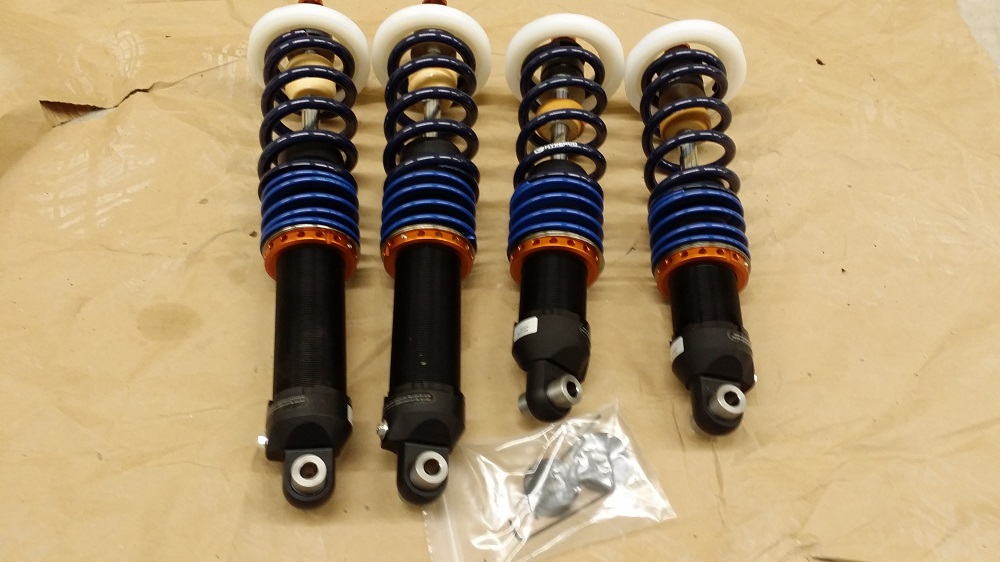
And finally, my brandy new Xida coilovers!!!
Now on to the installation progress.
God damn am I frustrated with BEGi right now. The adaptor for the oil feed line that is supposed to allow use of the oil feed along with the stock pressure sender. My adaptor is not correctly threaded, thus useless. So, without this ******* adaptor I am doing direct oil feed with no oil pressure sender.
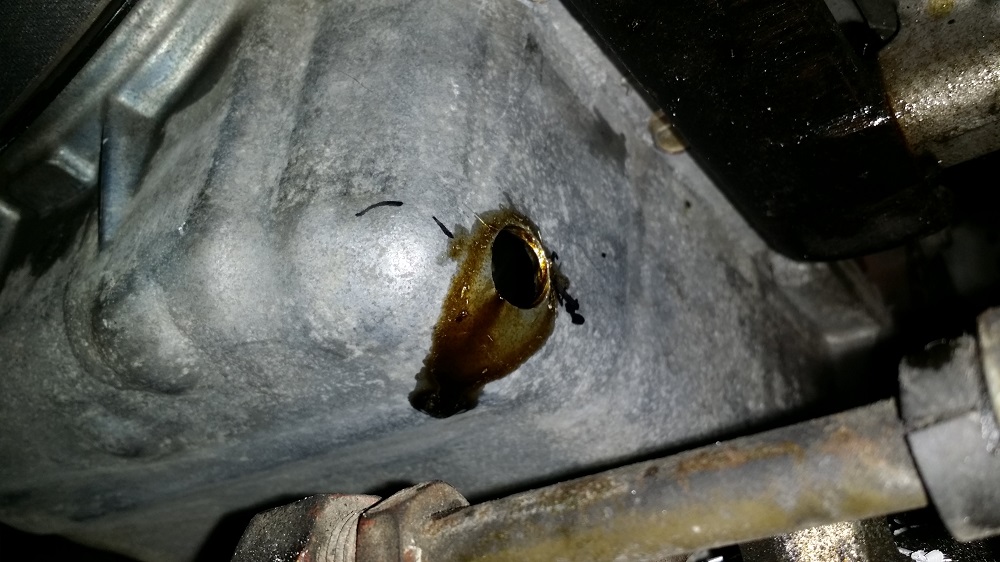
Holy **** is it scary to drill a hole in your oil pan! Especially when the hole location instructions specify '2.3" down from the oil pan flange, and 1.5" back from a strait edge held to the front 2" down from the oil pan flange'.
Anyone here have a ruler that reads decimals? Closest I could figure was 2 and 5/16. I hope I have the damn thing in the right spot!
I don't know, do you think I have enough mineral spirits based solvent?

This concludes my current update. I am posting this while letting the mineral spirits drain from my oil pan. I ended up using two quarts instead of the one quart specified in the instructions, but better safe than sorry right?
Keith
First picture is my old 01+ manifold I removed, with it's EGR tube, and brand new studs that arrived today.
Next is my new air / oil separator.
And finally, my brandy new Xida coilovers!!!
Now on to the installation progress.
God damn am I frustrated with BEGi right now. The adaptor for the oil feed line that is supposed to allow use of the oil feed along with the stock pressure sender. My adaptor is not correctly threaded, thus useless. So, without this ******* adaptor I am doing direct oil feed with no oil pressure sender.
Holy **** is it scary to drill a hole in your oil pan! Especially when the hole location instructions specify '2.3" down from the oil pan flange, and 1.5" back from a strait edge held to the front 2" down from the oil pan flange'.
Anyone here have a ruler that reads decimals? Closest I could figure was 2 and 5/16. I hope I have the damn thing in the right spot!
I don't know, do you think I have enough mineral spirits based solvent?
This concludes my current update. I am posting this while letting the mineral spirits drain from my oil pan. I ended up using two quarts instead of the one quart specified in the instructions, but better safe than sorry right?
Keith
Reply
0
0
08-26-2014, 11:11 PM
#71
Senior Member
Thread Starter
iTrader: (2)
Join Date: Mar 2014
Location: Meridian, Mississippi
Posts: 628
Total Cats: 44
Keith
Reply
0
0
08-27-2014, 11:45 AM
#73
Senior Member
Thread Starter
iTrader: (2)
Join Date: Mar 2014
Location: Meridian, Mississippi
Posts: 628
Total Cats: 44
Talked to Corky this morning. He said that adaptor now goes on the oil / water distribution block at the front of the engine, and you have to lengthen the oil pressure sender wires to route the oil pressure sender over there. I wasn't provided wire or butt connectors to re-route the sensor, but that isn't a big deal... I have spare wire and butt connectors.
The problem is with the horrible instructions. Out of date, and not clear what the **** they are talking about.
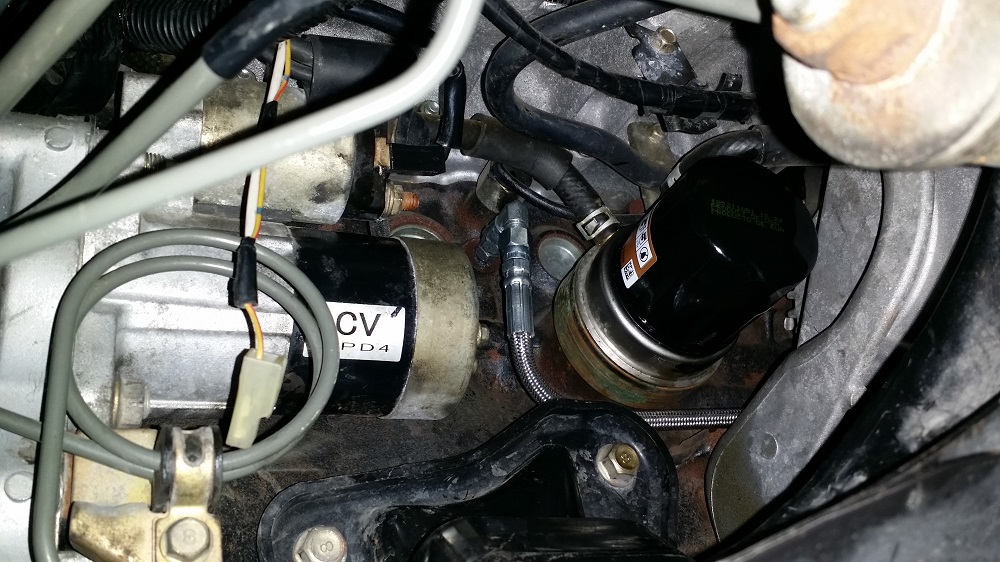
For example, I am now putting the turbo in... it says to attach the oil drain line, oil supply line, and the water line (singular, not plural) to the turbo. It even specifies what fitting to put "the" water line on. The water lines, and oil supply are all the same diameter but different lengths... with no specification of what line goes where... and there are two water lines not one (obviously). In the bag attached to these three lines there are 6 swivel connection fittings. No mention is made of using these fittings, but since there are 6 fittings and 3 hoses I am assuming I need one at each end of each hose.
So far with the exception of the lower radiator hose connection on the mixing manifold, workmanship on the parts has been excellent... but the instructions have caused hours in delays, trying to puzzle out what the **** they are talking about, or doing something wrong and having to re-do it.
Corky said they are re-writing all their instructions (yeah right) so I made a few suggestions. Make a cardboard template you put up against the oil pan with a hole where the center of the oil drain line fitting goes, so you can mark the spot with a sharpie. Also I said that in the instructions they need to say "take part x from bag #y" when they are talking about parts. As they are now, you have to look through a pile of bags and say "I think they mean this part"... and half the time you are wrong.
Keith
The problem is with the horrible instructions. Out of date, and not clear what the **** they are talking about.
For example, I am now putting the turbo in... it says to attach the oil drain line, oil supply line, and the water line (singular, not plural) to the turbo. It even specifies what fitting to put "the" water line on. The water lines, and oil supply are all the same diameter but different lengths... with no specification of what line goes where... and there are two water lines not one (obviously). In the bag attached to these three lines there are 6 swivel connection fittings. No mention is made of using these fittings, but since there are 6 fittings and 3 hoses I am assuming I need one at each end of each hose.
So far with the exception of the lower radiator hose connection on the mixing manifold, workmanship on the parts has been excellent... but the instructions have caused hours in delays, trying to puzzle out what the **** they are talking about, or doing something wrong and having to re-do it.
Corky said they are re-writing all their instructions (yeah right) so I made a few suggestions. Make a cardboard template you put up against the oil pan with a hole where the center of the oil drain line fitting goes, so you can mark the spot with a sharpie. Also I said that in the instructions they need to say "take part x from bag #y" when they are talking about parts. As they are now, you have to look through a pile of bags and say "I think they mean this part"... and half the time you are wrong.
Keith
Reply
0
0
08-27-2014, 01:11 PM
#75
Senior Member
Thread Starter
iTrader: (2)
Join Date: Mar 2014
Location: Meridian, Mississippi
Posts: 628
Total Cats: 44
They do great phone support though when you have to ask... but my shop is an all steel building so I can't talk to them while actually looking at what ever I have questions on.
Keith
Last edited by Twodoor; 08-27-2014 at 01:24 PM.
Reply
0
0
08-27-2014, 04:05 PM
#76
Senior Member
Thread Starter
iTrader: (2)
Join Date: Mar 2014
Location: Meridian, Mississippi
Posts: 628
Total Cats: 44
God Damn it!
******* turbo was supposed to have the compressor housing clocked so it would fit... but it isn't. Now I have to test fit it, remove it, check clearances, test fit it, check it again. Then lock everything down as a last test fit... then take it all back apart and add the oil drain, oil feed, and water lines.
At least it has the kind of compressor housing that you loosen 8 bolts and it can rotate rather than having to remove that damn snap ring. I don't know exactly how this works, it does have the snap ring on that side as well... but the housing does rotate when you loosed the 8 bolts.
sigh
Keith
Reply
0
0


