My N/A track car build
 09-23-2011, 06:42 PM
#21
Senior Member
Thread Starter
iTrader: (12)

Join Date: Nov 2005
Location: Murfreesboro, TN
Posts: 595
Total Cats: 3
When I last updated, the interior and safety stuff was complete and it was time to move onto some mechanical stuff and then bodywork. At that point I was $282.70 in the hole on this car.
To start this update, a friend who was in the process of revitalizing an R package needed some exhaust parts and I had this nice Jackson Racing exhaust system that came with car as well as a cat that he needed. I sold the two of those to him for $330 and got myself back in the black momentarily by $47.30.
When I first brought the car home and before I decided to keep it, I took the 1.8 brakes off and put them on my turbo Miata to upgrade it. Now that I was going to track this car, I figured it was in my best interest to go back to the 1.8 brakes. My buddy Darren had just backdated his �99 10AE to 1.6 brakes to lose the weight on his CSP autocross car and when he found out I was looking for 1.8 brakes, gave me his old setup off of his car. I had a set of Axis Ultimate front and Hawk HP+ rear pads that had almost no wear and used those when I swapped everything back over.
The next order of business was to get the 4:10 open diff out and replace it with the 4:30 Torsen that the previous owner was nice enough to give me with the car. Having done this before, it was a pretty straight forward job that I was able to do by myself in my garage on jack stands. While it was up in the air, I needed to address the exhaust issue since I sold the JR system. I had a test pipe that I use on my turbo car when I drag race and the OEM exhaust from the ES car. I put them on knowing they were not optimal, but at this point all I needed was functional.
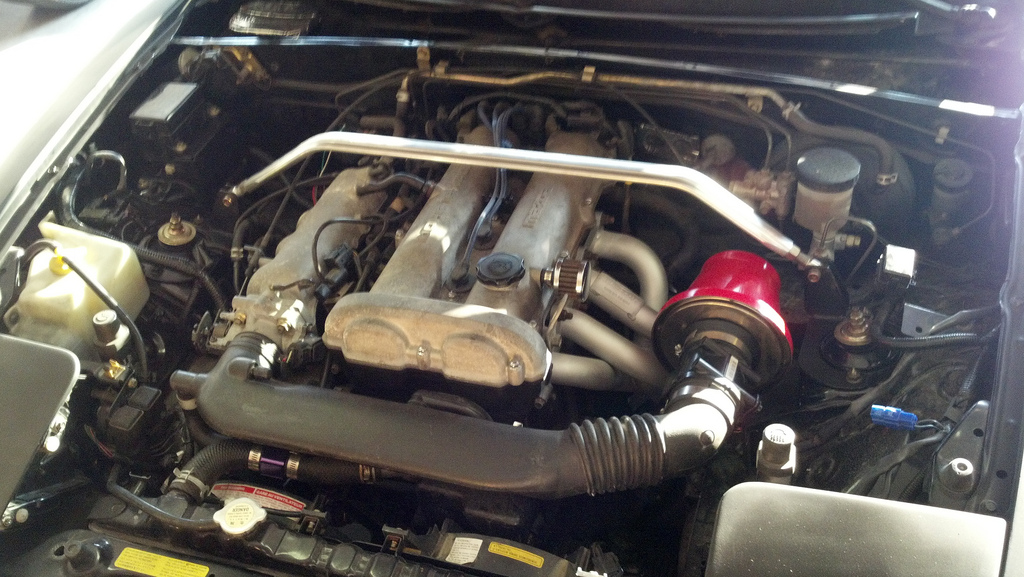
Next was to focus on the engine bay a bit. I started by removing the Jackson Racing header and cleaning it up and repainting it with a good high temp ceramic paint. I then moved on to fabricating an air filter setup. The previous owner gave me 2 different conical filters with the car and the one that seemed to fit best just happened to be bright yellow. A little scuffing up of the filter housing and some red spray paint, that issue was resolved. I then made a mount for the MAF sensor using part of an old alternator bracket to secure things in place. I also had a strut tower bar that used to be on my turbo car that was just laying around, so I added it into the mix.
Now time to spend a little money! With those nice Prosport gauges I installed in the last update, I had no where to mount the sensors. I purchased an inline water temp adapter for the upper radiator hose and an oil filter sandwich plate from Glow Shift to remedy that. These 2 items cost me $42.73 after using an online discount code I found. I then re-plumbed all the vacuum lines with silicon tubing from McMaster Carr ($30.54) and had to plug all the holes in the firewall and floor board since there was no A/C or heat with OEM plugs from Mazda ($17.97). Lastly, I needed to put a battery in and went to the local auto parts store for that and got one for $104.99. Now she is mechanically ready and the total investment to this point is $148.93.
I carried it the following weekend up to the Tweakit Racing shop to line it up. I had concerns about this since I knew the car had been wrecked by the previous owner. After getting the sensor heads on we went through the range of motion and everything seemed to be very equal from side to side. That was a huge relief for me, because if I had got to this point then found out the car was bent, I would have been devastated. Dan proceeded to line it up and we settled on 2.5 degrees of front camber, which resulted in about 3.4 degrees of caster and set the toe at zero. In the rear, we went with 2.0 degrees of camber and just over 1/16 total toe in. While I was at the shop, I mounted up an old set of Hoosier A6�s off of the ES car that still had quite a bit of rubber left onto a set of 14x7 Team Dynamics wheels I bought used for $300. I am now $448.93 in the red.
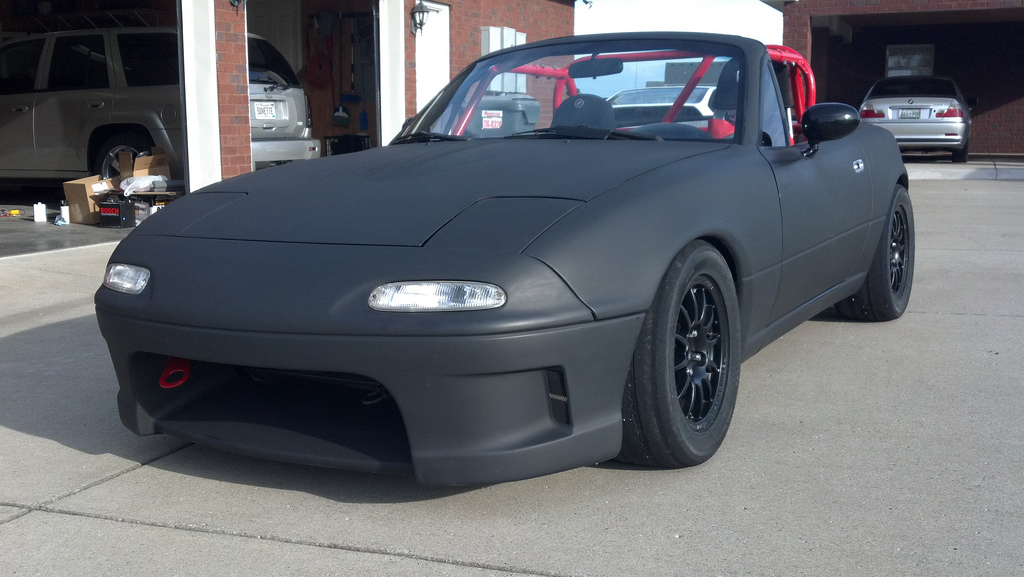
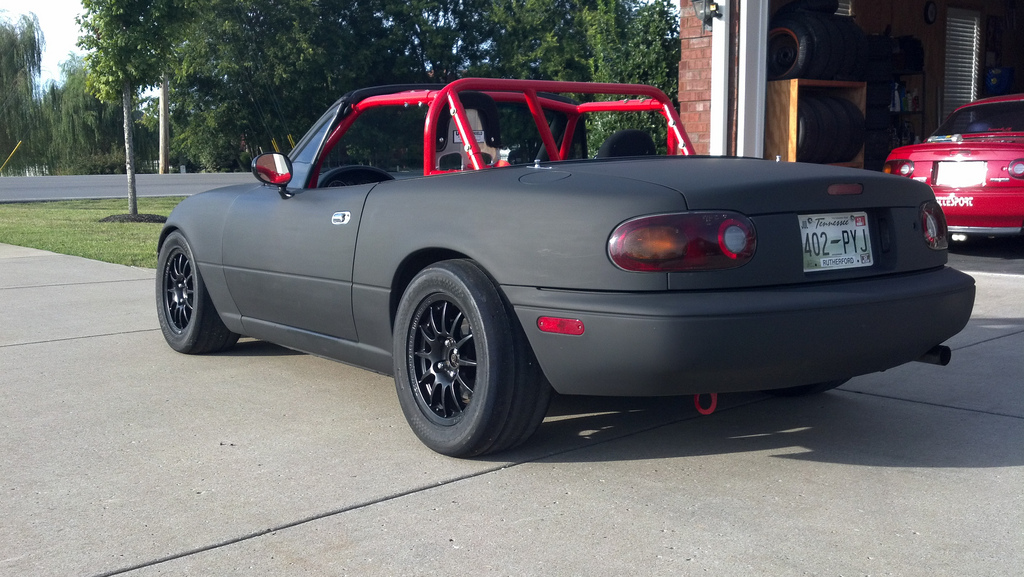
The next order of business was to make it a little more presentable. Most people know I am a little OCD about my cars and there is no way I was going to the track with it looking like it did. Tara had dug all of the bondo out of the body line of the car previously where the guy before me had tried to shave that. I then started blocking the car out where he had put liberal amounts of filler in places that had only minor dings. Once I got the body sorted out, I needed to replace the hood since I had snagged that very nice Garage Vary unit that was on the car for my turbo Miata. I found an OEM hood in the local pull a part for $35 and lined that up along with the Garage Vary front bumper that came with the car. That bumper did however require a little resurrection since the previous owned had filled in the body line on it as well and also molded in a set of TSIs (turn signal inductions). With the body work presentable, I spayed the entire car with black primer from a rattle can ($34.58). I had a set of OEM turn signals left over from my turbo car to put in place of those TSIs. I then installed a set of tow hooks that my parents got me last Christmas. They were free to me, but we will use the cost of $30.45 for this little exercise.
At this point I am $548.96 into the car and it is less than 2 days before I am to hit the track for the first time at the Music City Mustang Club event. The car has not been driven more than a few miles since I took ownership and not at all since most of these changes took place. So with that in mind, I decide to drive it to work for one last shake down prior to its track debut. It was a 50 degree morning and with no top and no heat, it was a bit brisk to say the least. Everything went well for the commute (only 6 miles each way) except I noticed pinging at WOT. That afternoon when I got home, I checked the timing and found the culprit. The timing was set at 20 degrees and the spec is 10 +/-1. I adjusted it to 14 degrees since I know I will be running 93 octane and take it for another quick spin. No pinging this time, so I bring it home and mount up the A6s and put it on the trailer.
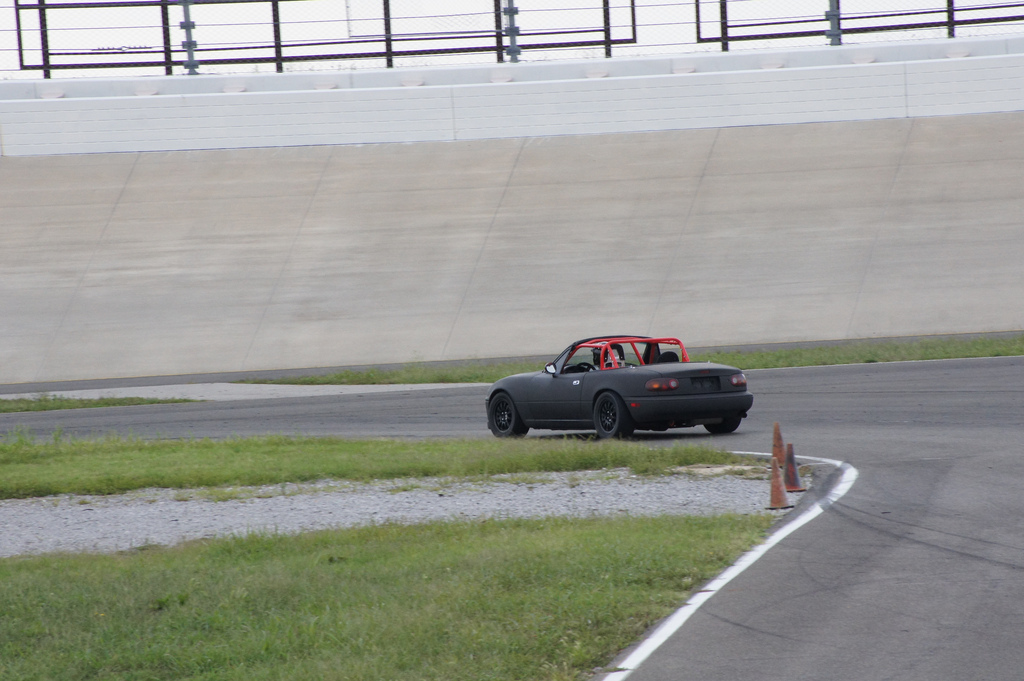
I get to the track (Nashville Superspeedway), get unloaded, through tech inspection, and registered. I am a bit nervous as I go out for the first session, but very excited too. I took it easy on the first one and came back in very pleased with the car and surprised at how well balanced it feels. I go out for the second session and push it a little harder. It still feels good, but has a touch of oversteer with the increased aggression. I soften up the rear bar for the third session, the only adjustment left at this point other than tire pressures, and head back out. The car is better, not perfect, but pretty damned good for what it is. After lunch I rotated the tires to get more even wear since the left rear was looking bad on the inside. It could be that I have too much rear camber, but it may just be this particular layout on the track so I am not adjusting anything just yet. We got seven 15 minute sessions total and for the last two I got to start up front. I was the fastest car in my run group and really had a blast on those last two times out since I didn�t have to deal with much traffic. I also took some video and was able to clock myself with 1:16 and 1:17 laps. For reference, the Spec Miata lap record there is in the 1:12s.

All in all, it was an absolute success! I never hoped or dreamed that the first outing would go so well. I have a few things I would like to do before the next event, but this thing is the best bang for the buck you could ever imagine! Until the next installment, cheers!
To start this update, a friend who was in the process of revitalizing an R package needed some exhaust parts and I had this nice Jackson Racing exhaust system that came with car as well as a cat that he needed. I sold the two of those to him for $330 and got myself back in the black momentarily by $47.30.
When I first brought the car home and before I decided to keep it, I took the 1.8 brakes off and put them on my turbo Miata to upgrade it. Now that I was going to track this car, I figured it was in my best interest to go back to the 1.8 brakes. My buddy Darren had just backdated his �99 10AE to 1.6 brakes to lose the weight on his CSP autocross car and when he found out I was looking for 1.8 brakes, gave me his old setup off of his car. I had a set of Axis Ultimate front and Hawk HP+ rear pads that had almost no wear and used those when I swapped everything back over.
The next order of business was to get the 4:10 open diff out and replace it with the 4:30 Torsen that the previous owner was nice enough to give me with the car. Having done this before, it was a pretty straight forward job that I was able to do by myself in my garage on jack stands. While it was up in the air, I needed to address the exhaust issue since I sold the JR system. I had a test pipe that I use on my turbo car when I drag race and the OEM exhaust from the ES car. I put them on knowing they were not optimal, but at this point all I needed was functional.
Next was to focus on the engine bay a bit. I started by removing the Jackson Racing header and cleaning it up and repainting it with a good high temp ceramic paint. I then moved on to fabricating an air filter setup. The previous owner gave me 2 different conical filters with the car and the one that seemed to fit best just happened to be bright yellow. A little scuffing up of the filter housing and some red spray paint, that issue was resolved. I then made a mount for the MAF sensor using part of an old alternator bracket to secure things in place. I also had a strut tower bar that used to be on my turbo car that was just laying around, so I added it into the mix.
Now time to spend a little money! With those nice Prosport gauges I installed in the last update, I had no where to mount the sensors. I purchased an inline water temp adapter for the upper radiator hose and an oil filter sandwich plate from Glow Shift to remedy that. These 2 items cost me $42.73 after using an online discount code I found. I then re-plumbed all the vacuum lines with silicon tubing from McMaster Carr ($30.54) and had to plug all the holes in the firewall and floor board since there was no A/C or heat with OEM plugs from Mazda ($17.97). Lastly, I needed to put a battery in and went to the local auto parts store for that and got one for $104.99. Now she is mechanically ready and the total investment to this point is $148.93.
I carried it the following weekend up to the Tweakit Racing shop to line it up. I had concerns about this since I knew the car had been wrecked by the previous owner. After getting the sensor heads on we went through the range of motion and everything seemed to be very equal from side to side. That was a huge relief for me, because if I had got to this point then found out the car was bent, I would have been devastated. Dan proceeded to line it up and we settled on 2.5 degrees of front camber, which resulted in about 3.4 degrees of caster and set the toe at zero. In the rear, we went with 2.0 degrees of camber and just over 1/16 total toe in. While I was at the shop, I mounted up an old set of Hoosier A6�s off of the ES car that still had quite a bit of rubber left onto a set of 14x7 Team Dynamics wheels I bought used for $300. I am now $448.93 in the red.
The next order of business was to make it a little more presentable. Most people know I am a little OCD about my cars and there is no way I was going to the track with it looking like it did. Tara had dug all of the bondo out of the body line of the car previously where the guy before me had tried to shave that. I then started blocking the car out where he had put liberal amounts of filler in places that had only minor dings. Once I got the body sorted out, I needed to replace the hood since I had snagged that very nice Garage Vary unit that was on the car for my turbo Miata. I found an OEM hood in the local pull a part for $35 and lined that up along with the Garage Vary front bumper that came with the car. That bumper did however require a little resurrection since the previous owned had filled in the body line on it as well and also molded in a set of TSIs (turn signal inductions). With the body work presentable, I spayed the entire car with black primer from a rattle can ($34.58). I had a set of OEM turn signals left over from my turbo car to put in place of those TSIs. I then installed a set of tow hooks that my parents got me last Christmas. They were free to me, but we will use the cost of $30.45 for this little exercise.
At this point I am $548.96 into the car and it is less than 2 days before I am to hit the track for the first time at the Music City Mustang Club event. The car has not been driven more than a few miles since I took ownership and not at all since most of these changes took place. So with that in mind, I decide to drive it to work for one last shake down prior to its track debut. It was a 50 degree morning and with no top and no heat, it was a bit brisk to say the least. Everything went well for the commute (only 6 miles each way) except I noticed pinging at WOT. That afternoon when I got home, I checked the timing and found the culprit. The timing was set at 20 degrees and the spec is 10 +/-1. I adjusted it to 14 degrees since I know I will be running 93 octane and take it for another quick spin. No pinging this time, so I bring it home and mount up the A6s and put it on the trailer.
I get to the track (Nashville Superspeedway), get unloaded, through tech inspection, and registered. I am a bit nervous as I go out for the first session, but very excited too. I took it easy on the first one and came back in very pleased with the car and surprised at how well balanced it feels. I go out for the second session and push it a little harder. It still feels good, but has a touch of oversteer with the increased aggression. I soften up the rear bar for the third session, the only adjustment left at this point other than tire pressures, and head back out. The car is better, not perfect, but pretty damned good for what it is. After lunch I rotated the tires to get more even wear since the left rear was looking bad on the inside. It could be that I have too much rear camber, but it may just be this particular layout on the track so I am not adjusting anything just yet. We got seven 15 minute sessions total and for the last two I got to start up front. I was the fastest car in my run group and really had a blast on those last two times out since I didn�t have to deal with much traffic. I also took some video and was able to clock myself with 1:16 and 1:17 laps. For reference, the Spec Miata lap record there is in the 1:12s.
All in all, it was an absolute success! I never hoped or dreamed that the first outing would go so well. I have a few things I would like to do before the next event, but this thing is the best bang for the buck you could ever imagine! Until the next installment, cheers!

Reply
 0
0

0


Thread
Thread Starter
Forum
Replies
Last Post


