97 Rotrex HPDE Build
 05-26-2014, 05:02 PM
#1
Senior Member
Thread Starter
iTrader: (4)

Join Date: Nov 2012
Location: Colorado
Posts: 818
Total Cats: 69
Alright I guess it's time for a build thread- been reading, lurking and posting in the bike thread long enough... I've had this 97 Miata almost 2 years; bought it to get into track driving and such. So far it's been to about 12 track days without any serious issues (knock on wood!). This is pretty much my first modified car- I had a Mazdaspeed 3 previously but only did very basic mods (intake, test pipe, accessport canned tunes)- so everything is pretty new to me.
I was all set to start building a copy of 949's rental car setup, but am moving to Colorado in a few months where the elevation would pretty much negate any power gains from where the car is at now. Then E02K had too good a deal to pass up on his used Rotrex kit. So here we go...
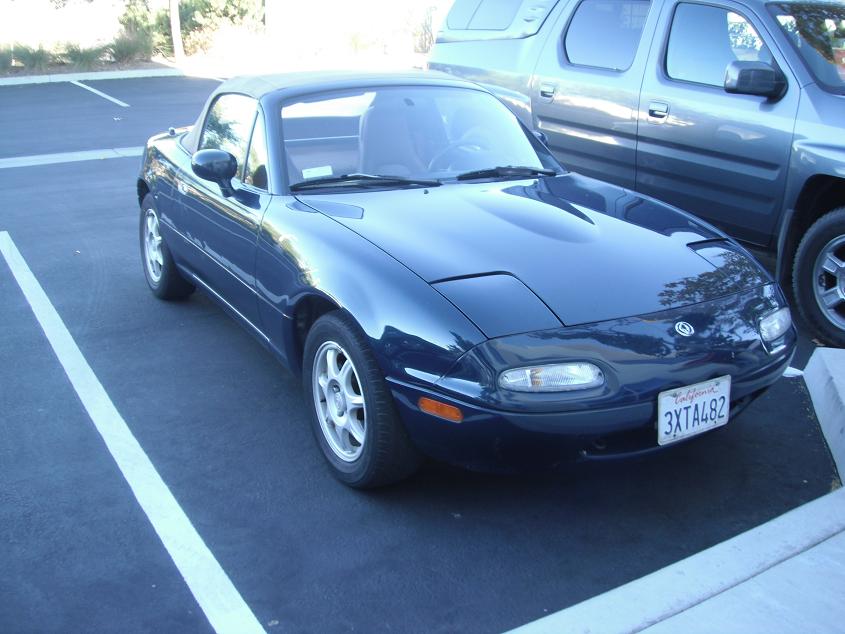
Started here- bone stock, one owner, 103,000 miles:
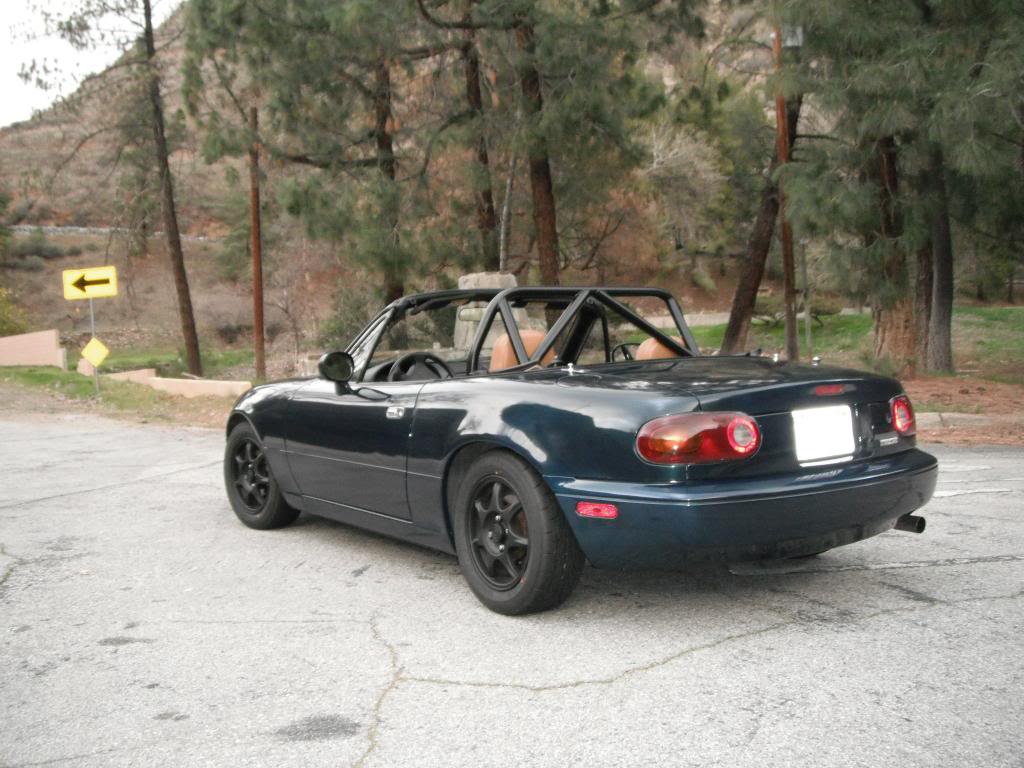
Probably should have stopped here when it was livable on the street and kinda fun on track:
Anyways this is where its at now:
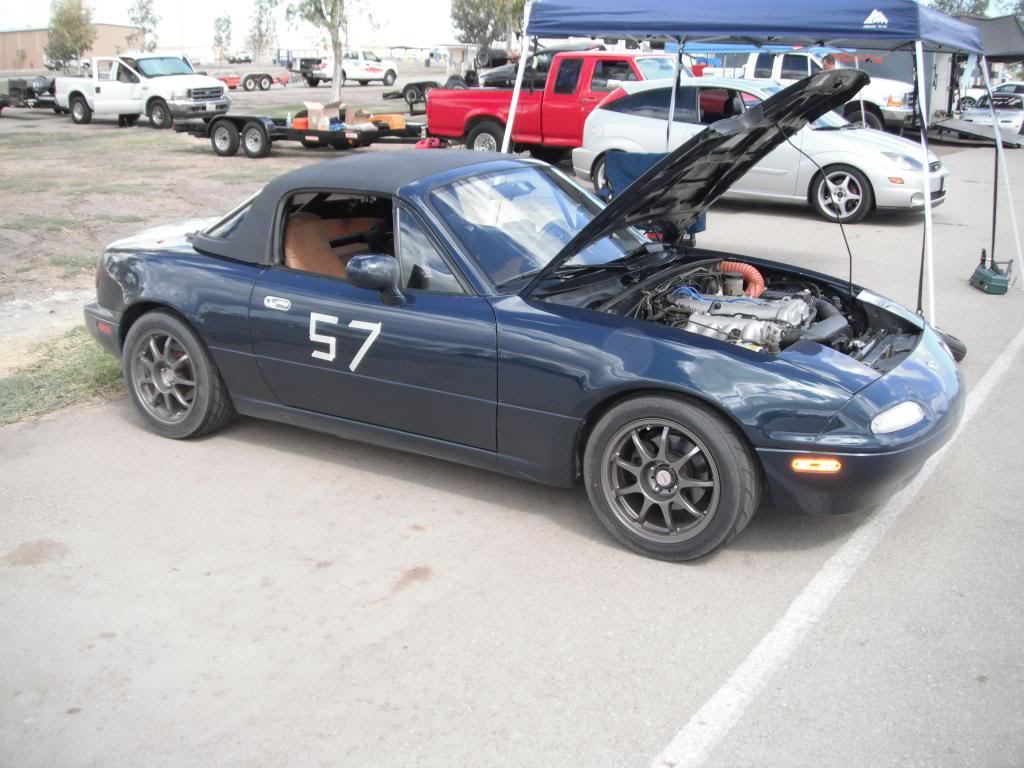
Currently it has:
-Original motor 107k miles
-Exhintake Cam
-RB Header/FM Exhaust
-DIY intake
-Megasquirt 2 PNP
-6 speed
-4.1? Torsen (came with it)
-FM happy meal/stage 1 clutch
-V-maxx Classics with the track springs (underdamped with these heavier springs)
-FM sways
-Kosei K4R 15x8
-BFG Rivals 205/50 (I don't like these as much as my previous RS-3's in 225/45)
-Hardtop
-Frame rails
-Sparco Sprint V & Harness
-Coolant reroute
-A/C PS delete
-Carbotech brake pads/SS lines/ducting
Hopefully I can get the Rotrex up and running on this engine, tune it and work out any kinks. Then eventually I'll install a new motor once this one dies.
Rotrex stuff:
-used Kraftwerks kit (bought from E02K- thanks!)
-Mazdaspeed miata intercooler
-Walbro 190 HP fuel pump
-ID 725 Injectors
-DIY intercooler piping
Just got the injectors and fuel pump in and running this weekend. The injectors seemed to make everything run a little better. Sweet.
Future stuff:
-Ported BP4W head (already have it- bought from TorqueZombie- thanks!)
-Skunk intake mani or squaretop
-new (used) shortblock
-New hubs all around
-Properly de-power steering rack
-15x9 wheels/Hoosiers?
-949 Big Grip Kit
-Big Brakes (if needed- probably will be needed)
-Win at HPDE
Questions for the experts:
1. How/where should I stack the intercooler & Rotrex oil cooler? Intercooler>Rotrex>Rad? Can I run them side-by-side (that would look stupid, but airflow might be better?)
2. Do I need an (engine) oil cooler?
3. Bigger Radiator? (I have the slightly larger rad from an automatic car and a coolant reroute. My temp gauge has never moved even on a 105 degree track day.)
4. Anything I'm missing?
I was all set to start building a copy of 949's rental car setup, but am moving to Colorado in a few months where the elevation would pretty much negate any power gains from where the car is at now. Then E02K had too good a deal to pass up on his used Rotrex kit. So here we go...
Started here- bone stock, one owner, 103,000 miles:

Probably should have stopped here when it was livable on the street and kinda fun on track:

Anyways this is where its at now:

Currently it has:
-Original motor 107k miles
-Exhintake Cam
-RB Header/FM Exhaust
-DIY intake
-Megasquirt 2 PNP
-6 speed
-4.1? Torsen (came with it)
-FM happy meal/stage 1 clutch
-V-maxx Classics with the track springs (underdamped with these heavier springs)
-FM sways
-Kosei K4R 15x8
-BFG Rivals 205/50 (I don't like these as much as my previous RS-3's in 225/45)
-Hardtop
-Frame rails
-Sparco Sprint V & Harness
-Coolant reroute
-A/C PS delete
-Carbotech brake pads/SS lines/ducting
Hopefully I can get the Rotrex up and running on this engine, tune it and work out any kinks. Then eventually I'll install a new motor once this one dies.
Rotrex stuff:
-used Kraftwerks kit (bought from E02K- thanks!)
-Mazdaspeed miata intercooler
-Walbro 190 HP fuel pump
-ID 725 Injectors
-DIY intercooler piping
Just got the injectors and fuel pump in and running this weekend. The injectors seemed to make everything run a little better. Sweet.
Future stuff:
-Ported BP4W head (already have it- bought from TorqueZombie- thanks!)
-Skunk intake mani or squaretop
-new (used) shortblock
-New hubs all around
-Properly de-power steering rack
-15x9 wheels/Hoosiers?
-949 Big Grip Kit
-Big Brakes (if needed- probably will be needed)
-Win at HPDE
Questions for the experts:
1. How/where should I stack the intercooler & Rotrex oil cooler? Intercooler>Rotrex>Rad? Can I run them side-by-side (that would look stupid, but airflow might be better?)
2. Do I need an (engine) oil cooler?
3. Bigger Radiator? (I have the slightly larger rad from an automatic car and a coolant reroute. My temp gauge has never moved even on a 105 degree track day.)
4. Anything I'm missing?

Reply
 1
1

1
05-26-2014, 05:48 PM
#2

No need for this with the MS and big injectors. Too late to return?
With good fluid and pads, the Miata's brakes can take a bunch of abuse. But they do taper the pads. The BBK's with Wilwood calipers will give you a maintenance advantage there. I'd do Emilio's 11.75" kit because the replacement rotors are much cheaper than the typical 11" kits for some reason.
Questions for the experts:
1. How/where should I stack the intercooler & Rotrex oil cooler? Intercooler>Rotrex>Rad? Can I run them side-by-side (that would look stupid, but airflow might be better?)
2. Do I need an (engine) oil cooler?
3. Bigger Radiator? (I have the slightly larger rad from an automatic car and a coolant reroute. My temp gauge has never moved even on a 105 degree track day.)
4. Anything I'm missing?
1. Intercooler (target temperature near ambient)
2. Radiator (target temperature 190)
3. Oil Cooler (targent temperature low-mid 200s)
You will want an engine oil cooler. With good ducting and the reroute, you may not need a bigger radiator -- but you'll know soon enough. The intercooler does a good job of blocking it unfortunately.
Add dedicated/accurate water and oil temp gauges if you don't already have them. If you add a BBK or start experimenting with pads, an adjustable prop valve is nice.
Reply
0
0
05-26-2014, 07:56 PM
#3
Senior Member
Thread Starter
iTrader: (4)
Join Date: Nov 2012
Location: Colorado
Posts: 818
Total Cats: 69
Looks like you're fixin' to take care of that issue. LOL.
Haha, yes that is expected.
No need for this with the MS and big injectors. Too late to return?
Came with the kit.
With good fluid and pads, the Miata's brakes can take a bunch of abuse. But they do taper the pads. The BBK's with Wilwood calipers will give you a maintenance advantage there. I'd do Emilio's 11.75" kit because the replacement rotors are much cheaper than the typical 11" kits for some reason.
I've got good pads, ducting, prop valve etc. I'll wait and see what happens with the brakes.
You should stack heat exchangers by order of the fluid temperatures you want to maintain. Coolest in front. So:
1. Intercooler (target temperature near ambient)
2. Radiator (target temperature 190)
3. Oil Cooler (targent temperature low-mid 200s)
Same thing with Rotrex oil cooler though?
You will want an engine oil cooler. With good ducting and the reroute, you may not need a bigger radiator -- but you'll know soon enough. The intercooler does a good job of blocking it unfortunately.
Add dedicated/accurate water and oil temp gauges if you don't already have them. If you add a BBK or start experimenting with pads, an adjustable prop valve is nice.
Thanks for the advice.
Reply
0
0
05-26-2014, 08:26 PM
#4
Not sure about the Rotrex oil cooler. Assume that oil system is separate from the engine's? What's the target temperature for the oil? Since that oil is part of the induction system (and you don't want to heat inlet air), I'm thinking the target temp for that is cooler than for the radiator?
Reply
0
0
06-09-2014, 11:15 PM
#5
Senior Member
Thread Starter
iTrader: (4)
Join Date: Nov 2012
Location: Colorado
Posts: 818
Total Cats: 69
It runs!!!!!!
 art y:
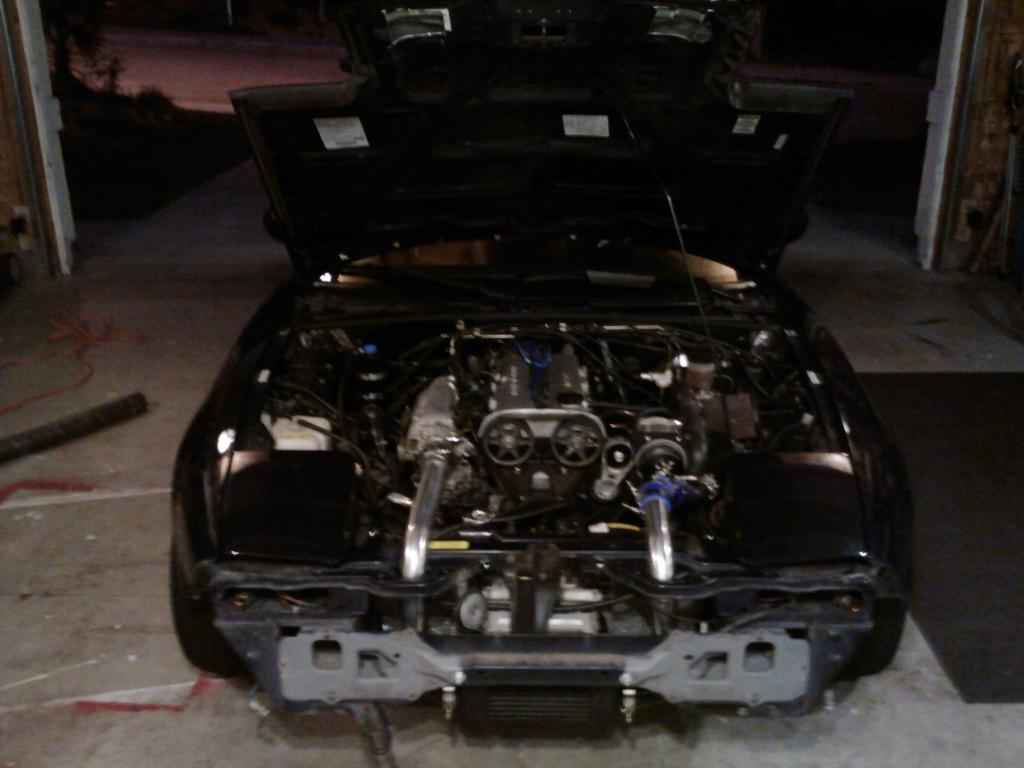
Kinda ghetto-rigged the NB kit intake piping to fit an NA with intercooler, so that may need to be revisited when I get access to a welder, but everything else turned out pretty decent.
drove around the block like this, nothing weird happened- didn't hear any pinging or sputtering or backfires so that is good. Will try to get dyno tuned in the next few weeks.
The only issue is when I rev the engine, then let it drop back down to idle- the megasquirt seems to have a hard time 'catching' the revs as they drop and it oscillates and usually stalls. The idle works perfect when it is just sitting there. Any recommendations on what to play with in tunerstudio to correct this?
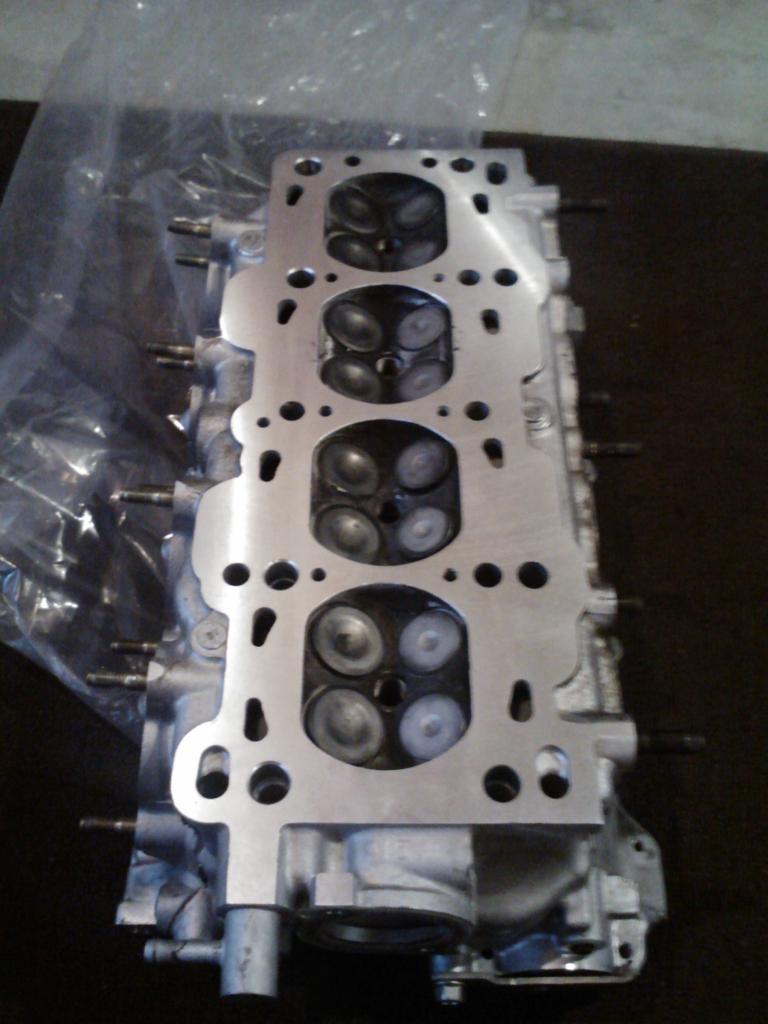
Also picked this up from the shop (Tim's Porting):
art y:Kinda ghetto-rigged the NB kit intake piping to fit an NA with intercooler, so that may need to be revisited when I get access to a welder, but everything else turned out pretty decent.
drove around the block like this, nothing weird happened- didn't hear any pinging or sputtering or backfires so that is good. Will try to get dyno tuned in the next few weeks.
The only issue is when I rev the engine, then let it drop back down to idle- the megasquirt seems to have a hard time 'catching' the revs as they drop and it oscillates and usually stalls. The idle works perfect when it is just sitting there. Any recommendations on what to play with in tunerstudio to correct this?
Also picked this up from the shop (Tim's Porting):
Reply
1
1
06-10-2014, 12:39 AM
#6
Elite Member
iTrader: (37)

Join Date: Apr 2010
Location: Very NorCal
Posts: 10,441
Total Cats: 1,899
Very nice! Any issues getting the Rotrex primed? I did my best to make sure it didn't completely drain. I'm guessing that's the 4W head, but its not installed yet?
What exactly did the folks at Tim's do to the head (and if you don't mind me be completely nosy) what did it end up costing?
Make with the VEAL and get that fuel map sorted!
What exactly did the folks at Tim's do to the head (and if you don't mind me be completely nosy) what did it end up costing?
Make with the VEAL and get that fuel map sorted!
Reply
0
0
06-10-2014, 10:52 AM
#7
Senior Member
Thread Starter
iTrader: (4)
Join Date: Nov 2012
Location: Colorado
Posts: 818
Total Cats: 69
Very nice! Any issues getting the Rotrex primed? I did my best to make sure it didn't completely drain. I'm guessing that's the 4W head, but its not installed yet?
What exactly did the folks at Tim's do to the head (and if you don't mind me be completely nosy) what did it end up costing?
Make with the VEAL and get that fuel map sorted!
What exactly did the folks at Tim's do to the head (and if you don't mind me be completely nosy) what did it end up costing?
Make with the VEAL and get that fuel map sorted!
Haha, yes I followed Kraftwerks' directions and tried using compressed air... and blew oil all over the engine bay and windshield. But after cleaning up that mess- I disconnected CAS and cranked the engine a few times with the 'out' fitting loose and it primed pretty easily.
Ya that is the bp4w head- Tim's did a basic 'stage 1' porting job, valve job, replaced valve seals, cleaned and decked the head. Paid $300 and took 2 1/2 weeks. Seemed very reasonable to me, although I've never had anything like that done before so IDK?
Reply
0
0
06-10-2014, 11:31 AM
#9
Elite Member
iTrader: (37)
Join Date: Apr 2010
Location: Very NorCal
Posts: 10,441
Total Cats: 1,899
Haha, yes I followed Kraftwerks' directions and tried using compressed air... and blew oil all over the engine bay and windshield. But after cleaning up that mess- I disconnected CAS and cranked the engine a few times with the 'out' fitting loose and it primed pretty easily.
 Thanks for the info!
Get that head installed! You can drive the mighty honda in the mean time
Reply
0
0
06-10-2014, 11:54 AM
#10
Senior Member
Thread Starter
iTrader: (4)
Join Date: Nov 2012
Location: Colorado
Posts: 818
Total Cats: 69
Aw crap, sorry about that. It is kinda funny though, because I did the exact same thing at least once. At least now you know what the stuff smells like, just in case there is a leak? (silver lining, etc)
That's a damn steal. Did they shim the cams or do the valve guides as well? I may have to give them a call, once you get this installed and whomp on it a bit. Thanks for the info!
Get that head installed! You can drive the mighty honda in the mean time
That's a damn steal. Did they shim the cams or do the valve guides as well? I may have to give them a call, once you get this installed and whomp on it a bit.
Thanks for the info! Get that head installed! You can drive the mighty honda in the mean time
He didn't shim the cams and no valve guides, although he said he'd give me shims for free if I figure out what I needed. I assume he'd do all that stuff if you requested it. Either way it's going to be a while before this head gets installed- I think I'm going to either buy or build another short block.
Reply
0
0
 06-10-2014, 11:15 PM
#12
Senior Member
Thread Starter
iTrader: (4)
Join Date: Nov 2012
Location: Colorado
Posts: 818
Total Cats: 69
Got the bumper and all other **** back installed and got out for a decent 20 minute drive. Everything feels pretty damn good considering- car pulls pretty hard after 4k...
One issue though:
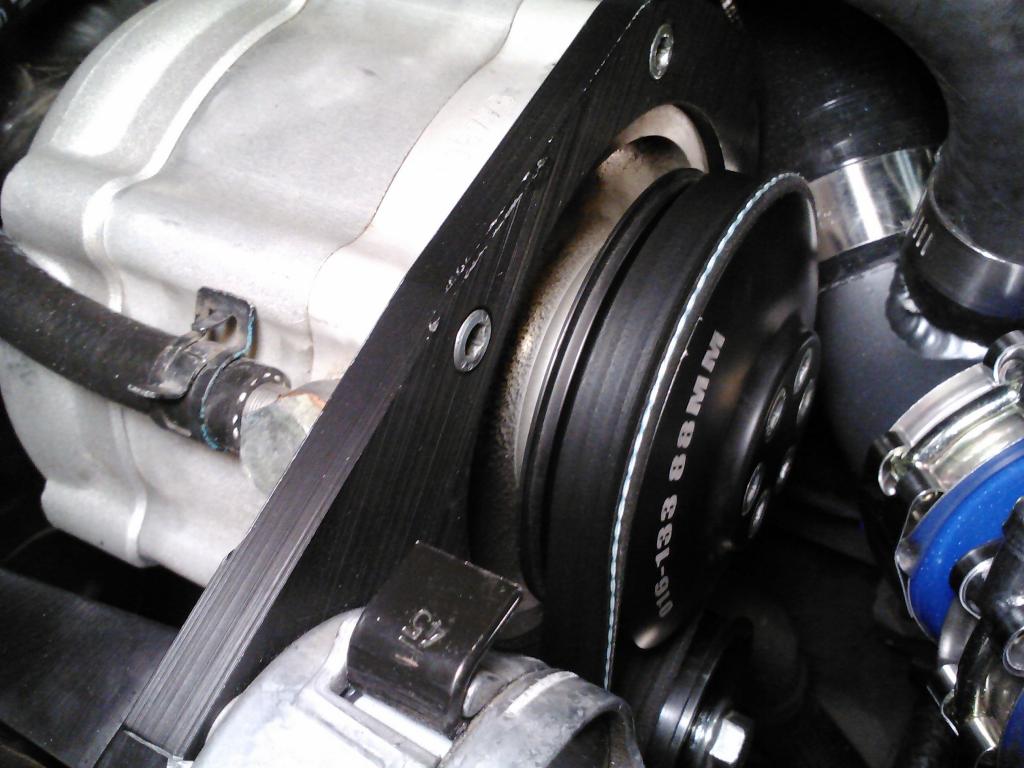
The belt moves over one rib after a while. Gordon- you solved this on your car correct? I am not currently using the modified tensioner hole- I'll switch to that and anything else I should try? more belt tension? Alignment issue?
Edit: found the post I was looking for... https://www.miataturbo.net/random-su...e3/#post951636
One issue though:
The belt moves over one rib after a while. Gordon- you solved this on your car correct? I am not currently using the modified tensioner hole- I'll switch to that and anything else I should try? more belt tension? Alignment issue?
Edit: found the post I was looking for... https://www.miataturbo.net/random-su...e3/#post951636
Last edited by dcamp2; 06-10-2014 at 11:29 PM.
Reply
0
0
06-11-2014, 12:44 PM
#13
Elite Member
iTrader: (37)
Join Date: Apr 2010
Location: Very NorCal
Posts: 10,441
Total Cats: 1,899
Yes! Use the dual bearing steel idler with the flat face and the auto tensioner with the one leg. There is a stack of shims behind the pulley on the auto tensioner that may need to be adjusted.
Are my adjustment marks still on the auto tensioner?
Unfortunately its a balancing act and its going to take some time to work out. Get Gates MicroV belts from O'Reilly with the warranty so you can return them if it strips a rib. The Goodyear Gatorback are also bitchen' belts as well.
Are my adjustment marks still on the auto tensioner?
Unfortunately its a balancing act and its going to take some time to work out. Get Gates MicroV belts from O'Reilly with the warranty so you can return them if it strips a rib. The Goodyear Gatorback are also bitchen' belts as well.
Reply
0
0
06-11-2014, 02:59 PM
#14
Senior Member
Thread Starter
iTrader: (4)
Join Date: Nov 2012
Location: Colorado
Posts: 818
Total Cats: 69
Yes! Use the dual bearing steel idler with the flat face and the auto tensioner with the one leg. There is a stack of shims behind the pulley on the auto tensioner that may need to be adjusted.
Are my adjustment marks still on the auto tensioner?
Unfortunately its a balancing act and its going to take some time to work out. Get Gates MicroV belts from O'Reilly with the warranty so you can return them if it strips a rib. The Goodyear Gatorback are also bitchen' belts as well.
Are my adjustment marks still on the auto tensioner?
Unfortunately its a balancing act and its going to take some time to work out. Get Gates MicroV belts from O'Reilly with the warranty so you can return them if it strips a rib. The Goodyear Gatorback are also bitchen' belts as well.
Thanks for the belt advice

Reply
0
0
06-14-2014, 06:48 PM
#15
Senior Member
Thread Starter
iTrader: (4)
Join Date: Nov 2012
Location: Colorado
Posts: 818
Total Cats: 69
Think I cured the jumping belt... Got a good 30 minute drive with some WOT and the belt stayed put.
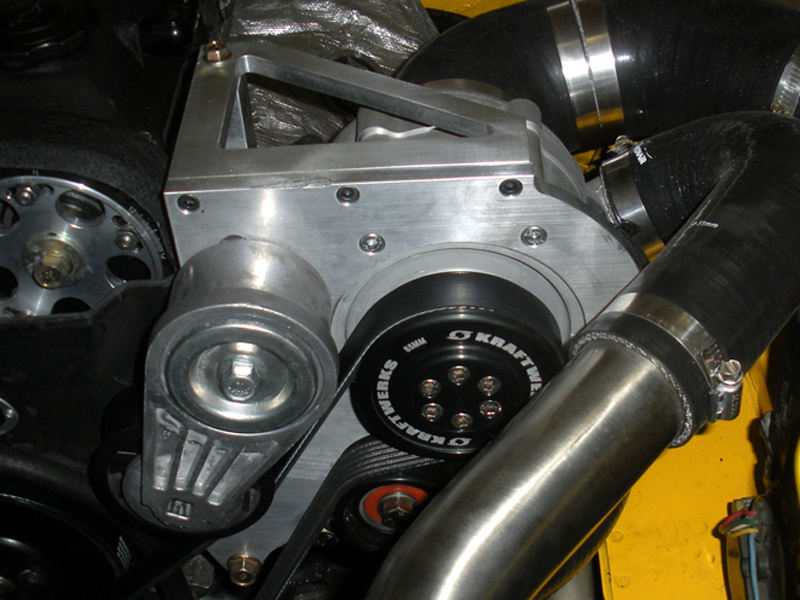
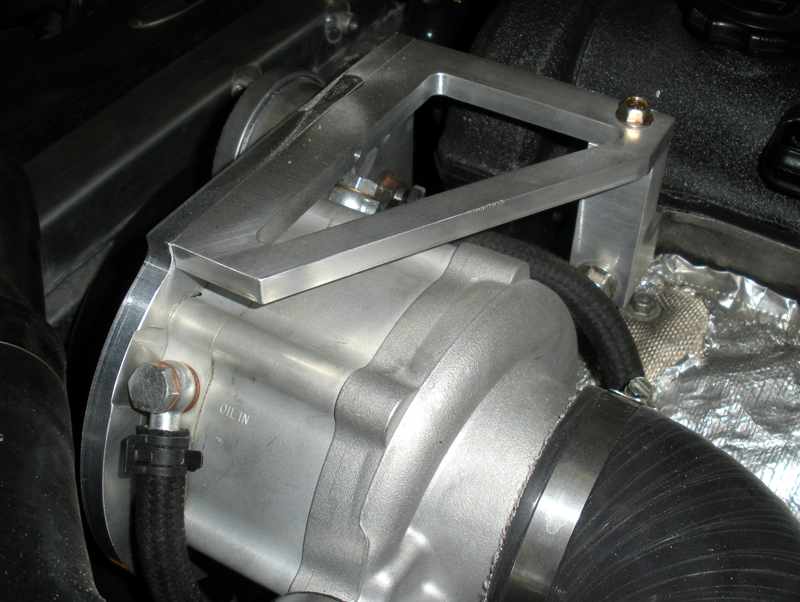
I removed the L bracket that ties the mounting plate to the engine block and milled off .075" (width of a washer I had laying around). This pulls the rotrex towards the back of the car.
The belt jumping seems to be from the flexy mounting plate that Kraftwerks uses. When you get on the throttle and spin up the charger, the belt tension increases and flexes the supercharger forward, allowing the belt to jump over. I watched the belt jump just by revving the engine in the driveway. So by milling down the bracket and pulling the alignment a little towards the back of the car- the tension can't pull the pulley forward enough to make the belt jump. Hope that makes sense.
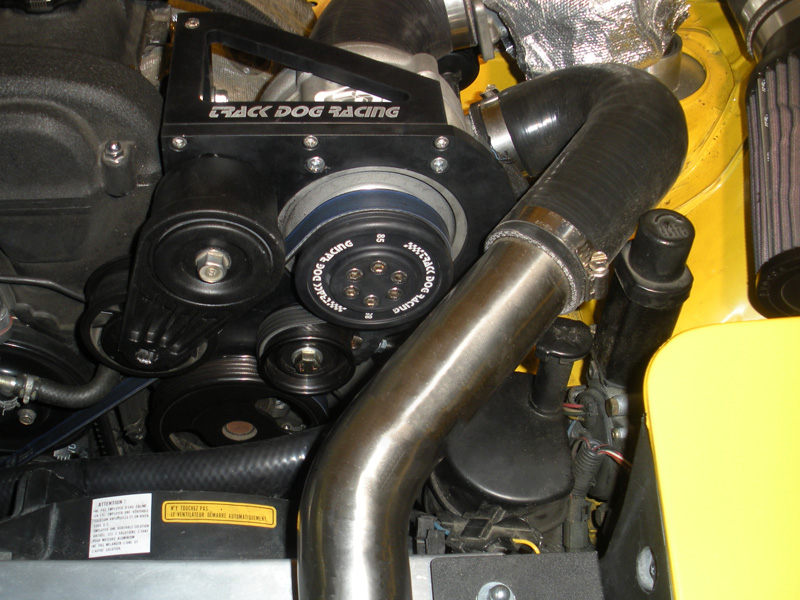
Anyways- it looks like Track Dog has this figured out and will hopefully sell just their mounting brackets:
I removed the L bracket that ties the mounting plate to the engine block and milled off .075" (width of a washer I had laying around). This pulls the rotrex towards the back of the car.
The belt jumping seems to be from the flexy mounting plate that Kraftwerks uses. When you get on the throttle and spin up the charger, the belt tension increases and flexes the supercharger forward, allowing the belt to jump over. I watched the belt jump just by revving the engine in the driveway. So by milling down the bracket and pulling the alignment a little towards the back of the car- the tension can't pull the pulley forward enough to make the belt jump. Hope that makes sense.
Anyways- it looks like Track Dog has this figured out and will hopefully sell just their mounting brackets:
Reply
0
0
06-14-2014, 09:09 PM
#17

I have seen and been driven in the TrackDog Rotrex car. The stuff is done, they said they are just waiting on parts to build inventory. Call them and ask if they will sell you a bracket, they have several. I compared the Kraftwerks and TDR brackets side by side and I came to same conclusion about how flexy the KF one is.
Reply
0
0
06-14-2014, 09:57 PM
#18
Senior Member
Thread Starter
iTrader: (4)
Join Date: Nov 2012
Location: Colorado
Posts: 818
Total Cats: 69
Huh, I feel like the supercharger is less complications vs turbo. No wastegate/boost creep issues, less heat, no change to my expensive exhaust, exhaust wont' melt or crack, etc.
I have seen and been driven in the TrackDog Rotrex car. The stuff is done, they said they are just waiting on parts to build inventory. Call them and ask if they will sell you a bracket, they have several. I compared the Kraftwerks and TDR brackets side by side and I came to same conclusion about how flexy the KF one is.
That is good to hear. I'll run this one for now, but if it continues to give me issues, I'll buy a TDR bracket assembly.
Yeah, I thought the Kraftwerks one was going to be flexy just by looking at it. It's like 1/4 aluminum and the back is all machined out. stupid.
Reply
0
0
06-15-2014, 12:09 AM
#19
Elite Member

iTrader: (2)
Join Date: May 2008
Location: Portland, Oregon
Posts: 3,468
Total Cats: 365
Looks good!
Keep the 190 fuel pump. Unless I missed something somewhere, you will need more fuel pump than stock. I would recommend DW300 (which I have) but you already have the 190 so go with that.
I had a belt alignment problem initially, but an updated version of the mounting plate and autotensioner solved that. I haven't had any belt walking problems as you describe.
You are using the 88mm pulley? Skunk2 has an 80mm which will bolt right on (which I am running). You can get a 75mm from Underdog Racing (which I have) but installing it is more complicated and I haven't moved to it yet. Skunk2 puts an adapter on the nose, which the 88 and 80mm pulleys bolt onto; the 75mm pulley bolts directly to the rotrex replacing that adapter.
Other than the belt issues with the initial V1 kit, I have had zero boost-related issues with the car. For weekend warrior duty it's awesome.
Reply
0
0
06-15-2014, 12:12 PM
#20
Senior Member
Thread Starter
iTrader: (4)
Join Date: Nov 2012
Location: Colorado
Posts: 818
Total Cats: 69
Mobius- Yeah, I have the stock 88mm pulley. You should install the 75mm pulley and sell me your 80mm...
Do you know how much boost is at redline 88 vs 80 vs 75?
Do you know how much boost is at redline 88 vs 80 vs 75?
Reply
0
0


