Nothing to see here, just project Sisyphus, move along
 08-12-2014, 04:03 PM
#321
Elite Member
Thread Starter
iTrader: (37)

Join Date: Apr 2010
Location: Very NorCal
Posts: 10,441
Total Cats: 1,899
Fine, here:
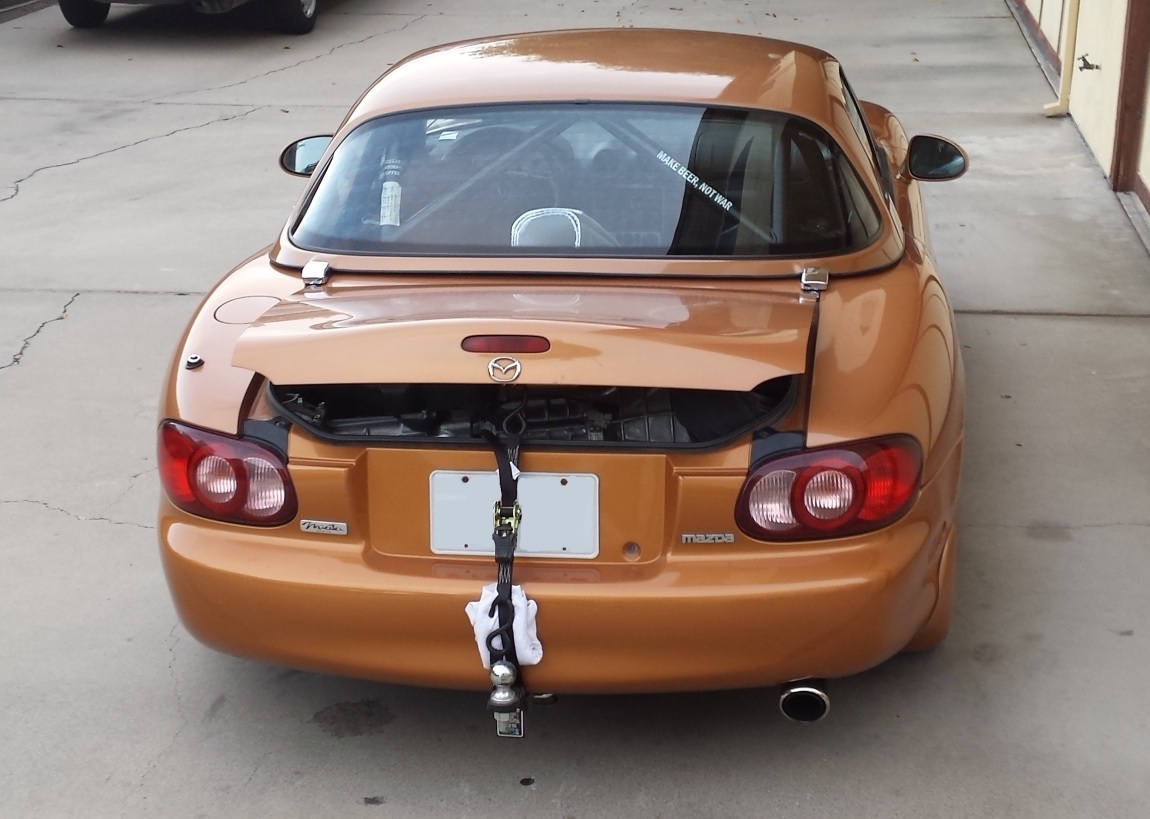
That's my car with the 6 speed in the trunk. I eventually pulled the passenger seat and just tossed it in the footwell.
Also more parts arrived today! Stupid CXRacing apparently can't tell the difference between blue and black. That's going to be replaced because you have no idea how much that kind of stuff bugs me.
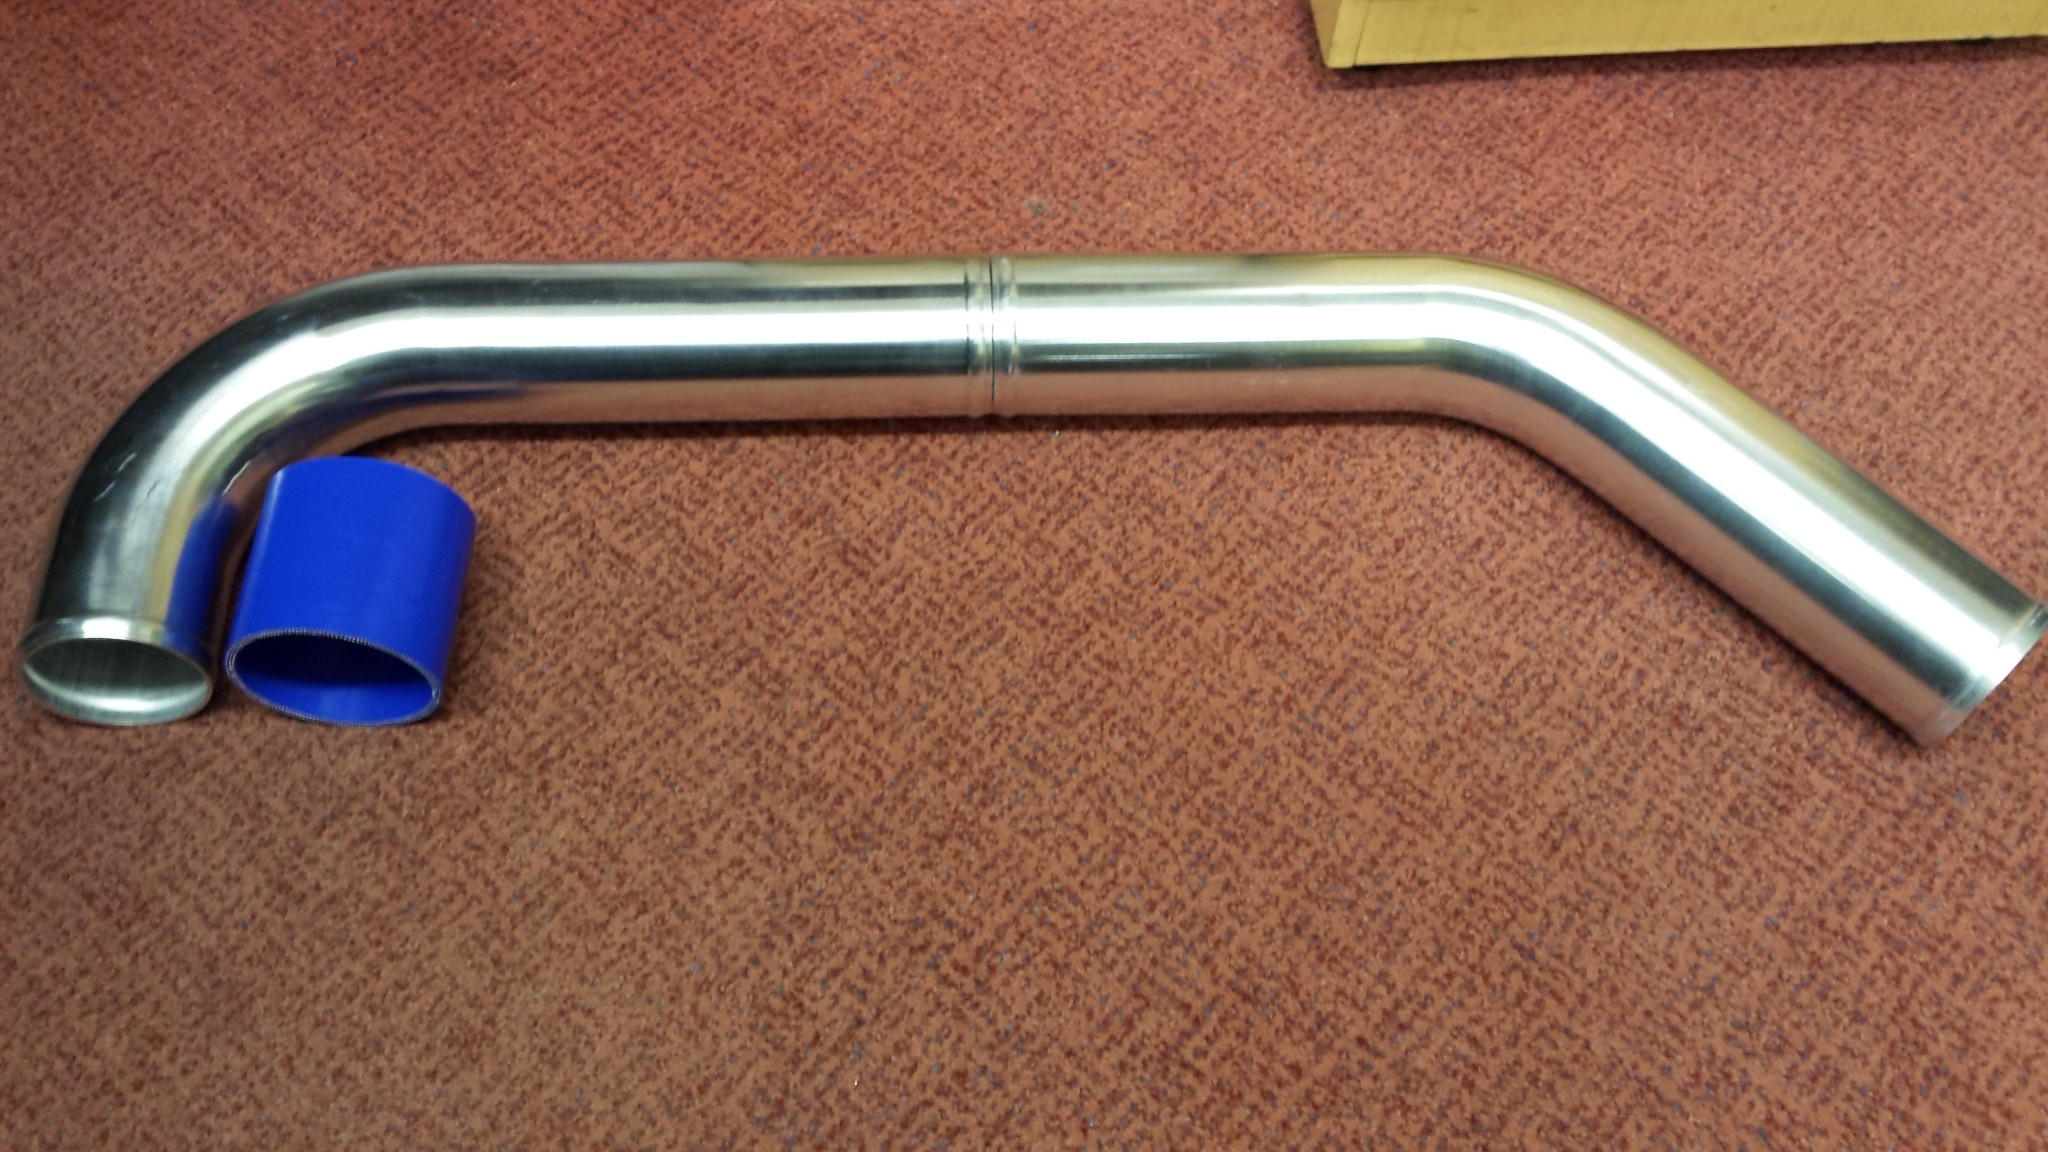
A little cut, a little zap, fabricate a brace with some vibration isolation and boom! 2.75" intake. Yes, it'll get welded in the middle. I'm going to shoot for somewhere around 18-23 inches, depending on how things line up. I'll also wrap it with something for a bit of heat isolation. I'll probably have to cut the 90� section down a bit to clear the radiator, but I'll know more after I actually get the radiator installed. I know I've got a 3/8" NPT weld bung somewhere for the GM IAT, I just need to find it.
I'll be using an aFe "ProDry S" filter that I picked up from somewhere a while ago. I believe it's the same model that GoodWin Racing has in their "clearance" section of their website.
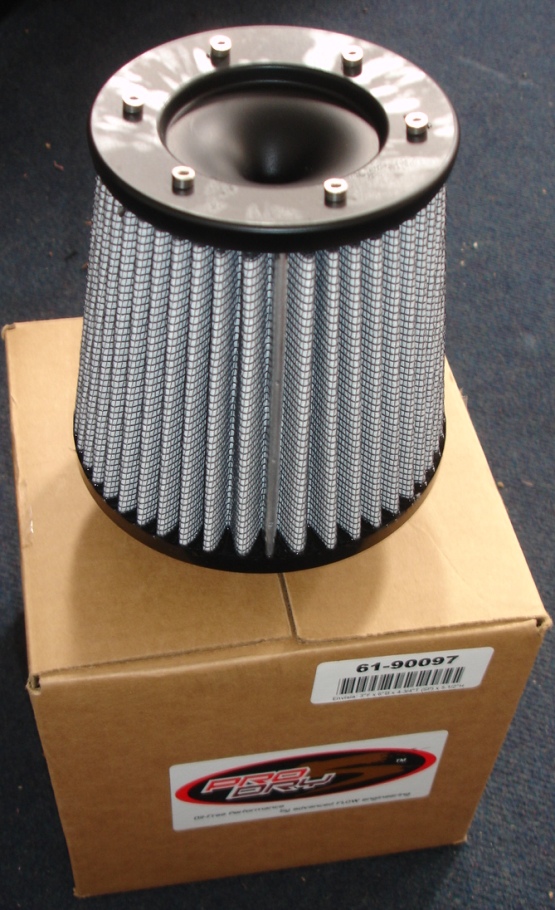
It's got that neat inverted cone inside to help guide air into the tube. I thought it was neat anyway.
So yeah, stuffs happening.
That's my car with the 6 speed in the trunk. I eventually pulled the passenger seat and just tossed it in the footwell.
Also more parts arrived today! Stupid CXRacing apparently can't tell the difference between blue and black. That's going to be replaced because you have no idea how much that kind of stuff bugs me.
A little cut, a little zap, fabricate a brace with some vibration isolation and boom! 2.75" intake. Yes, it'll get welded in the middle. I'm going to shoot for somewhere around 18-23 inches, depending on how things line up. I'll also wrap it with something for a bit of heat isolation. I'll probably have to cut the 90� section down a bit to clear the radiator, but I'll know more after I actually get the radiator installed. I know I've got a 3/8" NPT weld bung somewhere for the GM IAT, I just need to find it.
I'll be using an aFe "ProDry S" filter that I picked up from somewhere a while ago. I believe it's the same model that GoodWin Racing has in their "clearance" section of their website.
It's got that neat inverted cone inside to help guide air into the tube. I thought it was neat anyway.
So yeah, stuffs happening.

Reply
 0
0

0
08-13-2014, 11:33 PM
#322
Elite Member
Thread Starter
iTrader: (37)
Join Date: Apr 2010
Location: Very NorCal
Posts: 10,441
Total Cats: 1,899
Well, that was easy. Slapped the intake thing together and it came out to 23" almost exactly. I could probably shorten it my another 2~3" if I really wanted to, but I keep reading that 18-23 is ideal, so I'll just leave it alone. I should probably install the radiator and make sure it still fits  Also need to make some braces for it.
Midpipe got backordered or something so its not here yet. Vendor says manufacturer got them back in stock today, so maybe it'll ship tomorrow. If it ships tomorrow there is a slim chance I'll get it before close of business on Friday. Slim. /grumblecakesf
I pulled out the Wideband CAN interface box tonight when I got home and realized that I have a shitload of wires to deal with with the addition to the gauges. I could hardwire everything but that makes it a bitch to work with/around. I need to find some connectors to keep things modular and serviceable. Anyone got recommendations?
Also need to make some braces for it.Midpipe got backordered or something so its not here yet. Vendor says manufacturer got them back in stock today, so maybe it'll ship tomorrow. If it ships tomorrow there is a slim chance I'll get it before close of business on Friday. Slim. /grumblecakesf
I pulled out the Wideband CAN interface box tonight when I got home and realized that I have a shitload of wires to deal with with the addition to the gauges. I could hardwire everything but that makes it a bitch to work with/around. I need to find some connectors to keep things modular and serviceable. Anyone got recommendations?
Reply
0
0
08-19-2014, 01:27 AM
#323
Elite Member
Thread Starter
iTrader: (37)
Join Date: Apr 2010
Location: Very NorCal
Posts: 10,441
Total Cats: 1,899
Last of the N/A exhaust parts arrived earlier today. Yay. Behold its stainless steel wonderment!
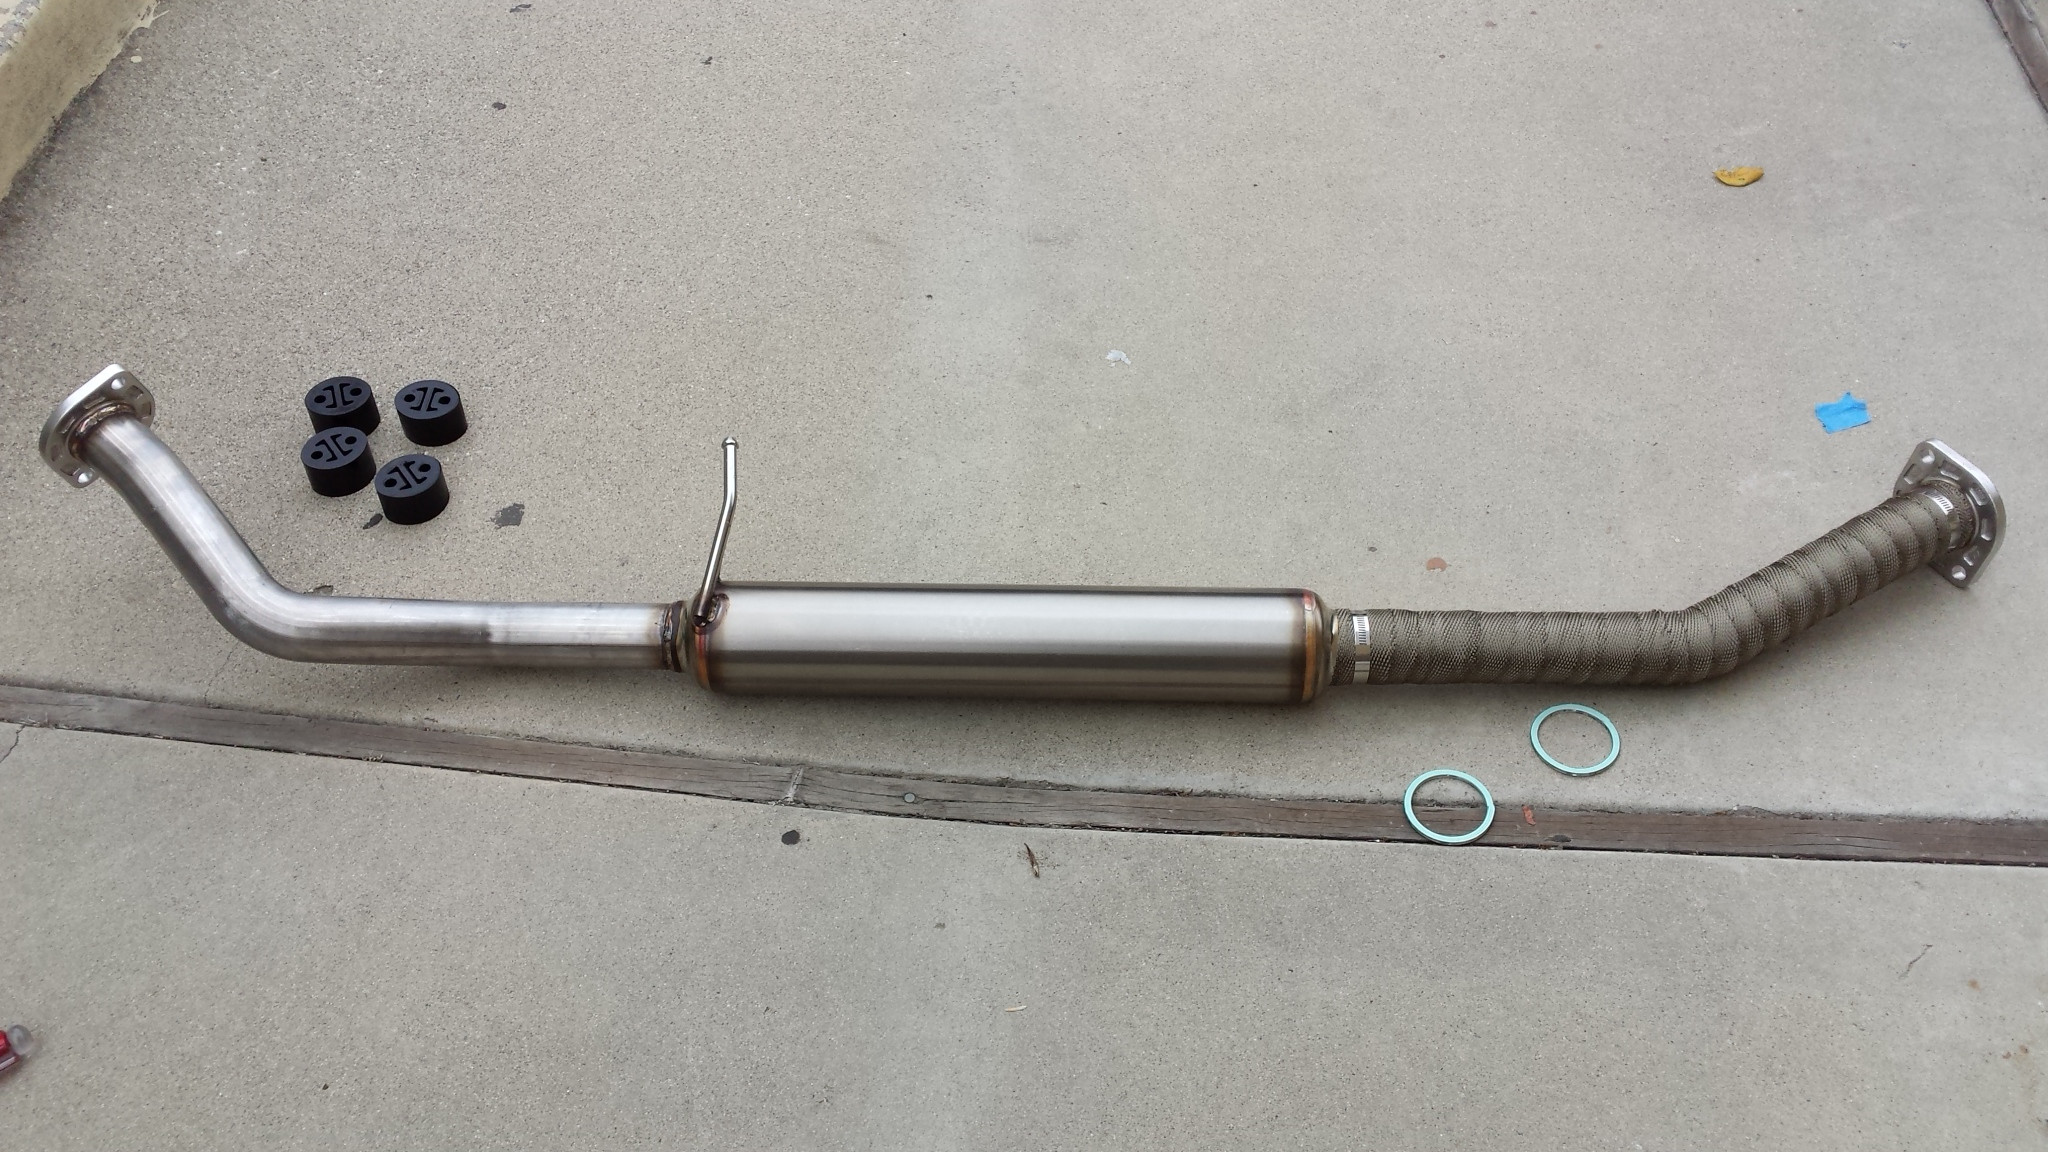
That's right, I wrapped the forward section of that beezy up with DEI Titanium Exhaust Wrap.
I managed to get off work on time for once and figured I could get the Racing Beat Midpipe and Squaretop installed before dark today.

And now I understand why people part-out at the drop of a hat. It took me THREE ******* HOURS just to get the midpipe installed and I never even looked at the squaretop. A variety of things took turns bending me over and having their way with me, far more things than I care to go into detail about at this point. Sufficed to say, the midpipe is finally installed and the car is driveable again.
So I've got that going for me, which is nice.
To show my appreciation, I went and flogged the everlivingshit out of the car for about an hour to burn the lube and **** off the pipes and heat wrap and whatnot. I will say this: the Racing Beat Header + Midpipe + Power Pulse Single is a respectable N/A exhaust. Its not too loud, just loud enough to remind you its a "performance" exhaust. When you mash the loud pedal in 3rd under an overpass it sounds a lot like a sportbike Cruising at 65mph it starts to get loud at part load until you remember to upshift into OD gear and then its totally tolerable. I need to get it on a real highway and see what it the sound is like at 80mph or more. Overall its a little louder than I'd like in a DD, but remember I'm also a giant wuss.
Note for people following along at home: Yes those are poly hanger mount bushing things, no I did not get them installed. It turns out the aerosol spray dry lube I've been using for various tasks has something in it that WELDS the ******* poly mounts to the exhaust hangers. I got ONE installed on ONE hanger and it froze.
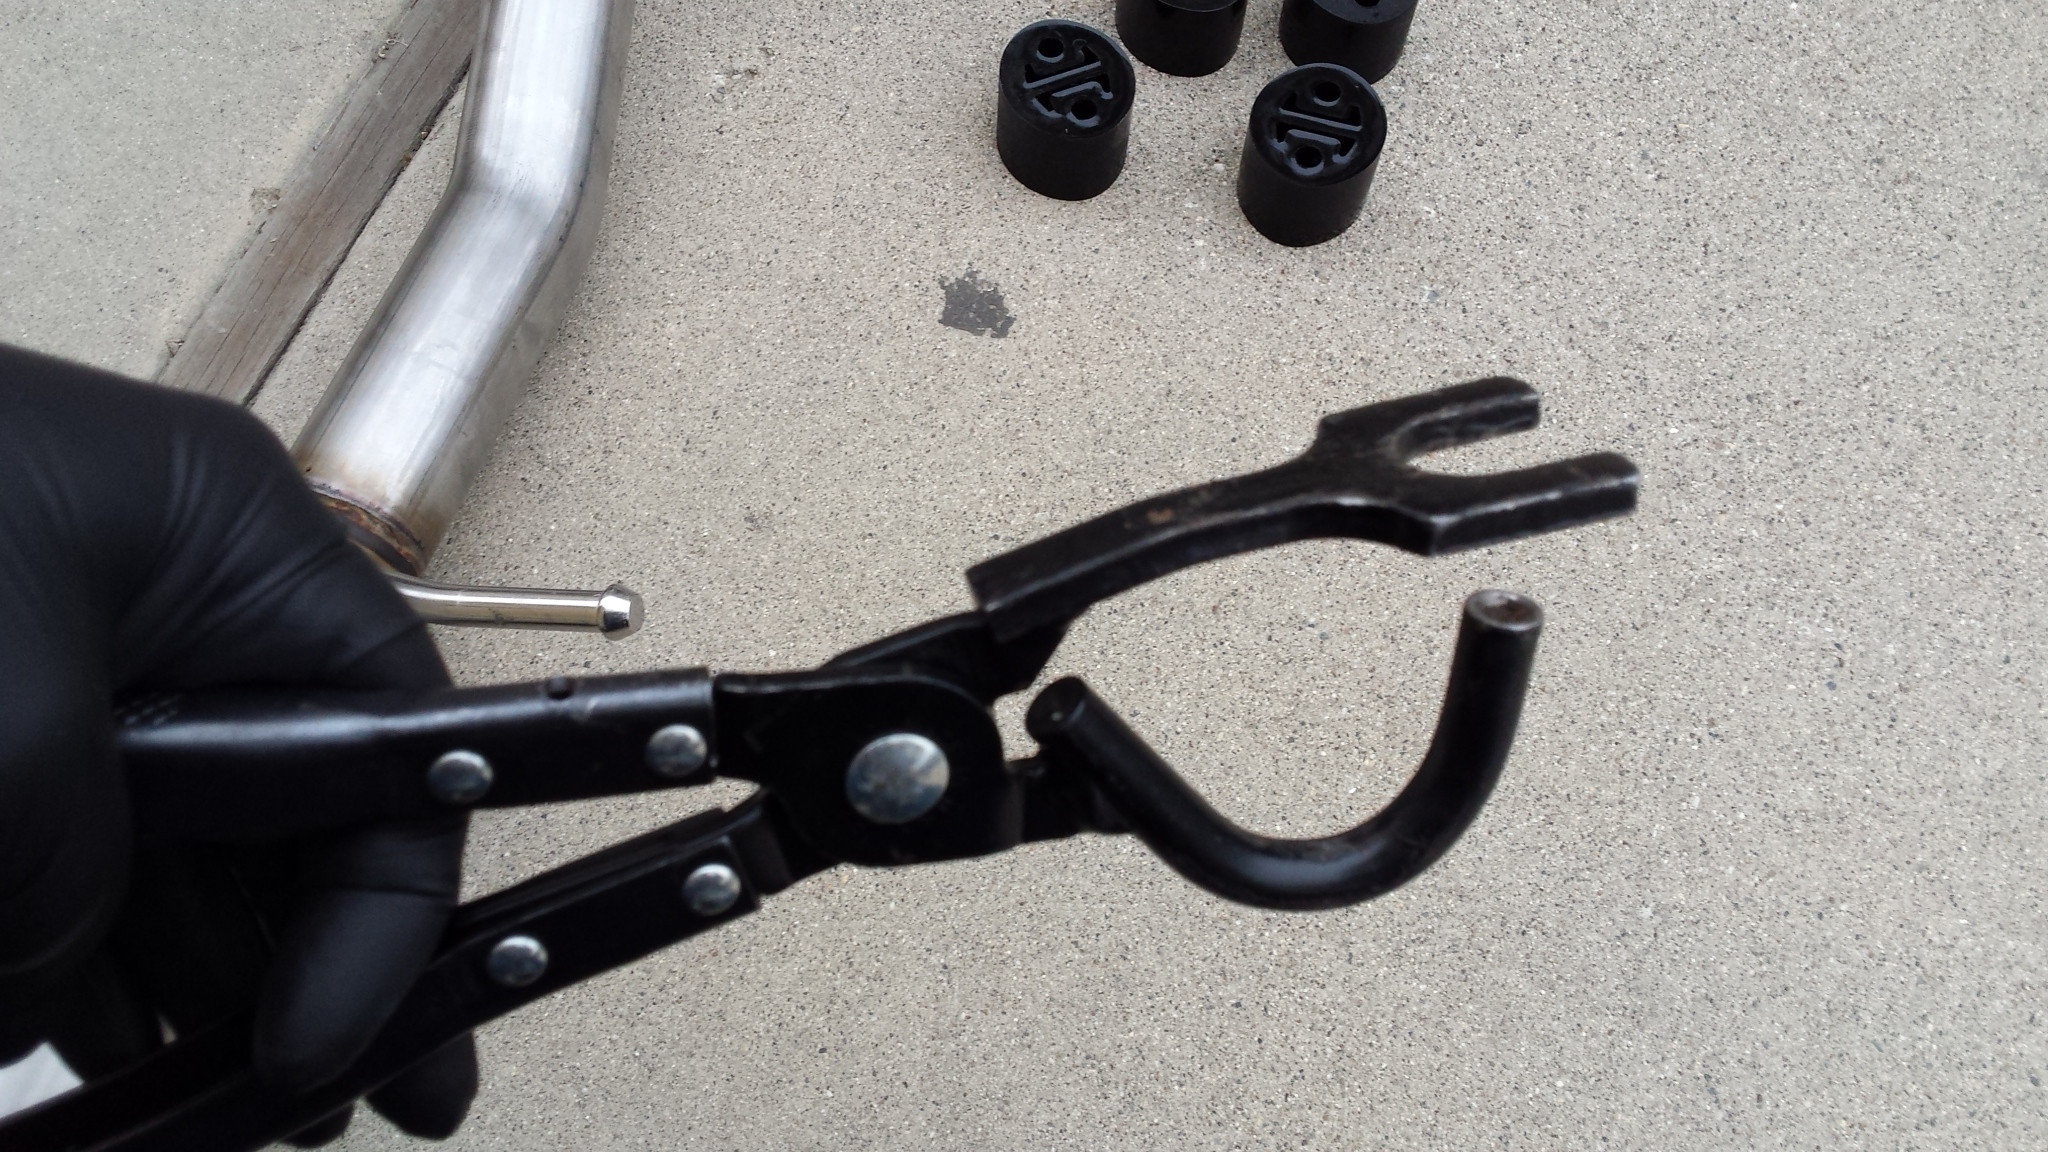
Even this glorious tool I "liberated" from Gesso's garage was completely ineffective. With no ability to twist or rotate the poly hanger bushing thing, let alone budge it or remove it, I gave up and cut it off with a razor blade. Now I'm one short
Maybe I'll do the squaretop tomorrow. Maybe.
That's right, I wrapped the forward section of that beezy up with DEI Titanium Exhaust Wrap.
I managed to get off work on time for once and figured I could get the Racing Beat Midpipe and Squaretop installed before dark today.
And now I understand why people part-out at the drop of a hat. It took me THREE ******* HOURS just to get the midpipe installed and I never even looked at the squaretop. A variety of things took turns bending me over and having their way with me, far more things than I care to go into detail about at this point. Sufficed to say, the midpipe is finally installed and the car is driveable again.
So I've got that going for me, which is nice.
To show my appreciation, I went and flogged the everlivingshit out of the car for about an hour to burn the lube and **** off the pipes and heat wrap and whatnot. I will say this: the Racing Beat Header + Midpipe + Power Pulse Single is a respectable N/A exhaust. Its not too loud, just loud enough to remind you its a "performance" exhaust. When you mash the loud pedal in 3rd under an overpass it sounds a lot like a sportbike
Cruising at 65mph it starts to get loud at part load until you remember to upshift into OD gear and then its totally tolerable. I need to get it on a real highway and see what it the sound is like at 80mph or more. Overall its a little louder than I'd like in a DD, but remember I'm also a giant wuss.Note for people following along at home: Yes those are poly hanger mount bushing things, no I did not get them installed. It turns out the aerosol spray dry lube I've been using for various tasks has something in it that WELDS the ******* poly mounts to the exhaust hangers. I got ONE installed on ONE hanger and it froze.
Even this glorious tool I "liberated" from Gesso's garage was completely ineffective. With no ability to twist or rotate the poly hanger bushing thing, let alone budge it or remove it, I gave up and cut it off with a razor blade. Now I'm one short
Maybe I'll do the squaretop tomorrow. Maybe.
Last edited by EO2K; 08-19-2014 at 02:06 AM.
Reply
1
1
08-19-2014, 01:43 AM
#324
Elite Member

Join Date: Oct 2013
Location: Cedar City, UT
Posts: 2,764
Total Cats: 951
I'd make fun of you if it wasn't for my distant memory of how long it took me to remove the downpipe/exhaust manifold from the original car. I won't go into specifics, but 3+ hours sounds right before I finally said, "**** it" and yanked the motor out in 15 minutes.
What namby pamby tool is that for the exhaust hangers? I just muscled my old ones off and put a little quick detailer on my poly hangers and shoved them on. Easy peasy.
Also I need a video of how this sounds.
What namby pamby tool is that for the exhaust hangers? I just muscled my old ones off and put a little quick detailer on my poly hangers and shoved them on. Easy peasy.
Also I need a video of how this sounds.
Reply
0
0
08-19-2014, 02:05 AM
#325
Elite Member
Thread Starter
iTrader: (37)
Join Date: Apr 2010
Location: Very NorCal
Posts: 10,441
Total Cats: 1,899
I actually took a 1st startup/warmup/idle video with my phone, but all you can hear on the playback is something vibrating in the nose of the car.  If the car makes it to a dyno before M@MRLS I'll bring along the GoPro. Unlike some people who will remain nameless, I actually keep mine charged.
Though I will freely admit, dyno tune is a glorious dream at the moment. I'd really REALLY like to have someone that actually knows what the hell they are doing with a BP4W+MS3 tune this thing, just to see what it can do. Andrew@TSE immediately springs to mind but I'm not going to waste his time unless things are mechanically perfect and ready to rock. He most likely has his own fish to fry before the event so I need everything done ASAP to be able to work around his schedule. We'll see how it all works out in the end.
If the car makes it to a dyno before M@MRLS I'll bring along the GoPro. Unlike some people who will remain nameless, I actually keep mine charged. Though I will freely admit, dyno tune is a glorious dream at the moment. I'd really REALLY like to have someone that actually knows what the hell they are doing with a BP4W+MS3 tune this thing, just to see what it can do. Andrew@TSE immediately springs to mind but I'm not going to waste his time unless things are mechanically perfect and ready to rock. He most likely has his own fish to fry before the event so I need everything done ASAP to be able to work around his schedule. We'll see how it all works out in the end.
Reply
0
0
08-19-2014, 02:32 AM
#326

Note for people following along at home: Yes those are poly hanger mount bushing things, no I did not get them installed. It turns out the aerosol spray dry lube I've been using for various tasks has something in it that WELDS the ******* poly mounts to the exhaust hangers. I got ONE installed on ONE hanger and it froze.

I have determined that from now on all things polyurethane bushing will get ES hyperlube, because I have a monster tub and it's impervious. It works extremely well, but gives absolutely no F*** about degreaser or soap, so don't get it on your hands unless you are planning the Thunderhill 25H of a fapp-fest

Awaiting the squaretop install, just call in sick

Reply
0
0
 08-19-2014, 12:19 PM
#329
Elite Member
Thread Starter
iTrader: (37)
Join Date: Apr 2010
Location: Very NorCal
Posts: 10,441
Total Cats: 1,899
I can probably get the lower installed tonight. As for porting the upper to match the 64mm tb, I still need a die grinder and a set of carbide burrs. Methinks a Harbor Freight trip may be warranted this evening.
Reply
0
0
08-20-2014, 11:43 PM
#330
Elite Member
Thread Starter
iTrader: (37)
Join Date: Apr 2010
Location: Very NorCal
Posts: 10,441
Total Cats: 1,899
Well, **** me sideways. One step forward, 2 steps back.
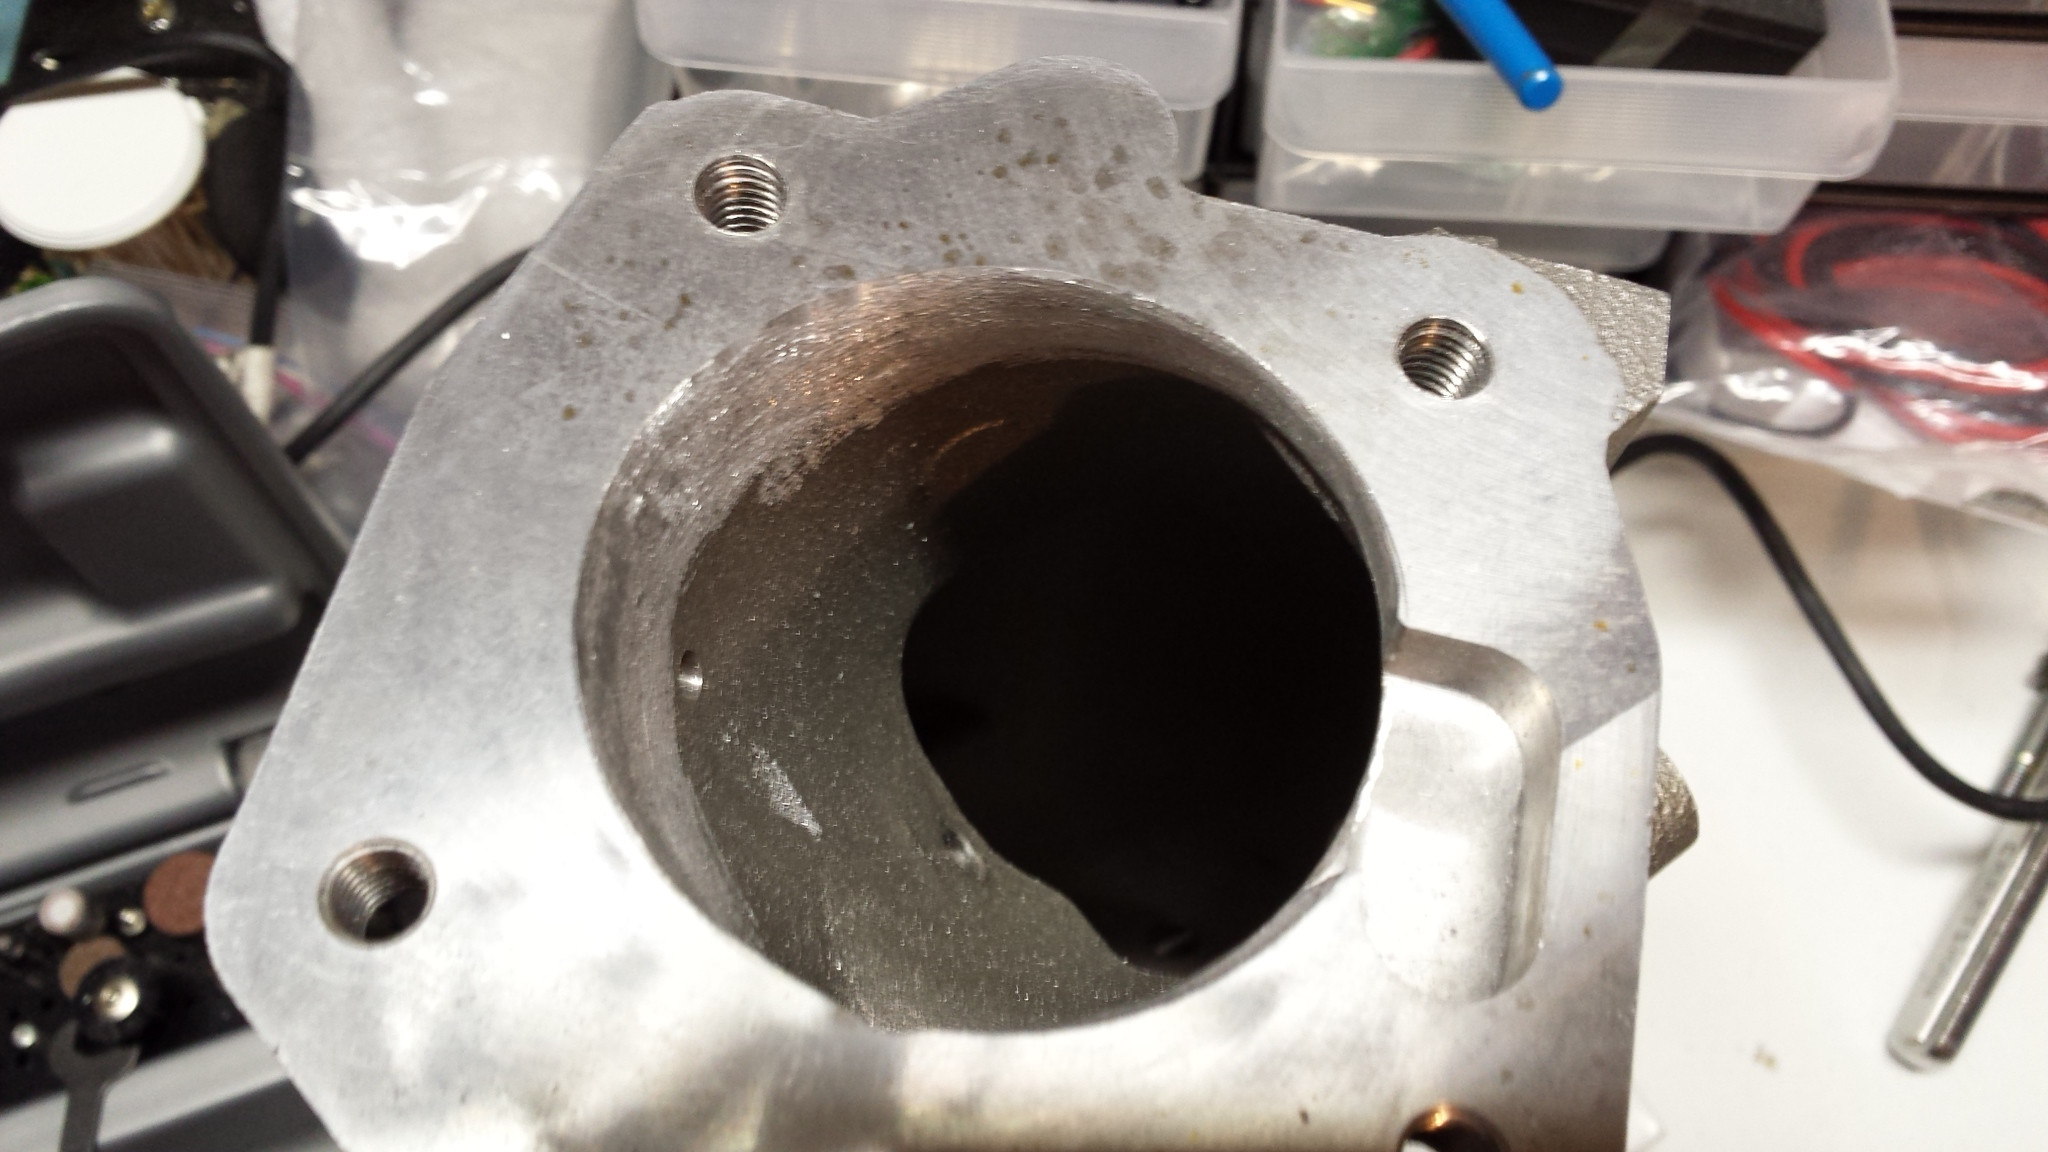
Throttle body inlet ported to match throttle body. So far so good! To clean the aluminum shavings out I blasted it with brake cleaner...
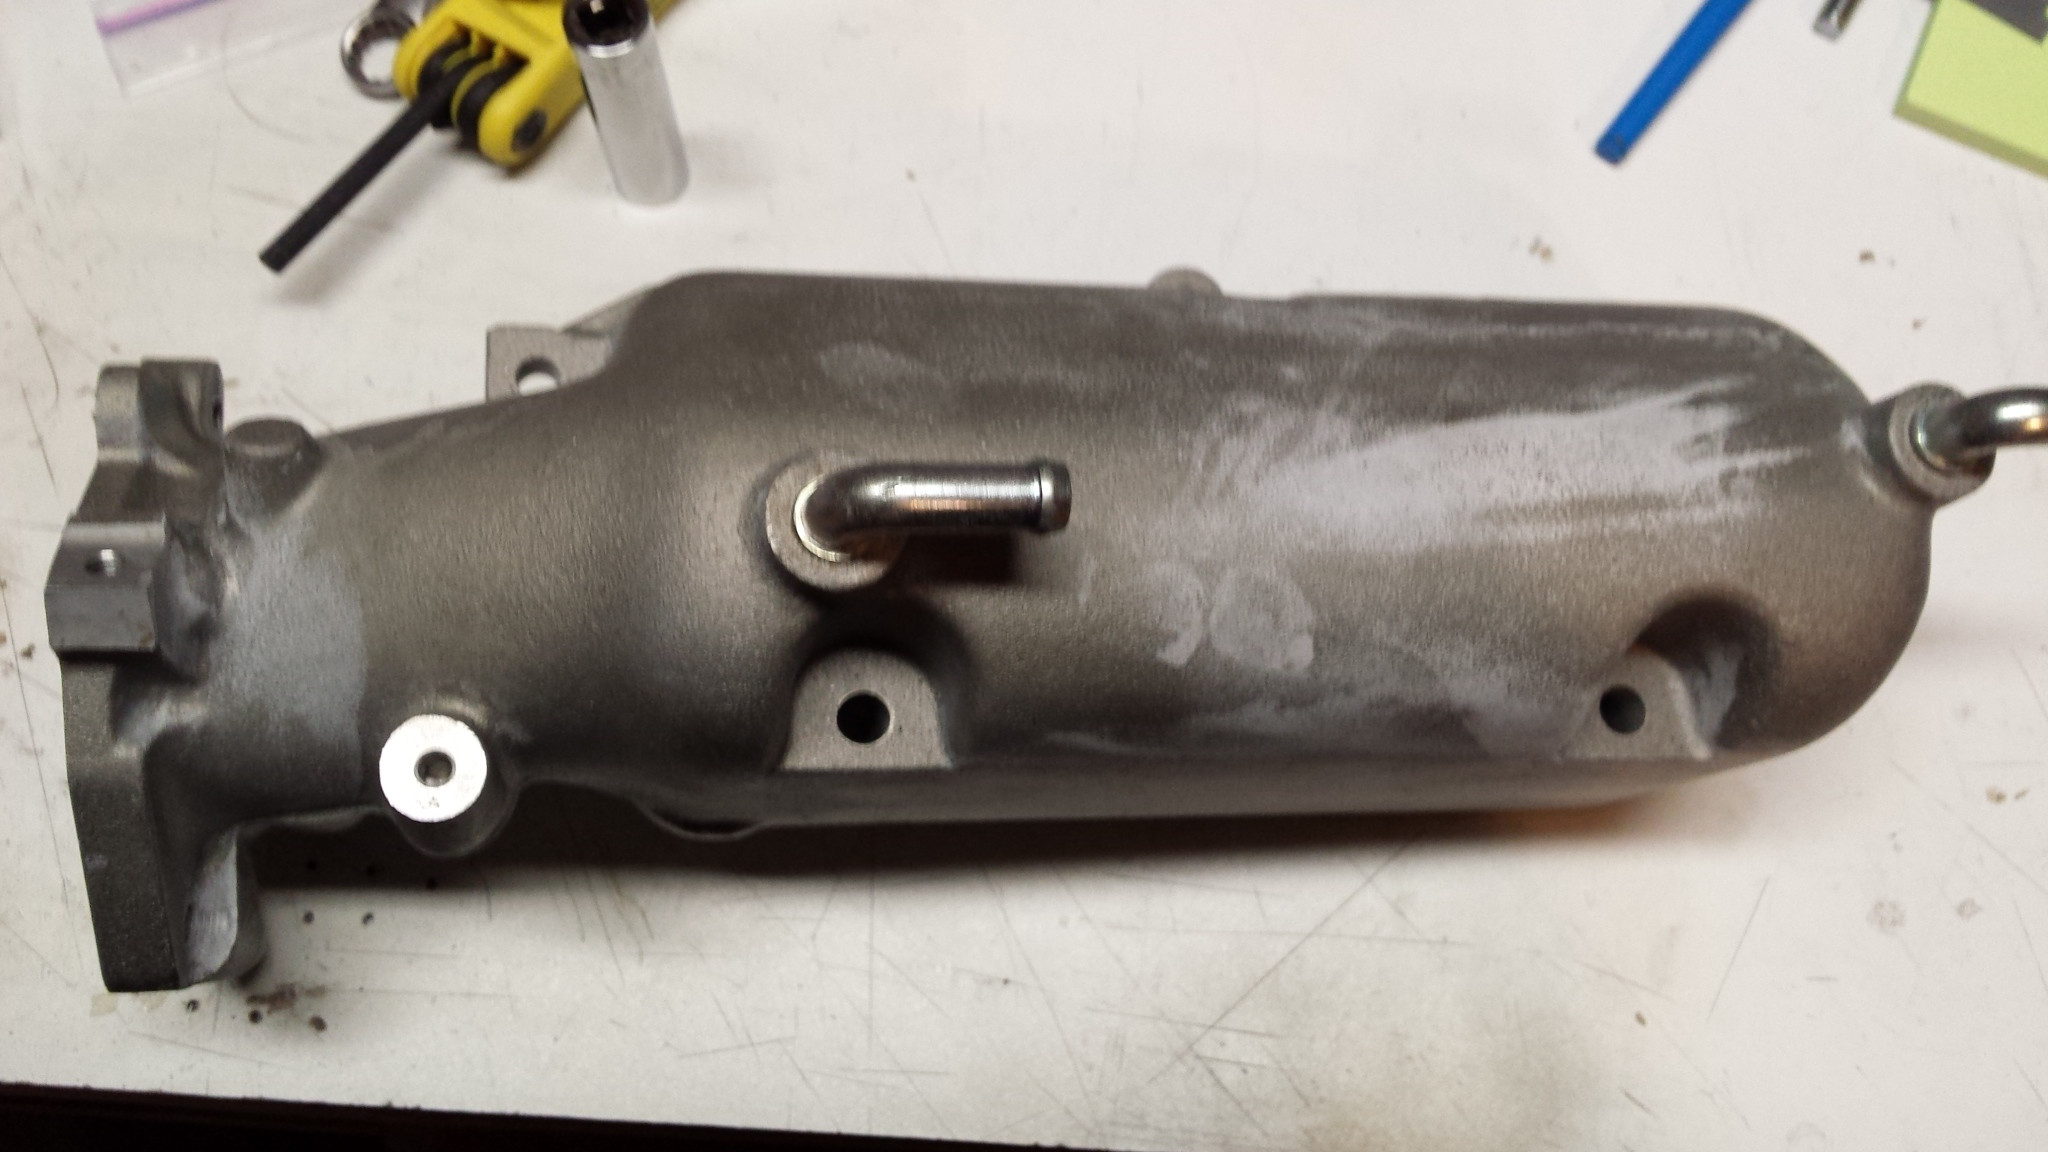
Goddammit!
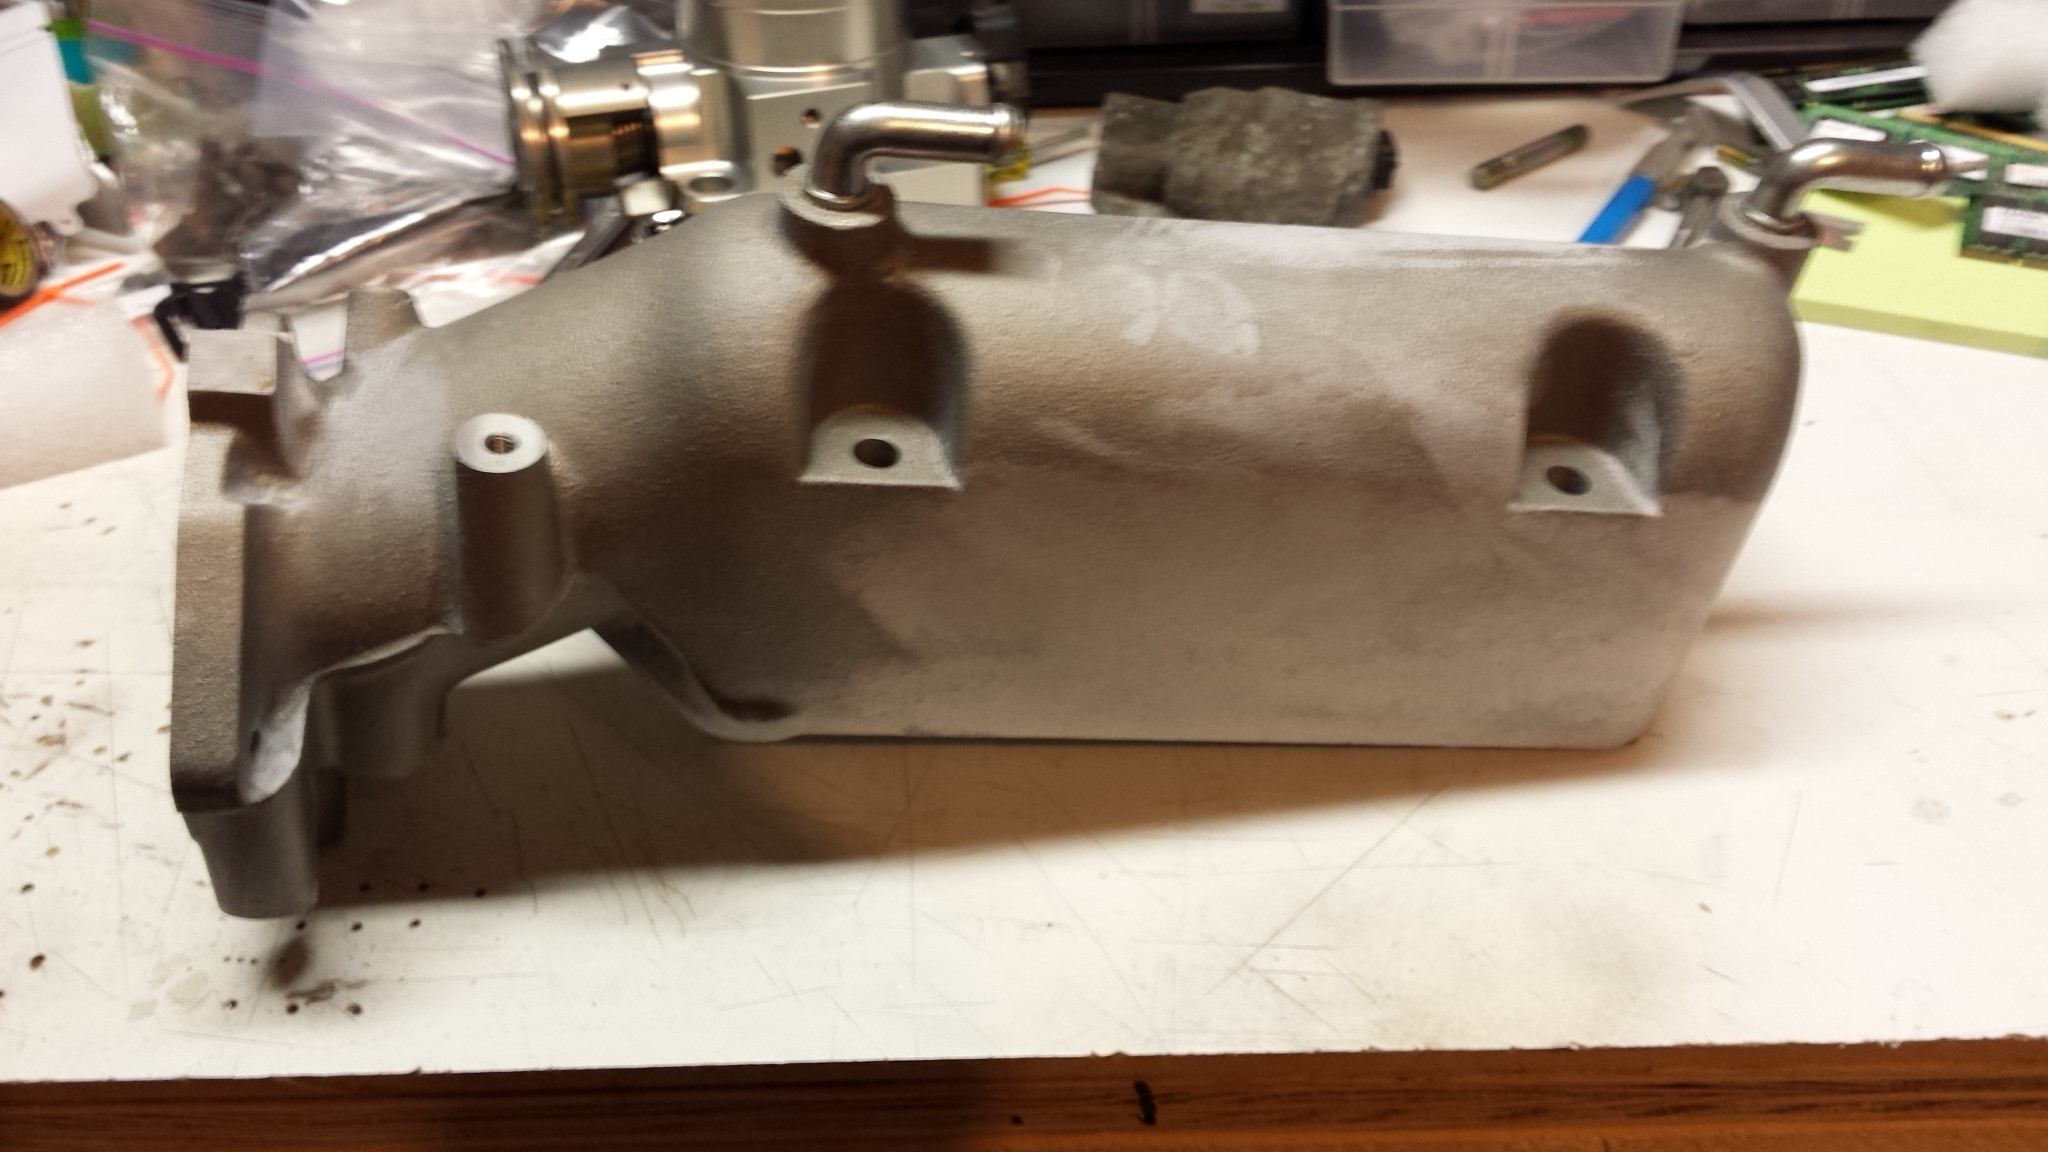
So much for that whole ******* afternoon wasted cleaning, spraying and baking my stupid manifold.
So I'll just install my Skunk2 Throttle Body...
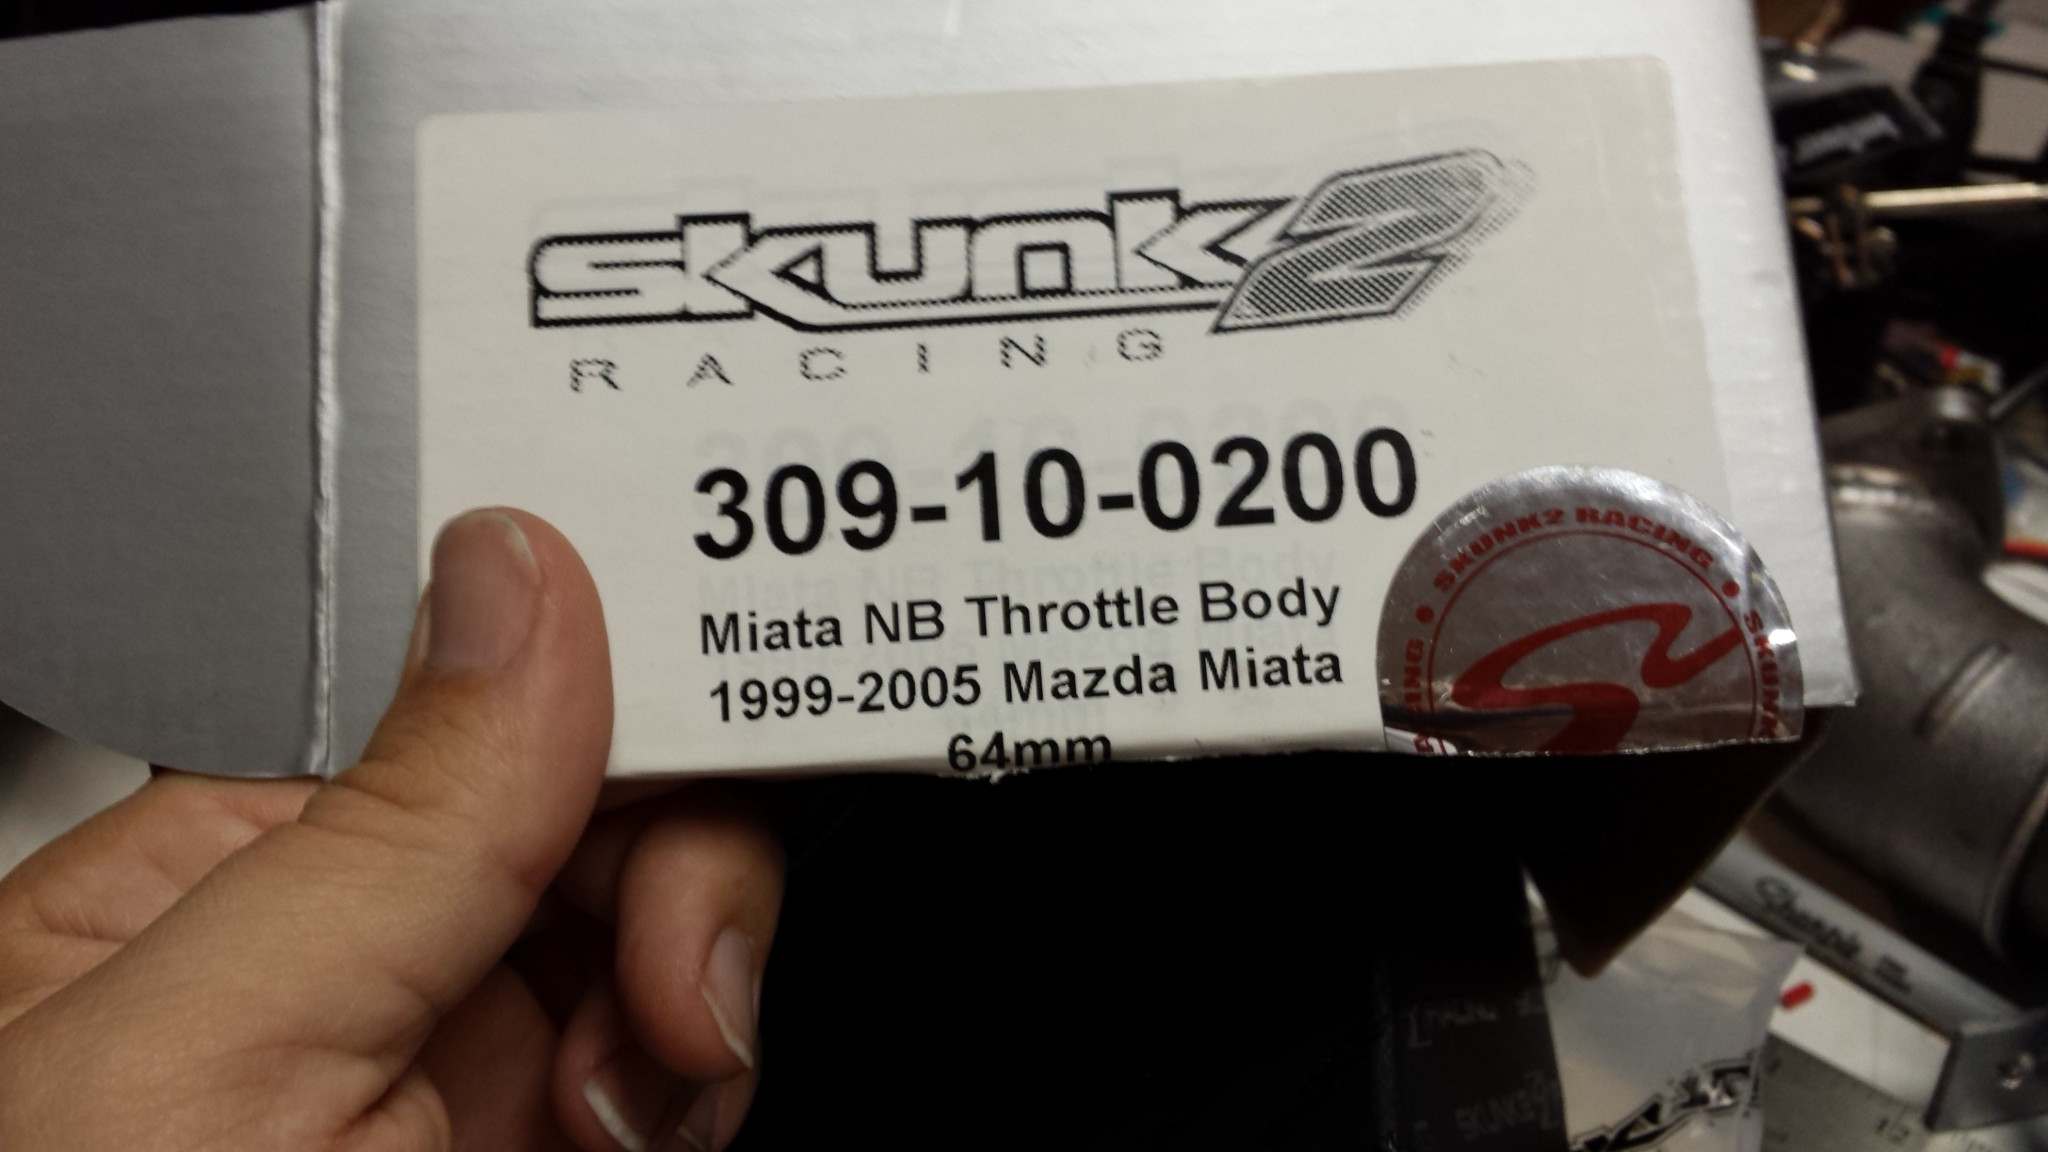
It's been opened and resealed previously, but its the same PN and sealed with the shiny Skunk2 sticker so I'm sure its fine. So far so good...
But no instructions or inventory. Okaaaayyyy... I'm a smart guy, I can figure this out. Why the **** can't I install this idle control valve?!
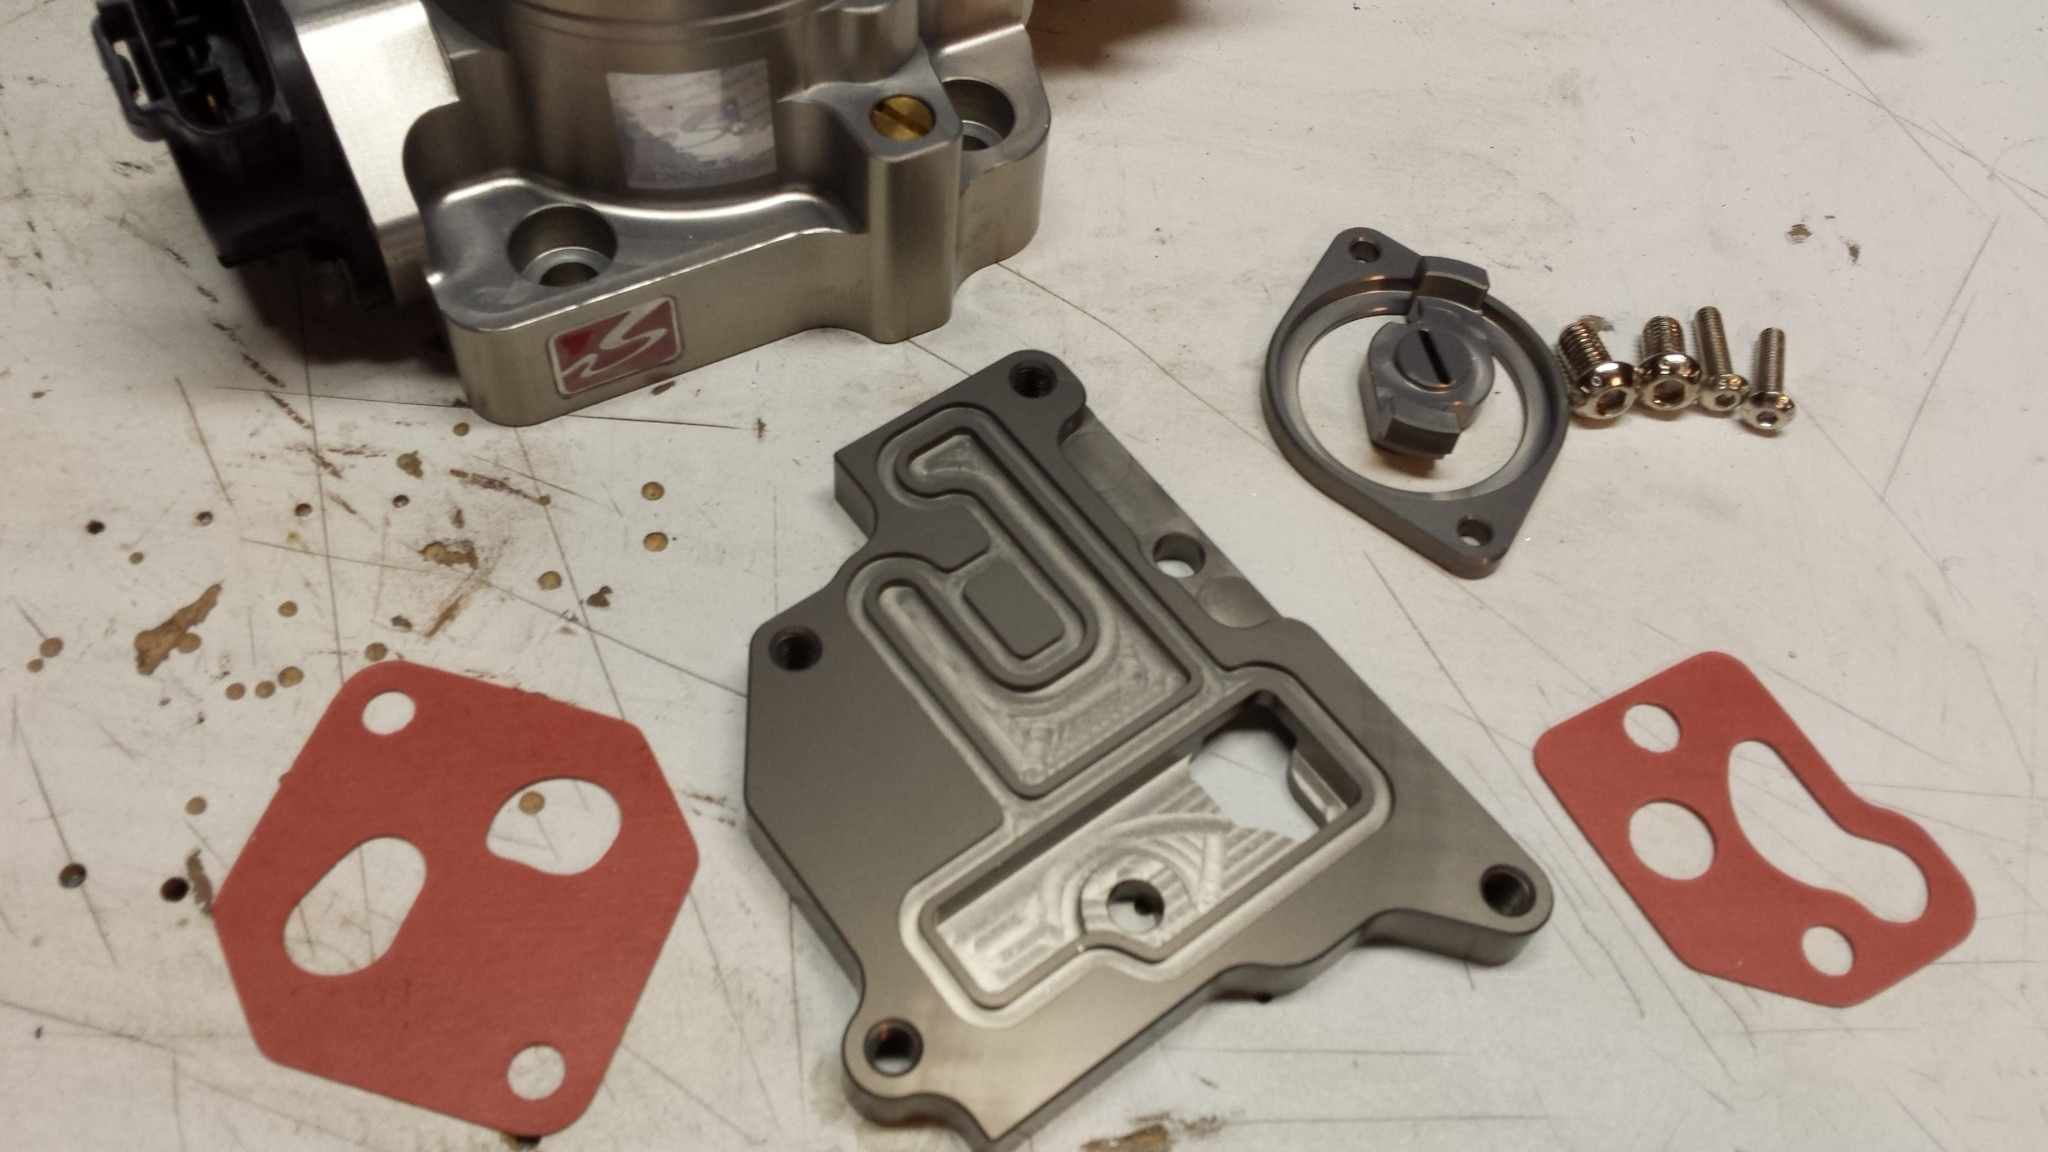
Here are the parts it came with... lets see if I can find these on the internet anywhere...
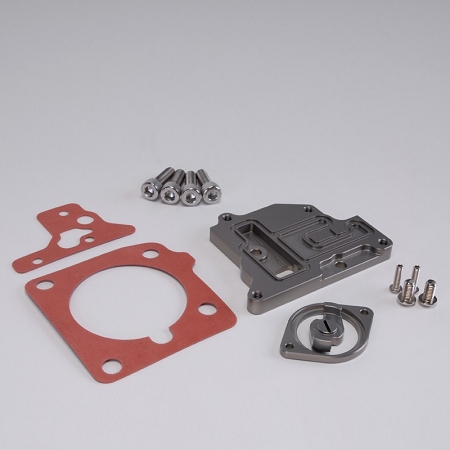
Skunk2 - Pro Series Billet 64MM Throttle Body - Mazda Miata 1990-1997
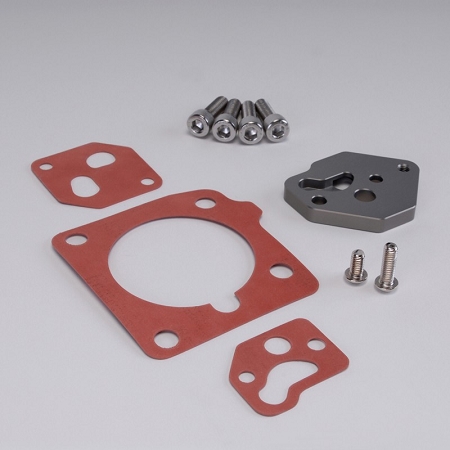
Skunk2 - Pro Series Billet 64MM Throttle Body - Mazda Miata 1999-2005
God damn sonnovabitch! Its like I got the hardware from one kit and the gaskets from another. **** me!! I bought this stupid thing back in January of 2013 from Doap, no ******* way I'm getting this exchanged.
GAHHHHHHHHHHH!
Time to email Skunk2 and see WTF.
So no manifold again tonight. Too much time ******* around trying to get this **** to work. Now its dark and cold and I'm angry so it can wait till tomorrow.
Throttle body inlet ported to match throttle body. So far so good! To clean the aluminum shavings out I blasted it with brake cleaner...
Goddammit!
So much for that whole ******* afternoon wasted cleaning, spraying and baking my stupid manifold.
So I'll just install my Skunk2 Throttle Body...
It's been opened and resealed previously, but its the same PN and sealed with the shiny Skunk2 sticker so I'm sure its fine. So far so good...
But no instructions or inventory. Okaaaayyyy... I'm a smart guy, I can figure this out. Why the **** can't I install this idle control valve?!
Here are the parts it came with... lets see if I can find these on the internet anywhere...
Skunk2 - Pro Series Billet 64MM Throttle Body - Mazda Miata 1990-1997
Skunk2 - Pro Series Billet 64MM Throttle Body - Mazda Miata 1999-2005
God damn sonnovabitch! Its like I got the hardware from one kit and the gaskets from another. **** me!! I bought this stupid thing back in January of 2013 from Doap, no ******* way I'm getting this exchanged.
GAHHHHHHHHHHH!
Time to email Skunk2 and see WTF.
So no manifold again tonight. Too much time ******* around trying to get this **** to work. Now its dark and cold and I'm angry so it can wait till tomorrow.
Reply
0
0
08-21-2014, 01:16 AM
#331
Elite Member

iTrader: (2)
Join Date: May 2008
Location: Portland, Oregon
Posts: 3,468
Total Cats: 365
G. Dude. You are like the king of emailing Skunk with WTF questions.
Can you PLEASE just get some bewst going on so I can feel good for you?
Gonna go hit my second stout faucet while I feel bad for you.
Can you PLEASE just get some bewst going on so I can feel good for you?
Gonna go hit my second stout faucet while I feel bad for you.
Reply
0
0
08-21-2014, 02:34 AM
#334
Elite Member
Thread Starter
iTrader: (37)
Join Date: Apr 2010
Location: Very NorCal
Posts: 10,441
Total Cats: 1,899
I'm going to go lick my EFR and try to imagine what manifolds must taste like.
I've never worked with the VHT high temp ceramic satin clear before, but I've also never seen something give up so quickly in the face of brake cleaner. Especially something that spent half a day curing in the oven. Ill probably rub it down with a rag and more cleaner and see if I can get the finish to even out. This is why I can't have nice things.
Based on previous experience, I expect nothing but pain from Skunk2. As an eternal pessimist I'll either be right or pleasantly surprised. Either way I'll win.
It's cool, I understood what you meant. The whims of The Great Magnet were not in my favor this evening.
Based on previous experience, I expect nothing but pain from Skunk2. As an eternal pessimist I'll either be right or pleasantly surprised. Either way I'll win.
It's cool, I understood what you meant. The whims of The Great Magnet were not in my favor this evening.
Reply
0
0
 08-21-2014, 01:08 PM
#338
nah, you gotta strip it or sand it down and re-do. you can't polish it out, the stupid brake cleaner literally bonds with it and fades/dulls it. it simply doesn't stand a chance
you should be able to just sand the spot and kinda blend the sanding around the spot so its all semi-even, then just re-spray the spot(s)
you should be able to just sand the spot and kinda blend the sanding around the spot so its all semi-even, then just re-spray the spot(s)
Reply
0
0
08-21-2014, 01:17 PM
#339
Elite Member
Thread Starter
iTrader: (37)
Join Date: Apr 2010
Location: Very NorCal
Posts: 10,441
Total Cats: 1,899
You can see my fingerprints where I touched it while it was wet. It felt slick/slimy like it melted the paint off. I think I'm just going to wipe it down and hope for the best. I'm grumpy enough with it that I don't care any more, I just want it installed and running.
My favorite part was when I stripped the philips screws on the IACV, so I removed their heads with the die grinder. So that's not going back on the old TB
I called Skunk2 and they promised to email me some form to get the thing sorted out like... 2 hours ago. So things are progressing as expected
My favorite part was when I stripped the philips screws on the IACV, so I removed their heads with the die grinder. So that's not going back on the old TB
I called Skunk2 and they promised to email me some form to get the thing sorted out like... 2 hours ago. So things are progressing as expected
Reply
0
0
08-21-2014, 05:49 PM
#340
Brake cleaner is some surprisingly nasty crap when it comes to paint. Stripping the entire thing would be really easy, and probably look alot better than a messed up coating.
Have you ever used the MC-156HQ coating or anything else from Cerakote? I have only heard great things about Cerakote's stuff, just FYI
Have you ever used the MC-156HQ coating or anything else from Cerakote? I have only heard great things about Cerakote's stuff, just FYI
Reply
0
0


