Pats Whipple W100AX Street/Track '99 Build Thread


 03-02-2015, 09:18 AM
#84
Elite Member
Thread Starter
iTrader: (16)
Join Date: Aug 2007
Location: Houston, TX
Posts: 9,292
Total Cats: 475
Yeah but I don't have an air compressor to run a plasma cutter, my 60 gallon compressor is at my dad's in another state. I've only broken 1 drill bit, admittedly it was trying to drill a 1.75" hole with a 1/8" bit....

Reply
 0
0

0
03-04-2015, 12:58 AM
#85
Elite Member
Thread Starter
iTrader: (16)
Join Date: Aug 2007
Location: Houston, TX
Posts: 9,292
Total Cats: 475
Hit a bump in the road today...
Got the SC setup 100% done, went to install it, that part went sorta OK, I gotta trim the heat shield some to gain access to one of the bolts. But anyways, I put the belt on an spun the engine over, it jumped a tooth off. But the pulleys are lined up! I thought.........
So I grabbed a bubble level, added shims to the SC pulley against the pulley to get it level, measured shim thickness, math, pulley is tilted back 0.69* from vertical. Measured engine, it's 1.84* from vertical... So 1.15 off!
So did some more math, adjusted my bracket, and now the SC pulley is 0.42 off from the crank pulley, so less than 1/2 a degree. I think that's good enough.
I checked it side to side using a straight edge, that appears to be perfectly parallel and in line, and also they are on the same plane it appears from front to back.
But belt still isn't tracking right..... I think if I adjust the bracket a bit more, and get that .42* closer to 0, it would be better, but I find it hard to believe that's not good enough. Well actually just looked up what Gates says, and they say no more than .25* of misalignment for this type of belt. So I'll adjust it a bit more, it won't take much more to get it that close.
Anyways, I think the "problem" is not that it isn't perfect, but that I have a 3 to 4' span of belt, and my "idler" pulleys have no edge on them to deal with any misalignment. So basically if my pulley is say 0.42 degrees off as it is now, and I tension the belt to say 150 lbf of tension, that gives it 1.1 lbF pushing my belt off. That's not much force, but with nothing to stop it, I think that's part of why it's jumping a tooth off. The idlers are letting the belt move around. I noticed most OEM 6 rib setups have an idler with an edge when the span is more than a foot or so.
So I bought a 03 ranger idler pulley, as I have changed one before on a ranger and remembered it has an edge on the sides. It was 13 bucks, in stock, has a 17mm hole in it though. I ordered a 17mm to .375" bushing for it. Will install it when the bushings arrive. Before then, I'm going to get the blower alignment as close as I can to zero, but I want to use a better pulley anyways as I DO NOT want to have belt issues down the road!
Reply
0
0
03-04-2015, 01:50 AM
#86
Elite Member
Thread Starter
iTrader: (16)
Join Date: Aug 2007
Location: Houston, TX
Posts: 9,292
Total Cats: 475
Ok so I measured some more angles/misalignment stuff after reading about it. PROBABLY should have read about that before building this...
The SC pulley is Forward of the crank pulley by 0.12" from rib to rib. The front edge of each pulley is not off that much, but the first rib of each pulley from the front is not spaced the same (.257" vs .193").
In the vertical plane, it's tilted forward 0.42* relative to the crank pulley.
In the horizontal plane, it's 0.84 degrees off (est, my measurement technique isn't ideal as it relies on the fenders being symmetric, but yes it's off for sure)
So it's forward, up, and left!
And to add to my confusion, the belt on the SC keeps jumping Forward, even though the SC pulley is already forward by 0.12"! I guess the other misalignments are the cause of that. Odd!
Just did some math, to correct the horizontal plane being off, I need to shim the rear mount 0.128", so a washer made from 1/8" metal (.125") should fix that plane.
The same rear mounts need to be drilled a touch larger to allow them to go down a bit more to fix the vertical 0.42* alignment. The rear holes are currently .625", I have a 23/32 bit that is .71875 so that will move the rear down .047", it needs to go down 0.064 to get it to zero degrees. Looks like a 3/4" bit moves it down .0625" which is damn close to .064. I'll try the 23/32 first and remeasure before I buy and use a 3/4" bit.
So my plan now is to try to fix the vertical and horizontal misalignment, then once those are good remeasure how far forward the SC pulley is and fix that to get the for/aft alignment right. If I flip the pulley, it will then be too far back, so then I'll need to make a spacer to shim it forward. Or washers, or something....
What a pain! Damn it!
Reply
0
0
03-07-2015, 02:59 AM
#87
Elite Member
Thread Starter
iTrader: (16)
Join Date: Aug 2007
Location: Houston, TX
Posts: 9,292
Total Cats: 475
Update
So was having belt issues. SC wasn't square in 3 different directions as noted above. So first one was it isn't parallel with crank. I fixed that, had to lower back of bracket, lift front up to get that fixed.
Then it was off left to right. I bought a framing square and used it to square the SC pulley with the two mounting tabs that go against the header. Thus pulley as long as header flange/head flange is square with crank (should be) then pulley is too.
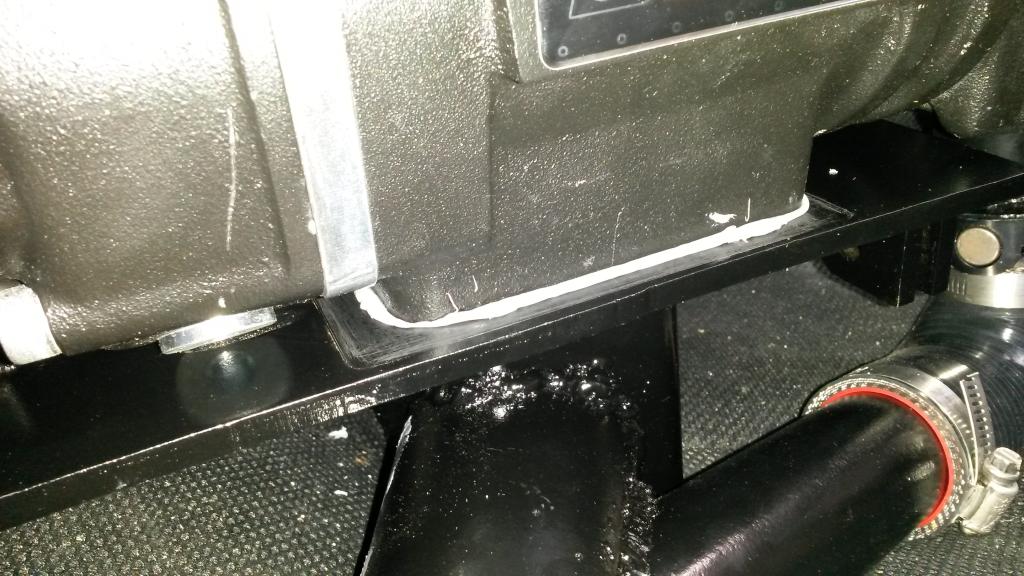
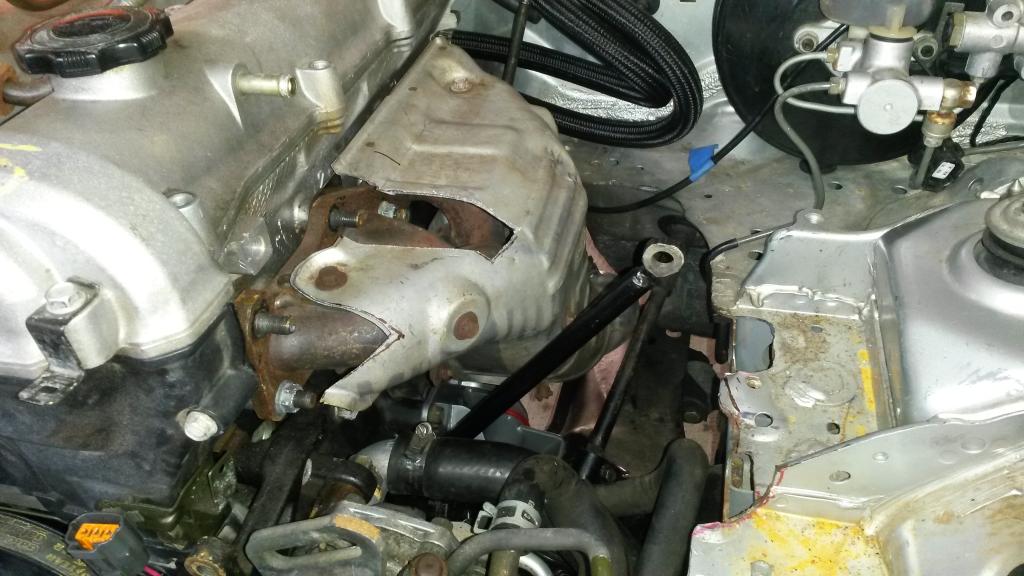
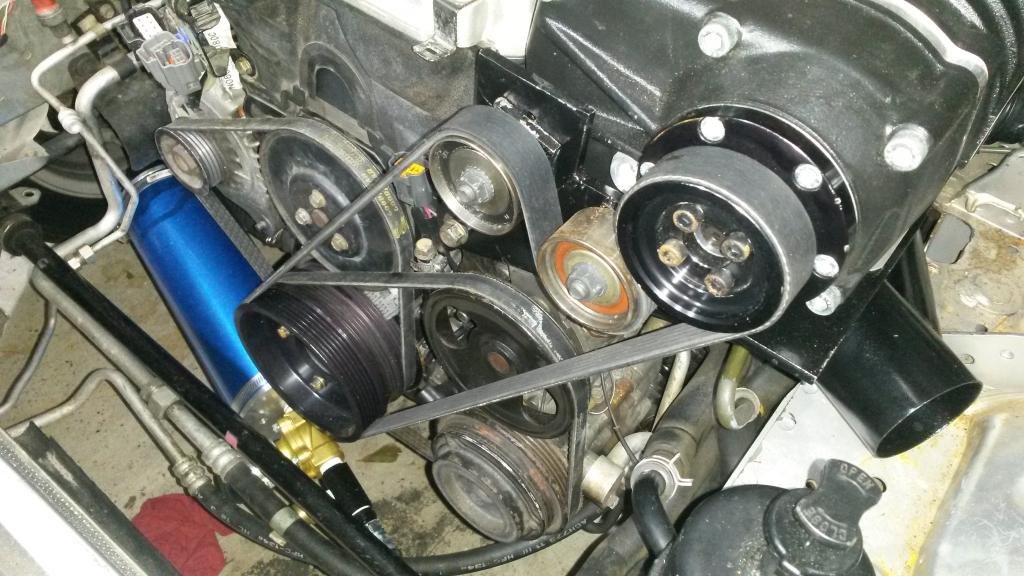
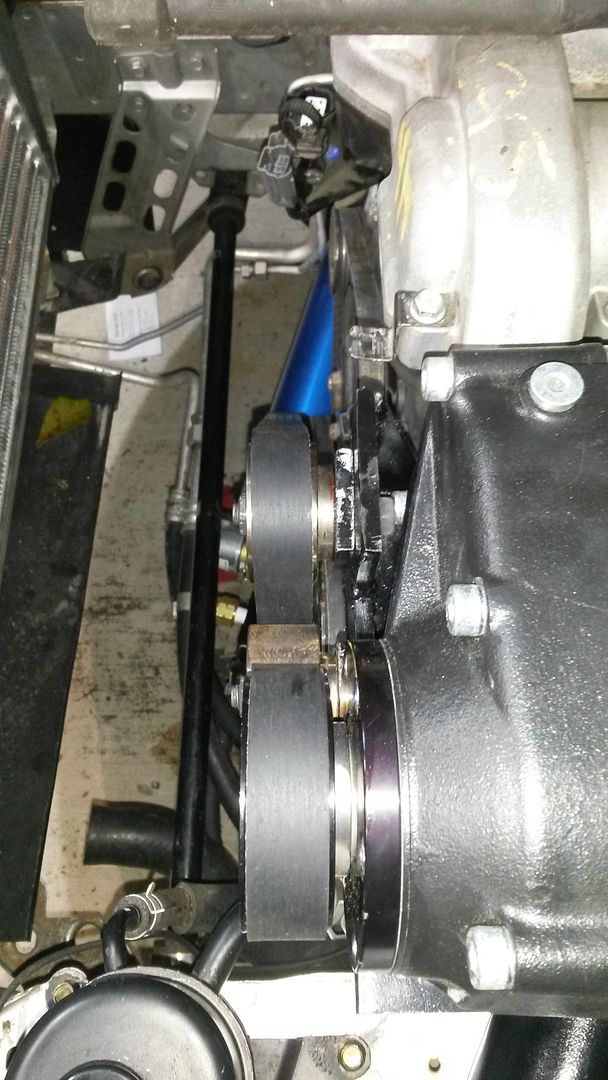
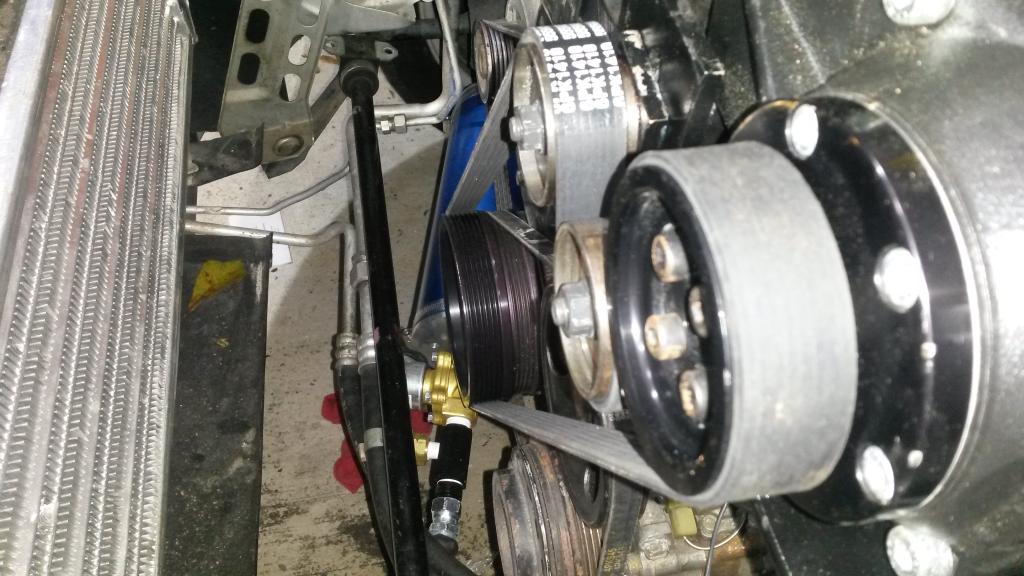
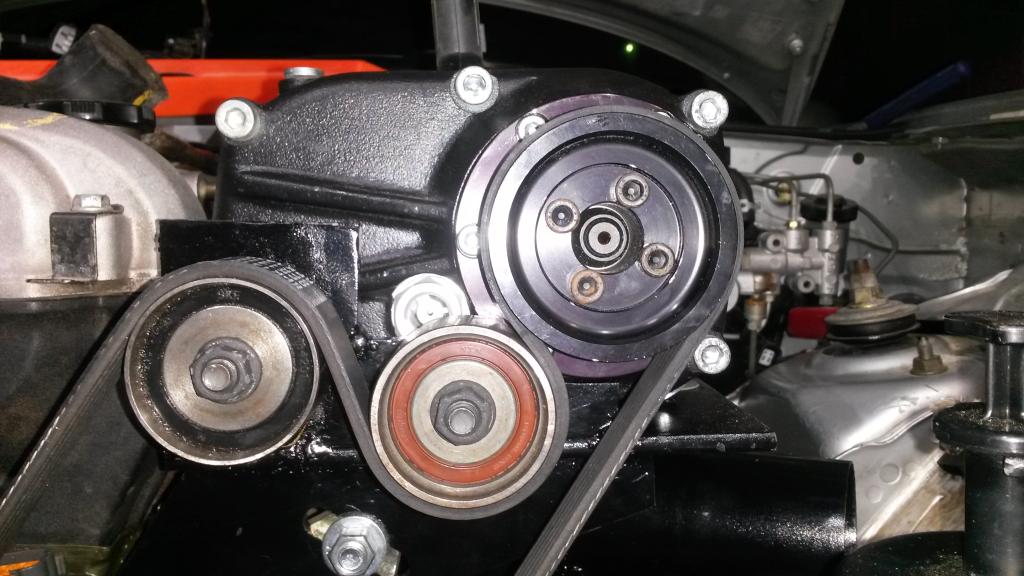
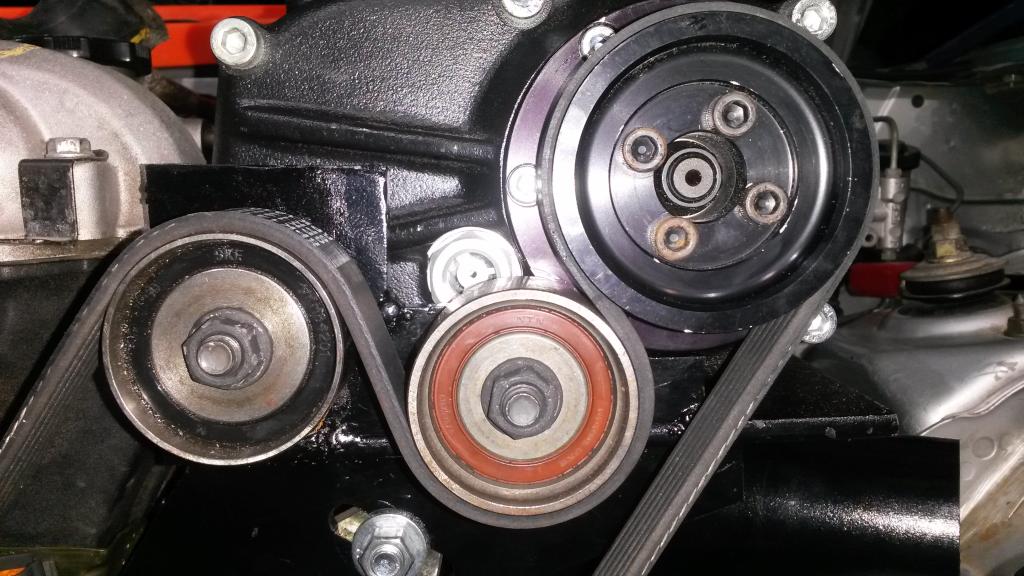
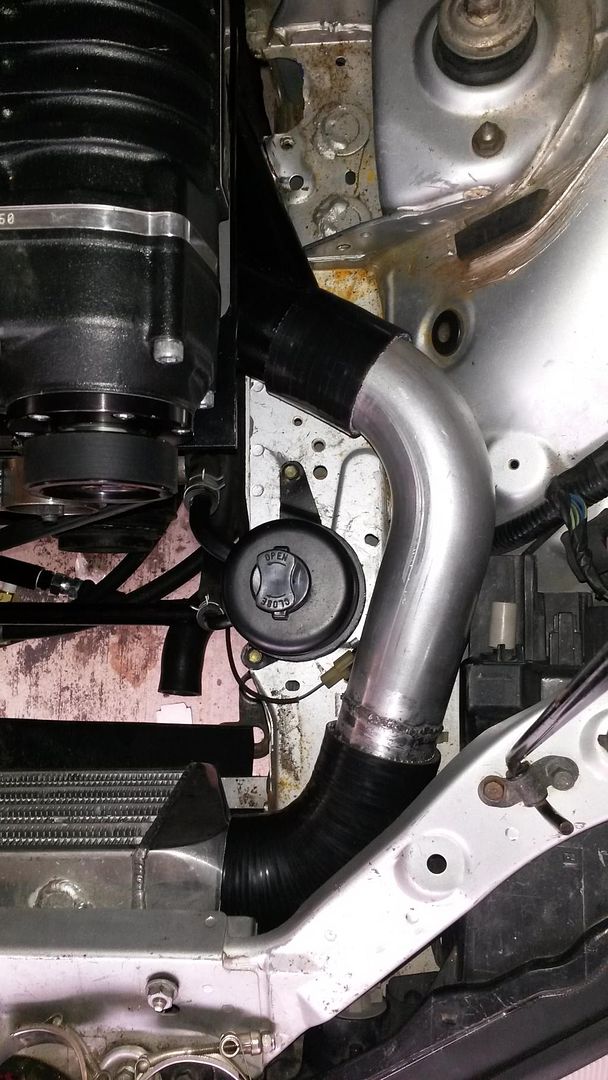
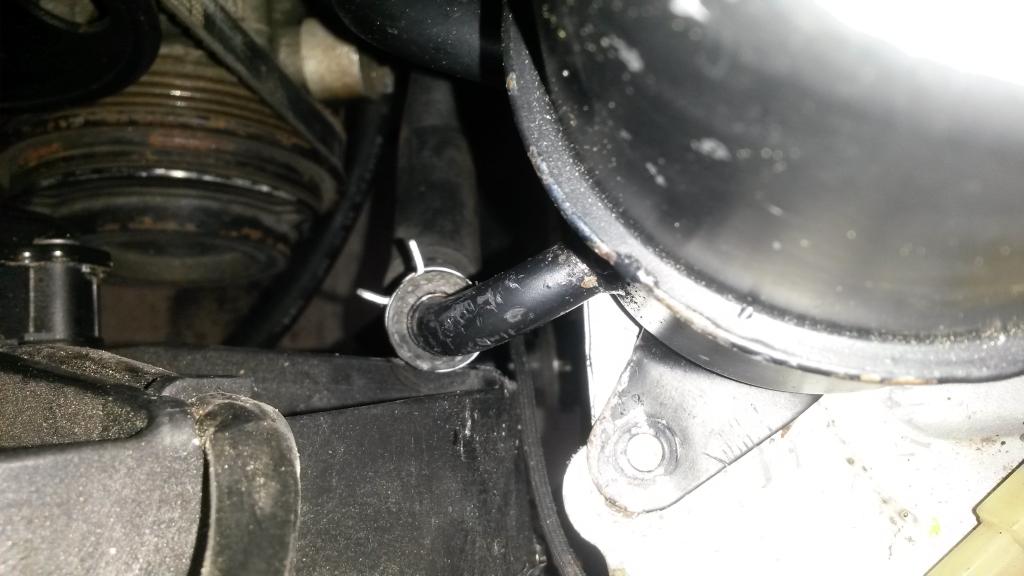
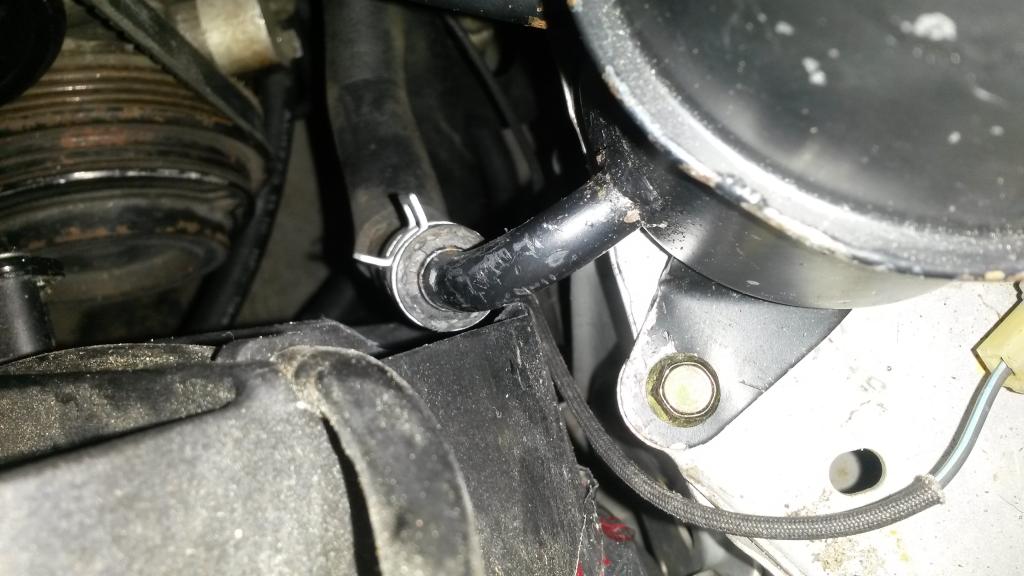
Last was SC pulley in/out. That one is actually off a Tiny tiny amount, hard to measure but somewhere around .06-.08". I don't even remember which way. At this point the belt tracks straight, but if I look at the idlers (see pics below) the belt is not perfectly being guided straight onto the SC pulley from the idler pulley, it twist on the idler. Note that both the idler and tensioner are smooth with no edge on the side.
My plan is, I have a new idler pulley with ribs and and edge, it's going where the tensioner is tomorrow, just waiting on a 17mm to .375 bushing to arrive. Then I'll space THAT pulley to match the SC. So then it feeds the belt to the SC straight, so belt will not jump off the SC, misallignment will be between Crank pulley and Tensioner, which has over 2 feet of belt, so .08" over 2' is nothing, like .003 degrees! So should be ok.
Will know tomorrow if it works, will know 100% once I drive it. But in theory this will fix the belt alignment problems.
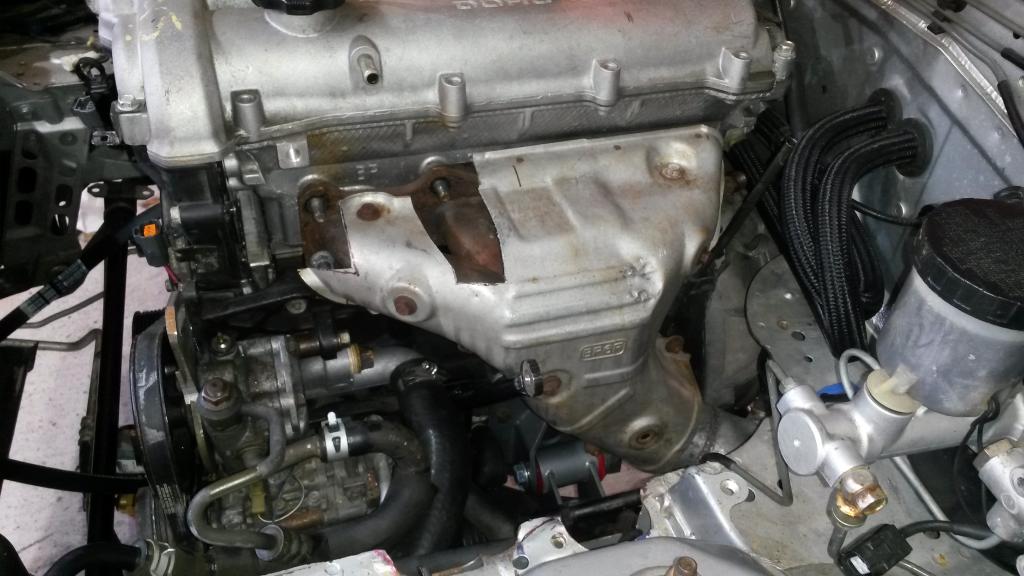
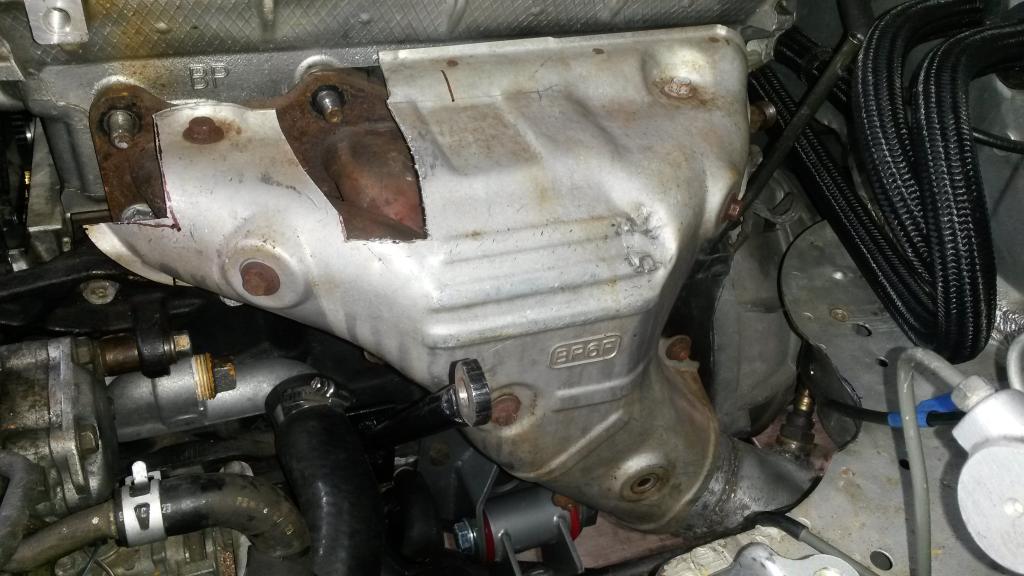
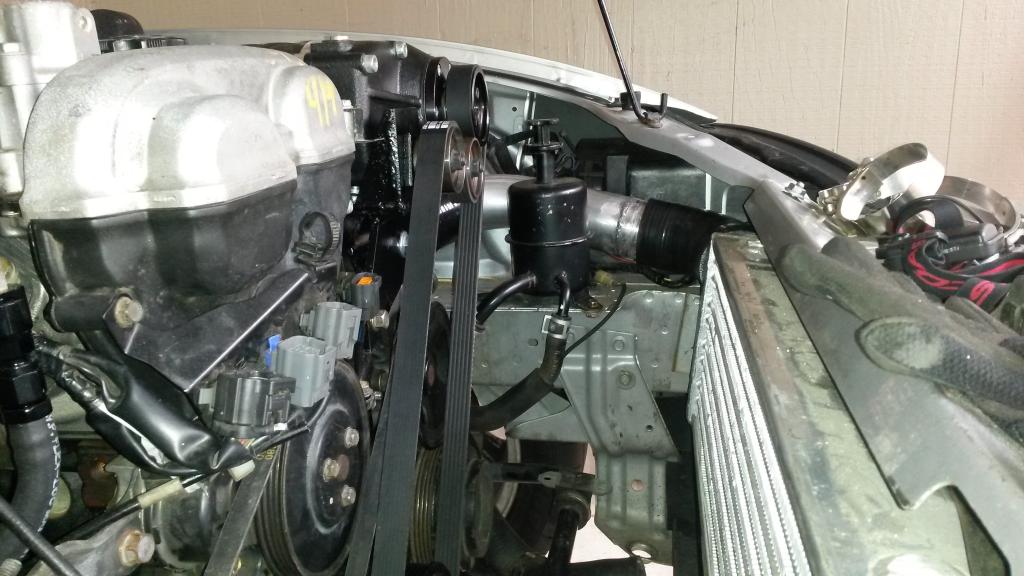
Had to trim heat shield more than I wanted to get SC to fit. On the plus side, not many Hotside SC's have a factory heat shield at all. If anyone cares I can post the order of operations to assemble it, but this crap all has to go together in a specific order, and 2 of the nuts require taping the nut to the socket...
Oil lines are almost done, gotta order fittings to make a custom one as the one I ordered is too long.
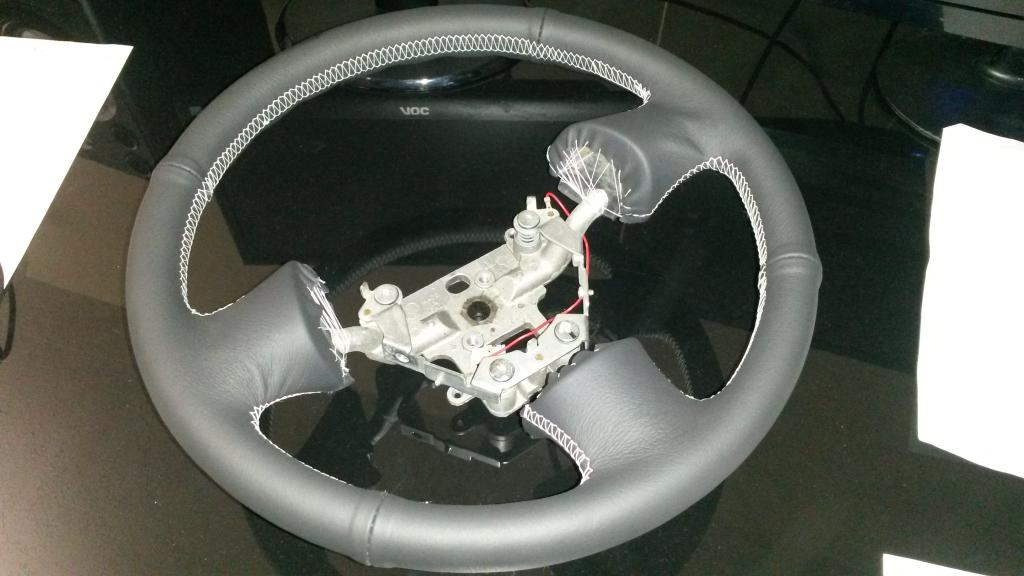
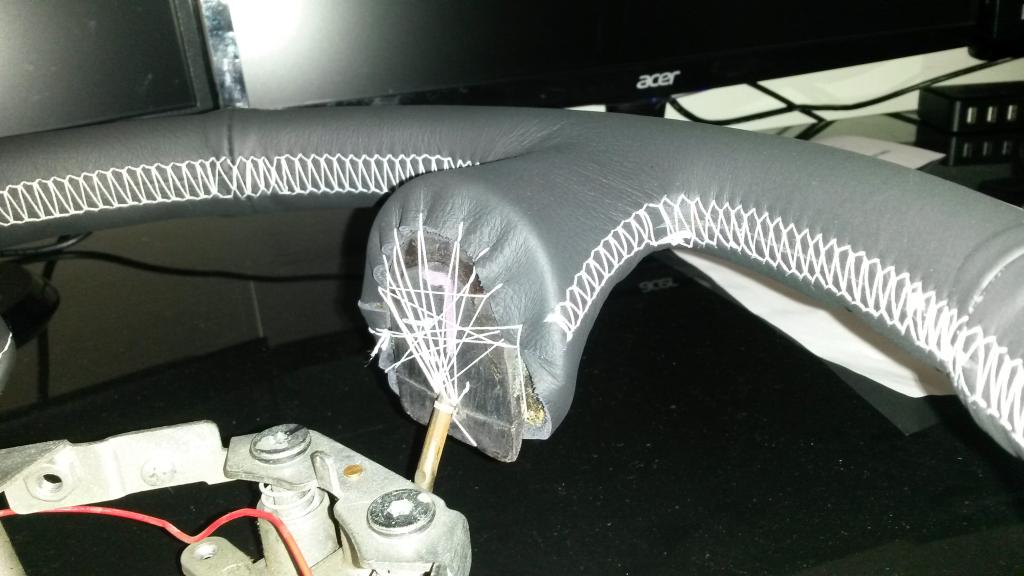
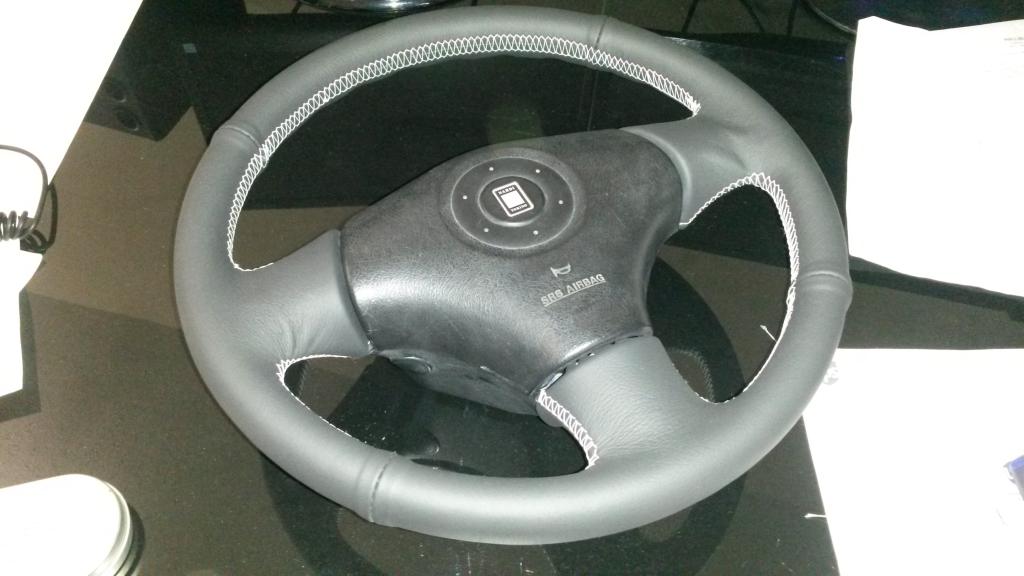
Also stiched on a new leather to the wheel, drilled holes in wheel first as foam was loose, injected super glue in it to re-glue it so it wouldn't be loose. My stiching sucks, I'm no seamstress. Also new shift boot and E brake handle.
Pics
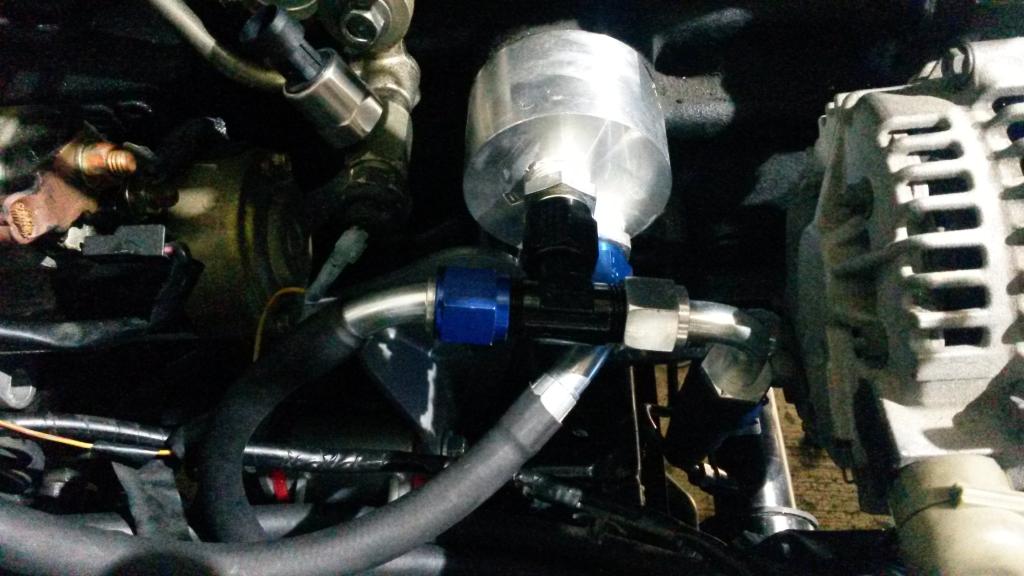
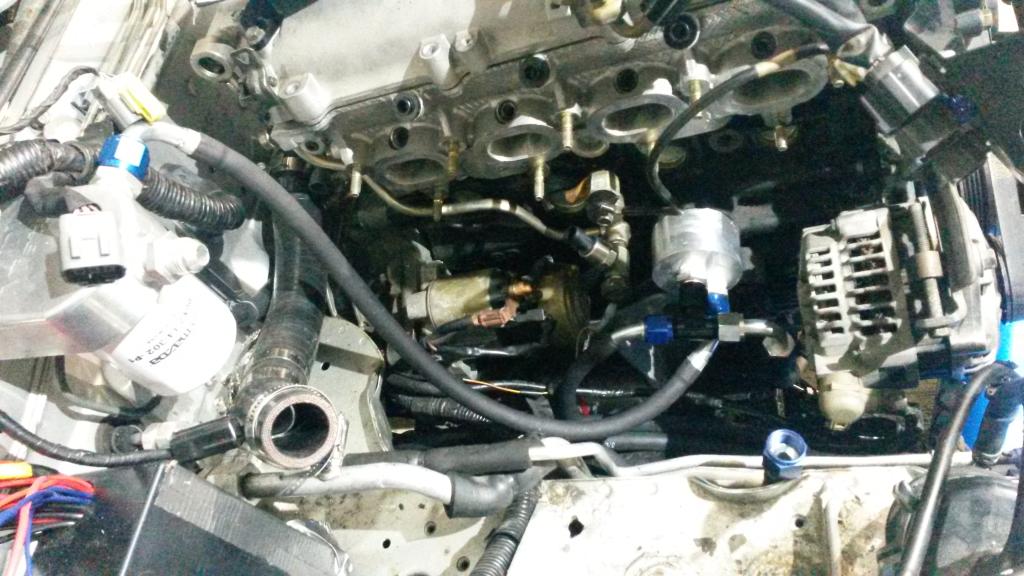
Oil Tee fitting
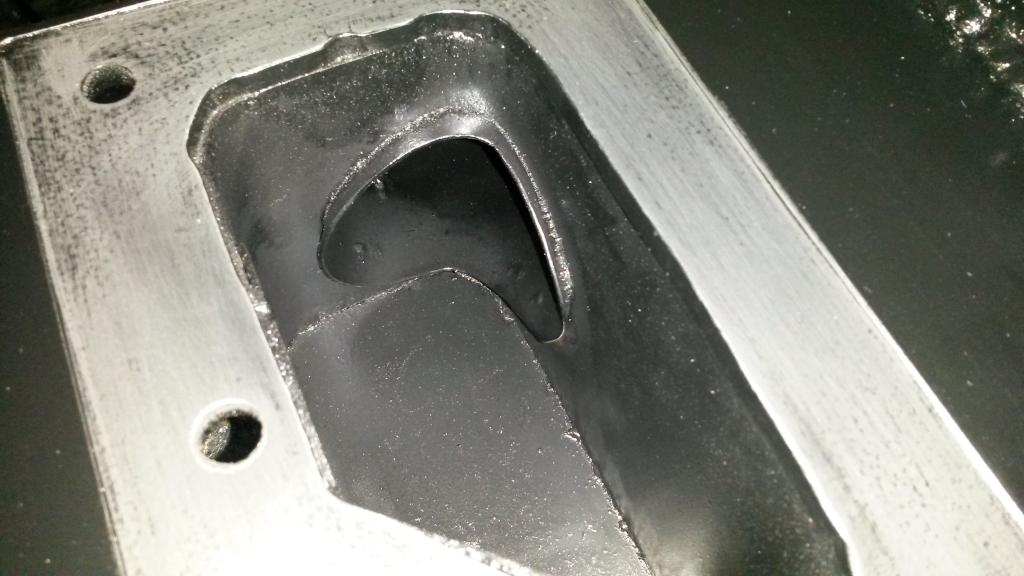
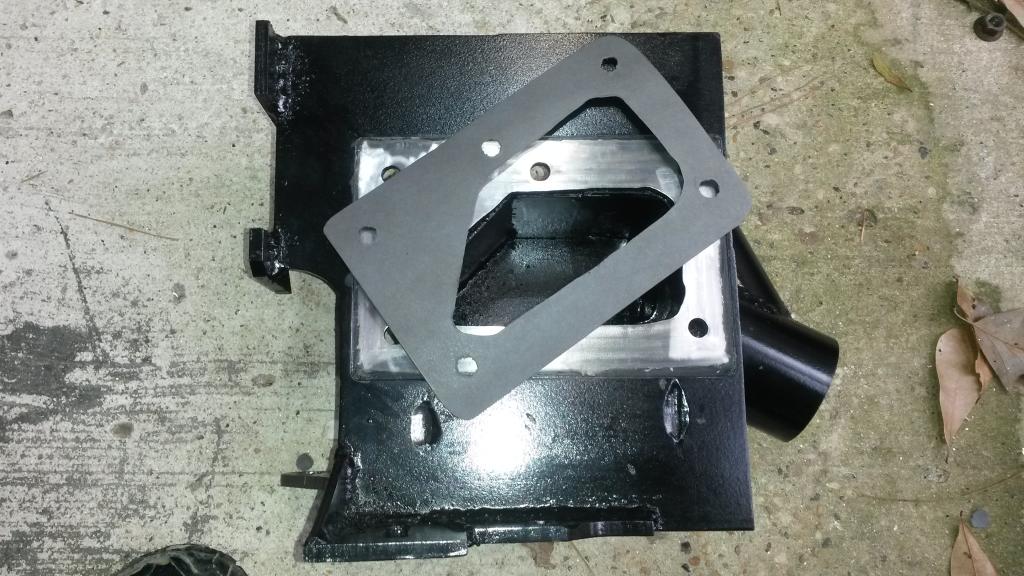
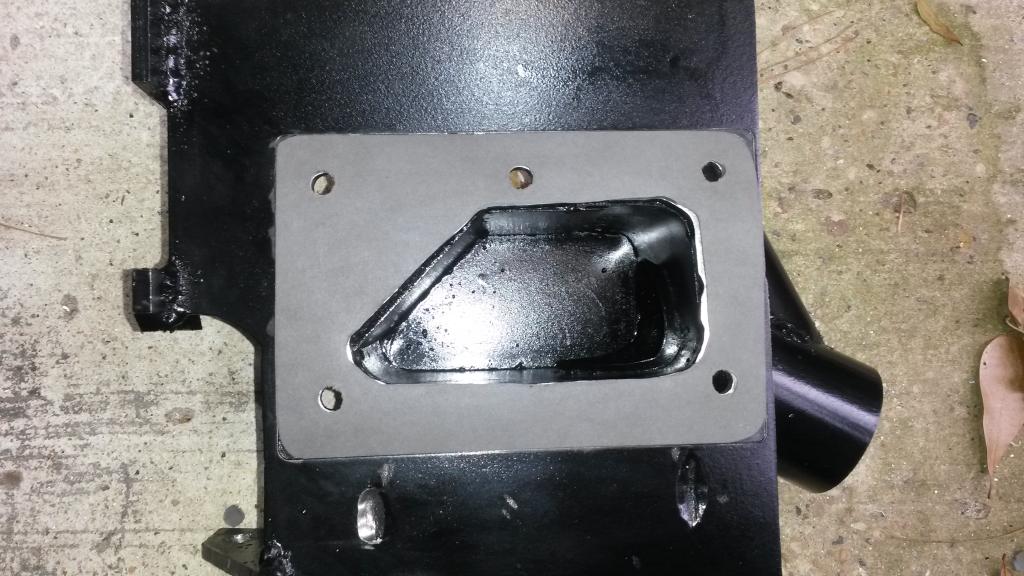
Blower base
Cleaned blower to get all the adhesive off, what a pain!
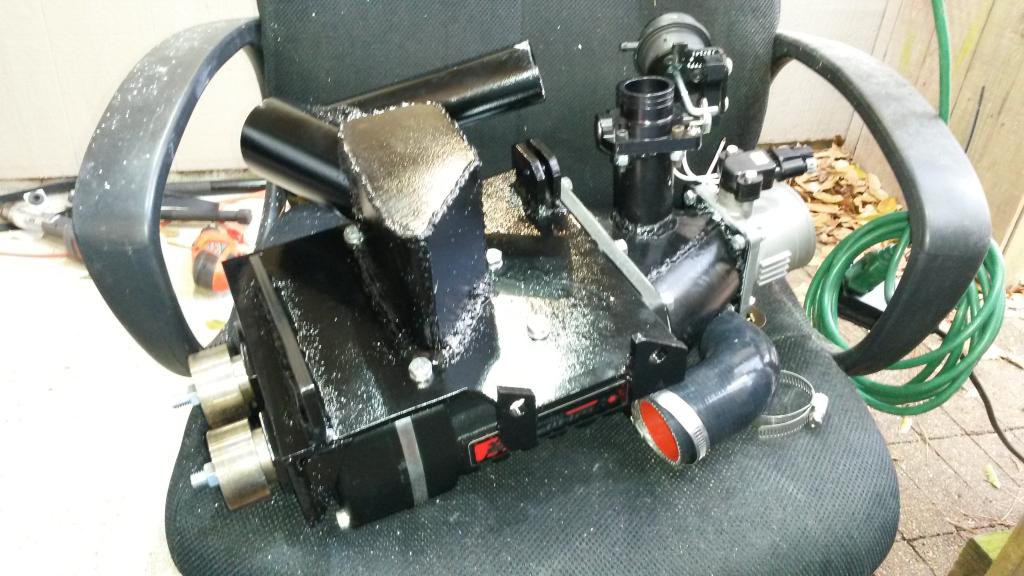
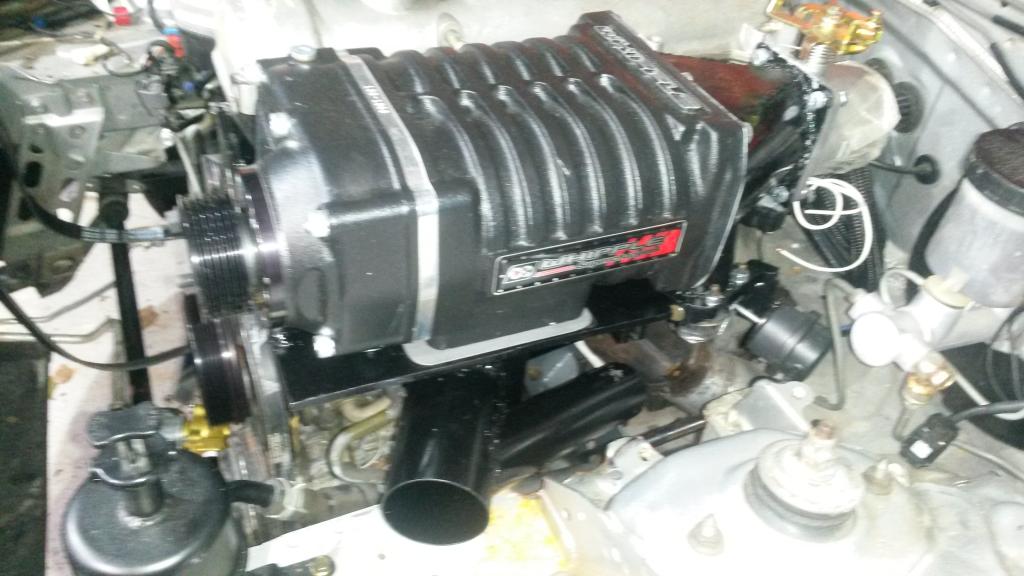
Upside down pic of assembly. As pictured, 40lbs, with blower, base, bypass, throttle body, TPS, pulleys, everything!
RTV'd on. This got changed to a custom gasket later so I could move SC to adjust it.
Custom felpro gasket I made.
Installed
Heat shield. Note: Has fiberglass between layers, I didn't know that!
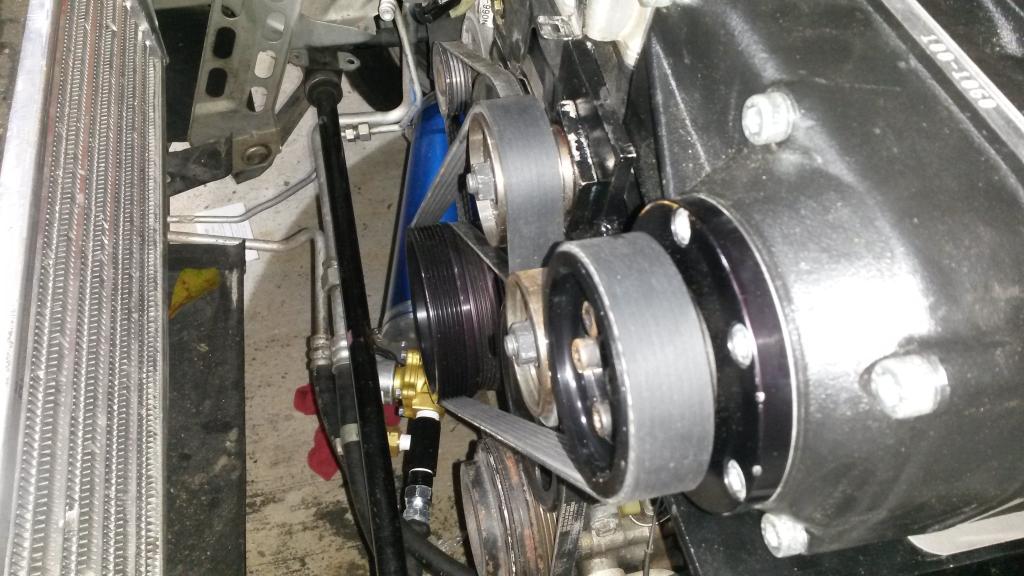
Belt routing looks nice!
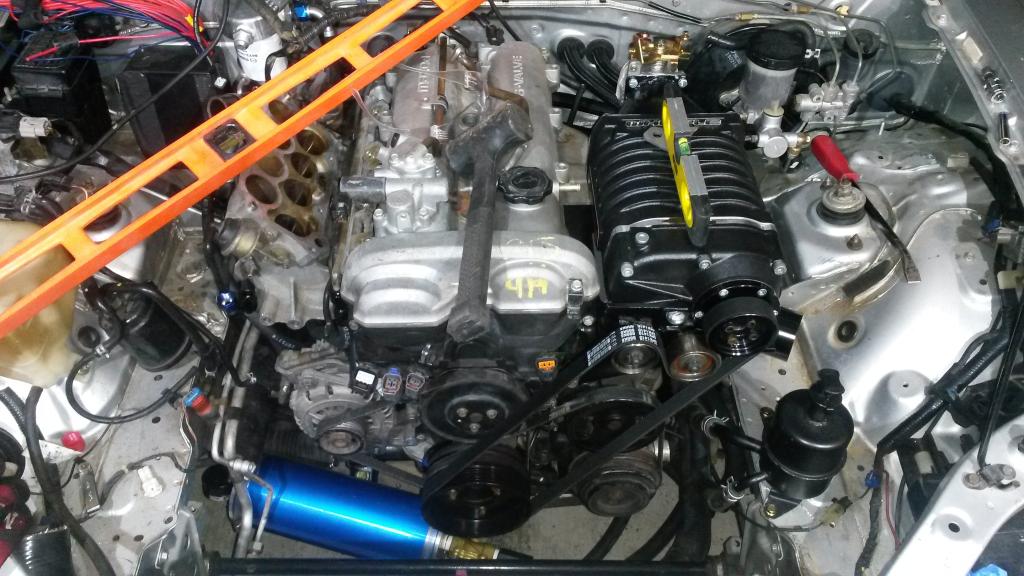
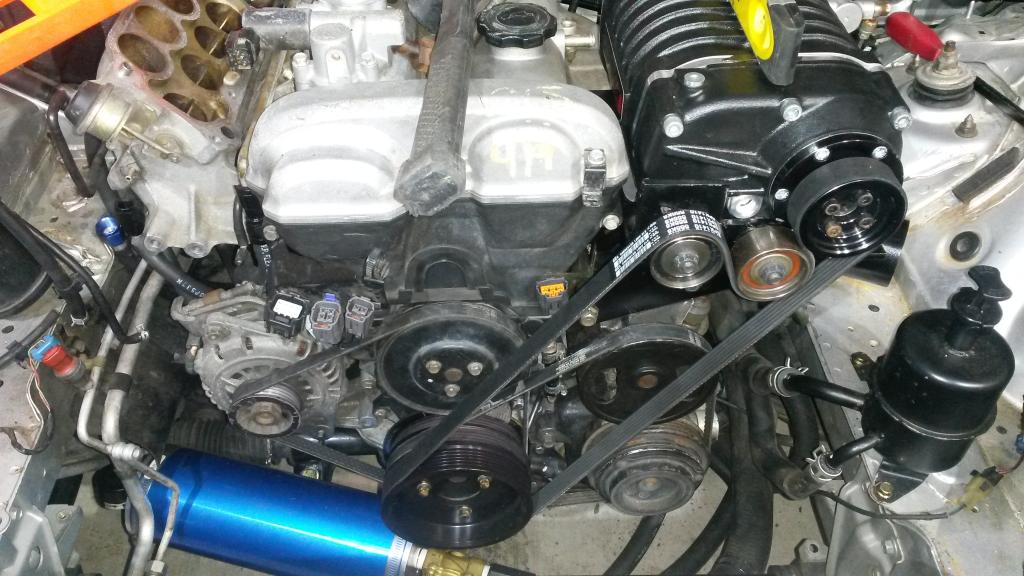
Over 270 degrees of belt wrap, can't get much more!
So was having belt issues. SC wasn't square in 3 different directions as noted above. So first one was it isn't parallel with crank. I fixed that, had to lower back of bracket, lift front up to get that fixed.
Then it was off left to right. I bought a framing square and used it to square the SC pulley with the two mounting tabs that go against the header. Thus pulley as long as header flange/head flange is square with crank (should be) then pulley is too.
Last was SC pulley in/out. That one is actually off a Tiny tiny amount, hard to measure but somewhere around .06-.08". I don't even remember which way. At this point the belt tracks straight, but if I look at the idlers (see pics below) the belt is not perfectly being guided straight onto the SC pulley from the idler pulley, it twist on the idler. Note that both the idler and tensioner are smooth with no edge on the side.
My plan is, I have a new idler pulley with ribs and and edge, it's going where the tensioner is tomorrow, just waiting on a 17mm to .375 bushing to arrive. Then I'll space THAT pulley to match the SC. So then it feeds the belt to the SC straight, so belt will not jump off the SC, misallignment will be between Crank pulley and Tensioner, which has over 2 feet of belt, so .08" over 2' is nothing, like .003 degrees! So should be ok.
Will know tomorrow if it works, will know 100% once I drive it. But in theory this will fix the belt alignment problems.
Had to trim heat shield more than I wanted to get SC to fit. On the plus side, not many Hotside SC's have a factory heat shield at all. If anyone cares I can post the order of operations to assemble it, but this crap all has to go together in a specific order, and 2 of the nuts require taping the nut to the socket...
Oil lines are almost done, gotta order fittings to make a custom one as the one I ordered is too long.
Also stiched on a new leather to the wheel, drilled holes in wheel first as foam was loose, injected super glue in it to re-glue it so it wouldn't be loose. My stiching sucks, I'm no seamstress. Also new shift boot and E brake handle.
Pics
Oil Tee fitting


Blower base

Cleaned blower to get all the adhesive off, what a pain!
Upside down pic of assembly. As pictured, 40lbs, with blower, base, bypass, throttle body, TPS, pulleys, everything!

RTV'd on. This got changed to a custom gasket later so I could move SC to adjust it.

Custom felpro gasket I made.


Installed


Heat shield. Note: Has fiberglass between layers, I didn't know that!


Belt routing looks nice!


Over 270 degrees of belt wrap, can't get much more!


Reply
0
0
03-07-2015, 01:06 PM
#88

It's looking good Pat. No doubt, alignment played a huge part, but I was wondering if the belt tracking issues might also be affected by the way you're using one of those idlers. I always thought it was a no-no to wrap the grooved side of a belt around a flat surfaced pulley. 
Also, if belt tracking continues to be sensitive to minute alignment issues, it is possible to mill a taper on the mounting base of the idler, and then clock it as necessary to steer the belt as necessary. Gary at TDR used to make them, but IDK if he still does.
.02
Also, if belt tracking continues to be sensitive to minute alignment issues, it is possible to mill a taper on the mounting base of the idler, and then clock it as necessary to steer the belt as necessary. Gary at TDR used to make them, but IDK if he still does.
.02
Reply
1
1
03-07-2015, 06:56 PM
#90
Elite Member
Thread Starter
iTrader: (16)
Join Date: Aug 2007
Location: Houston, TX
Posts: 9,292
Total Cats: 475
It's looking good Pat. No doubt, alignment played a huge part, but I was wondering if the belt tracking issues might also be affected by the way you're using one of those idlers. I always thought it was a no-no to wrap the grooved side of a belt around a flat surfaced pulley.
Also, if belt tracking continues to be sensitive to minute alignment issues, it is possible to mill a taper on the mounting base of the idler, and then clock it as necessary to steer the belt as necessary. Gary at TDR used to make them, but IDK if he still does.
.02
Also, if belt tracking continues to be sensitive to minute alignment issues, it is possible to mill a taper on the mounting base of the idler, and then clock it as necessary to steer the belt as necessary. Gary at TDR used to make them, but IDK if he still does.
.02
I'm going to change that actually, tonight! I have a new idler that has grooves that's going where the tensioner currently is. So hopefully that cures the belt tracking problems for good. I didn't think about making a taper as you say though, that could also be handy. Thanks for the tip! I love getting advice, it can help me improve my setup!
I'll post more pics tonight when I stop working but so far I got the cold side IC pipe made, cut the hood to clear the blower, and am about to cut one of my fans to get it to clear the P/S reservoir.
Reply
0
0
03-07-2015, 07:12 PM
#92
Elite Member
Thread Starter
iTrader: (16)
Join Date: Aug 2007
Location: Houston, TX
Posts: 9,292
Total Cats: 475
I do know the opening of my box is much much larger than the "opening" of the blower where the pockets of air expand out of. I'm hoping the air can basically expand into the box, and then flow down and out the side through the pipe. I don't know anything on how it pulsing will affect that though! At this point, I'm not gonna change it unless it proves to be a restriction. How would you tell though? I would think pressure drop, physics and all that...
Reply
0
0
03-08-2015, 01:06 AM
#95
Elite Member
Thread Starter
iTrader: (16)
Join Date: Aug 2007
Location: Houston, TX
Posts: 9,292
Total Cats: 475
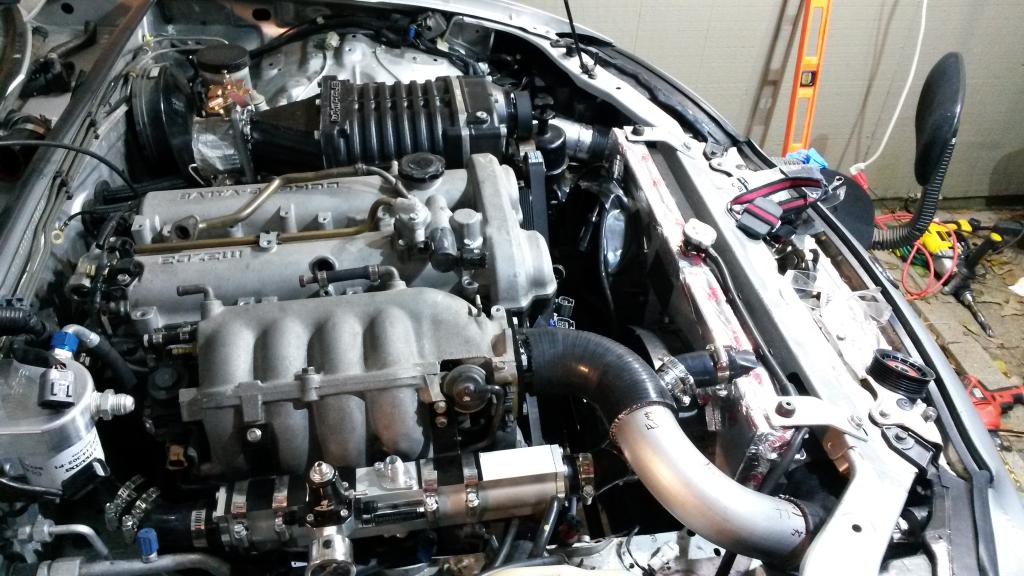
Good update today, got a good bit done/finished!
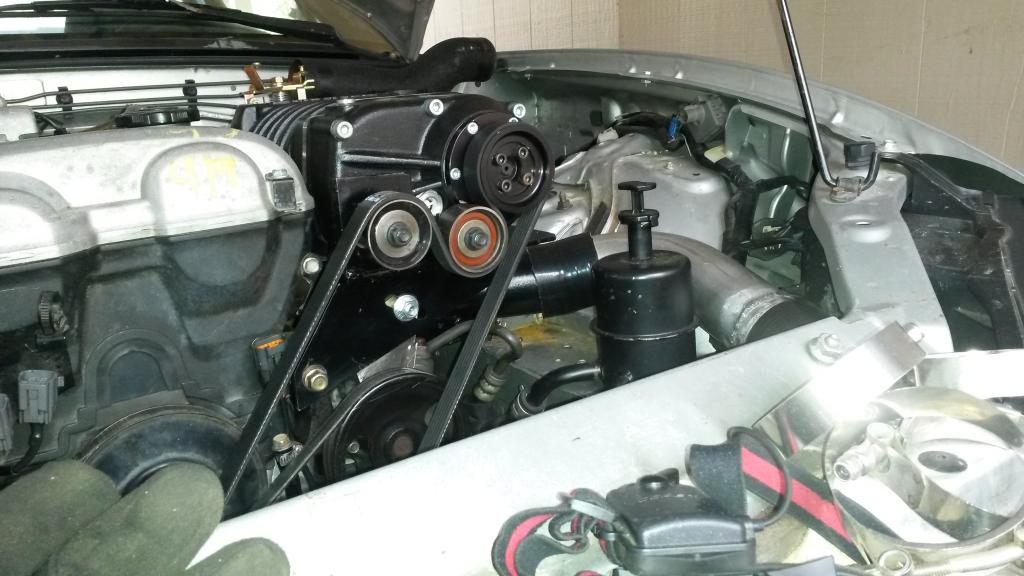
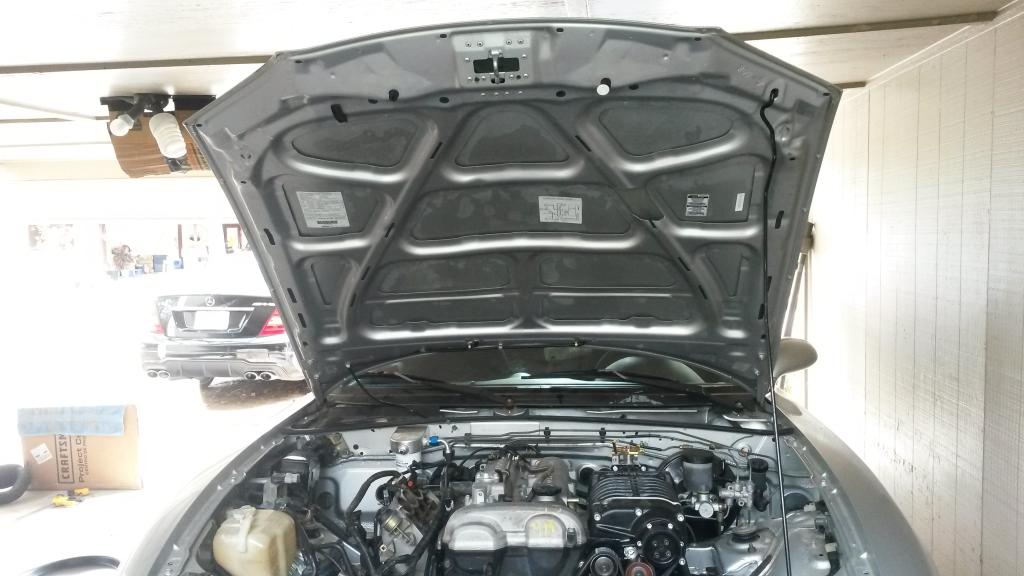
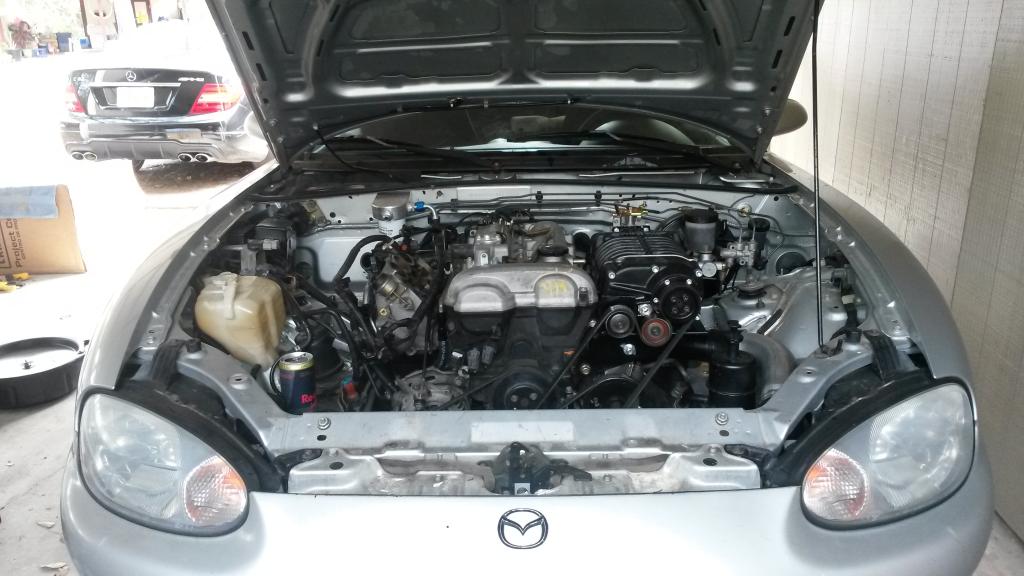
After getting the blower lined up, it hit the hood. It technically hit before, basically when the hood latched, it was like .020 from touching... So I fixed that, just notched the hood where the ribbing was hitting it. Also washed/scrubbed the underside of the hood. Damn it cleaned up a lot, I need to do the engine bay when the motor is out!
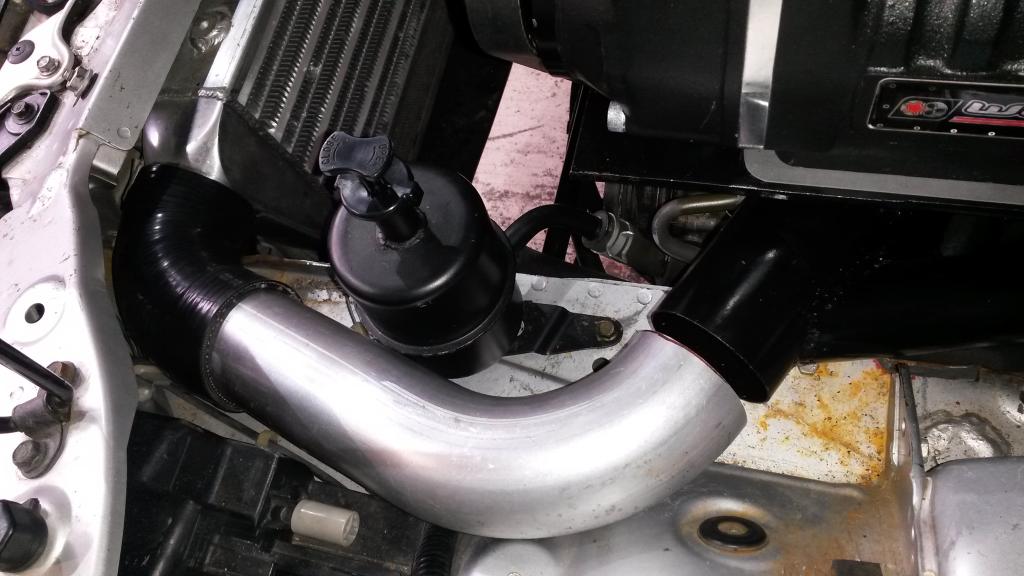
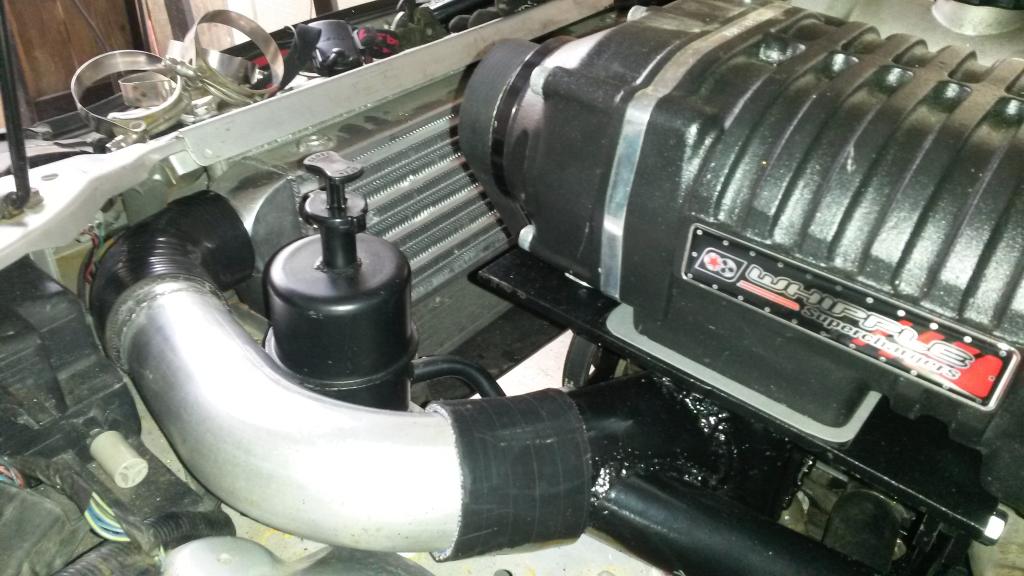
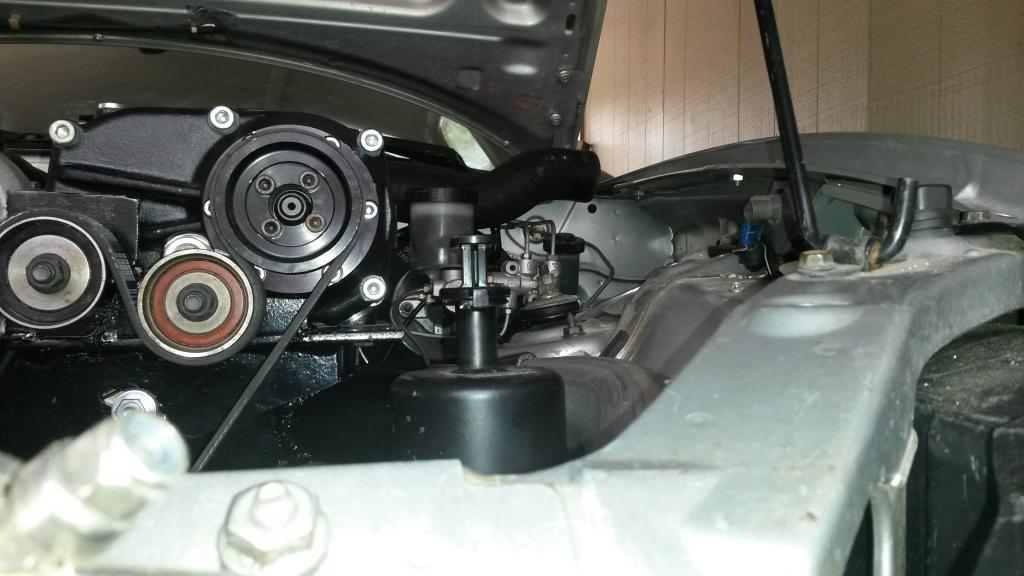
Got the intercooler pipes made. Just need to install WI nozzles on hotside, then paint them.
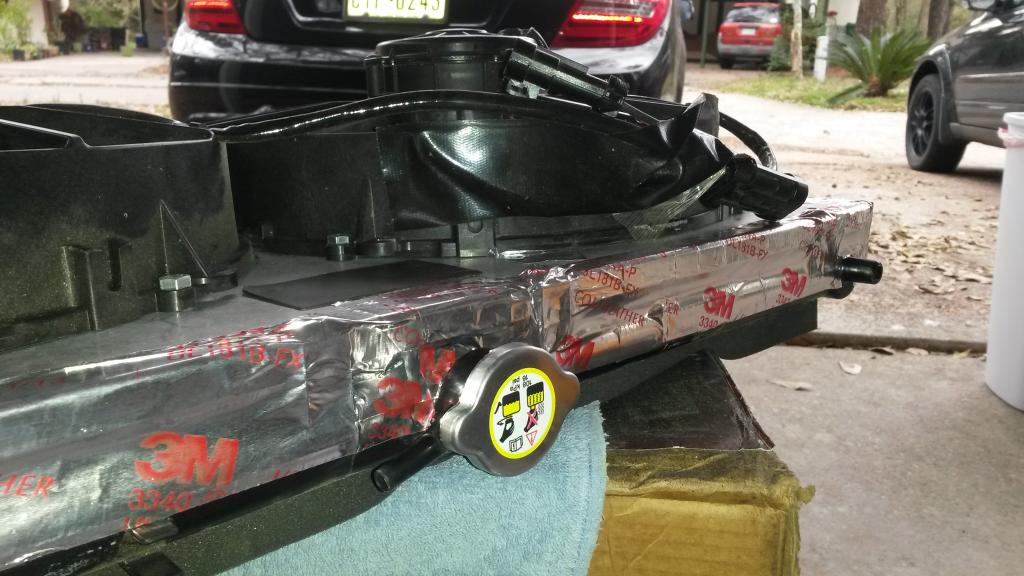
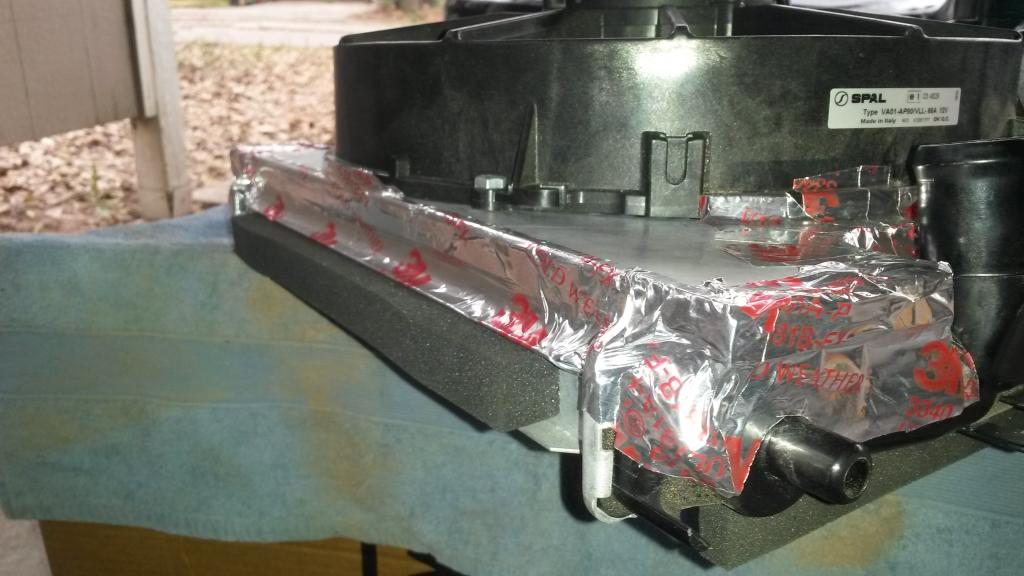
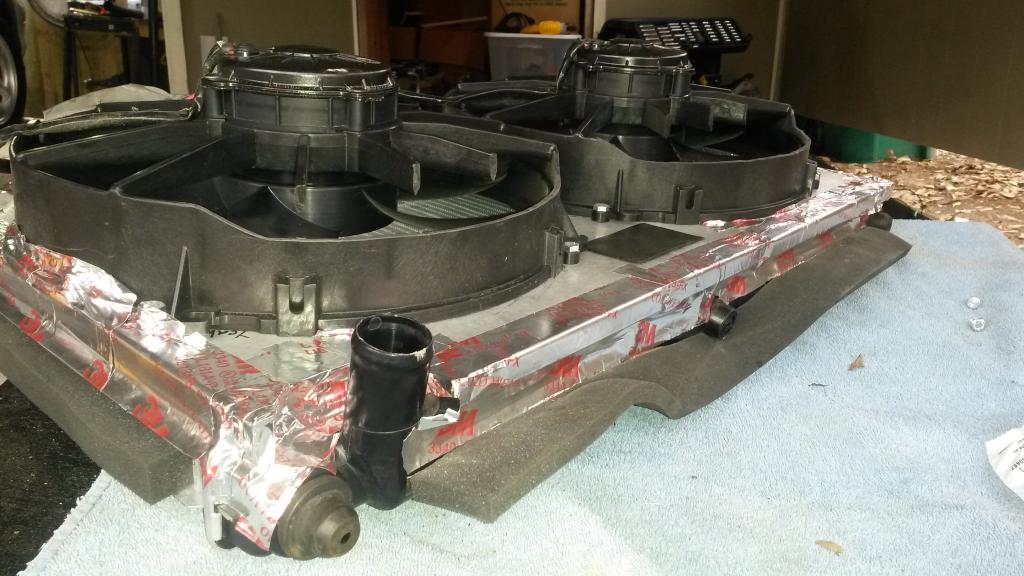
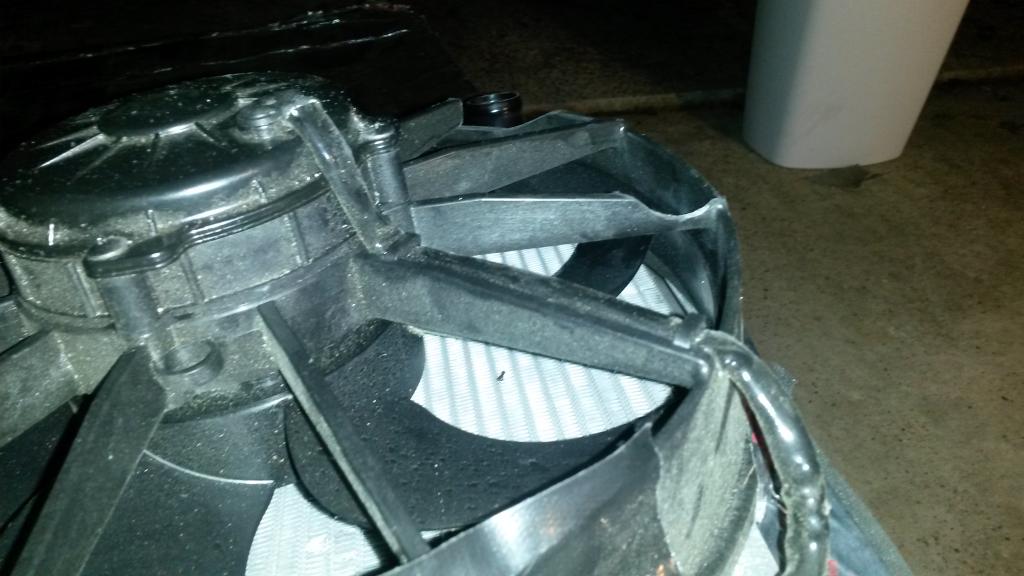
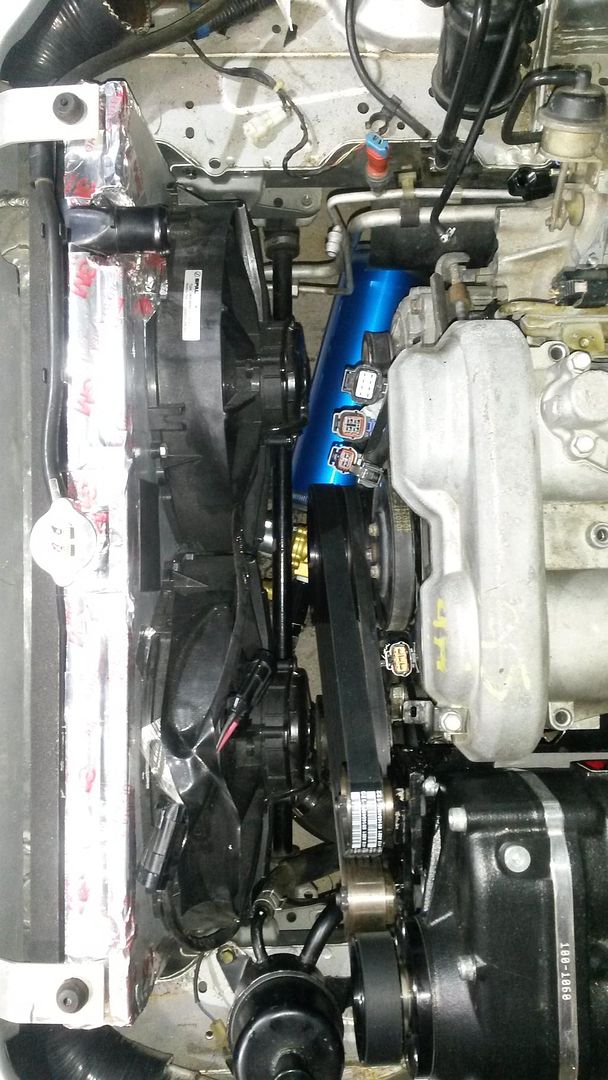
Got the fans shroud bolted down to the radiator with new bolts, then used 3M Metal foil tape to seal the shroud to the radiator 100%.
Then tried to install this assembly into the car, it would not go, had to lightweight (modify) the lower passengers side radiator mount, then it went. Then it dropped in, but hit a P/S hose. Couldn't bend the pipe, so I just lightweighted (notched) the fan.
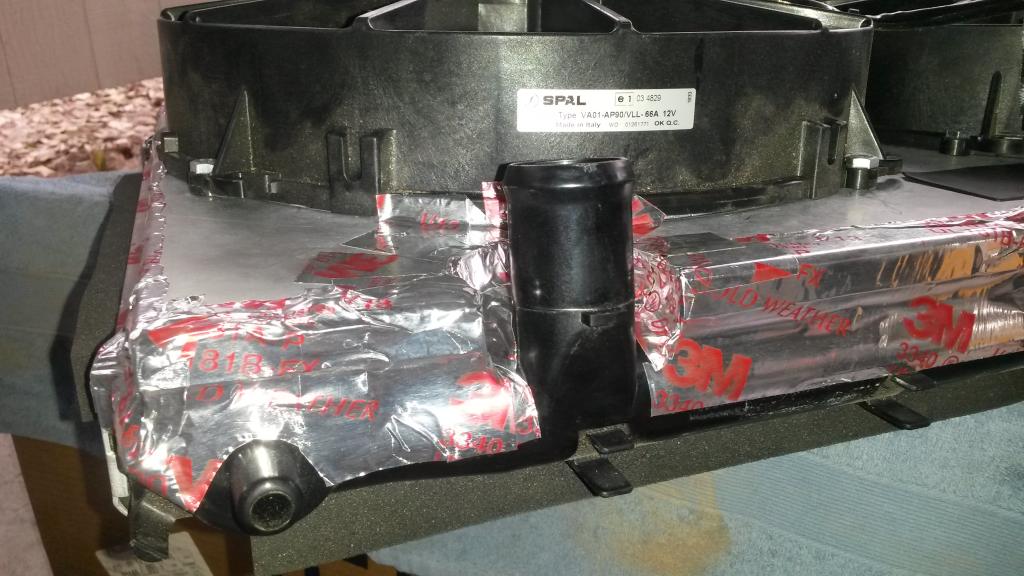
Then it went in, bolted it in. Damn, these fans look serious! They are SPAL extreme performance 12's, they should flow a lot.
Then did coldside intercooler piping. This is the part where Brain can hate on my intercooler setup, but at least it makes the intercooler pipe routing simple! Pics will show the IC pipe setup is not that bad!
Then finished the upper radiator hose to the radiator, using 1.25" Silicone.
That's about it. Spent over an hour on the phone helping a friend with a miata who's wrenching on his and having some trouble and had a few other distractions (my birthday...) so all things considered it was a good day!
Pics!
Clears headlight
Clears P/S resevoir
Pipes is simple, and LOW!
Lightweighted the hood.
Cut
Deburred
Hood clean!

'

Lightweight the radiator brackets
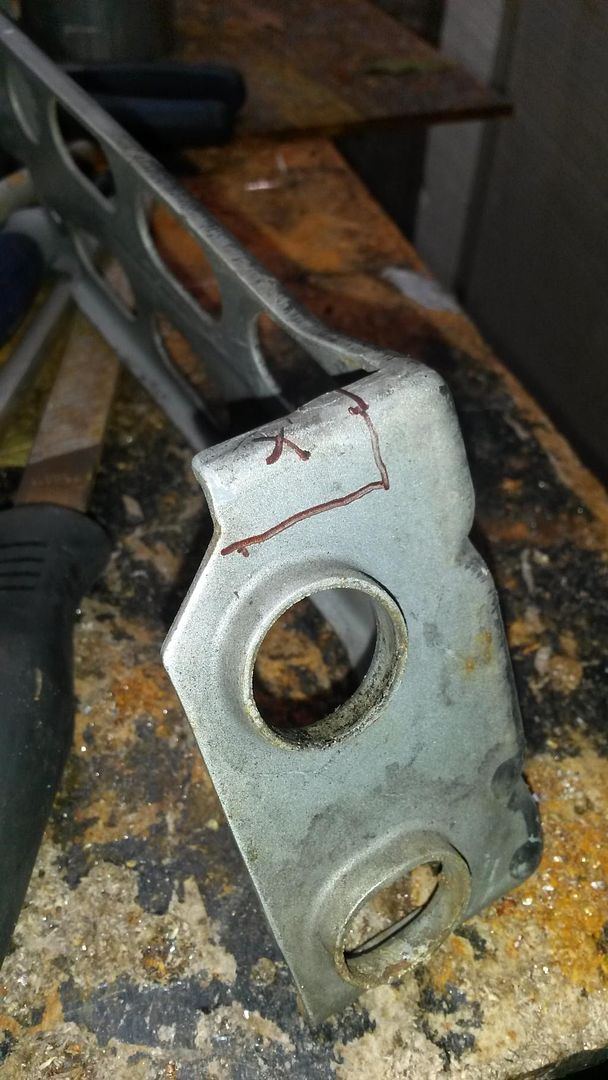
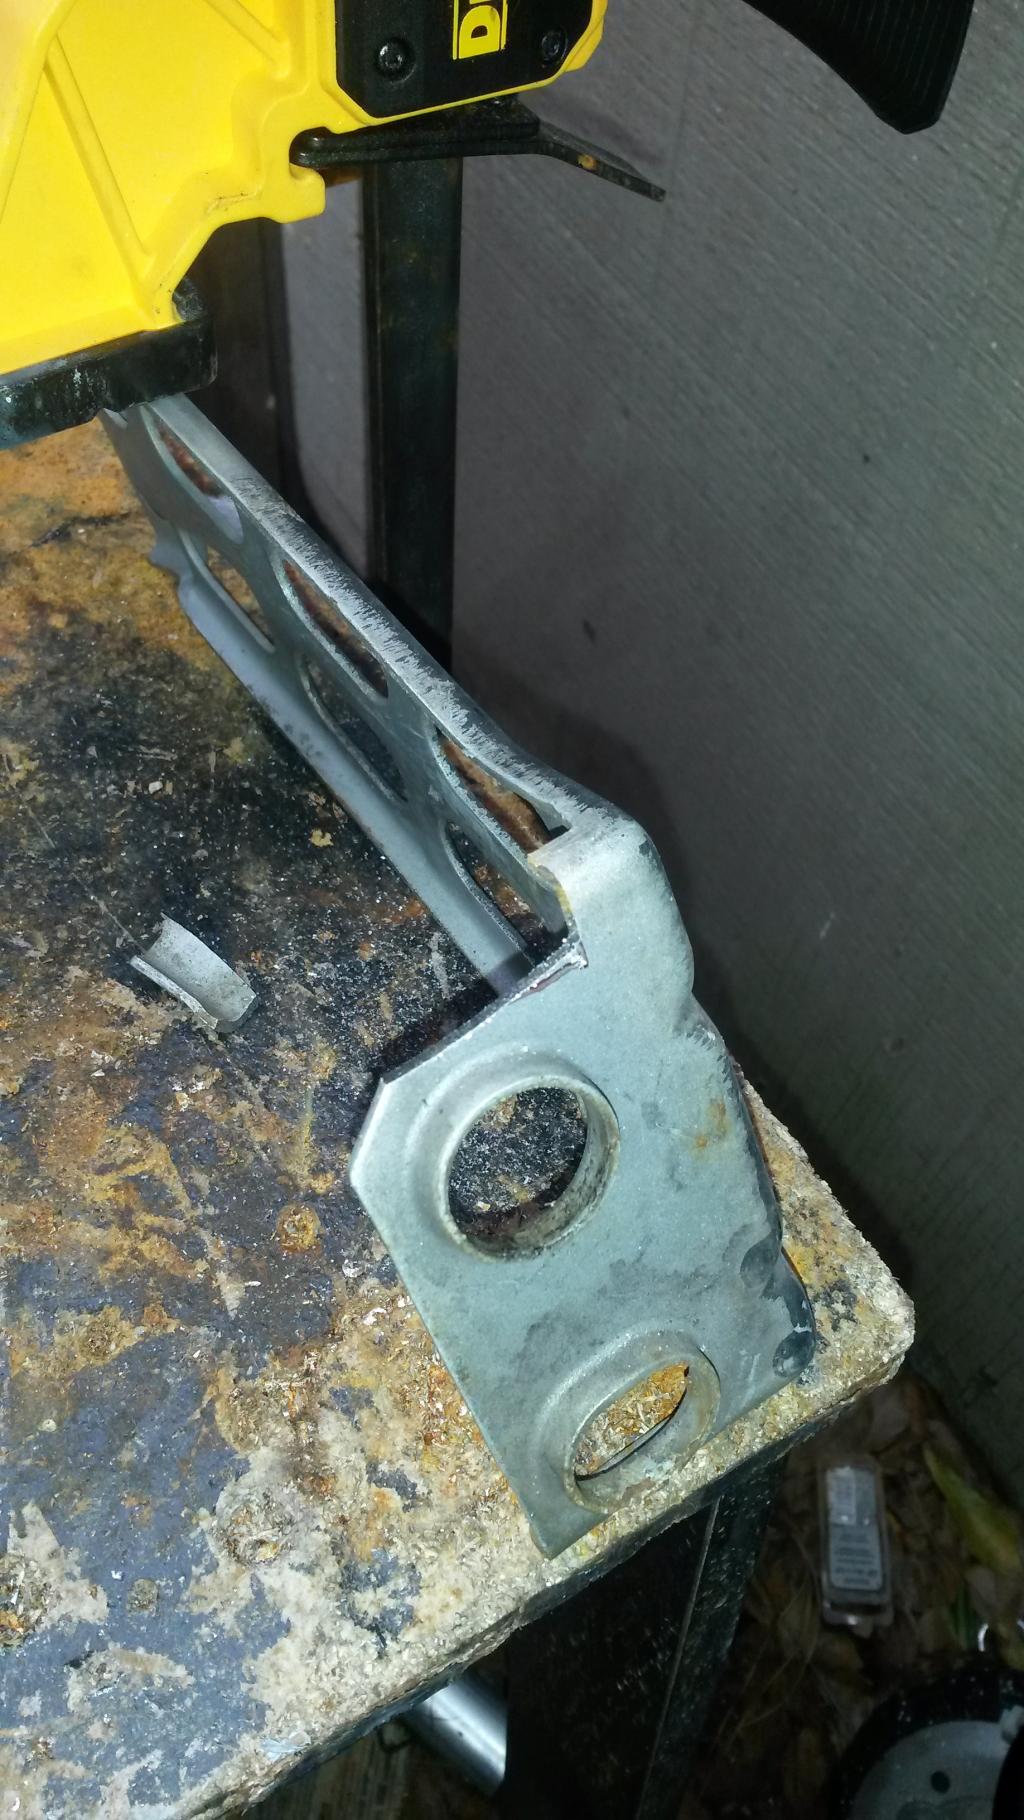
Then P/S Hose hit, so lightweight fan
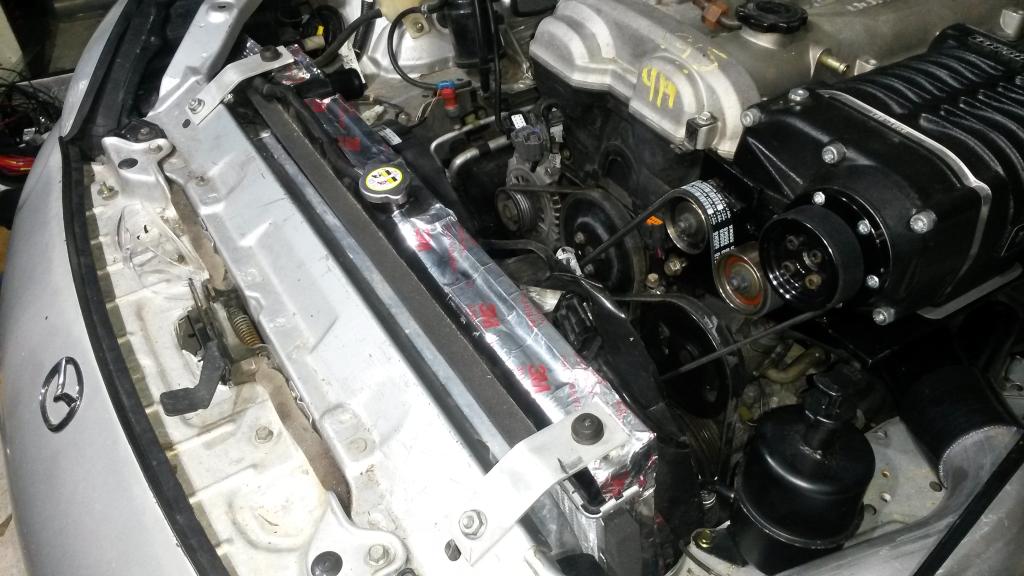
Hotside IC Pipe, rather simple!


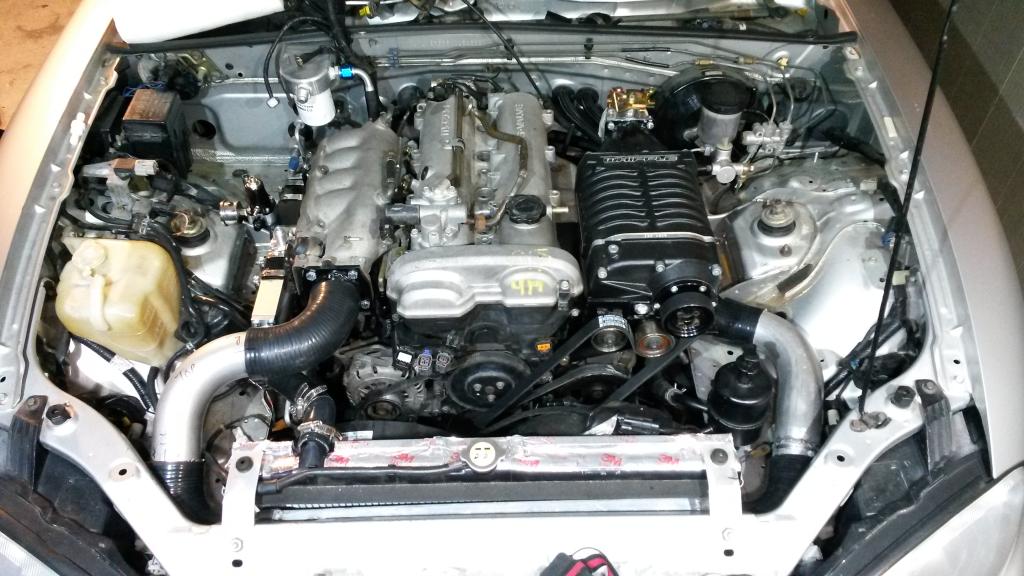
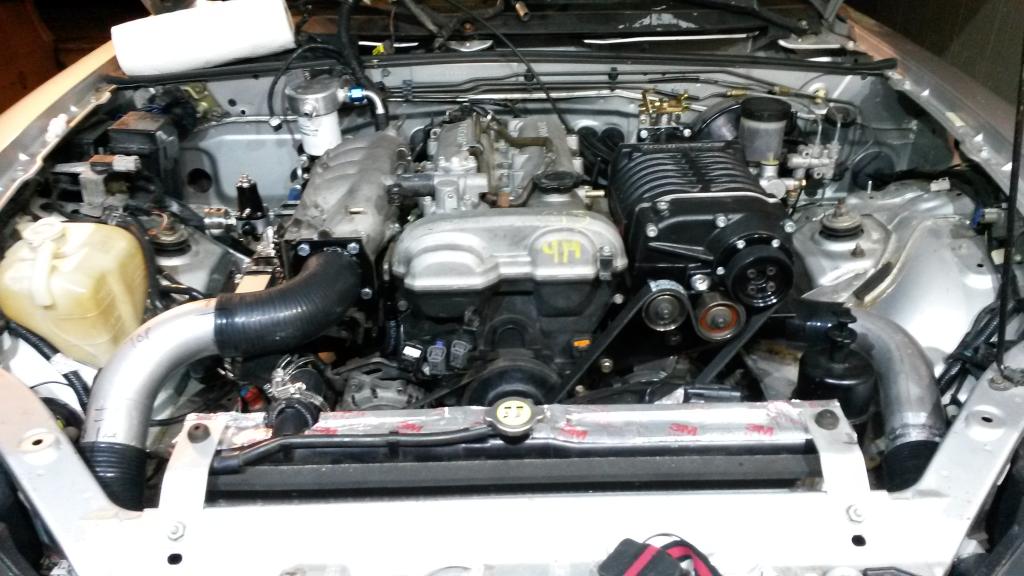
Was going to change tensioner pulley today, but bushing I ordered did not show up! Tracking said it would today, but it lied... So whenever it gets here I'll do that.
After getting the blower lined up, it hit the hood. It technically hit before, basically when the hood latched, it was like .020 from touching... So I fixed that, just notched the hood where the ribbing was hitting it. Also washed/scrubbed the underside of the hood. Damn it cleaned up a lot, I need to do the engine bay when the motor is out!
Got the intercooler pipes made. Just need to install WI nozzles on hotside, then paint them.
Got the fans shroud bolted down to the radiator with new bolts, then used 3M Metal foil tape to seal the shroud to the radiator 100%.
Then tried to install this assembly into the car, it would not go, had to lightweight (modify) the lower passengers side radiator mount, then it went. Then it dropped in, but hit a P/S hose. Couldn't bend the pipe, so I just lightweighted (notched) the fan.
Then it went in, bolted it in. Damn, these fans look serious! They are SPAL extreme performance 12's, they should flow a lot.
Then did coldside intercooler piping. This is the part where Brain can hate on my intercooler setup, but at least it makes the intercooler pipe routing simple! Pics will show the IC pipe setup is not that bad!
Then finished the upper radiator hose to the radiator, using 1.25" Silicone.
That's about it. Spent over an hour on the phone helping a friend with a miata who's wrenching on his and having some trouble and had a few other distractions (my birthday...) so all things considered it was a good day!
Pics!

Clears headlight

Clears P/S resevoir

Pipes is simple, and LOW!


Lightweighted the hood.


Cut

Deburred

Hood clean!


'


Lightweight the radiator brackets


Then P/S Hose hit, so lightweight fan


Hotside IC Pipe, rather simple!


Was going to change tensioner pulley today, but bushing I ordered did not show up! Tracking said it would today, but it lied... So whenever it gets here I'll do that.
Reply
0
0
03-08-2015, 01:23 AM
#96
Elite Member
Thread Starter
iTrader: (16)
Join Date: Aug 2007
Location: Houston, TX
Posts: 9,292
Total Cats: 475
ALSO, I forgot, I have a problem, maybe someone can help!
When I turn the key OFF, the CEL and air bag light glow dimmly. And if I try to turn the interior fan on, it works! It's like the car is staying on, it is, and it's draining the crap out of my battery. Any ideas? Maybe a bad ignition switch?
When I turn the key OFF, the CEL and air bag light glow dimmly. And if I try to turn the interior fan on, it works! It's like the car is staying on, it is, and it's draining the crap out of my battery. Any ideas? Maybe a bad ignition switch?
Reply
0
0
03-08-2015, 01:38 AM
#97
Elite Member
Thread Starter
iTrader: (16)
Join Date: Aug 2007
Location: Houston, TX
Posts: 9,292
Total Cats: 475
One more, I'm trying to figure out how to hook a pipe to the inlet of the blower. This is what I'm thinking right now.
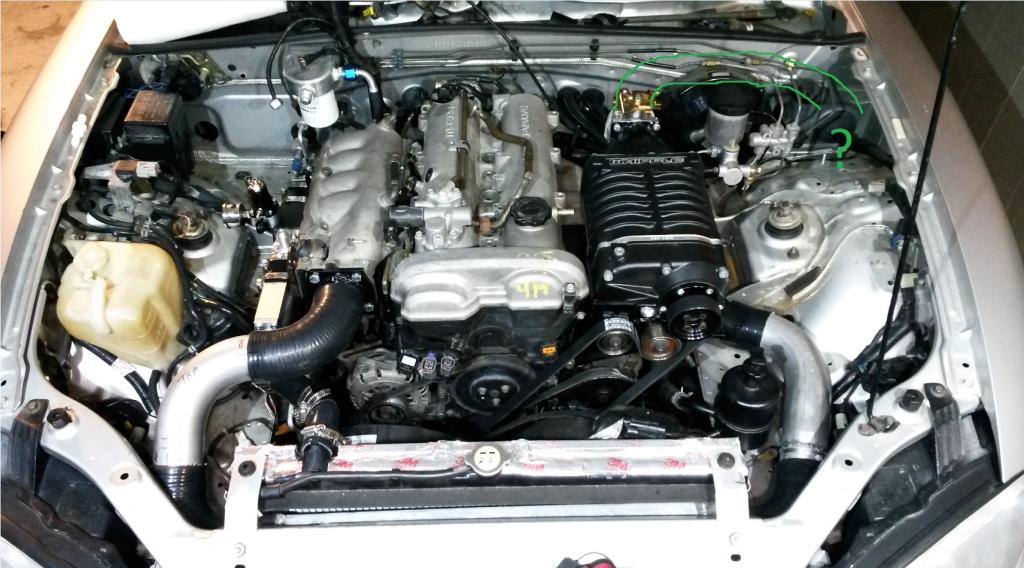
I WAS going to do a 180 at the throttle body and have it go forward between teh blower and the master cylinder, but there is just not enough space for 3" pipe there, AND, I'd need a 3" bend with a 1.5" radius to make that happen....
So I'm thinking of routing it as I drew in that pic. Basically out of the blower, 90 bend that angles up, then angle it back so it's level/flat and cross over the booster, behind the master cylinder resevoir, OVER the clutch resevoir, , then turn forward and down and after that I dunno but probably an air filter in that area and some kind of ducting to give it cool air.
Any ideas?
The area going over the booster is only about 2.5", not 3", so I'd have to ovalize the 3" tubing a bit, or use 3" silicone and let it just squish there, or step down to say 2.5" tubing for the intake, but I think that's a bad idea given this blower can inhale over 1,100 CFM, that's approaching Mach .4 with a 3" pipe!
Reply
0
0
03-08-2015, 01:47 AM
#98
Senior Member

iTrader: (2)

Join Date: Oct 2013
Location: Goleta, Southern California
Posts: 520
Total Cats: 27
I always wanted to go into the cowl area. Low pressure, cooler air. But you got to cut a hole. Many have done it before however you probably have to move brake lines.
Reply
0
0
03-08-2015, 06:58 AM
#100
Senior Member
iTrader: (1)
Join Date: Jan 2011
Location: Chattanooga, Tn
Posts: 1,234
Total Cats: 283
Have you ever used those SPAL fans before? I have just one of them on my Radiator and it pulls so much current we had to add timing and fuel at idle to keep the motor running when it kicked on. I don't see how in the world to have two of them running at the same time. But DAMN...they pull a serious amount of air.
Reply
0
0


