RWyatt's "It's takin forever" Build Thread
 08-08-2014, 11:48 AM
#181
Senior Member
Thread Starter

Join Date: Dec 2007
Location: ATL
Posts: 1,348
Total Cats: 128
OK...I'm officially stupid! I admit it.
Stupid engine-build move #1; I didn't try to put the dipstick (how appropriate) on until the engine was IN the car. "I don't want to damage it", I said. "It'll be easy, just thread it in and bolt up the ground strap", I said. SUUUUuuuuurrrrre.... I spent the better part of an hour trying to get the damned thing in place, but the captured bolt on the mounting tang wouldn't get into place because the heater core hard line was in the way. Then I spent the better part of another hour first trying to cut the head off the captured bolt with a Dremel cutoff wheel (FAIL), and then finding a grinder and grinding the damned thing off. THEN I spent the better part of ANOTHER hour trying to align the holes in the trans backing plate and fish a 10mm bolt and nut through the teenie little space between the hard line, firewall and downpipe. 3 hours lost for something that could (should) have been done in 5 minutes prior to the install.
Stupid engine-build move #2: I solved the water leak (a simple twist of the clamp and, voila, no more waterfall). BUT - upon cranking the engine w/o the fuel and spark (just to make sure everything turned OK - there was an oil leak; from whence I know not. I'm suspecting that my brand new IL Motorsports spacer block is leaking from somewhere, but that's not all!
Stupid engine-build move #3: I decided to forge ahead and get the engine running, just long enough to make sure that nothing fell off and to see the oil leak in action. So I put in the plugs, put the fuel pump relay back in, primed the fuel pump and turned the key...everything turned over like silk. It was poetry in motion. It was a thing of beauty.
IT was NOT starting!!
Not only was it NOT starting, everything was turning TOO smoothly. It was turning over as if the plugs were not installed. Did I screw up the cam timing?! I tore off the front covers and checked that. No, the timing was right. Did I NOT tighten the plugs down all the way? No, the plugs were snugged up nicely. Did I f-up the valves? I pulled out the feeler gauges and started checking the gaps on the lifters. First the intake side...yep, OK. Then the exhaust side...
And the the full horror of my stupidity hit me when I checked the gap on exhaust valve 1...there was no gap. In fact, every single G_d-damned exhaust valve had zero cam/lifter gap.
"How could that be?!" Didn't I get the right, replacement exhaust valves? So, I went to the internet (everything on the internet is true, right?) and looked up my order. Yep, Supertech exhaust valves...for 94-05, check...std valve head, check...+0.6 mm longer, che...WTF!!!!!
How in the hell did I miss that! Why didn't I check this a week ago before putting the engine back together? What was I drinking/smoking/injecting that caused me to overlook that.!! Nope, none of the above.
It's (join me in the chorus) BECAUSE YOU'RE STUPID!!
So what now? I'm gonna tear down the exhaust side of head then take out and carefully measure the shims. Then I'm going to subtract 0.6 mm from each shim and log those numbers (carefully). Then, I'm going to Cylinder Head Supply and see if I can find the appropriate 27 mm shims to match what I need - this assumes that each of the new exhaust valves is machined to be EXACTLY 0.6 mm taller than the stock valves without any tolerance differences (yeah, a faulty assumption). Upon receipt of the new shims (which, with my luck, will be approximately 3 years from now) I will proceed to place the right shim in the right lifter and carefully measure the gaps, noting any out-of-spec gaps. I will then bolt everything back together and try for a re-start. In the meantime I will order new shims for any out of spec ones and replace them as needed. Then I will kick myself repeatedly in the *** for being so stupid in the first place.
Comments?

Reply
 0
0

0
08-11-2014, 06:16 PM
#182
Senior Member
iTrader: (1)

Join Date: Sep 2011
Location: Lambertville, NJ
Posts: 1,215
Total Cats: 74
OK...I'm officially stupid! I admit it.
....
So what now? I'm gonna tear down the exhaust side of head then take out and carefully measure the shims. Then I'm going to subtract 0.6 mm from each shim and log those numbers (carefully). Then, I'm going to Cylinder Head Supply and see if I can find the appropriate 27 mm shims to match what I need - this assumes that each of the new exhaust valves is machined to be EXACTLY 0.6 mm taller than the stock valves without any tolerance differences (yeah, a faulty assumption). Upon receipt of the new shims (which, with my luck, will be approximately 3 years from now) I will proceed to place the right shim in the right lifter and carefully measure the gaps, noting any out-of-spec gaps. I will then bolt everything back together and try for a re-start. In the meantime I will order new shims for any out of spec ones and replace them as needed. Then I will kick myself repeatedly in the *** for being so stupid in the first place.
Comments?
But even if you would have gotten the right length valves you can't just re-use the same shims and assume they'll fit.
None of my shims were short enough to get any lash on any of the valves. So I just ordered a bunch of shims that were shorter, installed, measured and then ordered the other ones I needed. Even the shortest shim I could get at Mazda was still to tall for the Supertech valves.
You can order shims here:
27MM Valve Clearance Discs
It would be cheaper to have the valves ground down- you won't need to order as many shims- but by doing that you rob yourself of the option to install a re-ground cam later on.
The best solution would be to use the shim under bucket lifters from Supertech:
Supertech Cam Follower Lifter Miata
But that is also the priciest...
Reply
0
0
08-12-2014, 02:57 PM
#183
Senior Member
Thread Starter
Join Date: Dec 2007
Location: ATL
Posts: 1,348
Total Cats: 128
The exact same thing happened to me. Even more embarrassing since I hired a professional to do it. He still got it wrong. :-)
But even if you would have gotten the right length valves you can't just re-use the same shims and assume they'll fit.
None of my shims were short enough to get any lash on any of the valves. So I just ordered a bunch of shims that were shorter, installed, measured and then ordered the other ones I needed. Even the shortest shim I could get at Mazda was still to tall for the Supertech valves.
You can order shims here:
27MM Valve Clearance Discs
It would be cheaper to have the valves ground down- you won't need to order as many shims- but by doing that you rob yourself of the option to install a re-ground cam later on.
The best solution would be to use the shim under bucket lifters from Supertech:
Supertech Cam Follower Lifter Miata
But that is also the priciest...
FWIW - I considered the shim-under-bucket lifters but my budget said "NO!". So I ordered what I think I needed from Cylinder Head Supply; they should be here tomorrow. We'll see where I go from here.
Reply
0
0
08-18-2014, 02:23 PM
#184
Senior Member
Thread Starter
Join Date: Dec 2007
Location: ATL
Posts: 1,348
Total Cats: 128
IT'S ALIVE!
FrankenMiata LIVES!!
Part 1: So I went in Saturday. Objective - Car running by the end of the day. Things to do; find oil leak, fix water leak from reroute hose on back of the head (of course, that's the one that leaks), button up the valve cover, install home-brew radiator ducting, drive home and WIN!
Did all the above...except drive home, because when I turned the key, the car cranked but didn't start. ???!!! How could that be? Everything is connected. Everything is right. WHY won't it start?!
So I checked the spark...yep, I have spark. And I checked fuel...yep, I have fuel. All the wires are connected, all the hoses are properly connected. I installed a brand new CPS that I had laying around; NFG. I connected a used CAS that I had laying around; NFG. Then someone suggested that I check the timing. Highly insulted, I pulled the front covers off and confirmed...yes, the "I" on the intake cam is lined up with the "I" mark on the plate behind the cam sprocket, and the "E"'s are likewise lined up when #1 cylinder is at TDC (hint-hint) so the timing's just fine, amateur.
So I pulled out my timing light (just to check, you know) and the timing was WAY OFF! (If you saw my hint above, you know what I did wrong - besides relying on memory to set timing). A quick check of (reliable) reference material showed that "E" aligns with "E" on the intake cam and "I" aligns with "I" on the exhaust cam.
Can you guess what happened after I made the change...yep, it fired right up. 3 hours down the drain because of a faulty memory. (Supid engine-build move #4)
After that, I called it a day.
Part 2: Sunday dawned bright and sunny and I was determined to finish this damned thing once and for all - TODAY! So I finished everything up and took her out on the road for a few break-in runs. I used the "FM Break In Method". logged about 20 miles and pulled back into the garage and changed the oil.
Going home was trouble-free, although the water temps were reading a bit high but not abnormally so. It was good to feel the old girl with her new heart beating strong. I stayed out of (too much) boost - hard to do, but "mission accomplished.
Part 3: Monday morning, and time to drive into work. Started up without issue and drove out to the main street. "Hmmm, the windows seem a little slow. I'll have to remember to grease the tracks sometime."
Then, the unthinkable. Accelerating to the stoplight I got a bit of a bobble. I thought, "I guess I'll have to make some tweaks to the fuel tables in boosted areas. I'll just take it easy until I do that." Then the bobble became awful backfiring followed swiftly by a complete shutdown.
WTF?!!!
I coasted into a nearby parking lot to inspect what could possibly have gone wrong. Everything was still connected. Nothing (obvious) had fallen off. So I got a jump from a passing car and it started right up. "Momentary glitch?", I thought. But as I drove off, the car sputtered and died again - same symptoms.
30 minutes of poking and prodding uncovered the fact that, somewhere during the trip home on Sunday (or even before), the bolt on the alternator cable had come loose and the car had been running on the battery all that time - sacrificing itself during the process. I now had a terminal battery. $130, and 1.5 hours later and I had a new battery and a running car.
Lesson - stupid engine-build move #5; Don't check or double-check any critical connections, or bolts. Just assume that you "did that before" and move on.
Things to do;
- Check a log of "normal" (i.e. sedate) driving to see if there are any tweaks that need be done.
- Find out why the water temps are higher than expected. Pre-rebuild, temps would hover around 185-200. Post rebuild, temps are 195-210. Curious, but not frightening.
- Find out why my "both fans on" mod isn't working anymore.
- Grit my teeth and drive like a sane person for the next 100 miles.
Reply
0
0
08-19-2014, 08:05 AM
#185
Senior Member
Thread Starter
Join Date: Dec 2007
Location: ATL
Posts: 1,348
Total Cats: 128
So, this morning (after all of the drama yesterday) I'm on my way to work. I make a right turn onto a relatively deserted street and I decide to "tap the accelerator"...for research purposes, naturally. I don't go WOT, but I do get into it moderately.
What I got was grin-producing. The spool up seemed almost instantaneous. The kick in the pants was nice. And I even got a little wheelspin (the ground was wet, so I'll chalk it up to that). I had a log going - that's the "research part - so I just took a look at it, and the evidence was verifiable.
Before, going from 35 kPa to 200 kPa took 2.7 seconds (@ WOT to 5700 RPM). Today it took 1 sec to do the same, and that was only using less than 80% throttle opening and only revved to 4700+ RPM. Everything else was correspondingly "kick-***".
I think I'm going to like this rebuild!
I think I'm going to have to wear restraints to stay out of the throttle for the next 180 miles...
Reply
0
0
08-19-2014, 08:44 AM
#186
Senior Member
Thread Starter
Join Date: Dec 2007
Location: ATL
Posts: 1,348
Total Cats: 128
BTW - I think I know why my water temps are higher. I'm going to have to re-do my heater core routing. Before the rebuild, I came out of a line on the front water neck, through a long hose and into the heater core. The outlet from the core went into the hard pipe beneath the exhaust.
After the rebuild I had the same exit routing to the hard pipe but, in my infinite wisdom, I routed the source from an available fitting on the BEGI spacer on the back of the head thinking, "It's convenient, it's 'pretty' (as in I don't have a long line to the front of the engine), and it facilitates a complete water neck delete - making my engine front sleek and sexy.
What I neglected to account for is that, with this routing, I'm effectively looping hot water from the back of the head, into the heater core and the directly back into the water pump. I'm effectively bypassing a portion of the flow to the "main" radiator for a small radiator (the heater core) that's not always working as a heat exchanger.
DUH!
My current thought is to make an adjustment. I'll keep the flow from the spacer into the core but I'll plug the exit to the hard line and dump that flow back into the main return to the radiator via a "T". That way I'm keeping flow through the heater but sending the return back into the radiator, instead of directly back to the water pump.
Am I over-thinking this?
Reply
0
0
 08-25-2014, 11:38 AM
#188
Senior Member
Thread Starter
Join Date: Dec 2007
Location: ATL
Posts: 1,348
Total Cats: 128
The short story: Car is now running 1 battery and 2 alternators later. Now here's the whole story...
The long story:
Last Monday I drove into work, got 90% of the way to the train station and the car started sputtering and running like s**t. My first thought was that somehow the MS reset itself and was sending crap signals out. I pushed it into a parking spot and did a quick visual inspection. What I saw was that the bolt attaching the thick cable to the alternator had come off (somewhere) and the car was running off the battery - which quickly discharged completely. My AFR gauge blocks the idiot lights, so I couldn't see the "battery fail" light.
I re-attached the cable and I got a jump from a passer-by in the lot and the car started just fine, but wouldn't run very long. I called into work and then walked 2 miles back home to get the wife's car (the dreaded PT Cruiser!) and take the battery to the parts store to get it checked. Of course, they told me that the battery was toast (and I was inclined to believe them because it had been completely and totally discharged - which is a bad thing). So I bought a new battery thinking that everything would be OK.
I went into work...this was last Monday.
After work, I installed the new battery and drove home.
Tuesday:
The next morning, the car started fine and I drove back to the train station thinking everything was fine. On the way there I noticed that the lights were dim and the window took longer than normal to lower - both signs of a low charge. I didn't have any diagnostic equipment handy, but I decided NOT to try to drive back home that evening after work. During the day I tracked down a used alternator from a local source for a great price; so I left work early, walked home from the train station and drove out (in the Dreaded PT Cruiser) to pick up the alternator.
I came back to the train station, installed the alternator and drove back home - this time with my laptop plugged into the MS. All the way home I was watching the battery voltage hover around 11.5 volts, but no higher. WTF! Was this alternator bad as well?
Wednesday:
Was my "new" alternator bad? Couldn't be! So after work I spent several hours checking things; testing voltages and wire continuity wherever I could. Nothing was definitive aside from the fact that the alternator wasn't putting out anthing. So I guessed that the disconnected main wire damaged the regulating circuit. I thought...what if I put a stand-alone voltage regulator in place of the ECU-controlled regulator?
So I found an posting on the forum about substituting a Chrysler voltage regulator in place of the ECU-controlled regulator.
Thursday:
I bought the Chrysler VR and, using the info from the posting on the forum, I wired it into the "new" alternator...nothing. I still was getting less than 12 volts out of the alternator.
Friday:
I took the "new" alternator to O'Reilly's to get it tested (knowing full-well that it would come back with a "fail" - they ALWAYS fail).
No surprise, it failed.
So I said, "F-it, I'm going to get a brand-new, in the box NA alternator"! That way, if this one failed I can take it back under warranty for a replacement. And I got the NA alternator because of it's internal regulation.
So, I installed the new-new altranator, re-wired the connector to supply switched 12 volts and turned the key...and got 11.8 volts! DAMMIT!!! Did my brand-new alternator suffer from "crib-death"?!
As I was crying out to the gods I accidentally grounded the exposed other wire on the connector to the alternator. When that happened, I heard the engine revs drop (the car was running at the time), characteristic of the alternator charging. I grabbed the DVM and checked the voltage and - magically, thankfully - the voltage was 14.8 volts!
Hallelujah!
But why? Why was it charging NOW? Then I remembered something from the YouTube video that I had watched when I was looking for how to test an alternator. In it, the guy said that the bulb circuit had to be in-place before the alternator would begin charging. That "other wire" on the connector was for the bulb circuit. But it was too late to attack that, so...
Saturday:
I tapped into the wire for the bulb circuit into the ECU and connected that to the wire from the alternator connector. When I turned on the car I got...11.8 volts.
Damn you electricity!!
I turned off everything, got back under the dash and clipped the bulb-circuit wire where it went into the ECU. Then I turned everything back on again and...I got...15.1 volts!!!
Hallelujah!! Life is good! (But I still hate electricity)
I drove 40 miles and the battery was charging.
Sunday:
I drove 50 miles and the battery was charging.
Today:
I drove to work and the battery was charging. My battery will charge henceforth and forever more.
And I still hate electricity...
Reply
1
1
 08-26-2014, 11:37 AM
#190
Senior Member
Thread Starter
Join Date: Dec 2007
Location: ATL
Posts: 1,348
Total Cats: 128
I vowed, on my honor as a Mechanical Engineer, to fight the good fight against the evils of electricity [with strains of "I Fought The Law (and The Law Won)" playing in the background]!
Anyway, I figure I've paid my dues so I should get a "electrical problem free year pass" for all of this crap.
Now my focus is on re-tuning my VE table. It seems that I'm overly-rich everywhere based on logs from the past few days. I guess that makes sense since I should be burning fuel "more better" now that the engine is sealing better.
I've tried REAL HARD to stay out of the throttle too much during this break-in period, but DAMN it pulls so hard even at part throttle! I'm sure I'm not making much more than 200 WHP - I can't imagine what more than that feels like.
...actually, yes I can but I'm trying to let my wallet recover before getting greedy.
Reply
0
0
08-26-2014, 01:29 PM
#191
Retired Mech Design Engr

iTrader: (3)
Join Date: Jan 2013
Location: Seneca, SC
Posts: 5,009
Total Cats: 856
BTW - I think I know why my water temps are higher. I'm going to have to re-do my heater core routing. Before the rebuild, I came out of a line on the front water neck, through a long hose and into the heater core. The outlet from the core went into the hard pipe beneath the exhaust.
After the rebuild I had the same exit routing to the hard pipe but, in my infinite wisdom, I routed the source from an available fitting on the BEGI spacer on the back of the head thinking, "It's convenient, it's 'pretty' (as in I don't have a long line to the front of the engine), and it facilitates a complete water neck delete - making my engine front sleek and sexy.
What I neglected to account for is that, with this routing, I'm effectively looping hot water from the back of the head, into the heater core and the directly back into the water pump. I'm effectively bypassing a portion of the flow to the "main" radiator for a small radiator (the heater core) that's not always working as a heat exchanger.
DUH!
My current thought is to make an adjustment. I'll keep the flow from the spacer into the core but I'll plug the exit to the hard line and dump that flow back into the main return to the radiator via a "T". That way I'm keeping flow through the heater but sending the return back into the radiator, instead of directly back to the water pump.
Am I over-thinking this?
After the rebuild I had the same exit routing to the hard pipe but, in my infinite wisdom, I routed the source from an available fitting on the BEGI spacer on the back of the head thinking, "It's convenient, it's 'pretty' (as in I don't have a long line to the front of the engine), and it facilitates a complete water neck delete - making my engine front sleek and sexy.
What I neglected to account for is that, with this routing, I'm effectively looping hot water from the back of the head, into the heater core and the directly back into the water pump. I'm effectively bypassing a portion of the flow to the "main" radiator for a small radiator (the heater core) that's not always working as a heat exchanger.
DUH!
My current thought is to make an adjustment. I'll keep the flow from the spacer into the core but I'll plug the exit to the hard line and dump that flow back into the main return to the radiator via a "T". That way I'm keeping flow through the heater but sending the return back into the radiator, instead of directly back to the water pump.
Am I over-thinking this?
Reply
0
0
08-28-2014, 12:41 PM
#192
Senior Member
Thread Starter
Join Date: Dec 2007
Location: ATL
Posts: 1,348
Total Cats: 128
Dammit, dammit, damn, damn, DAMMIT!!!
Yesterday I hit 200 miles in the break-in period. Everything was going just fine - the car was running great and was strong. So I decided to put my boot into it just a little bit and damn if that didn't feel GOOD...until...I started to hear a little metallic rattle that turned into a loud clatter by the time I got to the exit ramp. By the time I got to a place to park and investigate I was afraid I was going to find parts hanging out the side of my newly painted block.
When I got the hood up to look, I didn't see any dripping oil or leaking water. There was no "viewport" in the side of the block. The only evidence that something was wrong was the clattering sound (that got louder with increased revs). So I limped home (keeping the revs under 2500) and shut 'er off.
Later (after a good cry) I went out and opened up the valve cover expecting to see a mangled pile of metal shavings but everything looked pristine and nothing was loose. So at this point I don't know exactly what happened, but I suspect that I spun a bearing and that's where the rattling is coming from.
This weekend will be spent in a post-mortem, and planning for how to recover.
Dammit, dammit, damn, damn, DAMMIT!!!
Reply
0
0
08-28-2014, 02:06 PM
#193

This is awful news. Sound like it's coming from the bottom end or up top? I know you did at least exhaust valves? What were your valve lash results? Or are you using HLA (they still need a centering adjustment). If you've covered this I could have missed it - I have not kept up with the build completely.
A couple of other things to look out for:
- Wrist pin retainers still in place.
- Did you check your bearing clearances during assembly?
- Thrust washer in backwards
Best of luck either way - let me know if there is anything I can do.
A couple of other things to look out for:
- Wrist pin retainers still in place.
- Did you check your bearing clearances during assembly?
- Thrust washer in backwards
Best of luck either way - let me know if there is anything I can do.
Reply
0
0
08-28-2014, 02:54 PM
#194
Senior Member
Thread Starter
Join Date: Dec 2007
Location: ATL
Posts: 1,348
Total Cats: 128
Yeah, it's all I can do to look at it sitting in the parking lot, all quiet and cold.
Anyway, my first impression was that the sound was coming from the top end that's why I went straight for the valve cover yesterday. I was hoping to find a bolt from the head studs bouncing around, or a valve shim that got spit out. Unfortunately, nothing of the sort. So further investigation is necessary.
I've got a project at work that going down the tubes fast (not 'cause of me, I got dumped into a s--t storm at the last minute to "save the day"), so I'm spending a lot of time there. Hopefully, I can get the head off this weekend and see what's going on there. Beyond that I'm going to have to pull that mother and "go deep".
During assembly;
- I'll see if the retainers are all in place when I go for the full teardown.
- Bearing clearances were all checked and good.
- I checked, re-checked and double-checked the thrust bearings during assembly.
I'm actually wondering if one of the oil squirters got loose. During assembly I (stupidly) put the crankshaft in before installing the squirters. I could get a wobble-extension into the gap and torque them to spec, but I should have done it the right way.
I hope that the damage is not too severe; I'd just DIE if there was something extensive to deal with.
Reply
0
0
08-28-2014, 02:59 PM
#195
Cpt. Slow
iTrader: (25)
Join Date: Oct 2005
Location: Oregon City, OR
Posts: 14,181
Total Cats: 1,132
Most likely bearing related. Loose objects don't stay rattling. If it's consistent, it's most likely a bearing. Squirter or bolt would be hit by the crank shaft once or twice, and either cause catastrophic engine failure, or fall to the bottom of the oil pan and sit there.
Reply
0
0
 08-31-2014, 08:36 AM
#197
Senior Member
Thread Starter
Join Date: Dec 2007
Location: ATL
Posts: 1,348
Total Cats: 128
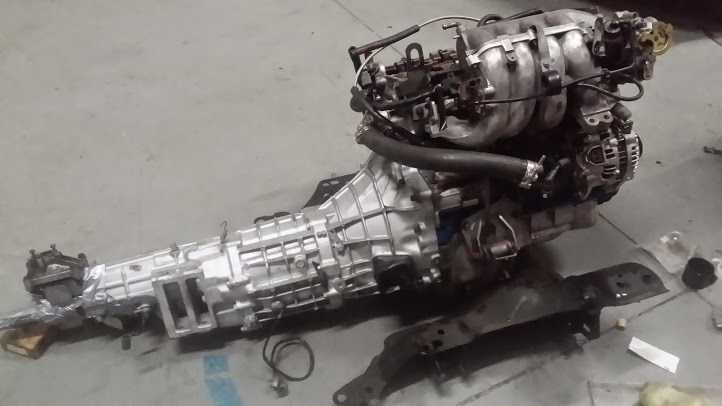
OK, so most of the tears have dried up and I've transported my car back to the garage where I do all of my work. I've made a major decision as well; I'm going to transplant all of the "stuff" from my car (including my re-rebuilt engine) into this;

Remember from the very first post in this thread, I said that this was my ultimate plan? Well, if I'm going to be "without Miata" again, I might as well do the whole kit-and-kaboodle.
Work starts next week...
Remember from the very first post in this thread, I said that this was my ultimate plan? Well, if I'm going to be "without Miata" again, I might as well do the whole kit-and-kaboodle.
Work starts next week...
Reply
0
0
09-03-2014, 09:14 AM
#198
Senior Member
Thread Starter
Join Date: Dec 2007
Location: ATL
Posts: 1,348
Total Cats: 128
Engine is out (again);
Doing post-mortem tonight. BTW - the block still look pretty; no "ventilation" anywhere in sight - which is a good thing because the only other short block I have is in Detroit.
Doing post-mortem tonight. BTW - the block still look pretty; no "ventilation" anywhere in sight - which is a good thing because the only other short block I have is in Detroit.
Reply
0
0
09-04-2014, 07:41 AM
#199
Senior Member
Thread Starter
Join Date: Dec 2007
Location: ATL
Posts: 1,348
Total Cats: 128
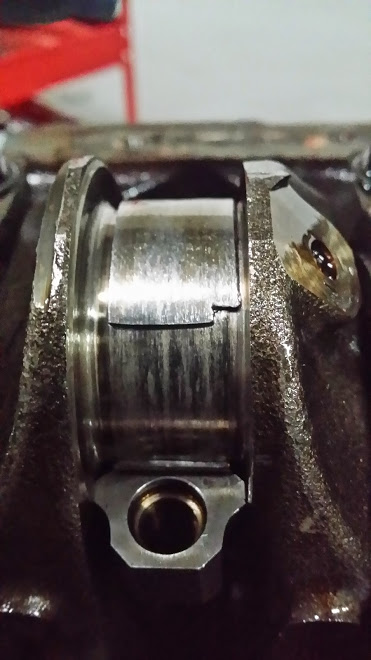
...so I tear down the engine last night and everything looks peachy until I take off the oil pan where I find a pile of this sitting on top of the oil pickup screen;

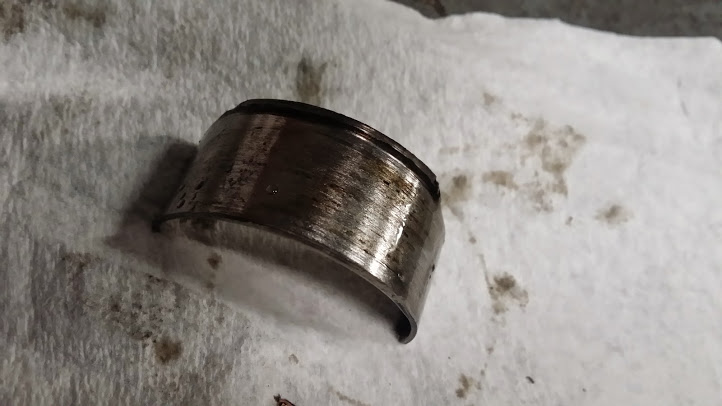
Hmmmm, that's not supposed to be there. Then I start to take off the rod bearing caps and see this under #1;
...the other side of the same bearing;
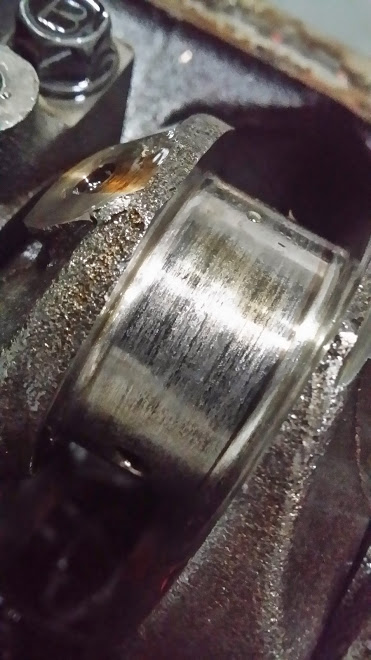
...and the matching journal;
The #2 bearing looked like this;
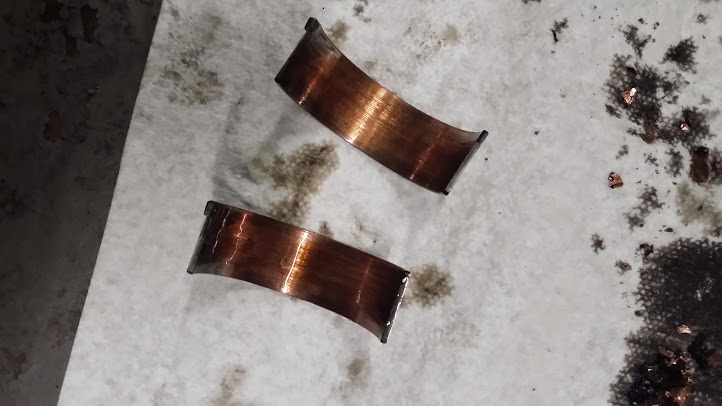
The other bearings and journals look pretty good, and the main bearings look to be in good shape as well.
Now the decision is whether to take the crank to a machine shop and have the journals ground down to the next oversize bearing size (and clean the bad ones up), OR source a new 1.8 crank locally (I'd buy a short block if that's necessary) at or around the same price ($200-400?, just a guess).
Hmmmm, that's not supposed to be there. Then I start to take off the rod bearing caps and see this under #1;
...the other side of the same bearing;
...and the matching journal;
The #2 bearing looked like this;
The other bearings and journals look pretty good, and the main bearings look to be in good shape as well.
Now the decision is whether to take the crank to a machine shop and have the journals ground down to the next oversize bearing size (and clean the bad ones up), OR source a new 1.8 crank locally (I'd buy a short block if that's necessary) at or around the same price ($200-400?, just a guess).
Reply
0
0


