RWyatt's "It's takin forever" Build Thread
 06-12-2014, 04:34 PM
#121
Elite Member

iTrader: (5)
Join Date: Oct 2011
Location: Detroit (the part with no rules or laws)
Posts: 5,677
Total Cats: 800
That log looks much better.
I'd use that.
Get it on an actual dyno for numbers. VD is good for an idea, but it was giving me numbers 20hp low.
I'd use that.
Get it on an actual dyno for numbers. VD is good for an idea, but it was giving me numbers 20hp low.

Reply
 0
0

0
06-13-2014, 07:43 AM
#122
Senior Member
Thread Starter

Join Date: Dec 2007
Location: ATL
Posts: 1,348
Total Cats: 128
DAMMIT, Dammit, day-umm-it!
Have to put off 'till next week to get to the dyno. Had to clear up some "domestic issues".
DAMMIT!!!
PS - made some more tweaks to the fuel map and the AFR is almost flat between 4700 and 7000. There's a plateau at 11.3 between 4700 and 5600, and another plateau at 11.7 between 5600 and 7000. There's a "lean" spike (12.4) down at 3050 and then a dip to 10.8 at 4200. I'll use the time till next Thursday to get those ironed out.
Tasks for this weekend;
1. Install some Vented Wing Windows from Project-G to try to get more airflow into the cabin (I ain't got no A/C so every little bit helps).
2. Finally get around to installing the Mazdaspeed Comp diff bushings.
3. Replace a temporary bolt/nut on the driveshaft with the OEM bolt (the original nut seized on the bolt - because rust - and had to be cut off).
4. Replace the inner and outer shift boots because old and torn.
5. Clean the engine bay (it looks like crap).
Plans for next week;
- GO TO THE DYNO!!!!!!!
- Replace valve stem seals. The existing ones are 50K miles old.
- Replace timing belt.
- Get rid of the freakin' ugly water neck (I've been running a reroute for years, just never got rid of the neck).
- Replace the front cover seals.
Last edited by rwyatt365; 06-13-2014 at 08:14 AM.
Reply
0
0
06-13-2014, 11:44 AM
#123
Elite Member
iTrader: (37)

Join Date: Apr 2010
Location: Very NorCal
Posts: 10,441
Total Cats: 1,899
. Install some Vented Wing Windows from Project-G to try to get more airflow into the cabin (I ain't got no A/C so every little bit helps).

Reply
0
0
 06-13-2014, 04:20 PM
#126
Elite Member
iTrader: (5)
Join Date: Oct 2011
Location: Detroit (the part with no rules or laws)
Posts: 5,677
Total Cats: 800
Make sure to datalog every pull.
They will be better than any street pull you will do, and be consistent.
If the dyno guys are cool, they may let you adjust a fuel and timing a little. It just takes a second to make a few quick changes.
They will be better than any street pull you will do, and be consistent.
If the dyno guys are cool, they may let you adjust a fuel and timing a little. It just takes a second to make a few quick changes.
Reply
0
0
06-16-2014, 08:35 AM
#127
Senior Member
Thread Starter
Join Date: Dec 2007
Location: ATL
Posts: 1,348
Total Cats: 128
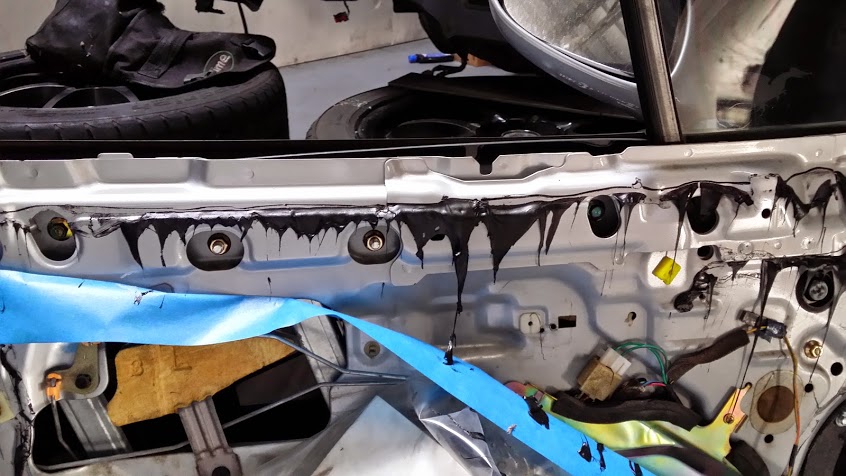
Installed the vent windows from ProjectG on Saturday. Things went pretty well, if I must say so myself.
The process;
Take off the door panels and fold back the plastic inner-liner (watch out for the black "dinosaur snot" that holds the liner to the door, I put painter's tape over it to keep from getting it all over everything that touches it).
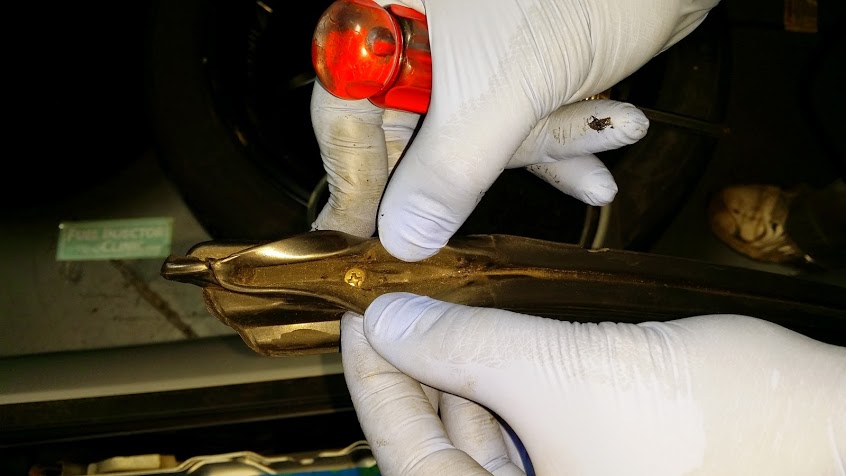
The instructions say to remove the window glass, but that's not entirely necessary. Just be careful during dis-assembly and re-assembly and you'll be fine.
If you have the access panel (the gold-ish thingy) on the door, you'll have to remove it to get access to the lower part of the guide rail;

Up at the top of the weatherstripping, hidden inside, is a screw that secures the guide rail to the vent window frame. That has to come out;
Then you're gonna have to pry the weather stripping off the corner of junction of the vent window frame and the guide rail. Be gentle but firm, the rubber will stretch but if you tear it, you're screwed and your window will leak forever.
Underneath the weatherstripping is a second screw that secures the guide rail to the vent window frame. That has to come out too;

PS - I have the door off the car, but that's not necessary.
Now you can remove the bolts that secure the guide rail to the door. There's one at the top;
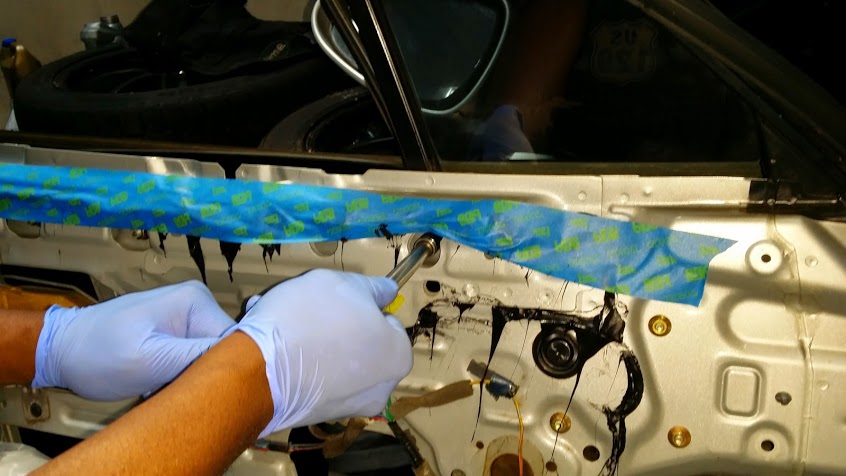
...and one at the bottom;

Now you just have to finesse the guide rail out of the door. Take your time, and it'll be fine;
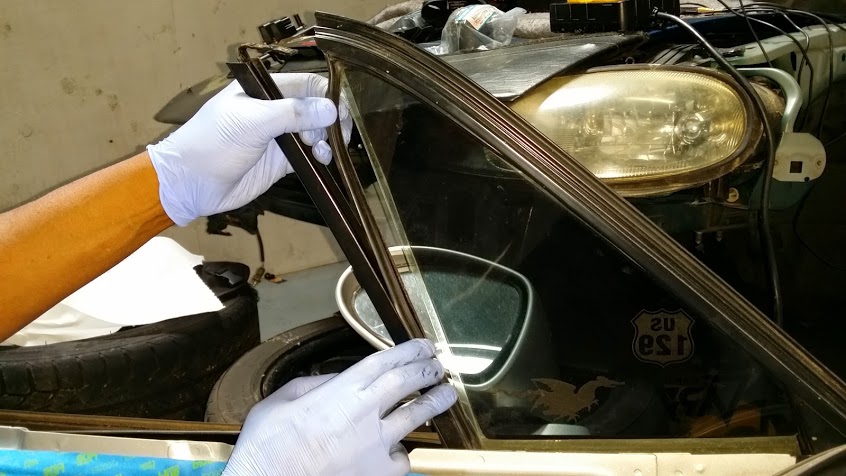
All that's left is to take the glass out of the weatherstripping and put the new plexiglass back in it's place.
Then comes the infamous "Reverse steps for re-assembly." The only real trick here is to make sure that everything is well lubricated (isn't that ALWAYS the case?). I used a spray bottle of water on the glass/rubber contact patches and WD40 on the metal/rubber contacts.
Re-inserting the window guide rail was the trickiest part. You'll have to start with the window glass halfway up and then have the rubber window seal part-way on the guide rail. Then push the guide rail and rubber between the window glass and vent window while keeping the rubber from pushing back up the rail.
Sounds like you need 3 hands? Well, you almost do 'cause the rubber will want to stick to the window and move up. Liberal lubrication, patience and doing things slowly will get the job done. I also had to jockey the window up and down a few times to get the water to distribute along the window track in the rubber guide so that it would slide more easily.
The first window took about an hour to do (including pic's), the second one got done in about 15 minutes. I didn't take pics of the final product, but I could tell the difference on a short trip around on a 85* Georgia afternoon. And last night it rained pretty good and the ports didn't leak, so I'm pretty pleased. I put a little bit of grease on the port "flappers" 'cause they were a little bit sticky but other than that...so far, so good.
PS - if you're wondering why the door in the pic's is silver but my car is blue/black, it's because I used a "practice door" for the pictures - a door that's intended to go on the shell that I'm eventually going to swap everything into...eventually...
The process;
Take off the door panels and fold back the plastic inner-liner (watch out for the black "dinosaur snot" that holds the liner to the door, I put painter's tape over it to keep from getting it all over everything that touches it).
The instructions say to remove the window glass, but that's not entirely necessary. Just be careful during dis-assembly and re-assembly and you'll be fine.
If you have the access panel (the gold-ish thingy) on the door, you'll have to remove it to get access to the lower part of the guide rail;
Up at the top of the weatherstripping, hidden inside, is a screw that secures the guide rail to the vent window frame. That has to come out;
Then you're gonna have to pry the weather stripping off the corner of junction of the vent window frame and the guide rail. Be gentle but firm, the rubber will stretch but if you tear it, you're screwed and your window will leak forever.
Underneath the weatherstripping is a second screw that secures the guide rail to the vent window frame. That has to come out too;
PS - I have the door off the car, but that's not necessary.
Now you can remove the bolts that secure the guide rail to the door. There's one at the top;
...and one at the bottom;
Now you just have to finesse the guide rail out of the door. Take your time, and it'll be fine;
All that's left is to take the glass out of the weatherstripping and put the new plexiglass back in it's place.
Then comes the infamous "Reverse steps for re-assembly." The only real trick here is to make sure that everything is well lubricated (isn't that ALWAYS the case?). I used a spray bottle of water on the glass/rubber contact patches and WD40 on the metal/rubber contacts.
Re-inserting the window guide rail was the trickiest part. You'll have to start with the window glass halfway up and then have the rubber window seal part-way on the guide rail. Then push the guide rail and rubber between the window glass and vent window while keeping the rubber from pushing back up the rail.
Sounds like you need 3 hands? Well, you almost do 'cause the rubber will want to stick to the window and move up. Liberal lubrication, patience and doing things slowly will get the job done. I also had to jockey the window up and down a few times to get the water to distribute along the window track in the rubber guide so that it would slide more easily.
The first window took about an hour to do (including pic's), the second one got done in about 15 minutes. I didn't take pics of the final product, but I could tell the difference on a short trip around on a 85* Georgia afternoon. And last night it rained pretty good and the ports didn't leak, so I'm pretty pleased. I put a little bit of grease on the port "flappers" 'cause they were a little bit sticky but other than that...so far, so good.
PS - if you're wondering why the door in the pic's is silver but my car is blue/black, it's because I used a "practice door" for the pictures - a door that's intended to go on the shell that I'm eventually going to swap everything into...eventually...
Reply
1
1
06-20-2014, 08:55 AM
#128
Senior Member
Thread Starter
Join Date: Dec 2007
Location: ATL
Posts: 1,348
Total Cats: 128
I went to a local dyno last night and the good news is I didn't break anything.
The bad news is...my car sucks *****. I only pulled 159 HP and 138 ft-lb. I won't even post up the dyno chart - because fail.
So, it looks like I'm gonna have to do some "surgery" to sort out this limp-dick engine. Time for a leak down test to see where I'm losing compression, and some diagnostics to try to identify why my RPM jitters so much.
I'm putting together a parts list for this rebuild. I'm figuring - at the very least - I'll have to replace the head gasket, hone the cylinders, new rings and lap the valves. This is the absolute, positive bare minimum work. I'm calling this "Stage 0". I figure I can do this for around $300 (reasonable expense).
Stage 1 maintenance items (since I have the engine open);
- Hardline oil return for the turbo (safety precaution since I've already had to replace the rubber water lines).
- Replace timing belt and pulleys (already on-hand)
- New valve seals (the existing ones are original - sue me, I'm lazy)
The incremental cost for this would be about $100 ('cause the valve seals are included in the FM Head Gasket Set, which I would get for Stage 0). Still reasonable.
Stage 2 Upgrades (looking towards the future);
- Manley rods (for insurance in case I get greedy later)
- Supertech valves and springs (sure...why not)
- ATI Super Damper (this just makes sense)
- BE oil pump (protection is a good thing)
I'm estimating $2.5-3K for all of this - out of my ballpark right now.
I could piece this together over time but I don't want to wait for the final product - I want 200 HP and I want it NOW (I'll settle for an honest 180)!!
So, my plan is to do Stage 0 and 1 now, verify my gain and then save up for Stage 2 (and beyond). Then I can do that work when it comes time to perform the "body swap" later.
N'est pas?
The bad news is...my car sucks *****.
I only pulled 159 HP and 138 ft-lb. I won't even post up the dyno chart - because fail.So, it looks like I'm gonna have to do some "surgery" to sort out this limp-dick engine. Time for a leak down test to see where I'm losing compression, and some diagnostics to try to identify why my RPM jitters so much.
I'm putting together a parts list for this rebuild. I'm figuring - at the very least - I'll have to replace the head gasket, hone the cylinders, new rings and lap the valves. This is the absolute, positive bare minimum work. I'm calling this "Stage 0". I figure I can do this for around $300 (reasonable expense).
Stage 1 maintenance items (since I have the engine open);
- Hardline oil return for the turbo (safety precaution since I've already had to replace the rubber water lines).
- Replace timing belt and pulleys (already on-hand)
- New valve seals (the existing ones are original - sue me, I'm lazy)
The incremental cost for this would be about $100 ('cause the valve seals are included in the FM Head Gasket Set, which I would get for Stage 0). Still reasonable.
Stage 2 Upgrades (looking towards the future);
- Manley rods (for insurance in case I get greedy later)
- Supertech valves and springs (sure...why not)
- ATI Super Damper (this just makes sense)
- BE oil pump (protection is a good thing)
I'm estimating $2.5-3K for all of this - out of my ballpark right now.
I could piece this together over time but I don't want to wait for the final product - I want 200 HP and I want it NOW (I'll settle for an honest 180)!!
So, my plan is to do Stage 0 and 1 now, verify my gain and then save up for Stage 2 (and beyond). Then I can do that work when it comes time to perform the "body swap" later.
N'est pas?
Reply
0
0
06-20-2014, 09:06 AM
#129
Cpt. Slow
iTrader: (25)
Join Date: Oct 2005
Location: Oregon City, OR
Posts: 14,179
Total Cats: 1,129
You're going to surface the head I'm assuming?
Has the compression been checked on the current motor?
Did you do any timing changes on the dyno?
I remember my heart breaking first dyno session like it was last year. Cause it was.
2psi, 3" exhaust, RX-8 injectors, and some timing work, and I've finally gone from a weak 153 to a healthy 185. Can't wait for the 200 mark, but it feels much better than it used to.
Reply
0
0
06-20-2014, 09:38 AM
#130
Senior Member
Thread Starter
Join Date: Dec 2007
Location: ATL
Posts: 1,348
Total Cats: 128
Head re-surfacing - yes
Compression #'s; 120, 122, 100, 135 (1-4)
No timing changes on dyno. 3 pulls, bang, bang, bang - dyno operator says, "Is something wrong with your car?". Even he was expecting better.
Compression #'s; 120, 122, 100, 135 (1-4)
No timing changes on dyno. 3 pulls, bang, bang, bang - dyno operator says, "Is something wrong with your car?". Even he was expecting better.
Reply
0
0
06-20-2014, 10:05 AM
#132
Senior Member
Thread Starter
Join Date: Dec 2007
Location: ATL
Posts: 1,348
Total Cats: 128
...to verify whether what I was seeing from Virtual Dyno was "real" (or not) - and to get a point of reference that I could use for comparison going forward.
Edit: I knew it was going to be ugly, but I figured it would only get better from here.
Edit: I knew it was going to be ugly, but I figured it would only get better from here.
Reply
0
0
06-25-2014, 02:25 PM
#133
Senior Member
Thread Starter
Join Date: Dec 2007
Location: ATL
Posts: 1,348
Total Cats: 128
"He's making a list, he's checking it twice..."
I'm putting together my list for the stuff needed to "refresh" my engine. I wouldn't call it "built", more like freshened up to get the damned thing up to snuff.
Since my last post I've discovered that the crank pulley had a slight wobble in it, about a 1/16" runout. Two years ago I had to do a Loctite-fix on the keyway (my fault that it got damaged) and it's been solid since then. The jittery RPM signal prompted me to try to see what was going on. One look at the pulley while the engine was running and I was pretty sure I had found the culprit.
So, I squared-up the keyway and re-did the fix. The pulley is better, but not 100%. I've managed to source a low(er) mileage 1.8 short block from a '00 that I'm going to be picking up next week. My only dilemma is whether to put my stuff on the "new" block, or perform a "crankshaft transplant" from the short block into my block (I'm leaning towards the latter). Either way, I figure it's the same amount of work.
Up 'till this discovery, I was having fun trying to perfect my tune. My two goals were;
a) to get the AFR dead-nuts flat between 11.5 and 12.0 on WOT pulls from 2000 RPM, and b) to eliminate a lean spike (and subsequent pig-rich condition) on high TPSdot throttle stabs.
I've just about got "a" taken care of, and I was honing in on "b". But I think all of this fun will have to be postponed until I finish my engine work.
DAMMIT!
One more things...my list-o-goodies includes some new H-beam rods, but there are a couple of other big-ticket items that I'm trying to choose between (because low cash flow); a BE oil pump, or ATI Super Damper. I'm looking for some expert input as to the best short term return-on-investment. Remember, my current power target is just to get near as I can get to 200WHP with my current setup.
So, which one is the better choice? BE, or ATI?
Reply
0
0
 06-26-2014, 05:35 PM
#135
Elite Member
iTrader: (5)
Join Date: Oct 2011
Location: Detroit (the part with no rules or laws)
Posts: 5,677
Total Cats: 800
Get the new block. Do a refresh. Put some cheap con rods and if the pistons from the old engine looks good maybe use those with new rings? Get the BE street pump. Put it in and run it.
Unless you're going for 8000+ rpms and extended track time with big boost i can't see the damper being that important. I bought one and still haven't installed it yet.
Unless you're going for 8000+ rpms and extended track time with big boost i can't see the damper being that important. I bought one and still haven't installed it yet.
Reply
0
0
06-27-2014, 11:48 AM
#136
Senior Member
Thread Starter
Join Date: Dec 2007
Location: ATL
Posts: 1,348
Total Cats: 128
...and the answer is...the BE pump by a landslide!
I'm gonna be in DTW next week, so my parts order will go in next Tuesday (don't want too much stuff piling up on my doorstep while I'm out of town - I figure it'll take 2-3 days for most of it to show up).
Current plans are to survive next week, party on the 4th and then get busy the week after;
- strip out and inspect my new/old crank (and either pat myself on the back or cry in my beer over that purchase)
- pull the engine and clean it
- pull the head, strip it and send it for re-surfacing
- pull the pistons and drop the crank
- hone the cylinders, check ring gaps
- retrieve my head, lap the valves and reassemble (re-using the stockers - I know, I know I had springs and retainers on the other list - so I lied)
- put everything together
- WIN!
I could do it all in a couple of long days, but my lovely, wonderful, darling wife would "be concerned" about me putting in long days in the garage.
Reply
0
0
 07-01-2014, 09:07 PM
#140
Senior Member
Thread Starter
Join Date: Dec 2007
Location: ATL
Posts: 1,348
Total Cats: 128
Going simple...getting the street pump w/ no shims. That should fit the bill.
Thanks. Parts stores are always an adventure in patience.
Going to pick up my "new" short block on Thursday.
Going to pick up my "new" short block on Thursday.
Reply
0
0


