Ryephile's loosely guided build
 02-25-2015, 01:16 PM
#81
Supporting Vendor


iTrader: (1)
Join Date: Sep 2010
Location: Lake Forest, CA
Posts: 7,951
Total Cats: 1,004
I actually wasn't kidding. The giggle was because of the MT.net tendency to talk more about non-Miata interests. I recently bought a wrecked 2012 500 5-speed just to make a buck. Since I got it fixed and drove it around I've started lusting after an Abarth. They do sound incredible and look like a total riot.
Plus they're dirt cheap used.
Fun stuff.
Plus they're dirt cheap used.
Fun stuff.

Reply
 0
0

0
03-09-2015, 03:48 PM
#82
Junior Member
Thread Starter
iTrader: (1)

Join Date: Jun 2014
Location: Metro Detroit
Posts: 270
Total Cats: 26
Did a "rough cut" VE tune this Friday evening as the roads were clean and dry. My friend that helped me is an OEM ECU calibrator, and it's awesome to see a true professional in their element. We did it the correct way; me driving at a designated load and RPM and the tuner focusing on sensor data, map region, and slope calculation with AFR closed loop turned off. The result looks beautiful up to 5psig and redline of 7200 rpm, and is interpolated beyond that on both axes. WOT tuning will happen later. Peak VE appears to be 4500 RPM, which makes sense on the stock cams.
As an aside, the wastegate actuator FM provided was totally wrong, actuating at 15 psig instead of the advertised 6. Obviously that's not going to work on my stock bottom end and intent of EBC.
As an aside, the wastegate actuator FM provided was totally wrong, actuating at 15 psig instead of the advertised 6. Obviously that's not going to work on my stock bottom end and intent of EBC.
Reply
0
0
03-23-2015, 10:48 AM
#83
Junior Member
Thread Starter
iTrader: (1)
Join Date: Jun 2014
Location: Metro Detroit
Posts: 270
Total Cats: 26
A few notes:
*clapped-out convertible top is being replaced today with a new Robbins top, yay!
*Discovered my engine setup prefers an injection timing of 300-� in idle region for most stable combustion. More advanced or retarded than that resulted in subtle misfiring which ended up making the idle oscillate through varying AFRs.
*Dialed in the new wastegate, which is a custom Kinugawa with a 0.3bar spring and homemade stainless actuator rod. Figured out base boost, and noted inherent creep, which was minimal from 6k to 7200 rpm. Then dialed in open-loop boost using 4th and 5th gear pulls until we started chasing our tails between percentages. Then clicked-on Closed-loop boost and it was almost magical how well it worked right out of the gate. Dialed in the sensitivity and it's now good to go.
Boost threshold for 180kpa on the road is 3k rpm, which is acceptable. It's a seemingly casual ramp from 2k to 3k, but we also haven't done any ignition timing tuning at this point, it's still inferred from my MS1/Greddy setup. Initial knock datalogs imply zero knock, which makes sense given the conservative ignition map.
Dyna-Pack at MonkeyWrench reserved for April 3rd. That'll be the final tuning where we'll figure out thermal capacity, dial in MBT in the more important regions of the map, keep out of knock, keep the torque below a rational amount, and dial in the XTau (which is already about perfect).
Reply
0
0
03-23-2015, 09:46 PM
#84
Junior Member
Thread Starter
iTrader: (1)
Join Date: Jun 2014
Location: Metro Detroit
Posts: 270
Total Cats: 26
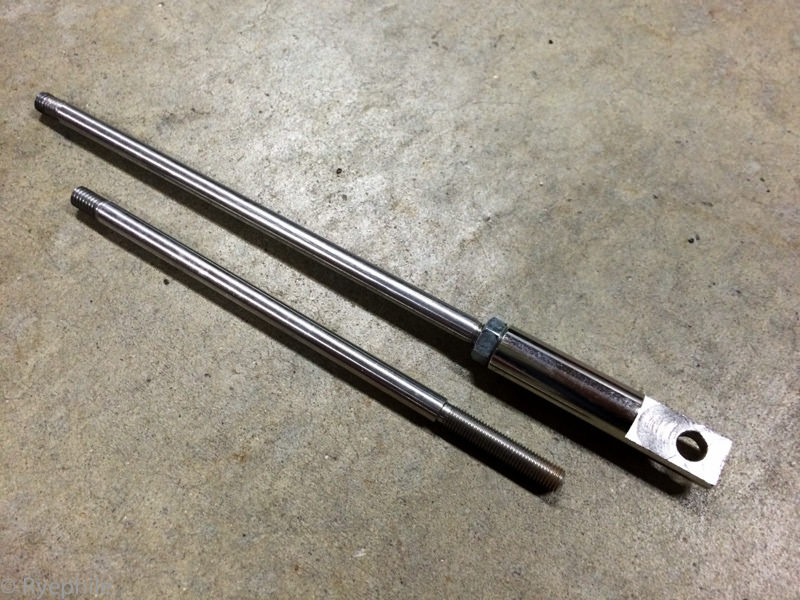
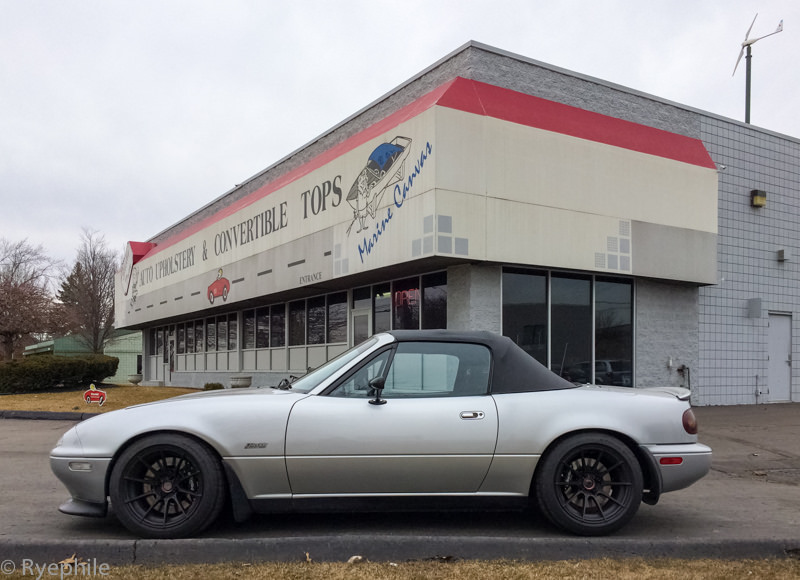
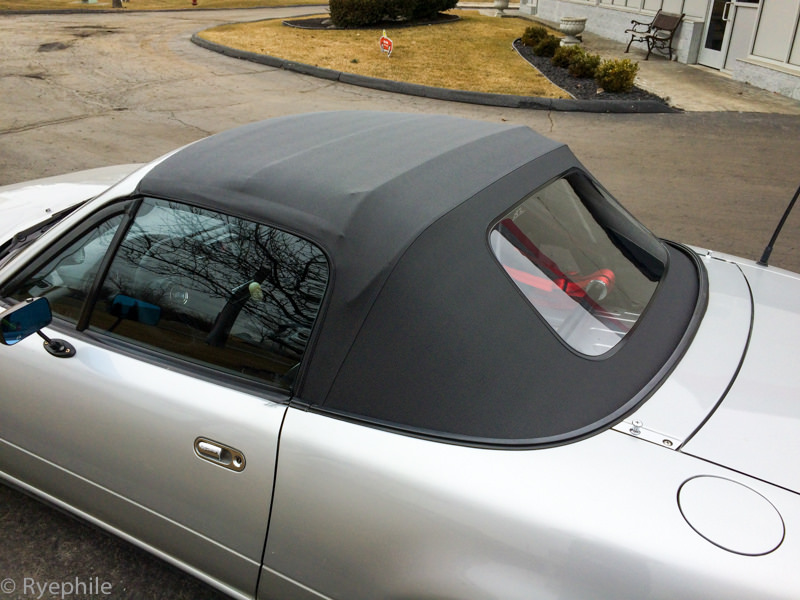
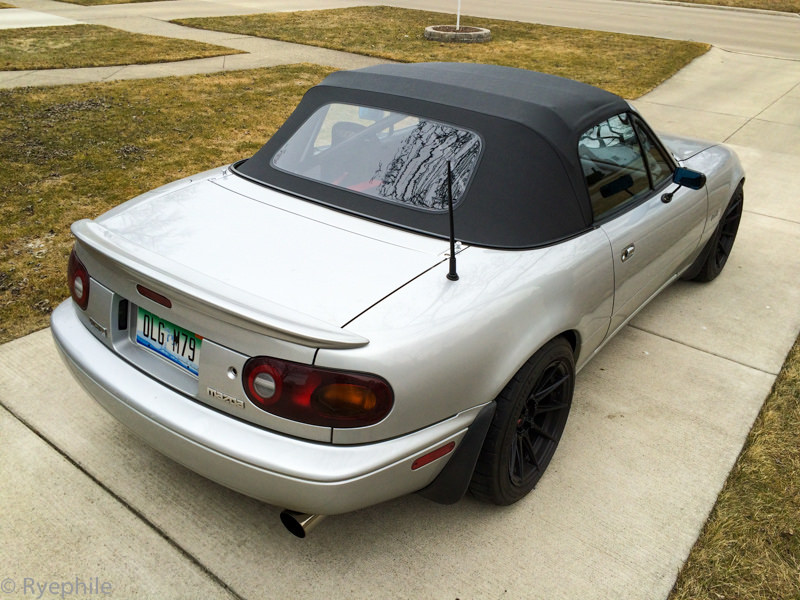
Pics: One of the 1" longer wastegate actuator rod I fabbed out of 303 stainless, and the rest from the new top install today. Shelby Trim did a great job, proving their reputation. This is the Robbins #2905 1-piece with zipperless vinyl window, so it'd be compatible with my roll-bar.
 IMG_5408.jpg by Ryephile, on Flickr
 IMG_5427.jpg by Ryephile, on Flickr
 IMG_5428.jpg by Ryephile, on Flickr
 IMG_5434.jpg by Ryephile, on Flickr
IMG_5408.jpg by Ryephile, on FlickrIMG_5427.jpg by Ryephile, on FlickrIMG_5428.jpg by Ryephile, on FlickrIMG_5434.jpg by Ryephile, on Flickr
Reply
0
0
03-26-2015, 11:15 PM
#85
Junior Member
Thread Starter
iTrader: (1)
Join Date: Jun 2014
Location: Metro Detroit
Posts: 270
Total Cats: 26
As a sanity check I re-re-checked my base timing. Ignition Options / Wheel Decoder settings, Miata 36-2, 0 deg offset, and Falling Edge.
 IMG_5438.jpg by Ryephile, on Flickr
*Set MS3 to fixed 10 deg timing
*Observe timing marks on ATI damper and timing belt cover
*Surprise surprise, 10 degrees on ATI is TDC on cover, and 10 degrees on cover is TDC on ATI, spot on.
For fun, I changed it to the Rising edge and +5 deg, and BAM the timing was 10 degrees retarded. TDC at TDC. Obviously that's not 10 degrees, so that setting combo is wrong for my setup.
I went further, reinstated my timing map and correct trigger settings, and took a terrible potato video of the movement. Video recorders and timing lights aren't too compatible for clean refresh. Nevertheless, the engine timing is perfect, exactly what my timing map indicates.
I'm satisfied that my settings are correct. Obviously yours will vary, since you don't have my hardware configuration.
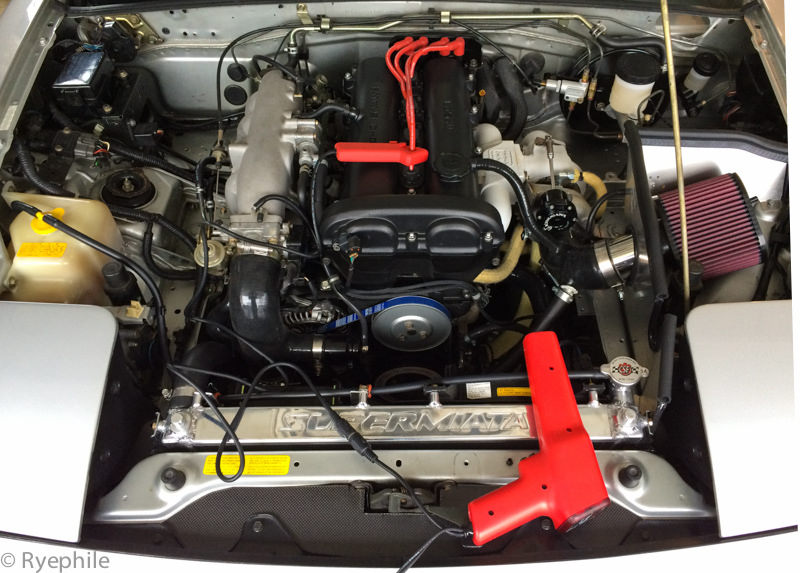
-->Oh, you can also kinda see the new Kinugawa wastegate actuator, which is very nice and actually works at advertised pressure.
IMG_5438.jpg by Ryephile, on Flickr*Set MS3 to fixed 10 deg timing
*Observe timing marks on ATI damper and timing belt cover
*Surprise surprise, 10 degrees on ATI is TDC on cover, and 10 degrees on cover is TDC on ATI, spot on.
For fun, I changed it to the Rising edge and +5 deg, and BAM the timing was 10 degrees retarded. TDC at TDC. Obviously that's not 10 degrees, so that setting combo is wrong for my setup.
I went further, reinstated my timing map and correct trigger settings, and took a terrible potato video of the movement. Video recorders and timing lights aren't too compatible for clean refresh. Nevertheless, the engine timing is perfect, exactly what my timing map indicates.
I'm satisfied that my settings are correct. Obviously yours will vary, since you don't have my hardware configuration.
-->Oh, you can also kinda see the new Kinugawa wastegate actuator, which is very nice and actually works at advertised pressure.
Reply
0
0

 04-01-2015, 10:08 PM
#88
Junior Member
Thread Starter
iTrader: (1)
Join Date: Jun 2014
Location: Metro Detroit
Posts: 270
Total Cats: 26
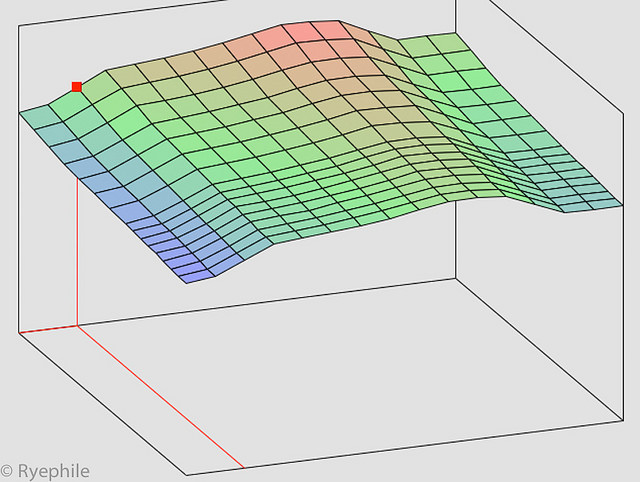
Thanks for the compliments.  As the tune is cleaned up I'll share more information. Here's a sneak peak though. This is the roughed-in VE map in 3D. The car runs within a small percentage of my AFR targets in open loop, so even in closed-loop the EGO correction is never having to adjust much. The units have been left out intentionally.
 Screen Shot 2015-04-01 at 9.59.37 PM.jpg by Ryephile, on Flickr
Unfortunately the car just did a cruel April Fools prank on me tonight during some EBC adjustments and the clutch is slipping. It simply can't hold the extra torque anymore. It was problem-free over the weekend, but alas its apparent borrowed time has expired. I'm now shopping for a new clutch that doesn't suck. The dyno tuning will have to wait. :(
As the tune is cleaned up I'll share more information. Here's a sneak peak though. This is the roughed-in VE map in 3D. The car runs within a small percentage of my AFR targets in open loop, so even in closed-loop the EGO correction is never having to adjust much. The units have been left out intentionally.Screen Shot 2015-04-01 at 9.59.37 PM.jpg by Ryephile, on FlickrUnfortunately the car just did a cruel April Fools prank on me tonight during some EBC adjustments and the clutch is slipping. It simply can't hold the extra torque anymore. It was problem-free over the weekend, but alas its apparent borrowed time has expired. I'm now shopping for a new clutch that doesn't suck. The dyno tuning will have to wait. :(
Reply
0
0
 04-02-2015, 04:29 PM
#90
Junior Member
Thread Starter
iTrader: (1)
Join Date: Jun 2014
Location: Metro Detroit
Posts: 270
Total Cats: 26
Torque transfer mechanism components ordered. ACT ZM2-HDG6 ordered from Andrew at TSE, ACT Prolite flywheel via Amazon Prime (!), and seals-n-stuff from Arlington Mazda.
FYI: Flyin Miata is currently out of stock on their Level 1 Happy Meal, ETA June-ish.
I'd hazard to say it's because most people just solo road-tune VEAL their table, which usually results in a coarse profile because they're not carefully pin-pointing individual map cells. For sure when I did it that way with my MS1 + VEAL, it was semi-effective but definitely not smooth.
Last edited by Ryephile; 04-02-2015 at 06:25 PM. Reason: P.S.A. info
Reply
0
0
04-07-2015, 02:03 PM
#91
Junior Member
Thread Starter
iTrader: (1)
Join Date: Jun 2014
Location: Metro Detroit
Posts: 270
Total Cats: 26
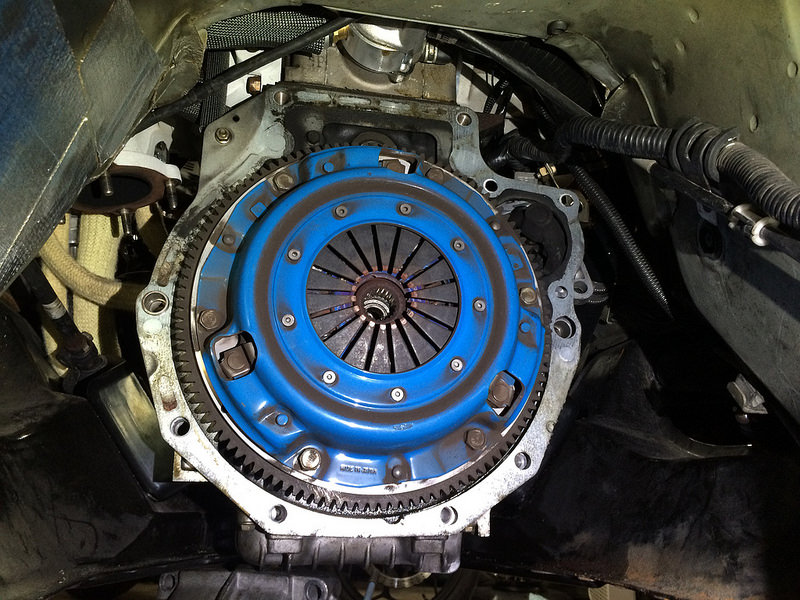
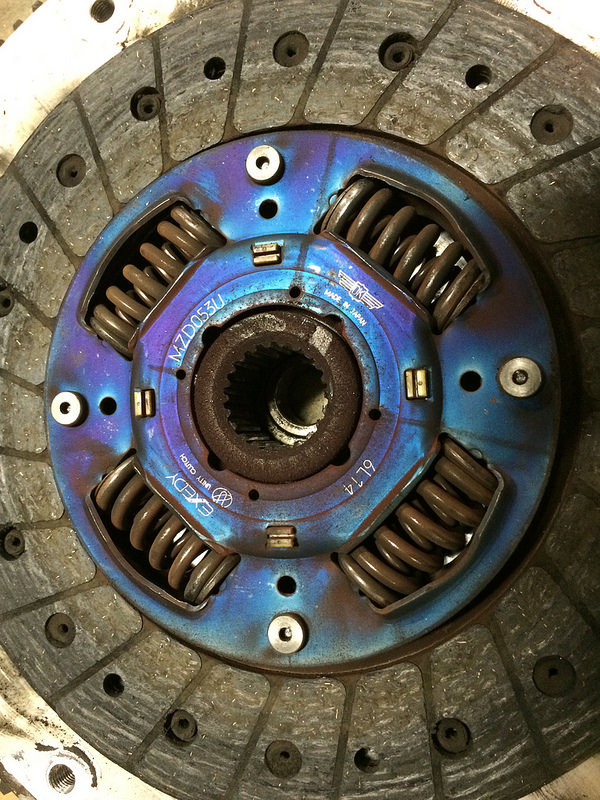
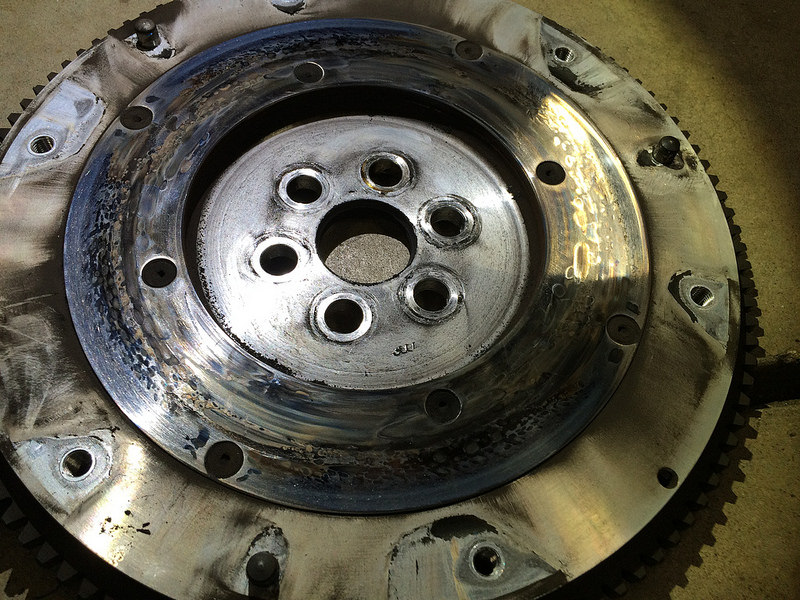
Trans and clutch removed. It was more glazed than a confectionery.
Anyone known exactly what this old clutch is? PP has the Daikin logo stamped in it, and the disc says Exedy.
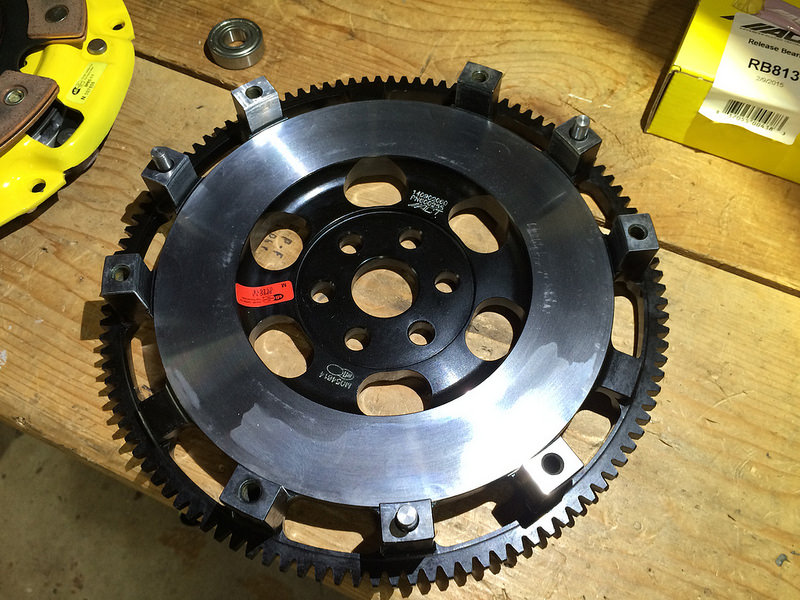
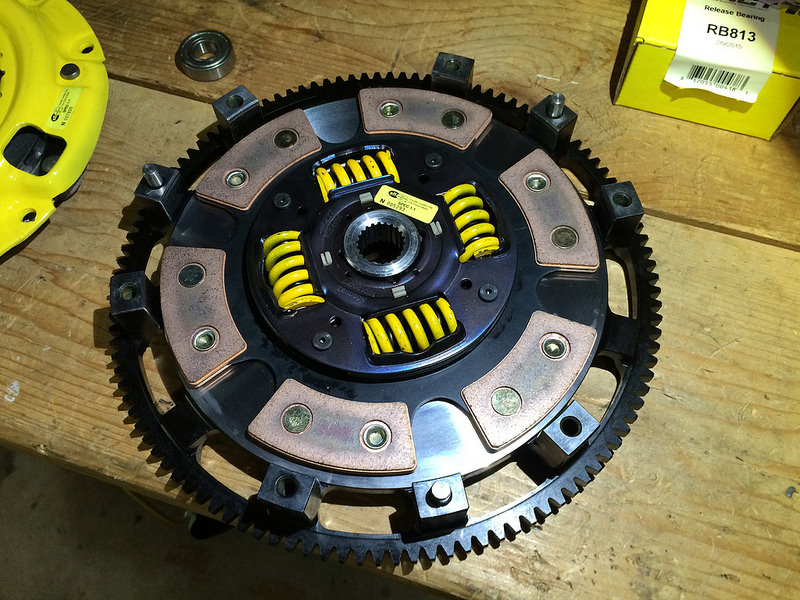
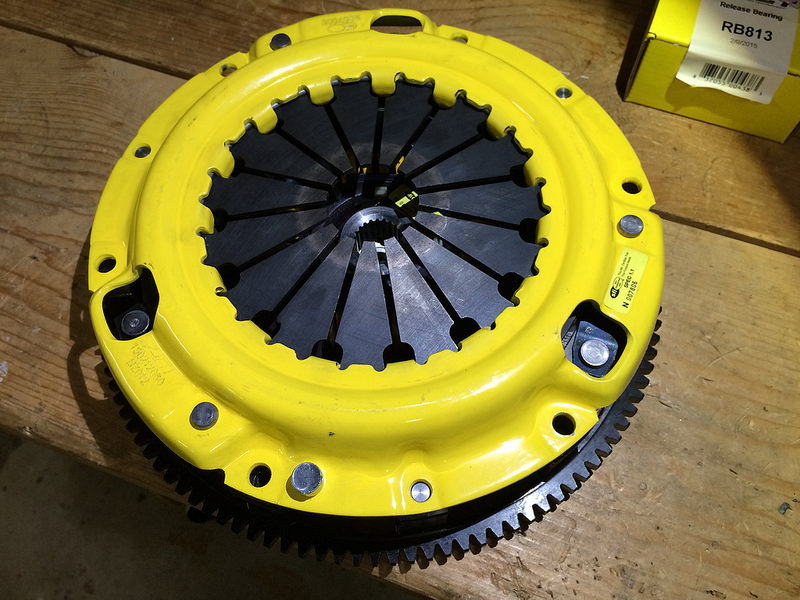
Old busted clutch & flywheel setup = 17 pounds
ACT HDG6 + Prolite flywheel = 21 pounds
Old Busted
 Clutch R&R with ACT HD 6-puck by Ryephile, on Flickr
 Clutch R&R with ACT HD 6-puck by Ryephile, on Flickr
 Clutch R&R with ACT HD 6-puck by Ryephile, on Flickr
New Hotness
 Clutch R&R with ACT HD 6-puck by Ryephile, on Flickr
 Clutch R&R with ACT HD 6-puck by Ryephile, on Flickr
 Clutch R&R with ACT HD 6-puck by Ryephile, on Flickr
^^^Note the balance weight at the bottom of the pressure plate.
Seals for the rear main [which was leaking] and the transmission input and output just arrived. I should make some progress tonight, but I'm also going to remove the rear diff to replace the bushings, so that'll take time.
Anyone known exactly what this old clutch is? PP has the Daikin logo stamped in it, and the disc says Exedy.
Old busted clutch & flywheel setup = 17 pounds
ACT HDG6 + Prolite flywheel = 21 pounds
Old Busted
Clutch R&R with ACT HD 6-puck by Ryephile, on FlickrClutch R&R with ACT HD 6-puck by Ryephile, on FlickrClutch R&R with ACT HD 6-puck by Ryephile, on FlickrNew Hotness
Clutch R&R with ACT HD 6-puck by Ryephile, on FlickrClutch R&R with ACT HD 6-puck by Ryephile, on FlickrClutch R&R with ACT HD 6-puck by Ryephile, on Flickr^^^Note the balance weight at the bottom of the pressure plate.
Seals for the rear main [which was leaking] and the transmission input and output just arrived. I should make some progress tonight, but I'm also going to remove the rear diff to replace the bushings, so that'll take time.
Reply
0
0
04-07-2015, 04:56 PM
#92
Senior Member

Join Date: May 2011
Posts: 638
Total Cats: 76
i like to use a little blow torch action to the eyelets of the diff carrier. Not all that much heat. you can just heat it up enough to hear it sizzle just barely which seems like enough to break the bond. Get a tube/pipe what have you that's the proper OD to line up with the metal sleeve the bushing sits in and give it 2-4 good whacks a 5lb sledge, comes out like buttah.
love the build as always.
love the build as always.
Reply
0
0
 04-13-2015, 01:52 PM
#94
Junior Member
Thread Starter
iTrader: (1)
Join Date: Jun 2014
Location: Metro Detroit
Posts: 270
Total Cats: 26
*Rear main crank seal replaced
*Trans input and output seals replaced
*New shift fork and rubber booty
Hulked the transmission back onto the car after very lightly lubing the throwout bearing-shift fork contact points along with the input shaft splines and throwout bearing sliding surface. Bolted up the clutch slave and the clutch pedal works great. Medium-Light effort, very nice "knee" point in the middle of the pedal travel.
Tonight I'll button up the car and then start putting on some break-in miles so I can finish the EBC tuning.
Reply
0
0
05-04-2015, 04:46 PM
#95
Junior Member
Thread Starter
iTrader: (1)
Join Date: Jun 2014
Location: Metro Detroit
Posts: 270
Total Cats: 26
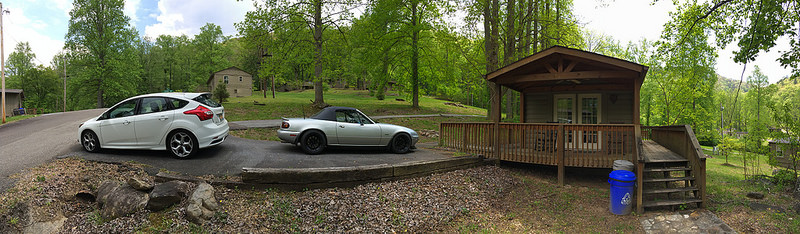
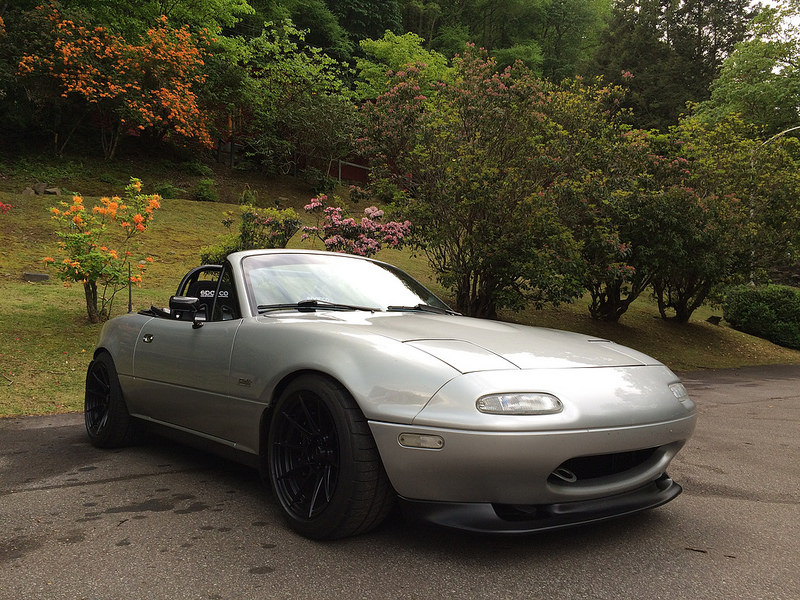
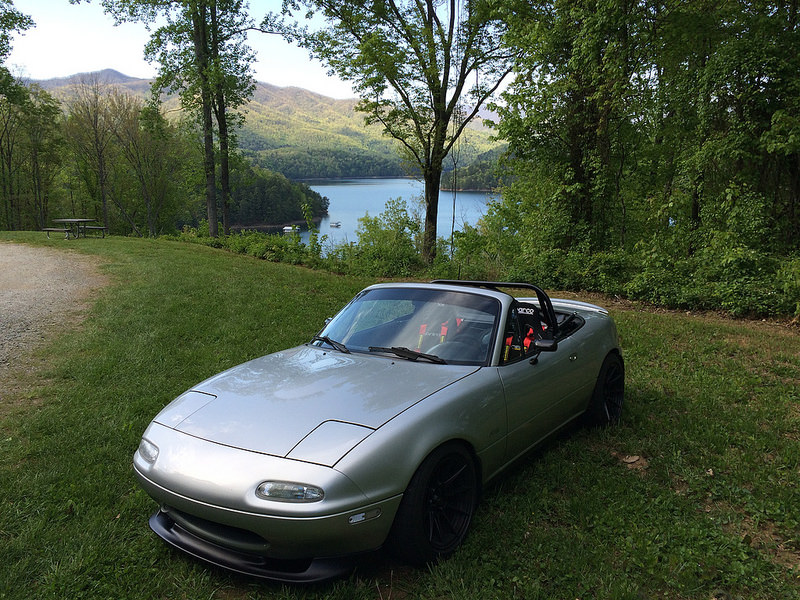
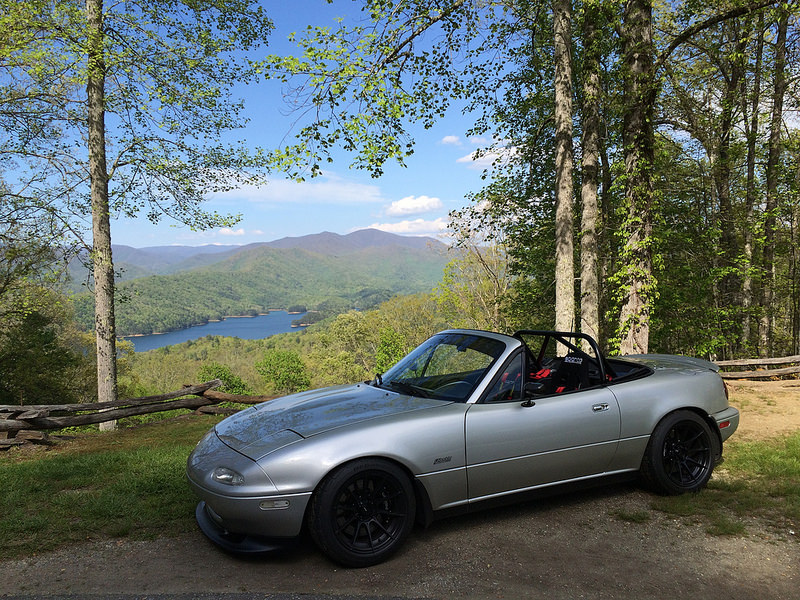
Brought the car to MOTD'15. The powertrain and the tune did very well. A few notes:
*Despite the R-pack tie-rod ends, the car still has notable bump-steer. This will have to be sorted out.
*The fixed alignment transformed the handling for the better, but there's room for improvement in transitions. The balance was quite neutral; power oversteer is available, trail-braking allows subtle rotation, yet in constant speed invokes mild understeer.
*AMSoil GL-4 for the Miata 5-speed transmission is terrible. Between the Motorcraft unicorn tears, AMSoil GL-4, and Redline MTL, the Redline shifts quickest and the AMSoil is simply incompatible with the syncros. This was painfully evident on the Dragon where you're doing hundreds of shifts per run.
*The ACT 6-puck certainly holds the torque, but it's graceless in 1st and reverse. Once underway however it's transparent and feels good.
*The brake balance needs work. With the Wilwood prop valve full-out, the TSE 11.75 + FM 10.9 still has too much front bias. I'll have to work on this.
*2 miles from home the lower right front caliper bolt fell out, causing the caliper lower outboard bleeder screw to lathe a concentric ring in the wheel. I'll have to investigate whether the TSE bracket is an improper [spongy] alloy choice, poor thread cutting, or an inappropriate bolt choice. To be fair, the Dragon is much more demanding on brakes than any racetrack, save perhaps the Nurburgring. 636 threshold braking zones in 26-ish minutes is many times the cyclic abuse per time unit on most racetracks. I've still never had this kind of failure.
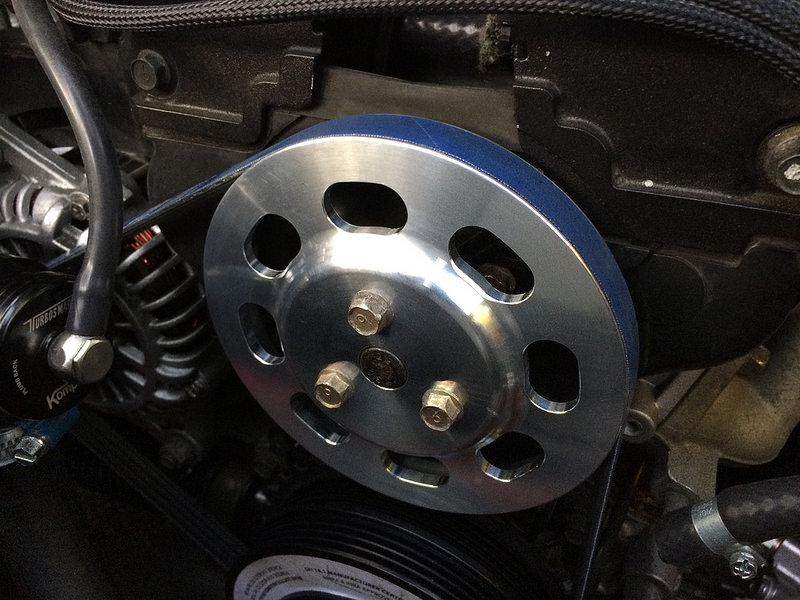
*The GarageStar water pump pulley is very good quality and finally stopped the cold-start belt squeal that the salvage OEM pulley appeared to be causing.
*Actual 29.7 to 30.9 MPG on the I-75 drive to and from the Dragon. This is ~10% better than the same road with the GReddy/MS1 setup and also much better than the bone-stock '95 I had back in the day.
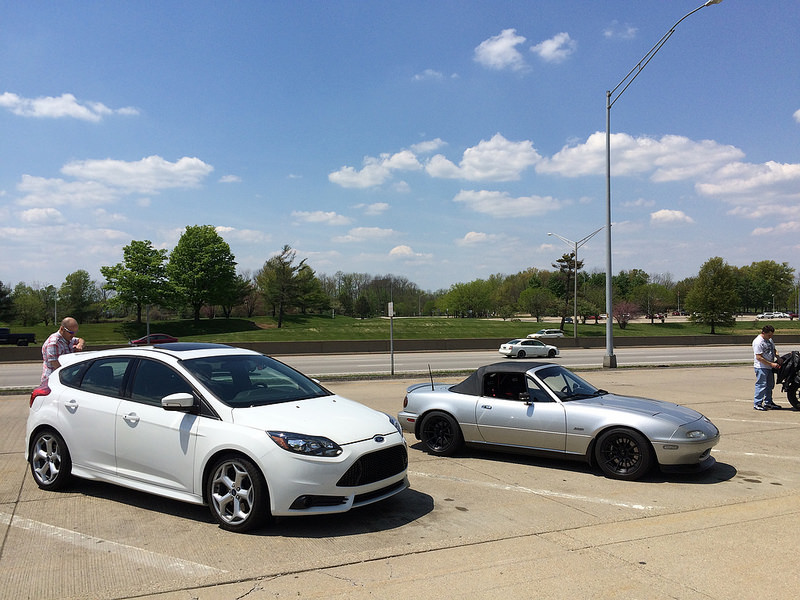 MOTD'15! by Ryephile, on Flickr
 MOTD'15! by Ryephile, on Flickr
 MOTD'15! by Ryephile, on Flickr
 MOTD'15! by Ryephile, on Flickr
 MOTD'15! by Ryephile, on Flickr
 MOTD'15! by Ryephile, on Flickr
 MOTD'15! by Ryephile, on Flickr
*Despite the R-pack tie-rod ends, the car still has notable bump-steer. This will have to be sorted out.
*The fixed alignment transformed the handling for the better, but there's room for improvement in transitions. The balance was quite neutral; power oversteer is available, trail-braking allows subtle rotation, yet in constant speed invokes mild understeer.
*AMSoil GL-4 for the Miata 5-speed transmission is terrible. Between the Motorcraft unicorn tears, AMSoil GL-4, and Redline MTL, the Redline shifts quickest and the AMSoil is simply incompatible with the syncros. This was painfully evident on the Dragon where you're doing hundreds of shifts per run.
*The ACT 6-puck certainly holds the torque, but it's graceless in 1st and reverse. Once underway however it's transparent and feels good.
*The brake balance needs work. With the Wilwood prop valve full-out, the TSE 11.75 + FM 10.9 still has too much front bias. I'll have to work on this.
*2 miles from home the lower right front caliper bolt fell out, causing the caliper lower outboard bleeder screw to lathe a concentric ring in the wheel. I'll have to investigate whether the TSE bracket is an improper [spongy] alloy choice, poor thread cutting, or an inappropriate bolt choice. To be fair, the Dragon is much more demanding on brakes than any racetrack, save perhaps the Nurburgring. 636 threshold braking zones in 26-ish minutes is many times the cyclic abuse per time unit on most racetracks. I've still never had this kind of failure.
*The GarageStar water pump pulley is very good quality and finally stopped the cold-start belt squeal that the salvage OEM pulley appeared to be causing.
*Actual 29.7 to 30.9 MPG on the I-75 drive to and from the Dragon. This is ~10% better than the same road with the GReddy/MS1 setup and also much better than the bone-stock '95 I had back in the day.
MOTD'15! by Ryephile, on FlickrMOTD'15! by Ryephile, on FlickrMOTD'15! by Ryephile, on FlickrMOTD'15! by Ryephile, on FlickrMOTD'15! by Ryephile, on FlickrMOTD'15! by Ryephile, on FlickrMOTD'15! by Ryephile, on Flickr
Reply
0
0
05-04-2015, 05:26 PM
#96
Former Vendor
iTrader: (31)

Join Date: Nov 2006
Location: Sunnyvale, CA
Posts: 15,442
Total Cats: 2,099
*2 miles from home the lower right front caliper bolt fell out, causing the caliper lower outboard bleeder screw to lathe a concentric ring in the wheel. I'll have to investigate whether the TSE bracket is an improper [spongy] alloy choice, poor thread cutting, or an inappropriate bolt choice.
*The brake balance needs work. With the Wilwood prop valve full-out, the TSE 11.75 + FM 10.9 still has too much front bias. I'll have to work on this.
Reply
0
0
05-04-2015, 05:49 PM
#97
Junior Member
Thread Starter
iTrader: (1)
Join Date: Jun 2014
Location: Metro Detroit
Posts: 270
Total Cats: 26
Are the other seven bolts used in the exact same environment loose as well? Could you have left the one bolt loose? It's worth mentioning that in 5+ years, we've never had anyone else complain about bolts working themselves loose from the brackets.
Full-out is max brakes to the front. If you want max rear brakes, you need to turn the valve full-clockwise (full-in).
Full-out is max brakes to the front. If you want max rear brakes, you need to turn the valve full-clockwise (full-in).
That would explain the prop valve then. I'll have to remember it as looser = less [rear] instead of righty-tighty. Here are the directions I should've read.
Reply
0
0
05-04-2015, 10:08 PM
#98
Junior Member
Thread Starter
iTrader: (1)
Join Date: Jun 2014
Location: Metro Detroit
Posts: 270
Total Cats: 26
*All 4 knuckle-to-bracket maintained torque
*Upper 2 caliper-to-bracket 1/4 turn loose
*Remaining lower caliper-to-bracket 1 turn loose, not even finger tight.
This is very interesting. It means that for some reason the caliper-to-bracket bolts aren't holding their torque, and the leading edge [lower] bolts are loosening significantly compared to the uppers.
Based on this symmetrical torque failure, it seems logical that either the brackets and/or bolts I received from TSE are unique in their failure mode or there is a design problem here. Surely more to come.
Reply
0
0
05-05-2015, 12:33 AM
#100
Junior Member
Thread Starter
iTrader: (1)
Join Date: Jun 2014
Location: Metro Detroit
Posts: 270
Total Cats: 26
60 LbFt, which is on the high side for Grade 8 of that size. You did not provide any recommended torque settings in the included printed instructions, so I went off good old charts.
The bolts you provided are different between the caliper and knuckle mountings, so I'm not ruling out that the knuckle bolts are acceptable [given they're holding torque] but the caliper bolts are faulty [since they don't hold torque]. It can be deduced the threads cut into the bracket are acceptable, assuming we're not running into a differential thermal expansion coefficient problem.
I suggest you check your torques. It's your safety, and that's more important than your pride. Just because nobody else has reported it doesn't mean it hasn't happened and they fixed it with band-aids like over-torquing, loctite red, or a real fix like adding a lock-nut.
Last edited by Ryephile; 05-05-2015 at 12:57 AM.
Reply
1
1


