Turbo Smurfette - Build in progress (slow)
 02-25-2015, 12:23 PM
#201
Elite Member
Thread Starter
iTrader: (4)

Join Date: Mar 2012
Location: Northern VA
Posts: 4,648
Total Cats: 544
Ordered:
New gaskets for everything VVT related
Pesky 1/8" BSPP banjo bolt to block
New OEM exhaust Studs/nuts
O-rings galore for Oil/VVT stuff
DIYautotune MS3 Knock Module
Looking for:
Aluminum welder for bung
pigtail for knock sensor
help tuning
Should I bother painting the assembled short block, or just leave it flakey and as is. I didn't have time to paint before machine took it in and balanced everything. I may reuse the same water feed from the back of the head as I previously had instead of building another line to the side of the block. Not sure.
Still need to assemble a new oil line, so that requires fittings.

Reply
 0
0

0
02-25-2015, 12:49 PM
#203
Elite Member
Thread Starter
iTrader: (4)
Join Date: Mar 2012
Location: Northern VA
Posts: 4,648
Total Cats: 544
Then I need a new sandwich adapter. Mine is sealed by a thin o-ring which was prone to leaking.
I was thinking of an oil cooler in the future and wasn't sure if I were comfortable with stacking endless adapters. heat exchanger (remove this?) - > sandwich plate - > oil cooler plate
I was thinking of an oil cooler in the future and wasn't sure if I were comfortable with stacking endless adapters. heat exchanger (remove this?) - > sandwich plate - > oil cooler plate
Reply
0
0
02-27-2015, 11:56 AM
#204
Elite Member
Thread Starter
iTrader: (4)
Join Date: Mar 2012
Location: Northern VA
Posts: 4,648
Total Cats: 544
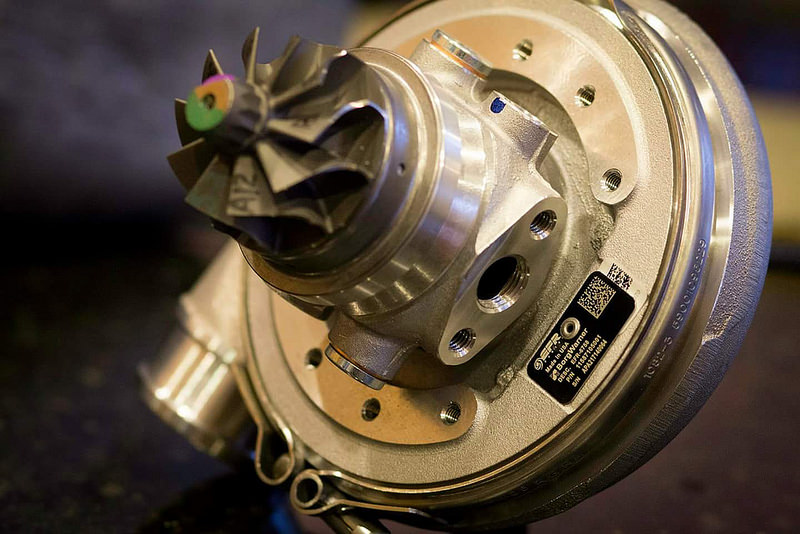
Supercore came in with aluminum bearing housing. Assembled it to the old exhaust housing from the blown 6258. Turbo is back in business. Waiting on some hose ends, gaskets, and some other studs/nuts from mazda. As soon as I get an engine stand, I'm going to start assembling.
Reply
2
2
03-05-2015, 11:10 PM
#208
Elite Member
Thread Starter
iTrader: (4)
Join Date: Mar 2012
Location: Northern VA
Posts: 4,648
Total Cats: 544
So it's begun...again
Transferred the Boundary Engineering pump and Cast water pump
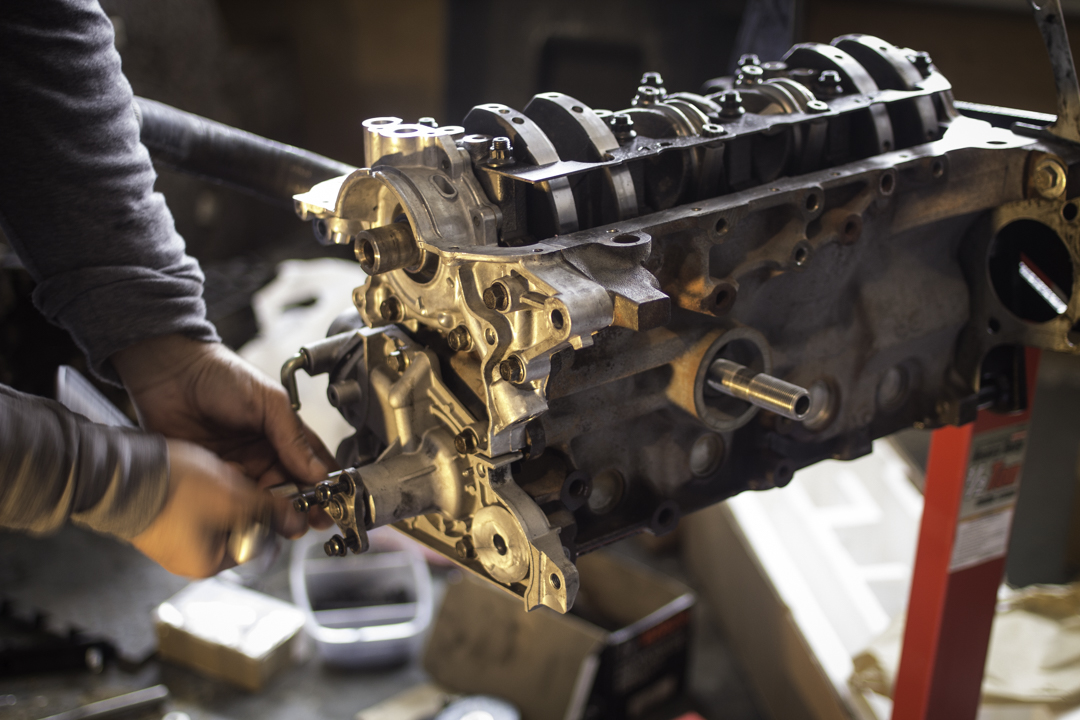
Eagle Rods, Supertech pistons, ACL race bearings, Cranks scraper, fully balanced rotating assembly, new seals everywhere, AN fittings on block for oil/water to turbo, oil port tapped from 1/8" BSPT to BSPP for banjo bolt to supply VVT solenoid

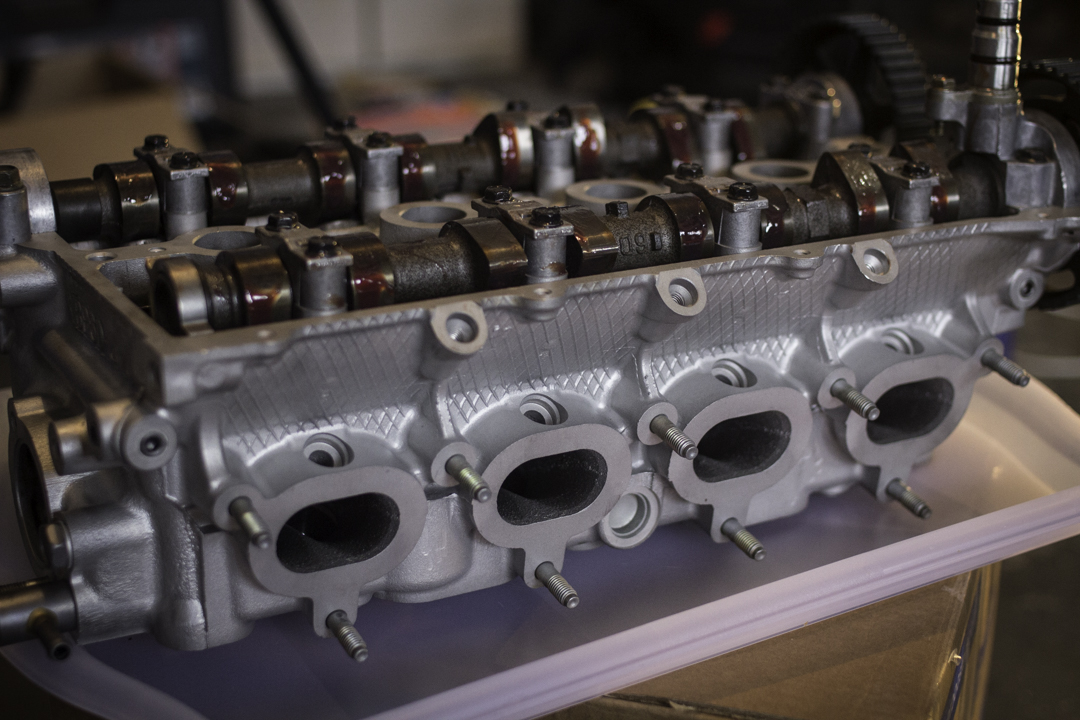
Head was cleaned and cut for +1mm for both intake and inconel exhaust valves. Supertech dual spring valvetrain with titanium retainers. Installed new cam seals, replaced the manifold studs.
Transferred the Boundary Engineering pump and Cast water pump
Eagle Rods, Supertech pistons, ACL race bearings, Cranks scraper, fully balanced rotating assembly, new seals everywhere, AN fittings on block for oil/water to turbo, oil port tapped from 1/8" BSPT to BSPP for banjo bolt to supply VVT solenoid
Head was cleaned and cut for +1mm for both intake and inconel exhaust valves. Supertech dual spring valvetrain with titanium retainers. Installed new cam seals, replaced the manifold studs.
Reply
1
1
 03-07-2015, 09:34 AM
#212
Elite Member
Thread Starter
iTrader: (4)
Join Date: Mar 2012
Location: Northern VA
Posts: 4,648
Total Cats: 544
I don't have the time nor the temperatures to paint the block. I'm leaving it natural and just want to get it running. I'm waiting for a shop to get back to me on the bung welding for oil pan before flipping the motor around for the head to be installed.
What is the consensus on cylinder walls. Clean off all grease/oil and make it bone dry for break in or leave it slightly lubricated?
Right now some assembly lube is literally applied to help suspend dust
What is the consensus on cylinder walls. Clean off all grease/oil and make it bone dry for break in or leave it slightly lubricated?
Right now some assembly lube is literally applied to help suspend dust
Reply
0
0
03-07-2015, 09:50 AM
#213
SADFab Destructive Testing Engineer


iTrader: (5)
Join Date: Apr 2014
Location: Beaverton, USA
Posts: 18,642
Total Cats: 1,866
I think you should try and paint the block. It only took me a day to do it, including cleaning. And my motor had been rallycrossed. It stops rust and looks way cleaner.
Reply
0
0
03-09-2015, 10:28 AM
#215
Elite Member
Thread Starter
iTrader: (4)
Join Date: Mar 2012
Location: Northern VA
Posts: 4,648
Total Cats: 544
Pistons are installed already, there's just some assembly lube slathered on the walls. Give it a good wipe down to take the excess off and hope for the best (but not fully degrease)?
I think the rings are already lubricated, but I just didn't feel confident about the amount of residual oil left in the cylinders. "Bob" said he did this to trap whatever dust might collect before assembly even though it was bagged. This is the same shop that assembled Soviets miracle motor.
I think the rings are already lubricated, but I just didn't feel confident about the amount of residual oil left in the cylinders. "Bob" said he did this to trap whatever dust might collect before assembly even though it was bagged. This is the same shop that assembled Soviets miracle motor.
Reply
0
0
03-10-2015, 12:11 PM
#217
Elite Member
Thread Starter
iTrader: (4)
Join Date: Mar 2012
Location: Northern VA
Posts: 4,648
Total Cats: 544
I harvested it off the previous motor, it looked like it cleared. This time around, I did make note to grind the corner a small bit by the rear main seal.
I'll be shipping your oil line today.
I'll be shipping your oil line today.
Reply
0
0
03-10-2015, 12:23 PM
#218
Elite Member
iTrader: (37)

Join Date: Apr 2010
Location: Very NorCal
Posts: 10,441
Total Cats: 1,899


Reply
0
0
03-10-2015, 12:29 PM
#219
Elite Member
Thread Starter
iTrader: (4)
Join Date: Mar 2012
Location: Northern VA
Posts: 4,648
Total Cats: 544
Humm... mine seems to contact the OEM windage tray on the backside, to the point where the bolt holes in the pan rail are ever so slightly off. Its going to make installing the pan and tray a bastard unless I subtly bend the tray to change the radius, but that sounds like all kinds of fail. Not sure what to do here
I leave two bolts threaded on the oil pan flange in the reverse direction to align and hold the windage tray in place. Once the oil pan is on and bolted down everywhere else, I back them out and replace them right side down.
Reply
0
0
03-11-2015, 11:32 AM
#220
Elite Member
Thread Starter
iTrader: (4)
Join Date: Mar 2012
Location: Northern VA
Posts: 4,648
Total Cats: 544
So I think I might have overtorqued the oil pan. The rear oil pan seal, while in, is bulging a bit from the keyed area. I don't know if it'll cause a huge problem, it's still seated but I just don't know. I'd like to avoid taking the whole oil pan off and spending a day cleaning again.
Maybe I take a picture later. I'm tired of this (which is making me impatient)
Head is already on and torqued. Motor is going to be difficult to flip around
Maybe I take a picture later. I'm tired of this (which is making me impatient)
Head is already on and torqued. Motor is going to be difficult to flip around
Reply
0
0


