Trent's build thread
 03-06-2009, 12:24 AM
#1
Elite Member
Thread Starter
iTrader: (11)
Join Date: Feb 2006
Location: Louisiana
Posts: 1,651
Total Cats: 39
This will serve as a reminder/placeholder for my projects as they come. I developed a work list, which I will place here and will tackle basically in order:
Install Energy Suspension bushings in rear (once correct crush tubes arrive from ES)
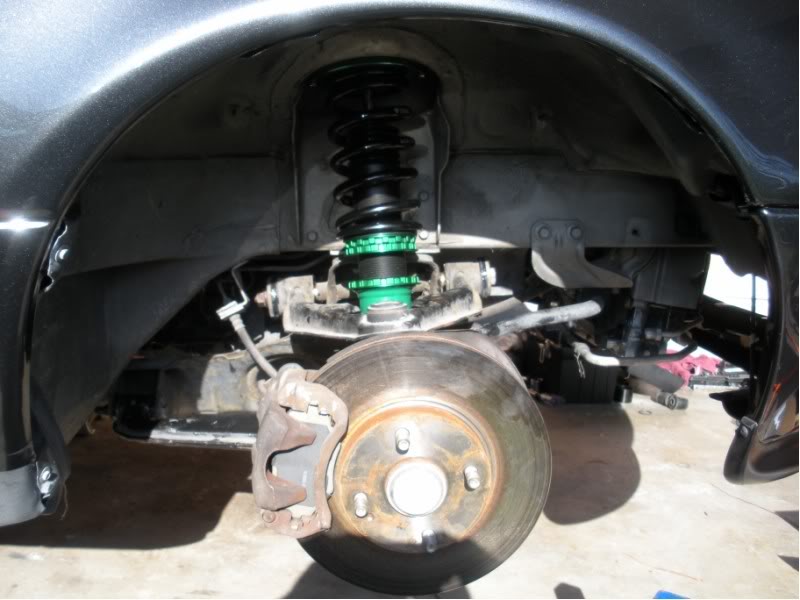
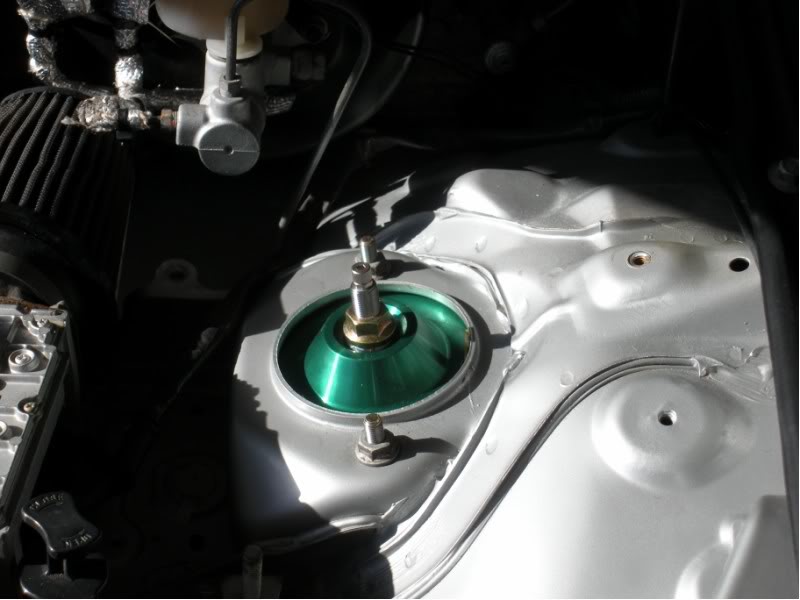
Install Tein Flex coilovers in rear
Set coilovers to 11 clicks from full stiff (fronts to 9 from full stiff)
Put forgotten dustboot on FL coilover (d'oh!)
Clean, grease, and install new upper balljoint boots
Clean, grease, and install new lower balljoint boots
Clean, grease, and install new tie-rod end boots
Set ride height at all four corners
Check on slight coolant and power steering leaks
Alignment
Upgrade front sway bar to Racing Beat hollow bar with reinforced mounting points.
Consider corner-weighting
Inspect differential mounts and replace if necessary with mazdaspeed mounts.
Bring car back to my painter for a do-over on the rockguard paint
Develop a battery tie-down system that is compatible with installed Optima redtop battery.
Replace old/sketchy Optima with factory unit if necessary. (probably the best option)
Retrofit NA8 trunk release cable to my NA6 chassis (easy)
Install Miataroadster steering wheel hub
Install Momo Prototipo steering wheel
Reconnect horn connection under the steering column
Consider installing Hella Supertone horns from my buddy
Install DDMWorks radio installation panel
Reinstall radio and buy/install door speakers
Install AEM UEGO gauge and prosport volt gauge in DDMWorks panel
Reroute AEM ground wire to engine bay ECU ground point
Recover driver's door panel to cover manual window crank hole. Necessary since power window upgrade.
Possibly upgraded material (black suede/alcantara?) for both panels.
Repair or replace upper main gauge hood.
Paint valve cover
Install, charge, and test factory A/C components (condenser and hard lines. blow out old lines and dryer with compressed air. it's going to be getting hot before I know it)
Install 323 GTX PCV valve
Drill stock crossover tube for IAT sensor
Wire IAT sensor and remove AFM
REMOVE 15 AMP FUSE PER MSPNP INSTRUCTIONS!!!!!!!
Install MSPNP
Install MegaTune on my laptop, and setup the firmware for a 1.6 with AFM removed
Set base timing
Buy fittings for Tuner Toys fuel rail
Install 460cc injectors in TT fuel rail
Adjust REQ_FUEL in MegaTune for 460cc injectors (230/460 * 13.2) = 6.6
Send AEM UEGO analog input to MS. Set MS to use AEM WBO2 as default O2 sensor.
Work on cold-start and warmup enrichment values
Modify lower throttlebody-side BEGi charge pipe to include IAT boss.
Street tune with MLV
Adjust IAT and CLT correction values
Install boost gauge in a-pillar gauge pod
Paint intercooler flat-black
Install complete BEGi S2 turbo kit
Street tune with MLV, slowly, up to wastegate can pressure
Either install manual boost controller or setup electronic boost control with the MS.
Consider installing VTPS on 1.6 throttle body so I can utilize launch control feature of MS and allow for TPS based map corrections.
Install oil catchcan off of valve cover breather. Route back to intake side of turbo plumbing.
DYNO TIME! to finalize spark map and nail down Electronic Boost Control, should I decide to use it.
Consider installing MOMO Start (or equivalent) racing seat and 5 or 6 point camlock harness.
May also need quick release hub adapter for steering wheel.
Will also have to make custom rails for seat (if using new side mount Start).
This list will probably grow as I go. :(
Install Energy Suspension bushings in rear (once correct crush tubes arrive from ES)
Install Tein Flex coilovers in rear
Set coilovers to 11 clicks from full stiff (fronts to 9 from full stiff)
Put forgotten dustboot on FL coilover (d'oh!)
Clean, grease, and install new upper balljoint boots
Clean, grease, and install new lower balljoint boots
Clean, grease, and install new tie-rod end boots
Set ride height at all four corners
Check on slight coolant and power steering leaks
Alignment
Upgrade front sway bar to Racing Beat hollow bar with reinforced mounting points.
Consider corner-weighting
Inspect differential mounts and replace if necessary with mazdaspeed mounts.
Bring car back to my painter for a do-over on the rockguard paint
Develop a battery tie-down system that is compatible with installed Optima redtop battery.
Replace old/sketchy Optima with factory unit if necessary. (probably the best option)
Retrofit NA8 trunk release cable to my NA6 chassis (easy)
Install Miataroadster steering wheel hub
Install Momo Prototipo steering wheel
Reconnect horn connection under the steering column
Consider installing Hella Supertone horns from my buddy
Install DDMWorks radio installation panel
Reinstall radio and buy/install door speakers
Install AEM UEGO gauge and prosport volt gauge in DDMWorks panel
Reroute AEM ground wire to engine bay ECU ground point
Recover driver's door panel to cover manual window crank hole. Necessary since power window upgrade.
Possibly upgraded material (black suede/alcantara?) for both panels.
Repair or replace upper main gauge hood.
Paint valve cover
Install, charge, and test factory A/C components (condenser and hard lines. blow out old lines and dryer with compressed air. it's going to be getting hot before I know it)
Install 323 GTX PCV valve
Drill stock crossover tube for IAT sensor
Wire IAT sensor and remove AFM
REMOVE 15 AMP FUSE PER MSPNP INSTRUCTIONS!!!!!!!
Install MSPNP
Install MegaTune on my laptop, and setup the firmware for a 1.6 with AFM removed
Set base timing
Buy fittings for Tuner Toys fuel rail
Install 460cc injectors in TT fuel rail
Adjust REQ_FUEL in MegaTune for 460cc injectors (230/460 * 13.2) = 6.6
Send AEM UEGO analog input to MS. Set MS to use AEM WBO2 as default O2 sensor.
Work on cold-start and warmup enrichment values
Modify lower throttlebody-side BEGi charge pipe to include IAT boss.
Street tune with MLV
Adjust IAT and CLT correction values
Install boost gauge in a-pillar gauge pod
Paint intercooler flat-black
Install complete BEGi S2 turbo kit
Street tune with MLV, slowly, up to wastegate can pressure
Either install manual boost controller or setup electronic boost control with the MS.
Consider installing VTPS on 1.6 throttle body so I can utilize launch control feature of MS and allow for TPS based map corrections.
Install oil catchcan off of valve cover breather. Route back to intake side of turbo plumbing.
DYNO TIME! to finalize spark map and nail down Electronic Boost Control, should I decide to use it.
Consider installing MOMO Start (or equivalent) racing seat and 5 or 6 point camlock harness.
May also need quick release hub adapter for steering wheel.
Will also have to make custom rails for seat (if using new side mount Start).
This list will probably grow as I go. :(
Last edited by Trent; 03-29-2009 at 10:39 PM.

Reply
 0
0

0


 03-29-2009, 10:38 PM
#6
Elite Member
Thread Starter
iTrader: (11)
Join Date: Feb 2006
Location: Louisiana
Posts: 1,651
Total Cats: 39
Teins installed and ride height set.
Interior buttoned up. Installed trunk release cable from a later car, DDMWorks radio surround, wired up and installed my AEM UEGO and Prosport voltage gauges. Also finally got around to installing a radio and putting some speakers in the doors. Haven't had audio in this car in months.
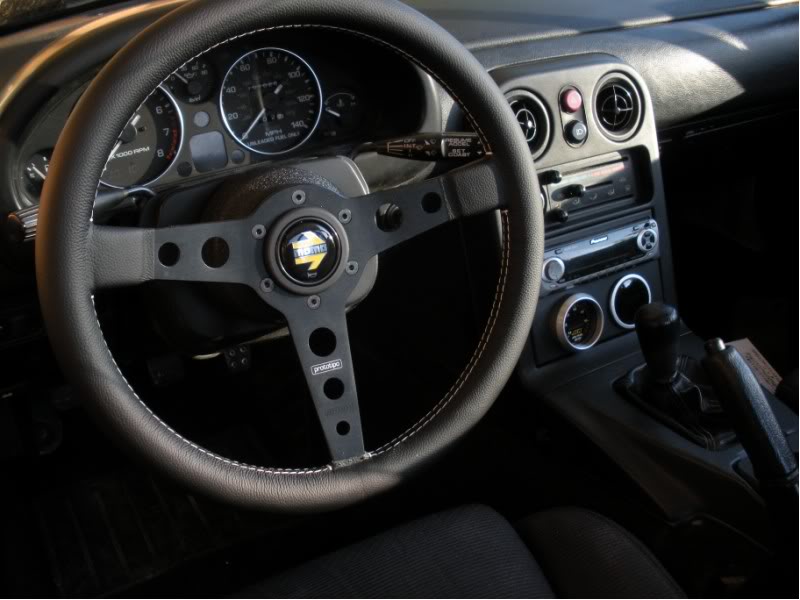
Today, I installed a Momo Prototipo steering while with a Daikei hub and Momo horn button. Speaking of the horn, I also installed my Hella Supertones.
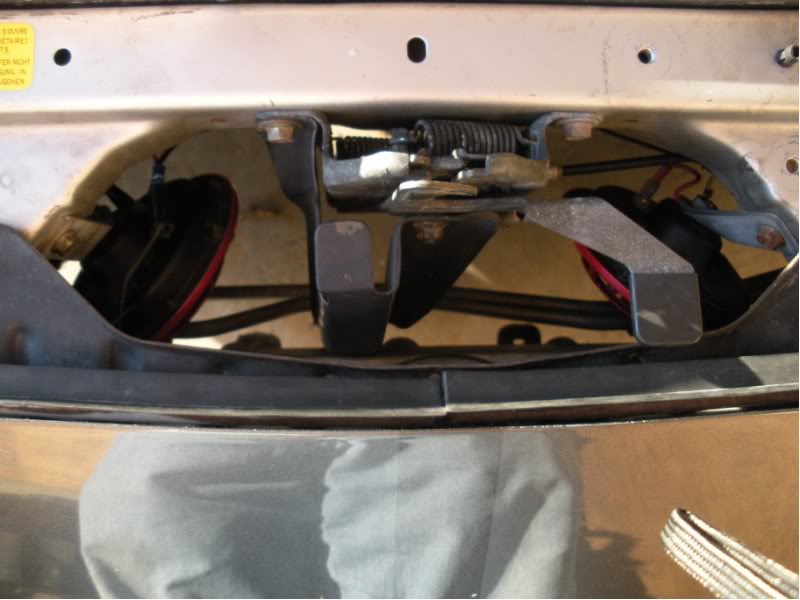
Interior buttoned up. Installed trunk release cable from a later car, DDMWorks radio surround, wired up and installed my AEM UEGO and Prosport voltage gauges. Also finally got around to installing a radio and putting some speakers in the doors. Haven't had audio in this car in months.
Today, I installed a Momo Prototipo steering while with a Daikei hub and Momo horn button. Speaking of the horn, I also installed my Hella Supertones.
Reply
0
0
03-30-2009, 12:56 AM
#7
Elite Member
iTrader: (1)
Join Date: Feb 2008
Location: Birmingham Alabama
Posts: 7,930
Total Cats: 45
Like the wheel. I'd like to install mine too but my damn Works Bell adapter has been on its way for over 2 months now. Yay for Japanese back orders.
Any reason you went with the Teins over other choices? Right price?
Looks good.
Any reason you went with the Teins over other choices? Right price?
Looks good.
Reply
0
0
 03-30-2009, 09:19 AM
#9
Elite Member
Thread Starter
iTrader: (11)
Join Date: Feb 2006
Location: Louisiana
Posts: 1,651
Total Cats: 39
As for the coilovers, Tein makes a solid product. Also, Emilio had a special several months back on the Teins with the 9/6 springs at the old Tein price (since they jacked up the price 15% recently).
Reply
0
0

Thread
Thread Starter
Forum
Replies
Last Post
stoves
Suspension, Brakes, Drivetrain
5
04-21-2016 03:00 PM


