View Poll Results: NEWBY'S....WAS/IS THIS THREAD HELPFUL TO YOU??
YES, GREAT INFO...JUST WHAT I NEEDED TO SEE!


7
38.89%
NOOOOOOOO, LAME.....


2
11.11%
N/A--NOT A NEWBY


9
50.00%
Voters: 18. You may not vote on this poll
Diy Build/parts List--1st Timer!!
 07-11-2007, 08:54 PM
#61
Elite Member
Thread Starter
iTrader: (17)

Join Date: May 2007
Location: NY
Posts: 1,615
Total Cats: 2
Ahhhh the infamous zipties....lol Well I'm not too good at predicting what I'm can or cannot do until its in my hands...nor do I have the experience to know...But from what I read, and seemed like a good route to try, most people install the sensor, then run the wires up through the turret into the interior and install the controller there, or in the glove or whatnot....Is this not feasable?
Appreciate the input guys, this is shaping up to be a pretty damn good discussion on a few different aspects...And I see the views are building up!
And +1 to Sam's question...I just followed the herd, but I thought I read that either closer to the turbo has too much heat, and I think I read that the fact that Begi has the divorced wg tube, it needs to be after the "reintroduction" to give a good reading??? I may be wayyyyyyy off, read so much its hard to keep track of things...thats why I finally said screw it, ordered and started learning ALOT better as things have arrived!
CLOCKING was a something I read and read about, but didnt understand WHY it was so curcial till i GOT it and tried putting in the car...Not to mention how easy it IS vs how hrad it SOUNDS>.....
"Oh I see, says the blind man to his deaf wife while the crippled kids jumped for joy":gay:

Reply
 0
0

0
07-12-2007, 09:12 AM
#62
Boost Czar


iTrader: (62)
Join Date: May 2005
Location: Chantilly, VA
Posts: 79,493
Total Cats: 4,080
It's at the 2 o'clock mark, good enough for me. As long as it's in the upper area between 8-4 you're fine.
Before MY flexpipe and it would be hard to route, since there is little room between the DP and tranny, and it's getting closer to the turbine. Would also require the LC-1 to be mounted somewhere on the PPF again, as the reach of the sensor is only like 18".
The location just before the Cat is best: It's far enough away from the turbo, it's before the cat, its easy to access in the future and routing under the shiftboot is close enough the controller can be inside the cabin.
Reply
0
0
07-12-2007, 09:37 AM
#63
Wait a minute, now theres confusion. tvalenziano mentioned that after calling Begi and asking about the sensor bungs in the DP they told him that it comes with two, one is vertical and also comes with plugs if you dont want to use it. Now let me get this straight, tvalenziano, when you called them they asked you where to put the bungs?
Sounds confusing because i would think everyone would use once location.
Also Braineack theres something wrong with the picture you posted compared to the pictures tvalenziano posted from begi. Look at your picture the length of pipe after the flex part is much longer, why?
Sounds confusing because i would think everyone would use once location.
Also Braineack theres something wrong with the picture you posted compared to the pictures tvalenziano posted from begi. Look at your picture the length of pipe after the flex part is much longer, why?
Reply
0
0
07-12-2007, 10:46 AM
#64
Boost Czar
iTrader: (62)
Join Date: May 2005
Location: Chantilly, VA
Posts: 79,493
Total Cats: 4,080
cause I have a different DP...not all are equal...it's trival.
most people still utilize the OEM o2 sensor, so they have (2) bungs, one close to the turbo for the NB, and one near the cat for the WB.
most people still utilize the OEM o2 sensor, so they have (2) bungs, one close to the turbo for the NB, and one near the cat for the WB.
Reply
0
0
07-12-2007, 10:52 AM
#65
Elite Member
Thread Starter
iTrader: (17)
Join Date: May 2007
Location: NY
Posts: 1,615
Total Cats: 2
The whole things a lil confusing, but seems like the NB o2 bung is there pretty much in stock location and they know where it is/where to put it...I guess the wb02 bung is more of an option, and therefore they ask for location....
Tell me if everyone is cool with me sending back the 2nd picture(that I posted), asking them to make it more vertical?? Or should i ask for "12oclock" position?? I just dont want to end up with fitment issues....
Tell me if everyone is cool with me sending back the 2nd picture(that I posted), asking them to make it more vertical?? Or should i ask for "12oclock" position?? I just dont want to end up with fitment issues....
Reply
0
0
07-12-2007, 11:07 AM
#66
Supporting Vendor

iTrader: (33)
Join Date: Jul 2006
Location: atlanta-ish
Posts: 12,659
Total Cats: 134
there should be a ton of room to fit a wb sensor in completely vertical, or as close to completely vertical as possible. The (3) wb bungs I've welded onto downpipes, I installed vertical. No fitment issues.
You want it before the cat, but forward of the cat. That's why I liked the position pre flex pipe on the pics you posted. The cat itself gets hot as *****, and can overheat the sensor. Scott's dp seems to be different, with the flex section well ahead of where yours is. But you can see in his pic how much room there is to fit a sensor in.
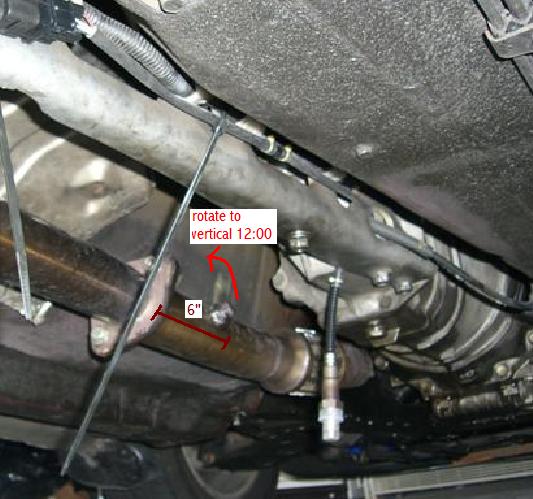
Tell them you want the bung 6" forward of the cat flange, between 12:00 vertical and 11:00 if facing from the front side (tilted slightly towards the tranny).
You want it before the cat, but forward of the cat. That's why I liked the position pre flex pipe on the pics you posted. The cat itself gets hot as *****, and can overheat the sensor. Scott's dp seems to be different, with the flex section well ahead of where yours is. But you can see in his pic how much room there is to fit a sensor in.
Tell them you want the bung 6" forward of the cat flange, between 12:00 vertical and 11:00 if facing from the front side (tilted slightly towards the tranny).

Reply
0
0
07-12-2007, 11:17 AM
#67
Elite Member
Thread Starter
iTrader: (17)
Join Date: May 2007
Location: NY
Posts: 1,615
Total Cats: 2
Thanks Ben, I dont plan on running a cat..gonna be a straight 3" exhaust, to maybe a free flow magnaflow muffler....
So I'd assume I dont have to worry much about how close it is...
But thanks for the confirmation of fitment...didnt want to end up not being able to fit it in...
So I'd assume I dont have to worry much about how close it is...
But thanks for the confirmation of fitment...didnt want to end up not being able to fit it in...
Reply
0
0
07-12-2007, 11:20 AM
#68
Supporting Vendor
iTrader: (33)
Join Date: Jul 2006
Location: atlanta-ish
Posts: 12,659
Total Cats: 134
If it ends up being in front of the flex section, instead of behind, that's fine. 6" forward from the cat, facing between 12:00 vertical and 11:00 towards inward. Will leave plenty of room to set the sensor and a heat shield if needed.
<edit> you posted a reply faster than I was able to mark Scott's picture. You never know when/if you'll need to install a cat in the future (like if you need to make the car legal when you sell it or whatever...) so go ahead and have the sensor put in assuming there is a cat. Plus you want the sensor away from the turbo heat for longevity, but you don't want it so far back there is a noticable delay between engine activity and sensor reaction.
<edit> you posted a reply faster than I was able to mark Scott's picture. You never know when/if you'll need to install a cat in the future (like if you need to make the car legal when you sell it or whatever...) so go ahead and have the sensor put in assuming there is a cat. Plus you want the sensor away from the turbo heat for longevity, but you don't want it so far back there is a noticable delay between engine activity and sensor reaction.
Reply
0
0

 ) but would it be possible to put the bung after the dp on a turndown for example?
07-12-2007, 10:18 PM
) but would it be possible to put the bung after the dp on a turndown for example?
07-12-2007, 10:18 PM
#71
Elite Member
Thread Starter
iTrader: (17)
Join Date: May 2007
Location: NY
Posts: 1,615
Total Cats: 2
Anyway, welcome aboard, ask away...I'm sure someone will get u the
answer(s) u need!
Reply
0
0
07-13-2007, 01:40 PM
#72
Elite Member
Thread Starter
iTrader: (17)
Join Date: May 2007
Location: NY
Posts: 1,615
Total Cats: 2
Ok guys, as promised "the box" arrived...Which means all the goodies are here... I'm at work so I cannot go through it, but all looks good for now...
Also wb02 sensor will be here today (per fedex tracking #)....
I can hardly wait!!!!
And yes once I get home I'll post pics of it all so all the newbys have a cheat sheet...Also I'll update the #1 post where all the parts are listed and be more detailed, also update "status"...My idea is to eventually get that 1st post to be a complete list of whats needed for my DYI turbo route, and prob many others...the real variations being where u source them....I really think at this point, the "gathering info/choosing parts/sourcing parts" parts of the build is prob harder than making it all work nicely...It's at least the most time consuming!
***lets not leave our new poster mazda/nissan hanging guru's...
Here's my input: If I understand the question correctly, ur askign if the wbo2/bung can be installed further down the exhaust system rather than on the DP?? From what Ben/others have said you dont want it to be too far away from the engine because then its not a "real time" and "real engine reading"...Basically if its too far down, u'll see delayed info on whats happening, which can be real bad...Also, I'm thinking mounting/routing of the controller would be an issue as ideal location is inside the cockpit
Reply
0
0
07-14-2007, 11:08 AM
#73
And yes once I get home I'll post pics of it all so all the newbys have a cheat sheet...Also I'll update the #1 post where all the parts are listed and be more detailed, also update "status"...My idea is to eventually get that 1st post to be a complete list of whats needed for my DYI turbo route, and prob many others...the real variations being where u source them....I really think at this point, the "gathering info/choosing parts/sourcing parts" parts of the build is prob harder than making it all work nicely...It's at least the most time consuming!

Btw, if you have aim do you mind giving me like 20 min of your time I just want to bounce some thoughts of you.
Reply
0
0
07-14-2007, 09:25 PM
#74
Elite Member
Thread Starter
iTrader: (17)
Join Date: May 2007
Location: NY
Posts: 1,615
Total Cats: 2
So finally got around to taking some pics...I have to test fit pretty much everythign except the pipes/couplers as I cant tell by eye wheather thigns like fittings are the right size...Will keep you guys posted..I will say that everything looks like real good quality stuff...fittings look bulletproof, same with the ss lines and ic piping/clamps/couplers....If it all fits, I'll be thrilled!
*Sam u have a pm, be more than happy to brainstorm with ya..
*Sam u have a pm, be more than happy to brainstorm with ya..
Reply
0
0
 Where did you get the flexi tube for the coolant line re route, as well as the other stuff ?
07-15-2007, 01:30 AM
Where did you get the flexi tube for the coolant line re route, as well as the other stuff ?
07-15-2007, 01:30 AM
#77
Elite Member
Thread Starter
iTrader: (17)
Join Date: May 2007
Location: NY
Posts: 1,615
Total Cats: 2
More part pics...with all the excitement of the big box, I forgot about the lil goodies!
***Sam, check out Brain's "Blew my motor here's what I'm doing" thread...He was nice enough to take a few shots of it, even the label w/ the part #...
It seems to be a pretty standard item and size (1.25" x 20")...He said he got the idea from FM as they use it on their kits...he got his from Napa, I got mine from Autozone...Mine is a lil stiff cause it has a spring inside, dunno if that will be a problem, or if all are liek that..u'll know when i do!
******edit*****
Before i forget...Got a chance to go through the big box...Everythign was there except for 1 fitting, and 2 bolts. Also we forgot about 1 coupler, and I think either I was sent the wrong WG bracket, or I'm a dumbass and cant figure it out...I test fitted everything on the turbo, and on the lines, just not on the actual car...Pretty sweet considering it was eevrythign I needed on my doorstep in less than 3days....By the time I'm ready for it, I'm sure the "other" parts will arrive...and everything again is super high quality...At this point I'm realllly happy. Again once everythign in THIS order is on the car and I know its good 2 go I will put a post specifically for the dealer...
Reply
0
0
07-15-2007, 01:51 AM
#78
Elite Member
Thread Starter
iTrader: (17)
Join Date: May 2007
Location: NY
Posts: 1,615
Total Cats: 2
Well finally found some time to do somethign to the car...And will hopefully have some more tomm.
I/C is installed. I "fabbed" up the brackets (aka cut, bent, and drilled holes...but hey fab is fab!). Took a lil bit to get them just right, but looks sweet, and solid. I think the hardest part was trying to get the height right. I think I finally have it, but I can always bring it up some if needed.
The I/C is sitting at right about 6" from the hood latch mounting bolts...I put the black plastic shroud (not undertray) thats in the mouth of the fascia on to get a good idea of where the opening was for the mouth, and went from there. Can't fit the intire IC in the mouth since mine is 12" tall...but I got a good amoutn in there...I started to trim the shroud, but held off since I'll also need to trim for the pipes...The bottom of my I/C is about 1" below the mouth shroud, so I have to trim off the bottom/back of it...
Super simple, measure 2x's cut once and it's an easy straight forward process...
1-Cut 1 bracket and drilled 2 holes to secure it to the top of the I/C
2-Measured then cut 2 hanger brackets, and bent 90*. (each hanger is about 6.5" long...5" to the bend, and 1.5" after)
3-Drilled 1 hole on each end of the hanger
4-Drilled matching holes in the 1st bracket to secure the hangers (I used some perrrrfect thick spacer/nuts to that came with my I/C...u can see in pics, they came w/ my IC..but I'm sure u can find somewhere & cheap)
5-Bolted the hangers/hood latch into place..., then placed the I/C and mounted the hangers to the bracket...
6-Its a very tight fit, and I BARELY had to bend the a/c lines where the canister is..(less than .50"). Everything is VERY snug and leveled without the pipes so i stopped looking for a way to secure the bottom...If/when I change my mind i'll post it up...If I find an easy/not interference way to throw some straps on there I will, but for now all is good!**It sits ALMOST perfectly centered...its unnoticeable, and again, with hardly any bending of the a/c lines...This was an 18x12x3 I/C...
tools---hacksaw, drill/bit, bench vice to bend, 10mm socket(hood latch bolts) + 13mm box end(I/C bolts)
Watcha guys think???
Reply
0
0
07-15-2007, 12:50 PM
#80
Supporting Vendor
iTrader: (33)
Join Date: Jul 2006
Location: atlanta-ish
Posts: 12,659
Total Cats: 134
It sits ALMOST perfectly centered...its unnoticeable, and again, with hardly any bending of the a/c lines...This was an 18x12x3 I/C...
Reply
0
0


