LSx coil thread
 03-08-2015, 09:40 PM
#81

Is there any reason this coil would not work well? New Ignition Coil Pack Fits GMC Chevy Pontiac Saab Buick Hummer V8 | eBay

Reply
 0
0

0
04-06-2015, 07:43 AM
#82
All-round "Good Guy"

Join Date: Dec 2009
Location: Brisbane, AUSTRALIA
Posts: 993
Total Cats: 245
I made a CNPS harness the previous weekend (with no capacitors), installed new Iridium BKR7EIX-11 sparkplugs and tried firing up the car with the GM D514A CNPS but it wouldn't turn over, just coughing and farting - very similar to the Fab9 COPS I tried previously. I figured it was probably because capacitors are really needed from 12V to GND and ordered some new bits to make another harness.
This weekend's plan was to finish up the GM CNPS installation since I finally had everything I needed.
My CNPS brackets were slightly too short since there wasn't any clearance between the rocker cover and the harness socket's locking tab - the socket's locking tab angles downward and touches the rocker cover.
I found that two small washers underneath each of the 4 bolt-points were enough to provide the required clearance but after dropping a few into the engine bay, knew that was NOT a long-term solution. Luckily I didn't have the splash tray fitted and being small and round, they bounced around the engine bay and rolled out underneath.
Two 3mm aluminium shims solved this issue:
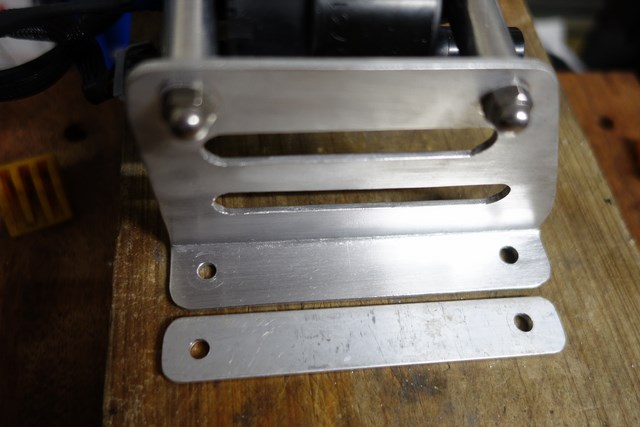
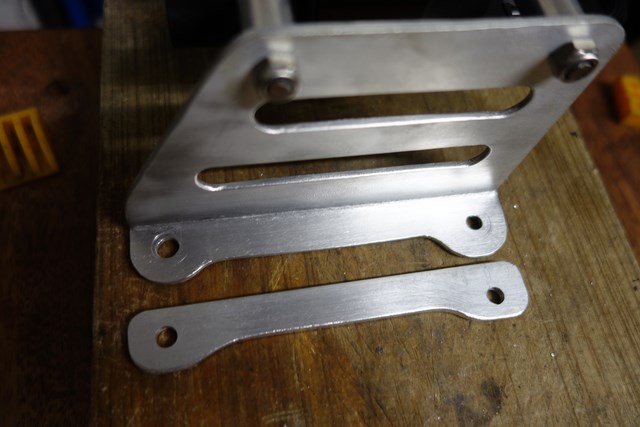
They've been shaped so that they're not visible.
Next issue was the FM Big Spark Kit Magnecor wires:
They've been made specifically for the FM bracket so are too long for me.
I ordered some 180* boots and connectors from Summit racing so that I could shorten the FM wires. Unfortunately the Summit boots are way too tight - you can force them onto the coils but getting them off again is a wrestling match. I then bought a set of Commodore (Aussie GM vehicle that uses the LS engine) Procomp 10.5mm wires from eBay, figuring I could re-use their boots and connectors.
Here's what the Procomp leads look like with the ends removed (left) vs the Summit kit (on right):
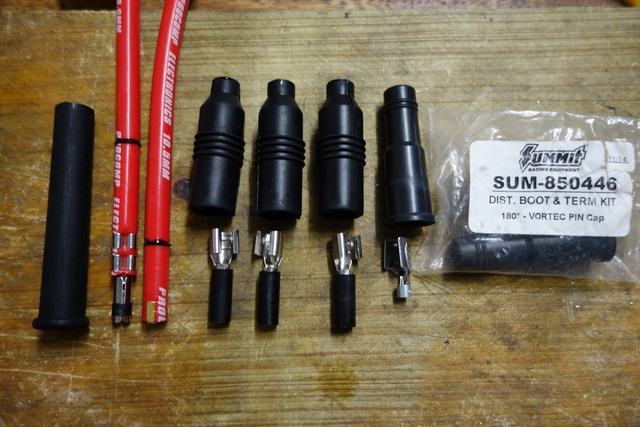
I'm using 3 180* connectors and will use the shortest FM 90* lead for cylinder 4.
The Procomp boots fit nice and snug and their connectors are much longer than the Summit connector - they're also sheathed.
Here's the Magnecor 8.5mm lead (top) vs the Procomp 10.5mm lead with the connectors removed:
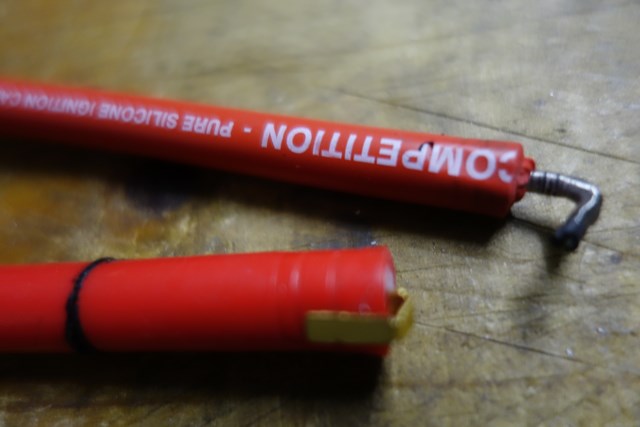
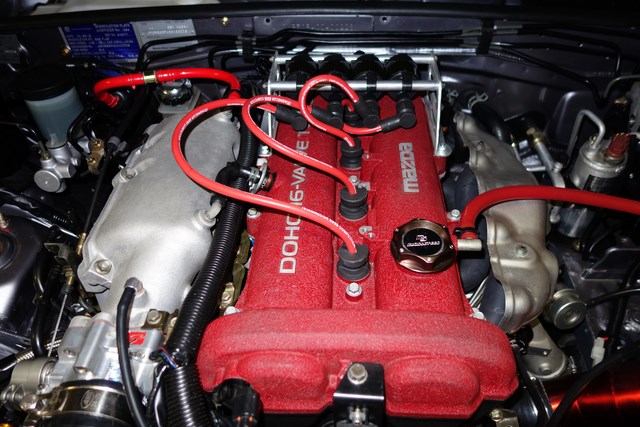
... installed:
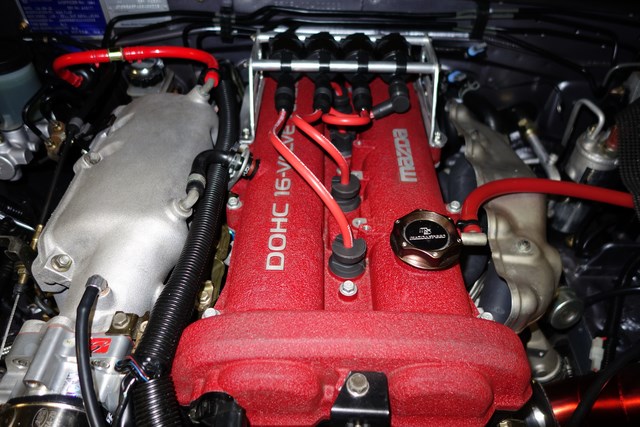
- much tidier!
The previous wiring harness I made used a common ground wire for all CNPS and the wiring was as short as possible but it made the harness very chunky and inflexible so this time I made the leads longer and made them as two separate harnesses, one for cylinder 1&4 and one for cylinder 2&3, each with their own 4700uF capacitor from 12V to engine GND.
Here's a great DIY soldering tool you should make if you don't have it already (shown holding some scrap wire for demonstration purposes):
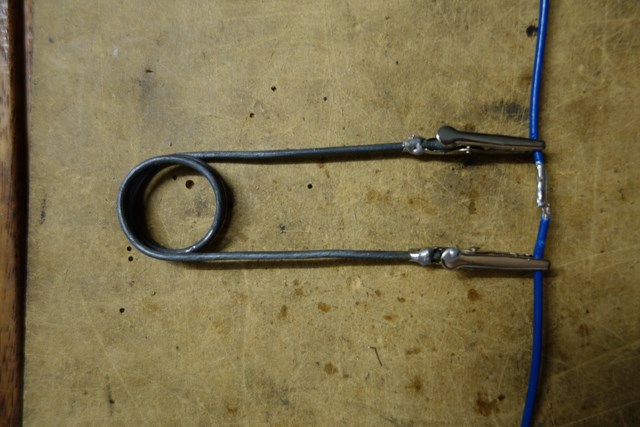
- much better than "helping hands" and really made my job of in-engine-bay soldering the ID1000 plugs into the factory harness "a doddle".
The GM factory wiring uses the crimps shown on the left below:
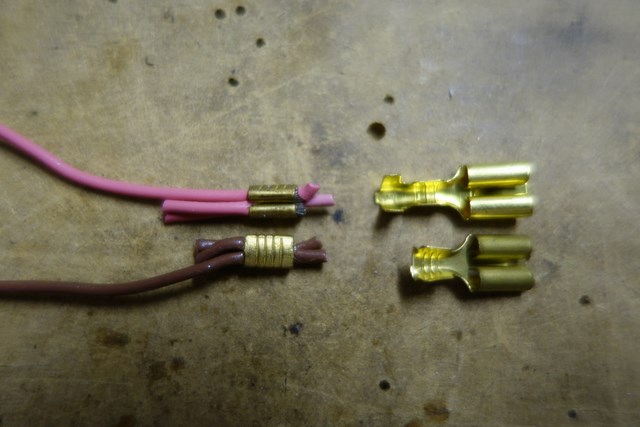
These crimps are great since they make it easier to join 4 wires together - trying to solder 4 wires together when their other ends are already connected to plugs is an exercise in chronic frustration. Unfortunately I couldn't find any so I hacked up some of my blade connectors (shown on the right), cutting the two end sections off for use as wire crimps. These DIY crimps plus soldering "for good measure" produced nice compact joins which passed the "tug test".
Here's the new harness (the other one looks the same):
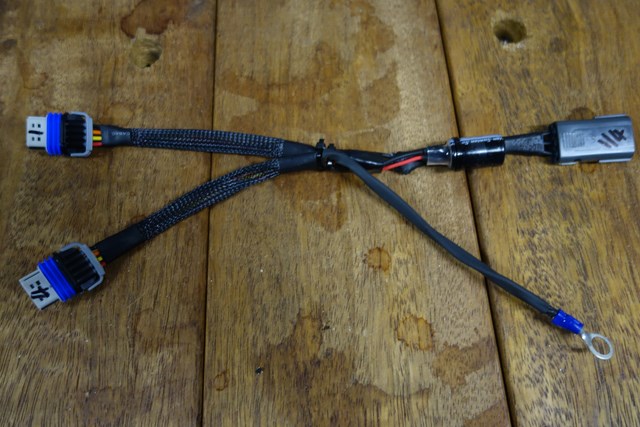
The capacitor is sheathed in some clear heatshrink and zip-tied to the harness.
Everything all in place, battery fully charged, dwell time set to a conservative 3200us, turn the key and...
CRANK, NO START!

I played around with the dwell time, going up in increments of 200us, all the way up to 5000us; the best I got was some coughing and farting again. All this tweaking really took a toll on the battery - at the end I noted that it was dropping to 9V during cranking and was at about 11.7V when I stopped.
I then spent a couple of days reading everything I could about this and suspect it has something to do with my Ignition MAP which looks like it hasn't really been touched.
I put the original NGK HKS M35i sparkplugs and OEM wiring back in, dropped the dwell time back to stock 2100uS, and everything fired up as normal.
More investigation required!
The D514A coils are also known as LS7 coils and I found this on the internetz:
Here are the dwell settings for the LS7 coils, again from Motec Aus via IJ:
Batt V Dwell
8V 10.2ms
9v 9.2
10v 7.4
11v 5.5
12v 4.4
13v 3.8
14v 3.3
15V 2.9
Those dwell times below 11V are a bit concerning. Should I be concerned about increasing the dwell time beyond 5ms?
The D585 coils are known to prematurely fire at 5ms but I haven't heard this is an issue with the D514A/LS7 coils.
This weekend's plan was to finish up the GM CNPS installation since I finally had everything I needed.
My CNPS brackets were slightly too short since there wasn't any clearance between the rocker cover and the harness socket's locking tab - the socket's locking tab angles downward and touches the rocker cover.
I found that two small washers underneath each of the 4 bolt-points were enough to provide the required clearance but after dropping a few into the engine bay, knew that was NOT a long-term solution. Luckily I didn't have the splash tray fitted and being small and round, they bounced around the engine bay and rolled out underneath.
Two 3mm aluminium shims solved this issue:
They've been shaped so that they're not visible.
Next issue was the FM Big Spark Kit Magnecor wires:

They've been made specifically for the FM bracket so are too long for me.
I ordered some 180* boots and connectors from Summit racing so that I could shorten the FM wires. Unfortunately the Summit boots are way too tight - you can force them onto the coils but getting them off again is a wrestling match. I then bought a set of Commodore (Aussie GM vehicle that uses the LS engine) Procomp 10.5mm wires from eBay, figuring I could re-use their boots and connectors.
Here's what the Procomp leads look like with the ends removed (left) vs the Summit kit (on right):

I'm using 3 180* connectors and will use the shortest FM 90* lead for cylinder 4.
The Procomp boots fit nice and snug and their connectors are much longer than the Summit connector - they're also sheathed.
Here's the Magnecor 8.5mm lead (top) vs the Procomp 10.5mm lead with the connectors removed:

... installed:

- much tidier!
The previous wiring harness I made used a common ground wire for all CNPS and the wiring was as short as possible but it made the harness very chunky and inflexible so this time I made the leads longer and made them as two separate harnesses, one for cylinder 1&4 and one for cylinder 2&3, each with their own 4700uF capacitor from 12V to engine GND.
Here's a great DIY soldering tool you should make if you don't have it already (shown holding some scrap wire for demonstration purposes):

- much better than "helping hands" and really made my job of in-engine-bay soldering the ID1000 plugs into the factory harness "a doddle".
The GM factory wiring uses the crimps shown on the left below:

These crimps are great since they make it easier to join 4 wires together - trying to solder 4 wires together when their other ends are already connected to plugs is an exercise in chronic frustration. Unfortunately I couldn't find any so I hacked up some of my blade connectors (shown on the right), cutting the two end sections off for use as wire crimps. These DIY crimps plus soldering "for good measure" produced nice compact joins which passed the "tug test".
Here's the new harness (the other one looks the same):

The capacitor is sheathed in some clear heatshrink and zip-tied to the harness.
Everything all in place, battery fully charged, dwell time set to a conservative 3200us, turn the key and...
CRANK, NO START!
I played around with the dwell time, going up in increments of 200us, all the way up to 5000us; the best I got was some coughing and farting again. All this tweaking really took a toll on the battery - at the end I noted that it was dropping to 9V during cranking and was at about 11.7V when I stopped.
I then spent a couple of days reading everything I could about this and suspect it has something to do with my Ignition MAP which looks like it hasn't really been touched.
I put the original NGK HKS M35i sparkplugs and OEM wiring back in, dropped the dwell time back to stock 2100uS, and everything fired up as normal.
More investigation required!
The D514A coils are also known as LS7 coils and I found this on the internetz:
Here are the dwell settings for the LS7 coils, again from Motec Aus via IJ:
Batt V Dwell
8V 10.2ms
9v 9.2
10v 7.4
11v 5.5
12v 4.4
13v 3.8
14v 3.3
15V 2.9
Those dwell times below 11V are a bit concerning. Should I be concerned about increasing the dwell time beyond 5ms?
The D585 coils are known to prematurely fire at 5ms but I haven't heard this is an issue with the D514A/LS7 coils.
Reply
1
1
 06-08-2015, 07:53 PM
#84
Junior Member

Join Date: Dec 2014
Posts: 91
Total Cats: -6
Not quite sure what I have done wrong in wiring up my ignition coils but i can only get 2 and 3 to fire.
Coils are LS2 D585
94 miata with 1.8
12v from all the coils are going into into the original coils 12v blue wires.
Ground from all coils are going to the cylinder head.
ECU ground is going back to MSPNP2 to ECU ground Pin Out
Trigger wire for 2 and 3 are connected to stock miata brown Trigger wire
Trigger for 1 and 4 are going to stock miata brown Trigger wire.
Problem is that only 2 and 3 will fire.
I have 8 coils and they all fire when in 2 and 3 position
using an ohm meter all the pins from factory gm connector are going to the correct places on my oem miata connector with the orange inside that connects to chassis harness.
swapped out spark plug wires, I made two sets. all work on 2 and 3 but not 1 and 4.
Is there something I should know about 1 and 4?
I have been through the wiring about 5 times already and still no luck.
My toyota coil on plugs work and my factory coils using the harness I dissected for the ls2 coils also worked.
Sorry for the wall of text but i am at a loss right now and would really like to get these coils working.
Reply
0
0
 06-30-2015, 08:45 PM
#88
Newb

Join Date: Jun 2015
Posts: 4
Total Cats: 0
so just completed LS coin install, new coils, new plugs, new wires, new pigtails. after setting dwell to 4.5 it started on the first try, idles like a champ spark on all 4 coils but as soon as i hit the throttle it would cut out. played with some accel settings and was able to drive it but now all i can get out of it is 5psi anything higher than that and it cuts out. the weirdest thing is that few months back i installed new wires on oem coils and it started doing the exact same thing but as soon as i swapped back to NGK wires all the problems went away.
any ideas, why would more spurk have any negative effect on accell tuning, am i missing something in setting?
please help, track day in 2 weeks
thanks
any ideas, why would more spurk have any negative effect on accell tuning, am i missing something in setting?
please help, track day in 2 weeks
thanks
Reply
0
0
06-30-2015, 09:48 PM
#89
Junior Member
Join Date: Dec 2014
Posts: 91
Total Cats: -6
The issue I was having ended up being a bad coil driver in my ecu. Sent it back to DIYAUTOTUNE to get fixed. the 1 and 4 cylinder driver was not putting out enough voltage on the trigger wire. ran some tests that DIY told me to run and the diagnosis was a bad coil driver.
Reply
0
0
07-31-2015, 06:40 PM
#90
TheCarPassionChannel
Join Date: Mar 2013
Location: San Diego, Ca
Posts: 188
Total Cats: 136
The issue I was having ended up being a bad coil driver in my ecu. Sent it back to DIYAUTOTUNE to get fixed. the 1 and 4 cylinder driver was not putting out enough voltage on the trigger wire. ran some tests that DIY told me to run and the diagnosis was a bad coil driver.
Reply
0
0
10-09-2015, 02:23 PM
#93
Elite Member
Join Date: Mar 2007
Location: Santa Clara, CA
Posts: 5,165
Total Cats: 855
--Ian
Reply
0
0
10-16-2015, 09:46 AM
#94
Wiring
If you are retaining all the factory wiring you will need to wire these as wasted spark:
A - grounded on engine
B - existing ground wire on coil connector loom
C - existing trigger wire on coil connector loom (trigger wire on coil connector 1 goes to both 1/4 GM coils, trigger wire on coil connector 2 goes to both 2/3 GM coils)
D - existing +12v wire on coil connector loom
These coils don't provide a tach output.
Here is a wiring diagram from swimming108:
Reply
0
0
10-16-2015, 11:47 AM
#96
Senior Member

Join Date: Feb 2009
Location: Philadelphia
Posts: 916
Total Cats: 70
So I just got my FM hardware kit, holy crap is there a ton of stuff in here. Harness, mount, bunch of connectors, pins, what looks like a massive ground cable, lengths of wire, as always with FM it comes with everything you need, but for $300 it should haha
What's this capacitor/resistor thing people are doing. Any benefit with the FM setup using the D510c coils?
What's this capacitor/resistor thing people are doing. Any benefit with the FM setup using the D510c coils?
Reply
0
0
10-16-2015, 11:53 AM
#97
2) My car is unable to ever be returned to stock at this point.
3) The factory harness is already molested so why not keep going.
I would rather just directly connect the necessary wires to my already made GM harness because it will take me all of 5 minutes. So does anyone know if the wiring diagram above applies to an MSM harness? My searches on this site and mazda-speed.com are not really helping.
Reply
0
0
10-16-2015, 12:01 PM
#98
Elite Member
iTrader: (37)

Join Date: Apr 2010
Location: Very NorCal
Posts: 10,441
Total Cats: 1,899
Well, I guess there is also that

Reply
0
0
10-16-2015, 12:16 PM
#99
I get that it looks nice and OEM to use fancy connectors but its a PITA, more expensive, and I will never need to break the harness up into multiple pieces. In fact, I should never have to unplug anything besides the pin from the coil for any reason if I do it right. So to me it's just added effort and cost for almost zero benefit other than an oem look for connectors that will sit behind the head and out of sight anyway.
Reply
0
0
10-16-2015, 12:44 PM
#100
Senior Member
Join Date: Feb 2009
Location: Philadelphia
Posts: 916
Total Cats: 70
So I was looking at new spark setups and decided to get the FM hardware kit and take a gamble on the coilpacks. I know the ACDelco ones from vendors online are around $60 a piece, even more at FM. I took a gamble on these $20 units from Amazon, just came in today, and I am happy to say, they are 100% legit ACDelco units and look brand new. Snag up this deal if you're looking to up your spark game!
Reply
0
0


