
Head Gasket Repair-How to Clean the block surface w/ pistons installed
 04-12-2012, 11:35 AM
#1
Senior Member
Thread Starter
iTrader: (1)
Join Date: Mar 2012
Location: Pensacola Fla.
Posts: 588
Total Cats: 203
Head Gasket Repair
How to Clean the block surface
Pistons installed.
The subject block is a 4G63, 7 bolt
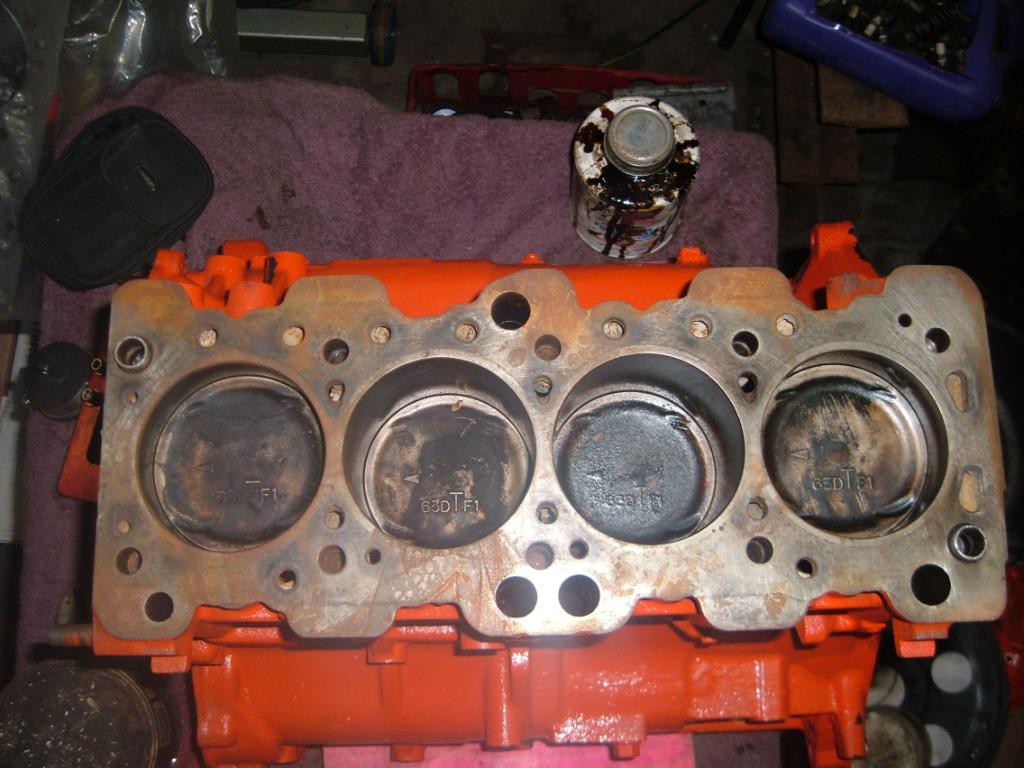
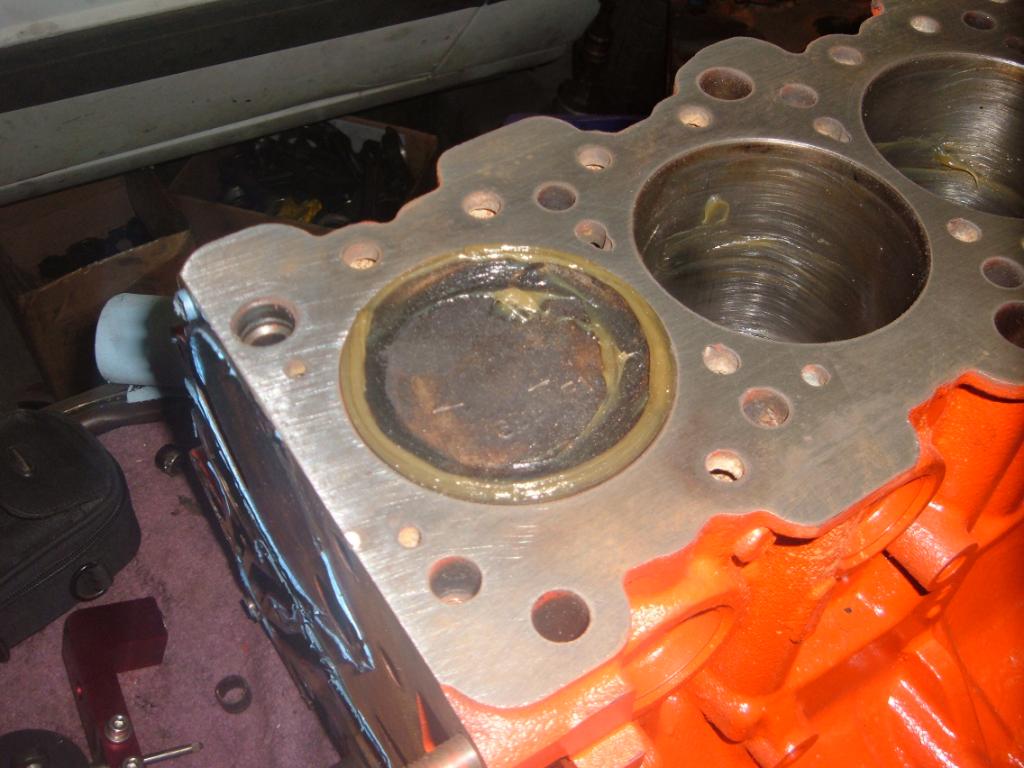
First roll the crank over till all 4 pistons are at mid stroke
Now find some sort of grease, I am using wheel bearing grease
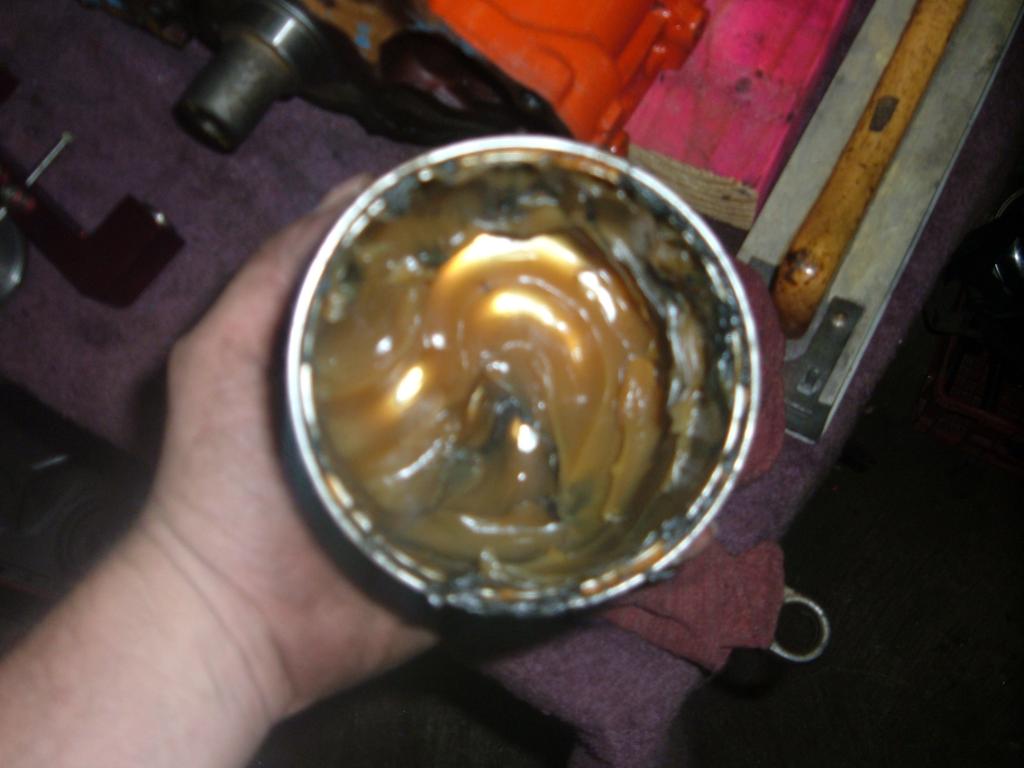
Get a finger full

Now smear it into a seal around the wall of the cylinder and piston

Now as the block deck is cleaned, the grit will not work down on the rings.
Now the head alignment dowels need to be removed, find something, back side of a drill bit, large bolt, or a � drive socket, Is should be close to the ID of the dowel.

Now take vice grips and clamp onto the dowel.

Start with wiggle movement, going to a twist when you feel movement,
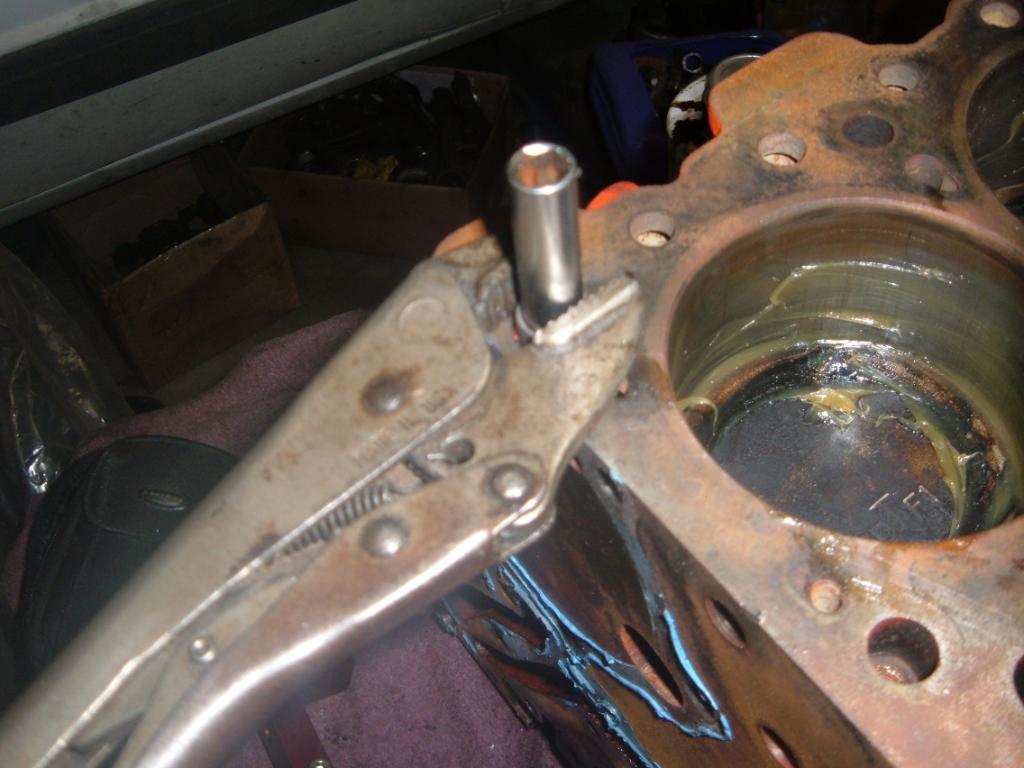
Walk the dowel out of the block.

I prefer a long hard back body board with 80 grit sandpaper.
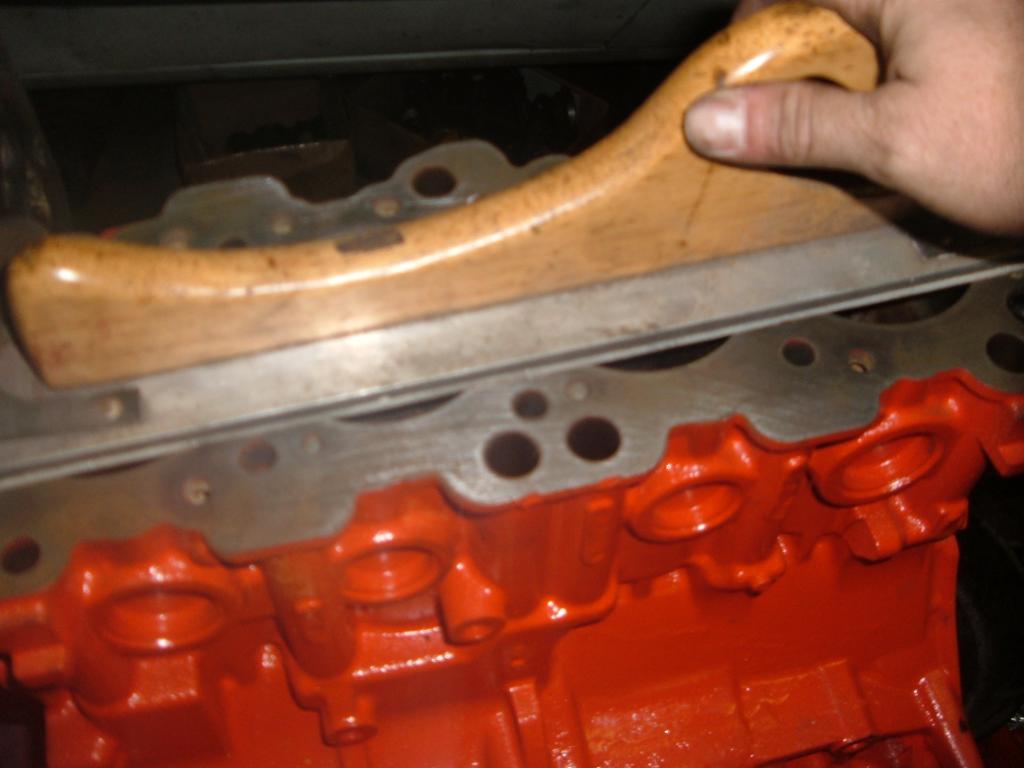
Now go over the deck surface with light to moderate force to remove the gasket residue.
Use different angles across the block.

Once all the residue is removed, rotate the engine over, so one pair of pistons is at TDC.
Now with rags, or blue paper towels, wipe the grease away, Wipe the Pistons at TDC, and the walls of the cylinders that are at BDC
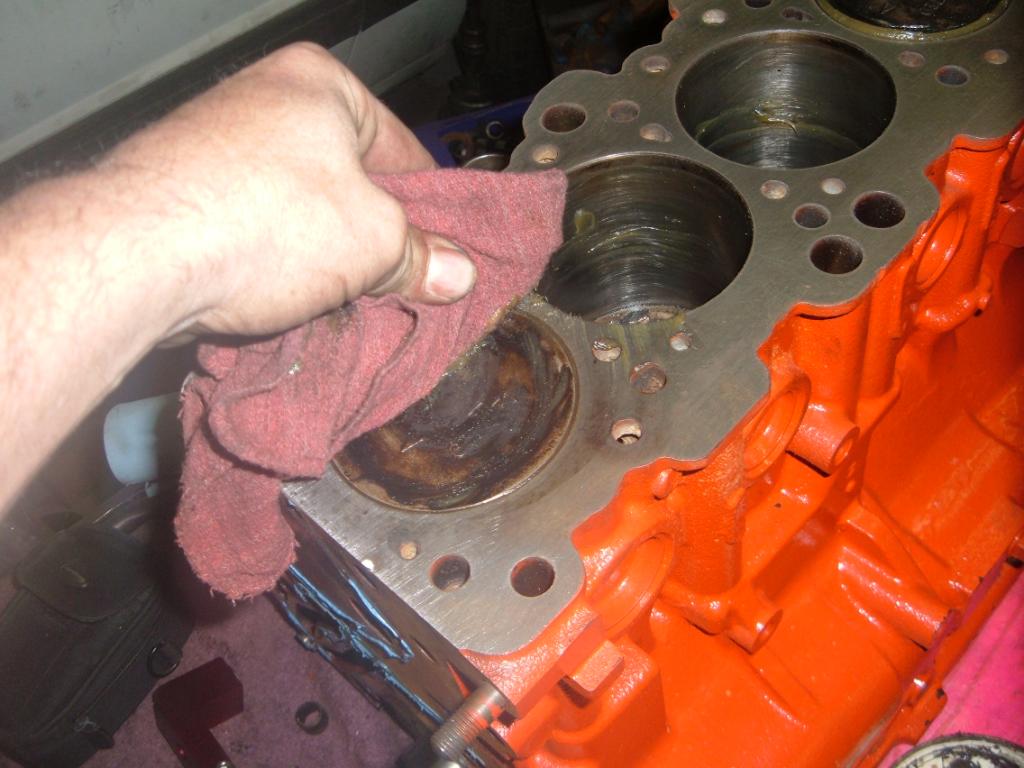
Now rotate the crank 180*, and repeat.
Do this till you can see the top ring on the piston at TDC.
Once the grease is cleaned up, Wipe the cylinders with a blue paper towel with clean engine oil on it.
Use a solvent, such as brake cleaner, and wipe the block deck.
Install the head alignment dowels back in.
You are now ready to install your head gasket, and finish your build.
How to Clean the block surface
Pistons installed.
The subject block is a 4G63, 7 bolt
First roll the crank over till all 4 pistons are at mid stroke
Now find some sort of grease, I am using wheel bearing grease
Get a finger full
Now smear it into a seal around the wall of the cylinder and piston
Now as the block deck is cleaned, the grit will not work down on the rings.
Now the head alignment dowels need to be removed, find something, back side of a drill bit, large bolt, or a � drive socket, Is should be close to the ID of the dowel.
Now take vice grips and clamp onto the dowel.
Start with wiggle movement, going to a twist when you feel movement,
Walk the dowel out of the block.
I prefer a long hard back body board with 80 grit sandpaper.
Now go over the deck surface with light to moderate force to remove the gasket residue.
Use different angles across the block.
Once all the residue is removed, rotate the engine over, so one pair of pistons is at TDC.
Now with rags, or blue paper towels, wipe the grease away, Wipe the Pistons at TDC, and the walls of the cylinders that are at BDC
Now rotate the crank 180*, and repeat.
Do this till you can see the top ring on the piston at TDC.
Once the grease is cleaned up, Wipe the cylinders with a blue paper towel with clean engine oil on it.
Use a solvent, such as brake cleaner, and wipe the block deck.
Install the head alignment dowels back in.
You are now ready to install your head gasket, and finish your build.

Reply
 4
4

4

 04-12-2012, 02:52 PM
#5
Senior Member
Thread Starter
iTrader: (1)
Join Date: Mar 2012
Location: Pensacola Fla.
Posts: 588
Total Cats: 203
Honestly, I can not think of a single shop or dealership, that flushes the coolant system before they install the head(s).
Have you ever pulled a water pump, and sprayed the waterjacket of a cast iron block and seen how much junk comes out? Even when the antifreeze is the proper color?
Most who would use this method would be working on a DD.
Cleaning the head bolt holes would also be a good idea.
Reply
2
2
04-15-2012, 09:00 AM
#6
Newb

Join Date: Apr 2012
Posts: 27
Total Cats: 0
good info for sure. im a little weary of doing my own head job but feel that it wont be nearly as difficult as I am thinking its going to be. Im worried about lining the cams up more than anything because I've only worked on chevy v8's before
Reply
0
0
09-13-2014, 09:45 PM
#9

I'm sincerely sorry for bringing this back from the dead....instead of starting another thread cross-referencing this post, I just thought I'd ask here:
Is this safe practice for an MLS headgasket; using 80 grit and just sanding away? Granted, the aim wasn't to deck the block, but will such a coarse sanding create problems down the road? Is this what a lot of you all do while the motor is still in the car on a head gasket change?
Once the grease is cleaned up, Wipe the cylinders with a blue paper towel with clean engine oil on it.
Use a solvent, such as brake cleaner, and wipe the block deck.
Install the head alignment dowels back in.
You are now ready to install your head gasket, and finish your build.
Use a solvent, such as brake cleaner, and wipe the block deck.
Install the head alignment dowels back in.
You are now ready to install your head gasket, and finish your build.
Is this safe practice for an MLS headgasket; using 80 grit and just sanding away? Granted, the aim wasn't to deck the block, but will such a coarse sanding create problems down the road? Is this what a lot of you all do while the motor is still in the car on a head gasket change?
Reply
0
0
09-13-2014, 10:33 PM
#10

It's fine. You should be more about cleaning off old gasket than rubbing the block but 80 grit is fine. It's more important that it's flat than shiny. We aren't trying to paint it and get a glossy finish. My head has some flaws in it and it holds just fine.
Again the key is that the surface is flat, not warped or dirty. The MLS gasket is a multi layer right? It'll seal well as long as it's clean and flat when it compresses. .
Again the key is that the surface is flat, not warped or dirty. The MLS gasket is a multi layer right? It'll seal well as long as it's clean and flat when it compresses. .
Reply
0
0
09-13-2014, 10:55 PM
#11
Senior Member
iTrader: (2)

Join Date: Mar 2014
Location: Meridian, Mississippi
Posts: 628
Total Cats: 44
It's fine. You should be more about cleaning off old gasket than rubbing the block but 80 grit is fine. It's more important that it's flat than shiny. We aren't trying to paint it and get a glossy finish. My head has some flaws in it and it holds just fine.
Again the key is that the surface is flat, not warped or dirty. The MLS gasket is a multi layer right? It'll seal well as long as it's clean and flat when it compresses. .
Again the key is that the surface is flat, not warped or dirty. The MLS gasket is a multi layer right? It'll seal well as long as it's clean and flat when it compresses. .
Keith
PS: OP don't apologize for bringing this back... it should be a sticky.
Reply
0
0
09-13-2014, 11:52 PM
#12

It's fine. You should be more about cleaning off old gasket than rubbing the block but 80 grit is fine. It's more important that it's flat than shiny. We aren't trying to paint it and get a glossy finish. My head has some flaws in it and it holds just fine.
Again the key is that the surface is flat, not warped or dirty. The MLS gasket is a multi layer right? It'll seal well as long as it's clean and flat when it compresses. .
Again the key is that the surface is flat, not warped or dirty. The MLS gasket is a multi layer right? It'll seal well as long as it's clean and flat when it compresses. .

Reply
0
0
09-14-2014, 12:26 AM
#13
Right, I always thought "it had to shine".
If this is used primarily to remove the gasket, does one go back over with 200 grit and sequentially finer to help recover a close to mirror but planar surface?
Or is it a case of: too bad remove the motor and get it machined anyways.
If this is used primarily to remove the gasket, does one go back over with 200 grit and sequentially finer to help recover a close to mirror but planar surface?
Or is it a case of: too bad remove the motor and get it machined anyways.
Reply
0
0
 09-14-2014, 01:17 AM
#16
I'd imagine the head is easy enough to just take it to a machinist if removed. The block, however would likely not be as prone to warping as aluminum, however I just feel like sanding completely jeopardizes the mating surface.
I'm not an engine builder or machinist, but may have to change my head gasket soon....also in for answers
I'm not an engine builder or machinist, but may have to change my head gasket soon....also in for answers
Reply
0
0
09-14-2014, 01:34 PM
#17
Clearly, it is the engine block which always poses the problem, as it requires so much more work to get it out and ready for machining.
In my estimation, that leads me to conclude this thread was purely intended to serve as a guide for a shortcut method (i.e. non block removal) for head gasket cleanup in prep for a NON-MLS gaskets only.
.02
Reply
0
0
09-15-2014, 03:03 AM
#19
Elite Member

Join Date: Mar 2007
Location: Santa Clara, CA
Posts: 5,165
Total Cats: 855
I know only this much about engine building --><--, so take everything I say with a grain of salt, but...
When I pulled the head off my 99 motor, I just went at the block surface with a razor-blade scraper, nothing more elaborate than that. The stock MLS gasket didn't really leave much residue on the block. Sealed up just fine for 40K+ miles after that until I popped a coolant hose at the track and overheated it.
--Ian
Reply
0
0


