
How to fix mild pre-detonation on forged pistons.
 04-09-2012, 11:55 AM
#1
Senior Member
Thread Starter
iTrader: (1)
Join Date: Mar 2012
Location: Pensacola Fla.
Posts: 588
Total Cats: 203
How to fix mild pre-detonation on forged pistons.
The subject pistons are Wiseco pn 6595M85
+14 cc dish pistons w/ H.D wrist pins
03-07 Evo VIII
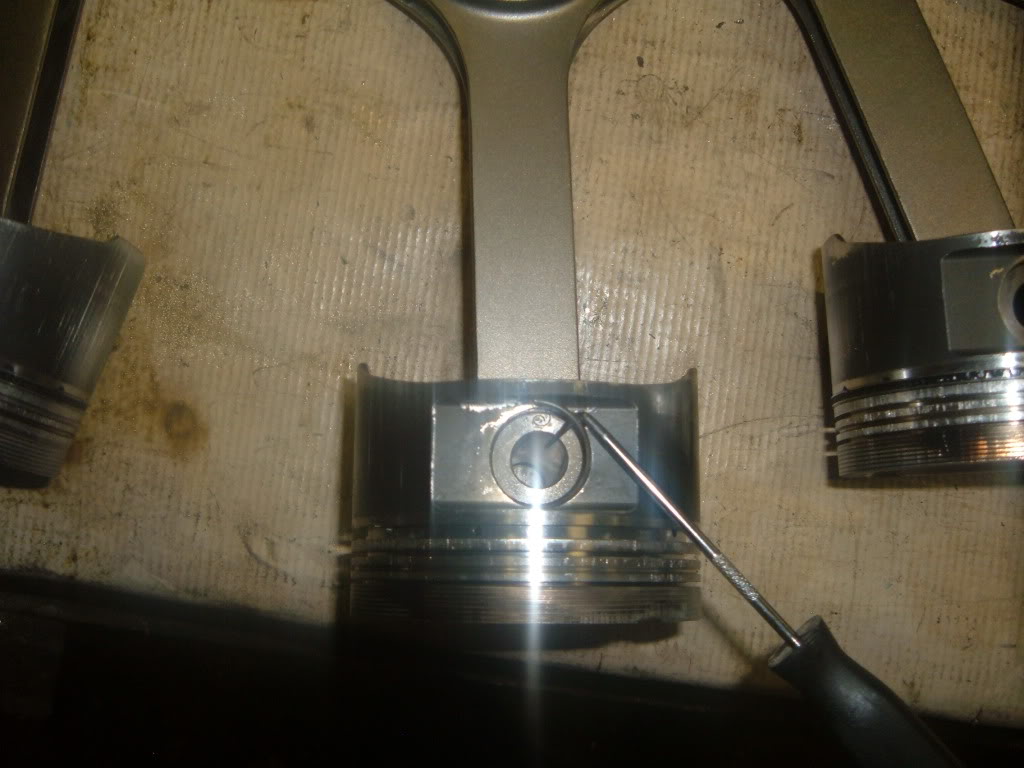
The pistons came into my shop with slight damage around the thin wall of the eyebrow on the outer edge.
They were hung on Eagle rods.
To me it looked like hot spotting and pre-det.

Notice the damage on the outer edge of the piston?

the first step is to remove the piston from the rod.
That is done by removing the C clips from the wrist pin bores.
Be careful not to bend or deform the clips, or you will have to order a new set form the piston manufacture.
Next is to mic the piston to make sure it is within spec.

Next using a small burr I ground away the damaged aluminum

After that I used a flapper wheel to smooth any rough spots and to remove the galling

I also removed the sharp edges (90*) that was from the machining of the piston when it was first made to help eliminate and more hot spots.
Next the pistons were glass beaded clean.

Now to maintain balance, the piston were weight matched within .2 grams

Next I checked the balance on the rods, starting with the small end.
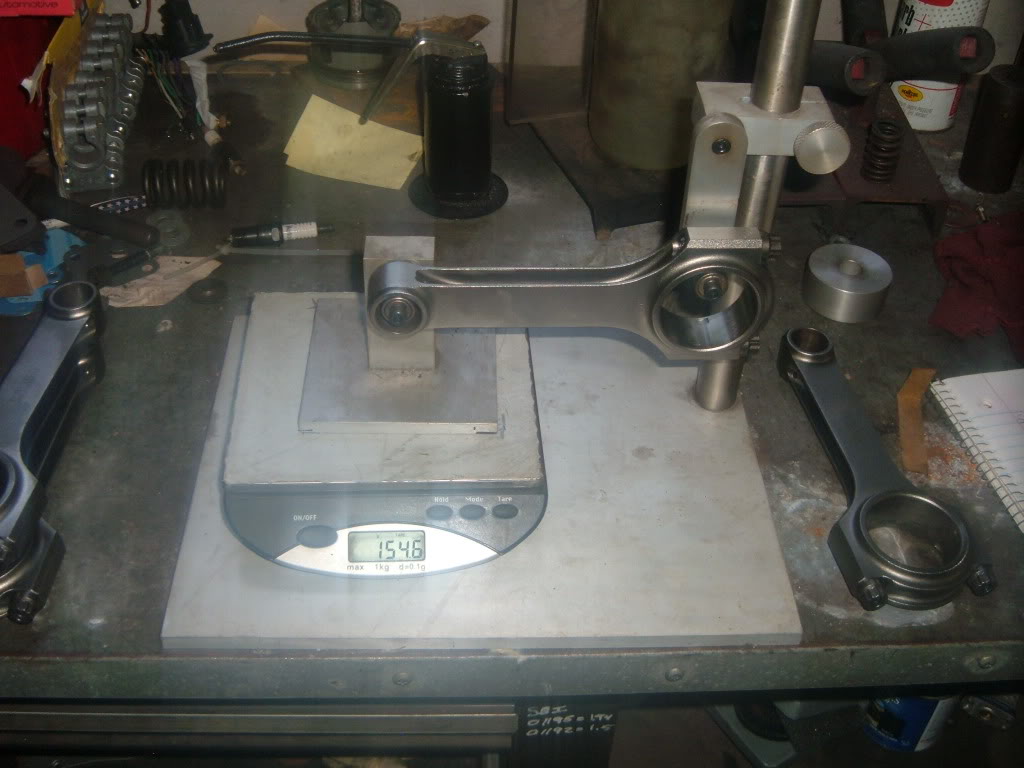
After all the small ends were matched.

I balanced the overall weight of the rod, also keeping the balance with in .2g .

Now it was time to hang the pistons on the rods.
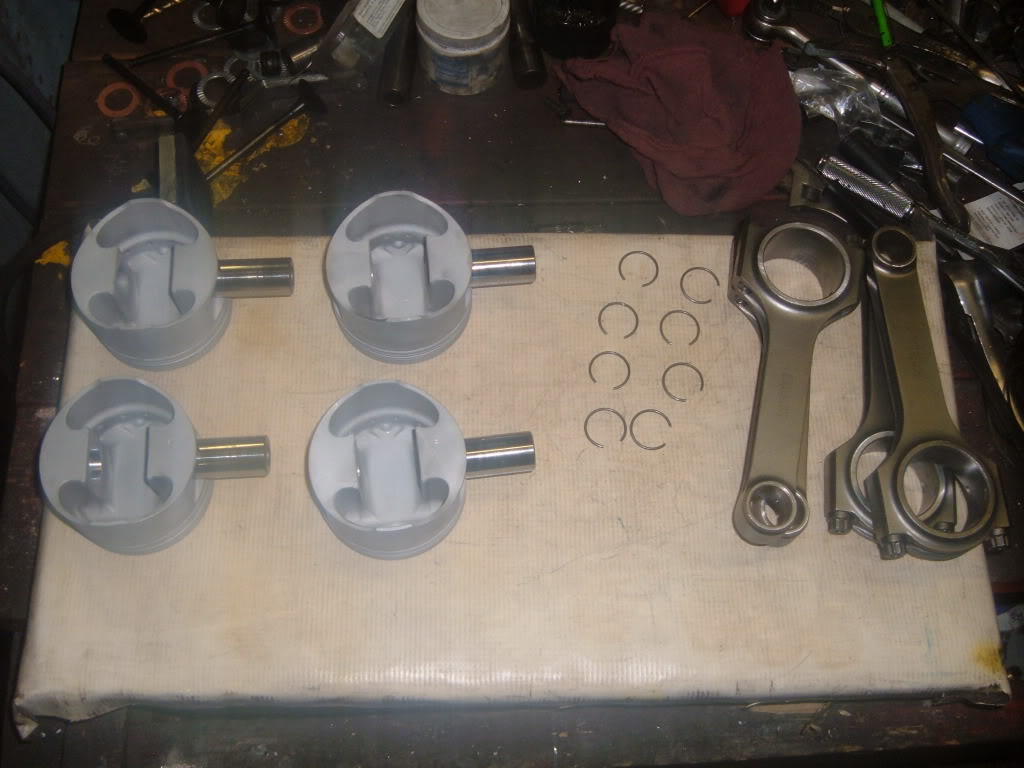
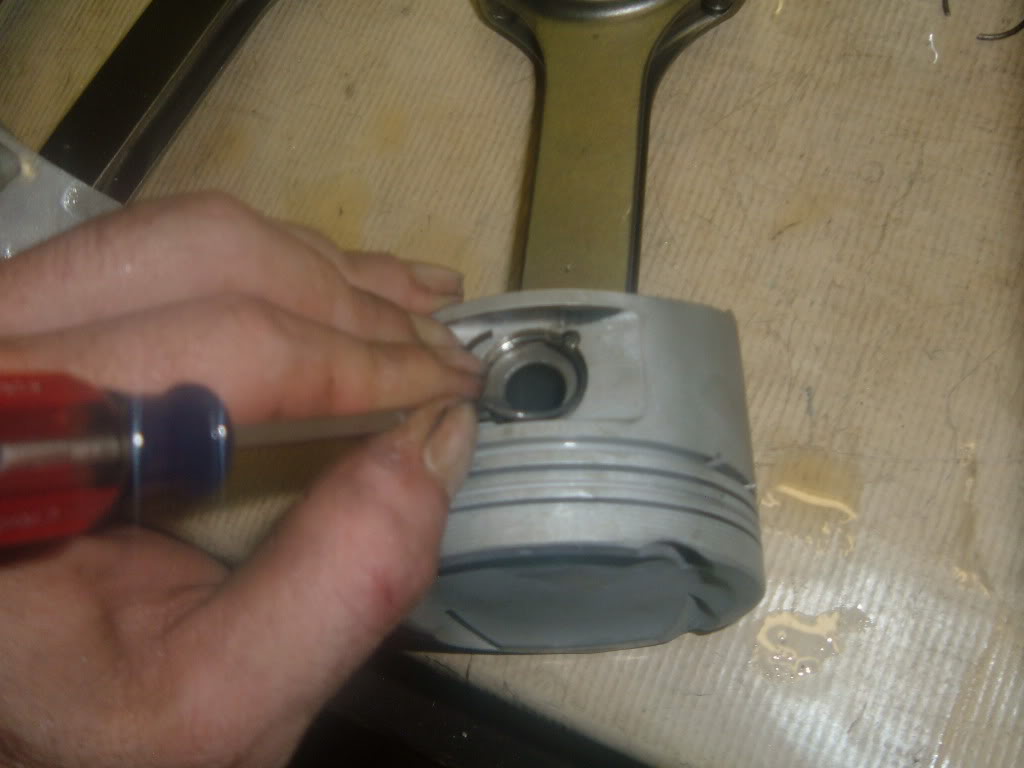
I start by installing one of the clips in each piston.

After that is done, I oil the wrist pin bores in the piston.

Also oiling the small end of the rod.

Then oiling the wrist pin
 .
.
Then sliding the wrist pin through the piston and rod, Making sure the piston faces the proper way on the rod.

The last step is to install the other wrist pin clip and making sure that all clips are seated in their grooves and the rod floats smoothly on the wrist pin.
The subject pistons are Wiseco pn 6595M85
+14 cc dish pistons w/ H.D wrist pins
03-07 Evo VIII
The pistons came into my shop with slight damage around the thin wall of the eyebrow on the outer edge.
They were hung on Eagle rods.
To me it looked like hot spotting and pre-det.
Notice the damage on the outer edge of the piston?
the first step is to remove the piston from the rod.
That is done by removing the C clips from the wrist pin bores.
Be careful not to bend or deform the clips, or you will have to order a new set form the piston manufacture.
Next is to mic the piston to make sure it is within spec.
Next using a small burr I ground away the damaged aluminum
After that I used a flapper wheel to smooth any rough spots and to remove the galling
I also removed the sharp edges (90*) that was from the machining of the piston when it was first made to help eliminate and more hot spots.
Next the pistons were glass beaded clean.
Now to maintain balance, the piston were weight matched within .2 grams
Next I checked the balance on the rods, starting with the small end.
After all the small ends were matched.
I balanced the overall weight of the rod, also keeping the balance with in .2g .
Now it was time to hang the pistons on the rods.
I start by installing one of the clips in each piston.
After that is done, I oil the wrist pin bores in the piston.
Also oiling the small end of the rod.
Then oiling the wrist pin
.Then sliding the wrist pin through the piston and rod, Making sure the piston faces the proper way on the rod.
The last step is to install the other wrist pin clip and making sure that all clips are seated in their grooves and the rod floats smoothly on the wrist pin.

Reply
 8
8

8
 04-09-2012, 12:06 PM
#3
Senior Member
Thread Starter
iTrader: (1)
Join Date: Mar 2012
Location: Pensacola Fla.
Posts: 588
Total Cats: 203
As long as you get any and all loose metal and grit it will be fine.
Reply
0
0

 04-09-2012, 05:11 PM
#7
Senior Member
Thread Starter
iTrader: (1)
Join Date: Mar 2012
Location: Pensacola Fla.
Posts: 588
Total Cats: 203
Niklas, Yes I would agree a bit of dressing on all the sharp edges would be nice to do, but it looks like some sort of coating on the top of the piston, with this I would contact the piston manufacture and see what they have to say about removing the coating.
Reply
0
0
04-09-2012, 05:21 PM
#8
Cpt. Slow

iTrader: (25)
Join Date: Oct 2005
Location: Oregon City, OR
Posts: 14,179
Total Cats: 1,129
Did you look closely at NiklasFalk's picture? Look again. And again. And again.
That's what your pictures need to look like. Otherwise, another quality post, thanks again for this stuff.
That's what your pictures need to look like. Otherwise, another quality post, thanks again for this stuff.
Reply
0
0
 04-09-2012, 06:25 PM
#10
Senior Member
Thread Starter
iTrader: (1)
Join Date: Mar 2012
Location: Pensacola Fla.
Posts: 588
Total Cats: 203
Miata2fast.... Depending on the machinist doing the balancing, you will be told all sorts of places.
Some say shallow drill the underside of the crown, personally, I want as much crown as I can get.
I tend to polish the flashing and trash off first, or bevel the sharp edges around the inside ot the wrist pin bosses.
If you look up a few pics, you will see the jig I use. You should be able to copy it.
Reply
0
0
04-09-2012, 06:32 PM
#11
Are those bearings the rod ends are resting on? Could I not just have a knife edged rest for the rod ends?
How about removing just a bit of material from the skirt of the piston to even up the weight?
I had to enlarge the valve pockets slightly, so I know I will need to match the piston weight before I put it all back together. I plan on doing this myself, so any advice is appreciated.
How about removing just a bit of material from the skirt of the piston to even up the weight?
I had to enlarge the valve pockets slightly, so I know I will need to match the piston weight before I put it all back together. I plan on doing this myself, so any advice is appreciated.
Reply
0
0
04-09-2012, 07:25 PM
#13
Senior Member
Thread Starter
iTrader: (1)
Join Date: Mar 2012
Location: Pensacola Fla.
Posts: 588
Total Cats: 203
Are those bearings the rod ends are resting on? Could I not just have a knife edged rest for the rod ends?
How about removing just a bit of material from the skirt of the piston to even up the weight?
I had to enlarge the valve pockets slightly, so I know I will need to match the piston weight before I put it all back together. I plan on doing this myself, so any advice is appreciated.
How about removing just a bit of material from the skirt of the piston to even up the weight?
I had to enlarge the valve pockets slightly, so I know I will need to match the piston weight before I put it all back together. I plan on doing this myself, so any advice is appreciated.
You can remove any flashing from the skirt, but go on a 45* from outside to in, but DO NOT knife edge it. Just sit and look at the piston and you will find flashing and trash to remove. most of the time with a decent set of pistions, you will remove about .75g at the most, unless you get one that made it in the wrong box, I have had sets before, have 1 piston be 2g or 3g off
Well, I am tryin to fit in around here.....
Reply
0
0
04-09-2012, 07:48 PM
#15
Senior Member
Thread Starter
iTrader: (1)
Join Date: Mar 2012
Location: Pensacola Fla.
Posts: 588
Total Cats: 203
Curly, You are correct, I do not own a Miata, I stated that in my intro thread.
I came here for some info for a build that a customer, and a board member here is doing.
The oil pump thread, I am keeping an eye on, I hope to dig thu a few engine build threads, and see what pitfalls and little tips I can find.
I came here for some info for a build that a customer, and a board member here is doing.
The oil pump thread, I am keeping an eye on, I hope to dig thu a few engine build threads, and see what pitfalls and little tips I can find.
Reply
0
0
04-09-2012, 07:54 PM
#17
Elite Member
iTrader: (2)

Join Date: Jan 2007
Location: Los Angeles, CA
Posts: 8,682
Total Cats: 130
BogusSVO, how much is the average cost for the job you posted?
Any drawbacks to removing the sharp edges other than slightly lowered compression? Why do manufacturers have sharp edges on their pistons anyways?
Any drawbacks to removing the sharp edges other than slightly lowered compression? Why do manufacturers have sharp edges on their pistons anyways?
Reply
0
0
04-10-2012, 03:23 AM
#18
It' cheaper to make them 80% complete and some customers just throw things together and place the sticker on the front fender (i.e. don't care).
The next time I'll use custom JE pistons instead, 2-3 times the price is nothing compared to the hassle of not getting what you want.
The next time I'll use custom JE pistons instead, 2-3 times the price is nothing compared to the hassle of not getting what you want.
Reply
0
0
04-10-2012, 03:38 AM
#19
Cpt. Slow
iTrader: (25)
Join Date: Oct 2005
Location: Oregon City, OR
Posts: 14,179
Total Cats: 1,129
Didn't mean to sound condescending BTW, merely stating how impressive your posts to prop rating, along with the fact that you don't even have a miata. Proof that we're very accepting of anyone that has something to bring to the table.
Reply
0
0


