K-swap How-to: A by-the-book K24A2 NB2 swap build thread

 05-01-2016, 11:28 PM
#22
Former Vendor

Thread Starter
iTrader: (31)

Join Date: Nov 2006
Location: Sunnyvale, CA
Posts: 15,442
Total Cats: 2,099
This is very true. There is so much bad information on engine swap weights because accessories can weigh 80+lb and people don't specify what is on the engines when they them Andrew, I have an 1100lb hanging scale I can lend you if you want something easy to weigh with. I think engines weights for swaps should get compared without clutch/flywheel, exhaust, AC, or PS- But everything else.
Fully dressed VVT motor with the following items 468lbs:
- Fully dressed longblock including coils, starter, and alternator
- VCTS intake manifold, throttle body, OEM manifold brace
- OEM VVT header and downpipe
- OEM subframe (no control arms)
- OEM clutch+flywheel
- OEM engine wiring harness (complete to ECU plugs)
- OEM 6-speed
- OEM power steering pump
- K24A2 longblock with coils
- K24 starter motor
- K24 alternator
- KMiata front subframe
- KMiata K20 oil pump/pickup/pan
- KMiata adapter plate and flywheel
- ACT HDSS clutch
- OEM Honda engine harness
- KMiata adapter harness
- OEM 6-speed
- Skunk2 Ultra Street intake manifold
- Skunk2 70mm throttle body
- KMiata street header + crossover pipe
From all the weights I have read online I pieced together an estimate that the actual weight of a k24 is about 25lb less than a BP when its dressed the same. That is pretty impressive when you consider one engine is .6l larger displacement and makes about double the horsepower with stockish internals.

Last edited by Savington; 05-02-2016 at 09:10 PM.

Reply
 5
5

5
05-01-2016, 11:36 PM
#23
Former Vendor
Thread Starter
iTrader: (31)
Join Date: Nov 2006
Location: Sunnyvale, CA
Posts: 15,442
Total Cats: 2,099
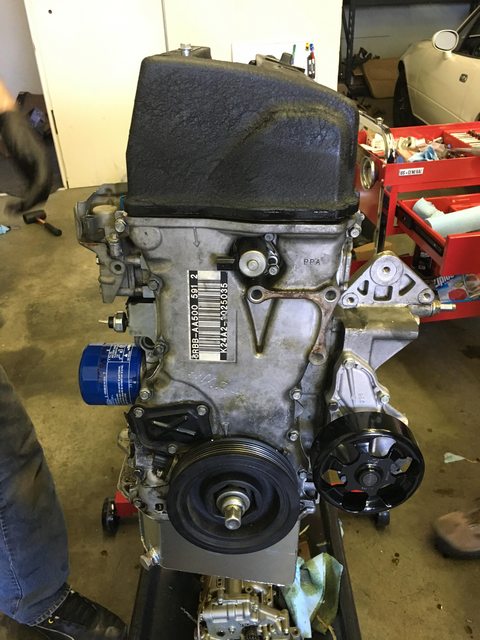
OK, first big content post. This post will cover all the engine prep required to go from an OEM TSX K24A2 to a prepped, ready-to-install longblock.
We are using a K24A2 longblock from a 2006 TSX for this swap. The K24A2s are definitely the most straightforward engines to use for the swap, and the 06-08s also make the most power in factory form. If you want max power, you can put together a K24/K20 hybrid setup, but the small gains aren't going to be worth it for 95% of customers. Keep in mind that some of the prep info here is going to be specific to the K24A2 block and head, so if you're using something else, pay attention.
To adapt the motor into a Miata, we need to remove the factory balance shafts and install the KMiata oil pan and oil pump setup. This will require removing the timing chain cover, valve cover, oil pan, and a few other items. One of the sole weak points in the entire K24 engine is the timing chain tensioner, so we'll be installing a brand new OEM tensioner on this 100k mile longblock. We will also install a 50deg VTC gear from an RSX Type-S, which substantially improves mid-range torque. Using the 06-08 longblock means we can safely use the 50deg gear without any limiters.
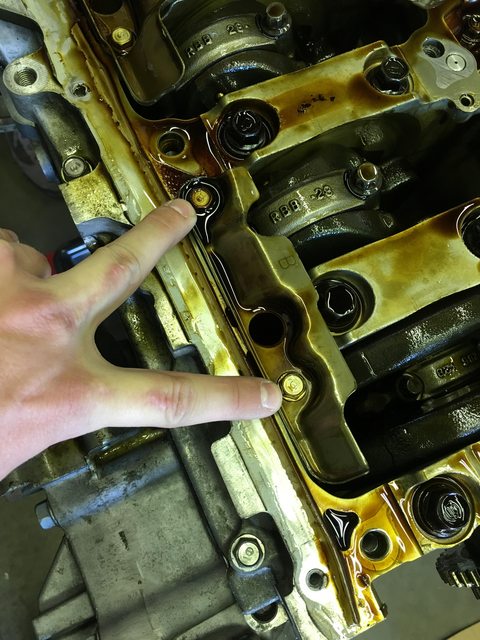
The first step is to pull the timing chain cover. Remove the valve cover, then remove all the 10mm bolts around the edges, as well as the VTC solenoid in the center of the cover and the two bolts next to it. This is RTV'd to the front of the engine, so pry lightly to break the seal. Remove the factory tensioner which sits on the lower left-hand side of the timing chain as well as the right-hand chain guide.
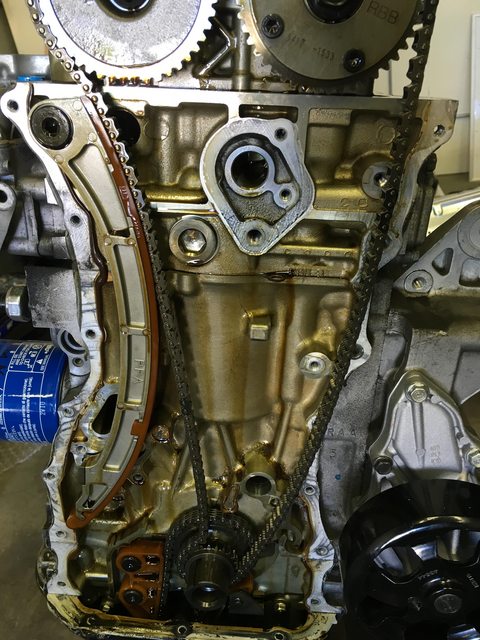
Also remove the upper chain guide. Once it�s gone, remove the OEM chain and set it aside. The tensioner is replaced, but the chain guides and chain will get reused.
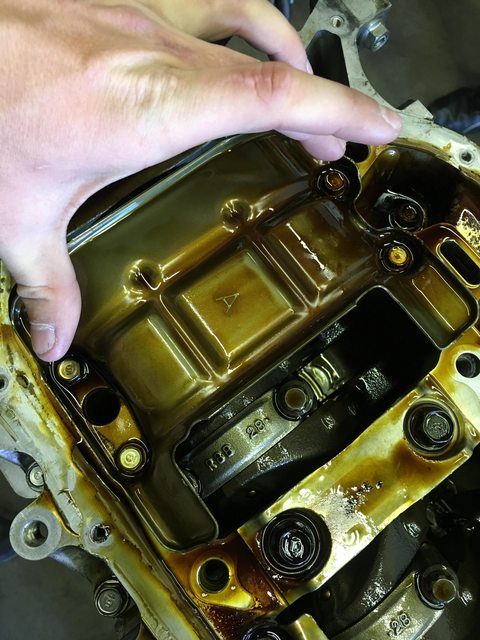
Flip the engine over and remove the factory oil pan. You�ll be left with the factory K24 oil pump, which incorporates the balance shafts. The steering rack needs to occupy this entire space, so the balance shafts (and the oil pump) have to go.
Here�s the chain which drives the oil pump. It sits behind the OEM chain and has its own tensioner. This tensioner will get reused, but the guide and chain are unique to the K20 pump. The tensioner and guide both need to be removed to get the oil pump off.
Unbolt the factory oil pump and remove it. The chain won�t come off first, so you�ll have to wiggle the gear off the crank at the same time. It�s easy to do, so don�t force anything.
You will also use a new K20 windage tray to match the new K20 pump. Remove the OEM windage trays:
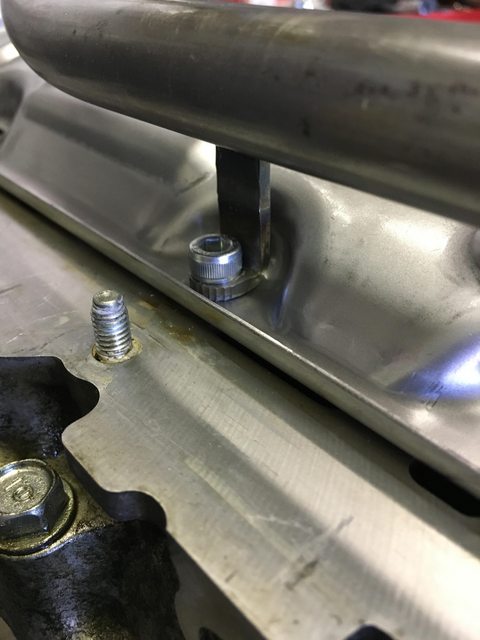
This small orifice needs to be removed and plugged in our block. Use a wood screw to give something to grab onto, then pull it out. It�s held in with an o-ring, so it shouldn�t take a huge amount of force.
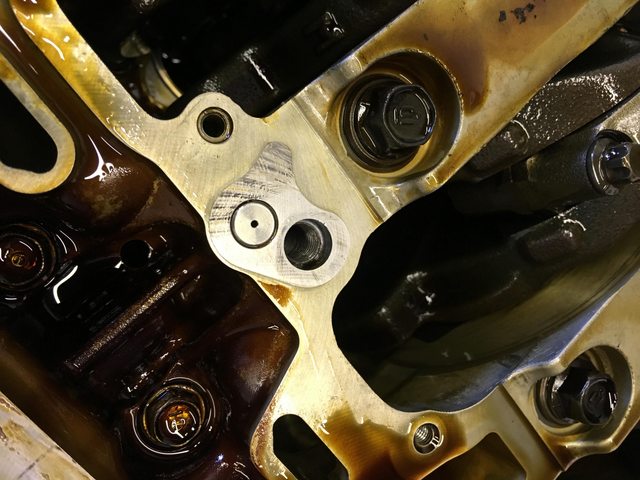
Once it�s out, the block will have threads. Simply install a bolt and a crush washer to plug it.
The K20A2 oil pump will be disassembled and reassembled with a new rear case half to adapt to the KMiata pickup tube and oil pan. The factory case half is on the left, with the KMiata part on the right. It�s a quick swap over, and the pump is ready to install. Notice that the factory doesn't use any sealant between the two halves - we didn't either.
Remember that the new chain, new pump, and front pulley all have to go on together.
In addition to the rear case half, KMiata modifies the K20 oil pump to clear the K24 block. You can see the notch in the oil pump body here:
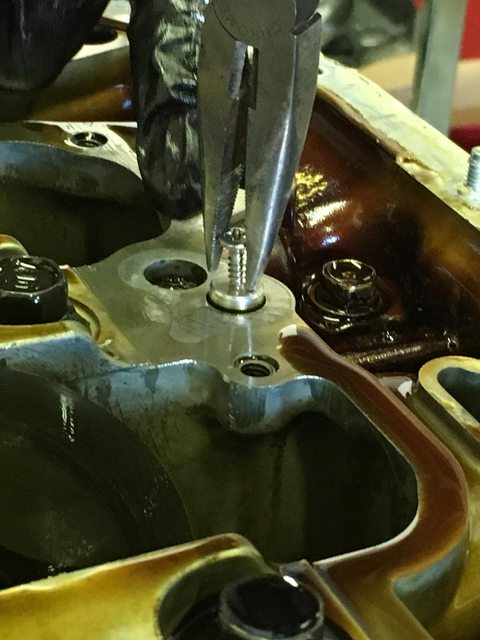
Install the K20 windage tray, but leave it loose. The pickup tube installs on one of the center mounting holes. Use the extra OEM bolt to fasten the pickup tube to the KMiata pump adapter with an o-ring to seal on the pump adapter.
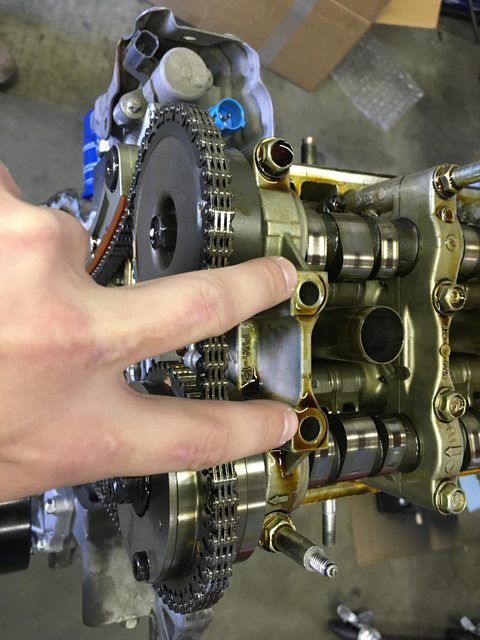
At this point, we have the K20 oil pump with KMiata adapter, new oil pickup tube, K20 windage tray, and the oil pump chain/tensioners all reassembled. We can now jump back to the front of the engine to set the timing and install the new tensioner.
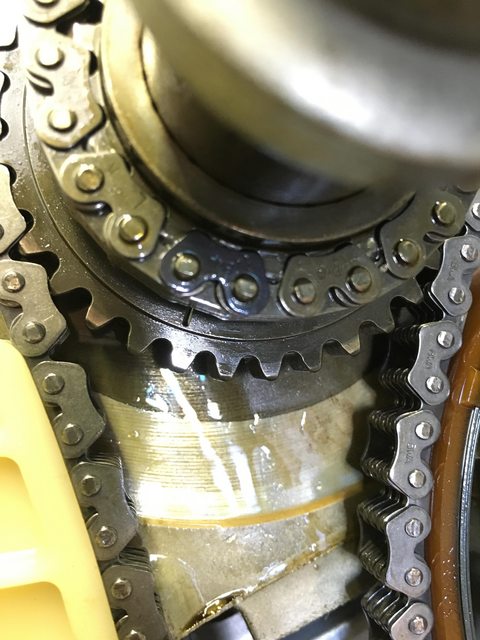
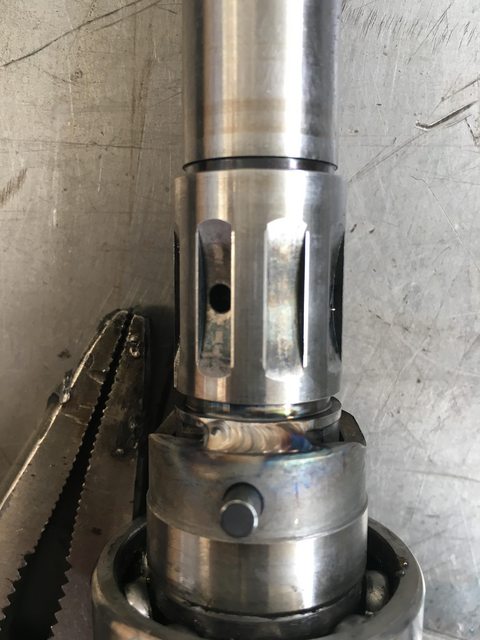
The K24 chain makes it extremely easy to set the timing from scratch. There�s a small dot on the cam pulleys and a small mark on the crank pulley. The timing chain has dark-colored links which correspond to the dots on the various pulleys.
Cam pulley dot lines up with the dark chain links:
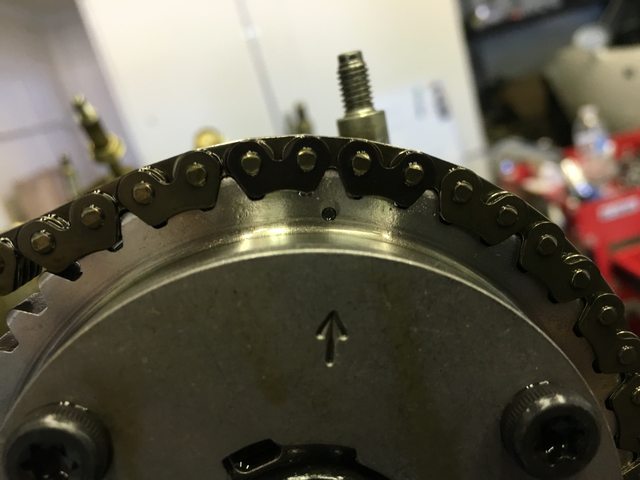
On the crank pulley, there�s only one dark link, and the mark lines up in the middle of that link.
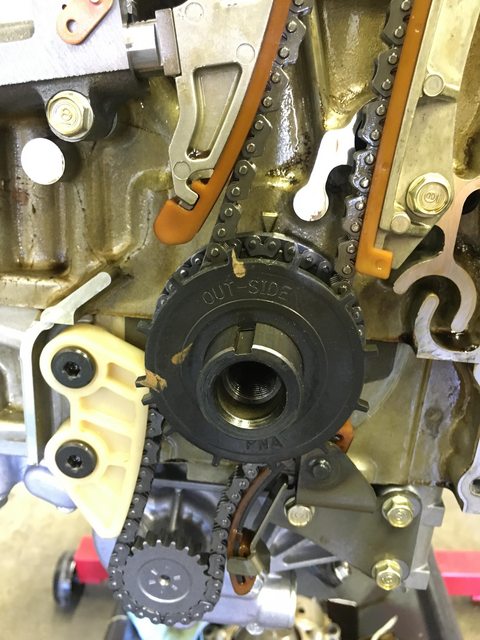
Install the chain guides and tensioners by pinning the tensioner back, then pull the pin and the tensioner will auto-tension the chain. It sets tension by hydraulics, but there�s also a ratchet system to maintain chain tension during engine startup.
Install the crank trigger wheel with �outside� facing the outside (if you didn�t figure that out on your own, you might be in over your head)
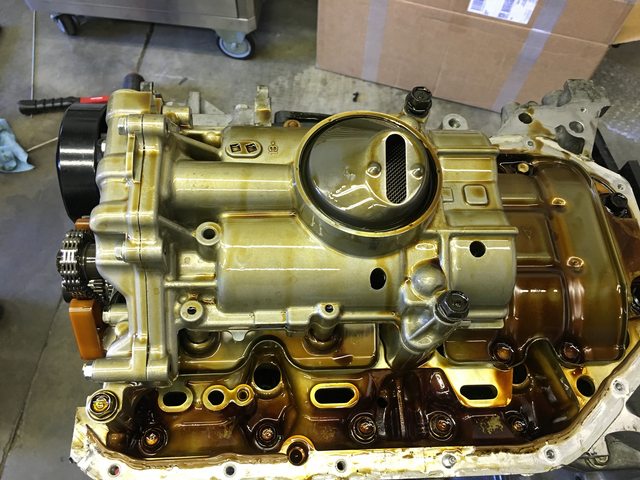
At this point, we can Hondabond the oil pan and timing chain cover into place, re-install the VTEC solenoid, and reinstall the valve cover. It�s not a bad idea to check valve lash while you�re reassembling and adjust if necessary. You should have a dressed K24 longblock at this point with a fresh valve lash job, fresh OEM tensioner, modified K20 pump with KMiata pickup tube, and KMiata oil pan.
We are using a K24A2 longblock from a 2006 TSX for this swap. The K24A2s are definitely the most straightforward engines to use for the swap, and the 06-08s also make the most power in factory form. If you want max power, you can put together a K24/K20 hybrid setup, but the small gains aren't going to be worth it for 95% of customers. Keep in mind that some of the prep info here is going to be specific to the K24A2 block and head, so if you're using something else, pay attention.
To adapt the motor into a Miata, we need to remove the factory balance shafts and install the KMiata oil pan and oil pump setup. This will require removing the timing chain cover, valve cover, oil pan, and a few other items. One of the sole weak points in the entire K24 engine is the timing chain tensioner, so we'll be installing a brand new OEM tensioner on this 100k mile longblock. We will also install a 50deg VTC gear from an RSX Type-S, which substantially improves mid-range torque. Using the 06-08 longblock means we can safely use the 50deg gear without any limiters.
The first step is to pull the timing chain cover. Remove the valve cover, then remove all the 10mm bolts around the edges, as well as the VTC solenoid in the center of the cover and the two bolts next to it. This is RTV'd to the front of the engine, so pry lightly to break the seal. Remove the factory tensioner which sits on the lower left-hand side of the timing chain as well as the right-hand chain guide.
Also remove the upper chain guide. Once it�s gone, remove the OEM chain and set it aside. The tensioner is replaced, but the chain guides and chain will get reused.
Flip the engine over and remove the factory oil pan. You�ll be left with the factory K24 oil pump, which incorporates the balance shafts. The steering rack needs to occupy this entire space, so the balance shafts (and the oil pump) have to go.
Here�s the chain which drives the oil pump. It sits behind the OEM chain and has its own tensioner. This tensioner will get reused, but the guide and chain are unique to the K20 pump. The tensioner and guide both need to be removed to get the oil pump off.
Unbolt the factory oil pump and remove it. The chain won�t come off first, so you�ll have to wiggle the gear off the crank at the same time. It�s easy to do, so don�t force anything.
You will also use a new K20 windage tray to match the new K20 pump. Remove the OEM windage trays:
This small orifice needs to be removed and plugged in our block. Use a wood screw to give something to grab onto, then pull it out. It�s held in with an o-ring, so it shouldn�t take a huge amount of force.
Once it�s out, the block will have threads. Simply install a bolt and a crush washer to plug it.
The K20A2 oil pump will be disassembled and reassembled with a new rear case half to adapt to the KMiata pickup tube and oil pan. The factory case half is on the left, with the KMiata part on the right. It�s a quick swap over, and the pump is ready to install. Notice that the factory doesn't use any sealant between the two halves - we didn't either.
Remember that the new chain, new pump, and front pulley all have to go on together.
In addition to the rear case half, KMiata modifies the K20 oil pump to clear the K24 block. You can see the notch in the oil pump body here:
Install the K20 windage tray, but leave it loose. The pickup tube installs on one of the center mounting holes. Use the extra OEM bolt to fasten the pickup tube to the KMiata pump adapter with an o-ring to seal on the pump adapter.
At this point, we have the K20 oil pump with KMiata adapter, new oil pickup tube, K20 windage tray, and the oil pump chain/tensioners all reassembled. We can now jump back to the front of the engine to set the timing and install the new tensioner.
The K24 chain makes it extremely easy to set the timing from scratch. There�s a small dot on the cam pulleys and a small mark on the crank pulley. The timing chain has dark-colored links which correspond to the dots on the various pulleys.
Cam pulley dot lines up with the dark chain links:
On the crank pulley, there�s only one dark link, and the mark lines up in the middle of that link.
Install the chain guides and tensioners by pinning the tensioner back, then pull the pin and the tensioner will auto-tension the chain. It sets tension by hydraulics, but there�s also a ratchet system to maintain chain tension during engine startup.
Install the crank trigger wheel with �outside� facing the outside (if you didn�t figure that out on your own, you might be in over your head
)At this point, we can Hondabond the oil pan and timing chain cover into place, re-install the VTEC solenoid, and reinstall the valve cover. It�s not a bad idea to check valve lash while you�re reassembling and adjust if necessary. You should have a dressed K24 longblock at this point with a fresh valve lash job, fresh OEM tensioner, modified K20 pump with KMiata pickup tube, and KMiata oil pan.
Reply
10
10
 05-02-2016, 12:04 AM
#25
Former Vendor
Thread Starter
iTrader: (31)
Join Date: Nov 2006
Location: Sunnyvale, CA
Posts: 15,442
Total Cats: 2,099
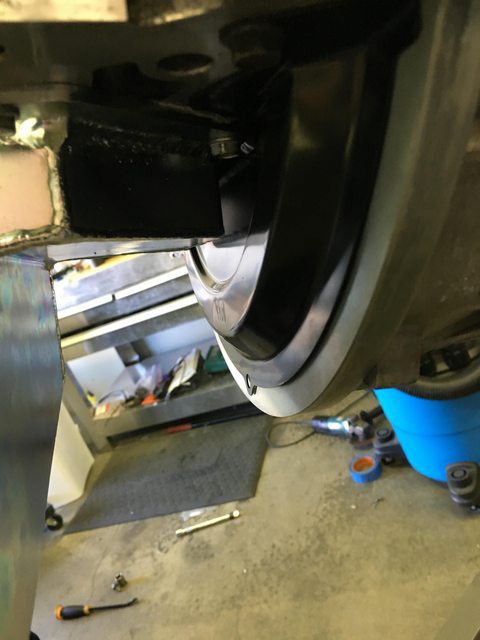
Quick pic of the welded pinion as well. Since you have to depower and shave all the hydraulic fittings off the rack to clear the oil pan, we took the time to properly depower the rack, remove the inner seal, grease the rack, and weld the pinion coupler.
Reply
2
2

 05-03-2016, 12:36 AM
#28
Former Vendor
Thread Starter
iTrader: (31)
Join Date: Nov 2006
Location: Sunnyvale, CA
Posts: 15,442
Total Cats: 2,099
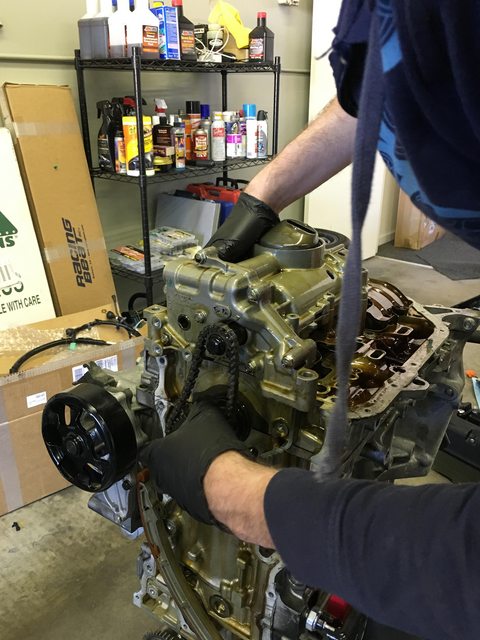
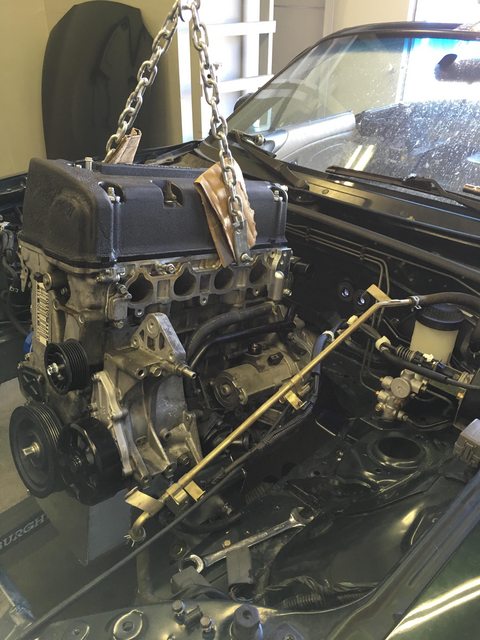
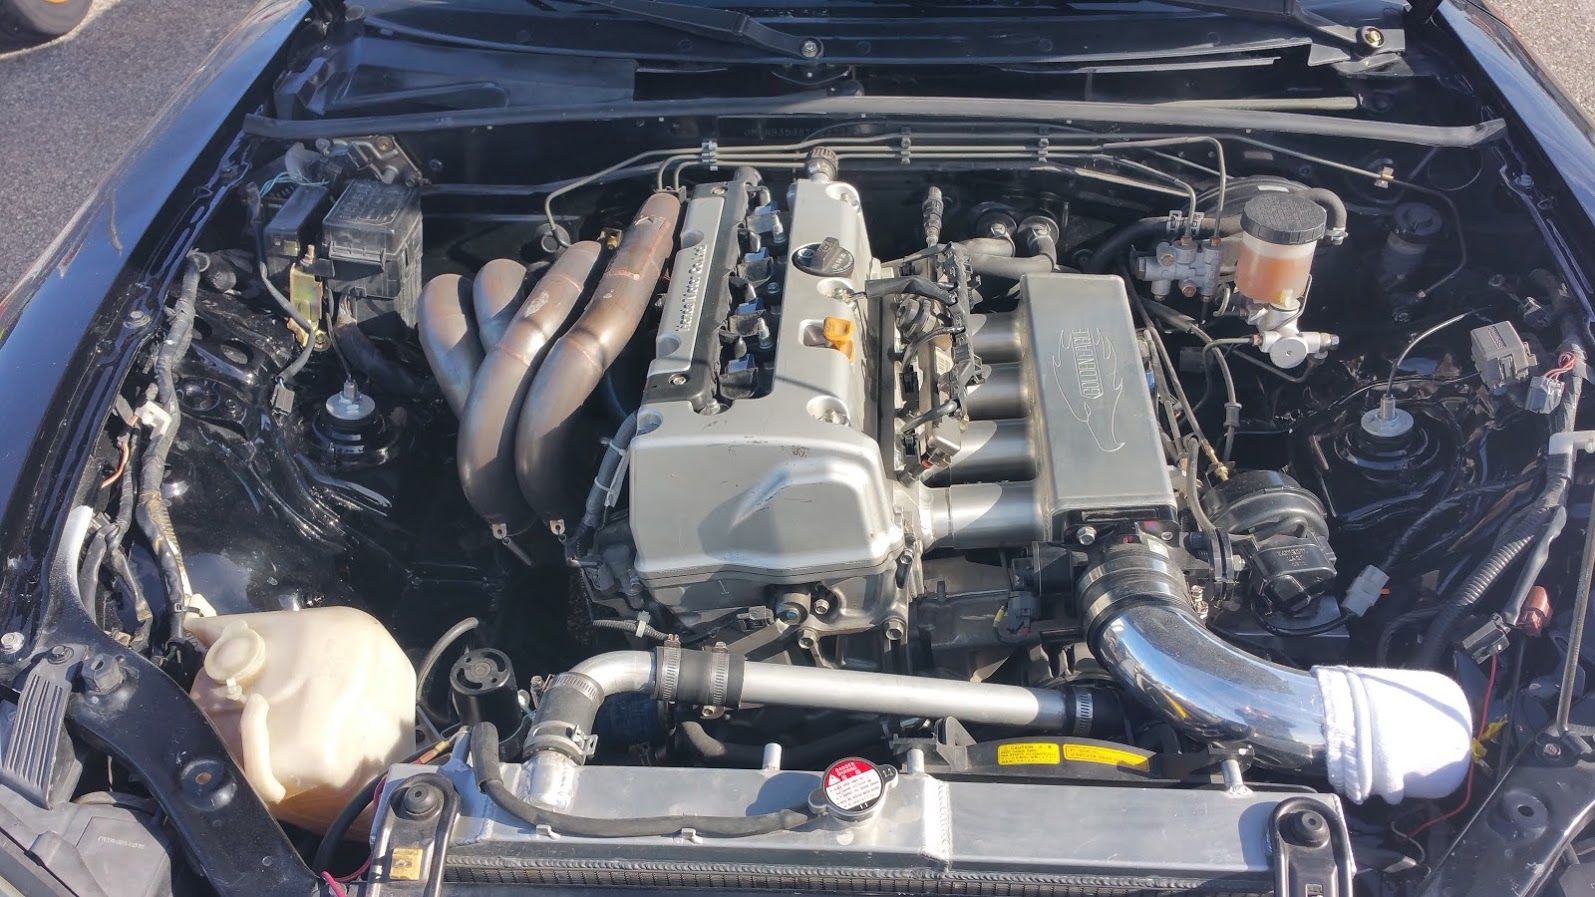
Onwards and downwards. We now have a dressed K24A2, prepped for installation. Time to get the rest of the swap parts installed and get the drivetrain installed.
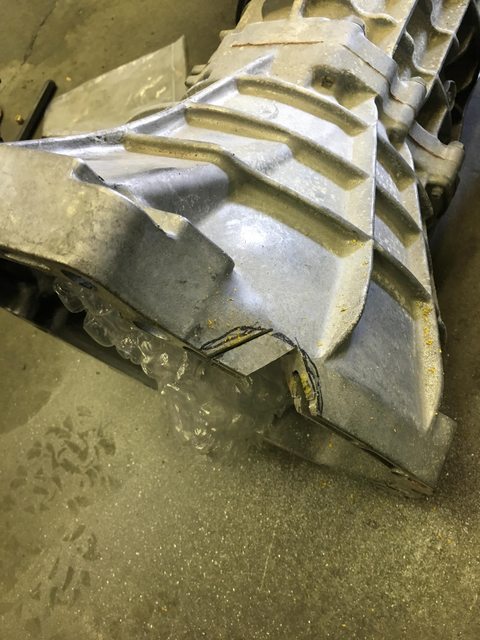
At this point, we can drop the motor and set it down (carefully) on the oil pan. The adapter plate gets bolted to the engine, then the KMiata flywheel gets bolted up, then the ACT clutch+disc. The 6-speed has to be notched to clear the TSX starter as shown:
You can also install the flywheel cover at this point.
There are a couple good plans of attack for actually getting the new engine and subframe into the car, but for this build, we�re trying to stay as relevant as possible to the average customer attempting this swap. So even though I have a really nice offset 2-post lift, we decided to slum it with jackstands and a hoist.
When going in from the top, it goes in just like a Miata engine, so we installed the subframe first.
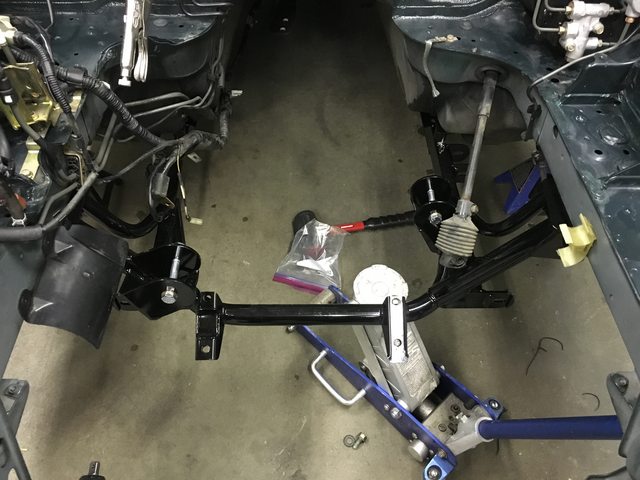
The engine goes in all as one unit � full longblock and trans together. Leave the engine mounts off for now.
Halfway in. We unbolted the factory brake booster hardline, since it�s not used and it interferes with the valve cover. The K24 is a tall motor, so getting it in between the firewall and the steering rack is a bit of a chore. Not significantly worse than a Miata, but if you aren�t careful, you�ll struggle pretty good with it.
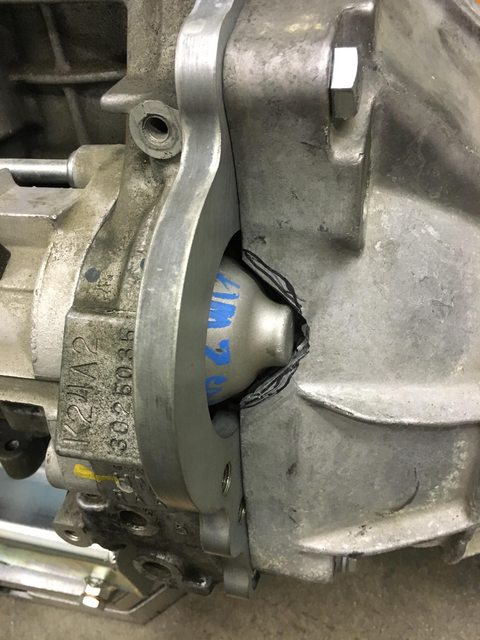
When installing engines in general, I try to line the shifter turret up with the hole in the chassis. That gives you a good reference for how far back the engine needs to sit. Once you have the shifter centered in the shifter hole on the chassis, and the steering rack is nestled into the oil pan, you can start thinking about motor mounts. The oil filter will have to come off to install the passenger side, and the starter motor makes installing the driver�s side a bit of a chore.
Once those are bolted up, though, you have a K24 in a Miata, which is sort of the point.
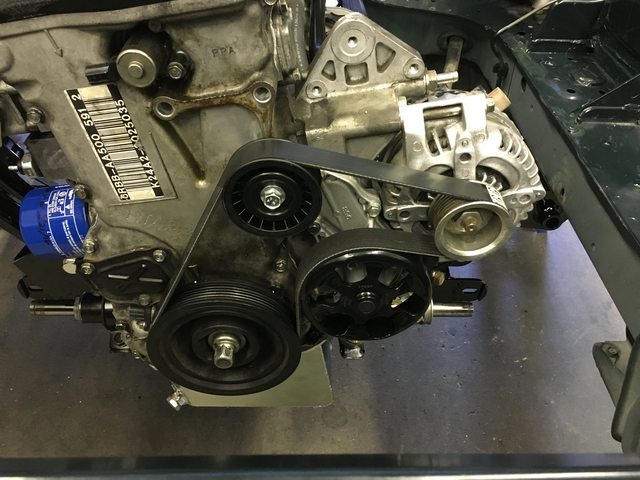
We decided to put the alternator on at this point along with the 4-pulley setup that KMiata makes. There�s no room for a belt tensioner underneath the throttle body, and there�s barely room for the alternator � it has to be shaved down on the top edge to clear the throttle body (some throttle bodies just don�t fit at all � stick to what works). If needed, you can shim the alternator out with washers later on.
With that, the engine is in the car. You can hook up the PPF, driveshaft, shifter, etc.
Next post will start to cover the wiring, intake manifold and header, fuel system, and other major systems.
At this point, we can drop the motor and set it down (carefully) on the oil pan. The adapter plate gets bolted to the engine, then the KMiata flywheel gets bolted up, then the ACT clutch+disc. The 6-speed has to be notched to clear the TSX starter as shown:
You can also install the flywheel cover at this point.
There are a couple good plans of attack for actually getting the new engine and subframe into the car, but for this build, we�re trying to stay as relevant as possible to the average customer attempting this swap. So even though I have a really nice offset 2-post lift, we decided to slum it with jackstands and a hoist.
When going in from the top, it goes in just like a Miata engine, so we installed the subframe first.
The engine goes in all as one unit � full longblock and trans together. Leave the engine mounts off for now.
Halfway in. We unbolted the factory brake booster hardline, since it�s not used and it interferes with the valve cover. The K24 is a tall motor, so getting it in between the firewall and the steering rack is a bit of a chore. Not significantly worse than a Miata, but if you aren�t careful, you�ll struggle pretty good with it.
When installing engines in general, I try to line the shifter turret up with the hole in the chassis. That gives you a good reference for how far back the engine needs to sit. Once you have the shifter centered in the shifter hole on the chassis, and the steering rack is nestled into the oil pan, you can start thinking about motor mounts. The oil filter will have to come off to install the passenger side, and the starter motor makes installing the driver�s side a bit of a chore.
Once those are bolted up, though, you have a K24 in a Miata, which is sort of the point.
We decided to put the alternator on at this point along with the 4-pulley setup that KMiata makes. There�s no room for a belt tensioner underneath the throttle body, and there�s barely room for the alternator � it has to be shaved down on the top edge to clear the throttle body (some throttle bodies just don�t fit at all � stick to what works). If needed, you can shim the alternator out with washers later on.
With that, the engine is in the car. You can hook up the PPF, driveshaft, shifter, etc.
Next post will start to cover the wiring, intake manifold and header, fuel system, and other major systems.
Reply
10
10
05-03-2016, 01:39 PM
#29
Supporting Vendor

Join Date: Sep 2012
Posts: 635
Total Cats: 322
Subscribed. Great documentation, Andrew.
__________________
KPower Industries
Home of the original KMiata Swap

K24 NC swap is coming in 2024! Learn more
info@kpower.industries
Follow us on Facebook and Instagram
KPower Industries
Home of the original KMiata Swap
K24 NC swap is coming in 2024! Learn more
info@kpower.industries
Follow us on Facebook and Instagram
Reply
0
0
 05-18-2016, 11:34 AM
#33
Former Vendor
Thread Starter
iTrader: (31)
Join Date: Nov 2006
Location: Sunnyvale, CA
Posts: 15,442
Total Cats: 2,099
David used this build to test out a new ECU/harness setup and we're just working out the kinks before fully documenting it. I should have another big update by the weekend. 
Reply
1
1
 05-25-2016, 12:11 PM
#35
Former Vendor
Thread Starter
iTrader: (31)
Join Date: Nov 2006
Location: Sunnyvale, CA
Posts: 15,442
Total Cats: 2,099
Took a short break to sort out some wiring. David is using this car to prototype the KTuner option mentioned on his website, and it took a little longer than expected to sort out, but everything is all working now. On with the show!
A few housekeeping items. In order to get the motor around the steering rack, you have to fully depower the rack and shave down the hydraulic fittings on the rack itself. While we were there, John at Inertialab gutted/greased the rack and my local pro welder threw a couple of beads around the pinion for a full depower.

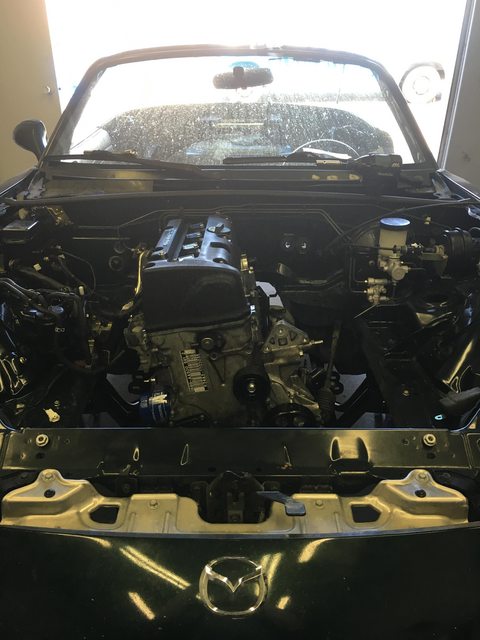
On to the intake side. We are using Skunk2’s new Ultra Street manifold. This manifold is set up for more pedestrian builds, but most importantly, it has a detatchable and reversible plenum which allows the throttle body to fire forward in the Miata engine bay. KMiata makes a throttle body adapter which kills several birds with one stone. When you flip the plenum, you also flip the throttle body upside down, so KTuner’s adapter bracket solves that. The K-series throttle body is fine, but the K-series TPS that’s attached to it is a tremendous piece of ****, so KMiata’s adapter allows you to run a 70mm B-series throttle body and TPS instead. It also includes a port for the K24 MAP sensor, and the KMiata throttle cable bracket attaches to it as well. The cable bracket is set up for an NB throttle cable.
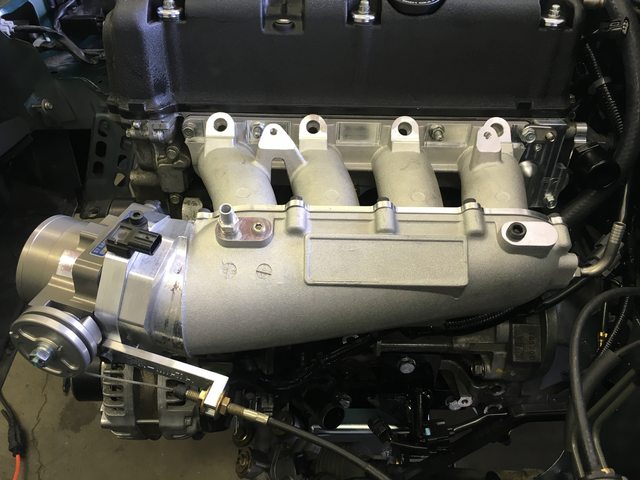
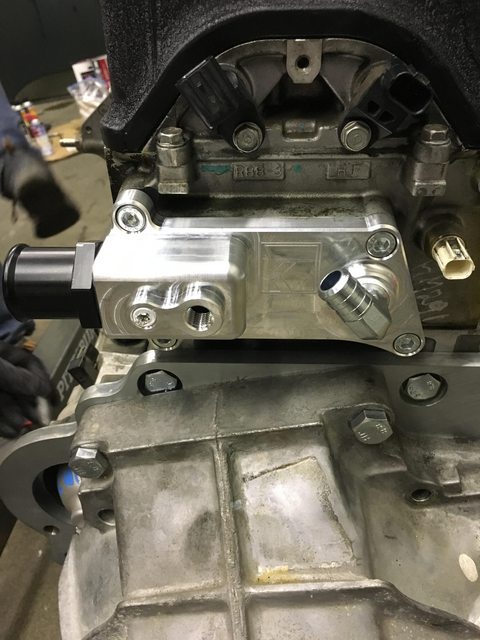
When using a K20-style manifold like the Skunk2 on a K24A2 head, there’s an open water port that needs to be routed to the thermostat housing. KMiata provided us with a piece from TracTuff which does that job.
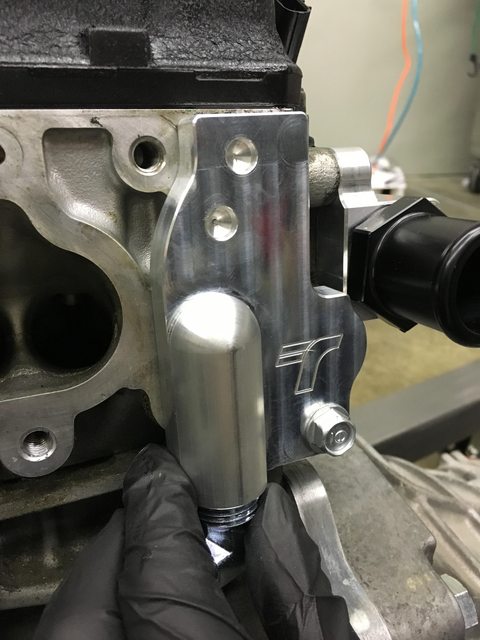
On the back of the head, KMiata makes a K24-specific rear water neck which provides the main water outlet from the head, an extra 1/8” NPT port, an M14x1.5 port for the factory Miata coolant temp sensor, and a port for the heater core feed.
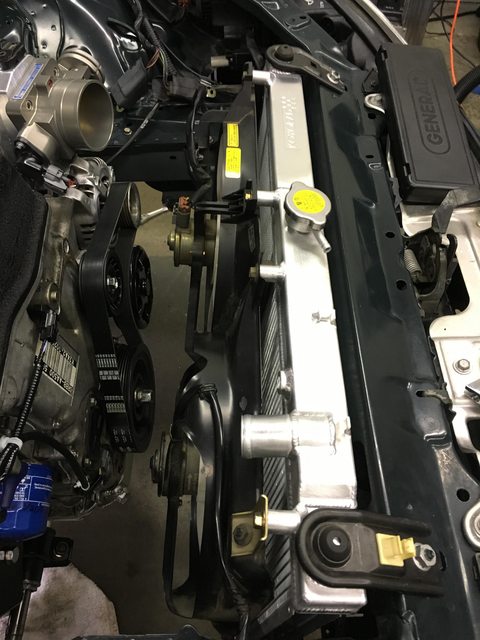
For the radiator, we’re using Koyo’s new dual-core Hyper V unit.
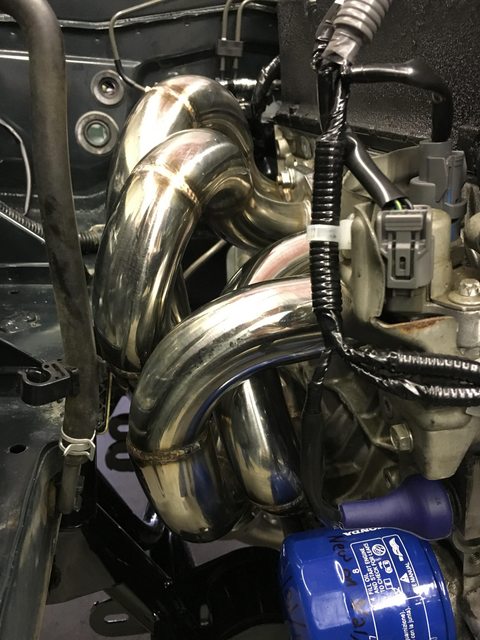
We are using KMiata’s Street header, another new product from David. It’s not quite the bag of snakes that the Race header is, but it’s also half the cost and makes great power.
The K-series is a returnless setup, same as the Miata, so we just rerouted the factory feed line and built a new nylon line to connect from the Miata feed line to the OEM K24A2 rail. I did slide a little heat shielding over the fuel line for safety, since the header is now on this side of the car.

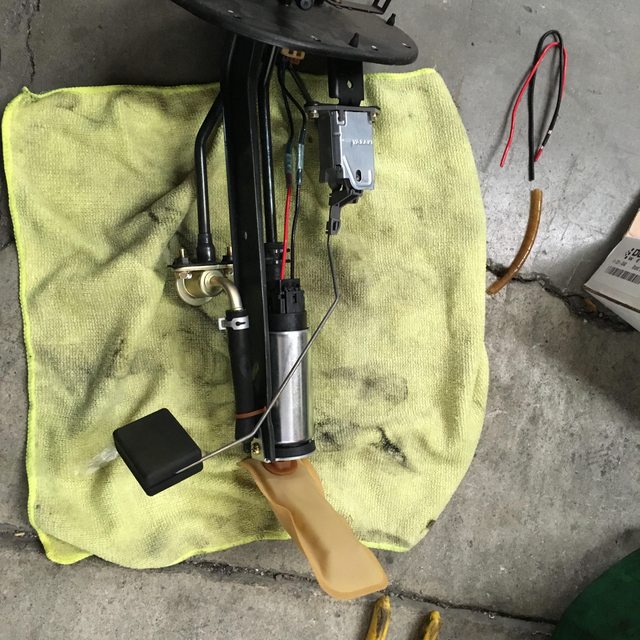
A DW100 replaces the factory fuel pump in the tank for a little extra capacity without overpowering the OEM 60psi FPR.
Next post will go over all the wiring.
On with the show!A few housekeeping items. In order to get the motor around the steering rack, you have to fully depower the rack and shave down the hydraulic fittings on the rack itself. While we were there, John at Inertialab gutted/greased the rack and my local pro welder threw a couple of beads around the pinion for a full depower.
On to the intake side. We are using Skunk2’s new Ultra Street manifold. This manifold is set up for more pedestrian builds, but most importantly, it has a detatchable and reversible plenum which allows the throttle body to fire forward in the Miata engine bay. KMiata makes a throttle body adapter which kills several birds with one stone. When you flip the plenum, you also flip the throttle body upside down, so KTuner’s adapter bracket solves that. The K-series throttle body is fine, but the K-series TPS that’s attached to it is a tremendous piece of ****, so KMiata’s adapter allows you to run a 70mm B-series throttle body and TPS instead. It also includes a port for the K24 MAP sensor, and the KMiata throttle cable bracket attaches to it as well. The cable bracket is set up for an NB throttle cable.
When using a K20-style manifold like the Skunk2 on a K24A2 head, there’s an open water port that needs to be routed to the thermostat housing. KMiata provided us with a piece from TracTuff which does that job.
On the back of the head, KMiata makes a K24-specific rear water neck which provides the main water outlet from the head, an extra 1/8” NPT port, an M14x1.5 port for the factory Miata coolant temp sensor, and a port for the heater core feed.
For the radiator, we’re using Koyo’s new dual-core Hyper V unit.
We are using KMiata’s Street header, another new product from David. It’s not quite the bag of snakes that the Race header is, but it’s also half the cost and makes great power.
The K-series is a returnless setup, same as the Miata, so we just rerouted the factory feed line and built a new nylon line to connect from the Miata feed line to the OEM K24A2 rail. I did slide a little heat shielding over the fuel line for safety, since the header is now on this side of the car.
A DW100 replaces the factory fuel pump in the tank for a little extra capacity without overpowering the OEM 60psi FPR.
Next post will go over all the wiring.
Last edited by Savington; 06-01-2016 at 01:10 PM.
Reply
2
2
05-25-2016, 01:05 PM
#36
Former Vendor
Thread Starter
iTrader: (31)
Join Date: Nov 2006
Location: Sunnyvale, CA
Posts: 15,442
Total Cats: 2,099
Let�s talk about wiring.
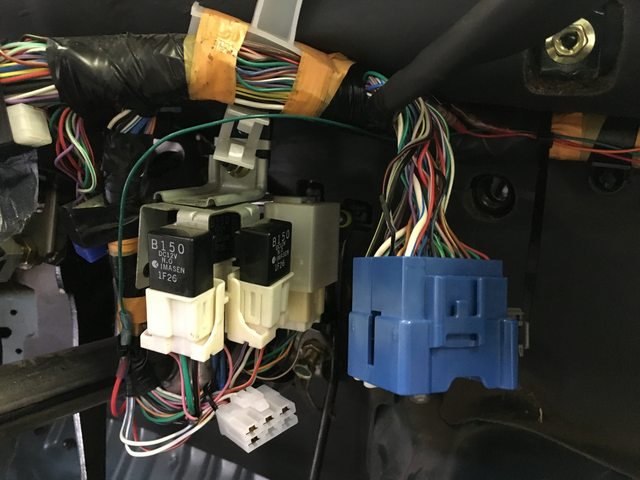
For the NB, we started by pulling the dashboard and all the HVAC equipment. We then removed the entire OEM engine harness, which unplugs at a big blue connector under the dash. This blue connector provides power and signals to the ECU, and then runs signals from the ECU to the dash and the rest of the car, so every single wire you need to splice into is available at that connector. (ignore the single wire spliced in at the fuel pump connector, we changed that later)
We�re using an OEM Honda ECU and a new OEM Honda engine harness. The OEM harness we�re using is from a Honda Element. The Element also came with a K24, so things like the crank sensor and knock sensor are wired correctly for a K24 application (the K20 is wired a little differently). The harness actually comes in two parts � one engine harness and one �charge harness�, which includes the plugs for the alternator, starter, and knock sensor. These harnesses are inexpensive enough that it wasn�t worth the hassle of trying to procure them from a junkyard in good, uncut condition � we just bought brand new parts from a Honda dealer.
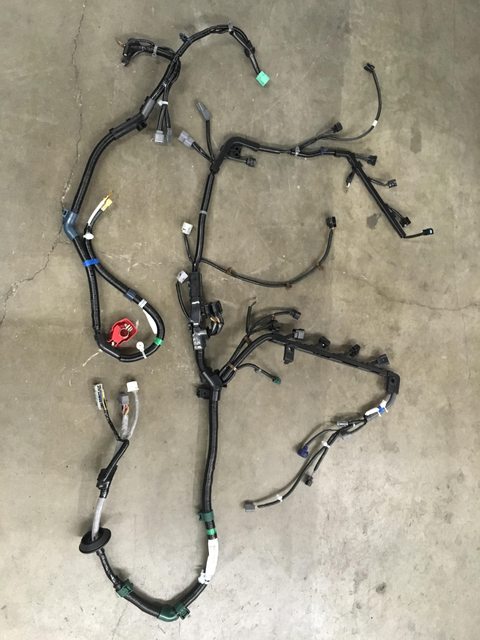
The harness has a few large plastic guards, which all need to come off in order to allow the harness to be packed into the Miata engine bay.
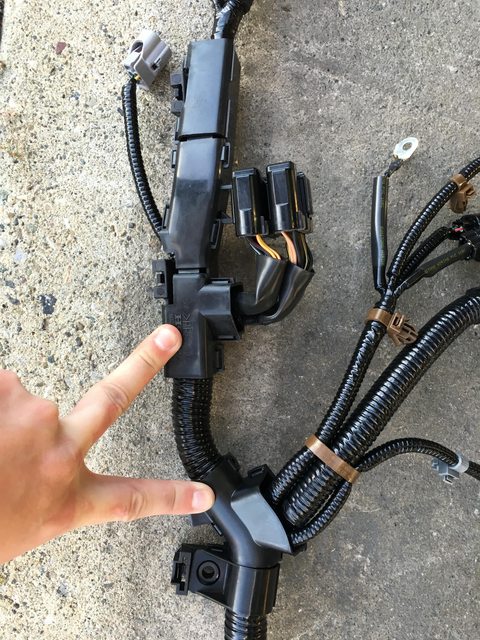

On the other side of the harness, we have the ECU connectors and a larger grey connector that normally attaches to the Element�s dash/body harness. The two ECU connectors go to the ECU, and the grey connector will plug into the KMiata adapter harness.

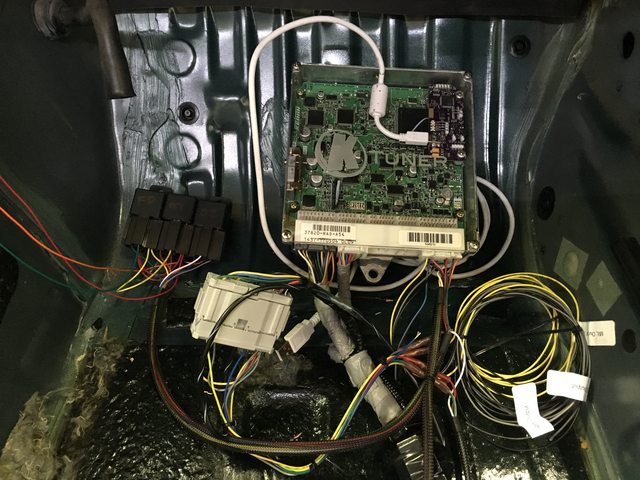
Here�s the ECU and patch harness setup. This is a fully tuneable KTuner ECU. The OEM Element harness plugs into connectors A and B, and the KMiata patch harness plugs into connector E and the grey dash/body connector. There are also a few extra wires for constant +12v, switched +12v, fuel pump, and fan control, as well as wires for the tachometer, CEL, and OEM coolant temp gauge. The KMiata patch harness includes a trio of relays for main relay function, oxygen sensor wideband function, and a fuel pump relay to trigger the OEM 1.6L Miata relay. For this NB application, we bypassed the KMiata fuel pump relay and ran the ECU�s fuel pump output directly to the OEM Miata relay. Everything will get mounted behind the glovebox and tied up/tucked behind the dash.
On the engine bay side, it�s an OEM harness, so everything plugs in really nicely. The only things worth mentioning are the hookups for the starter +12v and starter solenoid.
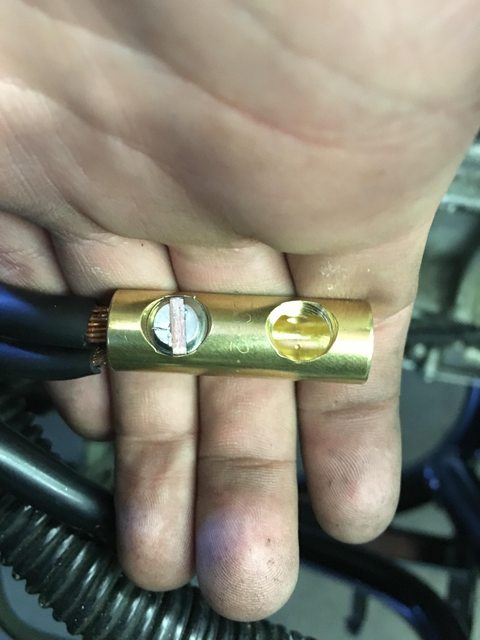
The OEM Honda charge harness includes the positive terminal for the battery, so we cut that off and crimped it to the OEM Miata harness. On the left are the two wires that normally fasten to the Miata starter, and on the right is the OEM Honda charge harness with the battery terminal cut off.
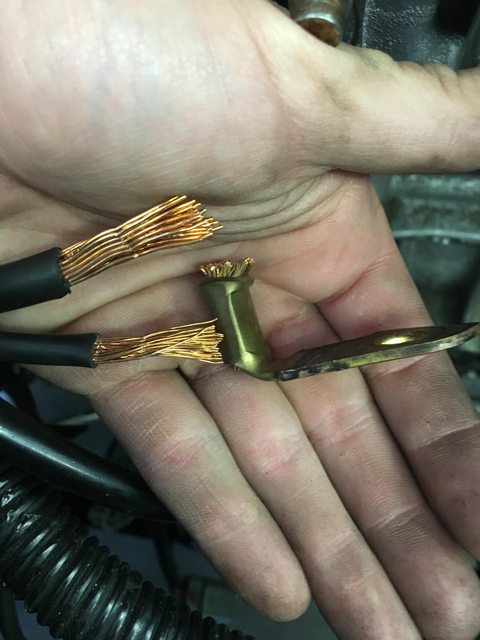
We used a big, screw-type connector and a huge piece of heat shrink over the top afterwards.
The OEM Honda starter solenoid wire is actually routed through the engine harness and pinned to the grey body/dash connector. KMiata�s patch harness then provides a flying lead which gets routed back into the engine bay and attached to the factory Miata starter solenoid wire.
With that, the engine starts and idles. We still have a bunch of small things to get done � we�re going to add a remote idle valve and we still need to build coolant and heater hoses, but the heavy lifting is done.
We�re also working on a whole ton of other chassis work � XIDAs, a poly/SAE863 bushing setup, 6ULs, Blackbird Fabworx GT3 rollbar, Elise seats, full stereo system, and the list goes on and on.
For the NB, we started by pulling the dashboard and all the HVAC equipment. We then removed the entire OEM engine harness, which unplugs at a big blue connector under the dash. This blue connector provides power and signals to the ECU, and then runs signals from the ECU to the dash and the rest of the car, so every single wire you need to splice into is available at that connector. (ignore the single wire spliced in at the fuel pump connector, we changed that later)
We�re using an OEM Honda ECU and a new OEM Honda engine harness. The OEM harness we�re using is from a Honda Element. The Element also came with a K24, so things like the crank sensor and knock sensor are wired correctly for a K24 application (the K20 is wired a little differently). The harness actually comes in two parts � one engine harness and one �charge harness�, which includes the plugs for the alternator, starter, and knock sensor. These harnesses are inexpensive enough that it wasn�t worth the hassle of trying to procure them from a junkyard in good, uncut condition � we just bought brand new parts from a Honda dealer.
The harness has a few large plastic guards, which all need to come off in order to allow the harness to be packed into the Miata engine bay.
On the other side of the harness, we have the ECU connectors and a larger grey connector that normally attaches to the Element�s dash/body harness. The two ECU connectors go to the ECU, and the grey connector will plug into the KMiata adapter harness.
Here�s the ECU and patch harness setup. This is a fully tuneable KTuner ECU. The OEM Element harness plugs into connectors A and B, and the KMiata patch harness plugs into connector E and the grey dash/body connector. There are also a few extra wires for constant +12v, switched +12v, fuel pump, and fan control, as well as wires for the tachometer, CEL, and OEM coolant temp gauge. The KMiata patch harness includes a trio of relays for main relay function, oxygen sensor wideband function, and a fuel pump relay to trigger the OEM 1.6L Miata relay. For this NB application, we bypassed the KMiata fuel pump relay and ran the ECU�s fuel pump output directly to the OEM Miata relay. Everything will get mounted behind the glovebox and tied up/tucked behind the dash.
On the engine bay side, it�s an OEM harness, so everything plugs in really nicely. The only things worth mentioning are the hookups for the starter +12v and starter solenoid.
The OEM Honda charge harness includes the positive terminal for the battery, so we cut that off and crimped it to the OEM Miata harness. On the left are the two wires that normally fasten to the Miata starter, and on the right is the OEM Honda charge harness with the battery terminal cut off.
We used a big, screw-type connector and a huge piece of heat shrink over the top afterwards.
The OEM Honda starter solenoid wire is actually routed through the engine harness and pinned to the grey body/dash connector. KMiata�s patch harness then provides a flying lead which gets routed back into the engine bay and attached to the factory Miata starter solenoid wire.
With that, the engine starts and idles. We still have a bunch of small things to get done � we�re going to add a remote idle valve and we still need to build coolant and heater hoses, but the heavy lifting is done.
We�re also working on a whole ton of other chassis work � XIDAs, a poly/SAE863 bushing setup, 6ULs, Blackbird Fabworx GT3 rollbar, Elise seats, full stereo system, and the list goes on and on.
Reply
4
4