Rebuilding a T25 Turbo
 12-04-2006, 10:56 AM
#1
Boost Czar


Thread Starter
iTrader: (62)
Join Date: May 2005
Location: Chantilly, VA
Posts: 79,490
Total Cats: 4,079
Rebuilding a T25
by: SamNavy
First things involve disassembly. Remove the compressor housing with c-clip pliers and remove the turbine housing's 4bolts and brackets.
Then unscrew the compressor blade nut (the thread pattern is backwards from normal). I used a (I think) 8mm 12pt socket on the compressor and a 13mm 6pt socket on the turbine... just be gentle. Once the nut is off, hold the blade sections in your hands and twist... the compressor wheel will loosen and pull it off. Then I clamped the CHRA in a vice and gently tapped on the shaft while jiggling the turbine wheel until it popped out. It might be a little tough, BUT THERE"S NOTHING AT THIS POINT TO PREVENT THE SHAFT FROM COMING OUT. The reason it's a little tough is because of a small clip on the shaft that just needs a little assistance in fitting through is hole.
Once the shaft is out, start taking things out of the inside... the rings, bearings, c-clips, etc...
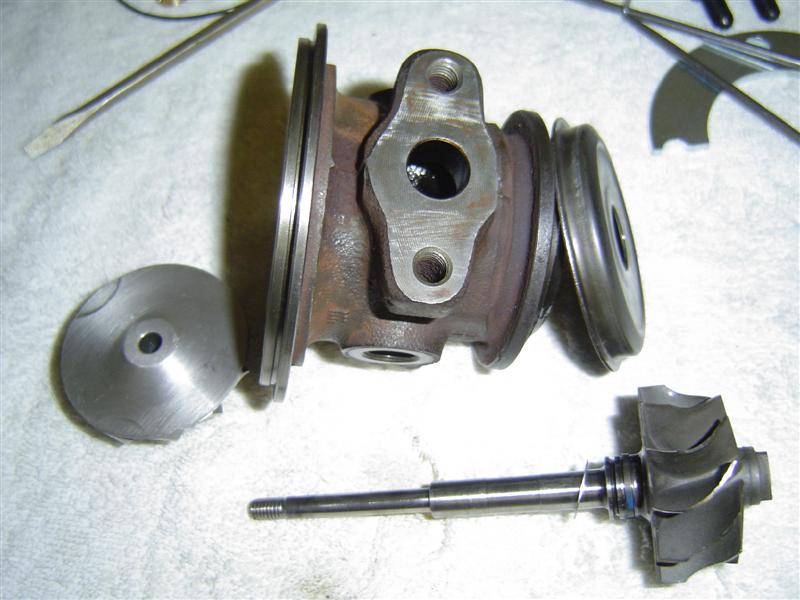
When it's gutted...
USING A DREMEL WIRE WHEEL ATTACHMENT, CLEAN THE ---- OUT OF EVERYTHING!!! I soaked the CHRA in engine degreaser and Simple Green for four hours before I started in with the Dremel. It looked really clean.

The first things that go in are the funky shaped wavy c-clips. There are two of them that sit in very skinny(obviously) races towards the center of the housing. IF YOU DO NOT OWN A SET OF DENTAL PICS, GO TO HARBOR FREIGHT OR SEARS RIGHT NOW! I put them in as shown in the first pic and then rotated them with the Dental Pics until they slipped in. One goes in each end of the CHRA. This is real easy, just a little patience with my big hands and the instruments in a small space.

Next the turbine side.
I used q-tips dipped in oil to lube everything.
Lube up one of the appropriate-sized gold bearings and slide it in.
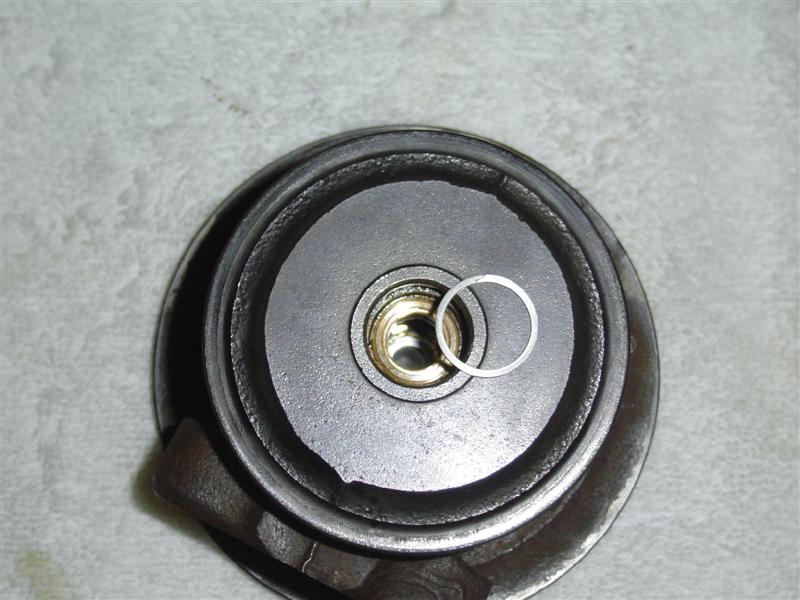
Next up is the aforementioned only REAL PAIN about the whole thing. I could not get this damn silver retaining ring in the first pic to click into position. It was to stiff to bend which you need it to for it to go in. So, I pried it apart a little and kind of "threaded" it down into place. Once it's in, it's compressed by it's track and the fact that it's bent a little is negated. Guess what, the turbine side is done now.
1. Funky wavy clip
2. Gold bearing
3. Funky retaining clip
Now onto the compressor side.
There are four pieces in the first pic and they go in next.
The fourth piece you may not see right away is the small clip on the spaceship looking thingy. Also, the smoother side (not the side with all the channels in it) of the C-shaped plate with the three holes in it goes to the outside. The channels are underneath for oil to flow through.
Once the small clip is on the spaceship, slide it over the C-shaped piece and ratched down with an appropriate sized Torx bit. (I bought a bitchin' security bit set at HF the other day, see pic). I used a good deal of force on those bits.
Once those pieces are in place and tightened, then it's just the Seal, Backing plate, and C-clip. You can see in the last pic the seal is already seated. It takes some light tapping and jiggling to get the backing plate to seat properly. DON'T FORCE IT... just keep jiggling and it'll go all the way down.

Now it's time to actually put the shaft through:gay:
There are two races on the shaft next to the turbine blades. The writeup linked above complained that his turbo when taken apart didn't have anything in the second race except baked oil. None of the 4 turbos I took apart had anything in that second race. In the first pic, you can see I've already inserted the retaining clip in the race closest to the blades. There's also a washer on there. Don't forget the turbine backing plate.
Lube the shaft up with some oil so it goes in easier, and then just put it through... maybe a little jiggleing and wiggling, but it will go. Once through, slide on the compressor wheel. Then tighten down the nut. I used as much force as I could with a 1/4" drive socket... I'm sure there's a torque setting, but I'm sure it's not going anywhere.
Attach the Turbine and Compressor housings (clocked to your application).
NOTE: The included larger C-clip in the rebuild kit is supposed to hold the compressor housing on was too small and I had to reuse the original.
I also had the stock water feed lines that came with one of my turbos that I will definitely be using. I've still got to bend them a little more to get them pointed the direction I want... but all looks good.
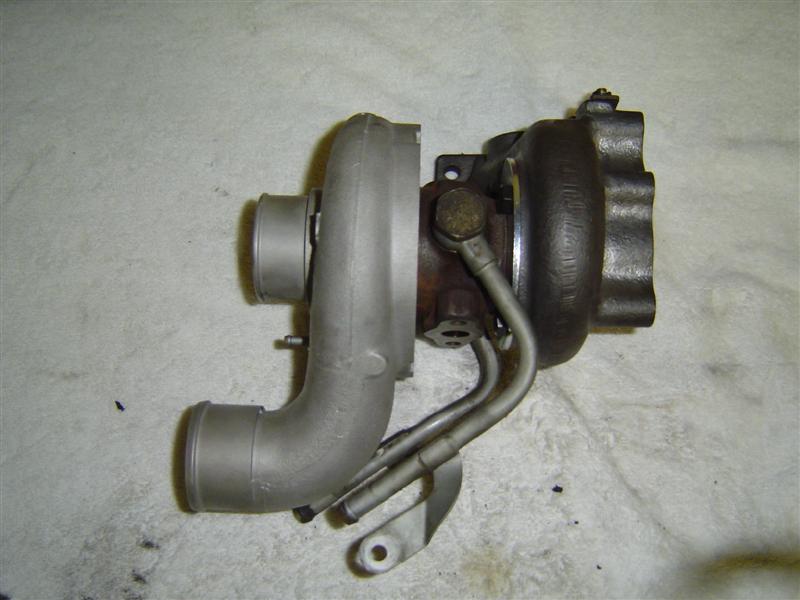
Tips:
Spend some quality time Dremeling.
Blow off everything with compressed air.
Everything that goes inside the turbo and all the inside surfaces get Q-tipped with oil... especially the seals.
Have a WELL LIT work area.
DON'T FORCE ANYTHING... IT WILL ALL FIT!
by: SamNavy
First things involve disassembly. Remove the compressor housing with c-clip pliers and remove the turbine housing's 4bolts and brackets.
Then unscrew the compressor blade nut (the thread pattern is backwards from normal). I used a (I think) 8mm 12pt socket on the compressor and a 13mm 6pt socket on the turbine... just be gentle. Once the nut is off, hold the blade sections in your hands and twist... the compressor wheel will loosen and pull it off. Then I clamped the CHRA in a vice and gently tapped on the shaft while jiggling the turbine wheel until it popped out. It might be a little tough, BUT THERE"S NOTHING AT THIS POINT TO PREVENT THE SHAFT FROM COMING OUT. The reason it's a little tough is because of a small clip on the shaft that just needs a little assistance in fitting through is hole.
Once the shaft is out, start taking things out of the inside... the rings, bearings, c-clips, etc...
When it's gutted...
USING A DREMEL WIRE WHEEL ATTACHMENT, CLEAN THE ---- OUT OF EVERYTHING!!! I soaked the CHRA in engine degreaser and Simple Green for four hours before I started in with the Dremel. It looked really clean.
The first things that go in are the funky shaped wavy c-clips. There are two of them that sit in very skinny(obviously) races towards the center of the housing. IF YOU DO NOT OWN A SET OF DENTAL PICS, GO TO HARBOR FREIGHT OR SEARS RIGHT NOW! I put them in as shown in the first pic and then rotated them with the Dental Pics until they slipped in. One goes in each end of the CHRA. This is real easy, just a little patience with my big hands and the instruments in a small space.
Next the turbine side.
I used q-tips dipped in oil to lube everything.
Lube up one of the appropriate-sized gold bearings and slide it in.
Next up is the aforementioned only REAL PAIN about the whole thing. I could not get this damn silver retaining ring in the first pic to click into position. It was to stiff to bend which you need it to for it to go in. So, I pried it apart a little and kind of "threaded" it down into place. Once it's in, it's compressed by it's track and the fact that it's bent a little is negated. Guess what, the turbine side is done now.
1. Funky wavy clip
2. Gold bearing
3. Funky retaining clip
Now onto the compressor side.
There are four pieces in the first pic and they go in next.
The fourth piece you may not see right away is the small clip on the spaceship looking thingy. Also, the smoother side (not the side with all the channels in it) of the C-shaped plate with the three holes in it goes to the outside. The channels are underneath for oil to flow through.
Once the small clip is on the spaceship, slide it over the C-shaped piece and ratched down with an appropriate sized Torx bit. (I bought a bitchin' security bit set at HF the other day, see pic). I used a good deal of force on those bits.
Once those pieces are in place and tightened, then it's just the Seal, Backing plate, and C-clip. You can see in the last pic the seal is already seated. It takes some light tapping and jiggling to get the backing plate to seat properly. DON'T FORCE IT... just keep jiggling and it'll go all the way down.
Now it's time to actually put the shaft through:gay:
There are two races on the shaft next to the turbine blades. The writeup linked above complained that his turbo when taken apart didn't have anything in the second race except baked oil. None of the 4 turbos I took apart had anything in that second race. In the first pic, you can see I've already inserted the retaining clip in the race closest to the blades. There's also a washer on there. Don't forget the turbine backing plate.
Lube the shaft up with some oil so it goes in easier, and then just put it through... maybe a little jiggleing and wiggling, but it will go. Once through, slide on the compressor wheel. Then tighten down the nut. I used as much force as I could with a 1/4" drive socket... I'm sure there's a torque setting, but I'm sure it's not going anywhere.
Attach the Turbine and Compressor housings (clocked to your application).
NOTE: The included larger C-clip in the rebuild kit is supposed to hold the compressor housing on was too small and I had to reuse the original.
I also had the stock water feed lines that came with one of my turbos that I will definitely be using. I've still got to bend them a little more to get them pointed the direction I want... but all looks good.
Tips:
Spend some quality time Dremeling.
Blow off everything with compressed air.
Everything that goes inside the turbo and all the inside surfaces get Q-tipped with oil... especially the seals.
Have a WELL LIT work area.
DON'T FORCE ANYTHING... IT WILL ALL FIT!
Last edited by curly; 02-24-2012 at 08:37 AM. Reason: All image links were broken.

 0
0


Thread
Thread Starter
Forum
Replies
Last Post


