How to make and install your own Diy MegaSquirt
 10-28-2007, 12:59 AM
#1
Boost Czar


Thread Starter
iTrader: (62)
Join Date: May 2005
Location: Chantilly, VA
Posts: 79,493
Total Cats: 4,080
NOTE: THESE DOCUMENTS ARE VERY OLD AND OUTDATED. DO NOT USE THEM.
DO NOT USE THEM FOR AN MS3
DO NOT USE THEM FOR AN MS2
DO NOT USE THEM FOR AN MS1 (because you shouldn't be building an MS1).
So you're ready to join the club?
let's start with what to buy.
For this write-up I'm using the v3.0 board with gives you all the upgrade options.
I order all my parts through diyautotune.com, a forum sponsor. You can source elsewhere, but don't expect a nicely labeled well thought out package.
Required:
(1) MegaSquirt-I Programmable EFI System PCB3.0 - UnAssembled Kit
(1) MSPNP IAT Sensor Kit - Steel Bung
(1) Lead Bending Tool
DO NOT USE THEM FOR AN MS3
DO NOT USE THEM FOR AN MS2
DO NOT USE THEM FOR AN MS1 (because you shouldn't be building an MS1).
So you're ready to join the club?
let's start with what to buy.
For this write-up I'm using the v3.0 board with gives you all the upgrade options.
I order all my parts through diyautotune.com, a forum sponsor. You can source elsewhere, but don't expect a nicely labeled well thought out package.
Required:
(1) MegaSquirt-I Programmable EFI System PCB3.0 - UnAssembled Kit
this is the main kit, it comes with the board, case, DB37 connector to build your harness and all the components you need to build a MS.
(1) MegaSquirt Tuning Cable (DB9 Straight Thru)required to communicate with your software.
get a serial - USB adapter if your laptop does not have a serial out. USB to Serial Adapter.
(1) PCBv3 and v2.2 -- Pullup Resistors 'ModKit'get a serial - USB adapter if your laptop does not have a serial out. USB to Serial Adapter.
Extra resistors needed to complete the "Mods"
(1) MegaSquirt Wiring Bundle - 23" LongWire kit to build your DB37 harness. Ms-I kit provides the connector and hood to use.
or pre-built 18" MegaSquirt Pigtail Harness
Optional:or pre-built 18" MegaSquirt Pigtail Harness
(1) MSPNP IAT Sensor Kit - Steel Bung
Required sensor to remove the AFM/MAF. The kit has a bung to weld to pipes, extra wire and contact to insert into the AFM/MAF harness for easy install.
(1) PCBv3 and v2.2 -- Boost Control Mod-KitMod kit for Boost Control feature.
(1) PCBv3 and v2.2 -- Relay Control 'ModKit'Mod kit for Fan control
(1) PCBv3 -- PWM IAC Valve Control (TIP120) 'Mod-Kit' (Stand Alone Only)Mod kit to control the idle valve
Recommended: (1) Lead Bending Tool
helps bend leads for easy installation.
(1) MegaSquirt Stimulator v2.2 - UnAssembled KitUsed to communicate with your laptop without the need of a harness in the car, lets you test your build and flash firmware.
Last edited by Braineack; 12-12-2016 at 08:36 AM.

Reply
 0
0

0
10-28-2007, 12:59 AM
#2
Boost Czar
Thread Starter
iTrader: (62)
Join Date: May 2005
Location: Chantilly, VA
Posts: 79,493
Total Cats: 4,080
Building the MS:
I've taken the liberty to remove from the component map what you don't need to install.
But please refer to www.megamanual.com for the step by step instructions.

Be sure to jump:
D1 & D2
XG1 to XG2
TachSelect to OPTIN
TSEL to OPTOUT
You'll notice I've removed R7 and left the hole vacant, only do this if doing a parallel install with plans to share the stock CLT sensor with the MS. If doing a standalone install leave R7 installed.
Mod your tach input and spark output like this:


****NOTE**** I built my harness different than I posted above, notice my spark outputs are crossed, do not follow that unless you have good reason to.
To eliminate noise/interference on the tach input we install a .1�F capacitor on that circuit as a filter. This eliminates random misses and allows you to use Hi-Res code successfully.
Solder the capacitor between JS8 and Ground, you can see this in the diagram below.


I've taken the liberty to remove from the component map what you don't need to install.
But please refer to www.megamanual.com for the step by step instructions.
Be sure to jump:
D1 & D2
XG1 to XG2
TachSelect to OPTIN
TSEL to OPTOUT
You'll notice I've removed R7 and left the hole vacant, only do this if doing a parallel install with plans to share the stock CLT sensor with the MS. If doing a standalone install leave R7 installed.
Mod your tach input and spark output like this:
Note: There is an alternate spark output circuit available which addresses the problems of backfire through the intake at startup as well as the possibility of frying your coils during a reflash. It requires a slightly different component configuration, and a change to the ignition settings in software. This alternate circuit is done in lieu of the 1k resistors soldered across D14 and D16. See here: https://www.miataturbo.net/forum/t33964/
Also, even if you do decide to build your circuit as shown in this writeup, you should still use 330 ohm resistors as opposed to 1k, for the reasons explained in the above link.
-Joe Perez
Also, even if you do decide to build your circuit as shown in this writeup, you should still use 330 ohm resistors as opposed to 1k, for the reasons explained in the above link.
-Joe Perez
****NOTE**** I built my harness different than I posted above, notice my spark outputs are crossed, do not follow that unless you have good reason to.
To eliminate noise/interference on the tach input we install a .1�F capacitor on that circuit as a filter. This eliminates random misses and allows you to use Hi-Res code successfully.
Solder the capacitor between JS8 and Ground, you can see this in the diagram below.
Last edited by Joe Perez; 02-02-2010 at 06:59 PM.
Reply
0
0
10-28-2007, 12:59 AM
#3
Boost Czar
Thread Starter
iTrader: (62)
Join Date: May 2005
Location: Chantilly, VA
Posts: 79,493
Total Cats: 4,080
Let's start with the harnesses.
You'll build your DB37 connector like this:


There are three options to install the MS:
First, being a boomslang. This allows you to plug your MS wiring in between the ecu and factory wiring so the installation can be completely reversable without damage to the factory harness.
to build yours you'll need to follow parts:
(1) 64 Pin Male connector (174518-7)
(1) 26 Pin Female connector (174516-6)
(1) 22 Pin Female connector (174515-6)
(32) .040" Contacts (175061-1)
(16) .070" Contacts (173631-6)
96-97 add:
(16) .040" Contacts (175061-1)
(1) 16 Pin Female connector (174514-6)
all part numbers are tyco / amp, and can be purchased at places like onlinecomponents.com. See tycoelectronics.com for more vendors and availability. this should run you $20-$30.
TRY www.newark.com for no minimum purchase amount.
example:


Option #2
the second option is running standalone. However you won't be able to run the a/c so you'll only want to do it this way if you dont got it. If you want to keep your A/C, you'll need to follow the directions in this thread. (ed. 19may08- JP) You'll also need to mod your MS for idle control and fan control.
The only part you'll need to make your harness is the 64 pin connector. Wire the db37 harness directly to the connector and then just plug it in the factory harness.


The 3rd option is wiring the DB37 harness directly into the factory harness. An option here is wiring switch for the igniter and injector paths so you can have either the MS or oem ecu control them at will.


The IAC-- I/Os on the MS are connected to these DB37 pins:
IAC1A -DB37 pin 25
IAC1B -DB37 pin 27
IAC2A -DB37 pin 29
IAC2B -DB37 pin 31
Just in case you need to know this for a CAS install in an NB or for whatever reason, this is the CAS pinout:
CKP- Pin 24
CMP- Pin 25

***1.6L Standalone users need to unplug your TPS connector.***
The stock TPS sensor is useless to begin and MS cannot do anything with the signal. I have wired these harnesses to work in conjunction with the Wells TPS210 mod as outlined below or an automatic throttle body. Wiring it this way gives you an easy upgrade opportunity.
https://www.miataturbo.net/forum/t12239/#post157397
You'll build your DB37 connector like this:
There are three options to install the MS:
First, being a boomslang. This allows you to plug your MS wiring in between the ecu and factory wiring so the installation can be completely reversable without damage to the factory harness.
to build yours you'll need to follow parts:
(1) 64 Pin Male connector (174518-7)
(1) 26 Pin Female connector (174516-6)
(1) 22 Pin Female connector (174515-6)
(32) .040" Contacts (175061-1)
(16) .070" Contacts (173631-6)
96-97 add:
(16) .040" Contacts (175061-1)
(1) 16 Pin Female connector (174514-6)
all part numbers are tyco / amp, and can be purchased at places like onlinecomponents.com. See tycoelectronics.com for more vendors and availability. this should run you $20-$30.
TRY www.newark.com for no minimum purchase amount.
example:
Option #2
the second option is running standalone. However you won't be able to run the a/c so you'll only want to do it this way if you dont got it. If you want to keep your A/C, you'll need to follow the directions in this thread. (ed. 19may08- JP) You'll also need to mod your MS for idle control and fan control.
The only part you'll need to make your harness is the 64 pin connector. Wire the db37 harness directly to the connector and then just plug it in the factory harness.
The 3rd option is wiring the DB37 harness directly into the factory harness. An option here is wiring switch for the igniter and injector paths so you can have either the MS or oem ecu control them at will.
The IAC-- I/Os on the MS are connected to these DB37 pins:
IAC1A -DB37 pin 25
IAC1B -DB37 pin 27
IAC2A -DB37 pin 29
IAC2B -DB37 pin 31
Just in case you need to know this for a CAS install in an NB or for whatever reason, this is the CAS pinout:
CKP- Pin 24
CMP- Pin 25
***1.6L Standalone users need to unplug your TPS connector.***
The stock TPS sensor is useless to begin and MS cannot do anything with the signal. I have wired these harnesses to work in conjunction with the Wells TPS210 mod as outlined below or an automatic throttle body. Wiring it this way gives you an easy upgrade opportunity.
https://www.miataturbo.net/forum/t12239/#post157397
Last edited by cjernigan; 03-01-2008 at 06:13 PM.
Reply
0
0
10-31-2007, 10:53 PM
#4
Boost Czar
Thread Starter
iTrader: (62)
Join Date: May 2005
Location: Chantilly, VA
Posts: 79,493
Total Cats: 4,080
To drive the 1.6L fuel pump:
Since the stock ECU does not trigger the fuel pump, but the AFM does, we need a circuit to be able to prime and drive it properly. We backfeed 12v into the fuel pump relay to make it happen. You must remove ST_SIG fuse else you will short out the circuit.
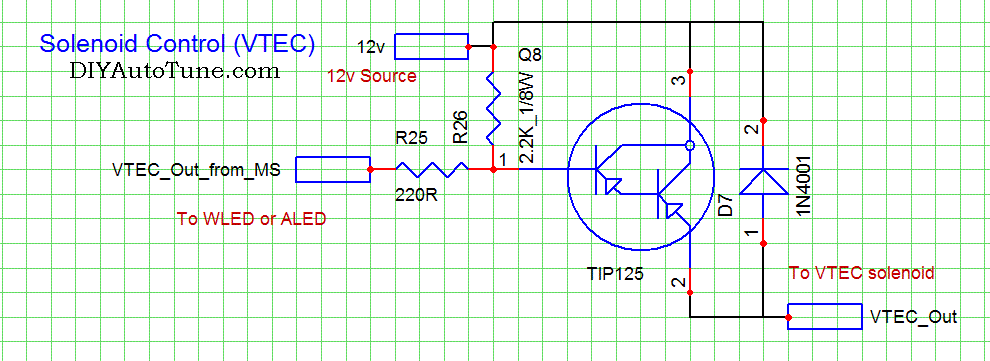
For this circuit you can use one of the tip125s you do not typically utilize: q12 or q9.
Connect the banded end of D4 to VTEC_Out_to_MS.
Connect the VTEC_Out to your harness going to 1C.
You can use s19 for your 12v source.
You MUST remove ST_Sig fuse under the hood or you will burn up the transistor!!!
Here's how I did mine:

To utilize A/C with your standalone unit!!!
Follow Joe's writeup here: https://www.miataturbo.net/forum/sho...d.php?p=256739
Fans mod:
The easiest way to do this is using an existing circuit built in the MS, the Middle LED circuit. Since we don't install Q4, we can use that transistor to drive the circuit. The transistor that currently is in place is too weak to drive the relay.
Simply swap Q7 for Q4, and jump the flat side of the middle LED to your harness. That's it. Under the software you'll enable the middle LED circuit to use Output 4 and then turn output to drive the fan control.
If you need something to trigger to ground at a certain temp, pick up the fan mod kit...You'll build it in the proto area. If you are running EBC make room for it.


Since the stock ECU does not trigger the fuel pump, but the AFM does, we need a circuit to be able to prime and drive it properly. We backfeed 12v into the fuel pump relay to make it happen. You must remove ST_SIG fuse else you will short out the circuit.
For this circuit you can use one of the tip125s you do not typically utilize: q12 or q9.
Connect the banded end of D4 to VTEC_Out_to_MS.
Connect the VTEC_Out to your harness going to 1C.
You can use s19 for your 12v source.
You MUST remove ST_Sig fuse under the hood or you will burn up the transistor!!!
Here's how I did mine:
To utilize A/C with your standalone unit!!!
Follow Joe's writeup here: https://www.miataturbo.net/forum/sho...d.php?p=256739
Fans mod:
The easiest way to do this is using an existing circuit built in the MS, the Middle LED circuit. Since we don't install Q4, we can use that transistor to drive the circuit. The transistor that currently is in place is too weak to drive the relay.
Simply swap Q7 for Q4, and jump the flat side of the middle LED to your harness. That's it. Under the software you'll enable the middle LED circuit to use Output 4 and then turn output to drive the fan control.
If you need something to trigger to ground at a certain temp, pick up the fan mod kit...You'll build it in the proto area. If you are running EBC make room for it.
Last edited by Braineack; 12-06-2007 at 12:41 PM.
Reply
0
0
11-20-2007, 10:16 AM
#5
Boost Czar
Thread Starter
iTrader: (62)
Join Date: May 2005
Location: Chantilly, VA
Posts: 79,493
Total Cats: 4,080
EBC:

If you aren't using the idle mod, then use the spot for Q16 on the heat sink, as you only need that for MSII.

The IAC outputs are right behind MOV1, use which you need, I'm using 1B

Connect JS2 through the Proto section for access on the top of the board.

Route the ground and JS2 leads around the components

If you have both the idle mod and EBC, considering drilling a hole in the case to act as a heatsink


or you can pick up a heatsink at Radio Shack and put it in the proto area

UPDATE: You must use an insulator on the FET if you are mounting it to the heatsink or case.
Good Boost Solenoid:
http://airinc.thomasnet.com/Item?cid...7&assetid=spec
If you aren't using the idle mod, then use the spot for Q16 on the heat sink, as you only need that for MSII.
The IAC outputs are right behind MOV1, use which you need, I'm using 1B
Connect JS2 through the Proto section for access on the top of the board.
Route the ground and JS2 leads around the components
If you have both the idle mod and EBC, considering drilling a hole in the case to act as a heatsink
or you can pick up a heatsink at Radio Shack and put it in the proto area
UPDATE: You must use an insulator on the FET if you are mounting it to the heatsink or case.
Good Boost Solenoid:
http://airinc.thomasnet.com/Item?cid...7&assetid=spec
Last edited by Braineack; 12-06-2007 at 12:41 PM.
Reply
0
0
11-23-2007, 10:25 PM
#6
Boost Czar
Thread Starter
iTrader: (62)
Join Date: May 2005
Location: Chantilly, VA
Posts: 79,493
Total Cats: 4,080
Installation:
AIT (air intake temp):
The easiest thing to do here will be to wire directly into the AFM/MAF harness, polarity doesn’t matter. Buy your AIT kit from DIYAUTOTUNE.com, buy the MSPNP kit, it will provide a bung for your pipes and contacts to stick into the stock harness.
1.6L (RED/GRN)

1.8L (RED/BLK)

Fuel Pump:
FUEL PUMP 1.6L only:
See post #4.
BOOST SOLENOID:
Connect red wire to the little blue +12v connector near the driver headlight (it has a cap on it, when you pull it off it’s just a little spade), or any or switched +12volt source. But this is the easiest to use as you’ll most likely be mounting it there anyways.
Connect the ground to the Green/white (IAC – B) wire in the MS harness or whatever pin you built it on.

The boost goes into the port with only one nipple. The exhaust to the wastegate is on the side with the little exhaust “filter”.
AIT (air intake temp):
The easiest thing to do here will be to wire directly into the AFM/MAF harness, polarity doesn’t matter. Buy your AIT kit from DIYAUTOTUNE.com, buy the MSPNP kit, it will provide a bung for your pipes and contacts to stick into the stock harness.
1.6L (RED/GRN)
1.8L (RED/BLK)
Fuel Pump:
FUEL PUMP 1.6L only:
See post #4.
BOOST SOLENOID:
Connect red wire to the little blue +12v connector near the driver headlight (it has a cap on it, when you pull it off it’s just a little spade), or any or switched +12volt source. But this is the easiest to use as you’ll most likely be mounting it there anyways.
Connect the ground to the Green/white (IAC – B) wire in the MS harness or whatever pin you built it on.
The boost goes into the port with only one nipple. The exhaust to the wastegate is on the side with the little exhaust “filter”.
Last edited by Braineack; 12-06-2007 at 12:42 PM.
Reply
0
0
11-24-2007, 12:21 PM
#7
Boost Czar
Thread Starter
iTrader: (62)
Join Date: May 2005
Location: Chantilly, VA
Posts: 79,493
Total Cats: 4,080
Software:
This guide requires the following software:
MegaTune: http://www.megasquirtpnp.com/downloa...tup_021108.exe
Hi-Res Code: http://boostedmiata.com/MS/msq/hr_10g.zip
EasyTherm: http://www.megamanual.com/files/soft...ll_Install.zip
Step 1:
Install the Megatune software onto your laptop.
Run the installation software for MegaTune allow the software to install to the default location.
http://www.megasquirtpnp.com/downloa...tup_021108.exe
Open the directory, leaving just the 9093 WITHOUT AFM to use, delete all the remaining 9093 or 9495 folders. Rename it to something like �Project Folder� or "IM_AWESOME"
then go here: http://www.boostedmiata.com/MS/msq/hr_10g.zip
Extract hr_10g.zip into the folder you just renamed and run copy-ini.bat. This will update your software to hr_10g code.
Step 2:
Create your Firmware file (only necessary if you're running parallel).
Piggyback with R7 installed: Use 1280 for CLT and 1450 for AIT for the bias.
Piggyback without R7: Use 2625 for CLT and 1450 for AIT for the bias.
Piggyback without R7 or R4 (recommended for piggyback sharing the sensors): Use 2625 for CLT and 3475 for AIT for the bias.
Standalone: Bias will be 2490 for each.
If 94-95: Use Rx7 defaults for the CLT and GM defaults for the AIT.
If piggyback with R7 installed: Use 910 for CLT and 1450 for AIT for the bias.
If piggyback without R7: Use 1450 for CLT and 1450 for AIT for the bias.
If standalone: The bias will be 2490 for each.
CLT Values:
deg F
-4 16150
104 1150
176 330
If 96-97: Resistance scale pending.
If piggyback with R7: Use 790 for CLT and xxxx for AIT for the bias.
If piggyback without R7: Use 1544 for CLT and xxxx for AIT for the bias.
If standalone: The bias will be 2490 for each.
If 99-00: (ECU CLT BIAS 1544; just my notes ignore)
If piggyback with R7: Use 790 for CLT and xxxx for AIT for the bias.
If piggyback without R7: Use 1544 for CLT and xxxx for AIT for the bias.
If standalone: The bias will be 2490 for each.
CLT values
Celsius temps
0 6000
40 1100
80 320
IF YOU ARENT USING A STIM, UNPLUG YOUR COILS/IGNITORS!
This guide requires the following software:
MegaTune: http://www.megasquirtpnp.com/downloa...tup_021108.exe
Hi-Res Code: http://boostedmiata.com/MS/msq/hr_10g.zip
EasyTherm: http://www.megamanual.com/files/soft...ll_Install.zip
Step 1:
Install the Megatune software onto your laptop.
Run the installation software for MegaTune allow the software to install to the default location.
http://www.megasquirtpnp.com/downloa...tup_021108.exe
Open the directory, leaving just the 9093 WITHOUT AFM to use, delete all the remaining 9093 or 9495 folders. Rename it to something like �Project Folder� or "IM_AWESOME"
then go here: http://www.boostedmiata.com/MS/msq/hr_10g.zip
Extract hr_10g.zip into the folder you just renamed and run copy-ini.bat. This will update your software to hr_10g code.
Step 2:
Create your Firmware file (only necessary if you're running parallel).
- Open EasyTherm
- Change the 'Code Version' (towards the bottom on the RHS of the screen) to "Custom"
- Change the port to your port (COM 1 or what-ever it is) on the bottom of the screen
- Change the 'Coolant and Air Temp' settings to your desired settings;
Piggyback with R7 installed: Use 1280 for CLT and 1450 for AIT for the bias.
Piggyback without R7: Use 2625 for CLT and 1450 for AIT for the bias.
Piggyback without R7 or R4 (recommended for piggyback sharing the sensors): Use 2625 for CLT and 3475 for AIT for the bias.
Standalone: Bias will be 2490 for each.
If 94-95: Use Rx7 defaults for the CLT and GM defaults for the AIT.
If piggyback with R7 installed: Use 910 for CLT and 1450 for AIT for the bias.
If piggyback without R7: Use 1450 for CLT and 1450 for AIT for the bias.
If standalone: The bias will be 2490 for each.
CLT Values:
deg F
-4 16150
104 1150
176 330
If 96-97: Resistance scale pending.
If piggyback with R7: Use 790 for CLT and xxxx for AIT for the bias.
If piggyback without R7: Use 1544 for CLT and xxxx for AIT for the bias.
If standalone: The bias will be 2490 for each.
If 99-00: (ECU CLT BIAS 1544; just my notes ignore)
If piggyback with R7: Use 790 for CLT and xxxx for AIT for the bias.
If piggyback without R7: Use 1544 for CLT and xxxx for AIT for the bias.
If standalone: The bias will be 2490 for each.
CLT values
Celsius temps
0 6000
40 1100
80 320
- Once you have changed the settings, click on the "Write .inc and .s19 Files" button on the bottom of the EasyTherm screen
- The file that you want to write to is the 'msns-extra.s19' file in the C:\EFI\ folder in the hr_10g file that you unzipped to earlier.
IF YOU ARENT USING A STIM, UNPLUG YOUR COILS/IGNITORS!
- Put a jumper on the boot pin on the MS motherboard and power up the Stim/ Ignition to ON.
- Click "upload to MS" Choose the 'msns-extra_mod.s19' file in C:\EFI\ (Don't touch a thing on your computer after this or it will freeze)
- It will write about 1775 lines, if it doesn�t do it again from step 2.
- Unpower the MS and remove the boot jumper.
- Copy the three .inc files from C:\Program Files\Easytherm into your Project Folder�s �MTCFG� folder, click yes to overwrite if prompted.
- Open the Megatune Software
- go to file > Configurator
- under MegaTune2.25, highlight msns-extra.ini.hr10, then go to file activate.
- Then File > Save.
Last edited by Joe Perez; 09-16-2008 at 11:06 PM. Reason: Fixed MSnS-E ldownload link
Reply
0
0
11-26-2007, 09:13 PM
#8
Boost Czar
Thread Starter
iTrader: (62)
Join Date: May 2005
Location: Chantilly, VA
Posts: 79,493
Total Cats: 4,080
Setting up Megatune:
Open megatune
Go to file > Configurator > car1 >settings > Code_variant
Make sure MSNS_EXTRA "James Murray and Phil Ringwood's MSnS extensions" is selected
Go to > Lamda_sensor
select:
AEM_LINEAR "AEM Gauge AEM-30-42xx"
or
LC-1 Linear 0-5v 10:20 AFR
IF 4-BAR MAP SENSOR
Go to > MAP_Sensor
Select 400kPa
I also like to uncheck Celsius and kPa.
File > Save
Exit.
Go to c:\program files\megasquirt\car1\mtcfg\custom.ini
Change this:

to this:

you can shange the settings to whatever you'd like, this allows autotune to pretty have tune in all situations. If for example you gave it a 100-255 MAP, it would only tune in boost...
At this point you need to load a base map, here are a few to get you started:
x
x
x
x
Configuring your map:
The first thing you have to do it match the ignition timing!
MS has no idea what your timing is. But if you tell it is all good then it will believe you.
Start and idle the car and open up Spark > Spark Settings.
To adjust the timing you adjust the trigger angle, that�s it.

First change the -10 to a 10. This is the fixed angle. You�re telling Megasquirt that you only want a static 10�. You never want it to give you any other timing.

Use a timing light and verify the timing is correct. If it�s not a match, change the trigger angle a few points and try again.

Once your timing light indicates 10�, change the 10 back to a -10. You are now telling Megasquirt to change the timing based on the preloaded map I gave you. If you go back out with a timing light you should see it changed to the 15-18� range.
You�re now ready to tune this baby up.
Open megatune
Go to file > Configurator > car1 >settings > Code_variant
Make sure MSNS_EXTRA "James Murray and Phil Ringwood's MSnS extensions" is selected
Go to > Lamda_sensor
select:
AEM_LINEAR "AEM Gauge AEM-30-42xx"
or
LC-1 Linear 0-5v 10:20 AFR
IF 4-BAR MAP SENSOR
Go to > MAP_Sensor
Select 400kPa
I also like to uncheck Celsius and kPa.
File > Save
Exit.
Go to c:\program files\megasquirt\car1\mtcfg\custom.ini
Change this:
to this:
you can shange the settings to whatever you'd like, this allows autotune to pretty have tune in all situations. If for example you gave it a 100-255 MAP, it would only tune in boost...
At this point you need to load a base map, here are a few to get you started:
x
x
x
x
Configuring your map:
The first thing you have to do it match the ignition timing!
MS has no idea what your timing is. But if you tell it is all good then it will believe you.
Start and idle the car and open up Spark > Spark Settings.
To adjust the timing you adjust the trigger angle, that�s it.
First change the -10 to a 10. This is the fixed angle. You�re telling Megasquirt that you only want a static 10�. You never want it to give you any other timing.
Use a timing light and verify the timing is correct. If it�s not a match, change the trigger angle a few points and try again.
Once your timing light indicates 10�, change the 10 back to a -10. You are now telling Megasquirt to change the timing based on the preloaded map I gave you. If you go back out with a timing light you should see it changed to the 15-18� range.
You�re now ready to tune this baby up.
Last edited by Braineack; 12-06-2007 at 12:46 PM.
Reply
0
0
12-01-2007, 04:52 PM
#12
Thanks, ok, I missed that. Like I said, I'm not too worried about AC, but I (think?) on my 2000 the alternator is run by the OEM ECU - but the MS won't support it, will it? I wonder what it does, anyway? I could probably just make a voltage monitoring box to run the alt, anyway.
Reply
0
0
12-01-2007, 09:26 PM
#15
I guess it's just... 'how it's done', but still...
Does it do anything else in the '99 besides leave the CEL on all the time and run the alternator?
Reply
0
0
12-01-2007, 09:28 PM
#16
Boost Czar
Thread Starter
iTrader: (62)
Join Date: May 2005
Location: Chantilly, VA
Posts: 79,493
Total Cats: 4,080
if you do nothing with the o2s and leave the MAF, you shoudl get no CELs. IF you remove the MAF and take the nessecary steps to fake both signals, AIT is fine it's the MAF signal we are debating, then you should be CEL free.
Reply
0
0
12-01-2007, 09:38 PM
#17
That's another reason I want a stand alone - so I can get rid of things like my rear-o2 sensor simulator (the NB's method for check it's there is relatively advanced). What I'm curious about is what good does it do me to keep the computer, not how hard is it to do. I'm appreciating the input, though - don't take it as an argument.
Reply
0
0
12-01-2007, 10:27 PM
#18
To go full standalone on the '99 with A/C you will have to do a few things.
Buy an NA alternator, they are internally regulated and will solve the alternator circuit problem. Then you can remove the stock IAT all together. Then you will have to build a custom circuit to control your A/C. The MSPNP has this custom circuit. You will want to take control of the intake butterfly's aka VICS or w/e it is. You can do that with the shift light output most likely. They are simply on or off.
The emmissions circuit can be removed completely, egr doesn't matter, mine is blocked off. The charcoal cannister system can be removed and replaced with a little filter.
So really if you want to go standalone. Go ahead man. It'll be a blast.
Then give me your O2 simulator. My rear sensor is taped up under the car and i'm tired of my CEL.
Reply
0
0
12-02-2007, 05:21 AM
#19
To go full standalone on the '99 with A/C you will have to do a few things.
Buy an NA alternator, they are internally regulated and will solve the alternator circuit problem. Then you can remove the stock IAT all together. Then you will have to build a custom circuit to control your A/C. The MSPNP has this custom circuit. You will want to take control of the intake butterfly's aka VICS or w/e it is. You can do that with the shift light output most likely. They are simply on or off.
The emmissions circuit can be removed completely, egr doesn't matter, mine is blocked off. The charcoal cannister system can be removed and replaced with a little filter.
So really if you want to go standalone. Go ahead man. It'll be a blast.
Then give me your O2 simulator. My rear sensor is taped up under the car and i'm tired of my CEL.
Buy an NA alternator, they are internally regulated and will solve the alternator circuit problem. Then you can remove the stock IAT all together. Then you will have to build a custom circuit to control your A/C. The MSPNP has this custom circuit. You will want to take control of the intake butterfly's aka VICS or w/e it is. You can do that with the shift light output most likely. They are simply on or off.
The emmissions circuit can be removed completely, egr doesn't matter, mine is blocked off. The charcoal cannister system can be removed and replaced with a little filter.
So really if you want to go standalone. Go ahead man. It'll be a blast.
Then give me your O2 simulator. My rear sensor is taped up under the car and i'm tired of my CEL.
Oh, yeah! VICS, that I do want to keep. AC is already gone, no issues there. Getting rid of emissions stuff would clean up the engine bay - and make me even more likely to get the battoning of my life next time I get pulled over but what the hell.
I've heard of this buying an NA alternator - it's probably the smartest thing to do. I can always copy the AC circuit later... Hmmm, you might be selling me here on this MS thing. Just... two injectors, c'mon!
Reply
0
0


