My first summer home improvement project
 11-11-2013, 09:30 PM
#1
Elite Member
Thread Starter
iTrader: (2)
Join Date: Jan 2009
Location: Columbus, OH
Posts: 4,140
Total Cats: 229
Bought this house about 2 years ago, and while I've done various "home improvement projects", I've never really done anything considerable - up until this point, the most I've done is to build bombproof shelving in the basement or tile the bathroom floor.
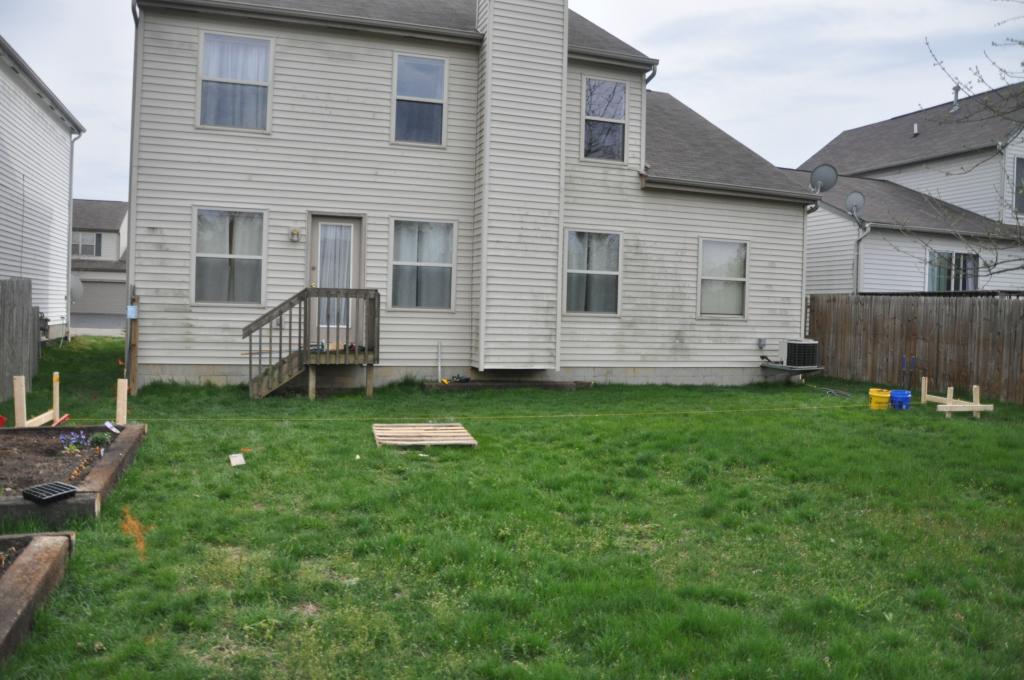
I wanted a deck - a big relaxing place to go out and sit during the summer, grill, relax, whatever. Unfortunately, what I had was this:
I researched for about a month to figure out all of the codes/requirements/best practices, created 2 sets of plans for the construction, went to the City of Columbus and got a building permit, and started diggin up holes!
Well, actually, before I started digging, I called Ohio's free "call before you dig" hotline to get some utility marks - found out that a phone line ran right through the middle of one of my prospective holes - after a conversation with AT&T (who's phone service I don't currently use) they said "yeah, just cut it, we can install a new line if you ever need service".
Sweet - Let the digging begin!
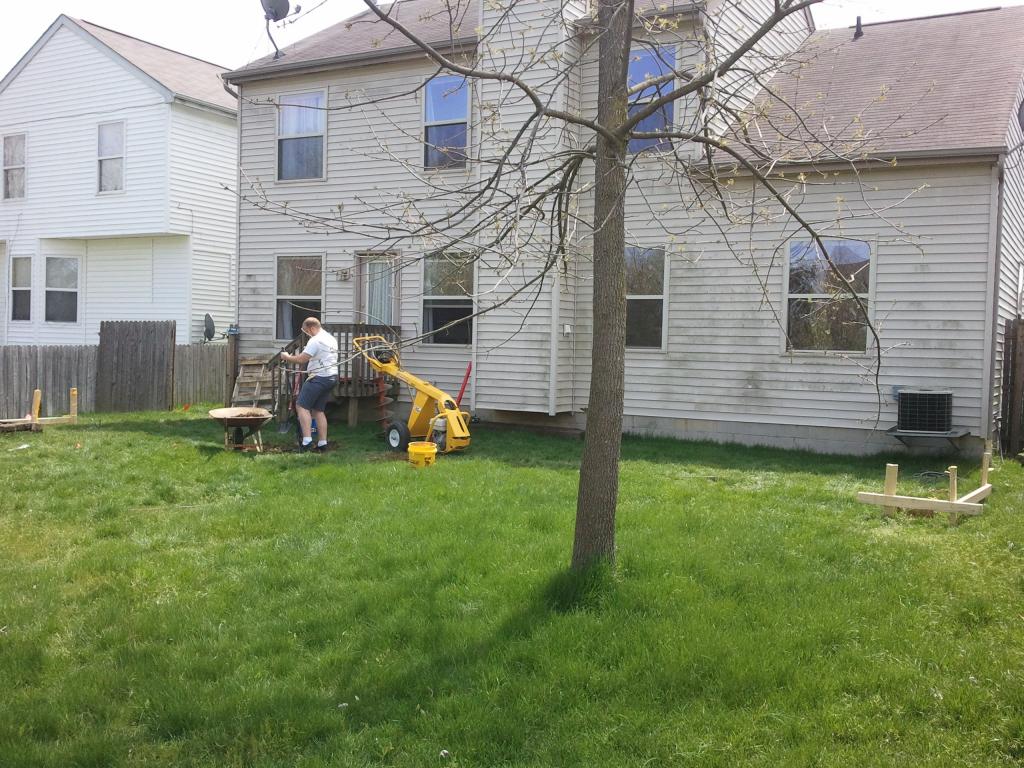
My plan called for seven holes, 12" diameter, 36" deep. I actually dug two full holes before I decided "hand digging is over-*******-rated". Went to home depot, rented a tow-behind power auger, worth every damn cent. Only problem left was the softball to volleyball sized rocks I hit every few inches. even the power auger couldn't get those out. It also pays to have friends - here's my best friend cleaning out a hole dug by said power auger.
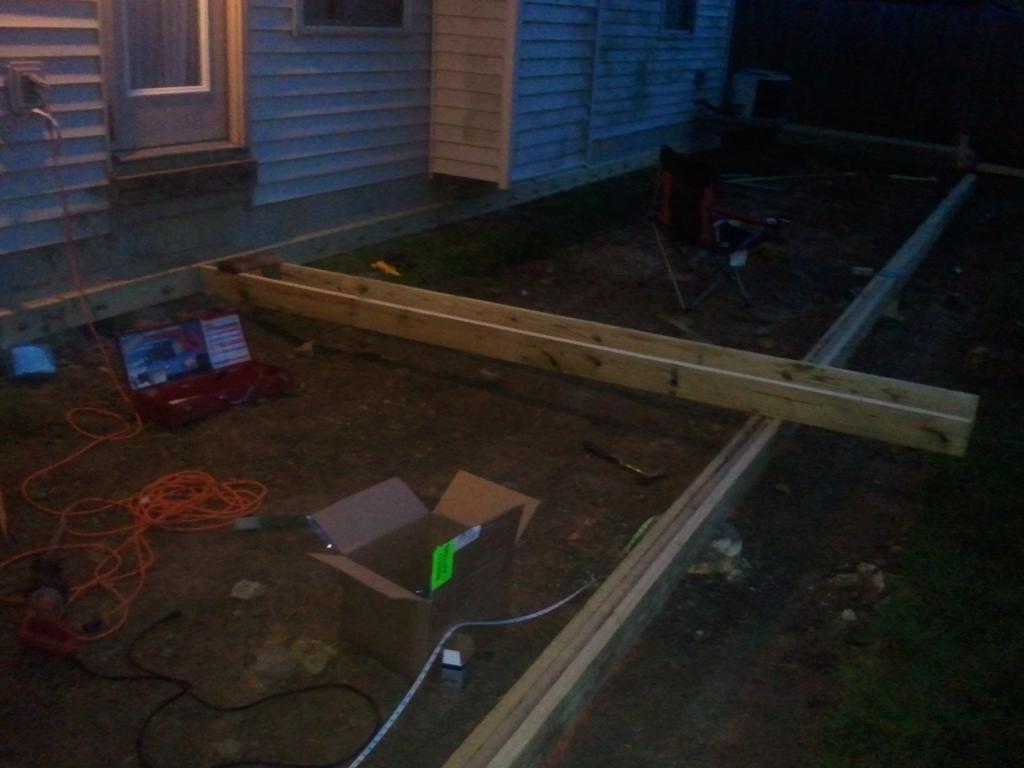
I had originally planned to install a grade beam because this is going to be a low level deck, after some careful measuring and analysis, including building a DIY water level for checking, I found that the ground was only about 2" too high for a wood beam. We had another problem also - our yard generally looked like ****, except for where the deck was going to go. If we installed the deck, we would be covering up every scrap of good high quality grass that I own. We went back to home depot for a solution to both problems. Came back with a rented sod cutter, set it deep to pull some soil off the top, and went to town. Here's the result:
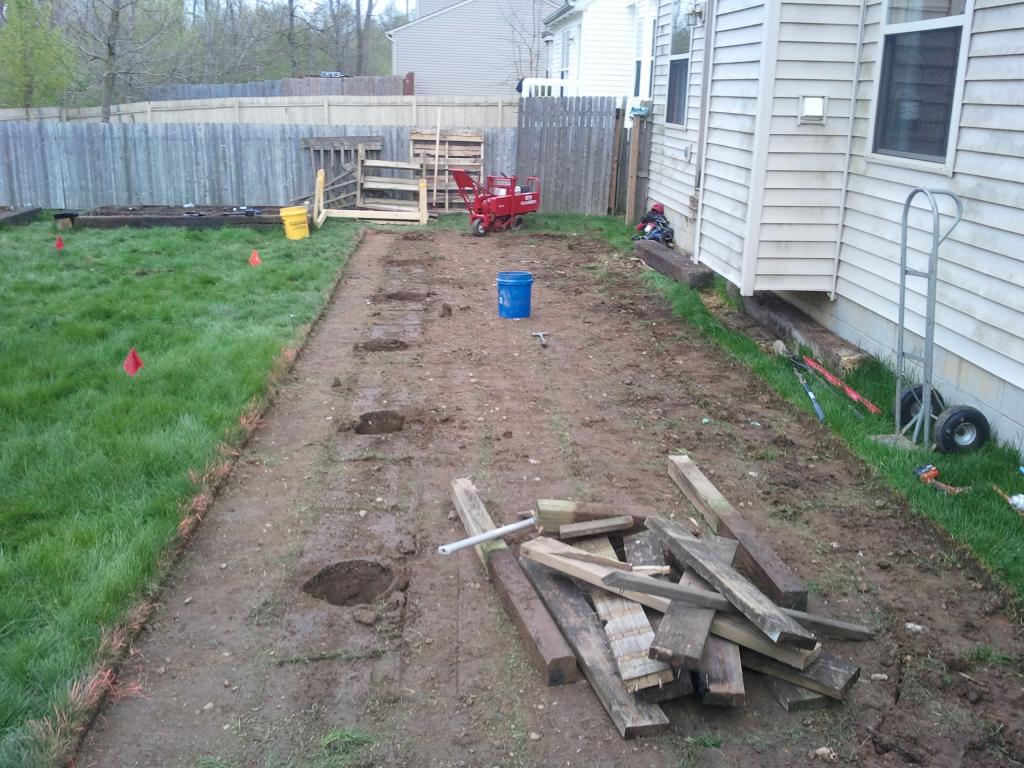
Used the cut sod and laid it over top of some dying turf � end result after a few months is a pretty good looking lawn.
Materials arrived sometime during the hole digging, I thought �I should be able to move this stuff in an hour or so��Well, I made a few key mistakes in that thought � first, I didn�t take into consideration that each individual deck board weighed on the order of 40-50 lbs.
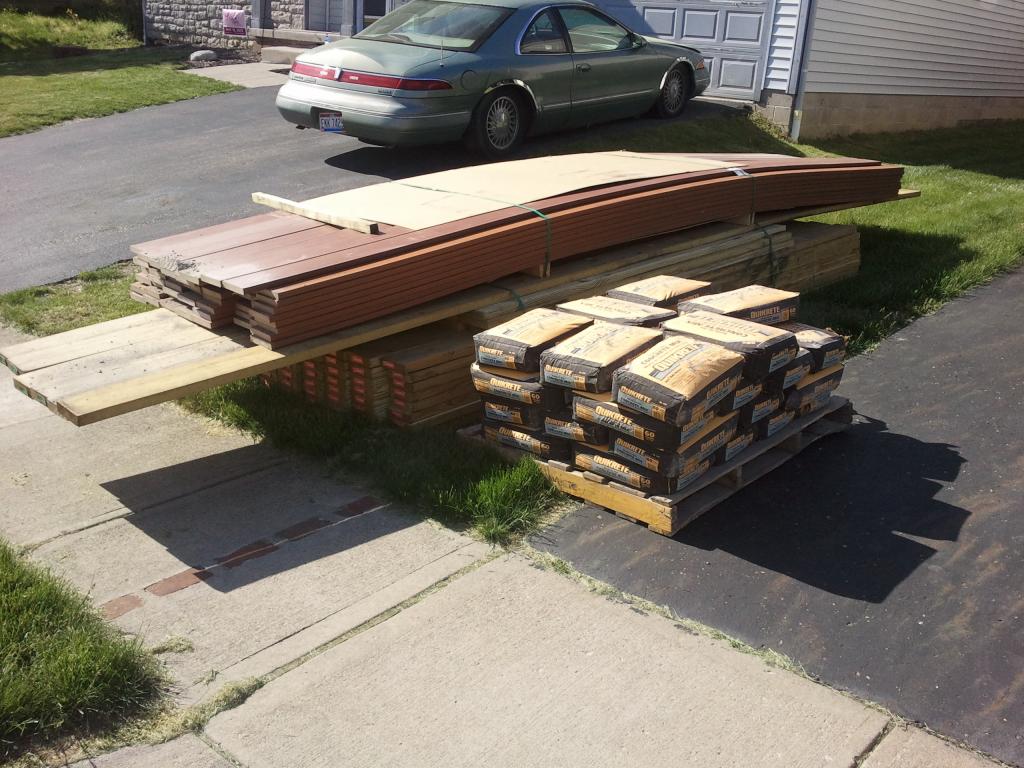
Also, having a decent amount of experience with house framing, my concept of the weight of wood was based on kiln-dried lumber � not the treated stuff. The 12� 2x6s were damn near dripping with the lumber treatment. The weight of everything meant that a 1-at-a-time approach seemed a slight bit too light, but a 2-at-a-time approach seemed to be about 35% more than I wanted to carry repetitively to the back yard. It was about a 2 � hour ordeal when all was said and done, and I decided that was all for the day.

There are a lot of steps involved in the above photo � First and foremost, you can see that I�ve placed the concrete forms (using my DIY water level) and placed the concrete. For those of you �not in the know�, the �maximum amount of allowable water� for quickrete ready mix isn�t nearly enough for this there just isn�t enough cement involved which means you have to add less water to get the �perfect 5000psi mix� � the solution of course is to add more water, unfortunately, you end up with a weaker cement. That�s okay for me though, the 12� diameter isn�t for the strength of the cement, it�s for the relative weakness of the soil 36� below. A weaker concrete mix will do.
For those that have built decks in the past and are wondering �why didn�t you just pour a 12 inch thick base and run a treated post up through the ground?� � the answer is �because that�s not the way that it made sense to build this deck.�
Against the house you�ll see the ledger board bolted to the CMU (That�s �concrete block�) basement wall. The top of that ledger board will basically be the finished height of the deck. For the anchors, I drilled into the block with a rotary drill (non-hammer) and used the strong-tie epoxy anchoring system. Affixed some 5/8� thick stainless steel studs, attached a double-thick 2x6� ledger board, and bolted the ledger board in place with stainless steel hardware. On most deck installations, if you�re attaching the deck ledger board to the existing house ledger board, you end up with the proper double-thick ledger. In this case, a single ledger board wouldn�t have provided the thickness for 10d joist hanging nails � so it�s gotta be doubled up.
Once the concrete had dried, it was time to get to work. The first step was laminating a 40� beam of triple 2x6. Fortunately I had intentionally spaced my concrete piers so that I could meet two 20� lengths on top of the center pier.
Used a total of six 20� 2x6s for the beam which was laid directly across the tops of the concrete piers and bolted into place. With that, I was able to begin work on the joists. Daytime pic:

And a pic of what the girl does when she ventures outside of the kitchen:
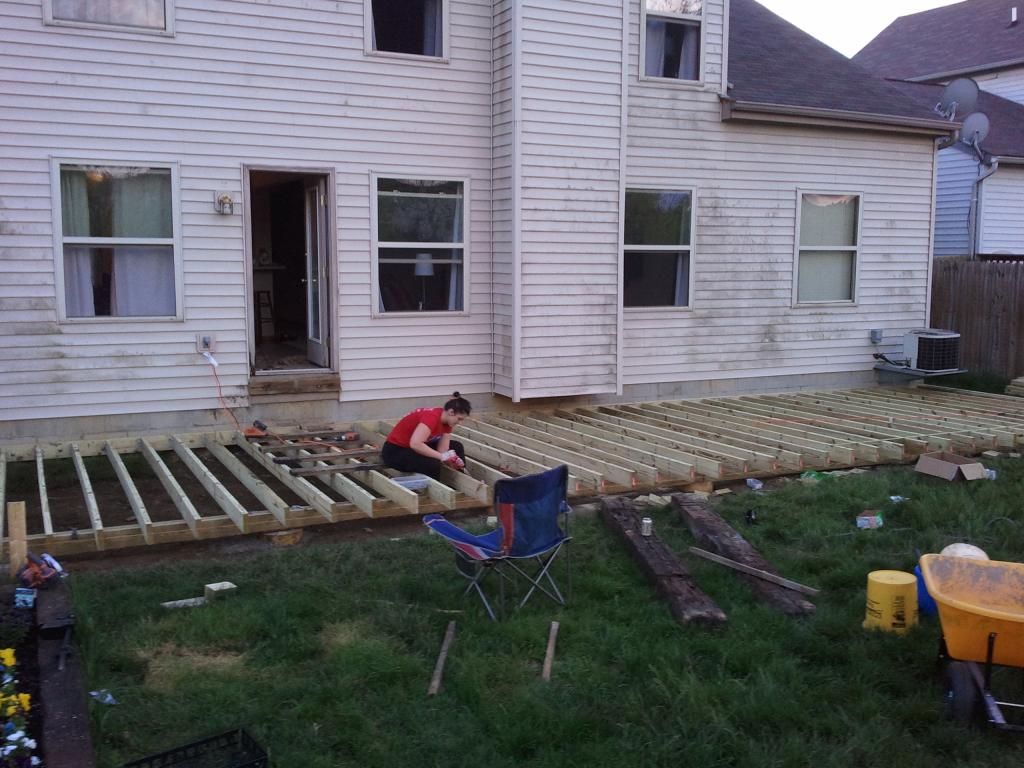
With the joists secured to the ledger board by joist hangers, to the beam by toe nails, and to each other by blocking, I was able to frame the stairs. The plans I had submitted to the City included stairs that only walked down in a single direction, but upon starting the build, I decided that I wanted to be able to walk down the stairs from the sides too. When finished, I designed it wayyy more complicated than it needed to be�but hey, it�s ******* bulletproof now.
Ta Da!!! And there we have it!! A finished deck!!
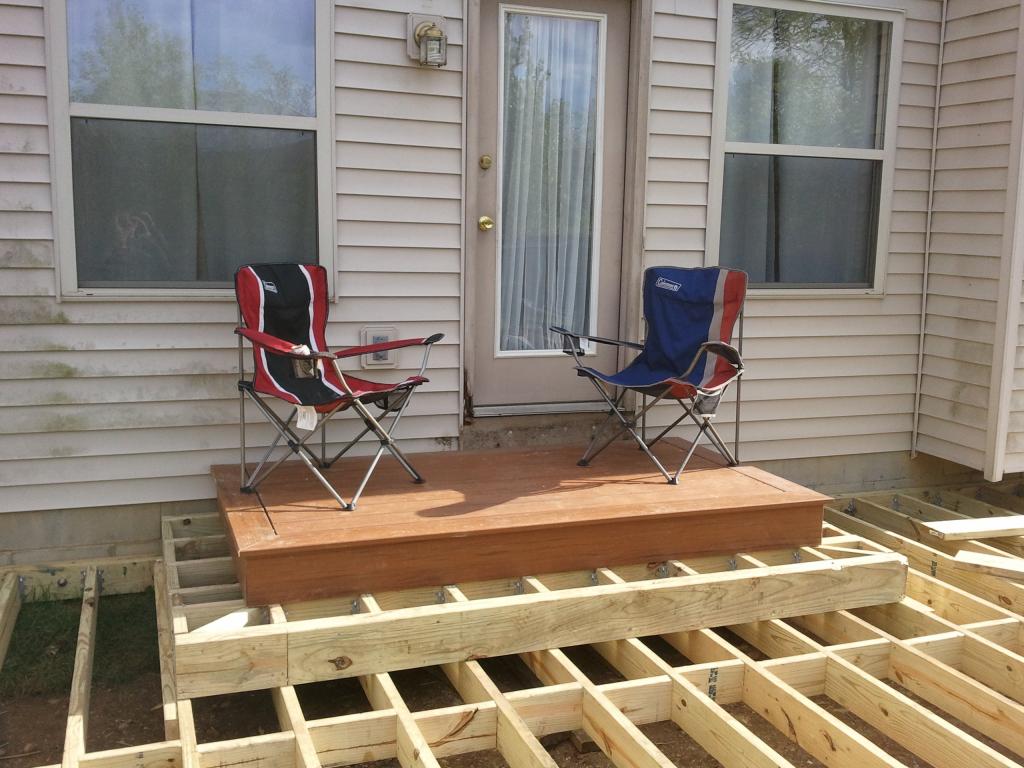
I wish � this turned out to be a much needed �space to step out of the house� while finishing the deck though.
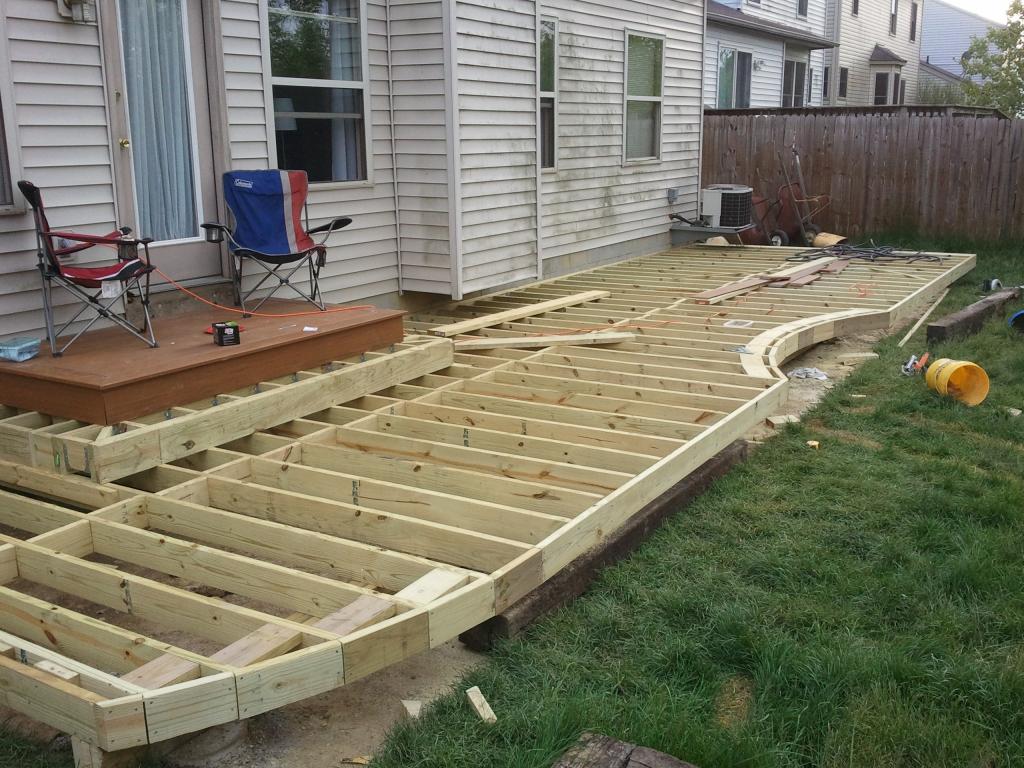
With some time, and a protractor, and a �string compass�, and a miter saw, and some more time, I was able to get the finish shape of the deck completed.
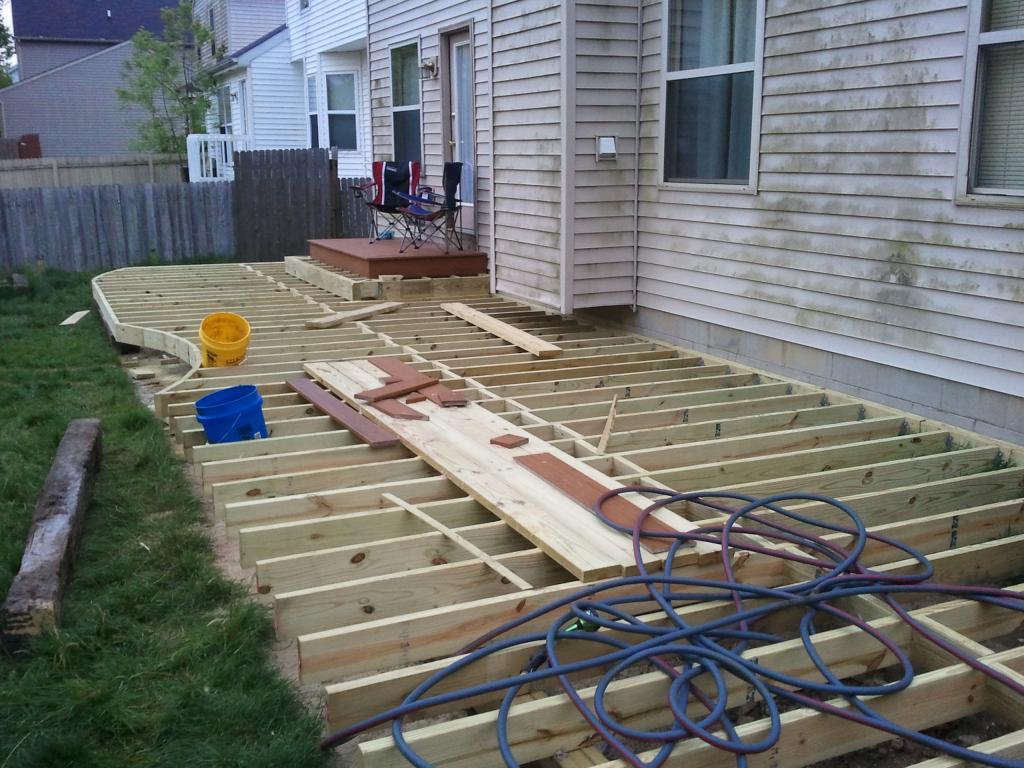
It includes a radiused corner by the (soon to be replaced) �gate� for easy path/access, and a central �curve� area, intended to be filled by a round concrete patio around a central fire pit.
Another days work, some more work with a protractor and miter saw, and deck edge blocking in place
And finally, I get to use �the pretty wood� as she calls it. Deck is �two tone� with a primary color and an accent board around the perimeter.
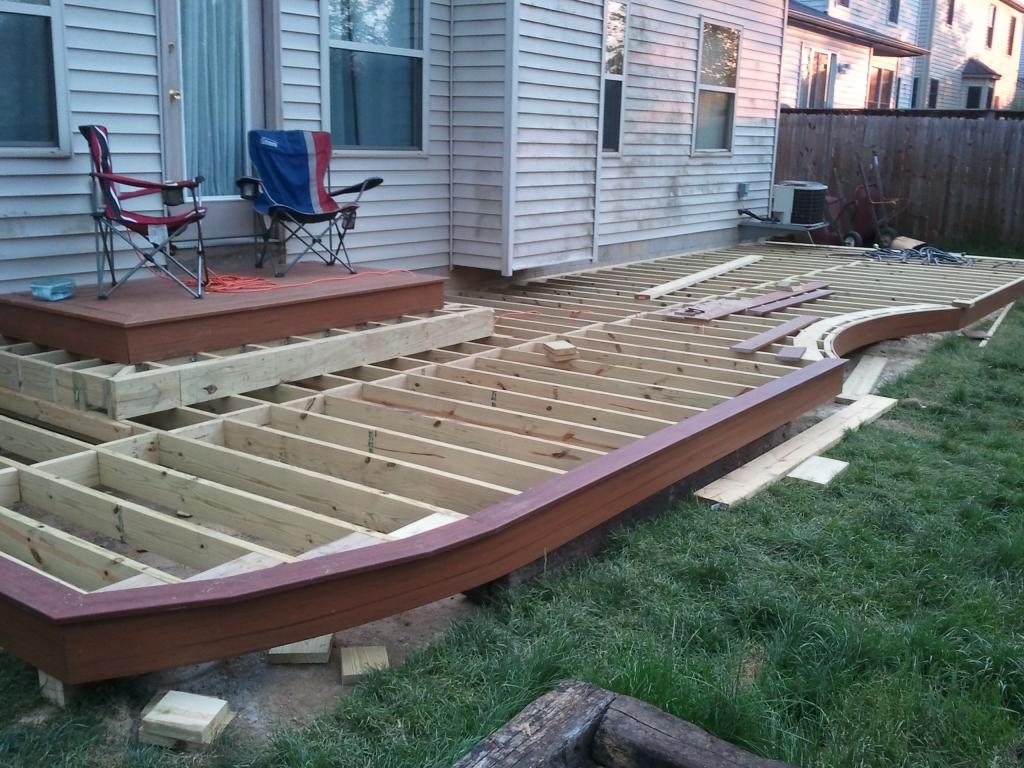
The fascia board is thin enough to �convince� into place without worry.
Some of the �field� boards in place:
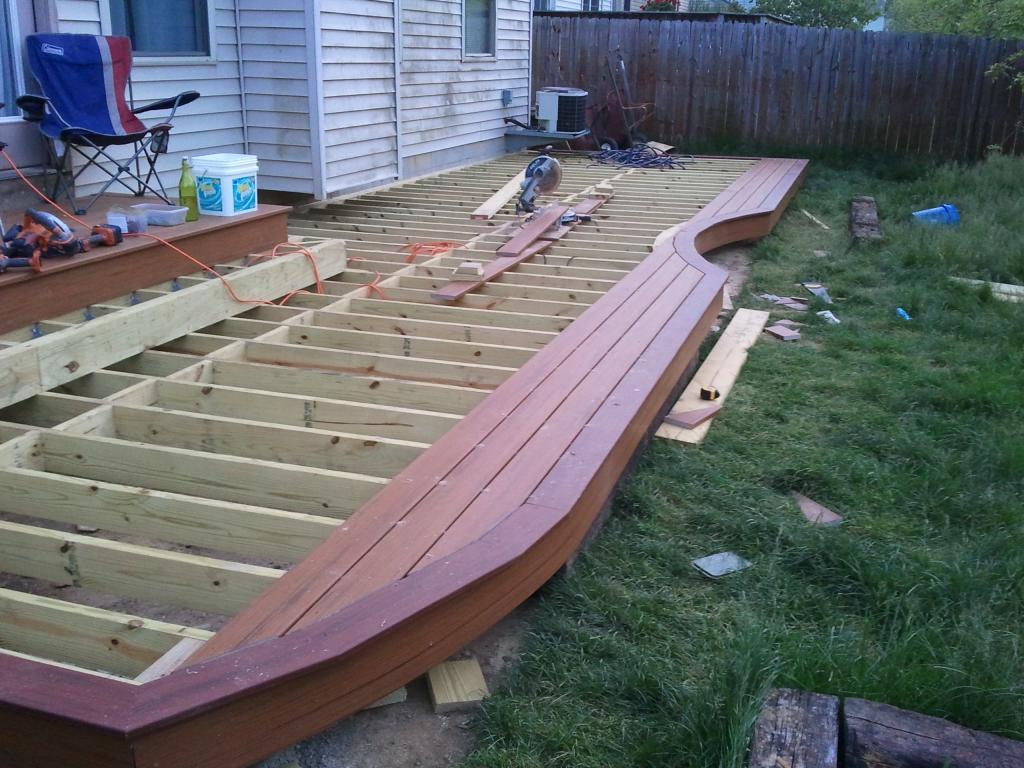
For the dimension of this deck, 2x6� joists must be 12� on center. Putting two screws into these field boards every 12� is a LOT of work. Between the picture above and the picture below, there is about 6-10 hours worth of work � which equates to about 3 days of useable after-work time.
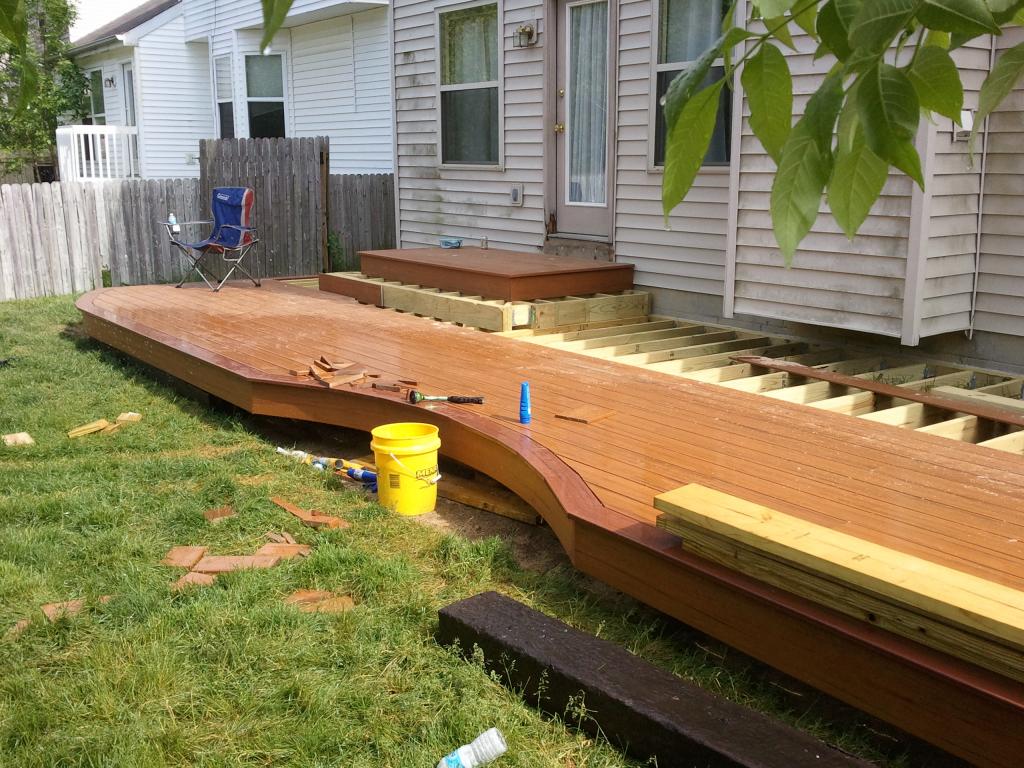
And finally below, the �almost finished� product � I had to wait two days to get the last of the fascia boards to finish the stair riser because I miscalculated by one board. You�ll also see that I replaced the deckboard of the top tier of stairs with the correct darker toned board as compared to my folley on the first pic of that tier completed.
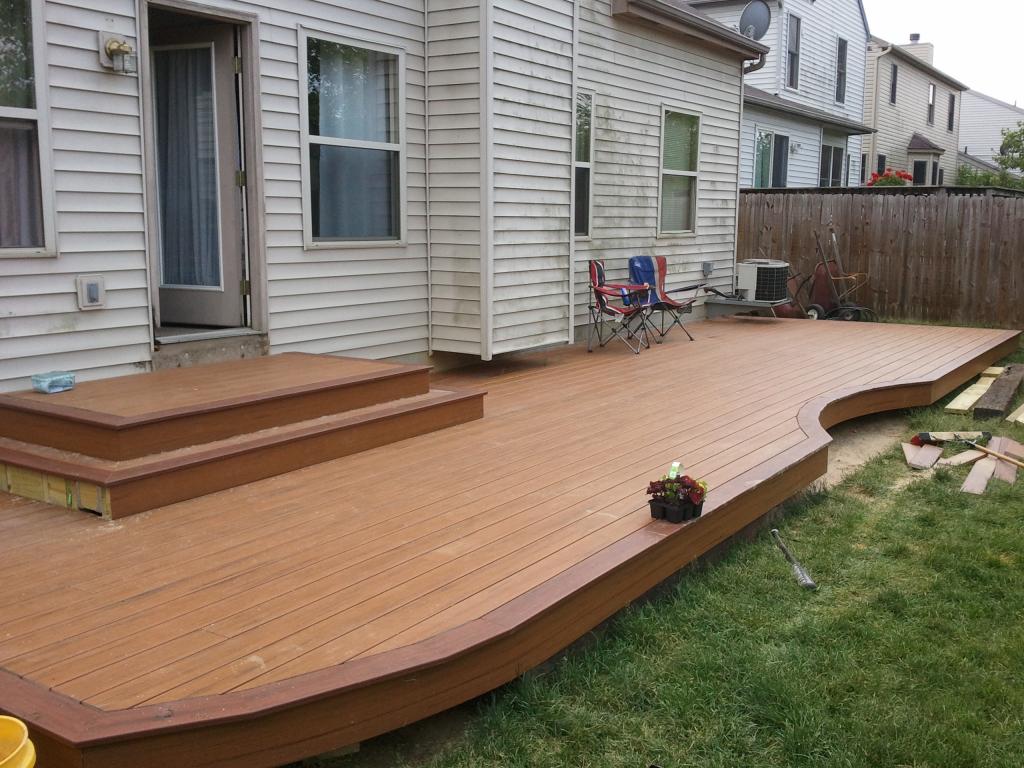
The paperwork box is sitting on top of the stairs waiting for final inspection from Columbus (it passed inspection, of course)
Within about a week of this photo, I power washed the back of the house � HUGE Difference!! We then put some patio furniture on � I was able to relocate the grill from the garage to the deck (thank GOD), and we've been able to enjoy the entire summer outside.
For those who want to know:
Decking: Timbertech Earthwood Evolutions Tropical
Earthwood Evolutions Tropical Capped Composite Decking - Product - TimberTech
(Includes 25-year physcial warranty AND 25-year fade and stain warranty)
Fasteners: Camo hidden edge fasteners with �marksman� jig tool
CAMO | Hidden Deck Fastening System | Marksman Tools
I wanted a deck - a big relaxing place to go out and sit during the summer, grill, relax, whatever. Unfortunately, what I had was this:

I researched for about a month to figure out all of the codes/requirements/best practices, created 2 sets of plans for the construction, went to the City of Columbus and got a building permit, and started diggin up holes!
Well, actually, before I started digging, I called Ohio's free "call before you dig" hotline to get some utility marks - found out that a phone line ran right through the middle of one of my prospective holes - after a conversation with AT&T (who's phone service I don't currently use) they said "yeah, just cut it, we can install a new line if you ever need service".
Sweet - Let the digging begin!
My plan called for seven holes, 12" diameter, 36" deep. I actually dug two full holes before I decided "hand digging is over-*******-rated". Went to home depot, rented a tow-behind power auger, worth every damn cent. Only problem left was the softball to volleyball sized rocks I hit every few inches. even the power auger couldn't get those out. It also pays to have friends - here's my best friend cleaning out a hole dug by said power auger.

I had originally planned to install a grade beam because this is going to be a low level deck, after some careful measuring and analysis, including building a DIY water level for checking, I found that the ground was only about 2" too high for a wood beam. We had another problem also - our yard generally looked like ****, except for where the deck was going to go. If we installed the deck, we would be covering up every scrap of good high quality grass that I own. We went back to home depot for a solution to both problems. Came back with a rented sod cutter, set it deep to pull some soil off the top, and went to town. Here's the result:

Used the cut sod and laid it over top of some dying turf � end result after a few months is a pretty good looking lawn.
Materials arrived sometime during the hole digging, I thought �I should be able to move this stuff in an hour or so��Well, I made a few key mistakes in that thought � first, I didn�t take into consideration that each individual deck board weighed on the order of 40-50 lbs.

Also, having a decent amount of experience with house framing, my concept of the weight of wood was based on kiln-dried lumber � not the treated stuff. The 12� 2x6s were damn near dripping with the lumber treatment. The weight of everything meant that a 1-at-a-time approach seemed a slight bit too light, but a 2-at-a-time approach seemed to be about 35% more than I wanted to carry repetitively to the back yard. It was about a 2 � hour ordeal when all was said and done, and I decided that was all for the day.

There are a lot of steps involved in the above photo � First and foremost, you can see that I�ve placed the concrete forms (using my DIY water level) and placed the concrete. For those of you �not in the know�, the �maximum amount of allowable water� for quickrete ready mix isn�t nearly enough for this there just isn�t enough cement involved which means you have to add less water to get the �perfect 5000psi mix� � the solution of course is to add more water, unfortunately, you end up with a weaker cement. That�s okay for me though, the 12� diameter isn�t for the strength of the cement, it�s for the relative weakness of the soil 36� below. A weaker concrete mix will do.
For those that have built decks in the past and are wondering �why didn�t you just pour a 12 inch thick base and run a treated post up through the ground?� � the answer is �because that�s not the way that it made sense to build this deck.�
Against the house you�ll see the ledger board bolted to the CMU (That�s �concrete block�) basement wall. The top of that ledger board will basically be the finished height of the deck. For the anchors, I drilled into the block with a rotary drill (non-hammer) and used the strong-tie epoxy anchoring system. Affixed some 5/8� thick stainless steel studs, attached a double-thick 2x6� ledger board, and bolted the ledger board in place with stainless steel hardware. On most deck installations, if you�re attaching the deck ledger board to the existing house ledger board, you end up with the proper double-thick ledger. In this case, a single ledger board wouldn�t have provided the thickness for 10d joist hanging nails � so it�s gotta be doubled up.
Once the concrete had dried, it was time to get to work. The first step was laminating a 40� beam of triple 2x6. Fortunately I had intentionally spaced my concrete piers so that I could meet two 20� lengths on top of the center pier.

Used a total of six 20� 2x6s for the beam which was laid directly across the tops of the concrete piers and bolted into place. With that, I was able to begin work on the joists. Daytime pic:

And a pic of what the girl does when she ventures outside of the kitchen:

With the joists secured to the ledger board by joist hangers, to the beam by toe nails, and to each other by blocking, I was able to frame the stairs. The plans I had submitted to the City included stairs that only walked down in a single direction, but upon starting the build, I decided that I wanted to be able to walk down the stairs from the sides too. When finished, I designed it wayyy more complicated than it needed to be�but hey, it�s ******* bulletproof now.
Ta Da!!! And there we have it!! A finished deck!!

I wish � this turned out to be a much needed �space to step out of the house� while finishing the deck though.
With some time, and a protractor, and a �string compass�, and a miter saw, and some more time, I was able to get the finish shape of the deck completed.

It includes a radiused corner by the (soon to be replaced) �gate� for easy path/access, and a central �curve� area, intended to be filled by a round concrete patio around a central fire pit.
Another days work, some more work with a protractor and miter saw, and deck edge blocking in place

And finally, I get to use �the pretty wood� as she calls it. Deck is �two tone� with a primary color and an accent board around the perimeter.

The fascia board is thin enough to �convince� into place without worry.
Some of the �field� boards in place:

For the dimension of this deck, 2x6� joists must be 12� on center. Putting two screws into these field boards every 12� is a LOT of work. Between the picture above and the picture below, there is about 6-10 hours worth of work � which equates to about 3 days of useable after-work time.

And finally below, the �almost finished� product � I had to wait two days to get the last of the fascia boards to finish the stair riser because I miscalculated by one board. You�ll also see that I replaced the deckboard of the top tier of stairs with the correct darker toned board as compared to my folley on the first pic of that tier completed.

The paperwork box is sitting on top of the stairs waiting for final inspection from Columbus (it passed inspection, of course)
Within about a week of this photo, I power washed the back of the house � HUGE Difference!! We then put some patio furniture on � I was able to relocate the grill from the garage to the deck (thank GOD), and we've been able to enjoy the entire summer outside.
For those who want to know:
Decking: Timbertech Earthwood Evolutions Tropical
Earthwood Evolutions Tropical Capped Composite Decking - Product - TimberTech
(Includes 25-year physcial warranty AND 25-year fade and stain warranty)
Fasteners: Camo hidden edge fasteners with �marksman� jig tool
CAMO | Hidden Deck Fastening System | Marksman Tools

Reply
 1
1

1
 11-11-2013, 09:43 PM
#3
Elite Member
Thread Starter
iTrader: (2)
Join Date: Jan 2009
Location: Columbus, OH
Posts: 4,140
Total Cats: 229
In my perfect world, we would add a roll-away awning or something of the sort - currently we have a 12' diameter cantilever canopy which has done us very well for sun protection and light rain protection.
Any significant overhead cover will have to come *after* next summer's french doors... You'll notice that the landing from the door was designed to accomodate a much larger door opening. I'll have to redesign that whole wall section, to include taking out the window and installing a header. That wall doesn't bear the load of the second floor, but it does bear the load of the roof.
Any significant overhead cover will have to come *after* next summer's french doors... You'll notice that the landing from the door was designed to accomodate a much larger door opening. I'll have to redesign that whole wall section, to include taking out the window and installing a header. That wall doesn't bear the load of the second floor, but it does bear the load of the roof.
Reply
0
0
11-12-2013, 07:49 AM
#4
Elite Member

Join Date: Oct 2011
Location: OKC, OK
Posts: 3,693
Total Cats: 222
Looks great! I often wish I knew how to do home improvement type stuff, flip side is I'm horrifically lazy so.
Glad you power washed the house. Also, being in OK, I'm laughing hysterically at the size of that tiny AC unit for a 2 story house......is there another one on the other wall? Ours is approximately 2x the size for a <1200 sq ft house and the end of July/August it still runs 22 hours a day.
Glad you power washed the house. Also, being in OK, I'm laughing hysterically at the size of that tiny AC unit for a 2 story house......is there another one on the other wall? Ours is approximately 2x the size for a <1200 sq ft house and the end of July/August it still runs 22 hours a day.
Reply
0
0
11-12-2013, 09:17 AM
#5
Elite Member
iTrader: (2)

Join Date: Sep 2008
Location: Central Florida
Posts: 2,799
Total Cats: 179
Glad to hear you powerwashed the house. The first thing I thought of when I saw those pictures was, "It'll be a shame if he finishes that nice deck and doesn't bother to paint or at least powerwash the exterior of the house."
Color me impressed with the finished product.
Color me impressed with the finished product.
Reply
0
0
 11-12-2013, 12:29 PM
#7
2 Props,3 Dildos,& 1 Cat


iTrader: (8)
Join Date: Jun 2005
Location: Fake Virginia
Posts: 19,338
Total Cats: 573
care to share your budget? I've got a deck about half that size that was built by someone with 3 functioning brian cells. The foundation is probably fine but the deck is flimsy, warping, and laid out like an Escher drawing. It needs help.
Reply
0
0
11-12-2013, 03:20 PM
#9
Elite Member
Thread Starter
iTrader: (2)
Join Date: Jan 2009
Location: Columbus, OH
Posts: 4,140
Total Cats: 229
I saved *every* receipt for this build, I'll tally them up when I get home from work. I also have my original building plans in PDF and Open Office format if anyone wants a copy.
Reply
0
0
11-12-2013, 03:31 PM
#10
Elite Member
Thread Starter
iTrader: (2)
Join Date: Jan 2009
Location: Columbus, OH
Posts: 4,140
Total Cats: 229
Looks great! I often wish I knew how to do home improvement type stuff, flip side is I'm horrifically lazy so.
Glad you power washed the house. Also, being in OK, I'm laughing hysterically at the size of that tiny AC unit for a 2 story house......is there another one on the other wall? Ours is approximately 2x the size for a <1200 sq ft house and the end of July/August it still runs 22 hours a day.
Glad you power washed the house. Also, being in OK, I'm laughing hysterically at the size of that tiny AC unit for a 2 story house......is there another one on the other wall? Ours is approximately 2x the size for a <1200 sq ft house and the end of July/August it still runs 22 hours a day.
A new unit is definitely on the short list of projects.
Reply
0
0
11-12-2013, 03:59 PM
#11
Elite Member
Join Date: Oct 2011
Location: OKC, OK
Posts: 3,693
Total Cats: 222
Yeah, when we hit July/August and it's 95 by 9:30am, the A/C runs basically non-stop from about 6am until 3am, then cycles a few times then back on. And still gains heat throughout the day.
If we just shut it off during the day, it would probably get hot enough inside to put the cats at risk. And it would never cool back down.
And sometimes I'll go spend 30 minutes spraying the unit outside to knock a couple of degrees off.
If we just shut it off during the day, it would probably get hot enough inside to put the cats at risk. And it would never cool back down.
And sometimes I'll go spend 30 minutes spraying the unit outside to knock a couple of degrees off.
Reply
0
0
11-12-2013, 04:19 PM
#12

AC is large enough to "keep up" - but that's it. That's probably the unit that was installed when MI built the house 12 years ago. The A/C turns off when we leave for work, and kicks on about 2 hours before we get home - and runs constantly and nearly in vain until the sun goes down. We've done a little bit of research on replacing that unit, to include mounting a new one on a concrete pad off of the deck, and I would like a unit roughly twice as large as what we currently have. I feel like a good A/C unit should be able to drop the air temp from 10* below ambient to 20* below ambient in less than an hour. This unit could probably barely maintain 20* below ambient if it ran constantly, but getting from -10 to -20 while the sun is shining in the middle of July....that's rough.
A new unit is definitely on the short list of projects.
A new unit is definitely on the short list of projects.
Should've done it 5 years ago.... Nice deck BTW!
Reply
0
0
 11-12-2013, 07:20 PM
#14
Elite Member
Thread Starter
iTrader: (2)
Join Date: Jan 2009
Location: Columbus, OH
Posts: 4,140
Total Cats: 229
Dug up and added up my receipts.
Permit Fees: 200
Rental Equipment Fees: 312.88
Durable goods receipts (tools that I can still use for other things) 121.75
Receipts of combined Durable goods and materials: 293.30
Materials Receipts: 6134.06
Total Cost: 7061.99
For an approximately 480 sq. ft. deck, that comes out to almost $15/sq. ft. Consider that the composite decking alone makes up for $4,243.54 of that cost.
Reply
0
0
11-12-2013, 07:53 PM
#15
There would've been but I'd taken them on window replacements earlier. Not sure what's out there for 2014 re. tax breaks.
I replaced my furnace 4-5 years ago and went for whatever the "next to most efficient"... read that as "I'm cheap and can't be bothered to do the cost vs efficiency stuff". Between the 2 of them my heat/AC bill is not bad.
Low enough to run the inefficient beer fridge in the garage which I've learned is a uniquely Midwestern thing.
Must keep priorities in line.
Reply
0
0
11-13-2013, 09:05 AM
#16
2 Props,3 Dildos,& 1 Cat
iTrader: (8)
Join Date: Jun 2005
Location: Fake Virginia
Posts: 19,338
Total Cats: 573
Dug up and added up my receipts.
Permit Fees: 200
Rental Equipment Fees: 312.88
Durable goods receipts (tools that I can still use for other things) 121.75
Receipts of combined Durable goods and materials: 293.30
Materials Receipts: 6134.06
Total Cost: 7061.99
For an approximately 480 sq. ft. deck, that comes out to almost $15/sq. ft. Consider that the composite decking alone makes up for $4,243.54 of that cost.
Permit Fees: 200
Rental Equipment Fees: 312.88
Durable goods receipts (tools that I can still use for other things) 121.75
Receipts of combined Durable goods and materials: 293.30
Materials Receipts: 6134.06
Total Cost: 7061.99
For an approximately 480 sq. ft. deck, that comes out to almost $15/sq. ft. Consider that the composite decking alone makes up for $4,243.54 of that cost.
Did you get equivalent cost for comparable wood decking and finishing? Redwood's not cheap either but it's not that pricey.
Reply
0
0
11-13-2013, 10:02 AM
#17
Elite Member
Thread Starter
iTrader: (2)
Join Date: Jan 2009
Location: Columbus, OH
Posts: 4,140
Total Cats: 229
The best price I found on this decking was 3.31/linear foot for a 5.36" wide board.
I just pulled up pressure treated pine decking on lowes.com, and 5/4x6 is about 0.52/linear foot. That puts the cost comparison of the composite at about 7 times as high as unfinished pressure treated wood decking. Cedar decking approaches about $1/linear foot. The best online pricing I can find for redwood decking at the moment is $2.50 to $3 per linear foot. Redwood gets more expensive/harder to find as you get closer to the east coast.
If one really wanted to cheap out on composite decking, menards sells their brand's least expensive option at $1.49/lin-ft which i've seen on sale for as low as $1.29/lin-ft. Keep in mind, though, "you get what you pay for" is a solid theme in the market, according to the research that I did prior to selecting a board with a price point more than twice that of locally available menards boards.
Over the life of the decking, there are cost savings of never having to pay for stain every other year, and never having to put in the time of actually doing the staining. Since the "wood" doesn't splinter, and the fasteners are all buried into the edge of the boards instead of the tops, this is truly a "barefoot" deck. These were all considerations when I made the decision of composite over wood.
When researching, I found a lot of information saying that composite decking required 12" O.C. construction - and I specifically remember an uncle, having built a composite deck years earlier when the industry was still in relative infancy, saying that the boards were super bendy, like damp fettucini. It looks like many of the quality modern composites (timbertech included) hold up just fine to 16" O.C. construction, even specifying "16-inches or less between joists" in their instructions and warranty requirements. My design consideration for 12" O.C. construction was actually a requirement of running 2x6" joists across a 10' span, not a limitation of the composite decking. This means that the composite industry has advanced to a point where the average homeowner, having the knowledge of how to use a drill and a saw, has a choice between composite and wood when it comes to replacing the decking of an ugly, aged deck without also going through the complication of adding joists to a standard 16" O.C. design.
There is a final consideration in using composite decking that isn't nearly as obvious. Talking to realtors, I've found it odd that having a large deck on a house often *decreases* the value of the home. I'm sure if you think about it briefly, it'll hit you like a ****-ton of bricks. (Hint: a ****-ton is roughly equivalent to 2,000 lbs + the weight of a good manly dump)
Just like adding a swimming pool, the large deck results in a potential decrease of property value because of the added maintenance. The composite deck, then, requiring zero additional routine maintenance over the life expectancy of the deck, should boost the property value by a noteworthy amount instead of potentially decreasing that value.
Reply
0
0
11-13-2013, 10:27 AM
#18

Just like adding a swimming pool, the large deck results in a potential decrease of property value because of the added maintenance. The composite deck, then, requiring zero additional routine maintenance over the life expectancy of the deck, should boost the property value by a noteworthy amount instead of potentially decreasing that value.
We have a huge wood deck on our house. I remember when we were looking at buying the house, my wife and realtor saw an awesome two level, million sqft deck, all I saw was a ton of maintenance and $$$ to maintain said million sqft of deck...
I just had someone sand it and stain it, I didn't have time to do it and it was getting to the point of really, really needing to be done. $1200 later I kind of wish I didn't have a deck at all.
Hopefully because we just had it professionally refinished, if we try to sell the house in the next ~year it won't decrease the value of the property, but help it. Hopefully...
Reply
0
0
11-13-2013, 10:40 AM
#19
2 Props,3 Dildos,& 1 Cat
iTrader: (8)
Join Date: Jun 2005
Location: Fake Virginia
Posts: 19,338
Total Cats: 573
Our deck is fairly small, but it is ugly and probably dragging down the value of the house.
I will have to check the joist spacing on my deck. They may need to be replaced anyway, but I wouldn't be surprised if the dickbag who put it in spaced them at like 21-15/16 inches just because he was a moron.
The big question is this:
since my deck is below the height that requries permits (3ft I believe), do I simply rebuild it in place with all the railings and **** or do I build a step-down platform like you did and make the deck ~1 foot off the ground and omit the railings.
Reply
0
0


