Patching a tire
 11-14-2012, 08:22 PM
#1
Elite Member

Thread Starter
iTrader: (3)

Join Date: Apr 2008
Location: Outside Portland Maine
Posts: 2,023
Total Cats: 19
I know some of you have professional auto experience, so I'm hoping to get some info here on tire patching.
I have 20 tires mounted on rims right now, and I have three tires with slow leaks (spread over three different sets). I would like to fix these tires.
I have access to a tire mounting machine and a balancer, so I would like to "do it right."
1. What patches/plugs/kit do I buy? Preferably on Amazon Prime, if they have something good. (if you don't have amazon prime, anything that has "free super-saver shipping" is prime eligible)
2. What are some basic instructions on how to perform the repair with that type of patch?
Tire types are anything from Hankook RS-3s to Michelin X-ice, to shitty Nankang all-seasons (these will be the test-tires to practice my new "skill").

Reply
 0
0

0
11-14-2012, 09:14 PM
#2
Senior Member

Join Date: Nov 2010
Location: Pittsburgh PA
Posts: 1,163
Total Cats: 12
Most leaks like that are due to bead corrosion.
Anyway, to fix a tire with a puncture:
1) Remove the debris
2) Drill out the hole with a carbide bit. You want the bit just slightly smaller than the plug.
3) Buff the tire surface on the inside of the tire, around a 1 inch radius from the center of the injury. (you want a 3D surface for the patch to adhere to)
EDIT: Clean off the rubber dust from the area. /EDIT
4) Apply rubber cement to the buffed area
5) Pull the patch through, with the rubber cement still wet. Pull it flush.
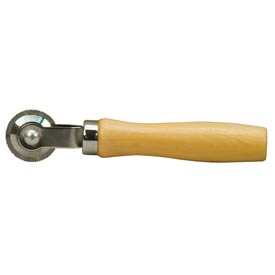
6) Reapply the rubber cement, and then use a tire stitcher (see below) to bond the patch. Reapply rubber cement to keep the stitcher from tearing up the patch. You don't need a lot, I usually reapply only once.
7) For a really good seal, apply bead sealer (the black liquid rubber kind) over the patch.
These plug/patches look decent. Same type we use at work:
BTW: this is a tire stitcher:
Anyway, to fix a tire with a puncture:
1) Remove the debris
2) Drill out the hole with a carbide bit. You want the bit just slightly smaller than the plug.
3) Buff the tire surface on the inside of the tire, around a 1 inch radius from the center of the injury. (you want a 3D surface for the patch to adhere to)
EDIT: Clean off the rubber dust from the area. /EDIT
4) Apply rubber cement to the buffed area
5) Pull the patch through, with the rubber cement still wet. Pull it flush.
6) Reapply the rubber cement, and then use a tire stitcher (see below) to bond the patch. Reapply rubber cement to keep the stitcher from tearing up the patch. You don't need a lot, I usually reapply only once.
7) For a really good seal, apply bead sealer (the black liquid rubber kind) over the patch.
These plug/patches look decent. Same type we use at work:
BTW: this is a tire stitcher:
Last edited by 2ndGearRubber; 11-15-2012 at 09:36 AM.
Reply
0
0
11-14-2012, 09:44 PM
#3
Senior Member

Join Date: Aug 2010
Location: Arl. Texas
Posts: 936
Total Cats: 27
There are dots or markings for the heavier side of the tire. Your supposed to mount this spot opposite of the valve stem. How would you mount it on a duel stem wheel, and would the weight of the patch effect this? Is this all handled during the static and dynamic balancing?
Just questions I wanna know so I can do it right too.
Just questions I wanna know so I can do it right too.
Reply
0
0
11-14-2012, 10:21 PM
#4
Senior Member

Join Date: Feb 2009
Location: DF-DUB
Posts: 625
Total Cats: 21
Lots of the major chains do a plug patch combo for free, or around the 20 dollar mark.
Combo patch

The metal is used as a guide to go through the hole and is then pulled off leaving a plug and a patch, its what most shops use, works well.
This is a normal patch, no plug

They both work great if put on properly.
Find puncture
remove nail or whatever
dismount tire, ream puncture until it is a little smaller than the plug
buff inside of tire around puncture smooth
apply cement and allow it to become tacky
run metal guide through puncture
pull through other side of tire, when pulling through the metal sleeve should come off plug should now be sticking out of outside of tire and may need to be pulled on to pull the patch on the inside flat.
run the plug stitcher over the patch in many different directions
This should make the clear plastic on the back of the patch pull up from tire
Remove plastic
Run stitcher over patch again to make sure all the edges are stuck to tire and sealed.
remount and rebalance
If you dont know what you are doing its easy to damage a tire, by buffing through the rubber on the inside and into the cords or damaging the carcass when reaming.
Just have someone do it, it will save you lots of time and you may end up finding someone to do it for free, those tire guys do them all day everyday they are gonna be way better and less likely to damage something.
Combo patch
The metal is used as a guide to go through the hole and is then pulled off leaving a plug and a patch, its what most shops use, works well.
This is a normal patch, no plug
They both work great if put on properly.
Find puncture
remove nail or whatever
dismount tire, ream puncture until it is a little smaller than the plug
buff inside of tire around puncture smooth
apply cement and allow it to become tacky
run metal guide through puncture
pull through other side of tire, when pulling through the metal sleeve should come off plug should now be sticking out of outside of tire and may need to be pulled on to pull the patch on the inside flat.
run the plug stitcher over the patch in many different directions
This should make the clear plastic on the back of the patch pull up from tire
Remove plastic
Run stitcher over patch again to make sure all the edges are stuck to tire and sealed.
remount and rebalance
If you dont know what you are doing its easy to damage a tire, by buffing through the rubber on the inside and into the cords or damaging the carcass when reaming.
Just have someone do it, it will save you lots of time and you may end up finding someone to do it for free, those tire guys do them all day everyday they are gonna be way better and less likely to damage something.
Reply
0
0
11-15-2012, 01:40 AM
#5
its not hard, in fact I find it harder to get the tire on and off rather than patching the hole.
imo, key instructions are as follow:
-rough and scuff to the best it can be
-apply vulcanizing aid (if wanted, its like rubber cement, fills the hole)
-apply sticky patch, plastic in still there
-Stitch thoroughly, and randomly
-remove plastic
-repeat stitch process
-
imo, key instructions are as follow:
-rough and scuff to the best it can be
-apply vulcanizing aid (if wanted, its like rubber cement, fills the hole)
-apply sticky patch, plastic in still there
-Stitch thoroughly, and randomly
-remove plastic
-repeat stitch process
-
Reply
0
0
11-15-2012, 08:54 AM
#6
Elite Member
iTrader: (1)
Join Date: Feb 2008
Location: Birmingham Alabama
Posts: 7,930
Total Cats: 45
Combo patches work well, but for the ******* love of god, don't use the blue rubber cement. **** is... ****. I would curse my day when I would go to one of our tire stations and couldn't find the regular cement and had to use the blue goo. I would have to attempt that **** 4 or 5 times to get it to work right, spending over an hour to get paid 2/10 hours labor.
And no, I wasn't retarded enough to try and use blue lube to try and patch a tire. We actually had some cement that was supposed to be fast drying, which was blue in color. The clear regular stuff worked a million times better.
And no, I wasn't retarded enough to try and use blue lube to try and patch a tire. We actually had some cement that was supposed to be fast drying, which was blue in color. The clear regular stuff worked a million times better.
Reply
0
0
11-15-2012, 09:41 AM
#8
Senior Member
Join Date: Nov 2010
Location: Pittsburgh PA
Posts: 1,163
Total Cats: 12
There are dots or markings for the heavier side of the tire. Your supposed to mount this spot opposite of the valve stem. How would you mount it on a duel stem wheel, and would the weight of the patch effect this? Is this all handled during the static and dynamic balancing?
Just questions I wanna know so I can do it right too.
Just questions I wanna know so I can do it right too.
The weight of the patch/plug is actually somewhat immaterial, since you have removed a similar amount of rubber in the application process. Don't worry about where the patch goes, relative to the wheel.
Reply
0
0
11-15-2012, 11:17 AM
#9
Elite Member
iTrader: (1)
Join Date: Feb 2008
Location: Birmingham Alabama
Posts: 7,930
Total Cats: 45
That's what I use on my personal cars, and I agree with your statement. Of course I use those when it's not a goddamn sidewall puncture or failure, which is 90% of the time. I'm not lucky enough to just have a nail or screw in the treads.
Reply
0
0
11-15-2012, 11:35 AM
#10
Tour de Franzia
iTrader: (6)
Join Date: Jun 2006
Location: Republic of Dallas
Posts: 29,085
Total Cats: 375
I've used the rope plug on a shoulder on street tires and NT-01s, I also lived to tell about it. That sidewall puncture rule of thumb is a gimmick to sell tires.
Reply
0
0
11-15-2012, 12:38 PM
#11
Elite Member
iTrader: (1)
Join Date: Feb 2008
Location: Birmingham Alabama
Posts: 7,930
Total Cats: 45
Good luck with that. Treads don't have to endure stresses that the sidewalls do. Under high rotational speeds the sidewalls stretch and expand and move a LOT more than treads. A plug or patch can work itself loose. If it's on a shoulder, depending on how far up it is, I may feel fine about plugging, but if it's an actual sidewall puncture, then hell no.
Sidewall /= Shoulder
Sidewall /= Shoulder
Reply
0
0
11-15-2012, 04:00 PM
#12

not sure if serious. if serious, you're wrong.
2 piece repair.
http://www.patchrubber.com/training/pass_puncture.pdf
1 piece repair is similar.
2 piece repair.
http://www.patchrubber.com/training/pass_puncture.pdf
1 piece repair is similar.
Reply
0
0

Thread
Thread Starter
Forum
Replies
Last Post


