Ziggo's 1993 Miata (its a rescue)
 04-21-2015, 12:54 AM
#22
Elite Member

Join Date: Mar 2007
Location: Santa Clara, CA
Posts: 5,165
Total Cats: 855
See this thread for part #s on the connectors:
https://www.miataturbo.net/general-m...nectors-13131/
You can order the parts from various web sites, online components.com is the one mentioned there, but mouser and digikey also have them. This is useful when one site is out of stock on some part number.

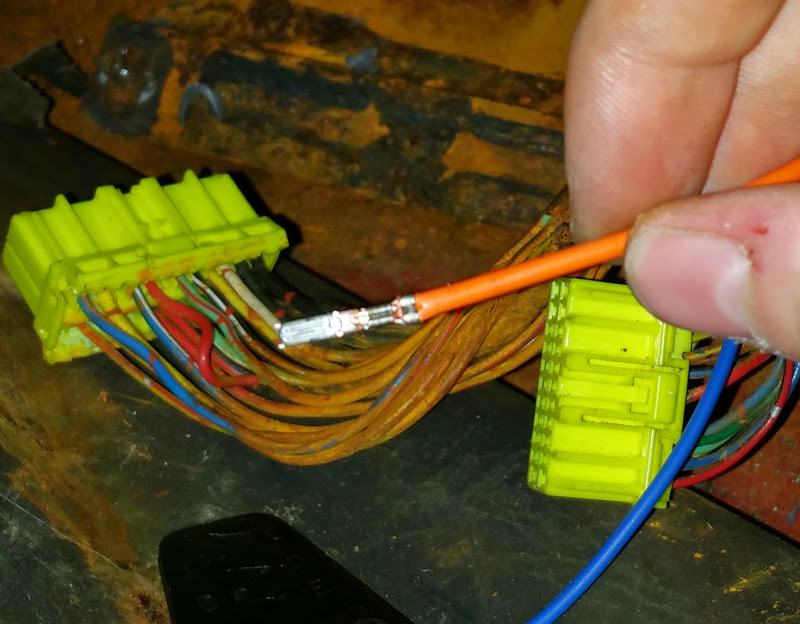
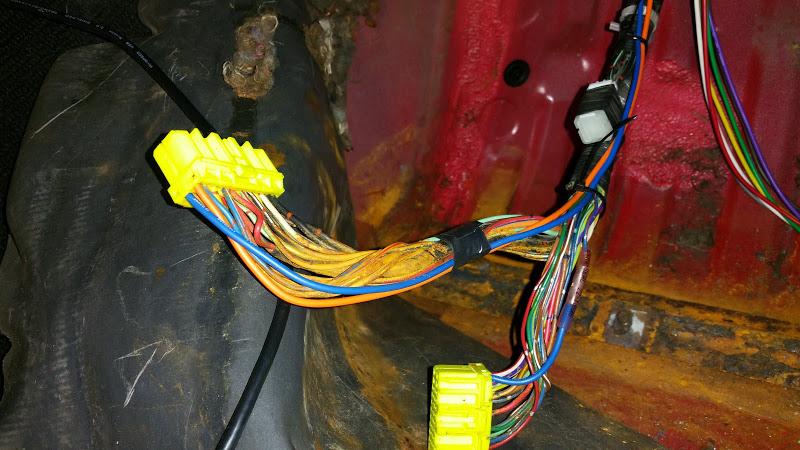
The simplest way to fix a broken wire like that is to get a new ECU pin, crimp it onto what's left of the wire, extract the old pin from the connector shell, and push in the new one. Of course, if all of the other wires are weak like that too, you may wind up doing more than just one pin.
--Ian

Reply
 1
1

1
04-21-2015, 07:49 AM
#24
Junior Member
Thread Starter

Join Date: Mar 2010
Location: Melissa, TX
Posts: 172
Total Cats: 20
I believe the 1990-2000 cars all use the same connectors for the ECU. Note that the pinouts vary, but the physical connectors are the same.
See this thread for part #s on the connectors:
https://www.miataturbo.net/general-m...nectors-13131/
You can order the parts from various web sites, online components.com is the one mentioned there, but mouser and digikey also have them. This is useful when one site is out of stock on some part number.
The simplest way to fix a broken wire like that is to get a new ECU pin, crimp it onto what's left of the wire, extract the old pin from the connector shell, and push in the new one. Of course, if all of the other wires are weak like that too, you may wind up doing more than just one pin.
--Ian
Reply
0
0
 04-26-2015, 01:05 PM
#26
Junior Member
Thread Starter
Join Date: Mar 2010
Location: Melissa, TX
Posts: 172
Total Cats: 20
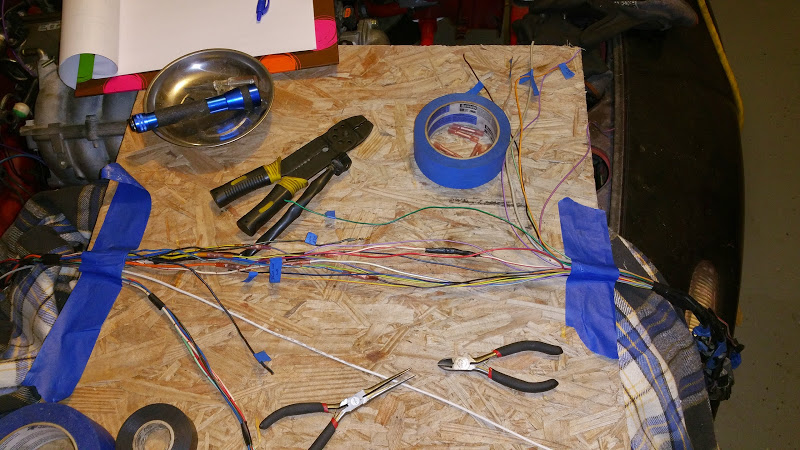
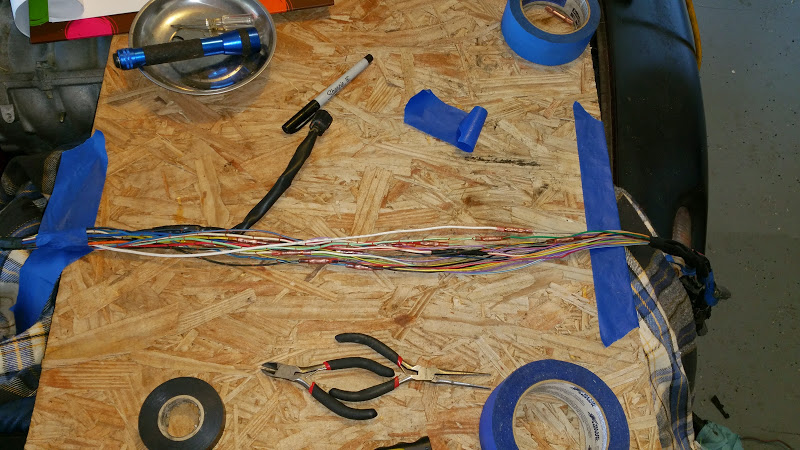
All done with this part. Ran out of crimp connectors, so more will be here tomorrow to do the spark plug wires (+12v, Coil 1&4, Coil 2&3 & VVT) and all the stuff for the ECU in the footwell. Will wait to button it all up pretty till after the motor turns over.
These crimp connectors are the best thing ever. Right size for all the wires I am working on, and includes the heatshrink sleeve and a glue that melts and makes a watertight seal and strain relief when you shrink the sleeving.
These crimp connectors are the best thing ever. Right size for all the wires I am working on, and includes the heatshrink sleeve and a glue that melts and makes a watertight seal and strain relief when you shrink the sleeving.
Reply
0
0
 05-02-2015, 11:09 AM
#28
Junior Member
Thread Starter
Join Date: Mar 2010
Location: Melissa, TX
Posts: 172
Total Cats: 20
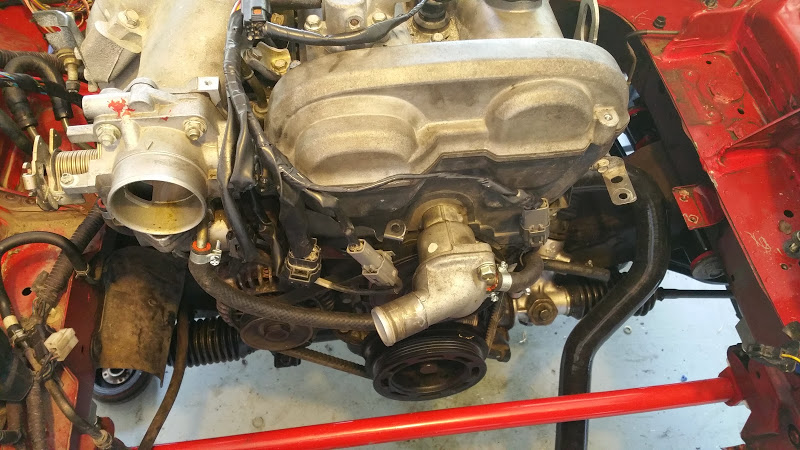
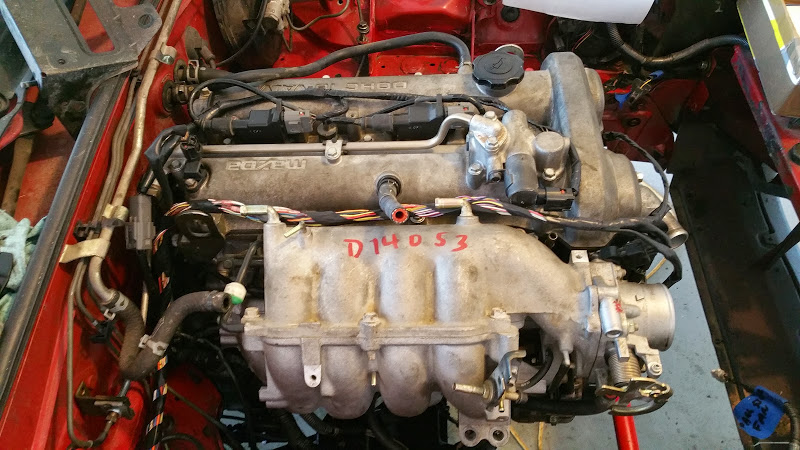
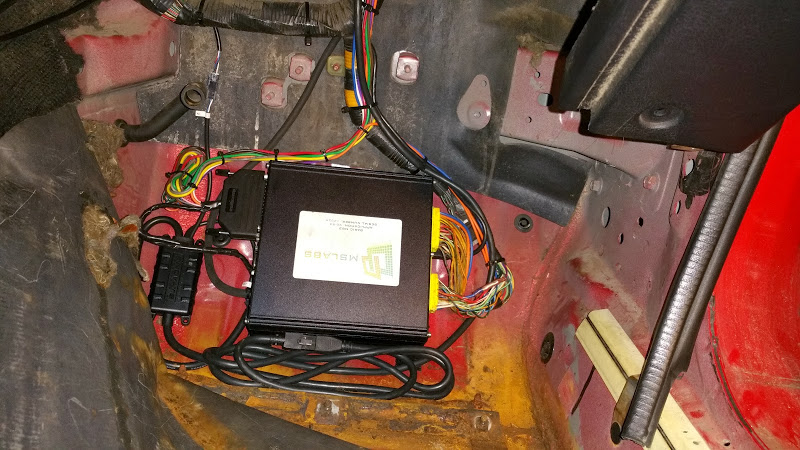
Finished the wiring in the engine bay today, and also spent a few minutes under the car reattaching the PPF, the drive shaft, and some other odds and ends under there. Starting to plot how I am going to attach the ECU, I am thinking just some two sided velcro to the chassis in the passenger footwell, and run a usb cable to the center console. Also ordered a $30 universal radiator fan and a new catalytic converter and clutch master cylinder.
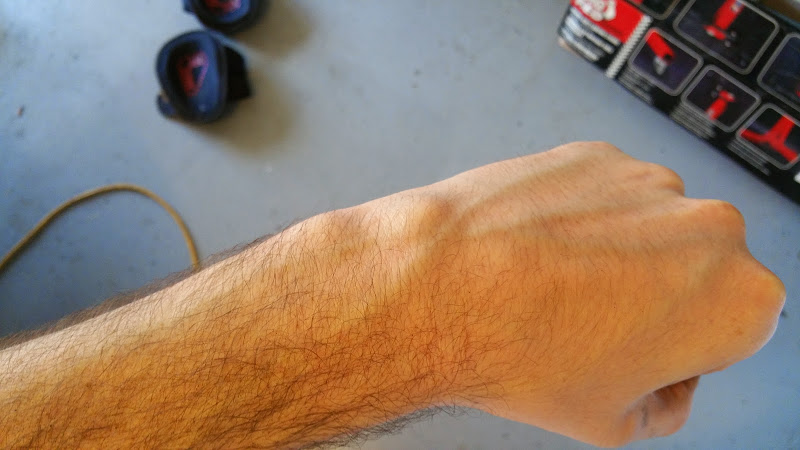
Progress is kind of slowing, I am having alot of trouble with my left wrist. I have an appointment with the orthopedist the week after next so they can take a look at what I think is a ganglion cyst. Its the bump just above where the two veins cross in the below picture. Makes my wrist get very stiff and painful whenever I spend much time working. Been bothering me since before christmas, but its recently gotten alot worse and I noticed the raised area.
Progress is kind of slowing, I am having alot of trouble with my left wrist. I have an appointment with the orthopedist the week after next so they can take a look at what I think is a ganglion cyst. Its the bump just above where the two veins cross in the below picture. Makes my wrist get very stiff and painful whenever I spend much time working. Been bothering me since before christmas, but its recently gotten alot worse and I noticed the raised area.
Reply
0
0
05-06-2015, 09:08 PM
#29
Junior Member
Thread Starter
Join Date: Mar 2010
Location: Melissa, TX
Posts: 172
Total Cats: 20
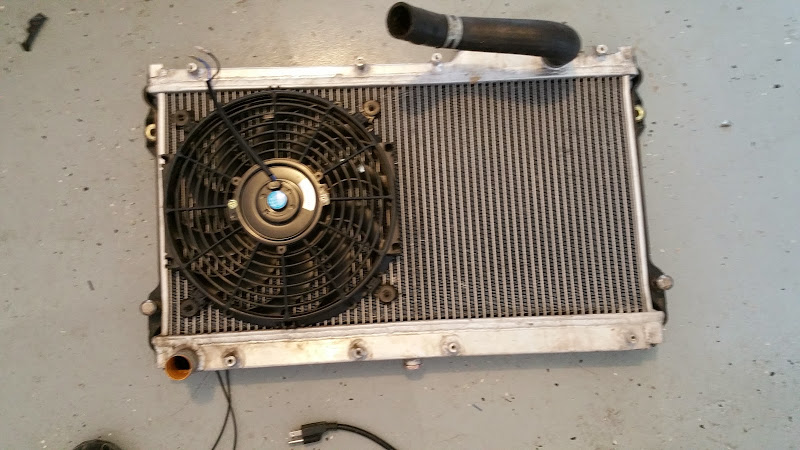
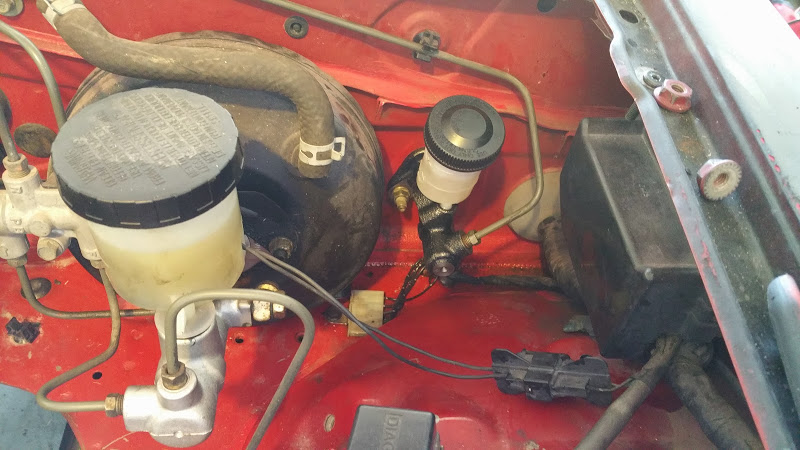
New clutch master cylinder in and clutch line bled. much better than the old rusty piece of **** and I figured since I should replace it anyway since I just did the slave and braided line. I also installed one of those $30 12" universal fit radiator fans. If it doesn't get the job done I'll add a second one.
I also got my quick connect fitting for the fuel rail that adapts the 5/16" quick connect fitting to the 3/8" fuel line.
So I ran the fuel lines too. Pretty simple. Also replaced the throttle cable with one from a 1999 to get the proper length.

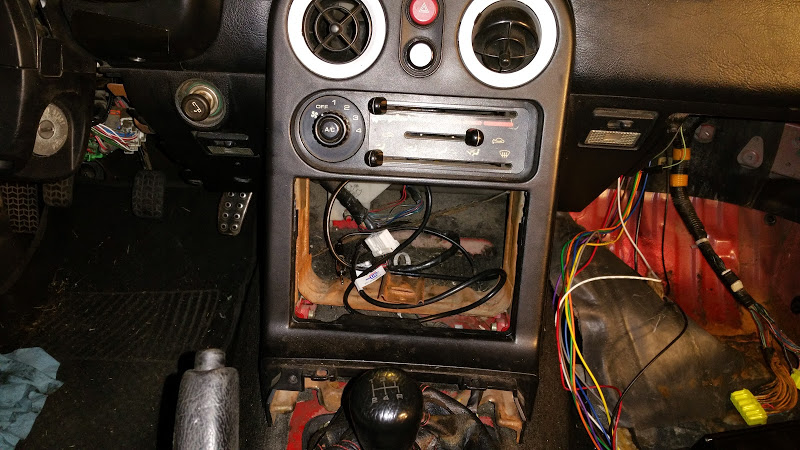
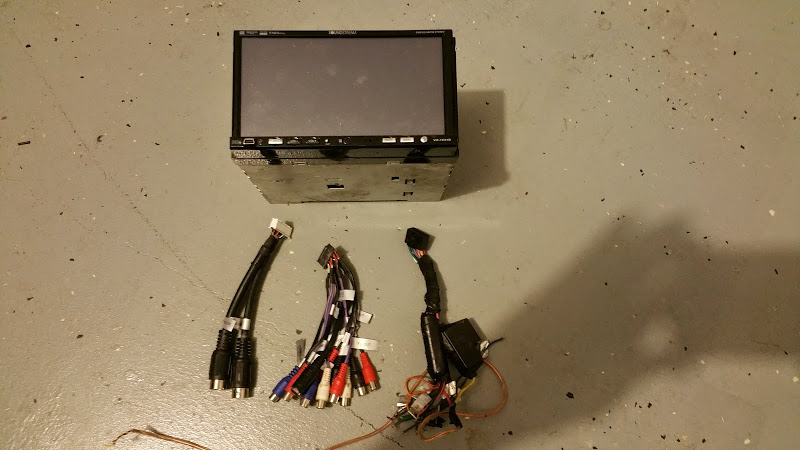
Also removed the DVD/NAV/Radio thing. Destined for craigslist. Will replace with a basic Radio + aux jack, as well as a panel mount USB port for the Megasquirt, and whatever else I feel like at a later date. For now it will just be a cubby hole. Not like I will be able to hear the stereo over the rattles anyway.
I also got my quick connect fitting for the fuel rail that adapts the 5/16" quick connect fitting to the 3/8" fuel line.
So I ran the fuel lines too. Pretty simple. Also replaced the throttle cable with one from a 1999 to get the proper length.
Also removed the DVD/NAV/Radio thing. Destined for craigslist. Will replace with a basic Radio + aux jack, as well as a panel mount USB port for the Megasquirt, and whatever else I feel like at a later date. For now it will just be a cubby hole. Not like I will be able to hear the stereo over the rattles anyway.
Reply
0
0
05-07-2015, 09:20 PM
#31
Junior Member
Thread Starter
Join Date: Mar 2010
Location: Melissa, TX
Posts: 172
Total Cats: 20
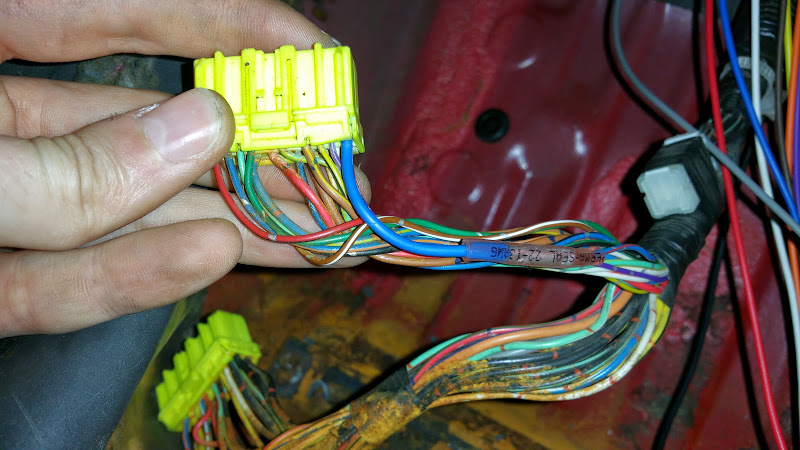
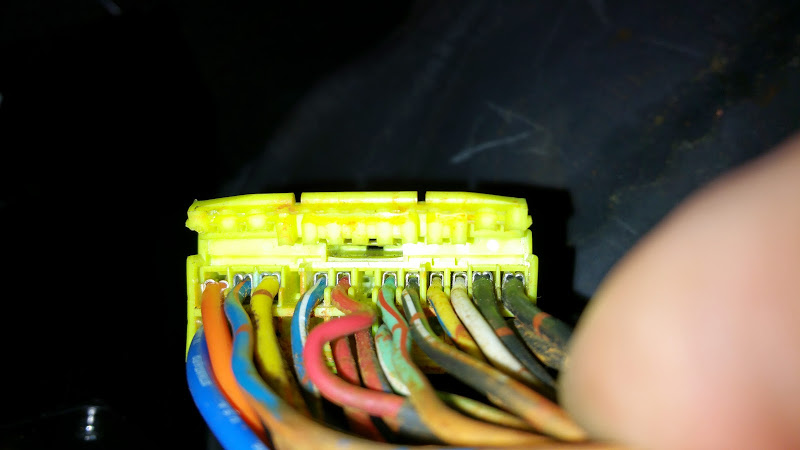
Fixed the +12v on the ECU harness, and added two contacts for the Inj 3 and Inj 4 signals. Sexy crimps if I do say so myself. I learned alot about working with automotive connectors with this project, wont be near as worried about working with them in the future. I could also see why the wire broke off to begin with. Car must have been assembled on a Friday afternoon because many of the insulation crimps that are supposed to provide strain relief were not crimped all the way down. You can see it in the last photo.
Reply
0
0
05-08-2015, 11:22 PM
#32
Junior Member
Thread Starter
Join Date: Mar 2010
Location: Melissa, TX
Posts: 172
Total Cats: 20
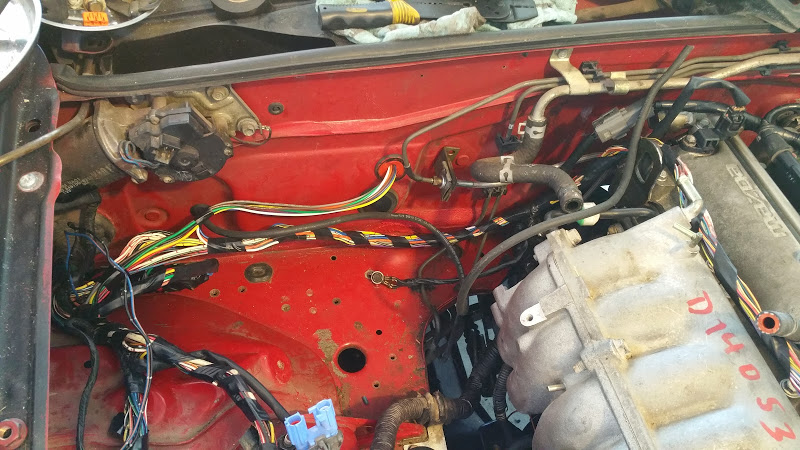
Slow day at work so I left early and spent the entire afternoon\evening working on the miata. Lots accomplished.
Added a wire to the DB-37 connector for the tachometer output. My solder job isn't as pretty, but it gets the job done. I spliced this wire into the tach wire going into the ECU on pin 2I. Since the 2004 coil ignitors don't output a tach signal, this is required for the tachometer in the gauges to work.
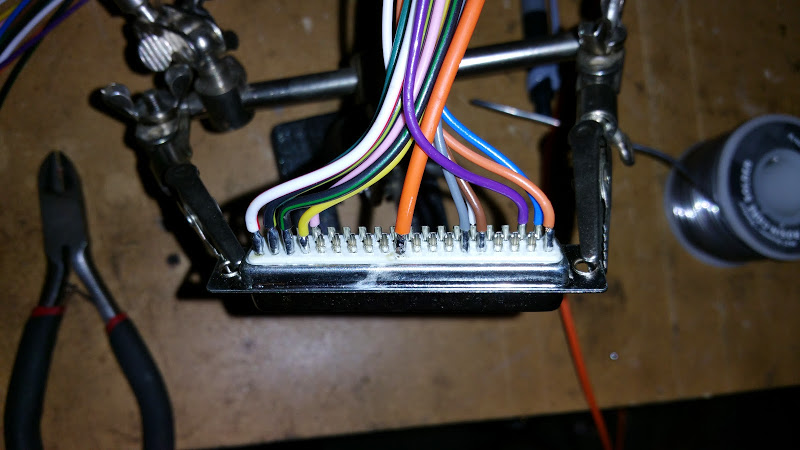
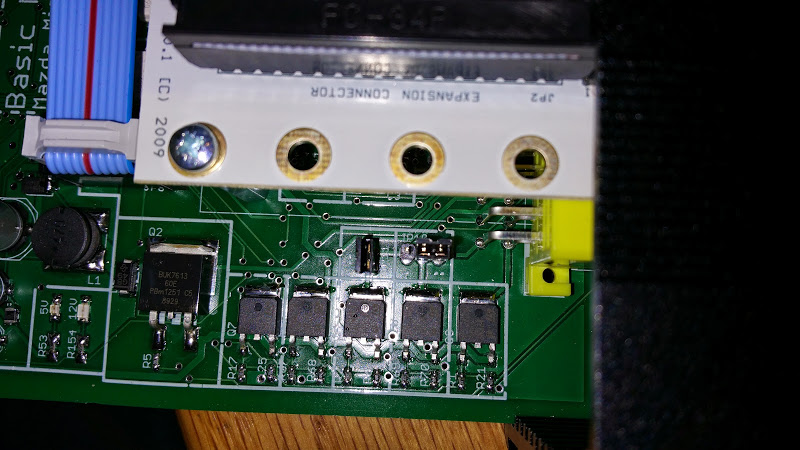
I also changed the JP10 and JP11 jumpers like so inside the ECU to enable sequential fuel output.
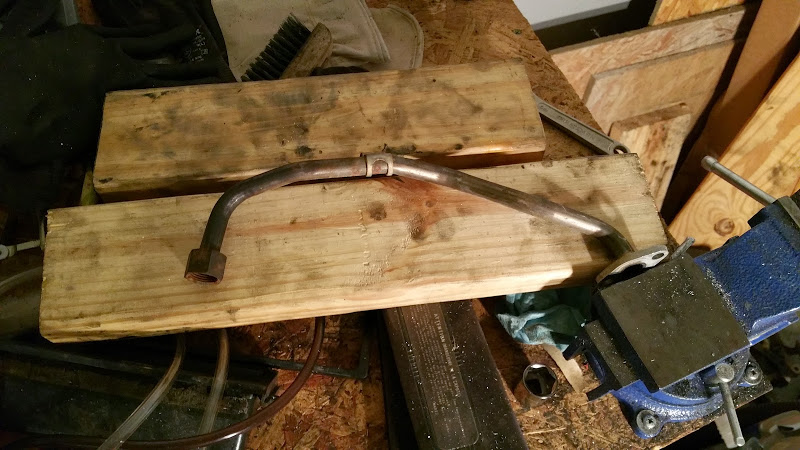
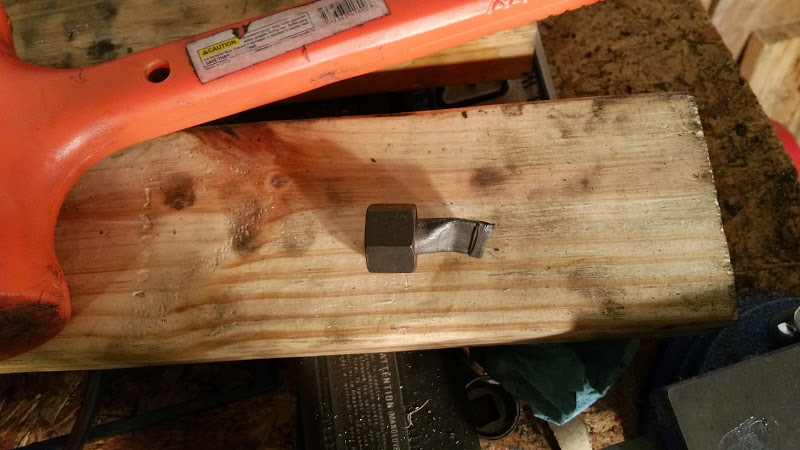
Racing Beat Header arrived, so that went in. The EGR plugs were backordered so I decided to make my own temporary one using the old EGR tube and a liberal application of force. Turned out pretty well.
With the Header in I could size up the wideband install. So ran the wires for it the the ECU and got everything setup around the ECU in the passenger footwell.
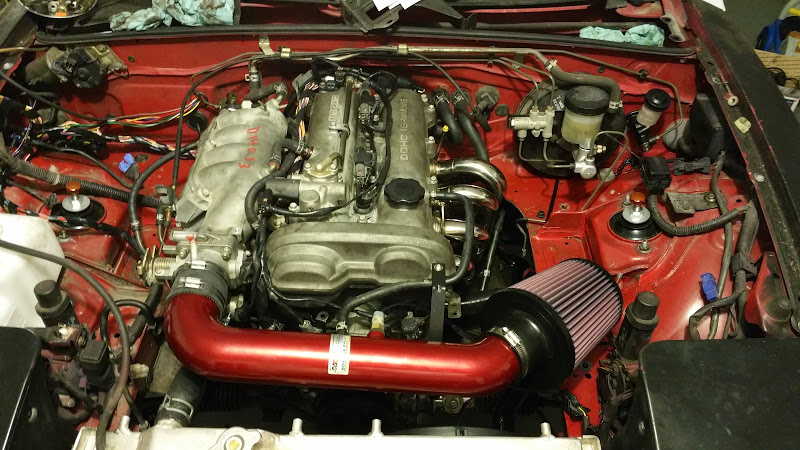
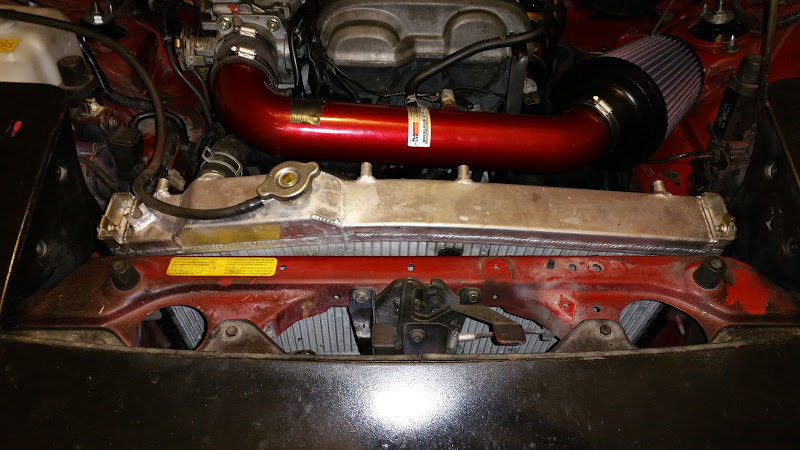
The intake also arrived so I installed the IAT sensor into it, and then ran wires to it from the old AFM cable bundle. I am kinda disappointed in the length of the pigtail DIYAutotune supplies with their GM open element IAT. I had to add an extension of about 10" to reach the AFM cable, resulting in an extra unnecessary crimp connection. Also installed the radiator and stole the connector from the old fan, crimped it to the new fan and got that all taken care of. A little bit of hose work, and this is really starting to look like something.
Tomorrow I will start to bring the car alive. I will go over my checklist to see if there is anything I missed, fresh fluids, and I will power up the ECU and make sure I am seeing a response from all the various sensors. I cant put the transmission fluid in till Sunday when my transfer pump arrives. The one I have is junk, and gravity filling the transmission would likely take all day anyway.
Added a wire to the DB-37 connector for the tachometer output. My solder job isn't as pretty, but it gets the job done. I spliced this wire into the tach wire going into the ECU on pin 2I. Since the 2004 coil ignitors don't output a tach signal, this is required for the tachometer in the gauges to work.
I also changed the JP10 and JP11 jumpers like so inside the ECU to enable sequential fuel output.
Racing Beat Header arrived, so that went in. The EGR plugs were backordered so I decided to make my own temporary one using the old EGR tube and a liberal application of force. Turned out pretty well.
With the Header in I could size up the wideband install. So ran the wires for it the the ECU and got everything setup around the ECU in the passenger footwell.
The intake also arrived so I installed the IAT sensor into it, and then ran wires to it from the old AFM cable bundle. I am kinda disappointed in the length of the pigtail DIYAutotune supplies with their GM open element IAT. I had to add an extension of about 10" to reach the AFM cable, resulting in an extra unnecessary crimp connection. Also installed the radiator and stole the connector from the old fan, crimped it to the new fan and got that all taken care of. A little bit of hose work, and this is really starting to look like something.
Tomorrow I will start to bring the car alive. I will go over my checklist to see if there is anything I missed, fresh fluids, and I will power up the ECU and make sure I am seeing a response from all the various sensors. I cant put the transmission fluid in till Sunday when my transfer pump arrives. The one I have is junk, and gravity filling the transmission would likely take all day anyway.
Reply
0
0
05-08-2015, 11:57 PM
#33
Cpt. Slow
iTrader: (25)
Join Date: Oct 2005
Location: Oregon City, OR
Posts: 14,175
Total Cats: 1,129
If you get a hose and a 2nd person, 5spd tranny fills are easy filling from the back of the engine bay. Mark the hose so you know its barely in, and have the plug ready when it starts dripping out.
Reply
0
0
05-09-2015, 09:41 PM
#34
Junior Member
Thread Starter
Join Date: Mar 2010
Location: Melissa, TX
Posts: 172
Total Cats: 20
Started right up!
Having trouble getting the car to idle at 850, i had to drop the minimum duty cycle on the IAC to 5% for it to work. I backed out the idle screw on the throttle body till it wasnt touching anymore and removed the tension from the throttle cable with no change. I couldn't find any vacuum leaks though. For now idle is set to 950 to give it some control on the low side.
Inspected for leaks, burped the coolant system and verified the fan control works. Everything seems to be in order. Tomorrow I will take it for a short drive and start using VE autotune
Reply
0
0
05-11-2015, 11:28 AM
#35
Junior Member
Thread Starter
Join Date: Mar 2010
Location: Melissa, TX
Posts: 172
Total Cats: 20
Everything seems to be going pretty smoothly, only issue is I seem to have a loose connection with the crank angle sensor. Will have to investigate. Car is quite sprightly with this motor and the 4.3 rear end. I won't say it's fast, but it's decidedly not slow.
Reply
0
0
 05-15-2015, 04:55 PM
#37
Junior Member
Thread Starter
Join Date: Mar 2010
Location: Melissa, TX
Posts: 172
Total Cats: 20
Well this is ******* wacky. I was looking for the source of a noise I was hearing at idle, sounded like a vacuum leak. So I hooked up my boost leak tester and found that the manifold was pressurizing the fuel rail. I checked the FPR and there are no leaks when I pressurize its vacuum line so its not leaking past there. The only thing I can figure is that its leaking back up thru one of the fuel injectors..... Anyone ever seen anything like this before?
Reply
0
0
05-16-2015, 06:09 PM
#38
Junior Member
Thread Starter
Join Date: Mar 2010
Location: Melissa, TX
Posts: 172
Total Cats: 20
So someone pointed me to checking the air gap on the crank position sensor. The gap was .012" per the book I should have set it to .020-.060" so I got out the feeler gauges and set it to .040" Since then I have not had any issues with it.
I removed the fuel rail and applied pressure to FPR and the nozzle of each of the fuel injectors, none of them leaked back. I freed up the seals a bit so they could move on the pintle, and reinstalled. A recheck with my leak tester didn't reveal any leak back into the fuel rail, though I still can hear it leaking around the injector seals. Not ideal, but the car idles smoothly so for now i'll leave it alone.
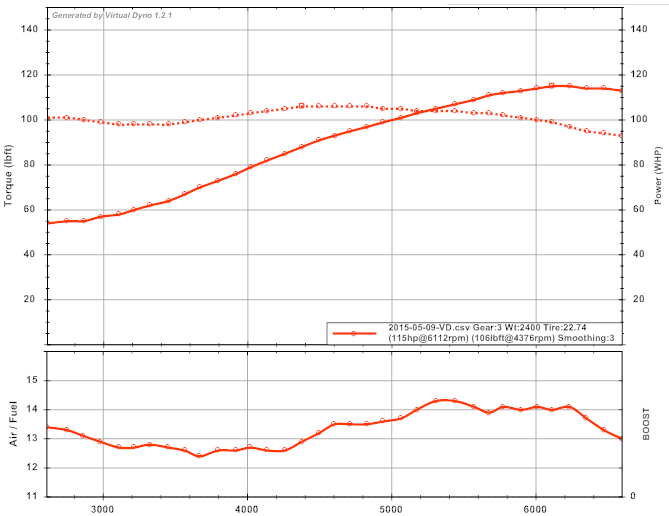
I started messing with the VE autotune, and did a bit of driving around. Worked my way up to full throttle in 3rd gear, no knock seen, so I did a full throttle log just to see where I am at. The VE table certainly needs more work, its was very lean up top, but still no knock.
I removed the fuel rail and applied pressure to FPR and the nozzle of each of the fuel injectors, none of them leaked back. I freed up the seals a bit so they could move on the pintle, and reinstalled. A recheck with my leak tester didn't reveal any leak back into the fuel rail, though I still can hear it leaking around the injector seals. Not ideal, but the car idles smoothly so for now i'll leave it alone.
I started messing with the VE autotune, and did a bit of driving around. Worked my way up to full throttle in 3rd gear, no knock seen, so I did a full throttle log just to see where I am at. The VE table certainly needs more work, its was very lean up top, but still no knock.
Reply
0
0
05-17-2015, 04:56 PM
#39
Junior Member
Thread Starter
Join Date: Mar 2010
Location: Melissa, TX
Posts: 172
Total Cats: 20
timing light arrived, so I set the base timing and spend some more time running driving filling in the VE table. Base timing was 1.2 degrees retarded. New logs are not all from the base timing, I also put the top up which I figure helps the drag, and wanted it to be consistent for future runs. Don't have any sunscreen so I am not ready to tool around for a long time with the top down.
Not going to mess with the tune any more. It seems pretty well set, and I am not concerned with power right now. Based on the results I could probably pick up a few more ponies if I needed to by mucking with the timing and running premium gas. Next thing to do will be to try and find the source of some of the rattles. It also sounds like my rotors are rubbing the dust shields too so I will need to pull the wheels and see if I can find the source of that.
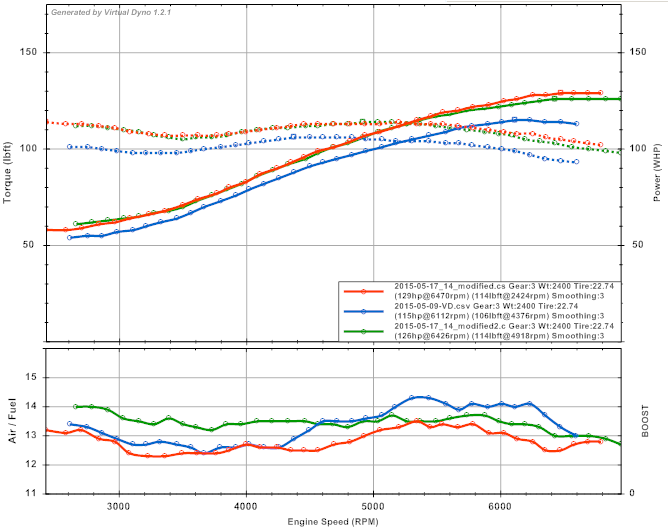
Not going to mess with the tune any more. It seems pretty well set, and I am not concerned with power right now. Based on the results I could probably pick up a few more ponies if I needed to by mucking with the timing and running premium gas. Next thing to do will be to try and find the source of some of the rattles. It also sounds like my rotors are rubbing the dust shields too so I will need to pull the wheels and see if I can find the source of that.
Reply
0
0
05-23-2015, 06:46 PM
#40
Junior Member
Thread Starter
Join Date: Mar 2010
Location: Melissa, TX
Posts: 172
Total Cats: 20
So much fail, one post may not be able to contain it all.
I was going in search of rattles, in reviewing my previous work I discovered that I fucked up the pilot bearing install, I didn't get it all the way flush in the flywheel. Thinking that this may be the source of a rattle (pilot bearing no longer seated) I was resigned to dropping the transmission.
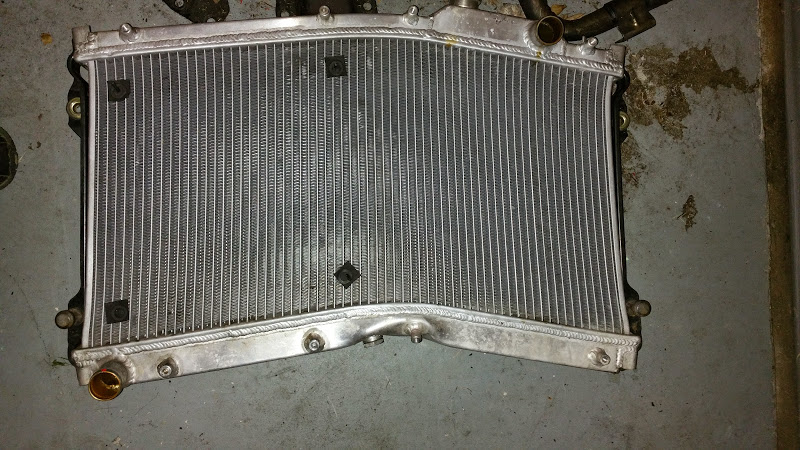
So first fail: I decided to use my fancy new HF jack to lift the car from the front subframe. I was pumping it up, saw that it wasnt rolling forward like it should, decided I would give it a couple more pumps *CRASH* Jack kicked out towards the front of the car, bouncing off the steering rack, oil pan, sway bar, and finally the radiator.
Everything seems to be ok, except for the radiator.....
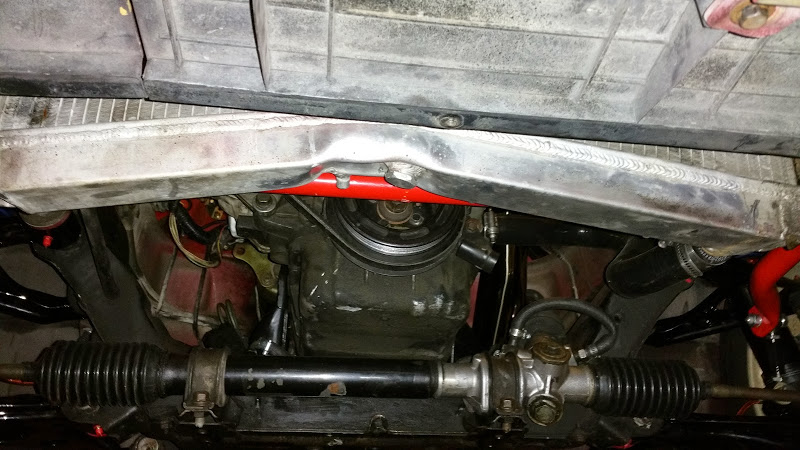
Talk about some ductile aluminum. It didn't suffer a significant crack anywhere.
Making space to work with the transmission means removing the header and catalytic converter.
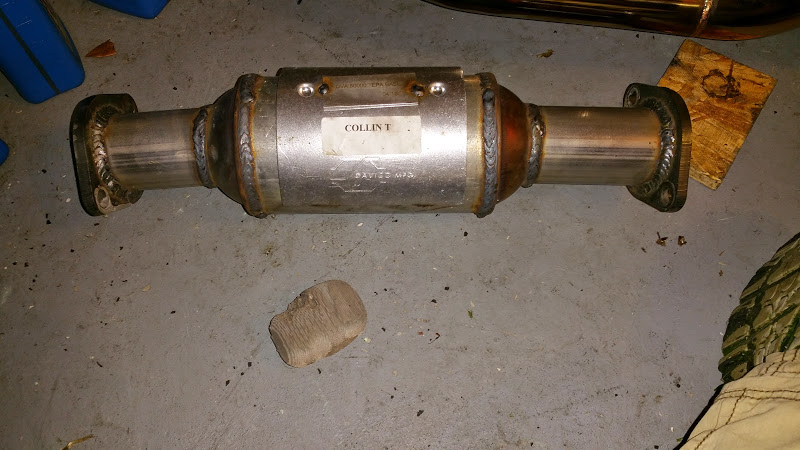
Probably was the source of my rattle, and some of the other weird behavior that I assumed was a product of the tune, intermittently I would get a weird exhaust note and a lack of power, which was probably the loose cat turned sideways, and a definite whistling sound. Both were becoming more frequent. I guess I have a test pipe now. I bought the cat because it was basically the same price as race pipes I was seeing. I don't care enough to replace it, I don't have to pass smog.
The rest of it went pretty smooth. Trans off, pound pilot bearing the rest of the way in, (it was still half seated) trans back on. Took about 5 hours, I am sore as hell though, I don't have a transmission jack so I was mostly just manhandling the transmission. I put a 2x4 over the hole in the transmission tunnel and wrapped a length of nylon rope around it and the transmission so I could keep the tail up while I worked on aligning the bellhousing. I also used a tail plug duct taped to the tail to keep the transmission fluid in, which worked pretty well, just lost a few drops when I pulled the plug to install the driveshaft. I also hit the universal joints in the driveshaft with the grease gun just because. The transmission end of it was not as free moving as I would like.
Now to shop radiators. The price on these things is everywhere. From a $50 shipped, plastic tanked, china special: Radiator for Mazda Fits Miata 1 8 L4 4CYL | eBay
A replacement for what I already had is $120 (I don't think they know what 2 row means)
Aluminum Radiator Fits Mazda Miata MX 5 MX5 L4 1 6 1 8 2row 1990 1997 MT | eBay
To a decent Koyo for $340 shipped:
VH060245 Koyo Racing Radiator 1989 1997 Mazda Miata MX 5 Hyper V Core 36mm | eBay
to ******* $600 for one with all the bells and whistles
Trackspeed Engineering
I may slap a turbo on this car and take it to the track at some point. So I am tempted to go big. But that is also years in the future so I wont need all that capacity, but cooler coolant never hurt anyone.. ugh.
I was going in search of rattles, in reviewing my previous work I discovered that I fucked up the pilot bearing install, I didn't get it all the way flush in the flywheel. Thinking that this may be the source of a rattle (pilot bearing no longer seated) I was resigned to dropping the transmission.
So first fail: I decided to use my fancy new HF jack to lift the car from the front subframe. I was pumping it up, saw that it wasnt rolling forward like it should, decided I would give it a couple more pumps *CRASH* Jack kicked out towards the front of the car, bouncing off the steering rack, oil pan, sway bar, and finally the radiator.
Everything seems to be ok, except for the radiator.....
Talk about some ductile aluminum. It didn't suffer a significant crack anywhere.
Making space to work with the transmission means removing the header and catalytic converter.
Probably was the source of my rattle, and some of the other weird behavior that I assumed was a product of the tune, intermittently I would get a weird exhaust note and a lack of power, which was probably the loose cat turned sideways, and a definite whistling sound. Both were becoming more frequent. I guess I have a test pipe now. I bought the cat because it was basically the same price as race pipes I was seeing. I don't care enough to replace it, I don't have to pass smog.
The rest of it went pretty smooth. Trans off, pound pilot bearing the rest of the way in, (it was still half seated) trans back on. Took about 5 hours, I am sore as hell though, I don't have a transmission jack so I was mostly just manhandling the transmission. I put a 2x4 over the hole in the transmission tunnel and wrapped a length of nylon rope around it and the transmission so I could keep the tail up while I worked on aligning the bellhousing. I also used a tail plug duct taped to the tail to keep the transmission fluid in, which worked pretty well, just lost a few drops when I pulled the plug to install the driveshaft. I also hit the universal joints in the driveshaft with the grease gun just because. The transmission end of it was not as free moving as I would like.
Now to shop radiators. The price on these things is everywhere. From a $50 shipped, plastic tanked, china special: Radiator for Mazda Fits Miata 1 8 L4 4CYL | eBay
A replacement for what I already had is $120 (I don't think they know what 2 row means)
Aluminum Radiator Fits Mazda Miata MX 5 MX5 L4 1 6 1 8 2row 1990 1997 MT | eBay
To a decent Koyo for $340 shipped:
VH060245 Koyo Racing Radiator 1989 1997 Mazda Miata MX 5 Hyper V Core 36mm | eBay
to ******* $600 for one with all the bells and whistles
Trackspeed Engineering
I may slap a turbo on this car and take it to the track at some point. So I am tempted to go big. But that is also years in the future so I wont need all that capacity, but cooler coolant never hurt anyone.. ugh.
Reply
0
0


