
brake duct prawns


 02-21-2012, 07:24 PM
#63
Elite Member

iTrader: (2)
Join Date: May 2008
Location: Portland, Oregon
Posts: 3,468
Total Cats: 365
I considered that as well, was going to run them off of the fog light connectors. I decided the ducting from the foglight holes would be sufficient.
One option - look at using ducted fans from small RC aircraft. They come in any number of sizes/voltage/current draw. Finding a 50mm fan should be pretty simple.
One option - look at using ducted fans from small RC aircraft. They come in any number of sizes/voltage/current draw. Finding a 50mm fan should be pretty simple.

Reply
 0
0

0
02-21-2012, 08:17 PM
#64
Elite Member
iTrader: (2)
Join Date: May 2008
Location: Portland, Oregon
Posts: 3,468
Total Cats: 365
Something like this: http://www.hobbyking.com/hobbyking/s...z_Thrust_.html
Comes with a brushed motor, which makes for easy hookup - no esc needed. You would need to drop the voltage going to it down to 7v or less, however. Only a 4amp draw so shouldn't tax the wiring.
The 55mm would blow quite a bit more air but wouldn't fit as nicely to a 2" diameter hose.
Comes with a brushed motor, which makes for easy hookup - no esc needed. You would need to drop the voltage going to it down to 7v or less, however. Only a 4amp draw so shouldn't tax the wiring.
The 55mm would blow quite a bit more air but wouldn't fit as nicely to a 2" diameter hose.
Reply
0
0
02-24-2012, 06:19 AM
#65

Kit will come with 11ft of high-temp (500*F) 2" hose, hose clamps, and a handful of zipties to keep everything out of the way.
They will install without removing the hub, but the old dust shields are a PITA to get off with the hub in the way. You really want to just buy two new nuts and dustcaps and remove the hubs - trust us on that. It's $20 well spent.
There's a GB link in our sponsor section, but I wanted to make sure the track crew saw these.
Reply
0
0
02-24-2012, 06:26 AM
#66
If you guys arent worried about cutting your bumpers, I have a pair of curved NACA ducts that match the contour of the bumper perfectly. Like so.
http://t3.gstatic.com/images?q=tbn:A...-wsLILGCh089NA
Pick some up like that, in 2.5'' and rivet them on.
http://t3.gstatic.com/images?q=tbn:A...-wsLILGCh089NA
Pick some up like that, in 2.5'' and rivet them on.
Reply
0
0
07-15-2012, 08:17 PM
#67
Elite Member

Join Date: May 2008
Location: Canada
Posts: 1,981
Total Cats: 2,224
I posted this on the other list, but thought I'd copy it here, in case anybody's interested:
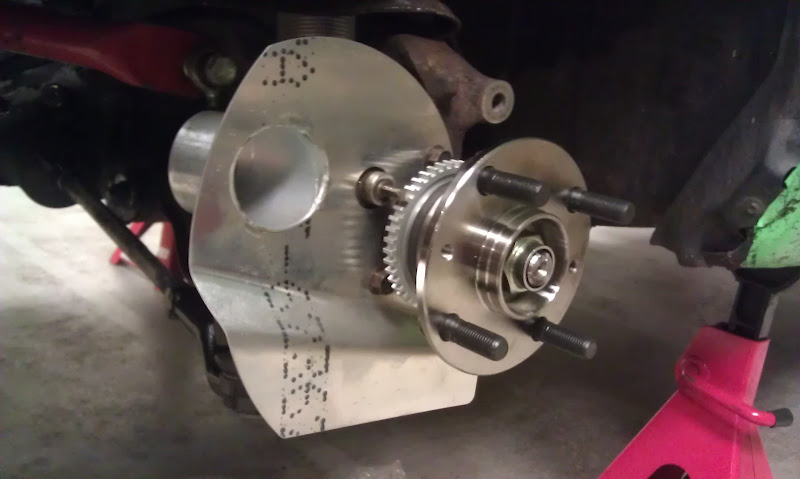
I picked up a set of TSE brake ducts from FM this spring and finally got around to installing them in anticipation of several upcoming track days. Getting the hub bolt off was a minor pain, but everything went relatively smoothly, until I examined my rotor (Goodwin BBK, v.2, IIRC). All the bolts holding the friction ring were loose and one had come completely out (first pic). It had caught in the edge of the hat and made a lovely gouge in the bracket (second picture). I don't think it's fatal, so I retorqued the friction ring bolts using Resbond left over from my Inconel stud install and continued on.
Final picture shows the installed brake duct. It went on very smoothly, with no fitment issues whatsoever. I ran out of time, so I'll do the second duct later this week. I'm interested to see if the rotor bolts are loose there as well. I'm probably going to pull off the rear rotors and double-check them as well.
Reply
0
0
07-16-2012, 03:19 AM
#68
Former Vendor
Thread Starter
iTrader: (31)

Join Date: Nov 2006
Location: Sunnyvale, CA
Posts: 15,442
Total Cats: 2,099
Way scary. That bracket would make me a little nervous now.
Just FYI, when you order an 11.75" BBK from us, the bolts thread straight into the hat (no nuts on the backside), and we Resbond and safety wire them into place here at the shop before they ship out. Absolutely no chance of that ever happening.
Glad the ducts are working as intended
Just FYI, when you order an 11.75" BBK from us, the bolts thread straight into the hat (no nuts on the backside), and we Resbond and safety wire them into place here at the shop before they ship out. Absolutely no chance of that ever happening.
Glad the ducts are working as intended
Reply
0
0
 07-16-2012, 08:55 PM
#71
Elite Member
Join Date: Mar 2007
Location: Santa Clara, CA
Posts: 5,165
Total Cats: 855
The Goodwin hats (at least, on version 1/2 -- I think the pictured one is version 3) aren't threaded, and drilling a nut that small for safety wire is pretty difficult. This is why I tossed out the hardware store coarse thread bolts that came with my kit and used aircraft bolts from coast fabrication instead.
DeerHunter: Are you reusing the gouged-up bracket?
--Ian
DeerHunter: Are you reusing the gouged-up bracket?
--Ian
Reply
0
0
07-17-2012, 01:07 AM
#72
Elite Member
Join Date: May 2008
Location: Canada
Posts: 1,981
Total Cats: 2,224
Ian, according to Brian Goodwin, this is the hardware on my BBK (it seems to match up well with what I saw). I've had the kit for several years and never bothered to take it apart until now (it's primarily a street car), so my results may not be typical. I'll be checking these annually from now on though.
And yes, I'll re-use the bracket since it's pretty meaty (much thicker than the Willwood-provided piece) and the gouge isn't that deep. I checked with Brian and Keith Tanner on this issue and they both concur that it should be fine.
And yes, I'll re-use the bracket since it's pretty meaty (much thicker than the Willwood-provided piece) and the gouge isn't that deep. I checked with Brian and Keith Tanner on this issue and they both concur that it should be fine.
Reply
0
0
07-17-2012, 06:33 PM
#73
Elite Member
Join Date: Mar 2007
Location: Santa Clara, CA
Posts: 5,165
Total Cats: 855
Ian, according to Brian Goodwin, this is the hardware on my BBK (it seems to match up well with what I saw). I've had the kit for several years and never bothered to take it apart until now (it's primarily a street car), so my results may not be typical. I'll be checking these annually from now on though.
And yes, I'll re-use the bracket since it's pretty meaty (much thicker than the Willwood-provided piece) and the gouge isn't that deep. I checked with Brian and Keith Tanner on this issue and they both concur that it should be fine.
And yes, I'll re-use the bracket since it's pretty meaty (much thicker than the Willwood-provided piece) and the gouge isn't that deep. I checked with Brian and Keith Tanner on this issue and they both concur that it should be fine.
--Ian
Reply
0
0
08-14-2012, 02:02 AM
#74
Elite Member
Join Date: May 2008
Location: Canada
Posts: 1,981
Total Cats: 2,224
The final install presented one major problem, in that the FM-supplied hose was ever-so-smaller than the neck on the TSE ducts. I finally solved the issue by removing a few coils of the inner "spring" winding, which allowed enough clearance to install. The other end connected to some plumbing adapters procured from Home Depot Motorsports (TM), which were screwed into my front air dam.
I thought I had routed the hose on both sides the same way, but the passenger side became discombobulated (see third attachment) and got into a position that allowed the hose to be crushed between the anti-roll bar and A-arm. I used a pair of pliers to round it out again (the material is tough) and routed it like you see in the last picture, which seems to present no more problems. First track day evaluation below:
I thought I had routed the hose on both sides the same way, but the passenger side became discombobulated (see third attachment) and got into a position that allowed the hose to be crushed between the anti-roll bar and A-arm. I used a pair of pliers to round it out again (the material is tough) and routed it like you see in the last picture, which seems to present no more problems. First track day evaluation below:
Reply
0
0
08-14-2012, 02:02 AM
#75
Elite Member
Join Date: May 2008
Location: Canada
Posts: 1,981
Total Cats: 2,224
Yesterday, I was fortunate enough to be able to do some "run what ya brung" lapping (two 45 minute sessions - plenty of seat time) at the temporary Indy Car track here in Edmonton. We don't have anything better than a go-cart track locally, so this was huge for local gearheads. We had a little bit of everything running at the same time, from the usual Miata contingent to modded Hondas, Evos (various vintages), BMWs, Porsches - up to a brand-new Audi R8 GT and Ferrari 458 (drool).
The first session went extremely well, and I passed just about everyone. My cooling setup was finally working as hoped, allowing for almost uninterrupted lapping with nary a wisp of steam in sight. The brakes (using PF-01 pads) were absolutely phenomenal, allowing me to dive into corners deep enough to elicit comments from watching seasoned racers. The track features 3 hairpin corners at the end of long straights, and I was blowing by the initial braking markers at approximately 180 km/h, leaving plenty in reserve to avoid any off-track excursions (and intimate acquaintance with some very solid-looking concrete barriers). At the end of the session, after a cool-down lap and driving to my parking spot, the front rotors were seeing temps of only 350F. My brother's BMW 330, on the other hand, was topping 500F. I think the ducts work as advertised.
The first session went extremely well, and I passed just about everyone. My cooling setup was finally working as hoped, allowing for almost uninterrupted lapping with nary a wisp of steam in sight. The brakes (using PF-01 pads) were absolutely phenomenal, allowing me to dive into corners deep enough to elicit comments from watching seasoned racers. The track features 3 hairpin corners at the end of long straights, and I was blowing by the initial braking markers at approximately 180 km/h, leaving plenty in reserve to avoid any off-track excursions (and intimate acquaintance with some very solid-looking concrete barriers). At the end of the session, after a cool-down lap and driving to my parking spot, the front rotors were seeing temps of only 350F. My brother's BMW 330, on the other hand, was topping 500F. I think the ducts work as advertised.
Last edited by DeerHunter; 08-14-2012 at 02:29 AM.
Reply
0
0
08-14-2012, 02:07 AM
#76
Former Vendor
Thread Starter
iTrader: (31)
Join Date: Nov 2006
Location: Sunnyvale, CA
Posts: 15,442
Total Cats: 2,099
Glad to hear it.  You can extend the life of the ducting a ton by attaching them to the tie rod end. That will translate the motion of the wheel into a straight in-out extension of the duct, rather than bending it back and forth like you have it now.
You can extend the life of the ducting a ton by attaching them to the tie rod end. That will translate the motion of the wheel into a straight in-out extension of the duct, rather than bending it back and forth like you have it now.
Reply
0
0
 08-14-2012, 05:50 PM
#79
Elite Member
Join Date: May 2008
Location: Canada
Posts: 1,981
Total Cats: 2,224
Video from morning lapping session can be found here. Several observers commented upon how strong my brakes appeared, even compared to some high-buck machinery. I was leaving a lot on the table (that old self-preservation instinct), but I was impressed with how it all works now.
I'm so stoked about that day. Luckily I get to do it again in 2 weeks.
Edit: Original upload to YouTube failed. New (working) link is up.
Edit: Original upload to YouTube failed. New (working) link is up.
Last edited by DeerHunter; 08-15-2012 at 12:37 AM.
Reply
0
0


