
Oil cooler tech
 12-25-2016, 07:17 AM
#341
Junior Member

Join Date: Dec 2015
Location: Brisbane, Queensland, Australia
Posts: 213
Total Cats: 67
The positively awesome fab work demonstrated above makes my efforts look rather basic. For those of us with access to more basic tools/skills I thought I'd share my work in progress attempt at a front right bumper/wing void oil cooler install.
I was inspired by the work that Lokiel completed, which can be seen here Foglight Oil Cooler install
For my purposes, I wanted to route the hoses to and from the cooler above the rail rather than under it, and to fit a filter relocation block with the filter hanging downwards rather than sideways or facing up.
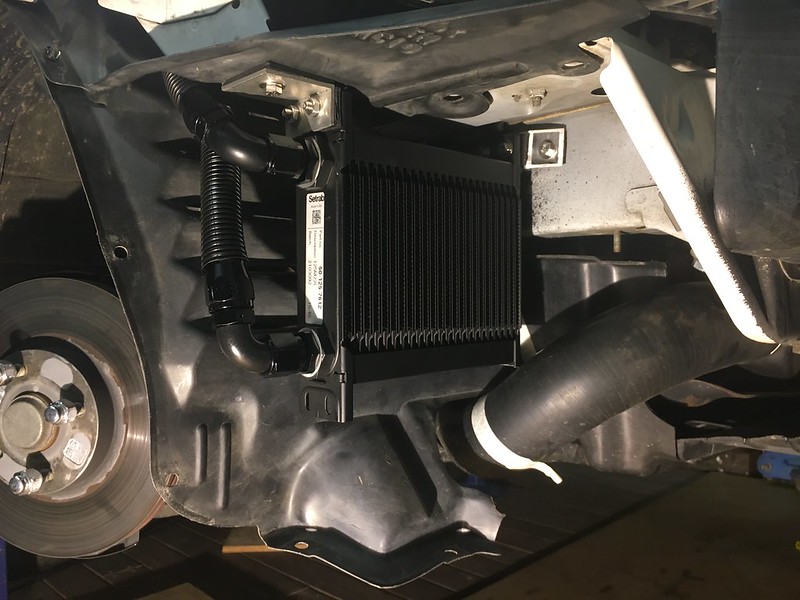
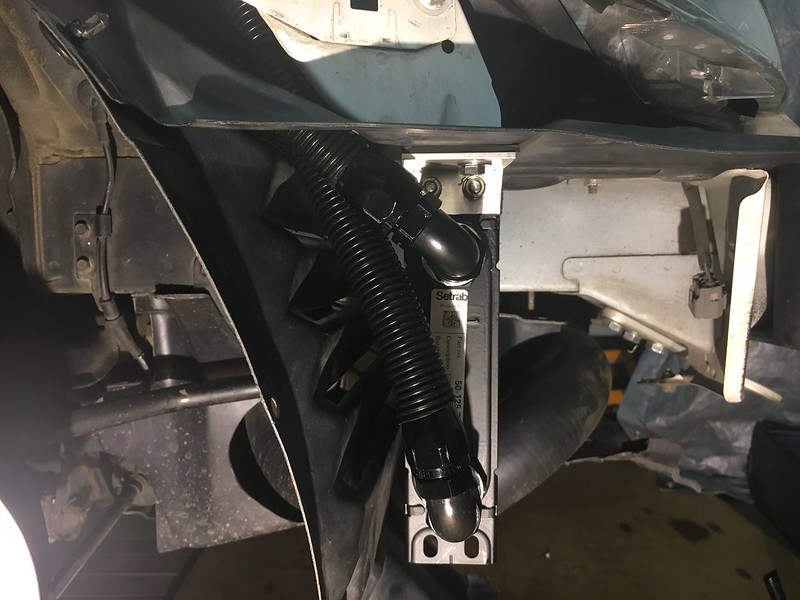
Mounted in this location, there is ample room to route the hoses down behind the headlight and into the void. This path requires cutting a small hole in the guard liner for the lines to pass through, but the lines do not intrude the wheel well. I used split loom to protect the hoses where they pass through the liner.
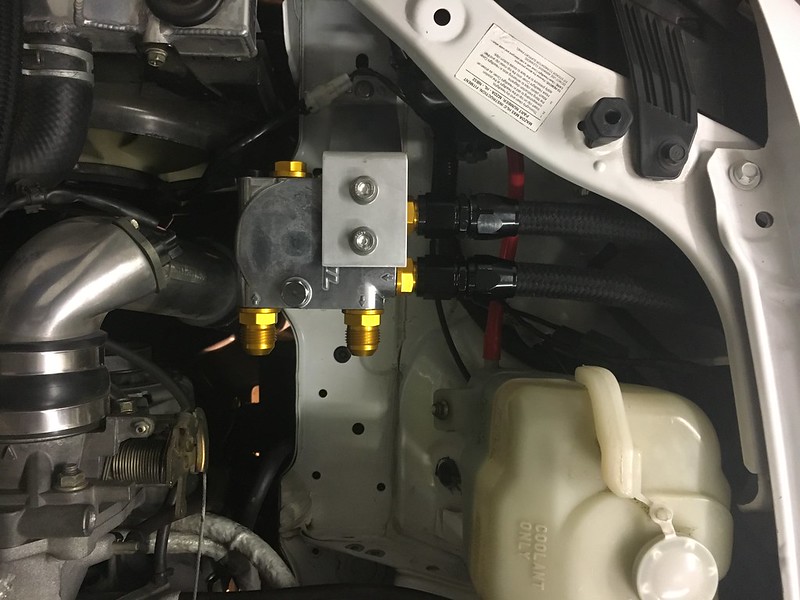
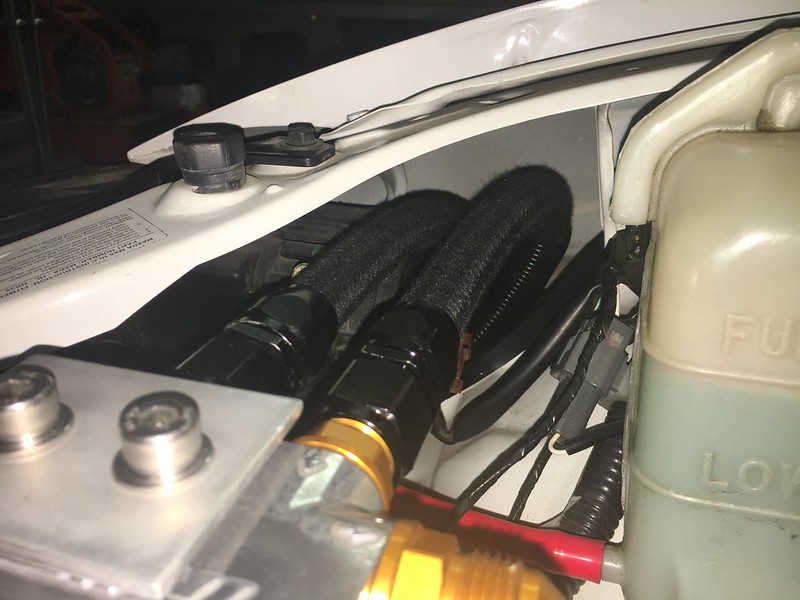
This is what the arrangement looks like from the engine bay:
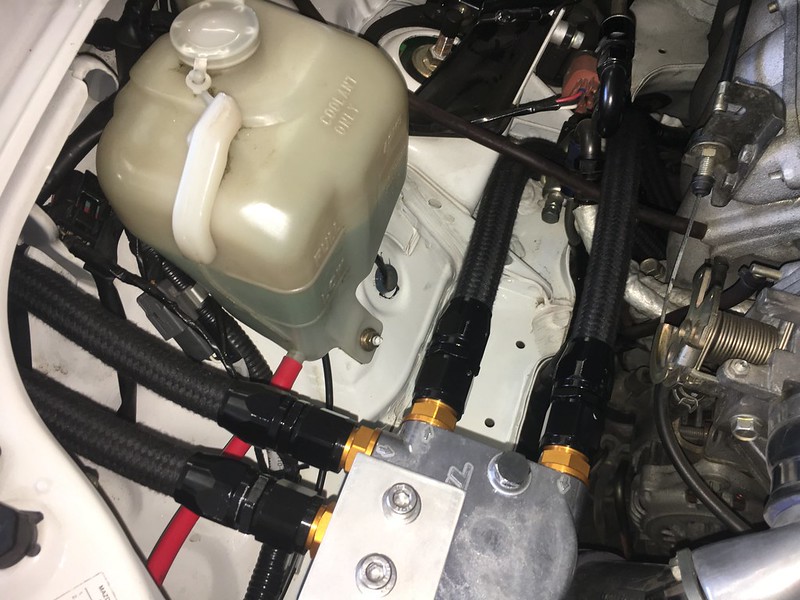
I have not put together ducting as yet, but plan to use the existing fog light hole as a source of airflow.
The brackets for the oil cooler and filter block are aluminium flat bar, angle and box section from the hardware store, fixed with nutserts and M6 bolts and packed with 3mm insertion rubber. The cooler is a Setrab, the filter block and relocation block are Grex/Greddy units, and the hose and ends are Speedflow 10AN.
I was inspired by the work that Lokiel completed, which can be seen here Foglight Oil Cooler install
For my purposes, I wanted to route the hoses to and from the cooler above the rail rather than under it, and to fit a filter relocation block with the filter hanging downwards rather than sideways or facing up.
Mounted in this location, there is ample room to route the hoses down behind the headlight and into the void. This path requires cutting a small hole in the guard liner for the lines to pass through, but the lines do not intrude the wheel well. I used split loom to protect the hoses where they pass through the liner.
This is what the arrangement looks like from the engine bay:
I have not put together ducting as yet, but plan to use the existing fog light hole as a source of airflow.
The brackets for the oil cooler and filter block are aluminium flat bar, angle and box section from the hardware store, fixed with nutserts and M6 bolts and packed with 3mm insertion rubber. The cooler is a Setrab, the filter block and relocation block are Grex/Greddy units, and the hose and ends are Speedflow 10AN.

Reply
 2
2

2
 01-04-2017, 07:06 PM
#343

Reply
1
1
01-06-2017, 11:20 AM
#344
Senior Member

Join Date: Jul 2015
Posts: 1,014
Total Cats: 140
Why haven't I read this thread earlier? A+ on the wealth of info in here!
Australian, I like that stealthy placement, but please keep in mind that rotating wheels create pressure in the wheel well and radiators work across pressure differentials. I much prefer mx592 way of venting it, albeit I would use a small gurney flap on the bumper, right before the vent opening to generate some suction in this area.
Australian, I like that stealthy placement, but please keep in mind that rotating wheels create pressure in the wheel well and radiators work across pressure differentials. I much prefer mx592 way of venting it, albeit I would use a small gurney flap on the bumper, right before the vent opening to generate some suction in this area.
Reply
0
0
05-25-2017, 06:36 PM
#345
Retired Mech Design Engr

iTrader: (3)
Join Date: Jan 2013
Location: Seneca, SC
Posts: 5,009
Total Cats: 856
I'm trying to picture where I might fit a 16 row Setrab in my '99 with A/C.
It seems to me that everything would work better if replacing the condenser from a NB2 would get the dryer out of the way and allow me to move the FMIC back 1.5 inches.
Will an NB2 condenser fit in an NB1?
Is the smaller, side mounted drier only about as thick as the condenser, as it appears to be in pictures?
Would I need to purchase a complete, new condenser, or is the drier a separate piece?
Otherwise, I may put the oil cooler above the FMIC, but that will not be so easily done.
Reply
0
0
05-25-2017, 06:50 PM
#346
Elite Member
iTrader: (37)

Join Date: Apr 2010
Location: Very NorCal
Posts: 10,441
Total Cats: 1,899
No. The easy answer without getting into details is "everything is different except the compressor." I did extensive reading about this because I too was trying to figure out how to swap NB2 AC bits into my NB1 so I could fit an intercooler and not ditch the AC.
You COULD have custom flexable AC hoses made to connect everything up, but I don't know if the juice would be worth the squeeze. I ended up ditching the AC. :(
You COULD have custom flexable AC hoses made to connect everything up, but I don't know if the juice would be worth the squeeze. I ended up ditching the AC. :(
Reply
0
0
05-25-2017, 07:15 PM
#347
No. The easy answer without getting into details is "everything is different except the compressor." I did extensive reading about this because I too was trying to figure out how to swap NB2 AC bits into my NB1 so I could fit an intercooler and not ditch the AC.
You COULD have custom flexable AC hoses made to connect everything up, but I don't know if the juice would be worth the squeeze. I ended up ditching the AC. :(
You COULD have custom flexable AC hoses made to connect everything up, but I don't know if the juice would be worth the squeeze. I ended up ditching the AC. :(
Reply
0
0
05-25-2017, 07:17 PM
#348
Elite Member
iTrader: (37)
Join Date: Apr 2010
Location: Very NorCal
Posts: 10,441
Total Cats: 1,899
I'm fairly positive the compressor and compressor mounting bracket are different between the MSM and the NB2, but I couldn't say between the NB1 and NB2. Nothing I read said that part was different, just like, nearly everything else.
Reply
0
0
05-25-2017, 07:50 PM
#351
Retired Mech Design Engr
iTrader: (3)
Join Date: Jan 2013
Location: Seneca, SC
Posts: 5,009
Total Cats: 856
No. The easy answer without getting into details is "everything is different except the compressor." I did extensive reading about this because I too was trying to figure out how to swap NB2 AC bits into my NB1 so I could fit an intercooler and not ditch the AC.
You COULD have custom flexable AC hoses made to connect everything up, but I don't know if the juice would be worth the squeeze. I ended up ditching the AC. :(
You COULD have custom flexable AC hoses made to connect everything up, but I don't know if the juice would be worth the squeeze. I ended up ditching the AC. :(
Reply
0
0
05-26-2017, 01:28 AM
#352
Retired Mech Design Engr
iTrader: (3)
Join Date: Jan 2013
Location: Seneca, SC
Posts: 5,009
Total Cats: 856
Also, is it a given that I will have to lose my IM brace to put in the Mocal thermostatic adaptor? I'm thinking that @nick470 only made a small modification to his.
Nick, did you use 90* fittings on your lines, or straight ones, to keep the brace?
I plan to purchase a kit from @Savington
Nick, did you use 90* fittings on your lines, or straight ones, to keep the brace?
I plan to purchase a kit from @Savington
Reply
0
0

 05-26-2017, 06:50 PM
#356
Post #53 in my build thread has the best pictures... Which aren't very good... One of them does show how the fittings are pointing off of the plate.
I will change a good bit about my oil cooler setup if I ever dig back in to it, so I'm not posting to spread my technique.
Could be worth looking at for some ideas.
I will change a good bit about my oil cooler setup if I ever dig back in to it, so I'm not posting to spread my technique.
Could be worth looking at for some ideas.
Reply
0
0
05-26-2017, 06:57 PM
#357
Retired Mech Design Engr
iTrader: (3)
Join Date: Jan 2013
Location: Seneca, SC
Posts: 5,009
Total Cats: 856
What harmonic balancer / damper?
Reply
0
0
05-26-2017, 07:57 PM
#358
Former Vendor
Thread Starter
iTrader: (31)

Join Date: Nov 2006
Location: Sunnyvale, CA
Posts: 15,442
Total Cats: 2,099
I used to say the same thing until I pulled the last motor out of Rover. ~3 years of track days, Squaretop manifold, no brace. There was a large (1x1x1") chunk broken out of the corner of the #1 runner of the manifold, straight through one of the mounting ears and all the way down into the runner, and four of the nine IM studs were broken. Suddenly I'm a fan of the OEM IM brace, or some sort of replacement which is compatible with oil coolers.
Reply
0
0
05-26-2017, 09:01 PM
#359
Junior Member
Join Date: Dec 2015
Location: Brisbane, Queensland, Australia
Posts: 213
Total Cats: 67
I used to say the same thing until I pulled the last motor out of Rover. ~3 years of track days, Squaretop manifold, no brace. There was a large (1x1x1") chunk broken out of the corner of the #1 runner of the manifold, straight through one of the mounting ears and all the way down into the runner, and four of the nine IM studs were broken. Suddenly I'm a fan of the OEM IM brace, or some sort of replacement which is compatible with oil coolers.
Reply
0
0
05-26-2017, 09:02 PM
#360
Retired Mech Design Engr
iTrader: (3)
Join Date: Jan 2013
Location: Seneca, SC
Posts: 5,009
Total Cats: 856
I used to say the same thing until I pulled the last motor out of Rover. ~3 years of track days, Squaretop manifold, no brace. There was a large (1x1x1") chunk broken out of the corner of the #1 runner of the manifold, straight through one of the mounting ears and all the way down into the runner, and four of the nine IM studs were broken. Suddenly I'm a fan of the OEM IM brace, or some sort of replacement which is compatible with oil coolers.
Think I can modify the stock brace somehow? Nick (see a couple of posts up) shaved a bit off his, but it looks like he would have used a straight hose fitting to mate up there. Think that concept would work? I'll try to find his picture and post it here with an edit.
EDIT: POST #17
I don't have my turbo oil feed coming from that area, only the stock oil pressure sending unit.
Reply
0
0


