Aerodynamics Splitters, spoilers, and all the aero advice you can handle.
Sponsored by:
Sponsored by:

Post your DIY aero pics

Thread Tools
 
Search this Thread
 
Old 05-22-2012, 02:04 PM
  #81  
Elite Member
iTrader: (15)
 
ZX-Tex's Avatar
 
Join Date: Dec 2007
Location: San Antonio, Texas
Posts: 4,847
Total Cats: 27
Default

+1

Originally Posted by vehicular
that looks great! You're going to have to make a digital pattern for the rest of us bums to copy!
ZX-Tex is offline  
Old 05-22-2012, 02:30 PM
  #82  
Boost Czar
iTrader: (62)
 
Braineack's Avatar
 
Join Date: May 2005
Location: Chantilly, VA
Posts: 79,490
Total Cats: 4,079
Default

Originally Posted by ZX-Tex
Also LOL at the stretched cloth idea. I had been thinking about trying that as well.
was is that lol? that's the base of a lot of fiberglass projects.


for example:


Attached Thumbnails Post your DIY aero pics-4a7_stall_box_7.jpg   Post your DIY aero pics-8a2_stall_box_8.jpg   Post your DIY aero pics-stall_box_16.jpg  
Braineack is offline  
Old 05-22-2012, 02:32 PM
  #83  
Senior Member
iTrader: (4)
 
dgmorr's Avatar
 
Join Date: Nov 2009
Location: Toronto, ON
Posts: 1,446
Total Cats: 6
Default

Originally Posted by lightyear
I made a quick fastback from the plastic alloy composite material. Took about 1.5hrs to come up with the design, cut it out and bend it.
Lol, I like the way you make things sound so simple. I was hungry today, so I made a quick sandwich.
dgmorr is offline  
Old 05-22-2012, 04:25 PM
  #84  
Elite Member
iTrader: (15)
 
ZX-Tex's Avatar
 
Join Date: Dec 2007
Location: San Antonio, Texas
Posts: 4,847
Total Cats: 27
Default

Originally Posted by Braineack
was is that lol? that's the base of a lot of fiberglass projects.
No not LOL at the idea, LOL at the fact that he had the SAME idea I did. Custom speaker enclosures just like you showed were the source of my inspiration.
ZX-Tex is offline  
Old 05-22-2012, 05:48 PM
  #85  
Senior Member
 
lightyear's Avatar
 
Join Date: Aug 2009
Location: melbourne aus
Posts: 515
Total Cats: 92
Default

I was a tiler for 15 years, so marking out and cutting the shape accurately is not too hard for me. Tip- use masking tape to draw a line on the trunk where you want the hardtop to finish, on one side only. Then find the centre and make marks at 100mm from centre out at the back edge of fastback, and the front edge. Then just measure how long the distance is. I will attach this with race tape. But you could use hinges on the top, and bonnet pins on the back.
lightyear is offline  
Old 05-22-2012, 11:28 PM
  #86  
Senior Member
iTrader: (1)
 
wannafbody's Avatar
 
Join Date: Nov 2010
Posts: 977
Total Cats: -369
Default

That is a seriously good idea. Maybe extend it back to the end of the trunk or even beyond and attach it with hood pins.
wannafbody is offline  
Old 05-23-2012, 12:06 AM
  #87  
Senior Member
 
lightyear's Avatar
 
Join Date: Aug 2009
Location: melbourne aus
Posts: 515
Total Cats: 92
Default

I didn't want to make it go past thing wing stays on this car. On the nb fastbacks we will have them go back much further. But I wanted to see how this angle works anyway in regards to attachment and flow.
lightyear is offline  
Old 05-23-2012, 02:01 AM
  #88  
Senior Member
 
mx5-kiwi's Avatar
 
Join Date: Dec 2010
Location: Auckland, NZ
Posts: 992
Total Cats: 57
Default

Unreal. !!!

A couple of questions.

1/ What did you use to bend it with ?

2/ Are you going to run a plexi window in the back there or just have side mirrors for rear view..?
mx5-kiwi is offline  
Old 05-23-2012, 02:33 AM
  #89  
Senior Member
 
lightyear's Avatar
 
Join Date: Aug 2009
Location: melbourne aus
Posts: 515
Total Cats: 92
Default

If I keep it on the car I might run a back window with some air guides either side of it. I bent it by standing on it, bending it over my knee, etc. That is what takes the time. I could keep working on it, but it is fine for test piece. Just made a vented hood too. Will post pics later.
lightyear is offline  
Old 05-23-2012, 04:35 AM
  #90  
Senior Member
 
lightyear's Avatar
 
Join Date: Aug 2009
Location: melbourne aus
Posts: 515
Total Cats: 92
Default

I cut the hood vents along the frame. Just makes it easier than cutting thru the frame in odd places.


I will still have to cut all the triangle shape pieces and rivet the to the sides of the vents.

Seems like i have taken over this thread, so no more updates from me.
Attached Thumbnails Post your DIY aero pics-ventf.jpg   Post your DIY aero pics-undervent.jpg  
lightyear is offline  
Old 05-23-2012, 06:29 AM
  #91  
Elite Member
iTrader: (2)
 
triple88a's Avatar
 
Join Date: Apr 2006
Location: Chicago, IL
Posts: 10,453
Total Cats: 1,796
Default

That i like.
triple88a is offline  
Old 05-23-2012, 07:51 AM
  #92  
573
Junior Member
iTrader: (2)
 
573's Avatar
 
Join Date: Nov 2011
Location: Troy, Michigan
Posts: 252
Total Cats: 17
Default

Nothing revolutionary, but here's my contribution.

Hood vents:


They work.


Cut bumper:


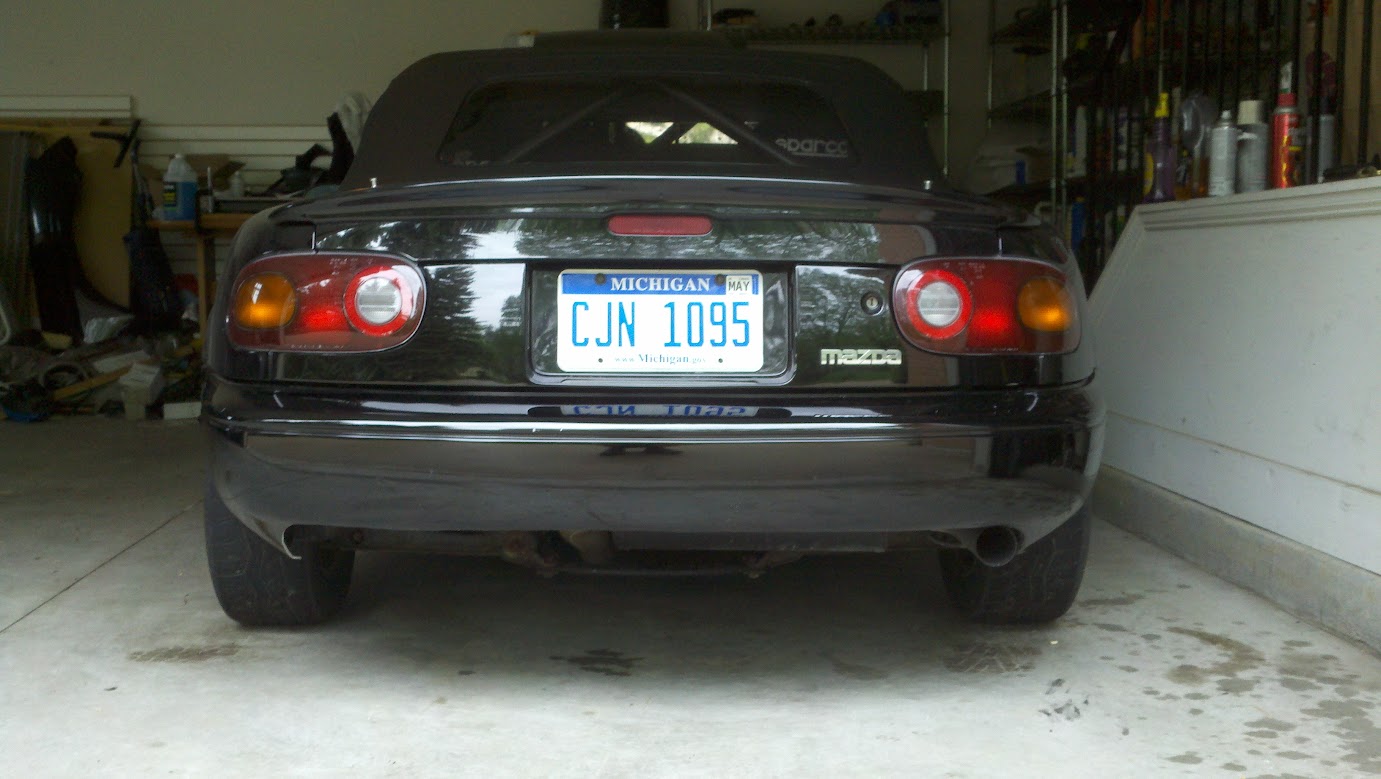
Also, as you can see in the first picture, I have a single wiper with a center rest position.

With these changes, I averaged 31.4 mpg on the highway, with the top down and cruising at about 75, on a recent road trip. I used to get around 24 or 25. My injectors changed between those points of comparison, as well. Take this information for what it's worth. I normally run the car on e85 so most of my fuel economy data is a bit goofy.
573 is offline  
Old 05-23-2012, 01:28 PM
  #93  
Elite Member
iTrader: (15)
 
Midtenn's Avatar
 
Join Date: Jan 2007
Location: Murfreesboro,TN
Posts: 2,041
Total Cats: 265
Default

Originally Posted by lightyear
I cut the hood vents along the frame. Just makes it easier than cutting thru the frame in odd places.

I will still have to cut all the triangle shape pieces and rivet the to the sides of the vents.

Seems like i have taken over this thread, so no more updates from me.
Any plans of adding a Gurney flap to leading edge?
Midtenn is offline  
Old 05-23-2012, 01:52 PM
  #94  
573
Junior Member
iTrader: (2)
 
573's Avatar
 
Join Date: Nov 2011
Location: Troy, Michigan
Posts: 252
Total Cats: 17
Default

It looks as though he bent the material upward--effectively the same thing.
573 is offline  
Old 05-23-2012, 02:56 PM
  #95  
Junior Member
 
Handy Man's Avatar
 
Join Date: Jun 2011
Location: Houston
Posts: 409
Total Cats: 20
Default

Originally Posted by lightyear
Seems like i have taken over this thread, so no more updates from me.
No, keep em coming!

You're doing some interesting stuff.
Handy Man is offline  
Old 05-23-2012, 03:54 PM
  #96  
Elite Member
iTrader: (15)
 
ZX-Tex's Avatar
 
Join Date: Dec 2007
Location: San Antonio, Texas
Posts: 4,847
Total Cats: 27
Default

+1

Originally Posted by handy man
no, keep em coming!

You're doing some interesting stuff.
ZX-Tex is offline  
Old 05-23-2012, 05:56 PM
  #97  
Elite Member
iTrader: (15)
 
Midtenn's Avatar
 
Join Date: Jan 2007
Location: Murfreesboro,TN
Posts: 2,041
Total Cats: 265
Default

Originally Posted by 573
It looks as though he bent the material upward--effectively the same thing.
Ah yes, I see it now.
Midtenn is offline  
Old 05-23-2012, 06:50 PM
  #98  
Senior Member
 
lightyear's Avatar
 
Join Date: Aug 2009
Location: melbourne aus
Posts: 515
Total Cats: 92
Default

Yes, the first vent has a 20mm raised flap, and the others have a 10mm raised flap. Or about 3/4" and bit under 1/2". So I made it from the leading edge -20mm up, 100mm down, 20mm straight, 10mm up, 100mm down, 20mm straight, etc.
lightyear is offline  
Old 05-25-2012, 04:52 PM
  #99  
Junior Member
 
Dolsiac's Avatar
 
Join Date: Apr 2012
Location: Sioux Falls, SD
Posts: 55
Total Cats: 1
Default

I would like to see more vented oem hoods as I am getting ready to cut mine. I looked at the post with the guy talking about carbon fiber with the diagrams of air flow ect but would like some more ideas on how to cut for an NA all motor build.
Dolsiac is offline  
Old 05-25-2012, 08:09 PM
  #100  
Newb
iTrader: (1)
 
mikaelhgn's Avatar
 
Join Date: Jul 2011
Posts: 16
Total Cats: 0
Default

ive got a question about the vented hood, are u going to run ducts to the vents from the rad or from an oil cooler, what are the advantages to running those vents, to relieve pressure under the hood/engine bay to lower temps or is it just to gain an aero advantage seems to me a smooth surface would be better for aero. Just questions not trying to anger anyone just looking for knowledge.
mikaelhgn is offline  


Quick Reply: Post your DIY aero pics


All times are GMT -4. The time now is 12:09 AM.