
99 10ae Suspension install writeup
 04-23-2011, 08:09 PM
#1
Elite Member
Thread Starter
iTrader: (2)
Join Date: Apr 2006
Location: Chicago, IL
Posts: 10,453
Total Cats: 1,796
This is my writeup on installing my V-Maxx it.
Jack up front end, use jack stands on both sides.
Pull both front tires.
I started with front left and all my pics are from it however the front right is exactly the same.
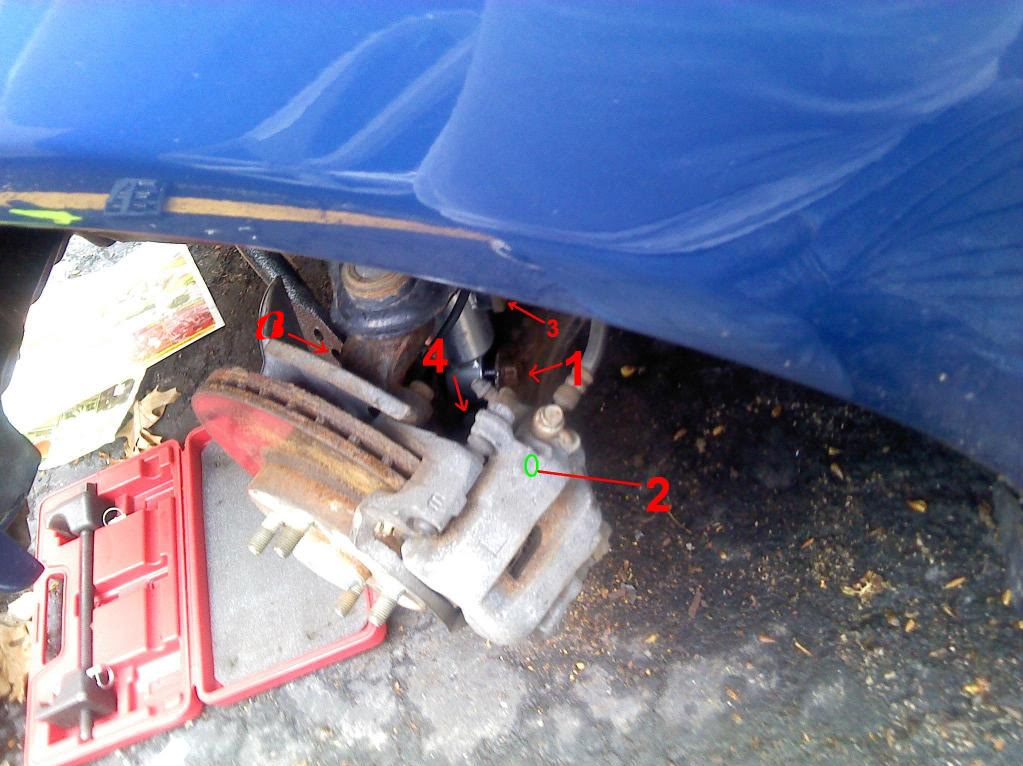
Before doing anything remove the 1 bolt on the anti sway bar link (1 per side, remove them both before you start and lower the anti sway bar down out of your way). #0 on my pic.
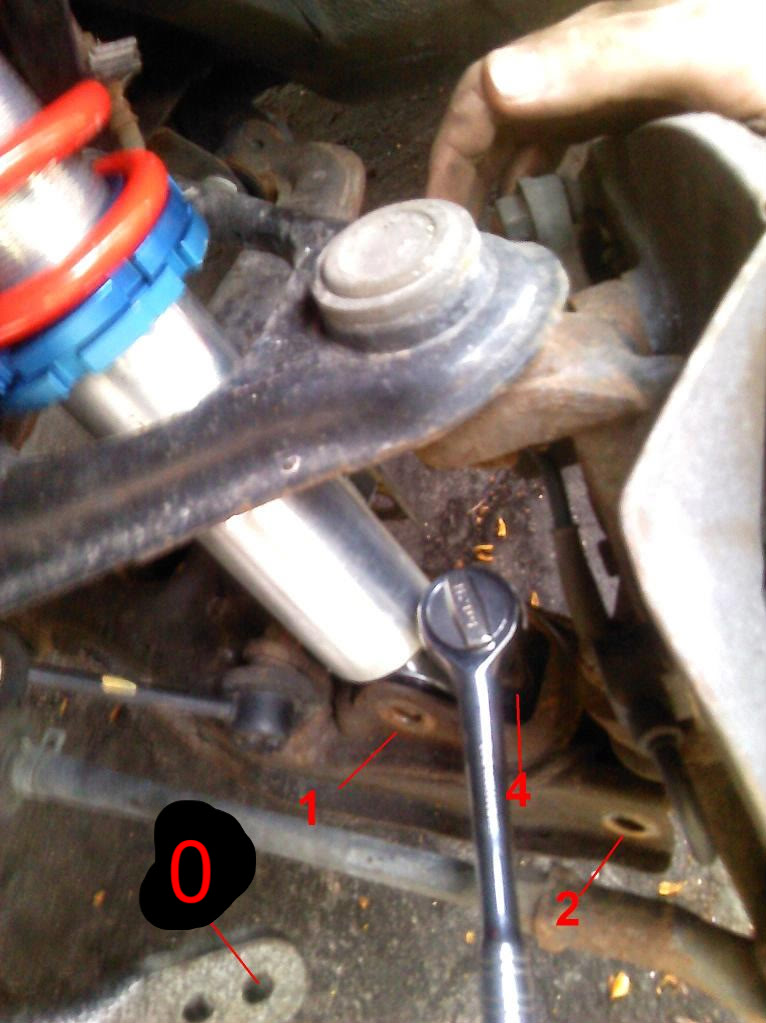
Then undo #1, then #2, then #3 (if you have abs, if not you wont have #3)
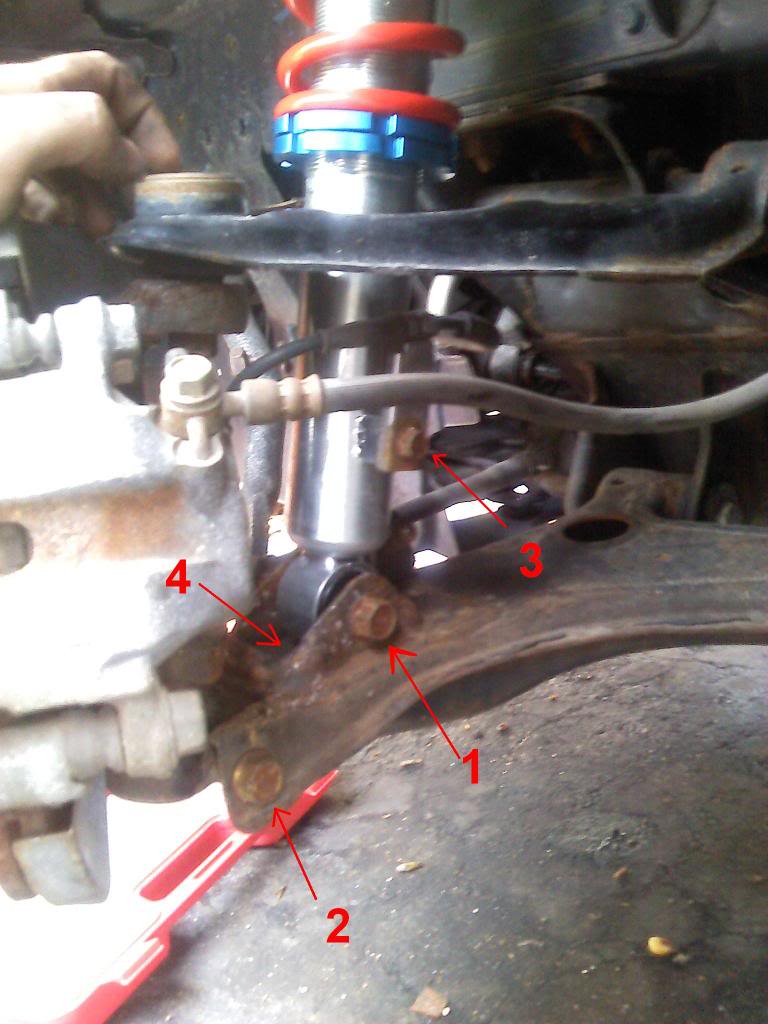
After you pull those 3 you should be able to move the shock towards the wheel well that will grant you clearance to the bolt underneath the shock. That is bolt #4.
After pulling #4, the knuckle assembly should be able to turn via the top and the front ball joints and the lower control arm should be able to move on its own.
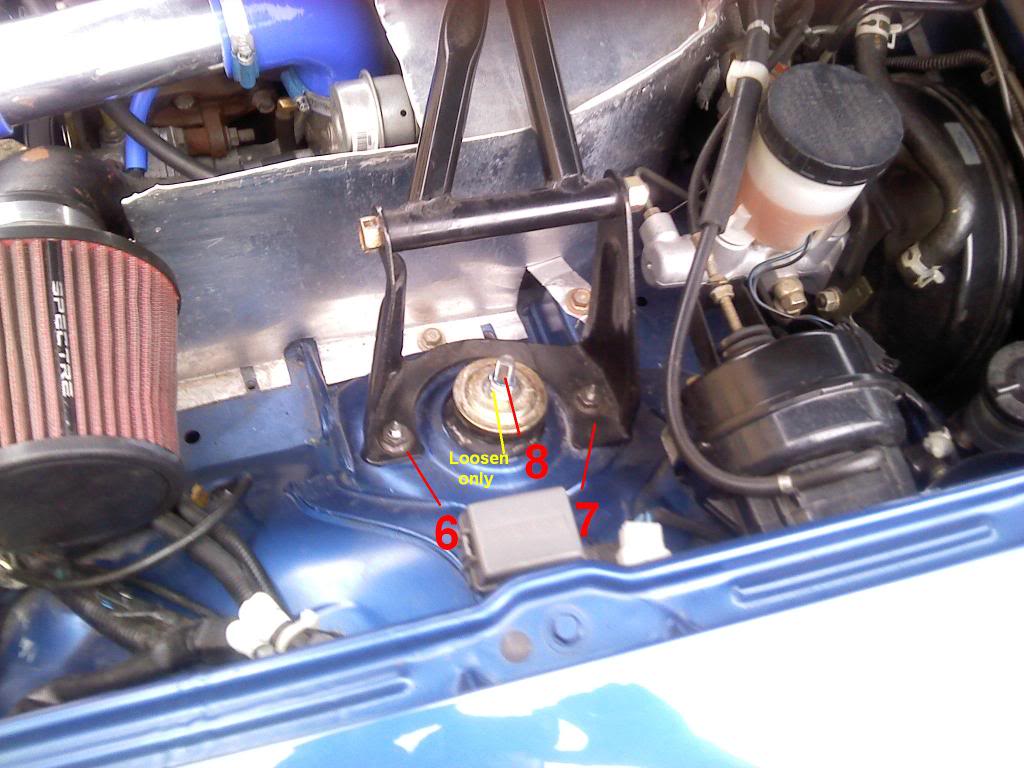
At this point undo the 2 bolts (6 and 7) that hold the shock to the chassis. Stock shocks have double nuts at the center. Remove top one (#8) and loosen the bottom one but DO NOT TAKE OFF THE BOTTOM NUT marked in yellow).
Now the shock can come out as 1 piece, dont try to use a spring compressor at this point, you're wasting your time.
Here is the somewhat tricky part. On mine both control arms were tight and were pushing up although everything was off. There is a hole in the bottom control arm that fits a regular box end wrench perfectly. Put the wrench in there and use your foot to press down on the lower control arm. Then push the shock down and try to wiggle it out of the top. After the top is out of the hole in the chassis and in the wheel well, at this point its push down on the upper control arm and pull it out.
Installation is in reverse
/\/\/\/\/\/\/\/\/\/\/\/\/\/\/\/\/\/\/\/\/\/\/\/\/\/\/\/\/\/\/\/\/\/\/\/\/\/\/\/\/\/\/\/\/\/\/\/\/\/\/\/\/\/\/\/\/\/\/\/\/\
/\/\/\/\/\/\/\/\/\/\/\/\/\/\/\/\/\/\/\/\/\/\/\/\/\/\/\/\/\/\/\/\/\/\/\/\/\/\/\/\/\/\/\/\/\/\/\/\/\/\/\/\/\/\/\/\/\/\/\/\/\
/\/\/\/\/\/\/\/\/\/\/\/\/\/\/\/\/\/\/\/\/\/\/\/\/\/\/\/\/\/\/\/\/\/\/\/\/\/\/\/\/\/\/\/\/\/\/\/\/\/\/\/\/\/\/\/\/\/\/\/\/\
/\/\/\/\/\/\/\/\/\/\/\/\/\/\/\/\/\/\/\/\/\/\/\/\/\/\/\/\/\/\/\/\/\/\/\/\/\/\/\/\/\/\/\/\/\/\/\/\/\/\/\/\/\/\/\/\/\/\/\/\/\
/\/\/\/\/\/\/\/\/\/\/\/\/\/\/\/\/\/\/\/\/\/\/\/\/\/\/\/\/\/\/\/\/\/\/\/\/\/\/\/\/\/\/\/\/\/\/\/\/\/\/\/\/\/\/\/\/\/\/\/\/\
Now on to the back. This is much simpler as the shock is not wedged in the upper control arm. Simple as undoing and bolting back on.
Before you lift anything undo the bolts in the trunk while the car is on the ground.
Take off all the carpet panels and the metal cover on the left side that covers the fuel piping.
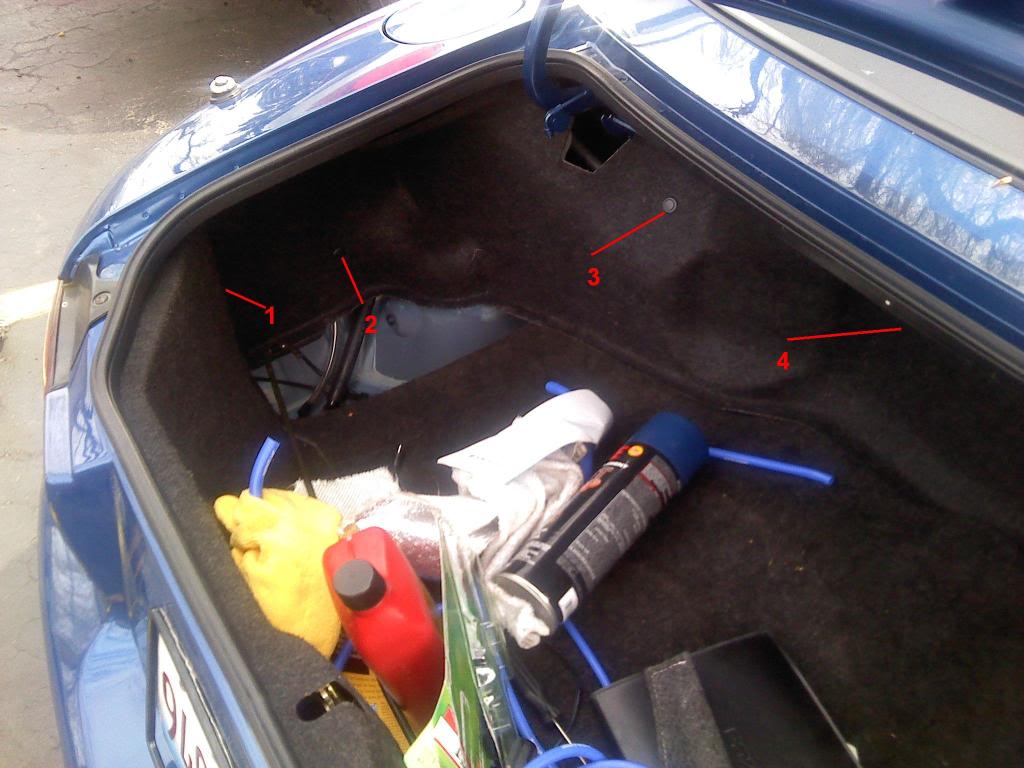
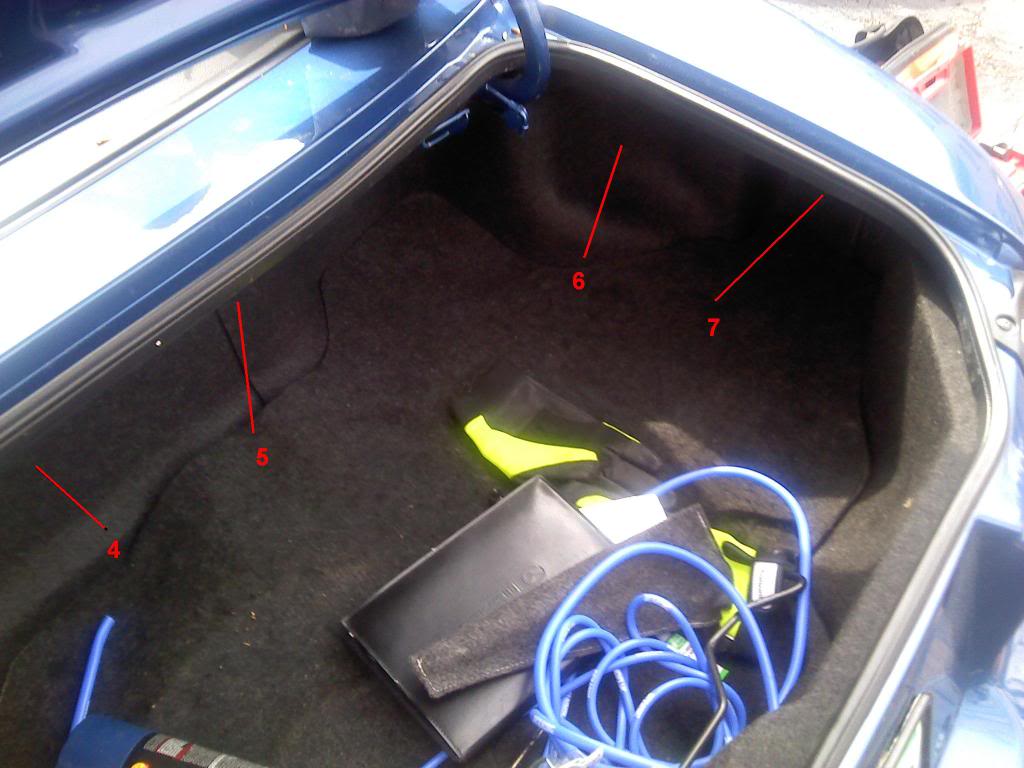
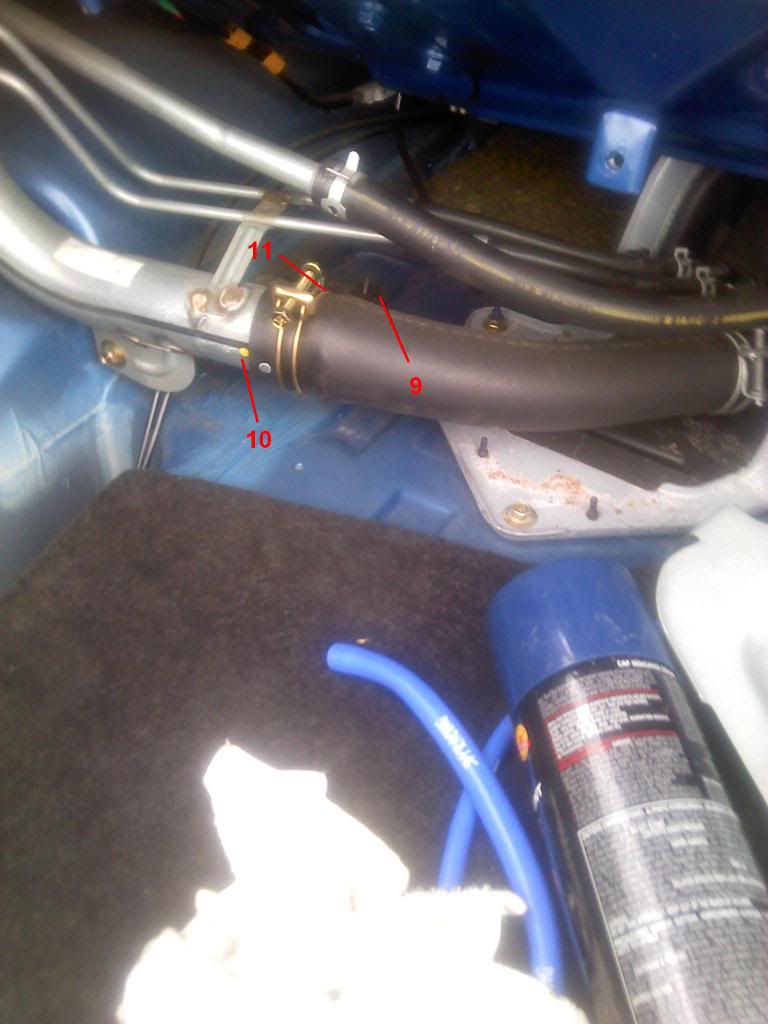
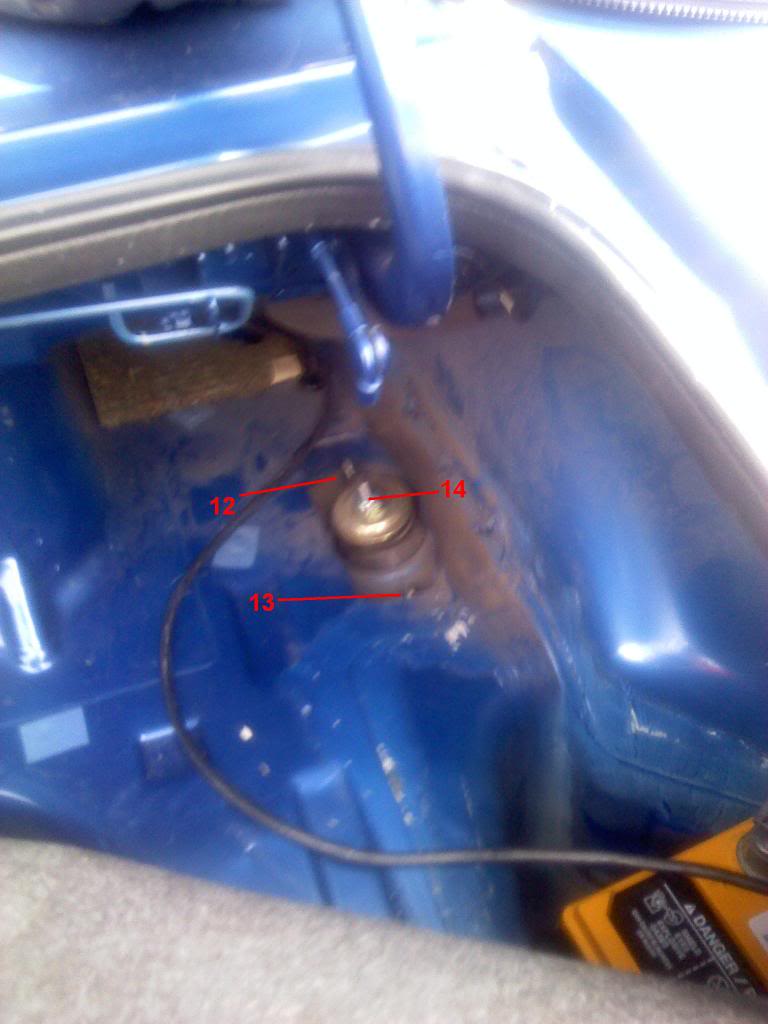
Now you should be looking at the top of the shocks. Don't worry about the center bolts at this point (11 and 14), undo the 2 side bolts. 9+10 and 12+13.
At this point jack up the rear end of the car. The rear end is easier if you do both sides at the same time so you have to jack them both up.
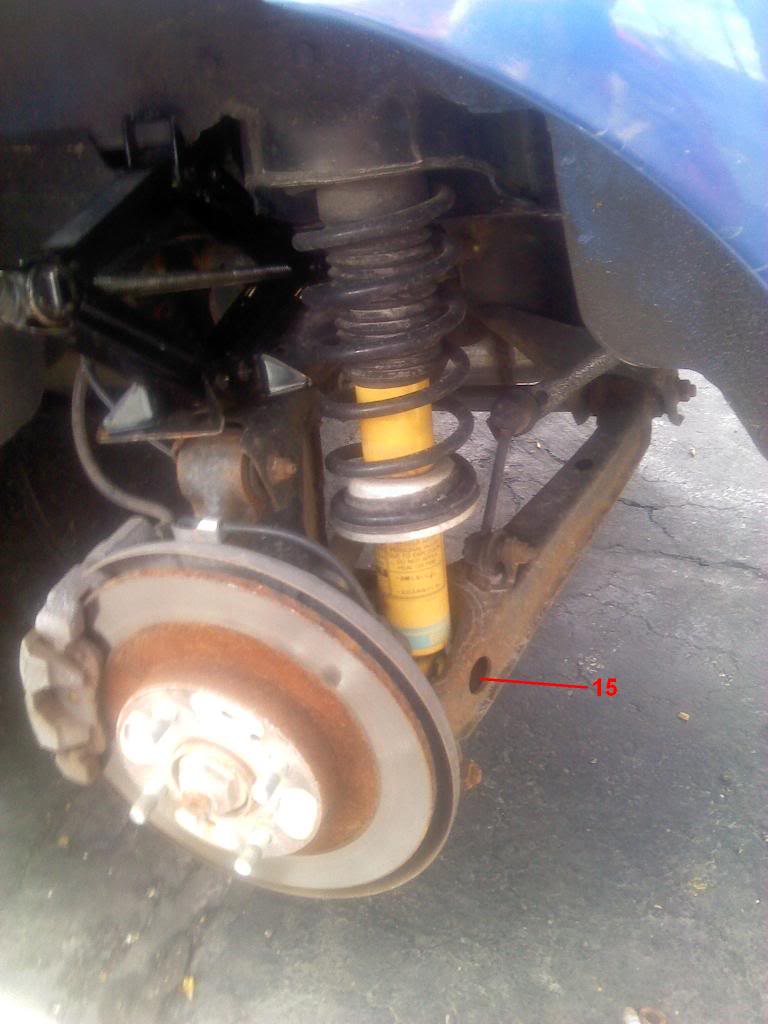
Remove bolt #15 on both sides. Don't worry about the anti sway bar bolts.
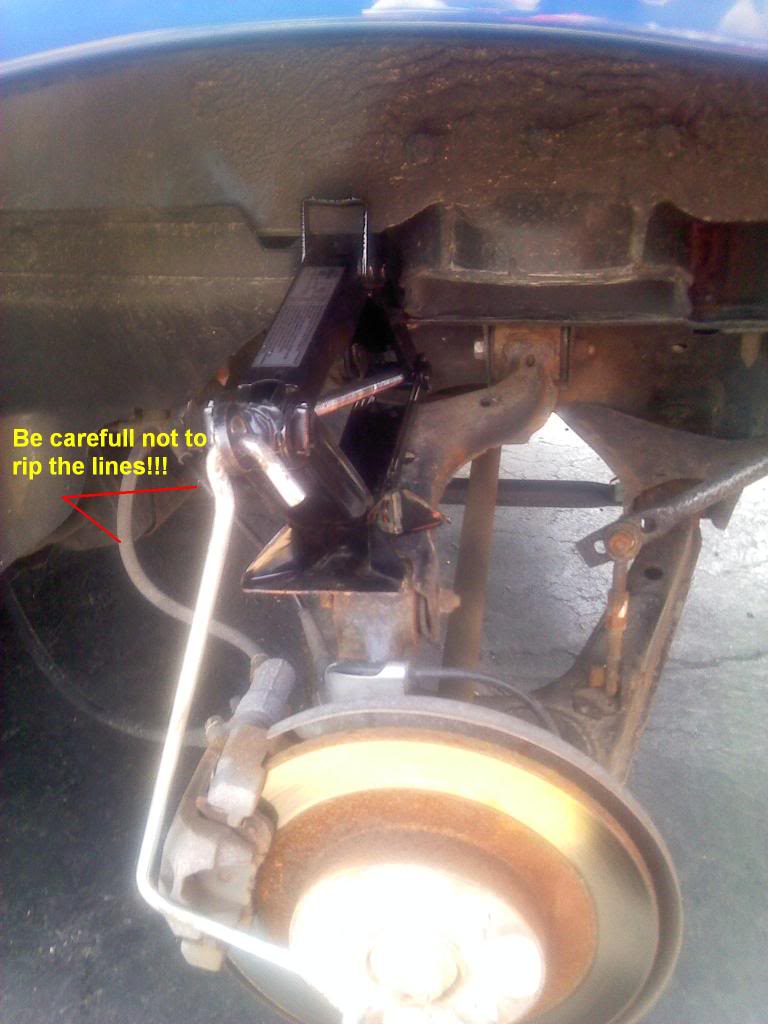
At this point you place the stock jack how I have it placed on my pic on top of the upper control arm with the grove in the sheet metal edge and use the jack to force the axle down (don't over do it).
WATCH NOT TO OVER STRETCH THE BRAKE AND ABS LINES!!!
Lift up the shock to align the holes at the top. Then pull the bottom of the shock out of the hole in the lower control arm.
Assemble the new part and toss it on there top side first, then bottom side.
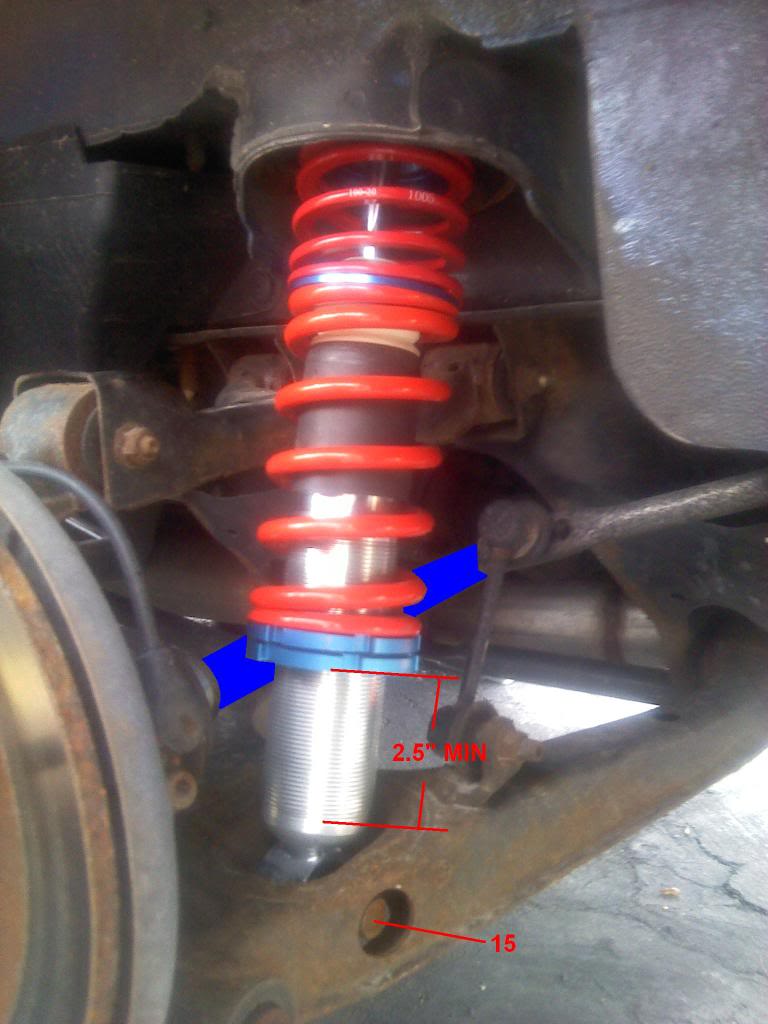
If it's adjustable MAKE SURE YOU HAVE IT ADJUSTED UP FAR ENOUGH TO CLEAR THE AXLE BEFORE YOU TOSS IT BACK INTO POSITION (axle painted blue in my pic). For the V-Maxx kit 2.5" from the bottom of the threads was just enough.
Toss the #15 bolt back on and get it started but don't worry about tightening it yet. Move on to the passenger side and pull the other shock using the same method. After you have both sides installed turn the stock jack around and use it to lift the axle up so you can get the top 2 bolts in the holes.
Install and tighten #9+10 12+13 nuts. Tighten bolt #15 on both sides and then install the metal and carpet covers in the trunk.
This completes my writeup.
Jack up front end, use jack stands on both sides.
Pull both front tires.
I started with front left and all my pics are from it however the front right is exactly the same.
Before doing anything remove the 1 bolt on the anti sway bar link (1 per side, remove them both before you start and lower the anti sway bar down out of your way). #0 on my pic.
Then undo #1, then #2, then #3 (if you have abs, if not you wont have #3)
After you pull those 3 you should be able to move the shock towards the wheel well that will grant you clearance to the bolt underneath the shock. That is bolt #4.
After pulling #4, the knuckle assembly should be able to turn via the top and the front ball joints and the lower control arm should be able to move on its own.
At this point undo the 2 bolts (6 and 7) that hold the shock to the chassis. Stock shocks have double nuts at the center. Remove top one (#8) and loosen the bottom one but DO NOT TAKE OFF THE BOTTOM NUT marked in yellow).
Now the shock can come out as 1 piece, dont try to use a spring compressor at this point, you're wasting your time.
Here is the somewhat tricky part. On mine both control arms were tight and were pushing up although everything was off. There is a hole in the bottom control arm that fits a regular box end wrench perfectly. Put the wrench in there and use your foot to press down on the lower control arm. Then push the shock down and try to wiggle it out of the top. After the top is out of the hole in the chassis and in the wheel well, at this point its push down on the upper control arm and pull it out.
Installation is in reverse
/\/\/\/\/\/\/\/\/\/\/\/\/\/\/\/\/\/\/\/\/\/\/\/\/\/\/\/\/\/\/\/\/\/\/\/\/\/\/\/\/\/\/\/\/\/\/\/\/\/\/\/\/\/\/\/\/\/\/\/\/\
/\/\/\/\/\/\/\/\/\/\/\/\/\/\/\/\/\/\/\/\/\/\/\/\/\/\/\/\/\/\/\/\/\/\/\/\/\/\/\/\/\/\/\/\/\/\/\/\/\/\/\/\/\/\/\/\/\/\/\/\/\
/\/\/\/\/\/\/\/\/\/\/\/\/\/\/\/\/\/\/\/\/\/\/\/\/\/\/\/\/\/\/\/\/\/\/\/\/\/\/\/\/\/\/\/\/\/\/\/\/\/\/\/\/\/\/\/\/\/\/\/\/\
/\/\/\/\/\/\/\/\/\/\/\/\/\/\/\/\/\/\/\/\/\/\/\/\/\/\/\/\/\/\/\/\/\/\/\/\/\/\/\/\/\/\/\/\/\/\/\/\/\/\/\/\/\/\/\/\/\/\/\/\/\
/\/\/\/\/\/\/\/\/\/\/\/\/\/\/\/\/\/\/\/\/\/\/\/\/\/\/\/\/\/\/\/\/\/\/\/\/\/\/\/\/\/\/\/\/\/\/\/\/\/\/\/\/\/\/\/\/\/\/\/\/\
Now on to the back. This is much simpler as the shock is not wedged in the upper control arm. Simple as undoing and bolting back on.
Before you lift anything undo the bolts in the trunk while the car is on the ground.
Take off all the carpet panels and the metal cover on the left side that covers the fuel piping.
Now you should be looking at the top of the shocks. Don't worry about the center bolts at this point (11 and 14), undo the 2 side bolts. 9+10 and 12+13.
At this point jack up the rear end of the car. The rear end is easier if you do both sides at the same time so you have to jack them both up.
Remove bolt #15 on both sides. Don't worry about the anti sway bar bolts.
At this point you place the stock jack how I have it placed on my pic on top of the upper control arm with the grove in the sheet metal edge and use the jack to force the axle down (don't over do it).
WATCH NOT TO OVER STRETCH THE BRAKE AND ABS LINES!!!
Lift up the shock to align the holes at the top. Then pull the bottom of the shock out of the hole in the lower control arm.
Assemble the new part and toss it on there top side first, then bottom side.
If it's adjustable MAKE SURE YOU HAVE IT ADJUSTED UP FAR ENOUGH TO CLEAR THE AXLE BEFORE YOU TOSS IT BACK INTO POSITION (axle painted blue in my pic). For the V-Maxx kit 2.5" from the bottom of the threads was just enough.
Toss the #15 bolt back on and get it started but don't worry about tightening it yet. Move on to the passenger side and pull the other shock using the same method. After you have both sides installed turn the stock jack around and use it to lift the axle up so you can get the top 2 bolts in the holes.
Install and tighten #9+10 12+13 nuts. Tighten bolt #15 on both sides and then install the metal and carpet covers in the trunk.
This completes my writeup.
Last edited by triple88a; 04-24-2011 at 10:53 PM.

Reply
 0
0

0
04-23-2011, 08:10 PM
#2
Elite Member
Thread Starter
iTrader: (2)
Join Date: Apr 2006
Location: Chicago, IL
Posts: 10,453
Total Cats: 1,796
V-Maxx Specific info...
When installing the front shocks adjust the height of the spring perches so the distance from the bottom locking ring to the bottom of the threads is 1.5".. that should give you 11.75" height from the center of the rim to the lip of the fender. If you want your car a bit higher then add on to that 1.5"
For the rear end, 3.25" from the bottom of the threads to the bottom of the locking ring will give you 12.25" from the center of the rim to the lip of the fender. Again have it set at minimum 2.5" before putting the assembled shocks in the vehicle otherwise the axle will be in the way and you will need to pull the spring to adjust it to the proper height...
The above numbers refer to that distance right there (2.5" on my photo)
Last edited by triple88a; 04-24-2011 at 10:57 PM.
Reply
0
0
 08-02-2011, 07:33 AM
#7
Boost Czar


iTrader: (62)
Join Date: May 2005
Location: Chantilly, VA
Posts: 79,490
Total Cats: 4,079
that's more than likely due to the dualing springs. the combined spring rate is like ~70 lb/in until the small spring compresses fully, then ramps up to the main spring rate.
so super cushy for absorbing small bumps, but competent when you need it.
so super cushy for absorbing small bumps, but competent when you need it.
Reply
0
0
08-02-2011, 06:29 PM
#8
Elite Member
Thread Starter
iTrader: (2)
Join Date: Apr 2006
Location: Chicago, IL
Posts: 10,453
Total Cats: 1,796
According to FM on the M.net those springs are suppose to be fully compressed at rest. I highly doubt it though. I'm thinking the same thing is going on.^
Reply
0
0
08-03-2011, 11:11 AM
#11
Junior Member

Join Date: Oct 2008
Location: Richmond, IN
Posts: 76
Total Cats: 0
I kinda remember the front giving me a little trouble when I put stiffer springs on it , this is a much better write up than the one I used from miata.net before I put the turbo on. It was good as well but yours is more thorough.
Reply
0
0
10-16-2011, 11:37 AM
#12
Newb

Join Date: Oct 2011
Location: Eugene, OR
Posts: 16
Total Cats: 0
Thanks for the write up, your suggestion about using the stock jack and notes on the height from bottom thread saved me a bunch of time.
My only problem was tightening the top nut without the shaft spinning. Their instructions of putting the car on it's wheels / jacking up the lower control arm only worked for 3 of the corners, the passenger front wouldn't budge. I figured shock compression had to do with it so I raised the lower spring perch almost to the top of the threads and that did it. Besides that (and throwing my back out), it was a pretty easy install.
Hopefully in the future they add an Allen key socket to make tightening of the top nut easier.
Reply
0
0


Thread
Thread Starter
Forum
Replies
Last Post
StratoBlue1109
Miata parts for sale/trade
21
09-30-2018 01:09 PM
stoves
Suspension, Brakes, Drivetrain
5
04-21-2016 03:00 PM


