
Safety Wire for 2-piece Brake Rotors
 02-27-2014, 09:16 PM
#1
Former Vendor

Thread Starter
iTrader: (31)

Join Date: Nov 2006
Location: Sunnyvale, CA
Posts: 15,442
Total Cats: 2,099
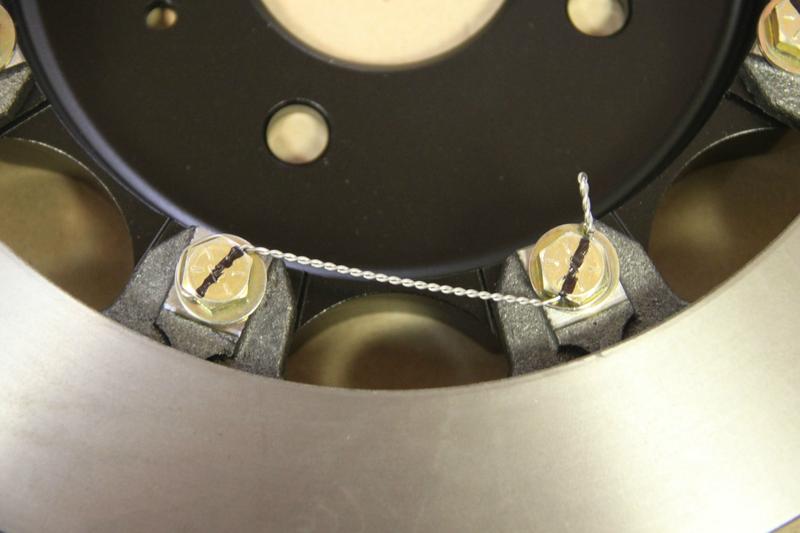
A couple of people have asked me for a step-by-step on how to quickly wire brake rotors for safety wire. The rotors here are our 11.75" Wilwood rotors, so the exact hardware on your rotor may not look the same, but the theory and some of the technique will still apply.
The goal of safety wire is to stretch a piece of wire tautly between two bolts in such a way that if either bolt were to loosen, the wire would grow more taut. Think of each bolt as a clock: if you run wire from 5o'clock on the left bolt to 10o'clock on the right bolt, both bolts can be loosened without disturbing the wire. Not good. If you wire them from 1o'clock to 7o'clock, neither bolt can be loosened. This is the most important thing to get right when you safety wire anything - if you wire in the wrong direction, you may as well not do it at all.
The only special tool you need to do safety wire is a pair of safety wire pliers. You can spend as little as $20 from Harbor Freight for a pair. You can do it with vise grips or even just a pair of needlenose, but it will take much, much longer. Buy the right tool for the job
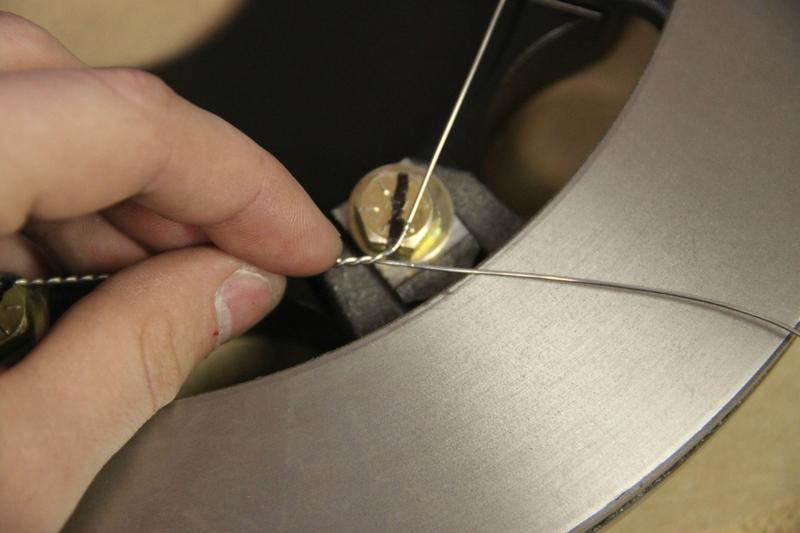
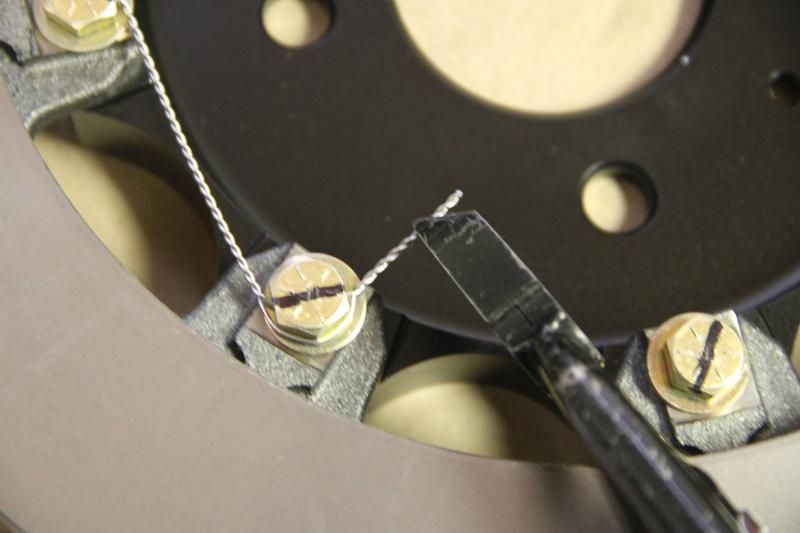
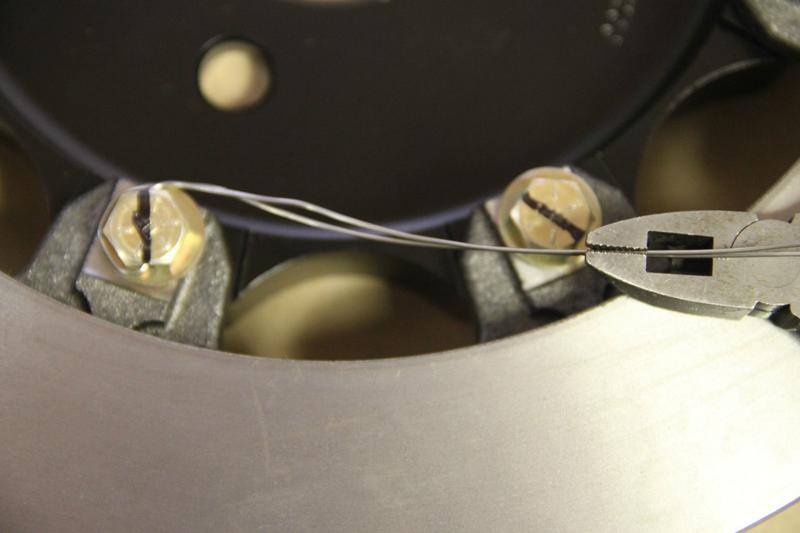
I've drawn the orientation of the hole through the head of the bolt with a black sharpie marker so you can easily see it.
I start by deciding on the path of the wire. In some cases, I'll be able to run directly from the 1 or 2 o'clock position to the 7-8o'clock position. Sometimes I'll need to start as far away as the 10 o'clock position on the left and wrap the wire all the way around to the 4 o'clock position on the right in order to maintain the correct wire path between the two bolts. In this case, I've chosen a fairly easy one just to demonstrate the technique. I'll show a more complex one later on.
I size the wire by threading through the backside of the hole I want to come out, routing along the appropriate wire path, and then laying it over the top of the bolt I'll be finishing on. Give yourself at least two extra inches beyond the end of the second bolt - more wire is better, but don't leave too much or it will get in the way when you twist the wire using the safety wire pliers.
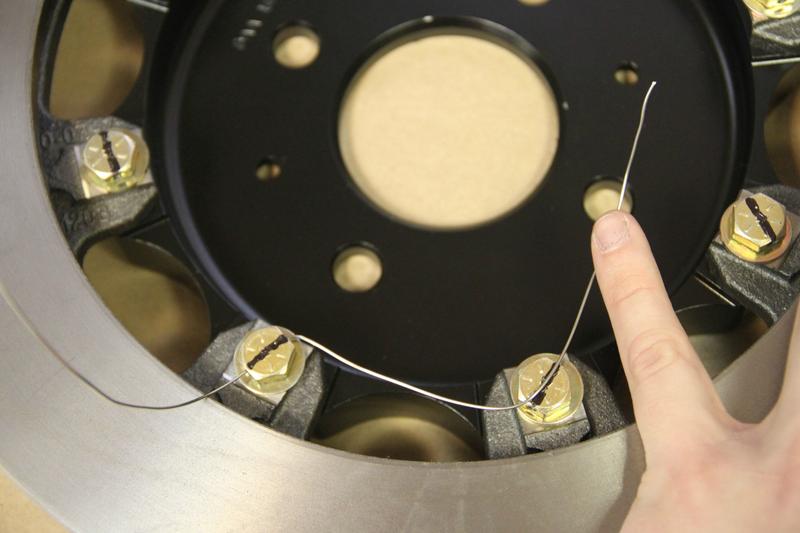
I then match the other side of the wire to this length. It's important to wrap the wire around the top side of the left bolt.
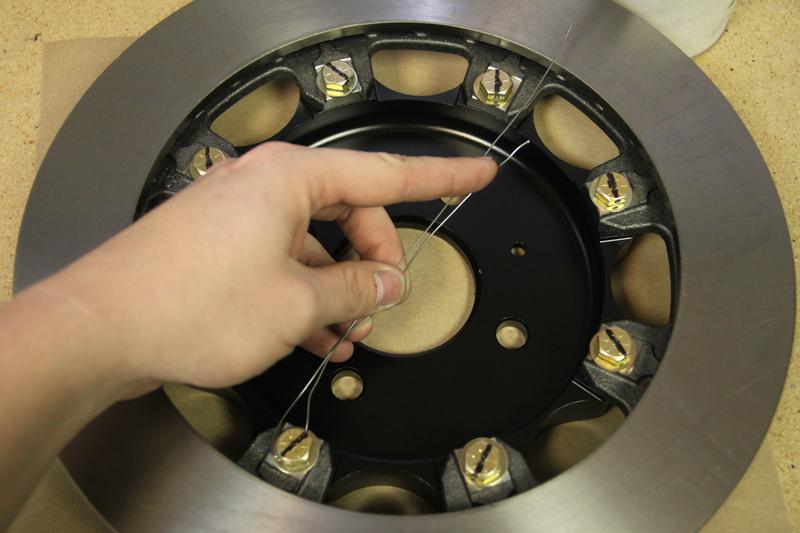
Clamp the wire at the intersection between the hole and the wire at approximately a right angle. You can err slightly on the short side, but don't go too short or you'll end up with an unattractive untwisted portion between the two bolts.

Once you've clamped, and you're sure the wire is routed over the top of the left-side bolt, give several twists on the pliers. My pliers typically get 7-8 twists between bolts, depending on the length of wire I'm twisting.
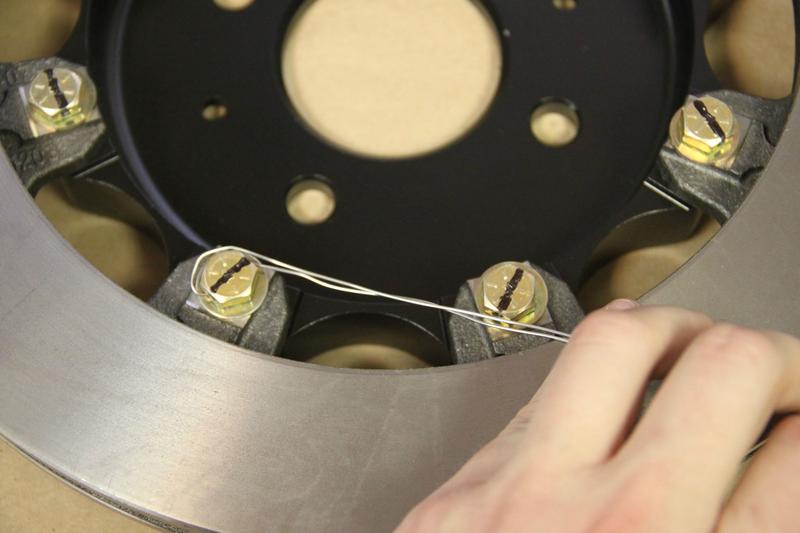
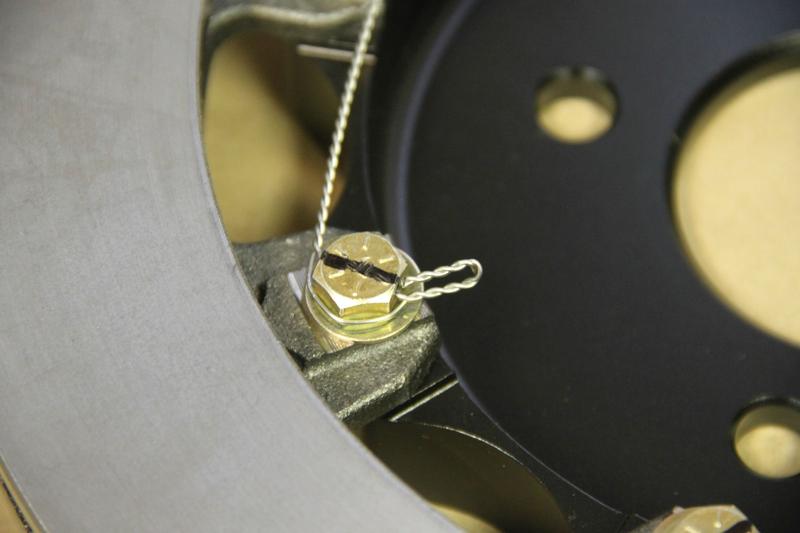
Separate the two ends of the wire and route whichever wire is on top through the hole. Route the wire on the bottom around the bottom of the right-hand bolt.
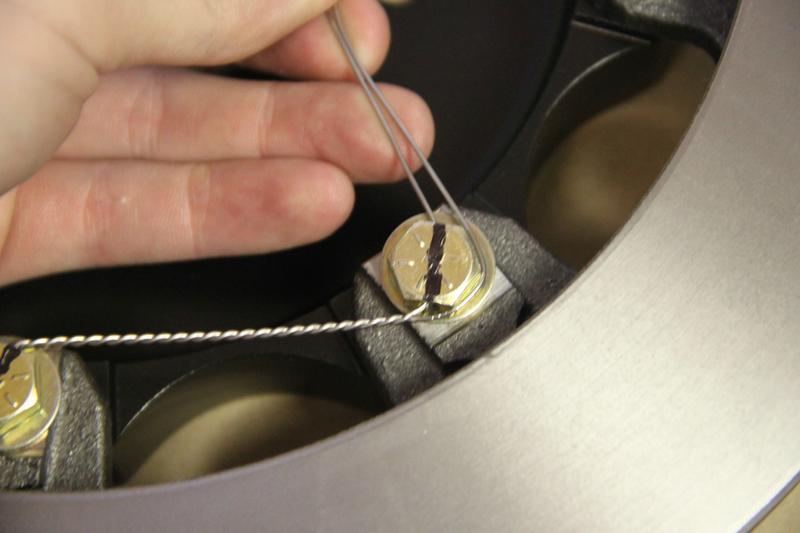
Clamp the wire about 1" past the end of the second bolt, and twist the wire backwards or counterclockwise. High-end safety wire pliers are reversible, but you can do this short portion by hand pretty easily with a cheap pair of pliers. The backward twist ensures that the wire stays wrapped around the bottom of the second bolt, instead of being rolled over onto the top side as the wire is twisted up.
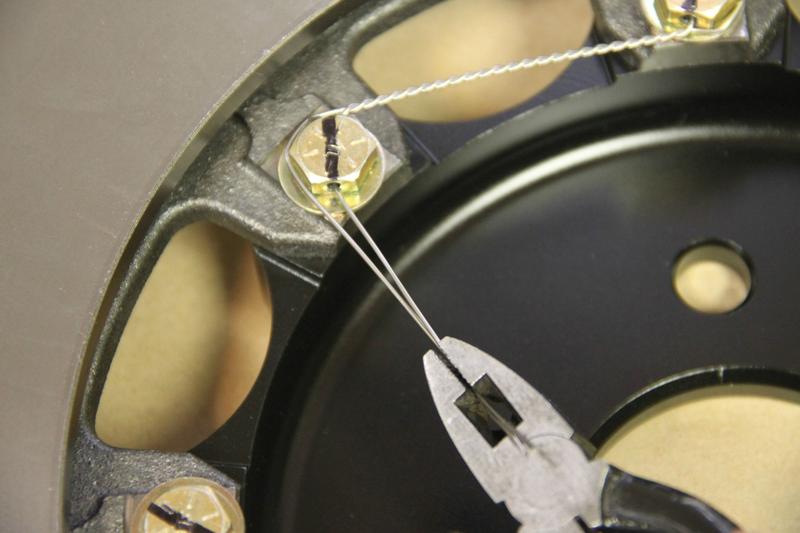
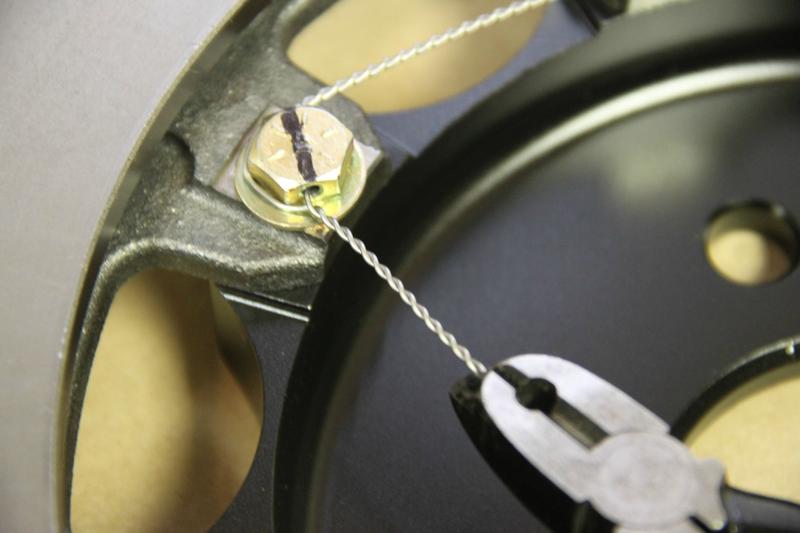
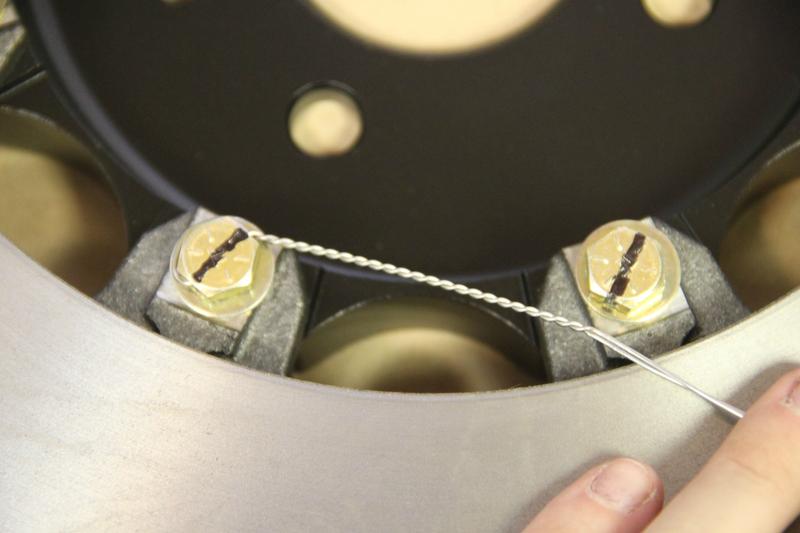
Clip the excess wires, leaving around 1" left. Grab it about 2/3 of the way away from the bolt, then fold the short portion over the top of the long portion. This keeps the sharp edge of the wire away from your hands while you're installing the rotor, and it just looks pretty.
And we're done! Only 7 more pairs to go!
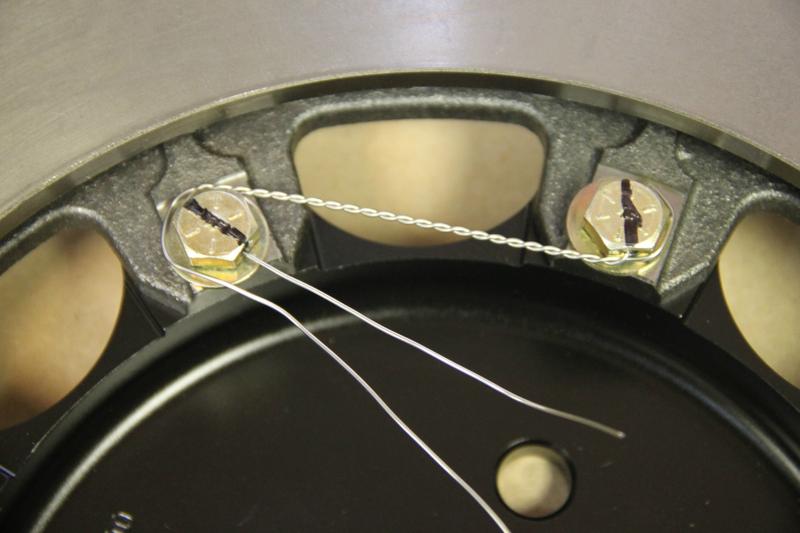
Here's a more complex example. In this pair, the two bolts don't provide as clear a path from the top left to the bottom right. In this case, I'll start at the 11o'clock position and wrap down and around to the 5o'clock position.
Here you can see where I clamp the wire for this example - right at the intersection between the hole and the wire.
Here's the final path with the first twist done (it's upside down now)
Hopefully this is helpful to those of you who are swapping your own rotor rings. If this looks wildly complex or over your head, no need to worry - for Trackspeed customers, just cut the old wire off and ship your hats and bolts back to me and I'll install new rings and wire on your hats for $100 per pair (including rotors).
The goal of safety wire is to stretch a piece of wire tautly between two bolts in such a way that if either bolt were to loosen, the wire would grow more taut. Think of each bolt as a clock: if you run wire from 5o'clock on the left bolt to 10o'clock on the right bolt, both bolts can be loosened without disturbing the wire. Not good. If you wire them from 1o'clock to 7o'clock, neither bolt can be loosened. This is the most important thing to get right when you safety wire anything - if you wire in the wrong direction, you may as well not do it at all.
The only special tool you need to do safety wire is a pair of safety wire pliers. You can spend as little as $20 from Harbor Freight for a pair. You can do it with vise grips or even just a pair of needlenose, but it will take much, much longer. Buy the right tool for the job
I've drawn the orientation of the hole through the head of the bolt with a black sharpie marker so you can easily see it.
I start by deciding on the path of the wire. In some cases, I'll be able to run directly from the 1 or 2 o'clock position to the 7-8o'clock position. Sometimes I'll need to start as far away as the 10 o'clock position on the left and wrap the wire all the way around to the 4 o'clock position on the right in order to maintain the correct wire path between the two bolts. In this case, I've chosen a fairly easy one just to demonstrate the technique. I'll show a more complex one later on.
I size the wire by threading through the backside of the hole I want to come out, routing along the appropriate wire path, and then laying it over the top of the bolt I'll be finishing on. Give yourself at least two extra inches beyond the end of the second bolt - more wire is better, but don't leave too much or it will get in the way when you twist the wire using the safety wire pliers.
I then match the other side of the wire to this length. It's important to wrap the wire around the top side of the left bolt.
Clamp the wire at the intersection between the hole and the wire at approximately a right angle. You can err slightly on the short side, but don't go too short or you'll end up with an unattractive untwisted portion between the two bolts.
Once you've clamped, and you're sure the wire is routed over the top of the left-side bolt, give several twists on the pliers. My pliers typically get 7-8 twists between bolts, depending on the length of wire I'm twisting.
Separate the two ends of the wire and route whichever wire is on top through the hole. Route the wire on the bottom around the bottom of the right-hand bolt.
Clamp the wire about 1" past the end of the second bolt, and twist the wire backwards or counterclockwise. High-end safety wire pliers are reversible, but you can do this short portion by hand pretty easily with a cheap pair of pliers. The backward twist ensures that the wire stays wrapped around the bottom of the second bolt, instead of being rolled over onto the top side as the wire is twisted up.
Clip the excess wires, leaving around 1" left. Grab it about 2/3 of the way away from the bolt, then fold the short portion over the top of the long portion. This keeps the sharp edge of the wire away from your hands while you're installing the rotor, and it just looks pretty.
And we're done! Only 7 more pairs to go!
Here's a more complex example. In this pair, the two bolts don't provide as clear a path from the top left to the bottom right. In this case, I'll start at the 11o'clock position and wrap down and around to the 5o'clock position.
Here you can see where I clamp the wire for this example - right at the intersection between the hole and the wire.
Here's the final path with the first twist done (it's upside down now)
Hopefully this is helpful to those of you who are swapping your own rotor rings. If this looks wildly complex or over your head, no need to worry - for Trackspeed customers, just cut the old wire off and ship your hats and bolts back to me and I'll install new rings and wire on your hats for $100 per pair (including rotors).

Reply
 12
12

12
02-27-2014, 10:21 PM
#2
Elite Member
iTrader: (37)

Join Date: Apr 2010
Location: Very NorCal
Posts: 10,441
Total Cats: 1,899
OK, this is awesome, thank you for the walkthrough with pics!
Could you possibly speak to the various materials for wires and fasteners? Also the relationship between hole size and wire size? Im thinking this might benifit those of us who are planning to do something silly like drill stock chra to turbine housing bolts for safety wire.
I regret I have but one prop to give for this post. Feels a bit sticky
Reply
0
0
02-27-2014, 11:05 PM
#3
Former Vendor
Thread Starter
iTrader: (31)
Join Date: Nov 2006
Location: Sunnyvale, CA
Posts: 15,442
Total Cats: 2,099
Wire is 304SS 0.032". 0.028" is available and easier to work with, so long as you don't break it by wrapping it too tight. Available at any motorcycle supply shop (Cycle Gear, etc). Fasteners come with our kit
Reply
0
0
02-27-2014, 11:28 PM
#4

OK, this is awesome, thank you for the walkthrough with pics!
Could you possibly speak to the various materials for wires and fasteners? Also the relationship between hole size and wire size? Im thinking this might benifit those of us who are planning to do something silly like drill stock chra to turbine housing bolts for safety wire.
I regret I have but one prop to give for this post. Feels a bit sticky
Could you possibly speak to the various materials for wires and fasteners? Also the relationship between hole size and wire size? Im thinking this might benifit those of us who are planning to do something silly like drill stock chra to turbine housing bolts for safety wire.
I regret I have but one prop to give for this post. Feels a bit sticky
Reply
0
0


 02-28-2014, 12:40 PM
#10
Elite Member

Join Date: Oct 2011
Location: OKC, OK
Posts: 3,693
Total Cats: 222
I'd feel better with them safety wired vs the Loctite button head screws that come with the kit.
Which Resbond formula do you use?
Reply
0
0
03-02-2014, 01:02 PM
#12

after years and many cans of safety wire, this makes like much easier. https://www.dmctools.com/Products/safe-t-cable.html
Reply
0
0

 03-03-2014, 11:52 PM
#15
Senior Member
iTrader: (1)

Join Date: Dec 2010
Location: Farmington Hills, MI
Posts: 1,218
Total Cats: 175
I'm not so sure about the common failure parts of hard tracked Miatas, but in FSAE we have a general rule of failures. If something breaks, does the vehicle roll to a stop, skid to a stop, or come to a screeching halt? If it's either of the latter two, it's a critical fastener and it needs some kind of positive lock. Whether that be safety wire, nylock nut (or some kind of self locking nut), or thread locker. Well, thread locker isn't acceptable for FSAE, but as long as it's not in a high heat area, it's good for me.
Reply
0
0

 03-04-2014, 06:26 AM
#17

Nice write up, Sav. Thanks.
I know you mentioned the reverse twist (I can see that helping), but I still can't see how that completely prevents the wire from slipping over the smooth side to the top of the bolt, effectively making the wire not taut anymore. I know it works, just wondering if it ever slips with so little friction.
I know you mentioned the reverse twist (I can see that helping), but I still can't see how that completely prevents the wire from slipping over the smooth side to the top of the bolt, effectively making the wire not taut anymore. I know it works, just wondering if it ever slips with so little friction.
Reply
0
0

 03-13-2014, 09:16 AM
#20

after years and many cans of safety wire, this makes like much easier. https://www.dmctools.com/Products/safe-t-cable.html
Reply
0
0

Thread
Thread Starter
Forum
Replies
Last Post
Zaphod
MEGAsquirt
47
10-26-2018 11:00 PM


