
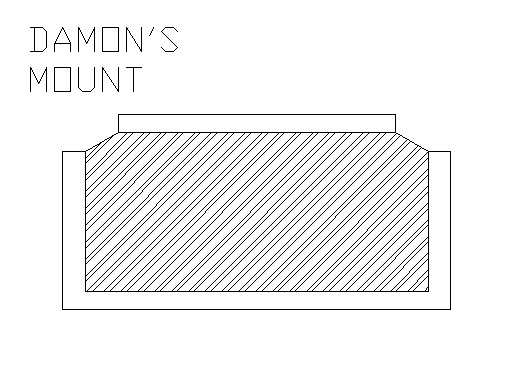
DIY Urethane Motor Mounts
 09-20-2009, 11:46 AM
#1
Elite Member

Thread Starter
iTrader: (51)
Join Date: Nov 2008
Location: Spring, TX
Posts: 7,257
Total Cats: 26
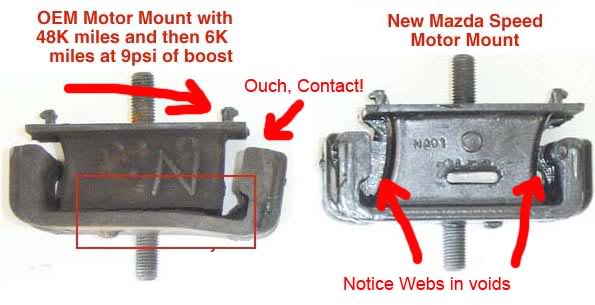
So about a month ago I got sick and effin' tired of my worthless OEM motor mounts. Chassis has 226K miles, and although this is the 3rd motor, I'm pretty neither one of the ******** that put in the replacement motors changed the mounts. I wish I had taken pictures of the old mount. Better yet I wish I had finished putting current motor in myself instead of finding all the unsorted crap that "mechanic" left for me to discover. Mine looked 5X worse than the top left, and were almost like the ones on top right.

(pic sourced from TDR...which is where I'd buy my Mazdaspeed mounts from if I were you)
I was tired of missing 2-3 shifts, tired of the movement, and then had a new problem crop up. It was moving so violently it was disturbing engine ground above 5000rpm!
So I looked for the Mazdaspeed mounts. No one had them, much less at the oft quoted but never seen $75 (I actually checked TDR's site this morning and they show this price, but haven't checked availability. Neogenesis says he still can't find any due to a nation-wide wait).
Anyhow I decided to go the DIY route after reading a few write-ups like the following:
Home Made Motor Mounts (BEST ONE)
DIY Polyurethane Motor mounts write up - Hondahookup.com
DIY Homemade Polyurethane Engine Mounts - Honda Forum / Acura Forum - SuperHonda.com
DIY Polyurethane Motor Mounts - JDM Universe.com
So I went and ordered a tube of 3M Windo-Weld Super Fast Urethane:

(not my photo either...didn't take one...same thing)
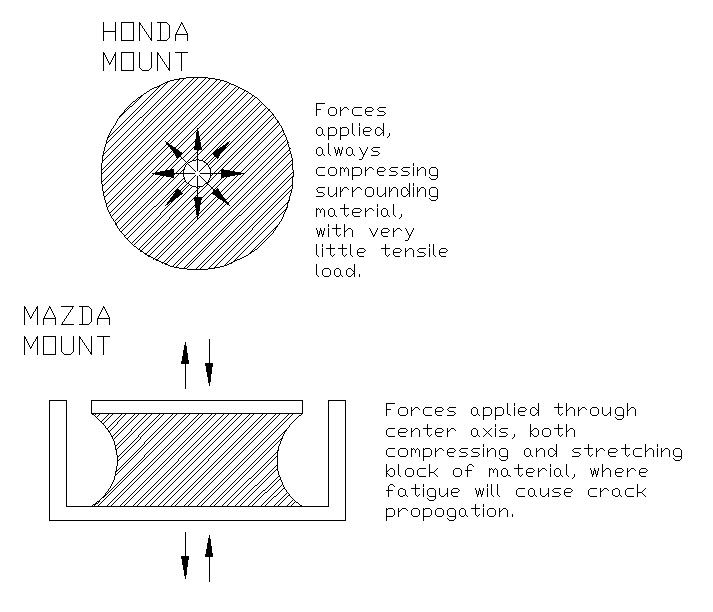
The "performance" motor mounts are made of urethane, and this is really the same material. Apparently it works well for the Honda crowd, but there was one thing I was worried about. Their motor mounts are constantly in compression load since they are circular, whereas our mounts alternate between compression and tension, generally loading the passenger side mount in compression, and driver side mount in tension under torque load. The opposite occurs during shifts, as well as vibrations doing both to both mounts at cruise and idle.
But to date I haven’t had any problems. dc2696 hasn’t had any problems with his in 4-5months, and we know how hard he is on ****.
So…on to making them.
First, pull your stinkin’ motor mounts, that is if you don’t have some spare junkers on hand. All of this would be a LOT easier if you have an extra set of mounts, because there is a minimum 2-3days downtime with prep and curing. I had my car apart and took two weeks. Occasional disassembly and prep work first week, and then let them sit for a week before re-installing.
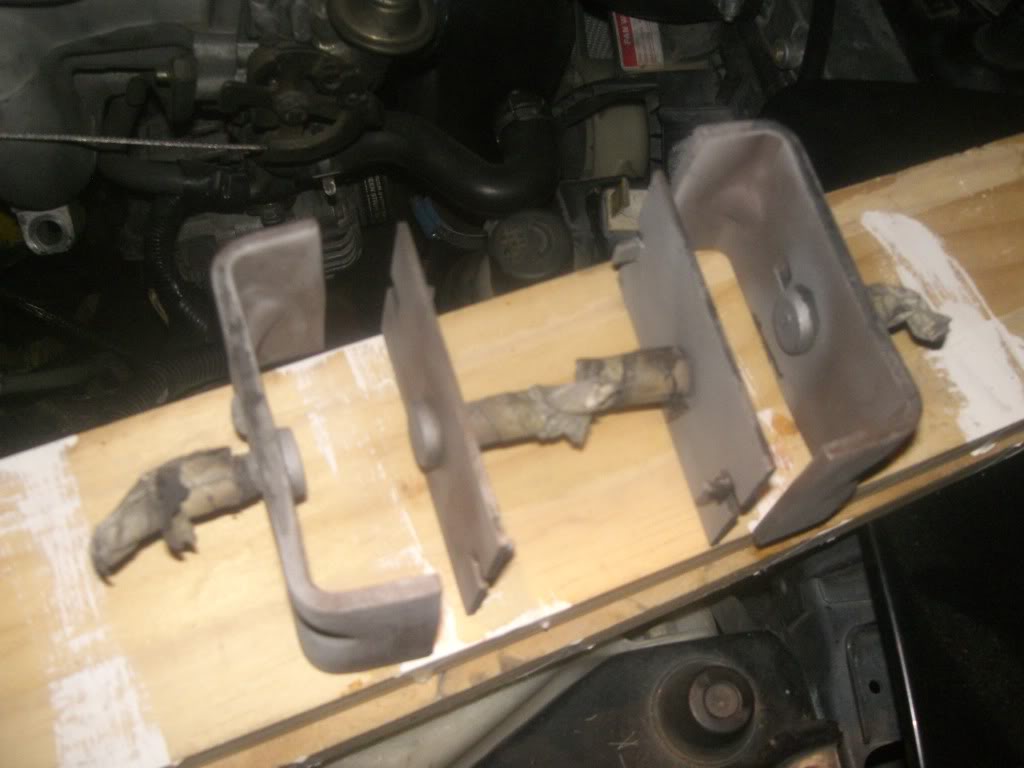
Anyhow, so you’ve got your crappy OEM mounts out…now you need to get the rubber out of them. I used a vice, a hammer and a pick, prying into the cracks and breaking the mount into it’s two pieces. This can be finished by hand…but I used an oxy-acetylene torch at work to get the stubborn final layers off after removing all the big chunks I could. While I was there I also blasted them. I was hoping this would not only clean them up, but give me more effective surface area for the urethane to adhere to.
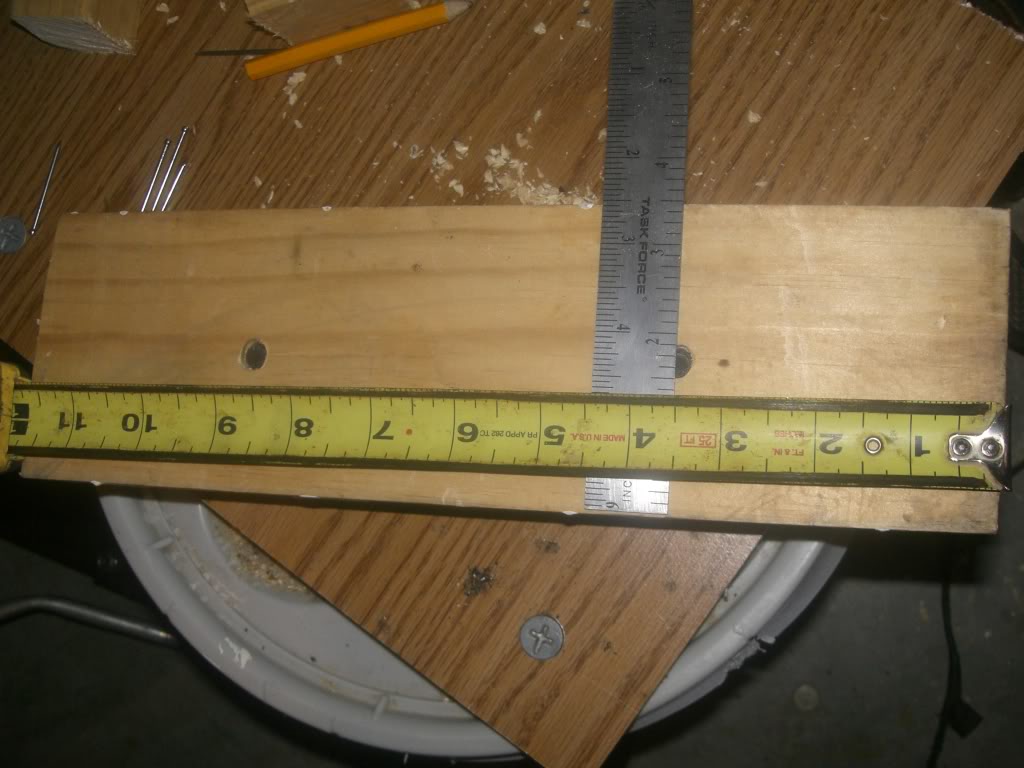
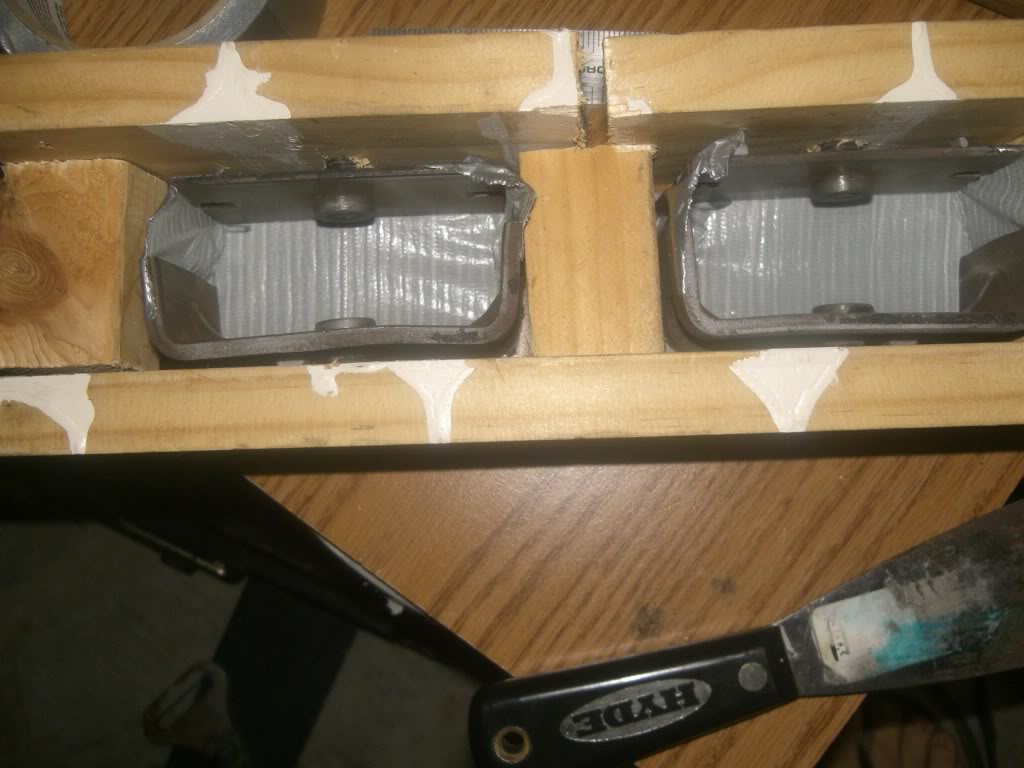
Now you have to make a jig to hold them in place since there are two pieces which you want to be aligned properly to fit back in. I measured mine before cutting old rubber out…and added 1/8” to the thickness for compression of the old rubber. I think I got this number from a side to side comparison in a write-up for mount swaps I can’t seem to find anymore.
I built my jig out of crap wood I had laying around in the gayrage, and my mounts still went back in fine. Just pay attention to the alignment of the two parts relative to each other. The studs are on the same axis…and their positions dictate how the mounts sit. I tried three times with the jig before I was content.
I first drilled holes through two matching width 12” L boards. I forget the size bit I used…but it was just big enough to provide an interference fit with the studs on the mounts. I left exactly enough space between the two holes to put another board in between the two mounts to aid in keeping them straight and the proper height.
Make sure as you drill through the two boards that you are in the center of your 1”x 4” or the mounts won’t line up.
I then tapped the four mount pieces into their respective holes and built a simple frame.
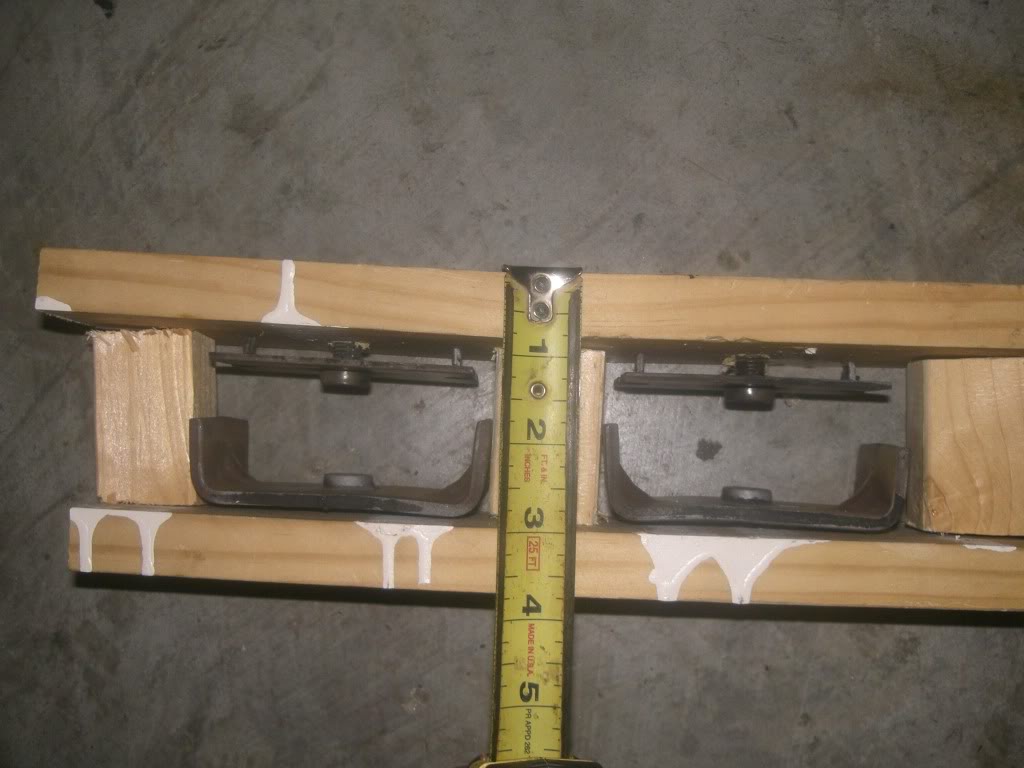
I took measurements -which were off- and adjusted by cutting and re-nailing until I was sure they were straighter than anyone on this forum. It looks ugly…but it works, and you get to tear it apart when you’re done!
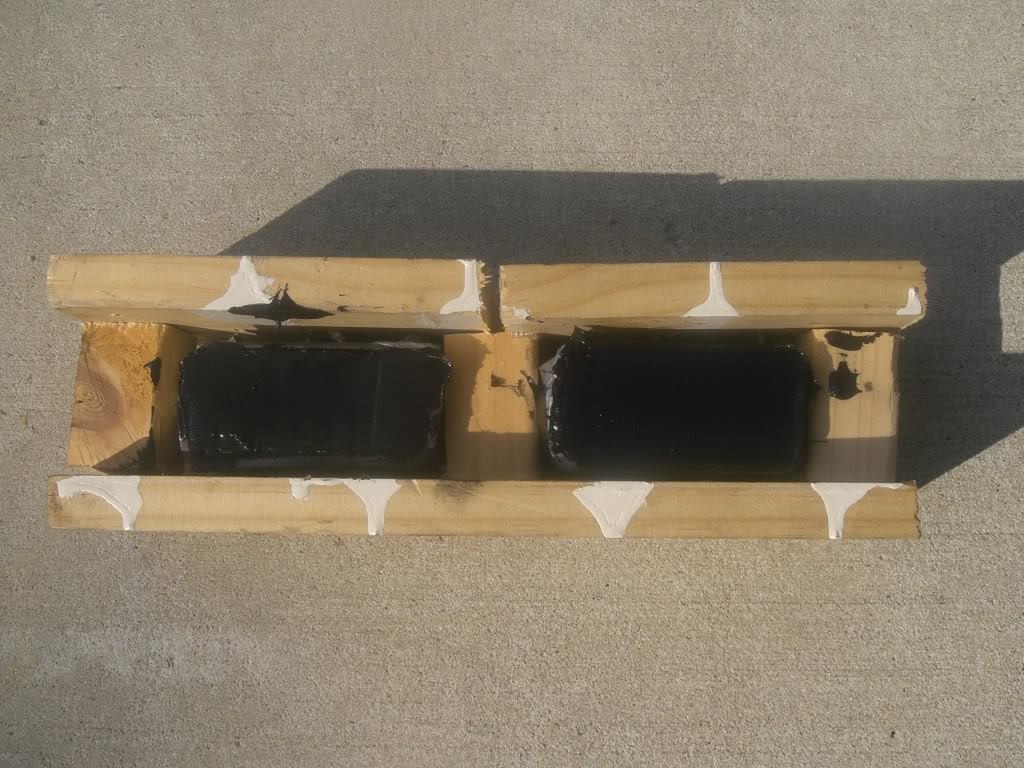
After that you simply tape off the back and sides…and fill in from the open side with your caulk gun.
I chose to fill mine in completely:
I did this for piece of mind…to make a little stronger…and because I didn’t care if I got more harmonics than the Mazda design due to zero accommodation of lateral movement..
NOTE: This probably caused me to have to use part of a second tube due to more volume filled. This effectively doubled the cost of the project, as well as requiring a frantic run to only parts store in neighboring town that had the crap. The only cool part was that my daughter went with me, and she picked out…of all things… a GT500 “Eleanor” Hot Wheels while we were standing in line at O’Reilly’s. I was proud (she’s 2yrs old).
Anyhow, mine are stiffer, but had I not done them this way I probably would have only used one 10oz tube. I didn’t want to fabricate a shim to put there that I could later remove, so you’re on your own there.
Taped off pre-filling:
In the process of filling:
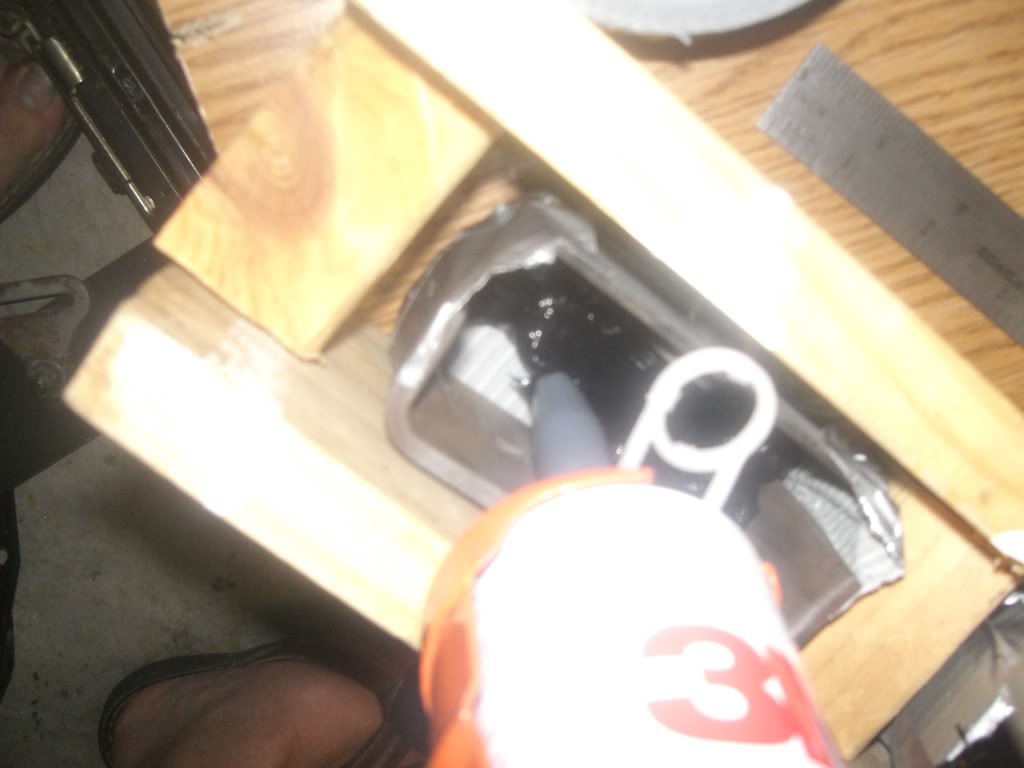
When filling, really worked to fill in ALL voids. You have to literally push it into the corners, and work at an even pace. Most of you should have a good “kung-fu masturbating grip” and all the squeezing of the caulk gun shouldn’t be too hard…but I got nearly worn out. I was nervous too. This stuff is messy, and I was trying to be clean at it.
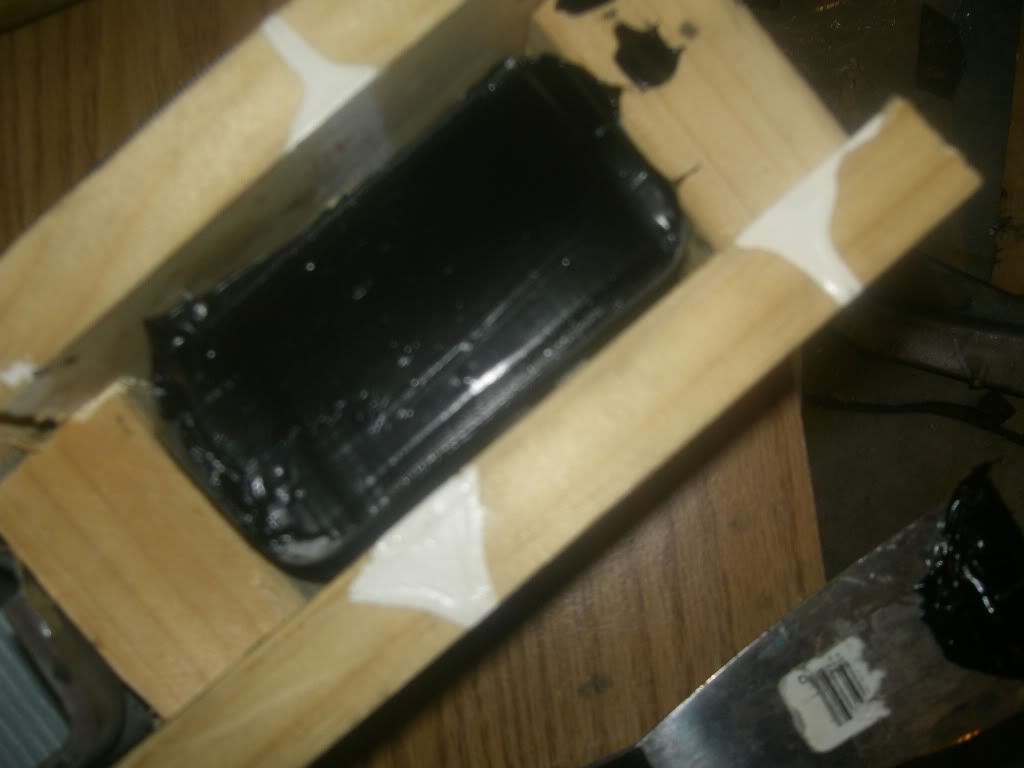
When you’re done filling one (above the brim) you can smooth it out with a scraper and put the leftover into the other mount.
Done filling and smoothed out with putty knife:
This was a pretty good feeling all said….I was surprised it didn’t give me more of a hassle (besides frantic 1hr run to store between mounts for more urethane), or make more of a mess.
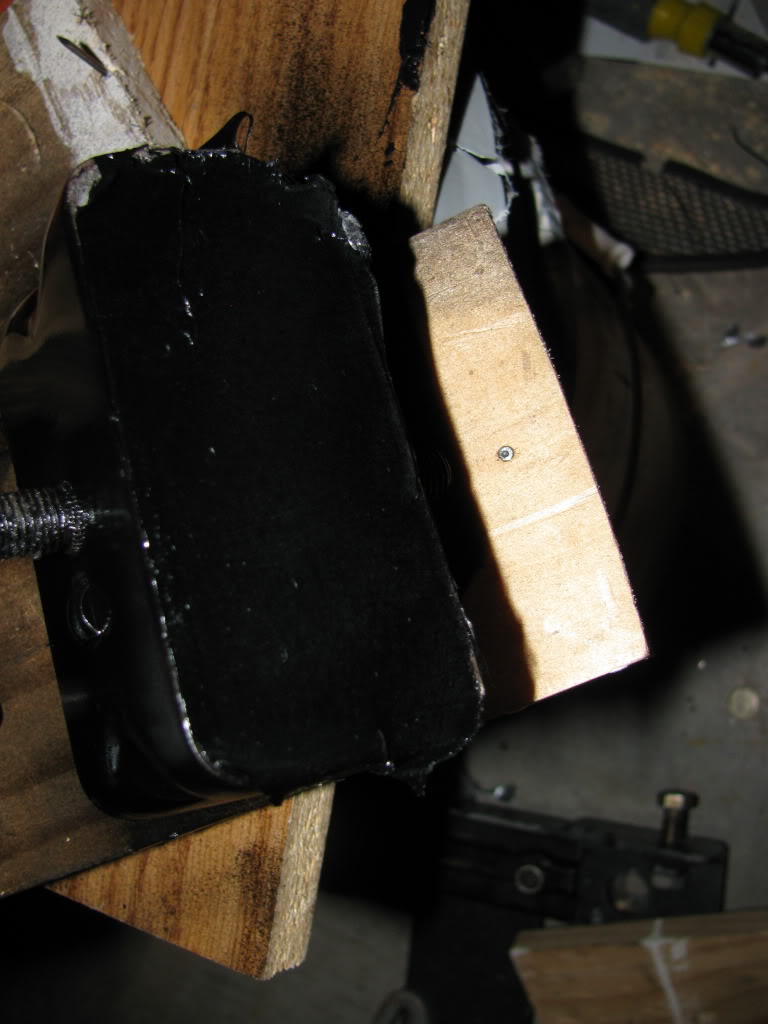
Set out in the sun to cure for a while:
I let mine cure for a week since I had the car apart for interior, wiring, and brake upgrades anyhow. They were very hard to the touch, and went back into engine bay without a hitch.
Finished product:
SUMMARY:
1. Remove rubber from old mounts.
2. Prep interior surface for adhesion.
3. Build jig or frame to hold mounts in position.
4. Tape up 3 sides.
5. Insert tip into gaping hole and unload your thick black goodness until she’s full.
Super easy.
IMPRESSIONS:
The difference is immediately noticeable. Idle actually felt smoother despite more vibrations coming into cockpit. I don’t have any carpet or insulation in right now, so I noticed every change, and it wasn’t bad in the slightest. The whole rev range is smoother, and throttle response seemed quicker. (I’ve also been driving a Chevy Cavalier for the month this car was in garage, so take all this with a grain of salt).
I did measure the movement of shifter under load. I used to get nearly an inch with old mounts between top gear full-load to off throttle transitions. This of course caused missed shifts and surely was tweaking on all kinds of things. That movement is now down to less than �”. It’s barely perceptible…and almost scary how little the shifter moves now. My MS resets above 5K rpm also disappeared, which supports my momentary loss of engine ground theory. It now pulls hard all the way to redline.
Would I do this mod again?
NO, unless it was my only choice. Having to get a second tube of urethane really chapped my hide. Had it been a $17 job I would be swearing by it…but that frantic run to store and dropping another $20 spot really took the frugal fun out of it for me. I lost over an hour extra of my Sunday, had to explain to SO what was going on, and doubled the project cost.
Also, I’m not as broke as I was at the time, and would either source the Mazdaspeed parts, or try the Megan Racing stuff to see if it’s quality.
There are parts out there that aren’t too expensive, and they minimize downtime. They also mean you don’t drive around worrying when you’re going to rip your caulk-gun-creation in half.
If you find yourself in the same spot I was in last month then IT CAN BE DONE. But as is often said here, just because you can doesn’t mean you should.
That said I’m very happy with the parts installed. It did change the driving character of the drivetrain. I feel the torque a lot more, and feel it going to the road better. I know where my shifter is…and I actually get less odd rattles and thumps. I like them…and they work. I’ve abused my car a good bit since installing them, and they still feel just as solid as Day 1.
I will clean up this post a little tomorrow with more pics and links, but am slapping it up since neogayness2004 was asking about it.
(pic sourced from TDR...which is where I'd buy my Mazdaspeed mounts from if I were you)
I was tired of missing 2-3 shifts, tired of the movement, and then had a new problem crop up. It was moving so violently it was disturbing engine ground above 5000rpm!
So I looked for the Mazdaspeed mounts. No one had them, much less at the oft quoted but never seen $75
(I actually checked TDR's site this morning and they show this price, but haven't checked availability. Neogenesis says he still can't find any due to a nation-wide wait).Anyhow I decided to go the DIY route after reading a few write-ups like the following:
Home Made Motor Mounts (BEST ONE)
DIY Polyurethane Motor mounts write up - Hondahookup.com
DIY Homemade Polyurethane Engine Mounts - Honda Forum / Acura Forum - SuperHonda.com
DIY Polyurethane Motor Mounts - JDM Universe.com
So I went and ordered a tube of 3M Windo-Weld Super Fast Urethane:
(not my photo either...didn't take one...same thing)
The "performance" motor mounts are made of urethane, and this is really the same material. Apparently it works well for the Honda crowd, but there was one thing I was worried about. Their motor mounts are constantly in compression load since they are circular, whereas our mounts alternate between compression and tension, generally loading the passenger side mount in compression, and driver side mount in tension under torque load. The opposite occurs during shifts, as well as vibrations doing both to both mounts at cruise and idle.
But to date I haven’t had any problems. dc2696 hasn’t had any problems with his in 4-5months, and we know how hard he is on ****.
So…on to making them.
First, pull your stinkin’ motor mounts, that is if you don’t have some spare junkers on hand. All of this would be a LOT easier if you have an extra set of mounts, because there is a minimum 2-3days downtime with prep and curing. I had my car apart and took two weeks. Occasional disassembly and prep work first week, and then let them sit for a week before re-installing.
Anyhow, so you’ve got your crappy OEM mounts out…now you need to get the rubber out of them. I used a vice, a hammer and a pick, prying into the cracks and breaking the mount into it’s two pieces. This can be finished by hand…but I used an oxy-acetylene torch at work to get the stubborn final layers off after removing all the big chunks I could. While I was there I also blasted them. I was hoping this would not only clean them up, but give me more effective surface area for the urethane to adhere to.
Now you have to make a jig to hold them in place since there are two pieces which you want to be aligned properly to fit back in. I measured mine before cutting old rubber out…and added 1/8” to the thickness for compression of the old rubber. I think I got this number from a side to side comparison in a write-up for mount swaps I can’t seem to find anymore.
I built my jig out of crap wood I had laying around in the gayrage, and my mounts still went back in fine. Just pay attention to the alignment of the two parts relative to each other. The studs are on the same axis…and their positions dictate how the mounts sit. I tried three times with the jig before I was content.
I first drilled holes through two matching width 12” L boards. I forget the size bit I used…but it was just big enough to provide an interference fit with the studs on the mounts. I left exactly enough space between the two holes to put another board in between the two mounts to aid in keeping them straight and the proper height.
Make sure as you drill through the two boards that you are in the center of your 1”x 4” or the mounts won’t line up.
I then tapped the four mount pieces into their respective holes and built a simple frame.
I took measurements -which were off- and adjusted by cutting and re-nailing until I was sure they were straighter than anyone on this forum. It looks ugly…but it works, and you get to tear it apart when you’re done!
After that you simply tape off the back and sides…and fill in from the open side with your caulk gun.
I chose to fill mine in completely:
I did this for piece of mind…to make a little stronger…and because I didn’t care if I got more harmonics than the Mazda design due to zero accommodation of lateral movement..
NOTE: This probably caused me to have to use part of a second tube due to more volume filled. This effectively doubled the cost of the project, as well as requiring a frantic run to only parts store in neighboring town that had the crap. The only cool part was that my daughter went with me, and she picked out…of all things… a GT500 “Eleanor” Hot Wheels while we were standing in line at O’Reilly’s. I was proud (she’s 2yrs old).
Anyhow, mine are stiffer, but had I not done them this way I probably would have only used one 10oz tube. I didn’t want to fabricate a shim to put there that I could later remove, so you’re on your own there.
Taped off pre-filling:
In the process of filling:
When filling, really worked to fill in ALL voids. You have to literally push it into the corners, and work at an even pace. Most of you should have a good “kung-fu masturbating grip” and all the squeezing of the caulk gun shouldn’t be too hard…but I got nearly worn out. I was nervous too. This stuff is messy, and I was trying to be clean at it.
When you’re done filling one (above the brim) you can smooth it out with a scraper and put the leftover into the other mount.
Done filling and smoothed out with putty knife:
This was a pretty good feeling all said….I was surprised it didn’t give me more of a hassle (besides frantic 1hr run to store between mounts for more urethane), or make more of a mess.
Set out in the sun to cure for a while:
I let mine cure for a week since I had the car apart for interior, wiring, and brake upgrades anyhow. They were very hard to the touch, and went back into engine bay without a hitch.
Finished product:
SUMMARY:
1. Remove rubber from old mounts.
2. Prep interior surface for adhesion.
3. Build jig or frame to hold mounts in position.
4. Tape up 3 sides.
5. Insert tip into gaping hole and unload your thick black goodness until she’s full.
Super easy.
IMPRESSIONS:
The difference is immediately noticeable. Idle actually felt smoother despite more vibrations coming into cockpit. I don’t have any carpet or insulation in right now, so I noticed every change, and it wasn’t bad in the slightest. The whole rev range is smoother, and throttle response seemed quicker. (I’ve also been driving a Chevy Cavalier for the month this car was in garage, so take all this with a grain of salt).
I did measure the movement of shifter under load. I used to get nearly an inch with old mounts between top gear full-load to off throttle transitions. This of course caused missed shifts and surely was tweaking on all kinds of things. That movement is now down to less than �”. It’s barely perceptible…and almost scary how little the shifter moves now. My MS resets above 5K rpm also disappeared, which supports my momentary loss of engine ground theory. It now pulls hard all the way to redline.
Would I do this mod again?
NO, unless it was my only choice. Having to get a second tube of urethane really chapped my hide. Had it been a $17 job I would be swearing by it…but that frantic run to store and dropping another $20 spot really took the frugal fun out of it for me. I lost over an hour extra of my Sunday, had to explain to SO what was going on, and doubled the project cost.
Also, I’m not as broke as I was at the time, and would either source the Mazdaspeed parts, or try the Megan Racing stuff to see if it’s quality.
There are parts out there that aren’t too expensive, and they minimize downtime. They also mean you don’t drive around worrying when you’re going to rip your caulk-gun-creation in half.
If you find yourself in the same spot I was in last month then IT CAN BE DONE. But as is often said here, just because you can doesn’t mean you should.
That said I’m very happy with the parts installed. It did change the driving character of the drivetrain. I feel the torque a lot more, and feel it going to the road better. I know where my shifter is…and I actually get less odd rattles and thumps. I like them…and they work. I’ve abused my car a good bit since installing them, and they still feel just as solid as Day 1.
I will clean up this post a little tomorrow with more pics and links, but am slapping it up since neogayness2004 was asking about it.
Last edited by gospeed81; 09-20-2009 at 09:34 PM.

Reply
 0
0

0

 09-20-2009, 12:29 PM
#4
Elite Member
Thread Starter
iTrader: (51)
Join Date: Nov 2008
Location: Spring, TX
Posts: 7,257
Total Cats: 26
When there are proven parts at fair prices you don't have to be a cheapass.
But a few folks were asking about it a while back, and I was ready to do mine, it was summer (free time) and I was broke.
They work...and I wanted to show it could be done for those that are interested.
I'm sure there are places now that have them in stock. While not being able to find them (or afford them) at the time caused me to try it, that's not the point of this thread.
Reply
0
0


 09-20-2009, 01:11 PM
#7
Elite Member
Thread Starter
iTrader: (51)
Join Date: Nov 2008
Location: Spring, TX
Posts: 7,257
Total Cats: 26
O'Reilly happened to have one in stock the day I did it, and it was about $5 cheaper.
Reply
0
0
 09-20-2009, 01:37 PM
#10
I don't see why you couldn't cut out all the stock rubber minus a little for it to maintain its shape/position. Then fill the rest.
From reading the data sheet it appears that this is some strong ****. The honda crowd has been doing this for near/over a decade without issues.
From reading the data sheet it appears that this is some strong ****. The honda crowd has been doing this for near/over a decade without issues.
Reply
0
0
09-20-2009, 01:39 PM
#11
Elite Member
Thread Starter
iTrader: (51)
Join Date: Nov 2008
Location: Spring, TX
Posts: 7,257
Total Cats: 26
Mazda mounts generally fail by developing cracks where the rubber block meets the metal due to the added tensile load on the mount.
You would want to remove the old rubber and "cast" the urethane mount to get the best adhesion to the two metal plates as possible.
Reply
0
0
09-20-2009, 01:45 PM
#12
Elite Member
Thread Starter
iTrader: (51)
Join Date: Nov 2008
Location: Spring, TX
Posts: 7,257
Total Cats: 26
There's a reason I used a torch... I didn't want to be chipping and scraping all damn day. I'm sure you could start a "coffee can fire" and get the same result. If you do use a torch just keep warping in mind...don't heat one area too much or they might change shape. I was pretty aggressive with the heat and didn't have a problem, but it's worth being aware of.
Making a jig isn't that hard, and it's worth knowing you have a solid block of urethane in there, instead of three seperate (read ready to break apart) blocks, one of which is old rubber.
The urethane adheres pretty well, it's made to stick to glass after all, so rough sanded metal isn't a problem. I'm not sure how well it would stick to petrified rubber though.
Reply
0
0
 09-20-2009, 05:09 PM
#15
You can't expect the same results with a Miata mount because you can only fill in around the rubber, and that won't accomplish much.
Reply
0
0
09-21-2009, 03:41 AM
#17

Clever, I've seen this done on civics before (years ago when a friend had a b18 EK swap done from junkyard parts). Functional, cheap, and AFAIK they still work now 6 years later. I went with the Mazdaspeed mounts personally, as I agree with you that they're already so cheap I might as well save the hassle and have an actual product.
Reply
0
0
09-21-2009, 12:34 PM
#18
Elite Member
Thread Starter
iTrader: (51)
Join Date: Nov 2008
Location: Spring, TX
Posts: 7,257
Total Cats: 26
I am seriously in love with these mounts again after hitting some nice roads this morning.
Another huge difference is how the power is put down. Where it used to torque the motor sideways in the bay and not react briskly...it's now solid and just spins those poor 195s out back. Much more predictable power delivery...much easier to know when it's going to break loose.
If mine last 2-3yrs I'll consider them a success.
Having not spent that money DOES mean I can get a few other little odds and ends I've been looking at. This project basically payed for end links, or brake pads, or half that deal I got on a Devil's Own kit, or a rebuild kit for this Tbird upgrade compressor/CHRA I just scored on eBay super cheap.
Money is money, and you can get ahead a little while still having the same quality part in there.
Reply
0
0
01-08-2010, 12:00 PM
#20
Newb

Join Date: Mar 2009
Location: Germany
Posts: 17
Total Cats: 0
Hi!
Im Michael, a from germany.
Nice inspiring job gospeed81. ;-)
Im bought 2 cans of that 3M PU over here in germany. Since 3M did rename their product line in 2009 and there is definitely a huge difference in product-policy here in europe it was hard to find the correct material. GotPower Line 560 Power line 590 (thats the right one) with the same specs as the window weld. (i hope so)
So far i just pulled out my mounts today.
Did you line up the two parts centered in the jig?
Im asking because the Mazdaspeeds as well as the OEMs are not centeres to each other to compensate the engine weight, pressing them in place to be centered when sitting in place.
Do you suggest due to the strenght of the PU to center them in the jig or did i just miss this detail in the picture and you fabricated them slightly shifted like the OEMs?
Got to go to home depot now to find a replacement gas can for my torch....
Thanks Michael
Im Michael, a
from germany. Nice inspiring job gospeed81. ;-)
Im bought 2 cans of that 3M PU over here in germany. Since 3M did rename their product line in 2009 and there is definitely a huge difference in product-policy here in europe it was hard to find the correct material. Got
So far i just pulled out my mounts today.
Did you line up the two parts centered in the jig?
Im asking because the Mazdaspeeds as well as the OEMs are not centeres to each other to compensate the engine weight, pressing them in place to be centered when sitting in place.
Do you suggest due to the strenght of the PU to center them in the jig or did i just miss this detail in the picture and you fabricated them slightly shifted like the OEMs?
Got to go to home depot now to find a replacement gas can for my torch....
Thanks Michael
Last edited by Speedwolf; 01-11-2010 at 12:38 PM. Reason: wrong information inside
Reply
0
0


