
Golferluke's Build Thread

Thread Starter
Junior Member
Joined: Oct 2009
Posts: 496
Total Cats: 3
From: Springfield, MO
Well shitballs, I was finishing up the motor today and realized my 460cc injectors I was putting in didn't have the insulators sooo I'm going to try to track some down tomorrow at napa/autozone/oreillys. Hopefully oreillys has them cause they are based here and I can get any part they sell the same day, really handy.
If they don't ill either have to put the build on hold to wait on shipping or put my stockers back in, get everything running and then install the 460s later when I get the parts in. Now that I think about it not having to retune in addition to breaking in motor and clutch would be nice... may just do that and order a seal kit.
If they don't ill either have to put the build on hold to wait on shipping or put my stockers back in, get everything running and then install the 460s later when I get the parts in. Now that I think about it not having to retune in addition to breaking in motor and clutch would be nice... may just do that and order a seal kit.
Reply
 0
0

0
Thread Starter
Junior Member
Joined: Oct 2009
Posts: 496
Total Cats: 3
From: Springfield, MO
It's alive! Lots to do still but it started! Put in distilled water and rotella t and pulled the cops plug off. Cranked it untill I saw oil pressure the put cops back on and started it up. Lots of fun smoke and smells from manifold but went away after a minute. Next an oil change and on to the breakin period.
Couple of things to work out though. The tires are slightly spinning with the car in neutral and clutch out (on jack stands) does that indicate the clutch pedal is out of adjustment or is that normal? I can reach back and stop it with my hand. Seems like I remember reading something about being due to input shaft spinning and moving fluid or something. Idk
Idles pretty high, guessing from throttle cable out of adjustment (read forgot to adjust) but tuner studio is showing like 10.5 afr. I tried calibrating the sensor but no change. No errors from the lc1 led. Idk I need to hook up the diagnostic cable to it and check it out I guess. I have had nothing but issues from this damn lc1... Doubt I'll buy another.
Reply
0
0


Thread Starter
Junior Member
Joined: Oct 2009
Posts: 496
Total Cats: 3
From: Springfield, MO
Same to you! I might have to look into that. I have a lc1 sensor, should plug up right? Does that have 2 outputs like for a guage? I've always wanted to program a small digital voltmeter to display afrs. The lc1 is cable of programming separate output signals but MY lc1 only has one output working. Another one of the many things I "love" about it.
Reply
0
0
I don't think my wheels were moving with the car in neutral up on jackstands. It's been a couple of years since I've done that, though; memory may be fuzzy at this point. Ebrake may have been on.
Good to see progress on the miata!
Good to see progress on the miata!
Reply
0
0

Thread Starter
Junior Member
Joined: Oct 2009
Posts: 496
Total Cats: 3
From: Springfield, MO
Thanks. I didn't find anything wrong strangely. I mean besides valve seals, leaky rear main seal etc. the crank mains and piston walls were actually amazingly clean. 180k miles and full cross hatching and no verticals. Bearings looked good also. So no idea what was wrong in the first place. Could of just been an injector or coil came loose that I missed but either way it needed rods/ clutch/ seals/ arp studs/ 6 speed etc to take any more boost.
Tomorrow I'm going to double check the lc1 connections then redo the warmup calibration and free air calibrations. See if I can figure out what's up.
Tomorrow I'm going to double check the lc1 connections then redo the warmup calibration and free air calibrations. See if I can figure out what's up.
Reply
0
0
Thread Starter
Junior Member
Joined: Oct 2009
Posts: 496
Total Cats: 3
From: Springfield, MO
Well small update, reset/recalibrated the lc1 and I THINK its working right, I'm so far from an expert on this though its not even funny. It sits at 10.7 during sensor warmup and 10.2 with ign on but car off. after starting it it jumps up around 14 ish and then settles around 11-12. The car is running super rough, I'm wondering if my old problem came back and its just going on 3 cylinders. Its running rich so I'm assuming that would indicate no spark right? plugs are new and I checked the cop harness but maybe I lost a coil?
Any way to check for a bad coil/no spark besides putting a plug on the block? Coil harness doesn't really allow it to reach that far.
EDIT:
http://www.harborfreight.com/inline-...ker-69014.html
will that work?
Any way to check for a bad coil/no spark besides putting a plug on the block? Coil harness doesn't really allow it to reach that far.
EDIT:
http://www.harborfreight.com/inline-...ker-69014.html
will that work?
Last edited by Golferluke; Apr 22, 2014 at 07:53 PM.
Reply
0
0
Thread Starter
Junior Member
Joined: Oct 2009
Posts: 496
Total Cats: 3
From: Springfield, MO
I'm dumb. Don't need tools for every job lol. I started it and pulled all the coils one by one and listened for a change. When I pulled 1, 2 and 4 idle dipped/stumbled. 3 made no change. Swapped coils 2 and 3 coils and repeated. Now 1,3,4 dipped. So yeah... Just a coil...
Reply
0
0
You can also pull the plugs, the misfiring cylinders' will be fouled.
I had the exact same symptoms, rough running and rich idle. Turned out to be #3 fuel injector clip had "clipped" but not actually made good contact. Re-seated the injector harness and everything was fine.
I had the exact same symptoms, rough running and rich idle. Turned out to be #3 fuel injector clip had "clipped" but not actually made good contact. Re-seated the injector harness and everything was fine.
Reply
0
0
Thread Starter
Junior Member
Joined: Oct 2009
Posts: 496
Total Cats: 3
From: Springfield, MO
Ok so it's up and running but even after adjusting the throttle cable it's still idling at 1500 and about 12 afrs. I'm sure I can tune it out but what worries me is it's the same tune I was dailying for like a year before all this. Only thing that's actually changed besides rings/seals etc is the rods and clutch/trans. I guess I'm about a 1000 feet higher elevation now but but megasquirt should adjust for that on start up. Any ideas why this would be? I may try and revert back to an OLD tune to see if there's a difference.
Reply
0
0
Thread Starter
Junior Member
Joined: Oct 2009
Posts: 496
Total Cats: 3
From: Springfield, MO
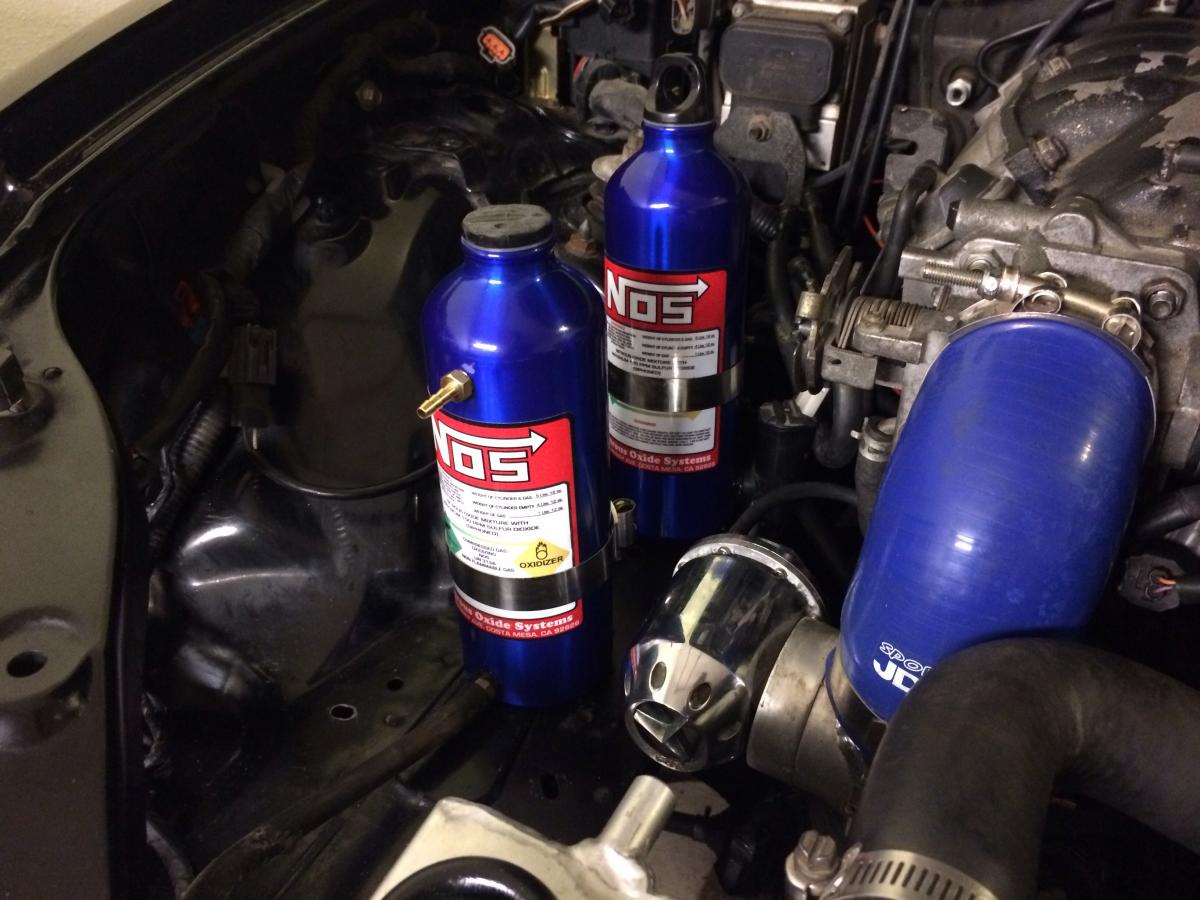
What the hell kind of build thread is this? Almost a whole page of text and no photos of dumb crap.
Got my new overflow bottle and wiper fluid reservoir setup installed.
Got my new overflow bottle and wiper fluid reservoir setup installed.
Reply
0
0
Thread Starter
Junior Member
Joined: Oct 2009
Posts: 496
Total Cats: 3
From: Springfield, MO
Took her out for a drive and no drama from the engine. Ran just fine. Everything else is a different story. Not driving a lowered miata for a year mixed with an unsprung 4 puck mixed with driving my de-powered steering for the first time made it feel like i was driving a ******* track car lol. No "problems" here either though.
Only thing is its still super rich. I'm attaching my so far untouched tune and a log from driving around my neighborhood. It stayed around 12 AFR most of the time and randomly hit mid 10s for part of it. Anybody mind taking a look?
I can always just cut the fuel by a **** ton and try and tune it out but I just feel like somethings wrong.
I've checked my grounds and soldered connections and they all seem solid.
Reply
0
0
Thread Starter
Junior Member
Joined: Oct 2009
Posts: 496
Total Cats: 3
From: Springfield, MO
Turns out the wide band sensor was bad. replaced that for $40 and runs like a charm. Ok not a charm but pretty good. idle is still like 1500 sometimes, and then goes back to like right at 1000 randomly but I'll mess with that another day. I never have gotten the idle thing down well.
Anyways I just got back from its first real test drive, nothing horrible. A little smoke at startup and a little puff when I let off the gas but I'm assuming thats normal for a motor with less that 25 miles? We'll see if it goes away. A little valve noise but its always had that. All in all I'm pretty excited just 480 miles to boost.... :(
Anyways I just got back from its first real test drive, nothing horrible. A little smoke at startup and a little puff when I let off the gas but I'm assuming thats normal for a motor with less that 25 miles? We'll see if it goes away. A little valve noise but its always had that. All in all I'm pretty excited just 480 miles to boost.... :(
Reply
0
0
Thread Starter
Junior Member
Joined: Oct 2009
Posts: 496
Total Cats: 3
From: Springfield, MO
Stupid people make me sad :(
Somebody just called about my miata I had listed on Craigslist for $150 :(
Last week I had some redneck call to ask "wat it *** outta cuz I need a trans for mah ford"
Back in sane people land the miata is doing great, the clutch feels soo much better after about 200 miles. It's hardly much different than a stock one, waaay better than I was expecting for a 4 puck unsprung.
The tune is pretty much right on except for idle problems after warming up. Sometimes it idles at 1500. Sometimes it bounces between 500 and 800 over and over (or just dies) sometimes is rock steady at 1100. Oh and if I put the clutch in while breaking for a stop sign it will just die unless I keep the revs up (heel toe required :( ) but all in all it's running well.
Reply
0
0
Thread Starter
Junior Member
Joined: Oct 2009
Posts: 496
Total Cats: 3
From: Springfield, MO
Ok more of an update after a few weeks. I'm done with break in now. I've been dialing in my ve table and everythings been going well. No smoke, no noises, no drama.
For the idle I spent last weekend going through old threads looking at idle settings/discussions and I've gotten it a lot better (thanks brain) its not quite as solid as it was but doesn't die at stop signs and though it does fluctuate and sometimes seek a little its always at the 1000 mark give or take a few. way better than a rock solid 1400 idle, or 800 depending on its mood.
I also found the new tunerstudio has autotune for warmup enrichment lol, pretty cool but tried it out and changed maybe 2% around 180* still cool though, I like the idea of adding autotuning features.
Ok so basically all is well in lukes miata land so time to throw a wrench in things. Time for mas BOOST
I picked up the grommets I needed to put the rx7 460's in so that will be happening today/tomorrow. Just need to figure out how to tune for them. I know there's a fueling change calculator in ts somewhere so i'll figure that out but what about getting them to idle? I don't expect 460s will be THAT difficult but do I need to do anything besides changing the ve table?
Lastly I'd appreciate if somebody could take a quick glance at my tables to see if anything sticks out and I know how much we like hosted pictures vs having to load up a msq so...
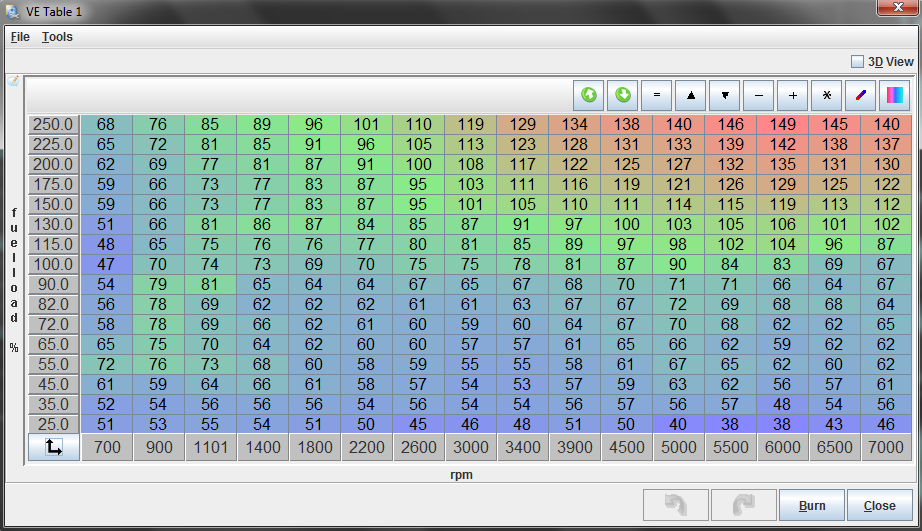
Reply
0
0

Senior Member
Joined: May 2011
Posts: 1,112
Total Cats: 35
From: Pennsylvania
so you moved BACK to missouri for a job? thats awesome... and rare... lol Most of us are moving OUT of missouri for jobs. haha
My sister still lives in springfield though, working at Sams Club, and going to MSU full time(or SMS? or whatever they call it now... they changed the name some years back, i didnt care enough to pay attention. lol )
I ran my miata out in and around springfield quite a bit for a while there. Used to go to that track thats just south of springfield. I ran a few times, but i mostly just went to watch some friends run their stupid 500hp civics... haha Have you gone down there at all???
Reply
0
0
Thread Starter
Junior Member
Joined: Oct 2009
Posts: 496
Total Cats: 3
From: Springfield, MO
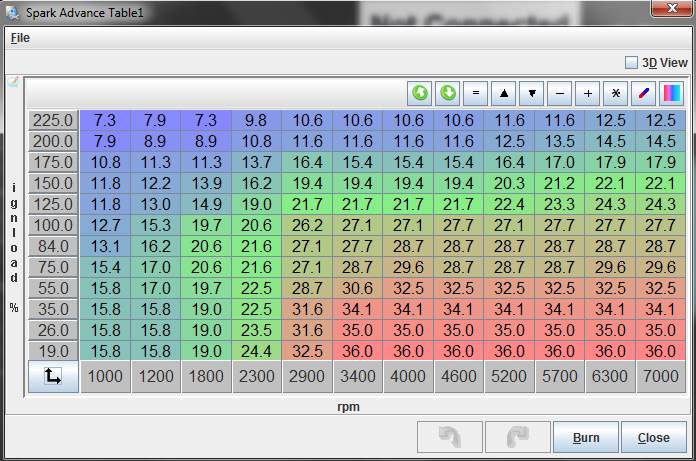
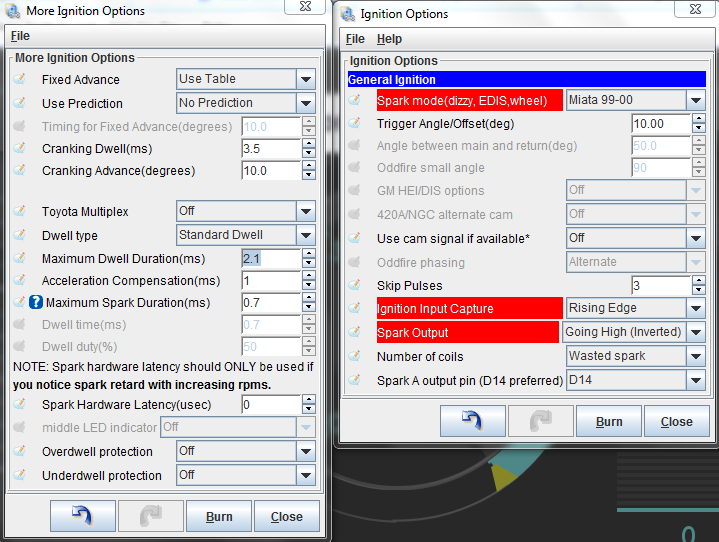
Oh and on the miata front I'm having trouble finding a thread in the last 5 years with solid dwell/ignition settings. I found some decent tidbits here and there and made some adjustments but all the threads end with someone saying "this is what I'm using now, is that right?" never to be answered so here's my shot at it I guess...
This is what I'm using now, is that right?
This is what I'm using now, is that right?
Reply
0
0


