Ugly Girlfriend
 06-26-2010, 12:18 AM
#1
Senior Member
Thread Starter

Join Date: May 2007
Location: Atlanta
Posts: 997
Total Cats: 156
Where to start...
Car:
94 NA, C package, 167k miles
Kit:
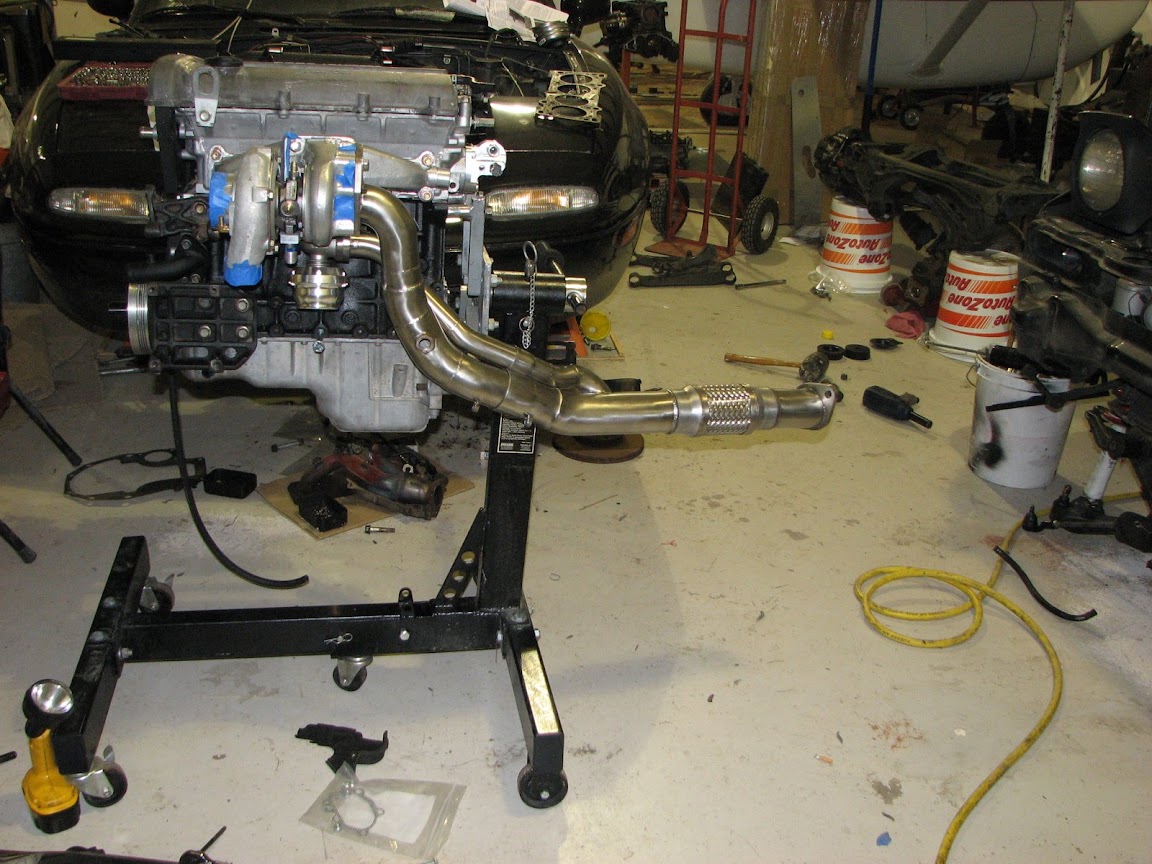
99 Begi S5 (used), then switched to S4 (used)
2871 w/ external wastegate
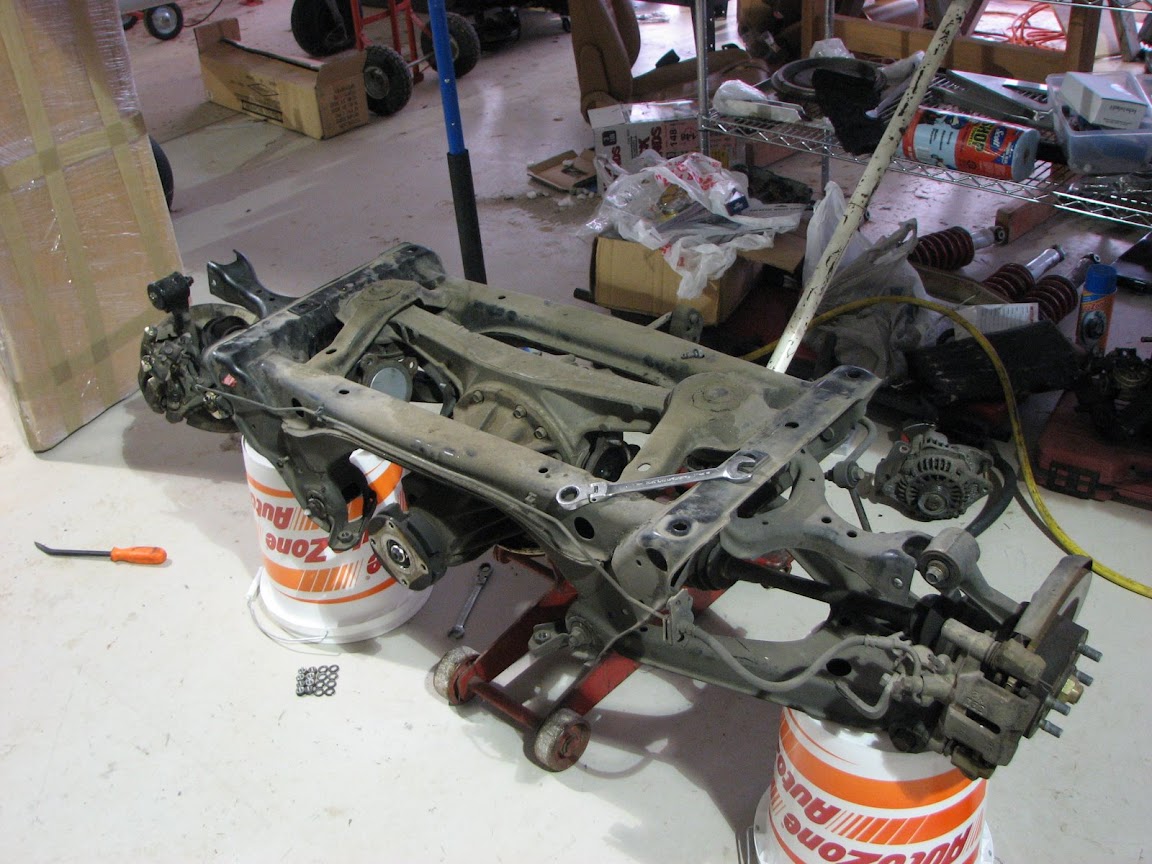
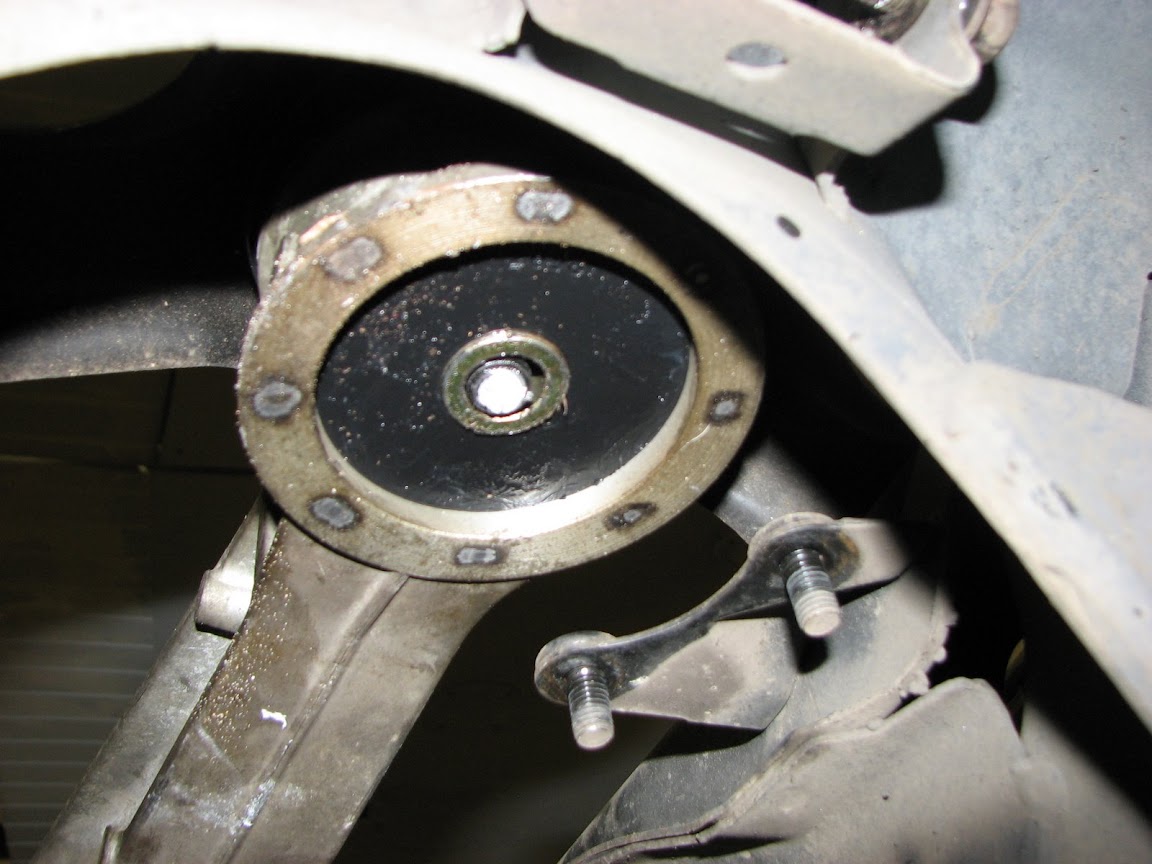
Suspension:
FM Frame rails w/ butterfly brace
FM Tophats
FM bumpstops
ES bushings
RB springs + tokicos
949 endlinks
hdhcdd
Engine:
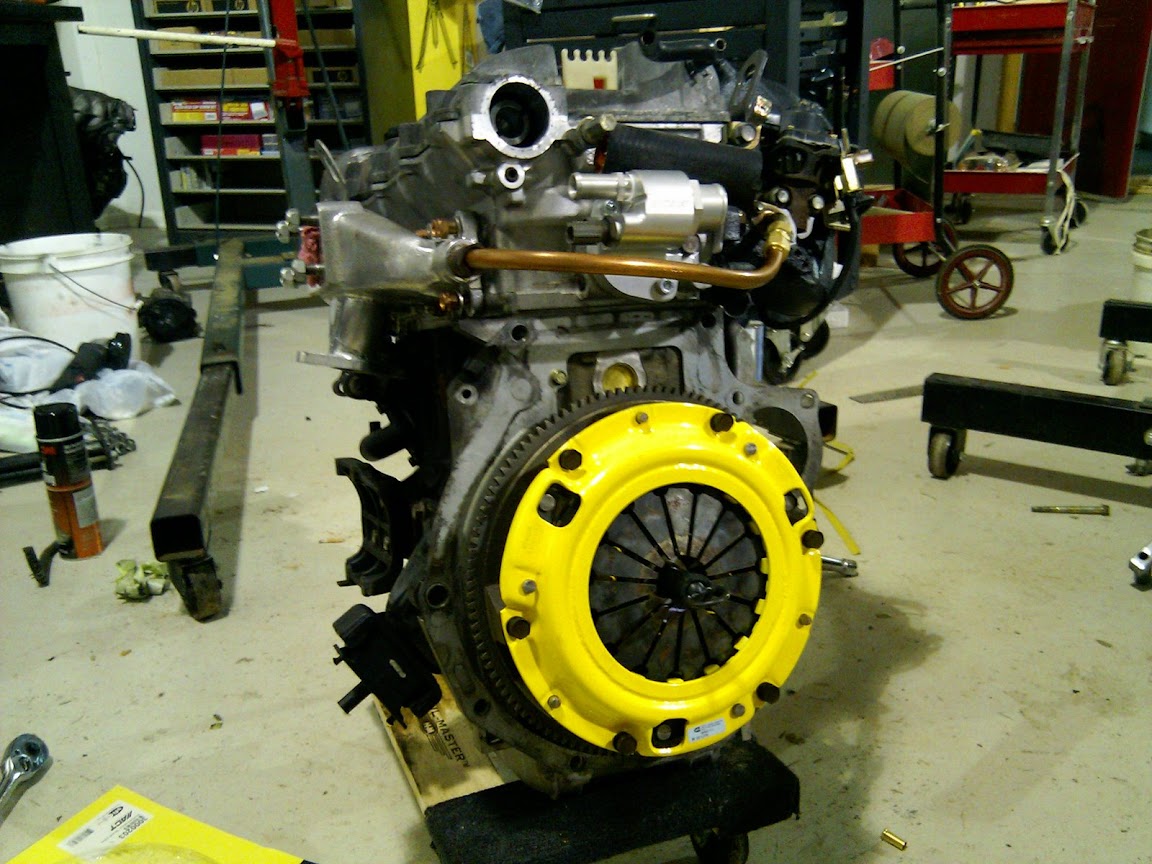
$125 Craigslist longblock
FM 9:1 +1mm Wiseco pistons
Eagle Rods
99 head, 3 angle valve job
M-Tuned coolant reroute
BEGI coolant reroute (if i put them together, does it make it hyper?)
M-Tuned fuel rail
Deatsch low-z 750cc
ARP head, lower studs.
Boundry oil pump gears
Godspeed Rad
Management:
MS2, sequential
jbperf peak and hold driver board
MapDaddy
IGN-1A's
EBC
megaview
launch control, fuel table switching
lc-1, xd-16, plx EGT gauge.
Goals:
Originally sought out 250hp... I think I've overdone it, haven't I?
I don't race (the occasional autocross), I don't drive overly fast; I'm a sick, sick bastard that enjoys wrenching and tweaking. I already have a truck and a daily driver. This is my fun car.
This is my 2nd miata - the first (a 96) I had a JRSC I pushed up to 9lb with water injection, no ic, 440cc injectors, megasquirt. Burned a valve. I'm selling that body to a friend of mine thats probably going to drop an LS1 in.
The good news - I've already been working on this for 6 months, I'm just about done - yes, I'm slow.
So - Minimal commentary, maximum pictures.
Difference between an NA and NB exhaust? About 3 inches.
A begi kit without problems? Where would the fun be in that.
freezeplug + rtv + aluminum plate

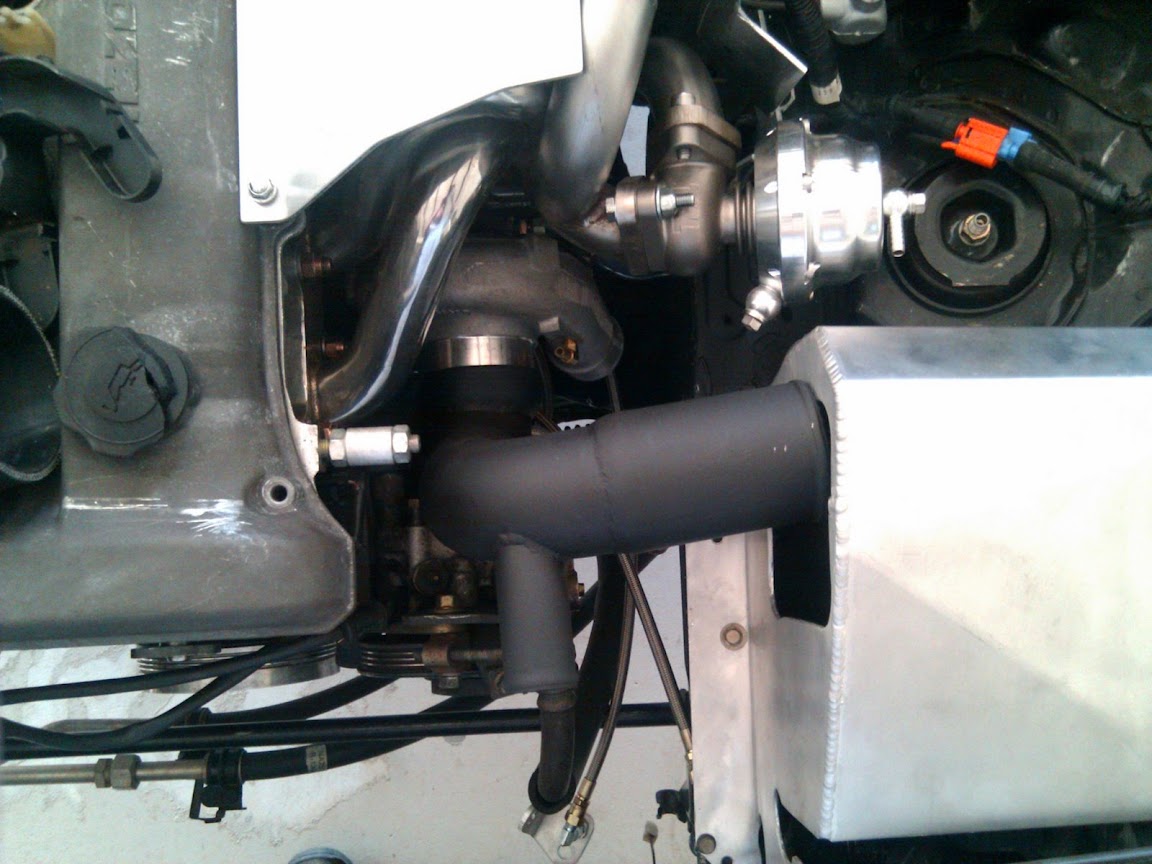
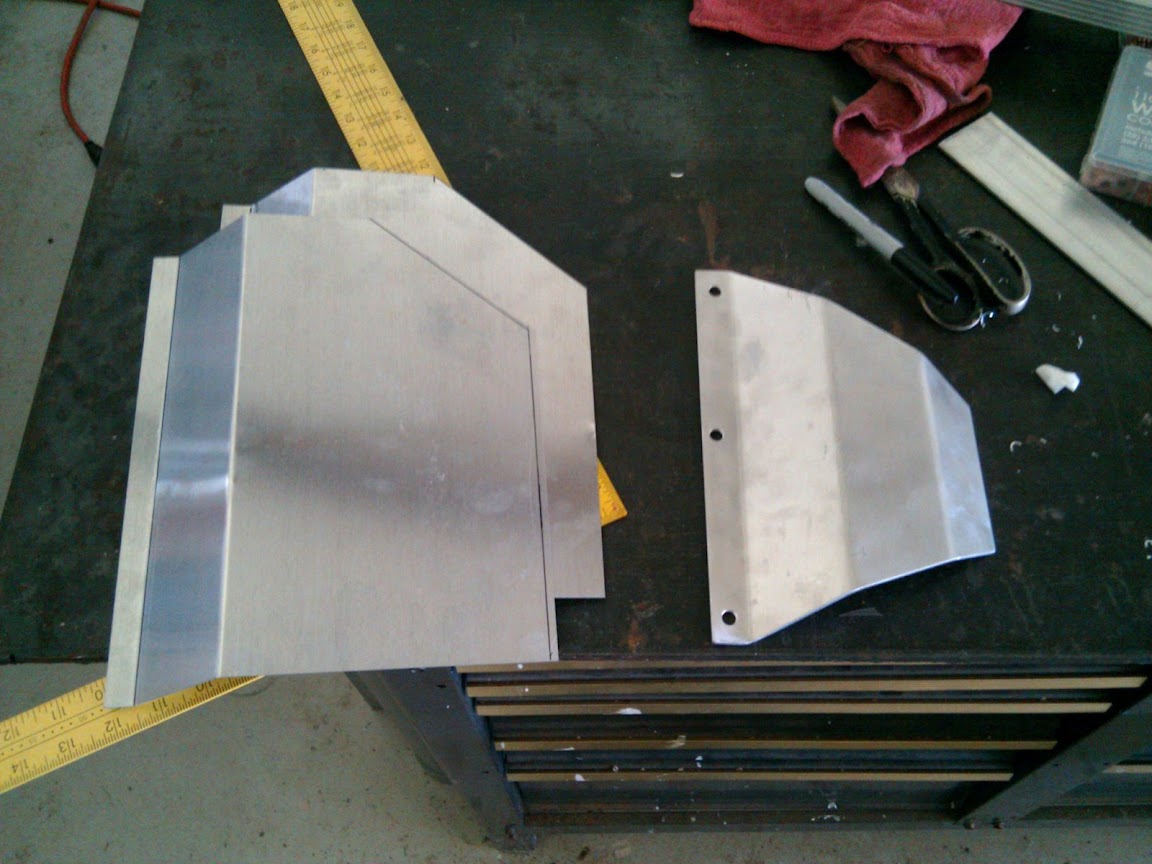
Heatshield refab + airgap (hurrah for a stomp sheer and sheetmetal break)

Car:
94 NA, C package, 167k miles
Kit:
99 Begi S5 (used), then switched to S4 (used)
2871 w/ external wastegate
Suspension:
FM Frame rails w/ butterfly brace
FM Tophats
FM bumpstops
ES bushings
RB springs + tokicos
949 endlinks
hdhcdd
Engine:
$125 Craigslist longblock
FM 9:1 +1mm Wiseco pistons
Eagle Rods
99 head, 3 angle valve job
M-Tuned coolant reroute
BEGI coolant reroute (if i put them together, does it make it hyper?)
M-Tuned fuel rail
Deatsch low-z 750cc
ARP head, lower studs.
Boundry oil pump gears
Godspeed Rad
Management:
MS2, sequential
jbperf peak and hold driver board
MapDaddy
IGN-1A's
EBC
megaview
launch control, fuel table switching
lc-1, xd-16, plx EGT gauge.
Goals:
Originally sought out 250hp... I think I've overdone it, haven't I?
I don't race (the occasional autocross), I don't drive overly fast; I'm a sick, sick bastard that enjoys wrenching and tweaking. I already have a truck and a daily driver. This is my fun car.
This is my 2nd miata - the first (a 96) I had a JRSC I pushed up to 9lb with water injection, no ic, 440cc injectors, megasquirt. Burned a valve. I'm selling that body to a friend of mine thats probably going to drop an LS1 in.
The good news - I've already been working on this for 6 months, I'm just about done - yes, I'm slow.
So - Minimal commentary, maximum pictures.
Difference between an NA and NB exhaust? About 3 inches.
A begi kit without problems? Where would the fun be in that.
freezeplug + rtv + aluminum plate
Heatshield refab + airgap (hurrah for a stomp sheer and sheetmetal break)

Reply
 0
0

0
 06-27-2010, 03:22 AM
#3
Senior Member
Thread Starter
Join Date: May 2007
Location: Atlanta
Posts: 997
Total Cats: 156
There's some disadvantages to the space..
0 cellphone coverage. 0 internet. No A/C. Closest working toilet is 3 miles away. Need to plan your ***** in advance.
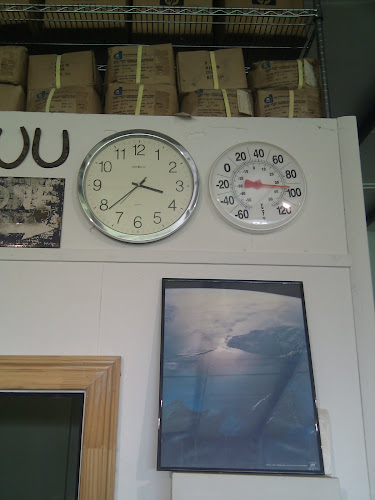
It wasn't so bad in the winter, at least the lights provided some heat from freezing your *** off. But now its a big metal box that's 100 degrees in the shade.
0 cellphone coverage. 0 internet. No A/C. Closest working toilet is 3 miles away. Need to plan your ***** in advance.
It wasn't so bad in the winter, at least the lights provided some heat from freezing your *** off. But now its a big metal box that's 100 degrees in the shade.
Reply
0
0

 07-04-2010, 03:35 AM
#6
Senior Member
Thread Starter
Join Date: May 2007
Location: Atlanta
Posts: 997
Total Cats: 156
window a/c unit won't quite cut it..
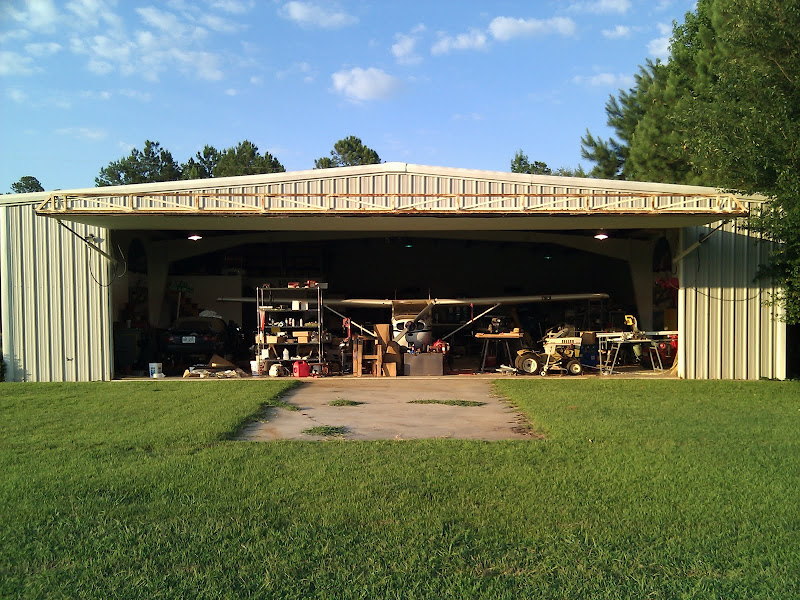
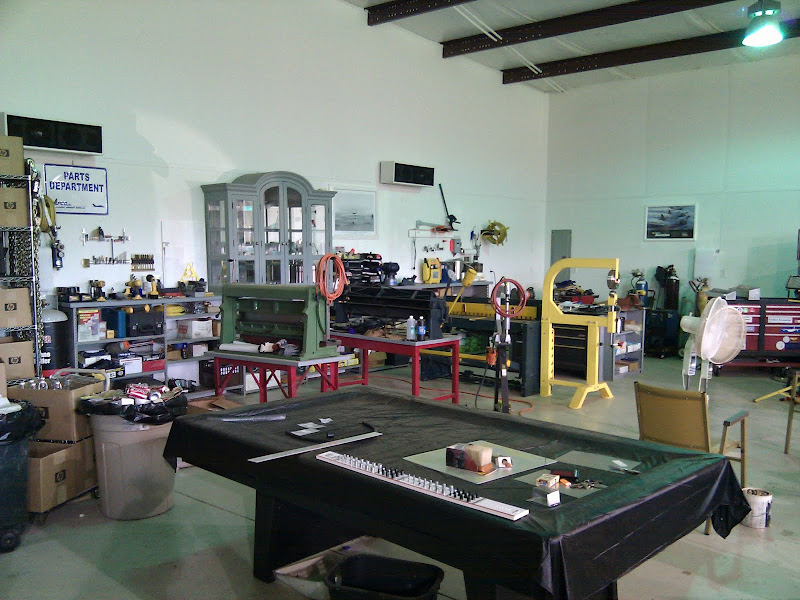
english wheel, planishing hammer, stomp shear, sheetmetal break, bandsaws, 120v outlets every 10 feet, 240v outlets every 30.. 20$ craigslist china cabinet painted in primer for the fancy tools. acetylene, mig, arc welder in the corner, thriftstore speaker cabinets with cheapy ebay speakers inside on the wall, 50$ craigslist pool table, kegorator... This is where my dad will be spending his retirement.
Beautiful day today, not horribly hot. Got a lot done
Gauges wired.
LC1 hiding under the radio. Ran the system and analog grounds to the sensor grounds on the engine, using 2x12ga wires soldered to a lug. Wired the heater ground onto a bolt behind the passenger seat. LC1 doesn't appear to be complaining yet. Using the bung right before the cat, as ..
Two bungs located before the flex joint are too close to the transmission tunnel.
Bung right behind the turbo will heat the sensor up too much.
Bung in the stockish location is too low and hits against the subframe.
Yes, 5 bungs. I have mentioned I picked this up never-installed secondhand right?
thermotec wrapped heater hoses.. yes, I tend to overkill everything..
Got the harbor freight airhorns working after reading that the horn switch went through the passengerside airbag. Added a relay next to the A/C relays on a small piece of aluminum stock. Managed to spot a good radiator hose with all the bends necessary for the hardpipe and enough space to run the ic pipe. Dayco 70815 hose - but I think it's a 16th too large. I'll know when I fill up the coolant and run a pressure test. Powergrip thermoplastic clamp on the radiator since it seemed a little too loose.

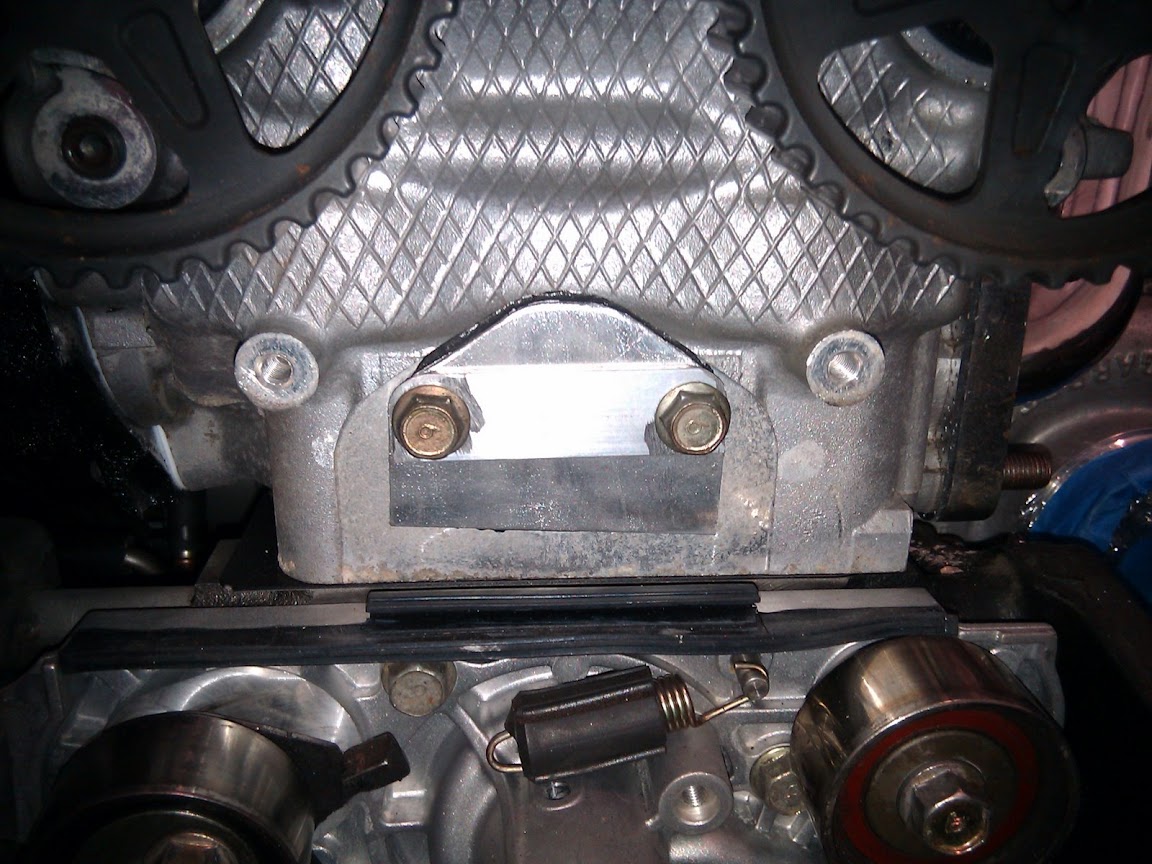
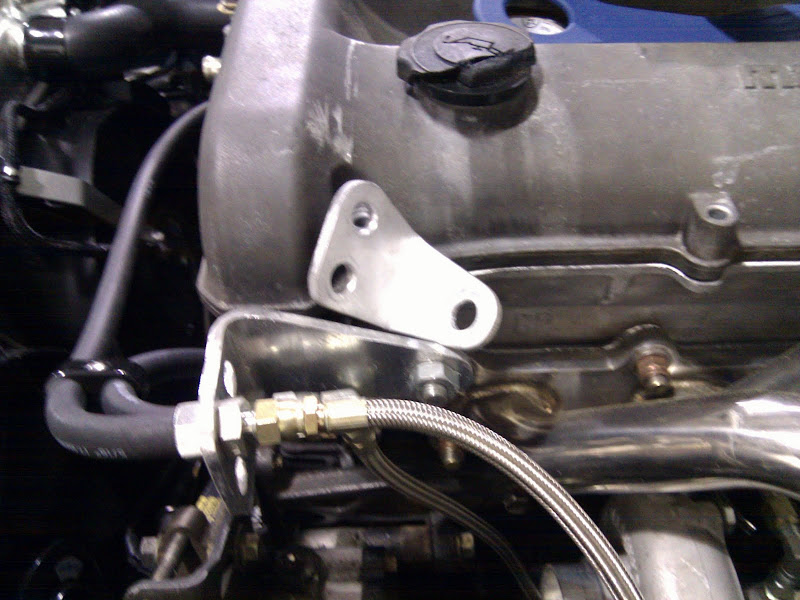
Coolant reroute. Still not happy with the SS lines on the turbo. Had to make a new bracket that wouldn't interfere with the inlet tube.
So a stupid question - can I run the car without the IC charge pipe and IAT in place, or is that ill advised? I'd like to take the car to my friends shop (50 miles) to fab the IC charge pipe. I could still toss the air filter onto the TB..
english wheel, planishing hammer, stomp shear, sheetmetal break, bandsaws, 120v outlets every 10 feet, 240v outlets every 30.. 20$ craigslist china cabinet painted in primer for the fancy tools. acetylene, mig, arc welder in the corner, thriftstore speaker cabinets with cheapy ebay speakers inside on the wall, 50$ craigslist pool table, kegorator... This is where my dad will be spending his retirement.
Beautiful day today, not horribly hot. Got a lot done
Gauges wired.
LC1 hiding under the radio. Ran the system and analog grounds to the sensor grounds on the engine, using 2x12ga wires soldered to a lug. Wired the heater ground onto a bolt behind the passenger seat. LC1 doesn't appear to be complaining yet. Using the bung right before the cat, as ..
Two bungs located before the flex joint are too close to the transmission tunnel.
Bung right behind the turbo will heat the sensor up too much.
Bung in the stockish location is too low and hits against the subframe.
Yes, 5 bungs. I have mentioned I picked this up never-installed secondhand right?
thermotec wrapped heater hoses.. yes, I tend to overkill everything..
Got the harbor freight airhorns working after reading that the horn switch went through the passengerside airbag. Added a relay next to the A/C relays on a small piece of aluminum stock. Managed to spot a good radiator hose with all the bends necessary for the hardpipe and enough space to run the ic pipe. Dayco 70815 hose - but I think it's a 16th too large. I'll know when I fill up the coolant and run a pressure test. Powergrip thermoplastic clamp on the radiator since it seemed a little too loose.
Coolant reroute. Still not happy with the SS lines on the turbo. Had to make a new bracket that wouldn't interfere with the inlet tube.
So a stupid question - can I run the car without the IC charge pipe and IAT in place, or is that ill advised? I'd like to take the car to my friends shop (50 miles) to fab the IC charge pipe. I could still toss the air filter onto the TB..
Reply
1
1
 07-05-2010, 09:19 PM
#9
Senior Member
Thread Starter
Join Date: May 2007
Location: Atlanta
Posts: 997
Total Cats: 156
sonofabitch
Friend of mine came out to help me today, got a fair amount done. Got the brakes bled, started bleeding the clutch until I ran out of brake fluid. Dropped the rear struts and got the FM tophats installed. Pressurized the coolant system via hand pump tester - found one leak at the heater core where I forgot to install a hoseclamp. Fixed that, pumped it up again - pressure was looking good, falling very slowly - until we saw water on the ground.

Was coming out right above the freeze plug. And water was coming up into the head up one of the stud holes. Got to use a new harbor freight toy, a boroscope. Found a few drops in cylinder 3. And a dead moth in cylinder 1.
Re-torque'd the headbolts. Cleaned the ARP studs and tried black RTV instead of Moly. Retorqued. Repressurized. Still leaking.
****.
****.
***.
So, looking for a new headgasket. Anyone care to suggest anything to do while I've got the head off?
Friend of mine came out to help me today, got a fair amount done. Got the brakes bled, started bleeding the clutch until I ran out of brake fluid. Dropped the rear struts and got the FM tophats installed. Pressurized the coolant system via hand pump tester - found one leak at the heater core where I forgot to install a hoseclamp. Fixed that, pumped it up again - pressure was looking good, falling very slowly - until we saw water on the ground.
Was coming out right above the freeze plug. And water was coming up into the head up one of the stud holes. Got to use a new harbor freight toy, a boroscope. Found a few drops in cylinder 3. And a dead moth in cylinder 1.
Re-torque'd the headbolts. Cleaned the ARP studs and tried black RTV instead of Moly. Retorqued. Repressurized. Still leaking.
****.
****.
***.
So, looking for a new headgasket. Anyone care to suggest anything to do while I've got the head off?
Reply
0
0
07-10-2010, 08:29 PM
#10
Senior Member
Thread Starter
Join Date: May 2007
Location: Atlanta
Posts: 997
Total Cats: 156
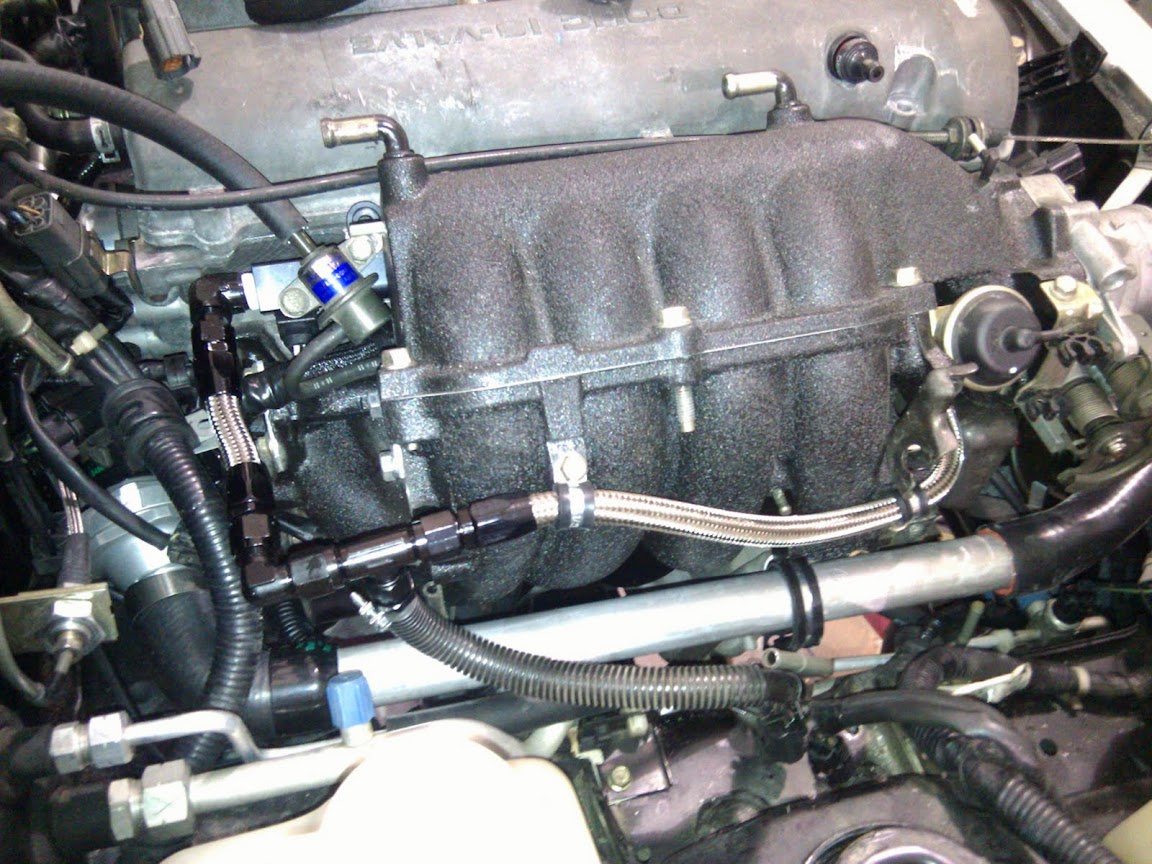
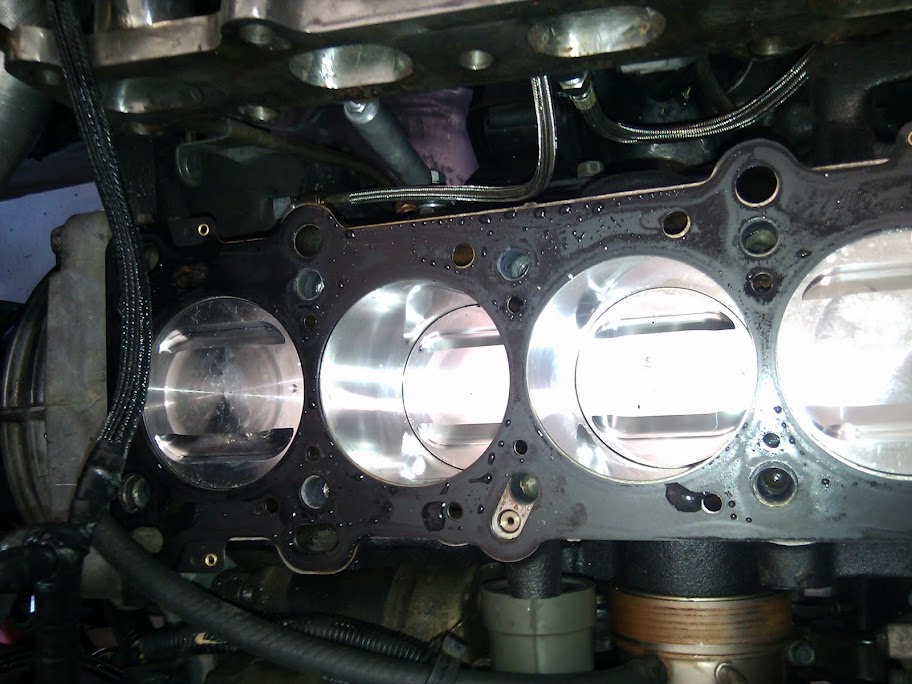
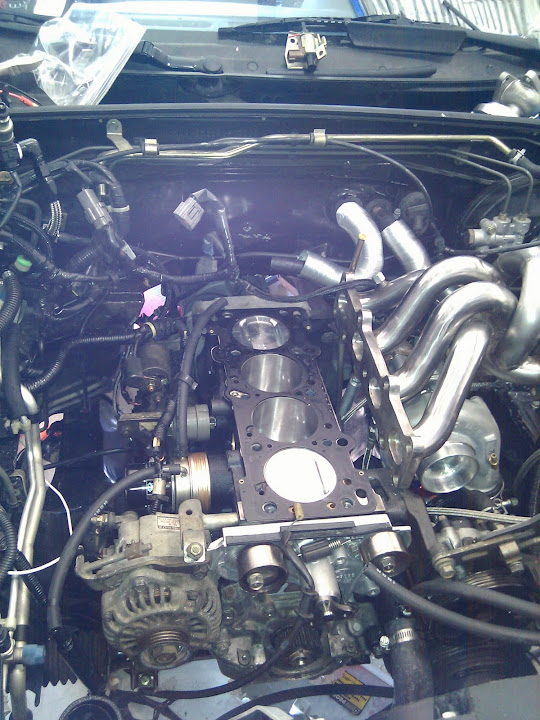
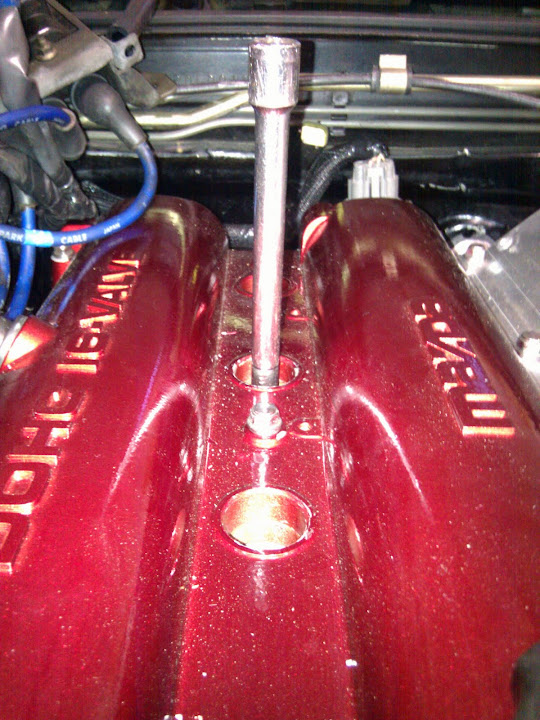
Got a new OEM MLS headgasket from mazda along with head alignment dowels, copper coated it, cleaned up the ARP hardware, and slapped it into place. While I was priming the cooling system for another pressure test, I managed to spray water everywhere. After using compressed air and brake cleaner to get the remaining water out of the cylinders and letting what remained evaporate overnight. I checked the cylinders with the Harbor freight borescope, and pressurized. No more leaks in the cylinder head! yay! After an hour at 15psi, the gauge dropped about 2 needlewidths (1/4-1/2 psi I think). Found a very small leak on the lower radiator hose where the -10AN line taps in from the heatercore. Going to go ahead and adapt that to AN fittings and reseal the adaptor. Ran a gallon of mineral spirits through the head to flush out any crap. Also replaced the line from the oil cooler to the IAC, skipping it completely - so now it goes straight to the turbo.
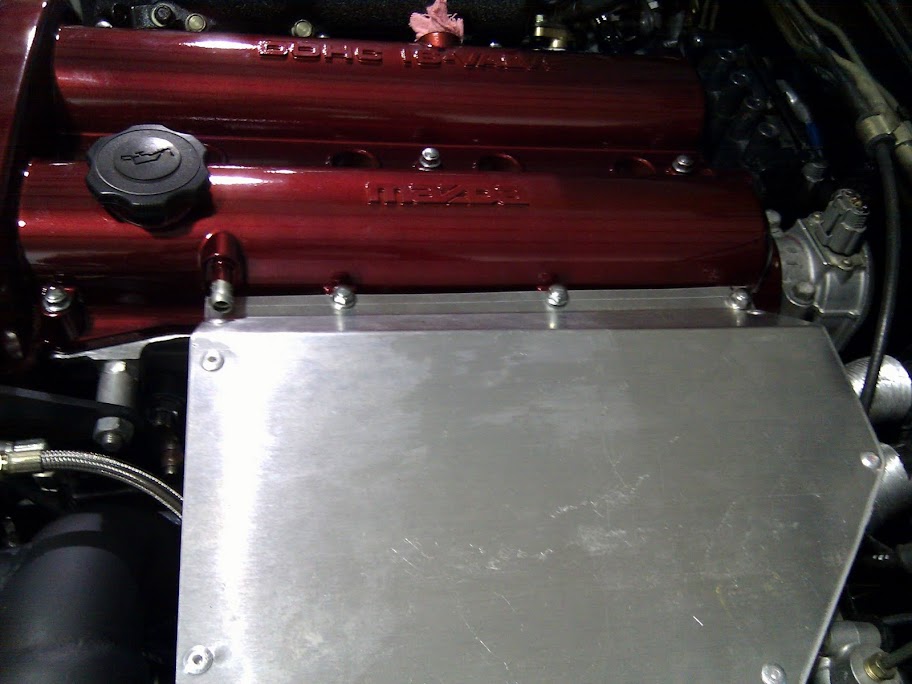
Otherwise - didn't take any pictures, but bored out the PCV passages from 1/4in to 3/8ths as per the catchcan thread, resealed the baffles, installed the CAS, got the exhaust manifold back on, timing belt back on, heatshields back on. I'm almost back to where I started before the leaky HG adventure started.
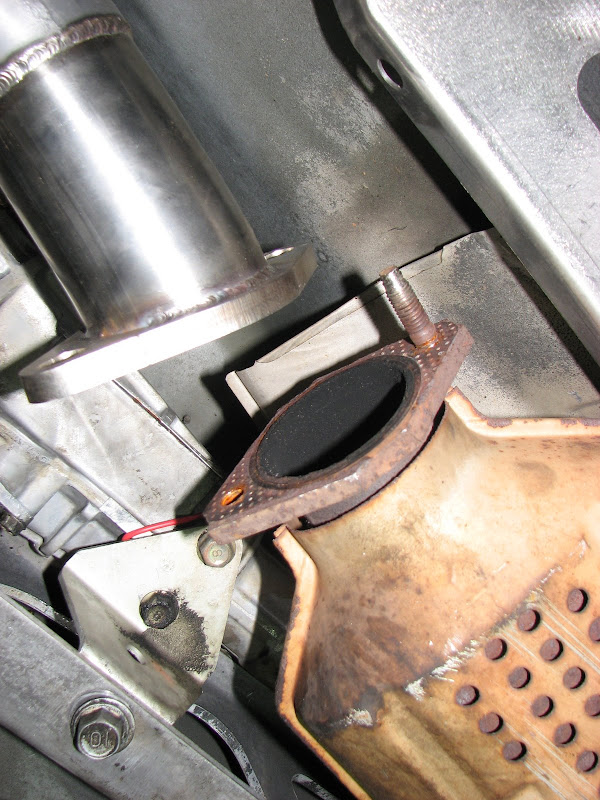
Ohya - with the head off, got the EGT probe installed. I eyed the bung location before I had the probe and, well, it was no good.
Heat shield interferes with the 2nd PCV port, going to have to figure that one out. Got some 2.5in aluminum tubes from CXRacing on ebay, but I found http://www.summitracing.com/parts/PTE-H7059/ actually has a tighter bend, plus is mild so I can weld bungs easier. Its going to be a frankenstein for sure.
Really pretty damn close to firing off the engine. Need to do fluids, crank pulley, valve cover, IAT sensor, coilpack, sparkplugs + wires, and the big one, a final megasquirt shakedown.
There's a ring terminal near/on the injector harness - I'm guessing its a ground, anyone recognize where its supposed to go? Back of the head?
Otherwise - didn't take any pictures, but bored out the PCV passages from 1/4in to 3/8ths as per the catchcan thread, resealed the baffles, installed the CAS, got the exhaust manifold back on, timing belt back on, heatshields back on. I'm almost back to where I started before the leaky HG adventure started.
Ohya - with the head off, got the EGT probe installed. I eyed the bung location before I had the probe and, well, it was no good.
Heat shield interferes with the 2nd PCV port, going to have to figure that one out. Got some 2.5in aluminum tubes from CXRacing on ebay, but I found http://www.summitracing.com/parts/PTE-H7059/ actually has a tighter bend, plus is mild so I can weld bungs easier. Its going to be a frankenstein for sure.
Really pretty damn close to firing off the engine. Need to do fluids, crank pulley, valve cover, IAT sensor, coilpack, sparkplugs + wires, and the big one, a final megasquirt shakedown.
There's a ring terminal near/on the injector harness - I'm guessing its a ground, anyone recognize where its supposed to go? Back of the head?
Reply
0
0
07-11-2010, 11:32 PM
#11
Senior Member
Thread Starter
Join Date: May 2007
Location: Atlanta
Posts: 997
Total Cats: 156
Woot
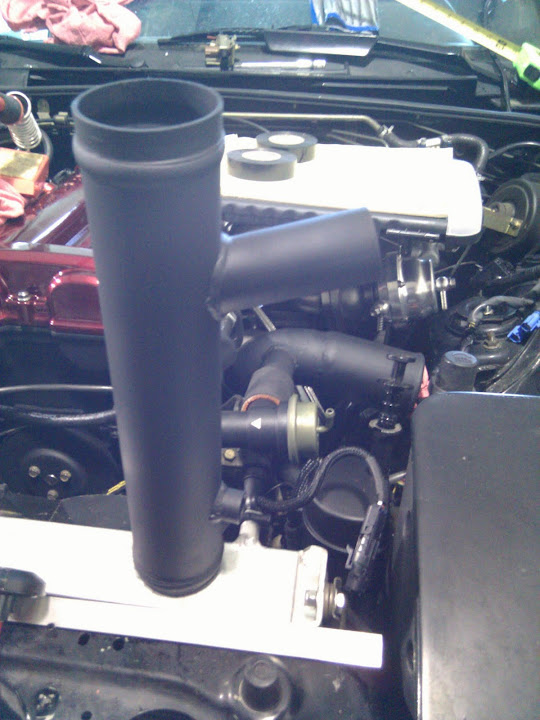
After RTV'ing the valve cover, installing the coil pack, started playing with the charge pipes. Nearly forgot I had ordered a silicon elbow - and a straight piece of 2.5in cut to length works pretty damn well..
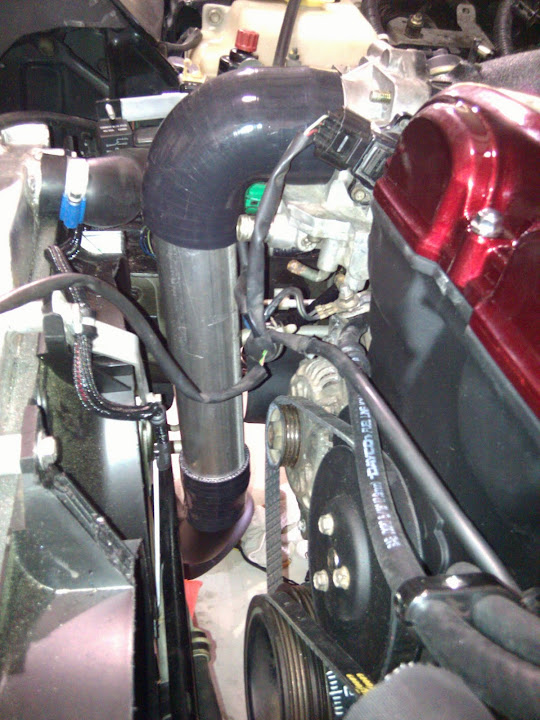
Just need to figure out a way to clear the idle air intake - anyone have suggestions?
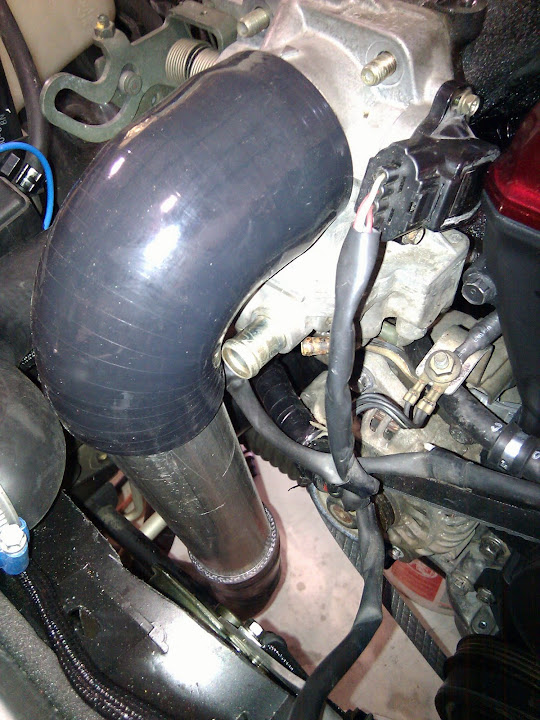
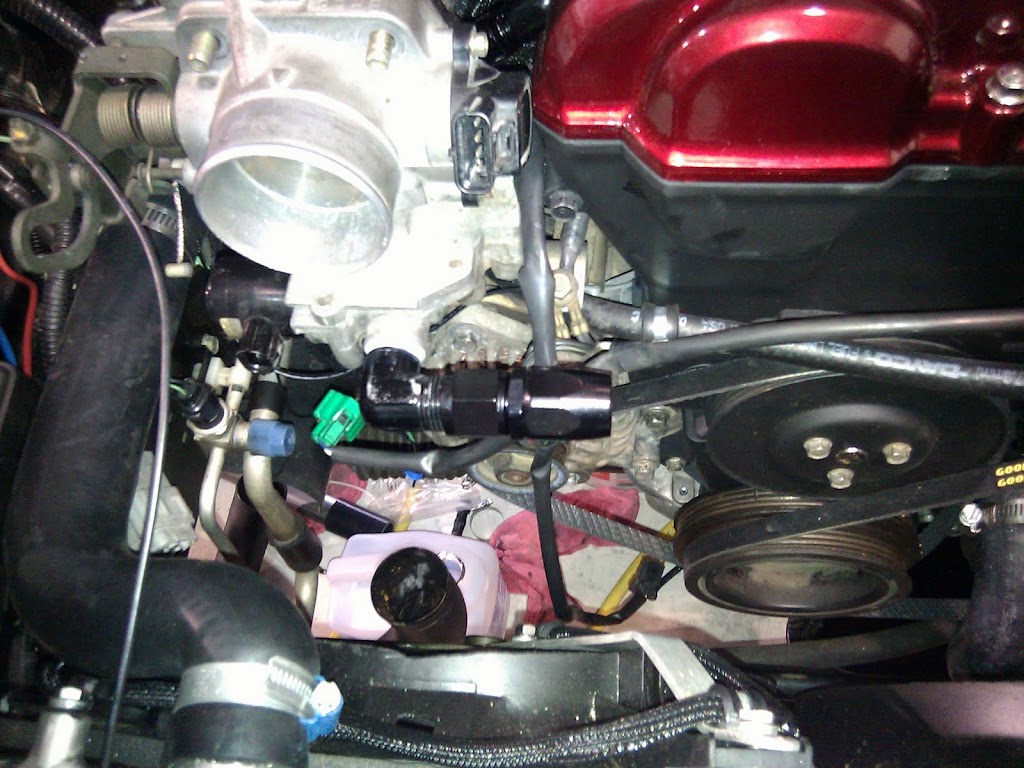
And figure out the best way to clear this, shouldn't be too difficult.

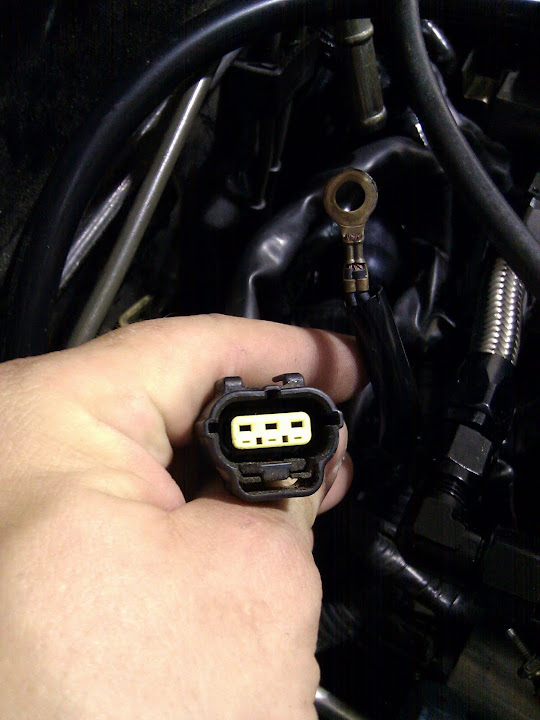
Anyone know what connectors those are for? I'm guessing the first is for the valve on the FPR, second one is EGR? And the ground eyelet - anyone know where that one is supposed to go?
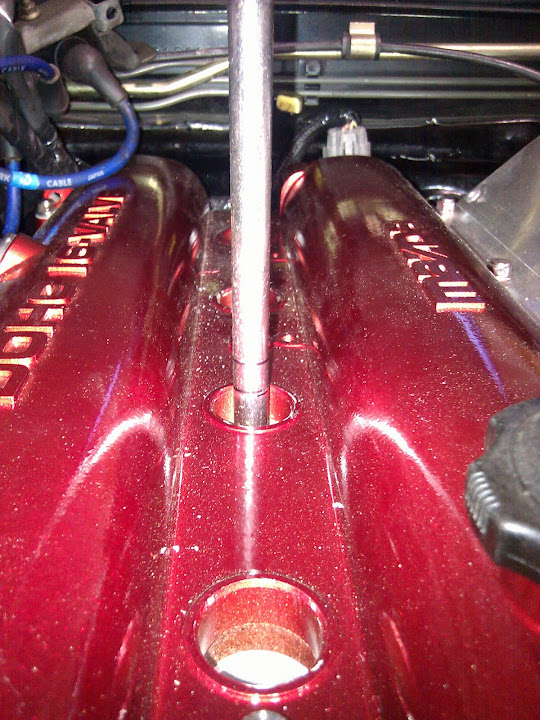
And positioning the IAT sensor - closer to the IC or closer to the TB?
After RTV'ing the valve cover, installing the coil pack, started playing with the charge pipes. Nearly forgot I had ordered a silicon elbow - and a straight piece of 2.5in cut to length works pretty damn well..
Just need to figure out a way to clear the idle air intake - anyone have suggestions?
And figure out the best way to clear this, shouldn't be too difficult.
Anyone know what connectors those are for? I'm guessing the first is for the valve on the FPR, second one is EGR? And the ground eyelet - anyone know where that one is supposed to go?
And positioning the IAT sensor - closer to the IC or closer to the TB?
Reply
0
0
 07-11-2010, 11:40 PM
#13
Senior Member
Thread Starter
Join Date: May 2007
Location: Atlanta
Posts: 997
Total Cats: 156
fans are already wired, injector harness is already wired. I've removed the EGR and canister system since I'm going MS standalone - just want to make sure I'm not missing anything.
I seem to recall reading that heatsoak is why you want to mount it closer to the IC than the TB
I seem to recall reading that heatsoak is why you want to mount it closer to the IC than the TB
Reply
0
0
07-11-2010, 11:52 PM
#14
i have always understood that you want your IAT sensors near the TB for the most accurate reading right before your car sucks in the air its reading!
IMHO if you put it right after the IC your sensor is reading cooler air than what is actually used. cause once the air comes out of the IC its gonna heat up a bit going through the bends of the pipes and what not.
but hey, i could be wrong. hopefully one of the smarter folks will chime in soon.
EDIT: if my car was put together i would run outside for you and check those plugs for you.....but its still in a million pieces.
Reply
0
0
07-25-2010, 06:23 PM
#15
Senior Member
Thread Starter
Join Date: May 2007
Location: Atlanta
Posts: 997
Total Cats: 156
So where was I..
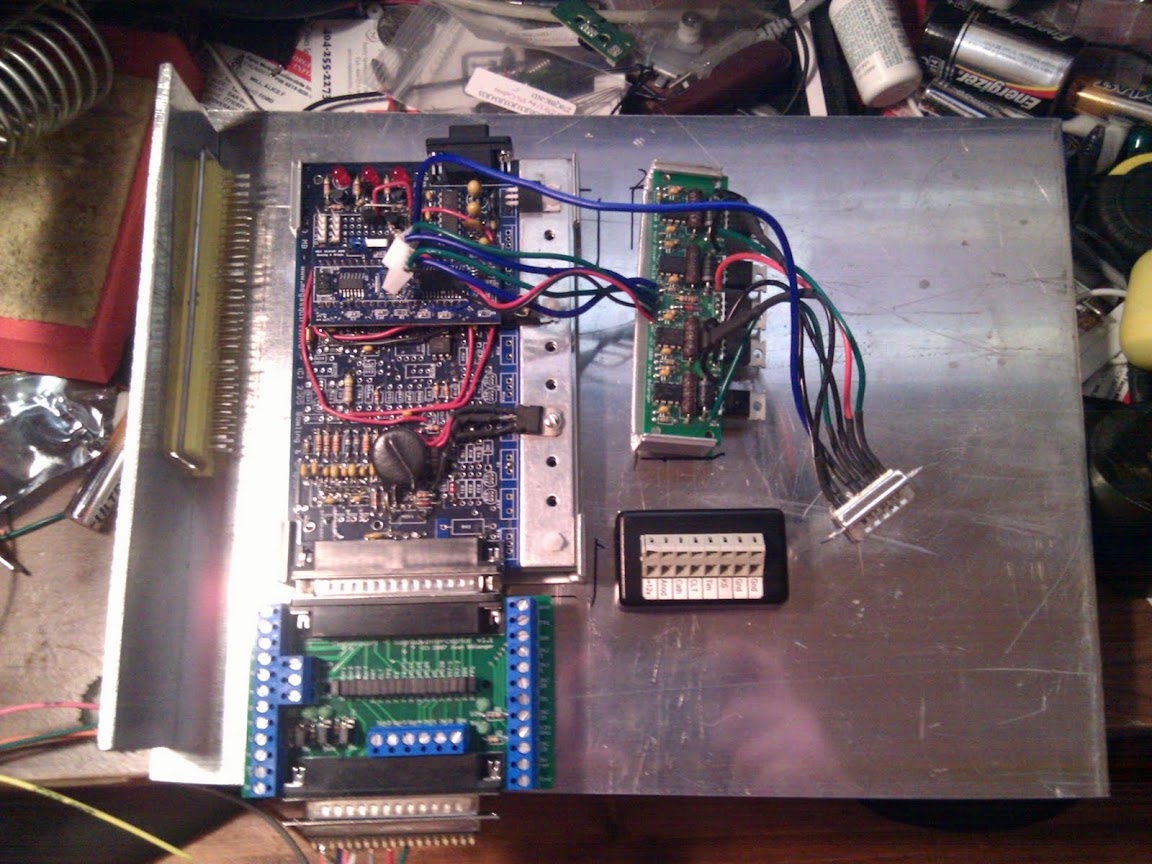
I was hoping to crank the engine this weekend, but I'm still lagging on the megasquirt. Was up till 5am Friday night wiring the harness, and I'm still not done - have to doublecheck my notes for the outputs and modifications I've done. I'm finishing it up tonight and doublechecking the outputs with jimstim, signal interceptor, and my oscope.
Its so close to getting the engine running its hard to not get excited. I'm having to really take my time and make sure I'm not missing or forgetting anything at this point. Got the rear suspension torque'd correctly, found the front swaybar poly bushings, installed the endlinks. I found I have a leak in the steering rack - Which I was worried quite a bit about. I crossthreaded it when I originally installed, managed to retap everything but was still worried since its a high pressure fitting. Looks like I'll be swapping it out with the one from the 96.
Got a piece of exhaust pipe, mocked it up with a sharpie, and had it welded up at an exhaust shop. My dad owns a bead roller kit, but we had to bust out the oxyacetalyene torch to heat the exhaust up before it would bend in the roller (another Harbor Freight tool) - overall, I'm very happy with the results. The BOV/Recirc valve is 1 3/8ths OD, which in pipe diameter is difficult to find. Found a 1.5 to 1.375 silicon reducer, laid a piece of flat, drew some diagrams, and took it to an exhaust shop. There are 2 3/8ths NPT bungs in the pipe, one for the air temp sensor, the other for the idle air.
Took the press fit piece of IAC valve out, then hit it with a 1/2 NPT pipe tap. However, didn't get enough clean threads with the $15 harbor freight 1/4, 3/8, and 1/2 tap and die kit since the tap bottomed out. Thankfully, my dad knows about tools and told me I needed to hunt down a bottoming tap. MSC wanted $80 for a 1/2 bottoming tap... eegah... so I ended up picking one up on ebay for $20. Then it was time to order some fittings - 1/2 NPT 90 degree to an-10, and a 3/8ths 90 degree to -10.
Well, once everything was shipped and in my hands, proceeded to tap. The elbow had too many threads showing (damn NPT) so I reverse threaded it on the die, cutting out the NPT taper basically. Then I had to hand ream the IAC hole since I didn't drill it out first and the threads were too tall. Then I ended up cutting 1/4in off the elbow so it would snug all the way down.
Then it was time to line everything up. Measure twice, cut once. I managed to select the 3/8ths bung to interfere with the alternator belt once the elbow was installed. ~!@#!@#$%$$#$%.
Reverse tapp'd the 3/8ths elbow, got it snugged all the way down. Had about 1/8th inch clearance from the alternator belt - not great, but probably good enough. That's when I noticed how the -10an line was going to be routed - the hose would be maybe 6 inches long and have to make a pretty nasty chicane. I threaded the fittings on - dammit, there went my 1/8th inch clearance on the belt. !@#$%&*
So - looked at the problem some more. Decided I could put another 3/8ths bung in the recirc pipe, and route the idle hose off to the side instead. That would work..
Until I saw that the silicone hose on the left side of the charge pipe had 0 clearance once the T clamp was on against the IAC electrical connection. @#$%#@$%$%
So.. yeah. ****.
Back to the drawing board - did some more research on throttle bodies on Miatas, found out that the 99+ TB is all internal - theres no IAC valve port. Well sonofa...
Went to pullapart today. Found a 1997 Kia Sephia has the 99 style TB. $28 (Ebay has them listed for Miata's specifically at ~100) and I'm set. Just need to clean it up and make sure the valve is electrically similar. So - thats 2 AN elbows at around $15 apiece, a tap and die set for $15, a bottoming tap for $25, 2 -10 AN hose ends at $5.. $70 for whats fixed by a $28 pullapart run (29 if you count the $1 yard entry fee..)
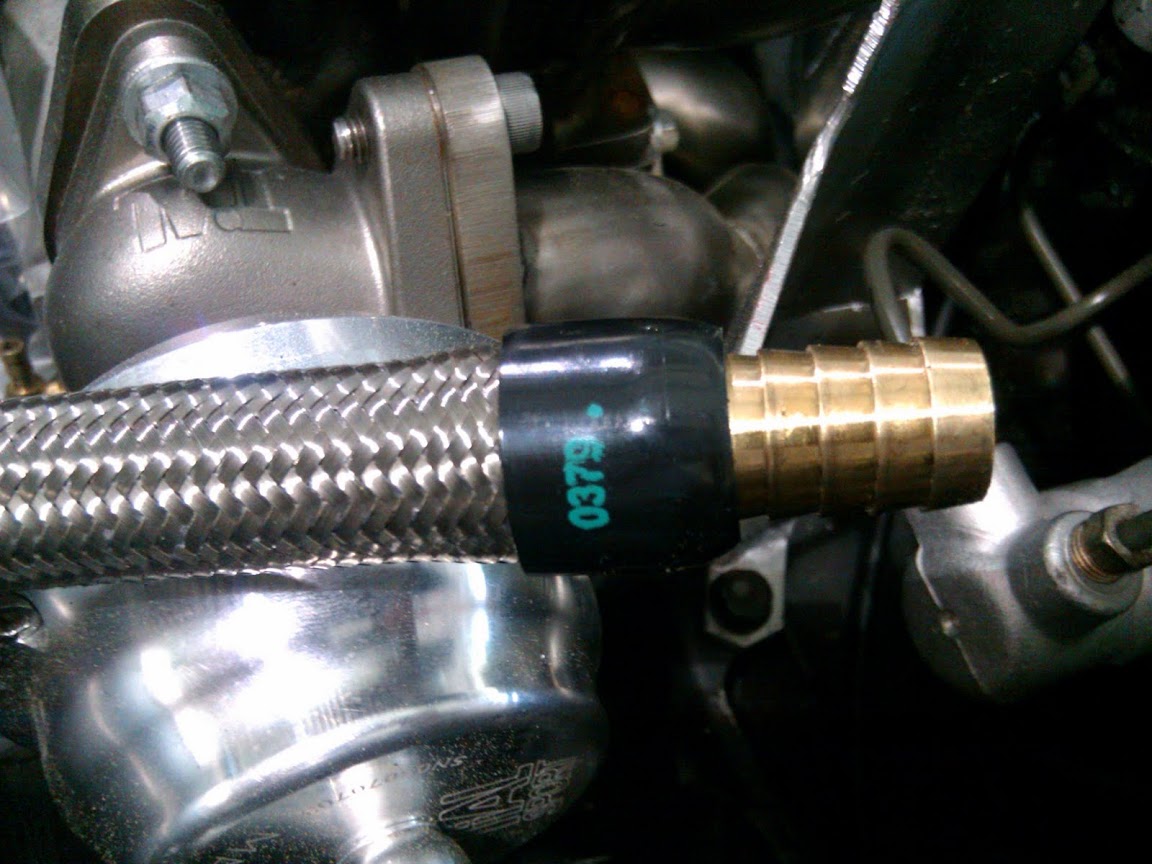
What else... installed the AN fitting on the heater hose, which was a gigantic pain in the *** as I didn't want to remove the hose from the car. Ended up taking an anvil under the car and cutting the line with a small sledge with about 1 foot of travel. I'll leak test it again next week.
Other than installing sparkplugs + wires, grounding the injector grounding wire, and torquing the bellhousing bolts, torquing the crank pulley, adding oil and installing the MS.. I think I'll be cranking it next weekend. I'll leave the power steering/ac belt off for the first fire until i get the steering rack moved across.
I was hoping to crank the engine this weekend, but I'm still lagging on the megasquirt. Was up till 5am Friday night wiring the harness, and I'm still not done - have to doublecheck my notes for the outputs and modifications I've done. I'm finishing it up tonight and doublechecking the outputs with jimstim, signal interceptor, and my oscope.
Its so close to getting the engine running its hard to not get excited. I'm having to really take my time and make sure I'm not missing or forgetting anything at this point. Got the rear suspension torque'd correctly, found the front swaybar poly bushings, installed the endlinks. I found I have a leak in the steering rack - Which I was worried quite a bit about. I crossthreaded it when I originally installed, managed to retap everything but was still worried since its a high pressure fitting. Looks like I'll be swapping it out with the one from the 96.
Got a piece of exhaust pipe, mocked it up with a sharpie, and had it welded up at an exhaust shop. My dad owns a bead roller kit, but we had to bust out the oxyacetalyene torch to heat the exhaust up before it would bend in the roller (another Harbor Freight tool) - overall, I'm very happy with the results. The BOV/Recirc valve is 1 3/8ths OD, which in pipe diameter is difficult to find. Found a 1.5 to 1.375 silicon reducer, laid a piece of flat, drew some diagrams, and took it to an exhaust shop. There are 2 3/8ths NPT bungs in the pipe, one for the air temp sensor, the other for the idle air.
Took the press fit piece of IAC valve out, then hit it with a 1/2 NPT pipe tap. However, didn't get enough clean threads with the $15 harbor freight 1/4, 3/8, and 1/2 tap and die kit since the tap bottomed out. Thankfully, my dad knows about tools and told me I needed to hunt down a bottoming tap. MSC wanted $80 for a 1/2 bottoming tap... eegah... so I ended up picking one up on ebay for $20. Then it was time to order some fittings - 1/2 NPT 90 degree to an-10, and a 3/8ths 90 degree to -10.
Well, once everything was shipped and in my hands, proceeded to tap. The elbow had too many threads showing (damn NPT) so I reverse threaded it on the die, cutting out the NPT taper basically. Then I had to hand ream the IAC hole since I didn't drill it out first and the threads were too tall. Then I ended up cutting 1/4in off the elbow so it would snug all the way down.
Then it was time to line everything up. Measure twice, cut once. I managed to select the 3/8ths bung to interfere with the alternator belt once the elbow was installed. ~!@#!@#$%$$#$%.
Reverse tapp'd the 3/8ths elbow, got it snugged all the way down. Had about 1/8th inch clearance from the alternator belt - not great, but probably good enough. That's when I noticed how the -10an line was going to be routed - the hose would be maybe 6 inches long and have to make a pretty nasty chicane. I threaded the fittings on - dammit, there went my 1/8th inch clearance on the belt. !@#$%&*
So - looked at the problem some more. Decided I could put another 3/8ths bung in the recirc pipe, and route the idle hose off to the side instead. That would work..
Until I saw that the silicone hose on the left side of the charge pipe had 0 clearance once the T clamp was on against the IAC electrical connection. @#$%#@$%$%
So.. yeah. ****.
Back to the drawing board - did some more research on throttle bodies on Miatas, found out that the 99+ TB is all internal - theres no IAC valve port. Well sonofa...
Went to pullapart today. Found a 1997 Kia Sephia has the 99 style TB. $28 (Ebay has them listed for Miata's specifically at ~100) and I'm set. Just need to clean it up and make sure the valve is electrically similar. So - thats 2 AN elbows at around $15 apiece, a tap and die set for $15, a bottoming tap for $25, 2 -10 AN hose ends at $5.. $70 for whats fixed by a $28 pullapart run (29 if you count the $1 yard entry fee..)
What else... installed the AN fitting on the heater hose, which was a gigantic pain in the *** as I didn't want to remove the hose from the car. Ended up taking an anvil under the car and cutting the line with a small sledge with about 1 foot of travel. I'll leak test it again next week.
Other than installing sparkplugs + wires, grounding the injector grounding wire, and torquing the bellhousing bolts, torquing the crank pulley, adding oil and installing the MS.. I think I'll be cranking it next weekend. I'll leave the power steering/ac belt off for the first fire until i get the steering rack moved across.
Reply
0
0
08-22-2010, 01:29 AM
#16
Senior Member
Thread Starter
Join Date: May 2007
Location: Atlanta
Posts: 997
Total Cats: 156
When we last saw our hero..
First off -
http://www.youtube.com/watch?v=vbAJAjQK8e0

But the lack of updates is not to imply that this was easily done. It's been hot. Really really hot. And I tend to make bad decisions when I'm overheated.
So I actually managed to get the car started (with help of some starter fluid) 3 weeks ago. But the engine was running rough - very rough. Pulling the sparkplug wires, it sounded like 2+3 weren't doing their job. So I pulled the plugs to check for gas, spark, etc. After fiddling around some more, swapping in the spare coil pack, doublechecking the injectors, etc, I put the sparkplugs back in and..
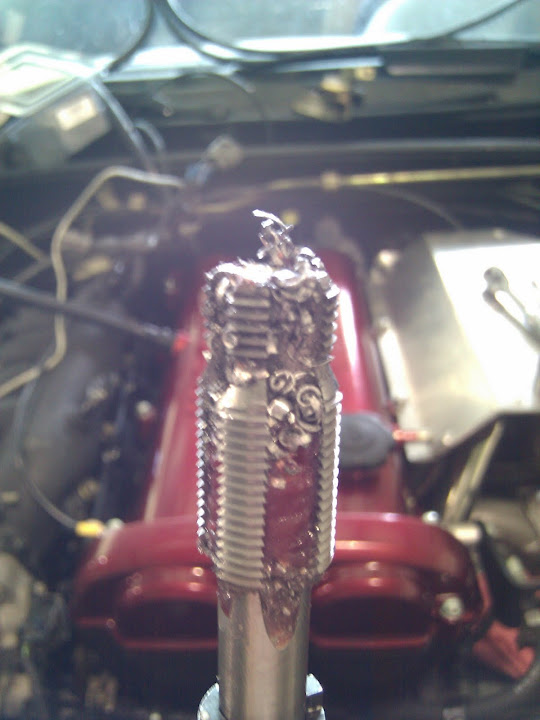
wait.. cylinder 3 doesn't feel right..
pull sparkplug 1, count out how many half turns it takes from starting to bottom out finger tight.. 20.. lets try that sparkplug in cylinder 3... 1 2 3... ****. Crossthreaded.
Not having a chaser handy, I started working on the steering rack. Pulled the rack off the 96, cleaned it up. Pulled the rack off the 94 - Hrm, these endlinks aren't coming out right.. damn its hot.. lets break out the BFH.. okay, new rack back in, let me put these endlinks back in... hm.. mushroomed. ****.
Figuring I had just bunged up the top 3 threads in cylinder 3, I wasn't sure how well a chaser would work. Doing some research, I found a neat little tool called a backtap. http://www.jegs.com/i/JEGS/555/80595...oductId=954483 . Stick it down the cylinder, expand the tab, reverse-tap. Well, that should work..
Next weekend rolls round, backtap the sparkplug, and start tightening.. 1.. 2.. 3.. turns, so far so good, 25, 26, 27... wtf? 30, 40... okay, somethings not right.
So take a sharpie and the extension.
Top mark is where the sparkplug bottoms out, bottom mark is 1 turn on the sparkplug.
Insert into cylinder 3 and..
****. Completely stripped.
Thoughts of taking the head off, taking it to a machine shop, maybe trailering the car to the machine shop are considered. I've never done a helicoil, but I understand the theory... more research.
http://www.youtube.com/watch?v=Ntiy8L97Nco
Timesert appears to be the answer. But eegah that **** is expensive... $180 for the proper extended deep-well kit. A tool I'll probably only use once. Dammit.
I'm not 100% sure if I overtorqued the sparkplug, or if the head came like that.. but it was probably me. Ahwell. Expensive lesson.
So - got all the parts this week, and time to dive in.
Grease to catch chips, and...
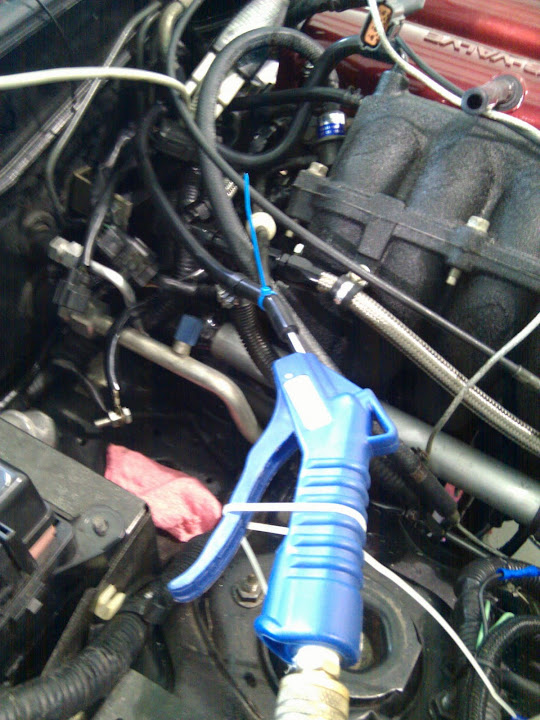
compressed air into the intake manifold, 3rd cylinder intake valve open. Not pictured: duct-tape shop vac to 3/8ths hose to act as a tiny vacuum inside the cylinder.
Overall - not too bad. I think I did it right. Nice to have youtube videos to study.
Also - why cylinders 2+3 sucked - I messed up the P&H injector board. I originally had it wired for MS1's batch mode, and when I wired it for sequential I just soldered up the pads for 3+4, leaving 1+2 outputs as is. That was wrong. 1+2 were, for all intents and purposes, firing 2x too long. And I somehow managed to fry the TPS - it's not reacting 100% linear. Hopefully I'll find another Kia in pullapart.
So - next steps.
Have my MS settings checked out.
Install outer tie rods.
Find a good shop to do an alignment (new rear subframe, new steering rack, new lowering spring perches, polyurethane bushings - yeah, nothing is square ATM)
Bumper, Hood, Trunk
electronic Boost controller wiring
aeromotive FPR install
power steering hoses
Tune
Drive
and a whole bunch of smaller steps inside there.
First off -
http://www.youtube.com/watch?v=vbAJAjQK8e0
But the lack of updates is not to imply that this was easily done. It's been hot. Really really hot. And I tend to make bad decisions when I'm overheated.
So I actually managed to get the car started (with help of some starter fluid) 3 weeks ago. But the engine was running rough - very rough. Pulling the sparkplug wires, it sounded like 2+3 weren't doing their job. So I pulled the plugs to check for gas, spark, etc. After fiddling around some more, swapping in the spare coil pack, doublechecking the injectors, etc, I put the sparkplugs back in and..
wait.. cylinder 3 doesn't feel right..
pull sparkplug 1, count out how many half turns it takes from starting to bottom out finger tight.. 20.. lets try that sparkplug in cylinder 3... 1 2 3... ****. Crossthreaded.
Not having a chaser handy, I started working on the steering rack. Pulled the rack off the 96, cleaned it up. Pulled the rack off the 94 - Hrm, these endlinks aren't coming out right.. damn its hot.. lets break out the BFH.. okay, new rack back in, let me put these endlinks back in... hm.. mushroomed. ****.
Figuring I had just bunged up the top 3 threads in cylinder 3, I wasn't sure how well a chaser would work. Doing some research, I found a neat little tool called a backtap. http://www.jegs.com/i/JEGS/555/80595...oductId=954483 . Stick it down the cylinder, expand the tab, reverse-tap. Well, that should work..
Next weekend rolls round, backtap the sparkplug, and start tightening.. 1.. 2.. 3.. turns, so far so good, 25, 26, 27... wtf? 30, 40... okay, somethings not right.
So take a sharpie and the extension.
Top mark is where the sparkplug bottoms out, bottom mark is 1 turn on the sparkplug.
Insert into cylinder 3 and..
****. Completely stripped.
Thoughts of taking the head off, taking it to a machine shop, maybe trailering the car to the machine shop are considered. I've never done a helicoil, but I understand the theory... more research.
http://www.youtube.com/watch?v=Ntiy8L97Nco
Timesert appears to be the answer. But eegah that **** is expensive... $180 for the proper extended deep-well kit. A tool I'll probably only use once. Dammit.
I'm not 100% sure if I overtorqued the sparkplug, or if the head came like that.. but it was probably me. Ahwell. Expensive lesson.
So - got all the parts this week, and time to dive in.
Grease to catch chips, and...
compressed air into the intake manifold, 3rd cylinder intake valve open. Not pictured: duct-tape shop vac to 3/8ths hose to act as a tiny vacuum inside the cylinder.
Overall - not too bad. I think I did it right. Nice to have youtube videos to study.
Also - why cylinders 2+3 sucked - I messed up the P&H injector board. I originally had it wired for MS1's batch mode, and when I wired it for sequential I just soldered up the pads for 3+4, leaving 1+2 outputs as is. That was wrong. 1+2 were, for all intents and purposes, firing 2x too long. And I somehow managed to fry the TPS - it's not reacting 100% linear. Hopefully I'll find another Kia in pullapart.
So - next steps.
Have my MS settings checked out.
Install outer tie rods.
Find a good shop to do an alignment (new rear subframe, new steering rack, new lowering spring perches, polyurethane bushings - yeah, nothing is square ATM)
Bumper, Hood, Trunk
electronic Boost controller wiring
aeromotive FPR install
power steering hoses
Tune
Drive
and a whole bunch of smaller steps inside there.
Reply
0
0
10-19-2014, 11:32 PM
#17
Senior Member
Thread Starter
Join Date: May 2007
Location: Atlanta
Posts: 997
Total Cats: 156
4 years between updates isn't odd, right?
So.. uhm.. where to start. I got fired from my job. I also got really frustrated with my car being unreliable. I took scuba lessons and decided to drive it from Atlanta to Key West with no tools. If it broke down or blew up, I was going to tow the bitch back and start parting it out.
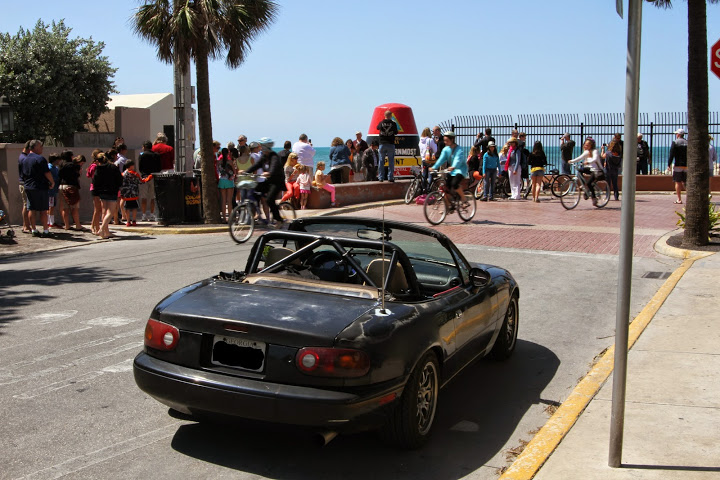
The car made it - but not without some problems. Cruise control cable got into the exhaust manifold, melting the throttle open. That was a quick 10 seconds of "Why am I not stopping?" approaching a red light; hit the cruise button, nope, put the clutch in to a high rev - ohshit, key off. So, car tried to kill me. On the upside - it also saved me after it refused to start after I found a (no ****) all you can drink for $20 Tuesday special somewhere in Tampa. Bad decisions aside - I had to finish it.
Technically, yes... I did drive a ***** route in Florida. I may or may not have done this on purpose. Since then...
I made this:
I cut this in half:
I helped assemble this:
I stayed here:

and rented this:

Then I bought this:
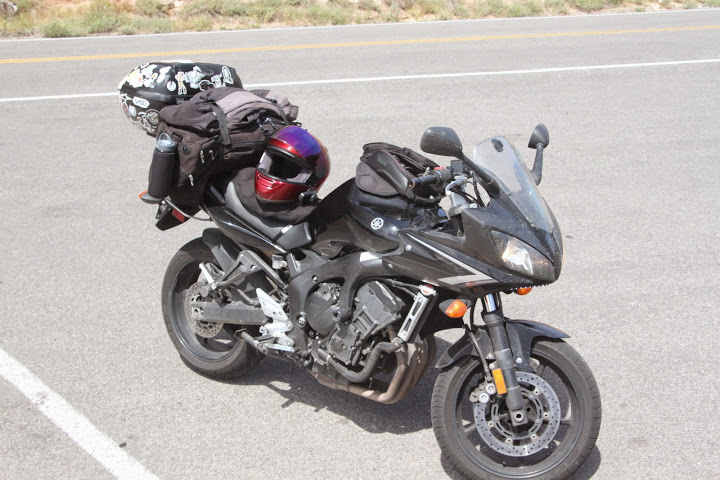
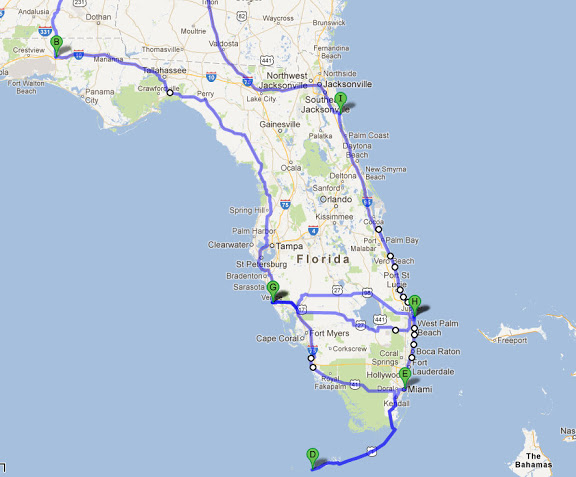
And went everywhere on it - Google maps won't even let me show my route in a single image. But from Atlanta to Vegas, Death Valley, Yosemite, San Francisco, Los Angeles, Tijuana, up the pacific coast highway through big sur until it merges with the 101 through Eureka, then up the Oregon coast till Portland, Seattle, Vancouver to Whistler on the Sea to Sky highway, then through to Bonneville, Salt Lake, Aspen and Denver, Boise, and back to Atlanta. While I was in Denver I managed to sneak by FM's open house - that was kinda neat.
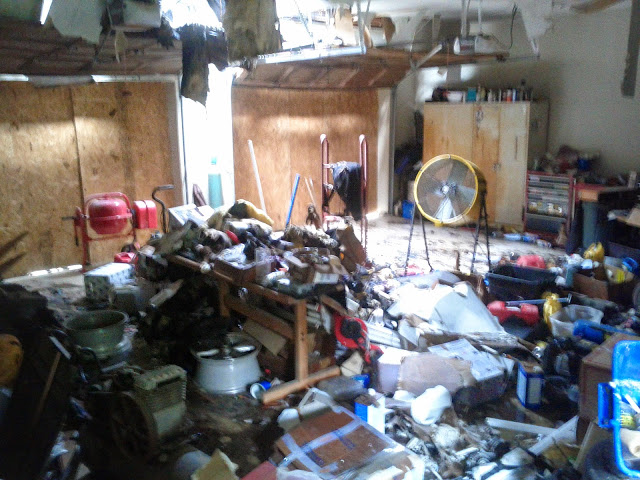
While I was riding around the country my parents house caught fire. Thankfully everyone is okay - but my tools and spare parts got toasted or flooded. Parents are well insured, but my parts won't be covered. No biggy - since everything could have been worse.
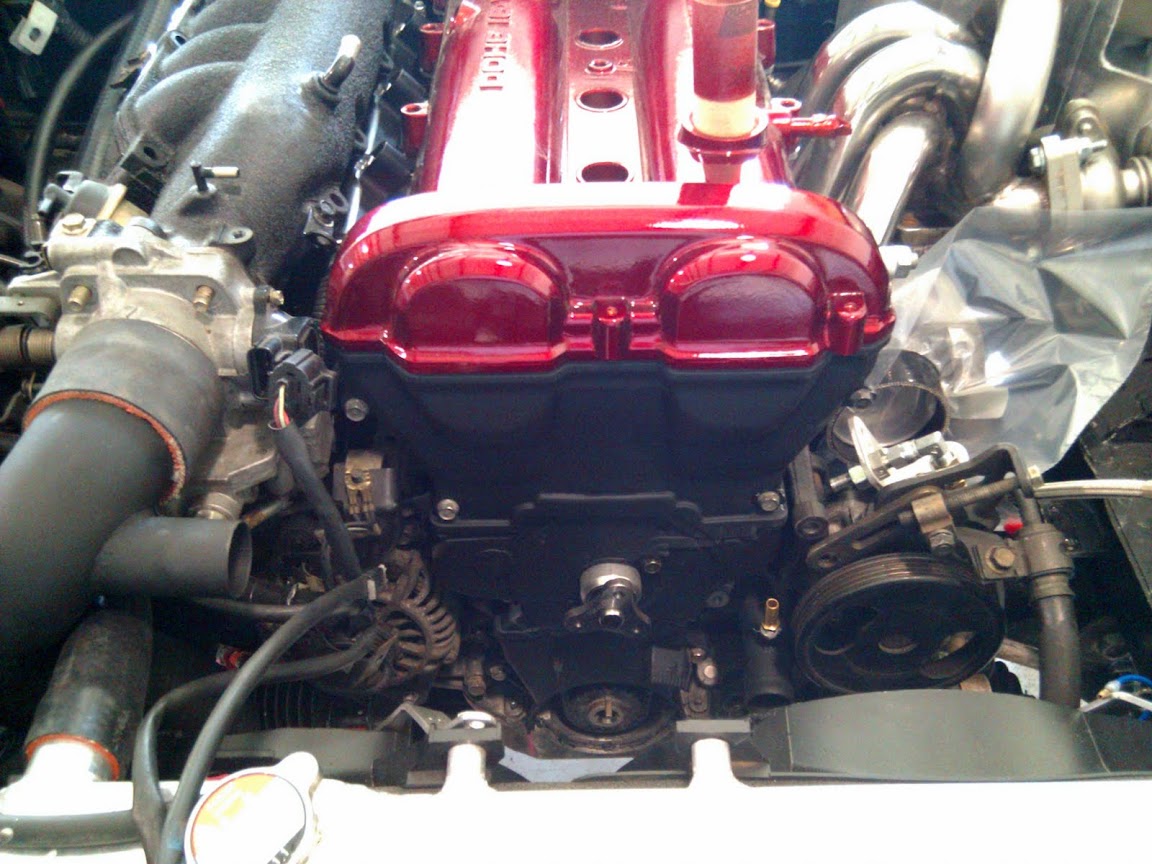
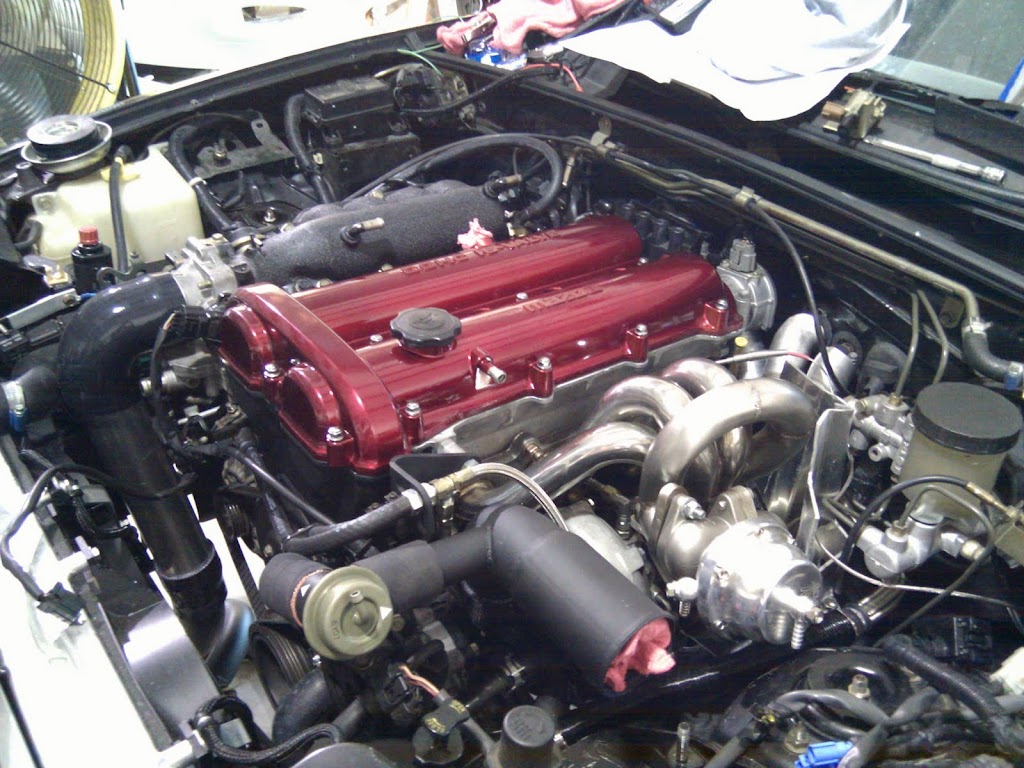
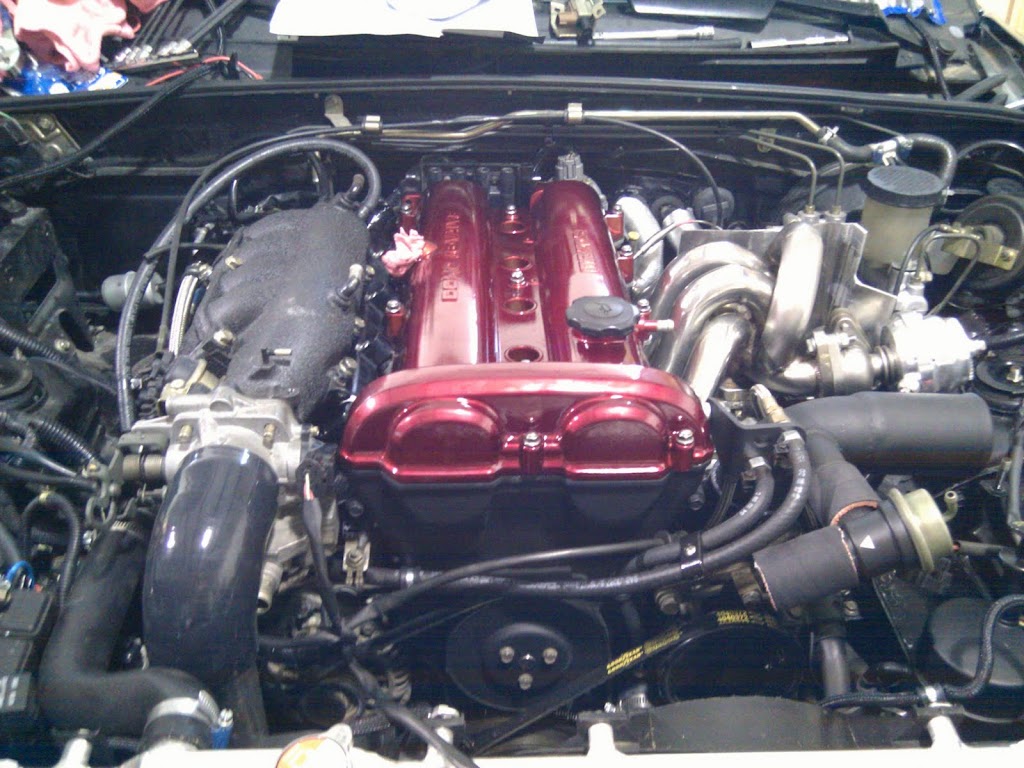
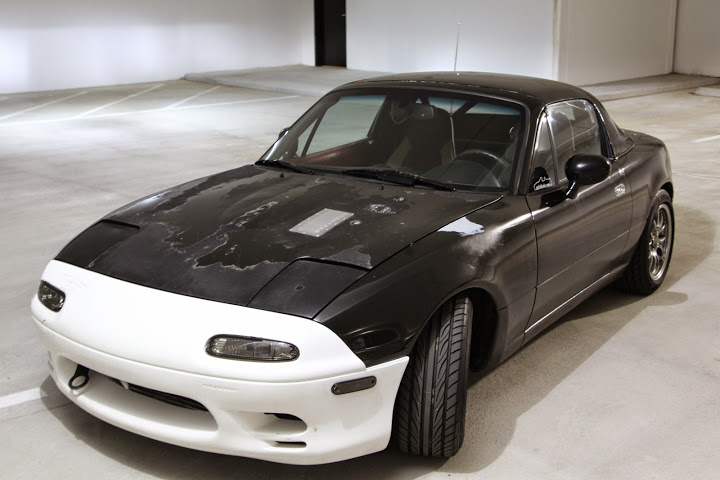
But my car still more or less looks like:
So - Ugly Girlfriend - It's what matters on the inside. That's what they tell all the ugly people, right?
Engine:
$125 Longblock off craigslist
FM Wiseco's, +1mm
Eagle Rods
M-Tuned coolant reroute, waterneck delete
99 Head, dremel port, bowl blend, valve deshroud, +1mm supertech valves
Boundary oil pump gears
VICS manifold, operational
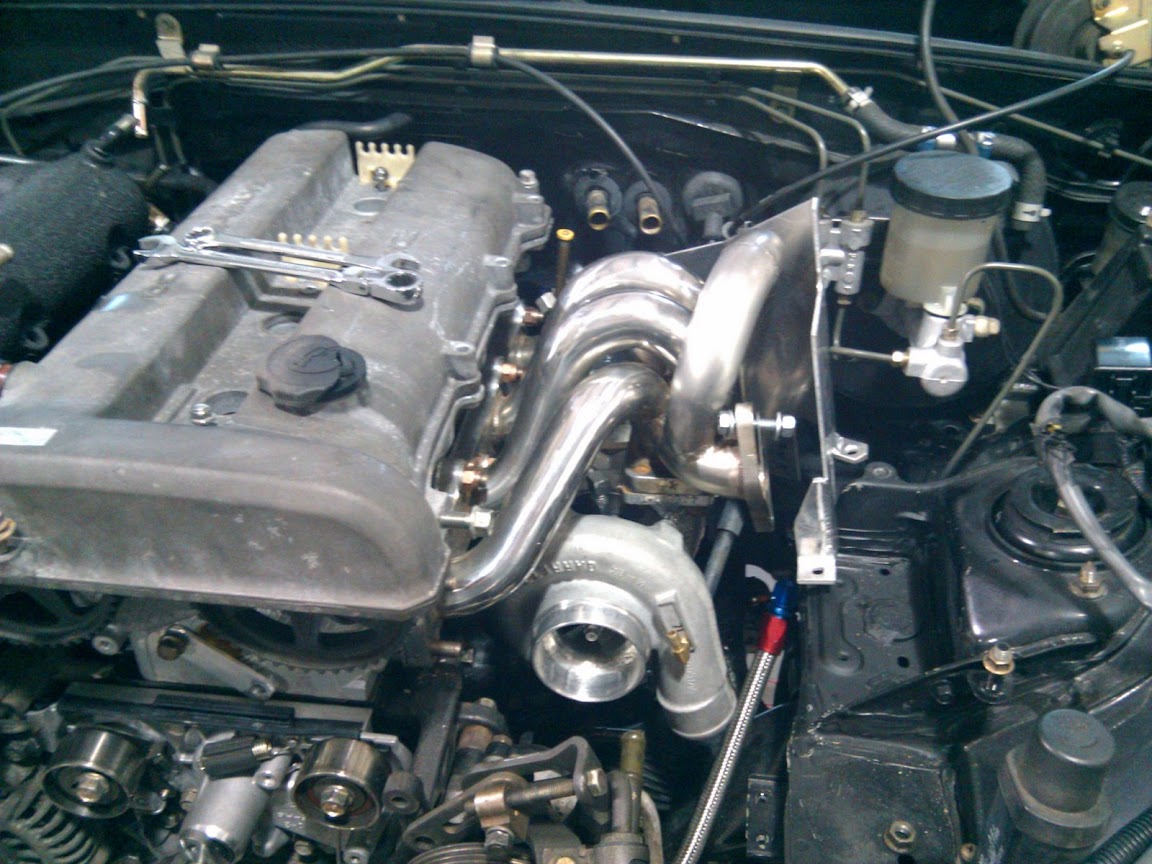
Turbo:
Begi S4 manifold, divorced Tial wastegate
GT2871 @ 12psi
Enthuza 3inch exhaust
Management:
MS3x
LC-1
750cc DW low-z injectors
jbperf peak and hold drivers
aeromotive afpr
stock coils, stock cas (for the moment).
Interior (aka, stuff most won't care about):
NB Dash, NBHVAC
PLX Devices display with EGT, Fluid Temp (Oil and Water), Fluid Pressure (Oil) modules
RAM Cell mount
Relay-based power window switches
Cobra shift ring
End result:

Red = 10psi WG pressure only
Blue = 12psi EBC spool
I know I'm missing a lot of tuning still, especially on the top end. Still haven't had a dyno tune.
I have kept a (much more boring) thread slightly updated on mx5atlanta (supguys?) and after reading through Jeffbucc's thread last night I decided here would be a good place to document cool ****(tm) I've done / am doing as I finish up the car/document some discrepancies in better detail. I'll have to go through old cellphone pictures.
Otherwise... I'm an electronics geek and will have some cool things coming out on that end now that I've finally gotten most of the mechanicals working. That means I do some stupid things - like here's a tinder swiper I made in about 20 minutes.
So.. uhm.. where to start. I got fired from my job. I also got really frustrated with my car being unreliable. I took scuba lessons and decided to drive it from Atlanta to Key West with no tools. If it broke down or blew up, I was going to tow the bitch back and start parting it out.
The car made it - but not without some problems. Cruise control cable got into the exhaust manifold, melting the throttle open. That was a quick 10 seconds of "Why am I not stopping?" approaching a red light; hit the cruise button, nope, put the clutch in to a high rev - ohshit, key off. So, car tried to kill me. On the upside - it also saved me after it refused to start after I found a (no ****) all you can drink for $20 Tuesday special somewhere in Tampa. Bad decisions aside - I had to finish it.
Technically, yes... I did drive a ***** route in Florida. I may or may not have done this on purpose. Since then...
I made this:
I cut this in half:
I helped assemble this:
I stayed here:
and rented this:
Then I bought this:
And went everywhere on it - Google maps won't even let me show my route in a single image. But from Atlanta to Vegas, Death Valley, Yosemite, San Francisco, Los Angeles, Tijuana, up the pacific coast highway through big sur until it merges with the 101 through Eureka, then up the Oregon coast till Portland, Seattle, Vancouver to Whistler on the Sea to Sky highway, then through to Bonneville, Salt Lake, Aspen and Denver, Boise, and back to Atlanta. While I was in Denver I managed to sneak by FM's open house - that was kinda neat.
While I was riding around the country my parents house caught fire. Thankfully everyone is okay - but my tools and spare parts got toasted or flooded. Parents are well insured, but my parts won't be covered. No biggy - since everything could have been worse.
But my car still more or less looks like:
So - Ugly Girlfriend - It's what matters on the inside. That's what they tell all the ugly people, right?
Engine:
$125 Longblock off craigslist
FM Wiseco's, +1mm
Eagle Rods
M-Tuned coolant reroute, waterneck delete
99 Head, dremel port, bowl blend, valve deshroud, +1mm supertech valves
Boundary oil pump gears
VICS manifold, operational
Turbo:
Begi S4 manifold, divorced Tial wastegate
GT2871 @ 12psi
Enthuza 3inch exhaust
Management:
MS3x
LC-1
750cc DW low-z injectors
jbperf peak and hold drivers
aeromotive afpr
stock coils, stock cas (for the moment).
Interior (aka, stuff most won't care about):
NB Dash, NBHVAC
PLX Devices display with EGT, Fluid Temp (Oil and Water), Fluid Pressure (Oil) modules
RAM Cell mount
Relay-based power window switches
Cobra shift ring
End result:
Red = 10psi WG pressure only
Blue = 12psi EBC spool
I know I'm missing a lot of tuning still, especially on the top end. Still haven't had a dyno tune.
I have kept a (much more boring) thread slightly updated on mx5atlanta (supguys?) and after reading through Jeffbucc's thread last night I decided here would be a good place to document cool ****(tm) I've done / am doing as I finish up the car/document some discrepancies in better detail. I'll have to go through old cellphone pictures.
Otherwise... I'm an electronics geek and will have some cool things coming out on that end now that I've finally gotten most of the mechanicals working. That means I do some stupid things - like here's a tinder swiper I made in about 20 minutes.
Reply
4
4
10-19-2014, 11:40 PM
#18
Elite Member
iTrader: (37)

Join Date: Apr 2010
Location: Very NorCal
Posts: 10,441
Total Cats: 1,899
Holy thread resurrection!
I had the same problem when my place burned down back in 08. House insurance wouldn't pay for car parts and auto insurance claimed they weren't attached to the car and therefore the insurance wouldn't cover it.
Tinderbot is all kinds of Welcome back!
I had the same problem when my place burned down back in 08. House insurance wouldn't pay for car parts and auto insurance claimed they weren't attached to the car and therefore the insurance wouldn't cover it.
Tinderbot is all kinds of
Welcome back!
Reply
0
0
10-19-2014, 11:54 PM
#19
Senior Member
Thread Starter
Join Date: May 2007
Location: Atlanta
Posts: 997
Total Cats: 156
Funny story - sorta; My dad was out of cell range, so my mother had to get the sheriff to contact him down at the hangar to let him know the house was on fire. Somehow the message got garbled - so when he was told "You need to find your wife and your pastor" he was shitting bricks (as I was across country on a motorcycle..).
Turns out the pastor is our neighbor 3 doors down. But after that scare - a little fire? NBD.
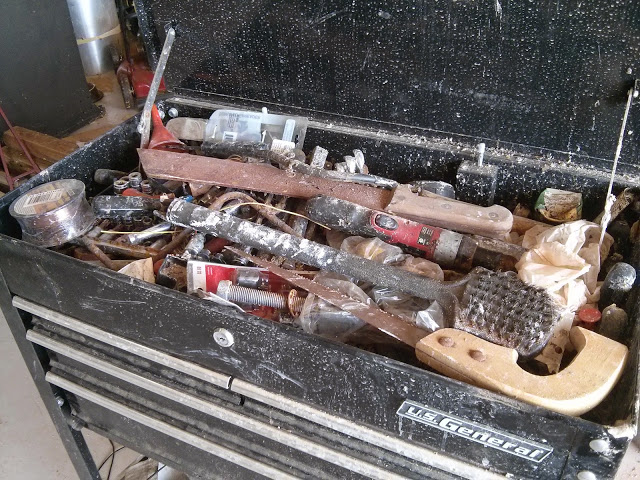
My dad captures most of the parts and threw them into PODs and took my toolchests down to the hangar.
Still though - This cleanup took almost 6 hours of cleaning / lubricating. Pretty sure my spare seats and non-stainless parts are going to be mostly trash by the time we get the house ready.
Turns out the pastor is our neighbor 3 doors down. But after that scare - a little fire? NBD.
My dad captures most of the parts and threw them into PODs and took my toolchests down to the hangar.
Still though - This cleanup took almost 6 hours of cleaning / lubricating. Pretty sure my spare seats and non-stainless parts are going to be mostly trash by the time we get the house ready.
Reply
0
0
10-29-2014, 03:28 PM
#20
Senior Member
Thread Starter
Join Date: May 2007
Location: Atlanta
Posts: 997
Total Cats: 156
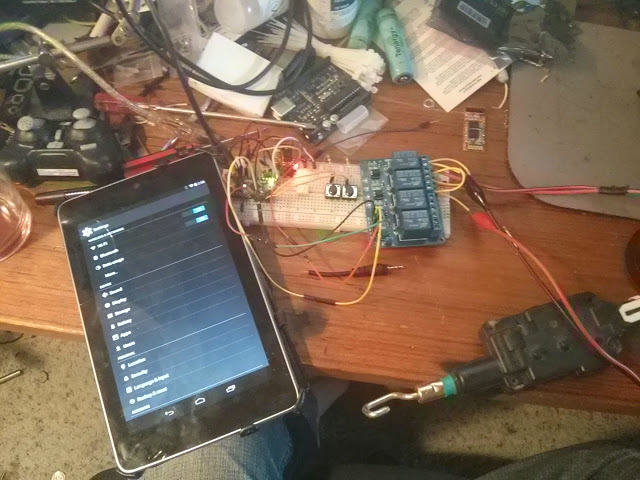
I shaved my trunk keyhole earlier this summer with the intention of using something like a keyfob to pop it. I relocated the key hole to the bottom of the trunk (inspiration from Hakuna miata) but re-hooked the trunk release line to the center console for convenience. The prices for conventional keyless entry boxes aren't terribly expensive - but I decided I hate carrying around a keyfob but I almost always have my phone.
Been working on this for a couple of days. It's not the most secure code in the world - but I doubt bluetooth man in the middle attacks to be too extremely common when you can just slash the top to break into a car. And, as an added bonus - it's actually cheaper than pretty much everything else.
I still need to optimize for power consumption to keep draw on the battery low - but I'll do that once the final parts from china arrive.
So - how much is this costing me? Ebay rules for stuff like this.
BOM:
$3 5v Arduino pro mini (from sparkfuns arduino days special)
$7 Bluetooth HC05 module
$8 8 channel relay driver (was going to design one, but for $8? not worth the effort)
$10 for 3 lock actuators. Fun fact - I pulled 3 from the junkyard at 8$ a piece. I ended up returning them when I found I could get them new for cheaper with hardware.
$3 door switch
$31 dollars
So how this'll work - come up to to the car, press button installed under the edge of decklid - arduino wakes up, queries bluetooth/phone presence, and unlocks trunk. I'll need to install a switch on the door handles somehow, but installing the actuators is already documented. I'll have 2 channels left over for relay stuff, just need to decide what I want to do with those (fuelpump cutout? interior lights?)
Reply
1
1


