The Portabull LFX Build
 01-03-2016, 03:12 AM
#1
Senior Member
Thread Starter

Join Date: May 2007
Location: Atlanta
Posts: 997
Total Cats: 156
I want to do a different type of build thread.
There aren't a lot of LFX builds - yet - that are well documented. I've spent a large amount of time reading V8 threads to try and get a handle on the fabrication and gotchas, as well as try and keep a strong record of parts used and money spent.
So - rather than a "today we did this" update, I've been taking pictures throughout the build and want to create chapters covering each system as they get completed. When you're doing such a large build like this, there's always something to work on - even if you're missing a part for the cooling system, you can spend the day working on the electrical instead. And eventually it'll all get done.
And rather than try and stretch this build out while waiting for things to get completed - this build has already been ongoing for 10 months.
So.. let's begin with a small intro. This is my dads (portabull) car.

This is the victim. Originally bought in 2007 off craigslist for $1500 with crap paint, busted 1st gear, carpet infused with dog hair. We fixed those issues eventually, then he inherited my JRSC supercharger when I went turbo. My brother would occasionally borrow the car while his was getting worked on.. and he didn't have much mechanical sympathy. It once overheated so badly that I broke the sparkplug off in the head with a 3ft breaker bar (but as I had upgraded to a 99 head in my turbo miata, we rebuilt my old 94 head and tossed it in). We set that as a goal - have this car limp over the 300k finish line, then get completely rebuilt for a solid JRSC rebuild. Refreshed bottom end, 99 head, upgraded injectors (no more rising rate FPR for additional fuel), mspnp, 4-2-1 header.
It crossed 300k. Then the speedo cable snapped. Then my brother's Xterra managed to shave all the syncro teeth off of first gear, so once again, he borrowed the miata.
And.. well..


Engine finally had enough. It started knocking and we tried to drive it the 50 miles to our workspace - but the engine locked up on the way and we had to grab a uhaul.
About this time the LFX kit was announced - I let my dad know about it, and we decided to go for it. 325hp, minimal engine bay modifications, similar weight to the BP engine, modern DOHC with VVT and direct injection? That's a bit nicer than 30 year old engine design.
Now the plan was a bit ambitious.. buy the parts, install the engine, get it running by the v8roadsters meet at the Mitty. Just under 2 months from our order in February to gather parts and get it running for the Mitty at the end of April. We'd have to sacrifice a lot of functionality - just shoehorn the engine in and get it on the road.
Needless to say.. that didn't happen.
So our current status, some 10 months later - We're close to done. Hopefully the engine will crank in the next couple of weeks. Along the way we've upgraded... well, pretty much everything. I might have made a mistake in showing my dad the Turbo Tom LS3 on youtube and Jeffbucc's build thread here. Stuff we've done that I probably won't cover how to...
- Control arms painted, new IL Motorsports bushings all around
- NA6 dash covered in leather and installed in NA8
- Electric windows installed with delrin window bushings
- ABS-Backed doorcards with microsuede covering + revlimiter door pulls
- Cappuchino washer install
- Stereo (woo!)
We're also lucky enough to have Summit Racing in our backyard (well, an hour away-ish) and waaay too many Harbor Freight tools. The local pull-a-part even occasionally has a miata, and there's another pick-n-pull that has newer cars (minus driveline) that I've scavenged for GM bits and pieces.
Build goals:
A streetable LFX. Working power steering, heat, air conditioning. Civilized enough for my non-trackday-going retiree father, fast enough to put a grin on our faces.
And note.. I have a few hundred photos saved. I might end up writing a few todo's in the thread as I try and find the picture or take a new picture if it's warranted. And I have a few things that are 99% done that I can write about (fuel, rear end, body modifications, steering) and some things that are 20% done (electrics, coolant plumbing, ECU tuning) that I'll be waiting to write about. Hopefully I won't have to go back and correct myself too much on what I have written about.
But to put it into perspective.. This is where we're at right now.


There aren't a lot of LFX builds - yet - that are well documented. I've spent a large amount of time reading V8 threads to try and get a handle on the fabrication and gotchas, as well as try and keep a strong record of parts used and money spent.
So - rather than a "today we did this" update, I've been taking pictures throughout the build and want to create chapters covering each system as they get completed. When you're doing such a large build like this, there's always something to work on - even if you're missing a part for the cooling system, you can spend the day working on the electrical instead. And eventually it'll all get done.
And rather than try and stretch this build out while waiting for things to get completed - this build has already been ongoing for 10 months.
So.. let's begin with a small intro. This is my dads (portabull) car.
This is the victim. Originally bought in 2007 off craigslist for $1500 with crap paint, busted 1st gear, carpet infused with dog hair. We fixed those issues eventually, then he inherited my JRSC supercharger when I went turbo. My brother would occasionally borrow the car while his was getting worked on.. and he didn't have much mechanical sympathy. It once overheated so badly that I broke the sparkplug off in the head with a 3ft breaker bar (but as I had upgraded to a 99 head in my turbo miata, we rebuilt my old 94 head and tossed it in). We set that as a goal - have this car limp over the 300k finish line, then get completely rebuilt for a solid JRSC rebuild. Refreshed bottom end, 99 head, upgraded injectors (no more rising rate FPR for additional fuel), mspnp, 4-2-1 header.
It crossed 300k. Then the speedo cable snapped. Then my brother's Xterra managed to shave all the syncro teeth off of first gear, so once again, he borrowed the miata.
And.. well..
Engine finally had enough. It started knocking and we tried to drive it the 50 miles to our workspace - but the engine locked up on the way and we had to grab a uhaul.
About this time the LFX kit was announced - I let my dad know about it, and we decided to go for it. 325hp, minimal engine bay modifications, similar weight to the BP engine, modern DOHC with VVT and direct injection? That's a bit nicer than 30 year old engine design.
Now the plan was a bit ambitious.. buy the parts, install the engine, get it running by the v8roadsters meet at the Mitty. Just under 2 months from our order in February to gather parts and get it running for the Mitty at the end of April. We'd have to sacrifice a lot of functionality - just shoehorn the engine in and get it on the road.
Needless to say.. that didn't happen.
So our current status, some 10 months later - We're close to done. Hopefully the engine will crank in the next couple of weeks. Along the way we've upgraded... well, pretty much everything. I might have made a mistake in showing my dad the Turbo Tom LS3 on youtube and Jeffbucc's build thread here. Stuff we've done that I probably won't cover how to...
- Control arms painted, new IL Motorsports bushings all around
- NA6 dash covered in leather and installed in NA8
- Electric windows installed with delrin window bushings
- ABS-Backed doorcards with microsuede covering + revlimiter door pulls
- Cappuchino washer install
- Stereo (woo!)
We're also lucky enough to have Summit Racing in our backyard (well, an hour away-ish) and waaay too many Harbor Freight tools. The local pull-a-part even occasionally has a miata, and there's another pick-n-pull that has newer cars (minus driveline) that I've scavenged for GM bits and pieces.
Build goals:
A streetable LFX. Working power steering, heat, air conditioning. Civilized enough for my non-trackday-going retiree father, fast enough to put a grin on our faces.
And note.. I have a few hundred photos saved. I might end up writing a few todo's in the thread as I try and find the picture or take a new picture if it's warranted. And I have a few things that are 99% done that I can write about (fuel, rear end, body modifications, steering) and some things that are 20% done (electrics, coolant plumbing, ECU tuning) that I'll be waiting to write about. Hopefully I won't have to go back and correct myself too much on what I have written about.
But to put it into perspective.. This is where we're at right now.
Last edited by gooflophaze; 01-03-2016 at 03:34 AM.

Reply
 0
0

0
01-03-2016, 03:15 AM
#2
Senior Member
Thread Starter
Join Date: May 2007
Location: Atlanta
Posts: 997
Total Cats: 156
So.. lets begin with.. hunting down a driveline.
There are a couple of decisions to made for parts. First, of course, is which differential - Ford or Getrag. Then what ratio. As this was going to be a mostly daily car, a Getrag 3.23 was decided on. We have a local pick n pull that pulls the engine out and puts the rest of the carcass out, so I tried hunting there for a few days to find the right part number and option code. Turns out, that's easier said than done. Trying to find the option/RPO code by VIN requires a subscription for most people.. soo.. that ended up being a crapshoot. But I found one local for $300 out of a cadillac SRX.
MV5 vs MV7 - I think this has been hashed out quite well in https://www.miataturbo.net/engine-pe...2/#post1246673
We found an MV7 from LKQ, shipped to our front door for $1097.
Your major resource for hunting down a driveline is going to be on car-part.com.The goal was to find an engine within day-trip distance so I can inspect it and verify it has all the bracketry and accessories, with less than 15k miles. Basically something mint and local-ish. I found one and went to go look at it - looking up directions to the yard I noticed they had 1.1 stars on Google - now I don't usually pay too much attention to those ratings, but 20 minutes from the yard I get a call that the oil pan was cracked. And when I get there, no one knows anything. The salesman I've been talking to is missing and the mechanics mulling around are all pissed off because their parts are missing / aren't ready, and they've already been waiting there for three hours. It was, indeed, a 1.1 star yard. So I bailed.
I spent more time on the phone - my script with the yards usually goes like this.
"Hi, I'm looking for a 2012+ Camaro V6 engine. I saw you have in stock on car-part.com. Is it still available? *"
* lesson learned - car-part.com's database isn't live. I've noticed it tends to update twice a week.
"I'm looking to do an engine swap into a miata. Can I get all the accessories with it as well? *"
* lesson learned - since mostly mechanics are searching for cores to replace a busted engine with, accessories are usually stripped off and sold seperately. Wiring harnesses aren't a big deal and can be bought new from GM for $200, and they make pulling an engine much faster when you can cut 'em out.
"When can I come take a look at it? *"
* lesson learned - Sometimes the engine is already stripped and palleted, waiting on the warehouse shelf - these usually don't have the accessories. Some times they're still in the car on the yard, waiting for a buyer to pull whatever part is needed. The "Good" yards I've called at this point will usually have a salesman take my information and go inspect the engine himself, giving me a call back an hour or two later. This is usually the heartbreaker moment - when they discover that the impact has cracked the oil pan, or there was an engine bay fire, or the intake manifold is cracked and there's water in the cylinder (yes, all these things I've actually heard). If it's still in the car, though, they'll need a day or two to have the engine pulled and palleted.
The LFX design makes this a little bit worse. One of the engine mounts is integrated into the oil pan, so a hard shunt will crack the pan. This might not be the end of your hunt yet - if you're buying a shortened oilpan from v8roadsters, they modify new pans from GM.
That said - I found an engine, of all places.. from v8roadsters. They had one for a racecar project that they decided they wouldn't be able to get to this year. So.. snatched that up from them for ~2k. 2012 engine with only 7k miles on it. Woohoo.
Manual Transmission vs Automatic - the engines are the same. The wiring harnesses are not. I've (hopefully) modified the automatic wiring harness to operate as a manual harness fairly simply. I'll be covering this once I get to the wiring.
To do an automatic to manual conversion, the biggest pain in the *** is going to be finding a flywheel. The LFX uses a dual mass flywheel. I'm not a fan. The previous "GM High Function engine", the LLT, uses a single mass flywheel and quite frankly may work just fine. While I was hunting parts there weren't any replacement flywheels available, and cost a pretty penny (iirc, +$500) new from GM. I eventually found one on car-part $250 with a pressure plate and clutch. GM dealers apparently keep the clutch disc in stock for $150(?). Once we received the disc, it appeared to be in pretty good condition, and figured that an OK clutch from a car that weighs 3750lbs ought to work just fine with roughly half the weight.
Our MV7 from the great white north had it's shifter cut off. It's very similar to the TR6060 shifter, but carries a different part number. Once again - car-part.com - and found one for $150 (oddly enough, same place I snagged the clutch from a few months prior). Unfortunately the shifter is almost fully aluminum, meaning we couldn't weld it - but v8roadsters gave us a fairly quick turnaround and modified it for $125. That said, if you have to find one.. I'm almost positive that the TR6060 and AY6 are identical-enough after modification.

<stolen image from carnut>
Bolts - hey, this is kinda important. Three times we got the wrong flywheel bolts - kept giving us flex plate bolts. The proper bolts are allen head, not hex head. Oh - and the flywheel bolts aren't evenly spaced. That was a few minutes of confusion and cursing while holding a 30lb flywheel.
<todo - I have a receipt around here to verify>
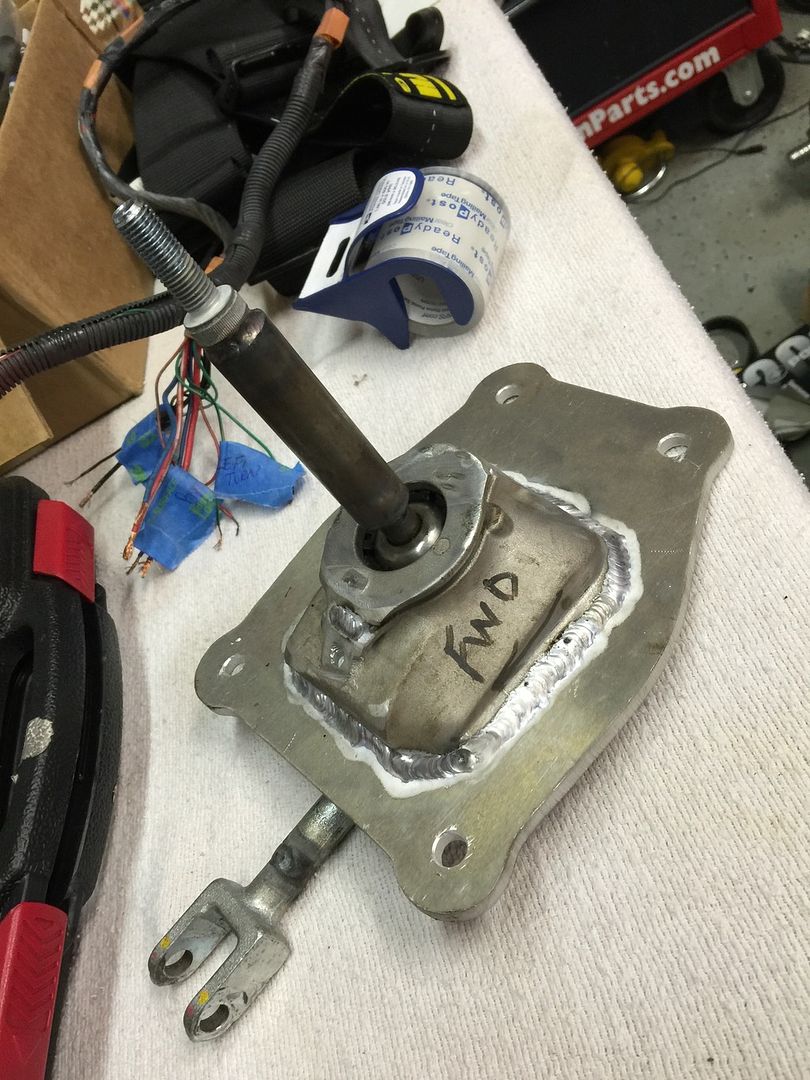
Crank to Flywheel - 11569956, 8x req(?)
Pressure plate to flywheel - 11611397, 6x req
Engine to Flywheel cover plate, probably won't come with engine - 24222918
Starter bolts - 11588740
Bellhousing bolts - 11515770, 11 req(?)
There are a couple of decisions to made for parts. First, of course, is which differential - Ford or Getrag. Then what ratio. As this was going to be a mostly daily car, a Getrag 3.23 was decided on. We have a local pick n pull that pulls the engine out and puts the rest of the carcass out, so I tried hunting there for a few days to find the right part number and option code. Turns out, that's easier said than done. Trying to find the option/RPO code by VIN requires a subscription for most people.. soo.. that ended up being a crapshoot. But I found one local for $300 out of a cadillac SRX.
MV5 vs MV7 - I think this has been hashed out quite well in https://www.miataturbo.net/engine-pe...2/#post1246673
We found an MV7 from LKQ, shipped to our front door for $1097.
Your major resource for hunting down a driveline is going to be on car-part.com.The goal was to find an engine within day-trip distance so I can inspect it and verify it has all the bracketry and accessories, with less than 15k miles. Basically something mint and local-ish. I found one and went to go look at it - looking up directions to the yard I noticed they had 1.1 stars on Google - now I don't usually pay too much attention to those ratings, but 20 minutes from the yard I get a call that the oil pan was cracked. And when I get there, no one knows anything. The salesman I've been talking to is missing and the mechanics mulling around are all pissed off because their parts are missing / aren't ready, and they've already been waiting there for three hours. It was, indeed, a 1.1 star yard. So I bailed.
I spent more time on the phone - my script with the yards usually goes like this.
"Hi, I'm looking for a 2012+ Camaro V6 engine. I saw you have in stock on car-part.com. Is it still available? *"
* lesson learned - car-part.com's database isn't live. I've noticed it tends to update twice a week.
"I'm looking to do an engine swap into a miata. Can I get all the accessories with it as well? *"
* lesson learned - since mostly mechanics are searching for cores to replace a busted engine with, accessories are usually stripped off and sold seperately. Wiring harnesses aren't a big deal and can be bought new from GM for $200, and they make pulling an engine much faster when you can cut 'em out.
"When can I come take a look at it? *"
* lesson learned - Sometimes the engine is already stripped and palleted, waiting on the warehouse shelf - these usually don't have the accessories. Some times they're still in the car on the yard, waiting for a buyer to pull whatever part is needed. The "Good" yards I've called at this point will usually have a salesman take my information and go inspect the engine himself, giving me a call back an hour or two later. This is usually the heartbreaker moment - when they discover that the impact has cracked the oil pan, or there was an engine bay fire, or the intake manifold is cracked and there's water in the cylinder (yes, all these things I've actually heard). If it's still in the car, though, they'll need a day or two to have the engine pulled and palleted.
The LFX design makes this a little bit worse. One of the engine mounts is integrated into the oil pan, so a hard shunt will crack the pan. This might not be the end of your hunt yet - if you're buying a shortened oilpan from v8roadsters, they modify new pans from GM.
That said - I found an engine, of all places.. from v8roadsters. They had one for a racecar project that they decided they wouldn't be able to get to this year. So.. snatched that up from them for ~2k. 2012 engine with only 7k miles on it. Woohoo.
Manual Transmission vs Automatic - the engines are the same. The wiring harnesses are not. I've (hopefully) modified the automatic wiring harness to operate as a manual harness fairly simply. I'll be covering this once I get to the wiring.
To do an automatic to manual conversion, the biggest pain in the *** is going to be finding a flywheel. The LFX uses a dual mass flywheel. I'm not a fan. The previous "GM High Function engine", the LLT, uses a single mass flywheel and quite frankly may work just fine. While I was hunting parts there weren't any replacement flywheels available, and cost a pretty penny (iirc, +$500) new from GM. I eventually found one on car-part $250 with a pressure plate and clutch. GM dealers apparently keep the clutch disc in stock for $150(?). Once we received the disc, it appeared to be in pretty good condition, and figured that an OK clutch from a car that weighs 3750lbs ought to work just fine with roughly half the weight.
Our MV7 from the great white north had it's shifter cut off. It's very similar to the TR6060 shifter, but carries a different part number. Once again - car-part.com - and found one for $150 (oddly enough, same place I snagged the clutch from a few months prior). Unfortunately the shifter is almost fully aluminum, meaning we couldn't weld it - but v8roadsters gave us a fairly quick turnaround and modified it for $125. That said, if you have to find one.. I'm almost positive that the TR6060 and AY6 are identical-enough after modification.
<stolen image from carnut>
Bolts - hey, this is kinda important. Three times we got the wrong flywheel bolts - kept giving us flex plate bolts. The proper bolts are allen head, not hex head. Oh - and the flywheel bolts aren't evenly spaced. That was a few minutes of confusion and cursing while holding a 30lb flywheel.
<todo - I have a receipt around here to verify>
Crank to Flywheel - 11569956, 8x req(?)
Pressure plate to flywheel - 11611397, 6x req
Engine to Flywheel cover plate, probably won't come with engine - 24222918
Starter bolts - 11588740
Bellhousing bolts - 11515770, 11 req(?)
Last edited by gooflophaze; 01-04-2016 at 05:07 AM.
Reply
1
1
01-03-2016, 05:18 AM
#3
Senior Member
Thread Starter
Join Date: May 2007
Location: Atlanta
Posts: 997
Total Cats: 156
Engine bay modifications:
For the LFX you're basically following the same instructions as the V8, except you won't need to widen the transmission tunnel.
You'll need a few things.
1. A crapload of cutting discs.
2. A good respirator. Those crapload of cutting discs will have you blowing black snot for days.
3. A heavy wire wheel. Seam sealer is pretty gummy and gets everywhere, and you'll need a clear view of the spotwelds for the..
4. Spot weld cutters. Turbo Tom has a really nice kit in his build. I'm not sponsored by Summit or Carl's Jr. so I used 2 from Summit and a few more from Harbor freight. I'd say 5 is a fair number.
5. A plasma cutter. If you didn't want one before, you'll want one after the 20th disc and the 15th time you've reset the air compressor after it's tripped a breaker (sidenote: replaced the compressor starter capacitors, works like a champ now).
So - begin by masking up the holes, blasting the sealer everywhere, and lay down a line extending the engine bay sides back to the firewall.
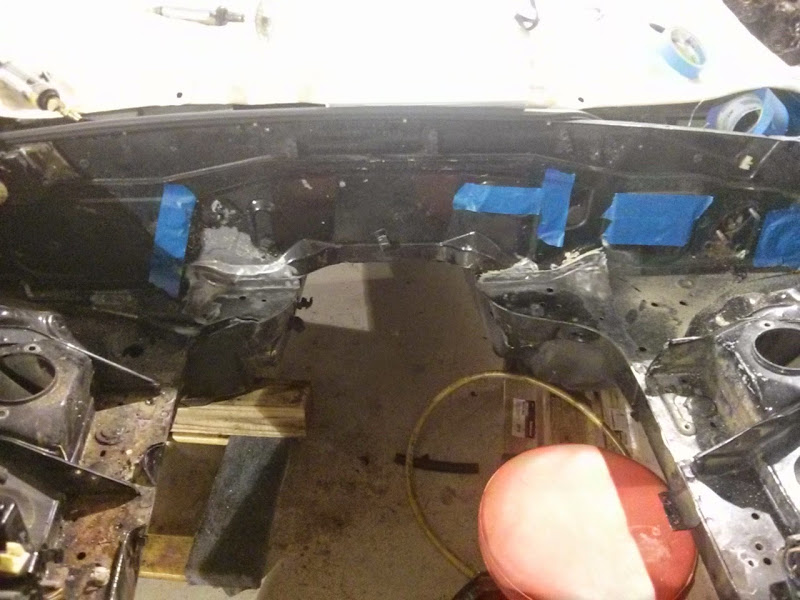
Lay down a few cuts, break out the hammer after the last cutting disc wears out and...

The cheap spotweld cutters I used didn't cut the entire weld, just most of it. Try and hit the exact center of the spotweld with a centerpunch, drill it with a small drillbit maybe 1mm deep, just enough to give the spotweld cutter some tooth.

The smaller the piece of metal, the easier it'll be to pry off the body and kiss the high spots with an angle grinder.

Here, you can see where I made a mistake. If I had left a little more metal I might have been able to stretch it a little easier and wouldn't have had to fill the crack. You're trying to make the firewall square.
To do that.. break out the BFH.

After that stick the reinforcement pieces in, tack weld, weld, fill cracks, load it up in seam sealer.

And paint..

Oh wait.. don't paint yet.. there's a few mods yet to make. (d0h).
The drivers side head is longer and needs some clearance against the firewall. First, find the spot you need to hit by putting the engine in the subframe, lowering the body onto it, marking it, and then smacking the crap out of it.
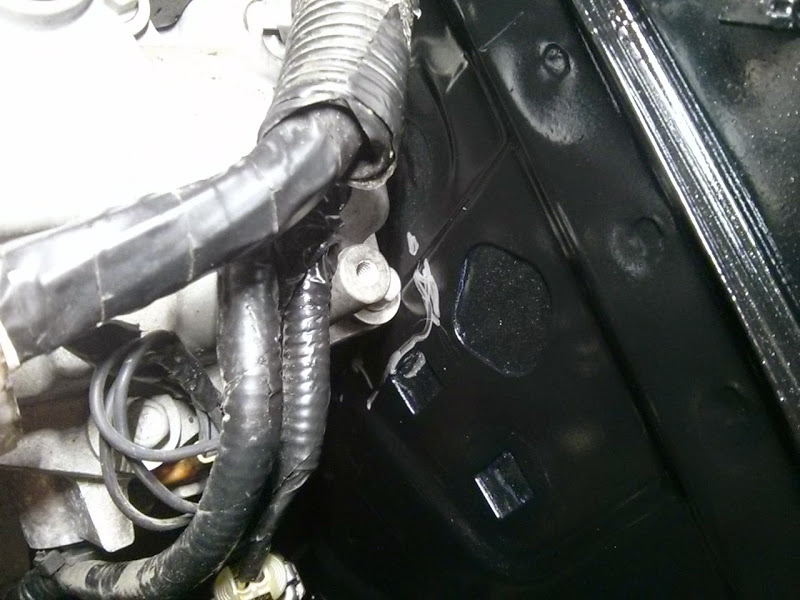
Those are the throttle body, cruise control, and speedometer holes. Yes, the heater core holes are blocked behind the head. If you want to close them up with sheetmetal, now would be the time (before you deform the crap out of this spot).

Note: Summit Chassis Paint is really pretty damn good stuff (Another tip from TurboTom). It's damn glossy and damn black and makes it a real pain in the *** to photograph anything because it sucks all the light. We had a broken speedometer cable we closed the firewall hole with. Ordered 2 cruise control blanking grommets (Mazda B09241661, $4.70 apiece) and 2 1.25in body plugs (Summit SFT-0186) for the heater core. That said - I think it'd be easier to weld in some 18ga before you beat the crap out of this.
And then paint.
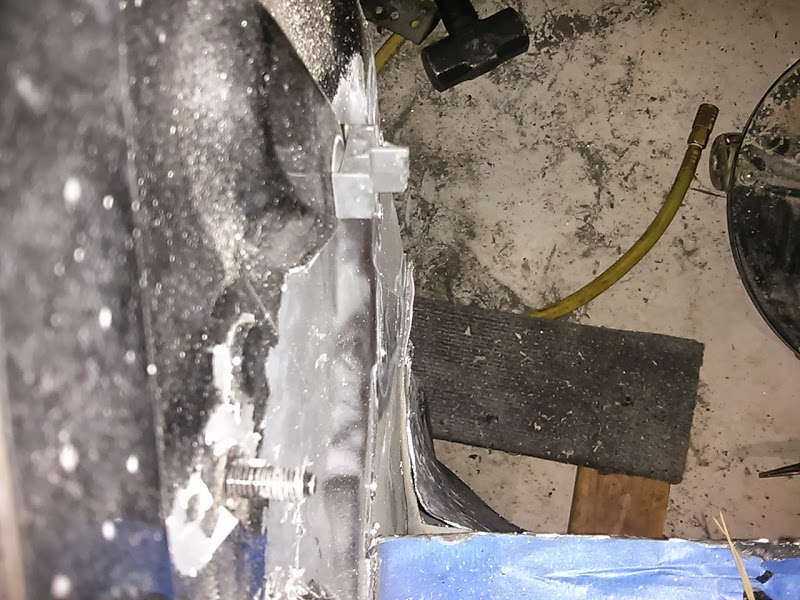
Oh.. wait.. before you pull the engine out again.. there are a few places along the engine bay you'll need to soften the lip. Now would be a good time to mark these..

At the power steering pump, this'll prevent the ATF hose from chafing.
The exhaust might also be a good place - so far, we haven't needed to.. but it's really hard to show just how tight the clearances are. This may give you a small idea - the exhaust is slightly below the rail.

I also recommend removing (nearly) as much as possible from the passenger side without compromising the top seam. This area gets *very* busy later on, and every extra mm helps. Here's a quick preview. We split a piece of AN-6 aluminum tubing to help prevent chafing.

For the LFX you're basically following the same instructions as the V8, except you won't need to widen the transmission tunnel.
You'll need a few things.
1. A crapload of cutting discs.
2. A good respirator. Those crapload of cutting discs will have you blowing black snot for days.
3. A heavy wire wheel. Seam sealer is pretty gummy and gets everywhere, and you'll need a clear view of the spotwelds for the..
4. Spot weld cutters. Turbo Tom has a really nice kit in his build. I'm not sponsored by Summit or Carl's Jr. so I used 2 from Summit and a few more from Harbor freight. I'd say 5 is a fair number.
5. A plasma cutter. If you didn't want one before, you'll want one after the 20th disc and the 15th time you've reset the air compressor after it's tripped a breaker (sidenote: replaced the compressor starter capacitors, works like a champ now).
So - begin by masking up the holes, blasting the sealer everywhere, and lay down a line extending the engine bay sides back to the firewall.
Lay down a few cuts, break out the hammer after the last cutting disc wears out and...
The cheap spotweld cutters I used didn't cut the entire weld, just most of it. Try and hit the exact center of the spotweld with a centerpunch, drill it with a small drillbit maybe 1mm deep, just enough to give the spotweld cutter some tooth.
The smaller the piece of metal, the easier it'll be to pry off the body and kiss the high spots with an angle grinder.
Here, you can see where I made a mistake. If I had left a little more metal I might have been able to stretch it a little easier and wouldn't have had to fill the crack. You're trying to make the firewall square.
To do that.. break out the BFH.
After that stick the reinforcement pieces in, tack weld, weld, fill cracks, load it up in seam sealer.
And paint..
Oh wait.. don't paint yet.. there's a few mods yet to make. (d0h).
The drivers side head is longer and needs some clearance against the firewall. First, find the spot you need to hit by putting the engine in the subframe, lowering the body onto it, marking it, and then smacking the crap out of it.
Those are the throttle body, cruise control, and speedometer holes. Yes, the heater core holes are blocked behind the head. If you want to close them up with sheetmetal, now would be the time (before you deform the crap out of this spot).
Note: Summit Chassis Paint is really pretty damn good stuff (Another tip from TurboTom). It's damn glossy and damn black and makes it a real pain in the *** to photograph anything because it sucks all the light. We had a broken speedometer cable we closed the firewall hole with. Ordered 2 cruise control blanking grommets (Mazda B09241661, $4.70 apiece) and 2 1.25in body plugs (Summit SFT-0186) for the heater core. That said - I think it'd be easier to weld in some 18ga before you beat the crap out of this.
And then paint.
Oh.. wait.. before you pull the engine out again.. there are a few places along the engine bay you'll need to soften the lip. Now would be a good time to mark these..
At the power steering pump, this'll prevent the ATF hose from chafing.
The exhaust might also be a good place - so far, we haven't needed to.. but it's really hard to show just how tight the clearances are. This may give you a small idea - the exhaust is slightly below the rail.
I also recommend removing (nearly) as much as possible from the passenger side without compromising the top seam. This area gets *very* busy later on, and every extra mm helps. Here's a quick preview. We split a piece of AN-6 aluminum tubing to help prevent chafing.
Reply
1
1
 01-03-2016, 10:22 PM
#6
Newb

Join Date: Jan 2016
Posts: 21
Total Cats: 10
Thanks for the post, looks like you're running a few weeks ahead of our LFX build that started in October.
Couple hopefully quick questions based on what you've run into:
What gas pedal are you using? We started with a 2015 v6 camaro pedal...very stiff and a little too much angle to the left. I ordered a GM Performance LS3 conversion pedal, hoping that with the same connector it would work and would be a better option since the V8 guys seem to have good luck with the positioning of this pedal.
Are you using factory modified downpipes or the exhaust from v8r?
Have you sorted out AC yet, I've found a supplier that makes LS2/3 conversion blocks that mate to the compressor with threaded fittings after the block. With rough measurements, looks like this might fit our compressors.
Curious what you're doing with the purge solenoid on the passenger side of the intake...need to call v8r and see if they program this out of the ecu, otherwise I guess we can connect it back to the factory setup back near the gas tank?
Looks like you're using the heater core reroute, any issues running the heater core lines behind the heater core box and evaporator box and then through the firewall?
Over the Christmas to New Years break, got the cage done and mounted the getrag and now midway through a control arm bushing refresh (to anyone thinking about doing this, what a PITA).
Basically running out of things to do. Waiting on the ecu tune, downpipes, wiring harness, heater core reroute, cooling system, axles, and fuel system from v8r.
Hoping for startup in late January, testing in Feb, and track ready beginning of March.
Best of luck to you on your build and thanks in advance for any help you might be able to provide on the questions (feel free to let me know if there's anything you're curious about from our end too.
Here are a couple pics from our build.
Apologies for the double photo upload, had issues with the post submtting.
Last edited by 1999LFX; 01-03-2016 at 10:35 PM.
Reply
1
1
 01-04-2016, 02:37 AM
#8
Senior Member
Thread Starter
Join Date: May 2007
Location: Atlanta
Posts: 997
Total Cats: 156
heh.. trying to fast forward through the build.. so..
Gas pedal - came with the engine and ecu, so probably a 2012. I'll throw it up as the next chapter (only took an afternoon to build).
Exhaust - We're hoping to do the same as carnut - toss the car to Jason at enthuza (he's an hour away from us), have him weld us up some. For the moment, we've put a gigantic dimple in the drivers side stub that came with the engine (cats were plasma'd off, we cleaned it up with the band saw) that will just barely clear the steering shaft. Hopefully this'll allow us to drive the car up and off the trailer, verify our HPTuners, make sure the engine runs, etc, before we toss it to Enthuza.
A/C - not yet sorted. I was hoping to retain the stock hardlines, but they won't clear the alternator. I think I might have some busted up ones that I might try bending to see how malleable it is, but that's low priority for the moment. I also want to take another jaunt through the junkyard and see if there's something I can make work from another mazda.
Purge solenoid - currently disconnected. I don't see much purpose in running it without a charcoal canister.
Heater core reroute - I got this idea from the yellow submarine build -http://ls1tech.com/forums/conversions-hybrids/1349121-yellow-submarine-goes-nuclear-ls2-t56-miata.html - and it's different than the kit v8roadster sells. That said, I do have love for high quality components like thermoplastic clamps and vibrant silicon hoses. But we used 5/8ths-10AN aluminum pipe and bent it. It'll be a chapter once I finish up the cooling. Right now we've got an interference between the water pump inlet and the radiator, I'm ordering a LF3 water pump inlet tomorrow.
Hood - This might be a chapter of itself, plus I want to give measurements. We managed to snag 2 extra hoods from pull a part, but ended up pretty much nailing it on the first one. We took a HF vibrating cutting tool and trimmed as much plastic off the intake manifold as possible. Then air hammer with a leather bag full of shot, more hammers, custom hammers, english wheel and eventually..


But yeah, it clears, and is subtle but not garish. Not too bad for a $30 hood. And if need be, we can always build version 2.
Gas pedal - came with the engine and ecu, so probably a 2012. I'll throw it up as the next chapter (only took an afternoon to build).
Exhaust - We're hoping to do the same as carnut - toss the car to Jason at enthuza (he's an hour away from us), have him weld us up some. For the moment, we've put a gigantic dimple in the drivers side stub that came with the engine (cats were plasma'd off, we cleaned it up with the band saw) that will just barely clear the steering shaft. Hopefully this'll allow us to drive the car up and off the trailer, verify our HPTuners, make sure the engine runs, etc, before we toss it to Enthuza.
A/C - not yet sorted. I was hoping to retain the stock hardlines, but they won't clear the alternator. I think I might have some busted up ones that I might try bending to see how malleable it is, but that's low priority for the moment. I also want to take another jaunt through the junkyard and see if there's something I can make work from another mazda.
Purge solenoid - currently disconnected. I don't see much purpose in running it without a charcoal canister.
Heater core reroute - I got this idea from the yellow submarine build -http://ls1tech.com/forums/conversions-hybrids/1349121-yellow-submarine-goes-nuclear-ls2-t56-miata.html - and it's different than the kit v8roadster sells. That said, I do have love for high quality components like thermoplastic clamps and vibrant silicon hoses. But we used 5/8ths-10AN aluminum pipe and bent it. It'll be a chapter once I finish up the cooling. Right now we've got an interference between the water pump inlet and the radiator, I'm ordering a LF3 water pump inlet tomorrow.
Hood - This might be a chapter of itself, plus I want to give measurements. We managed to snag 2 extra hoods from pull a part, but ended up pretty much nailing it on the first one. We took a HF vibrating cutting tool and trimmed as much plastic off the intake manifold as possible. Then air hammer with a leather bag full of shot, more hammers, custom hammers, english wheel and eventually..
But yeah, it clears, and is subtle but not garish. Not too bad for a $30 hood. And if need be, we can always build version 2.
Reply
0
0
01-04-2016, 03:36 AM
#9
Senior Member
Thread Starter
Join Date: May 2007
Location: Atlanta
Posts: 997
Total Cats: 156
Pedals
The LFX (and LS3) are drive by wire. My friends have described these as kinda the ultimate killjoys for acceleration - put your foot on the floor and it starts rocketing off and then.. just.. stops.. because CAFE dictates that you can't have too much fun. We've picked up the Vitesse Throttle Controller to turn the loud pedal back up to 11. That's an easy install though.
A quick word on wiring - the majority of the harness is Delphi GT150 connectors. The connector for the drive by wire pedal is a six cavity female. They pretty much don't exist outside of drive by wire connectors - so one of these connectors cost $20 on ebay.
Local pick n pull has a few cars with 'em. $2 a pop.
Anyway - onto the pedal box modifications.
First - the pedals are pretty close in size.

So a quick cut with the die grinder and we have a new pedal cover. Cut a groove in the top plastic to fit the lip of the miata pedal, some JB Weld, and a drywall screw heated with a torch to melt the plastic of the DBW pedal.. and we've got a stock looking pedal.
Positioning the pedal was fairly straight forward. The pedal height (from the firewall) is almost the same as the stock, the hinge point is *very* close. Took the pedal out of the hinge, made a few cuts, clamped the bracket in the vice to unfold it..


From there we pulled a piece of scrap metal out of the pile, cut it to size, welded it to the unfolded pedal point, drilled some holes...
voila.

I ran a rennenmetal big pedal for years on my turbo car, so a gas pedal close to the brake for me.. I actually like for easy heel/toe. My dad decided to fill the holes and redrill them to angle the pedal closer to stock.
I do seem to recall there was a stud on the firewall that'll need to be ground down for the new pedal assembly to fit.
The wilwood master cylinder install.. I don't think I have any photos of this. We did grab the v8roadsters kit for this which includes a firewall adapter. The miata has studs at 2 and and 8 positions, whereas the wilwood is 12 and 6. The opening in the firewall needs to be opened up a little bit with the die grinder.
The clutch also has a very large switch that works as the starter interlock system - it's a 12ga wire that goes straight from the key to the clutch to the underhood fusebox and then to the starter solenoid. The stock clutch rod has a piece of bracketry that depresses the switch that the wilwood clutch doesn't have. Instead of trying to integrate the switch, we bypassed this switch alltogether by splicing the wires with a big ol butt connector. We also couldn't fit the rubber boot of the wilwood back through the firewall. Hopefully it doesn't leak.
quick sidenote: The LFX ECM uses a relay on the starter solenoid that's controlled by the ecm. I *think* (not positive) the camaro uses autostop at red lights. Either way - the starter is controlled by the ECM / body module. We're going to be bypassing this, connecting the miata's interlock system directly to the 14ga starter solenoid wire fused with a <todo.. look up fuse size..>.
The LFX (and LS3) are drive by wire. My friends have described these as kinda the ultimate killjoys for acceleration - put your foot on the floor and it starts rocketing off and then.. just.. stops.. because CAFE dictates that you can't have too much fun. We've picked up the Vitesse Throttle Controller to turn the loud pedal back up to 11. That's an easy install though.
A quick word on wiring - the majority of the harness is Delphi GT150 connectors. The connector for the drive by wire pedal is a six cavity female. They pretty much don't exist outside of drive by wire connectors - so one of these connectors cost $20 on ebay.
Local pick n pull has a few cars with 'em. $2 a pop.
Anyway - onto the pedal box modifications.
First - the pedals are pretty close in size.
So a quick cut with the die grinder and we have a new pedal cover. Cut a groove in the top plastic to fit the lip of the miata pedal, some JB Weld, and a drywall screw heated with a torch to melt the plastic of the DBW pedal.. and we've got a stock looking pedal.
Positioning the pedal was fairly straight forward. The pedal height (from the firewall) is almost the same as the stock, the hinge point is *very* close. Took the pedal out of the hinge, made a few cuts, clamped the bracket in the vice to unfold it..
From there we pulled a piece of scrap metal out of the pile, cut it to size, welded it to the unfolded pedal point, drilled some holes...
voila.
I ran a rennenmetal big pedal for years on my turbo car, so a gas pedal close to the brake for me.. I actually like for easy heel/toe. My dad decided to fill the holes and redrill them to angle the pedal closer to stock.
I do seem to recall there was a stud on the firewall that'll need to be ground down for the new pedal assembly to fit.
The wilwood master cylinder install.. I don't think I have any photos of this. We did grab the v8roadsters kit for this which includes a firewall adapter. The miata has studs at 2 and and 8 positions, whereas the wilwood is 12 and 6. The opening in the firewall needs to be opened up a little bit with the die grinder.
The clutch also has a very large switch that works as the starter interlock system - it's a 12ga wire that goes straight from the key to the clutch to the underhood fusebox and then to the starter solenoid. The stock clutch rod has a piece of bracketry that depresses the switch that the wilwood clutch doesn't have. Instead of trying to integrate the switch, we bypassed this switch alltogether by splicing the wires with a big ol butt connector. We also couldn't fit the rubber boot of the wilwood back through the firewall. Hopefully it doesn't leak.
quick sidenote: The LFX ECM uses a relay on the starter solenoid that's controlled by the ecm. I *think* (not positive) the camaro uses autostop at red lights. Either way - the starter is controlled by the ECM / body module. We're going to be bypassing this, connecting the miata's interlock system directly to the 14ga starter solenoid wire fused with a <todo.. look up fuse size..>.
Reply
1
1
01-04-2016, 04:57 AM
#10
Senior Member
Thread Starter
Join Date: May 2007
Location: Atlanta
Posts: 997
Total Cats: 156
Fuel system
Fuel system is identical to V8's. The corvette uses a combo fuel pressure regulator and fuel filter that raises the pressure up to 58psi (up from the miata's 43.5psi). This setup using the C5 vette's filter is so common, when I went to pick up AN fittings from Summit the salesman had all the part numbers saved in his notebook.
A bunch of the V8 guys run straight braided hose through the transmission tunnel. And a few of those guys complain about smelling gas after a few years. Well, we have harbor freight 3/8ths hose bender.. so AN6 hardline (almost) all the way.
First off - we upgraded the fuel pump from a 190lph walbro we used while it was supercharged to a 255lph from 949. There are two ways to adapt the fuel pump outputs on the tank - either a 5/16 compression fitting or a russell EFI fitting (RUS-644110). The EFI fittings are pretty cool, they slip over the hose barb. I didn't know about them, instead opting to cut off the barb and use the compression fitting.
One quick tip - cut off a piece of tubing and tape them to the opening of the fuel tank. This'll give you a visual reference of the angle the pipes need to meet at. Also helps to label the output and return line so you don't have to keep looking at the manual.

After that, mount the wix filter to the body. We bent the stock bracket on the filter to allow us to clock it so the lines wouldn't have to cross, and then rebent it to tighten it against the filter. With the lines bent, we put a AN6 cap over the output. This allowed us to run the fuel pump off a dewalt battery and put pressure on the system to check for leaks.

Routing the tubing, we decided the stock-ish routing would be best, since the frame rail protects the lines to a certain extent. Since we're getting rid of the PPF we need to be mindful of how we're going to route the battery cables as well. So I made some brackets that would hold the ground cable (we're upgrading it to 2ga) and tubing with insulated clamps. Just a piece of flat, drilled and tapped with M6x1.0 threaded rod, welded from the backside. These will hang off the frame rails. If I had to do it over again, I'd use slightly wider flat stock so I could put a 3rd stud in that will hold the brake line on the inside ahead of the frame rail bolt hole.

End result - very happy with this. Used a 1/4in insulated clamp in the side of the frame rail reinforcement for the brake line.

In the engine bay - cut a piece of aluminum stock and used a 45 degree AN6 bulkhead fitting to provide a final hardpoint for the fuel line.

From there - RUS-644120 3/8ths to AN6 EFI fitting on the LFX fuel rail and a nylon braided hose to allow for engine rocking.
Here's a pretty complete list of all the fittings used:

Fuel system is identical to V8's. The corvette uses a combo fuel pressure regulator and fuel filter that raises the pressure up to 58psi (up from the miata's 43.5psi). This setup using the C5 vette's filter is so common, when I went to pick up AN fittings from Summit the salesman had all the part numbers saved in his notebook.
A bunch of the V8 guys run straight braided hose through the transmission tunnel. And a few of those guys complain about smelling gas after a few years. Well, we have harbor freight 3/8ths hose bender.. so AN6 hardline (almost) all the way.
First off - we upgraded the fuel pump from a 190lph walbro we used while it was supercharged to a 255lph from 949. There are two ways to adapt the fuel pump outputs on the tank - either a 5/16 compression fitting or a russell EFI fitting (RUS-644110). The EFI fittings are pretty cool, they slip over the hose barb. I didn't know about them, instead opting to cut off the barb and use the compression fitting.
One quick tip - cut off a piece of tubing and tape them to the opening of the fuel tank. This'll give you a visual reference of the angle the pipes need to meet at. Also helps to label the output and return line so you don't have to keep looking at the manual.
After that, mount the wix filter to the body. We bent the stock bracket on the filter to allow us to clock it so the lines wouldn't have to cross, and then rebent it to tighten it against the filter. With the lines bent, we put a AN6 cap over the output. This allowed us to run the fuel pump off a dewalt battery and put pressure on the system to check for leaks.
Routing the tubing, we decided the stock-ish routing would be best, since the frame rail protects the lines to a certain extent. Since we're getting rid of the PPF we need to be mindful of how we're going to route the battery cables as well. So I made some brackets that would hold the ground cable (we're upgrading it to 2ga) and tubing with insulated clamps. Just a piece of flat, drilled and tapped with M6x1.0 threaded rod, welded from the backside. These will hang off the frame rails. If I had to do it over again, I'd use slightly wider flat stock so I could put a 3rd stud in that will hold the brake line on the inside ahead of the frame rail bolt hole.
End result - very happy with this. Used a 1/4in insulated clamp in the side of the frame rail reinforcement for the brake line.
In the engine bay - cut a piece of aluminum stock and used a 45 degree AN6 bulkhead fitting to provide a final hardpoint for the fuel line.
From there - RUS-644120 3/8ths to AN6 EFI fitting on the LFX fuel rail and a nylon braided hose to allow for engine rocking.
Here's a pretty complete list of all the fittings used:
Reply
4
4


 01-12-2016, 08:46 PM
#16
Senior Member
Thread Starter
Join Date: May 2007
Location: Atlanta
Posts: 997
Total Cats: 156
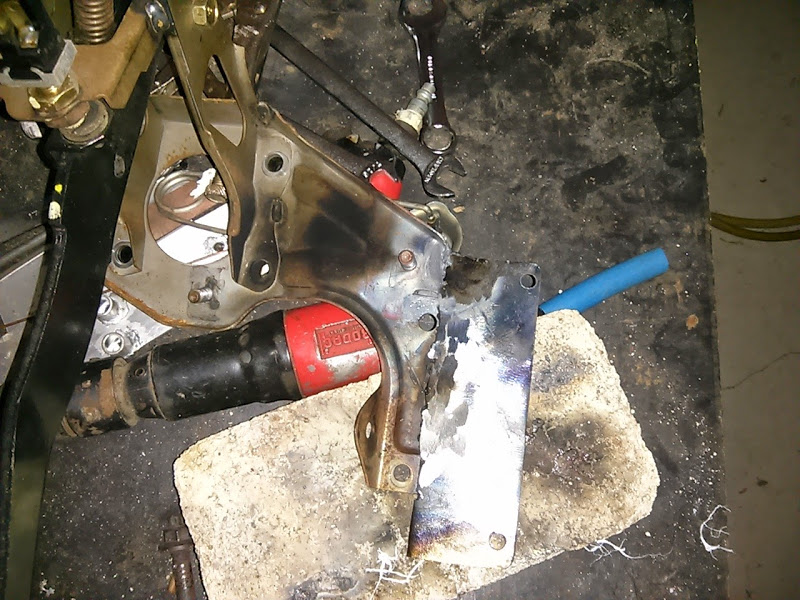
More like 3/4in to 1-1/4in. The driver side head sits further back than the passenger side (you know, because it's a V6).
https://www.miataturbo.net/attachmen...ine=1451816290
You can see a disconnected wiring connector at the bottom, you can either extend that to go around the outside of the head or bang enough clearance for it to fit. And in this photo before the pocket was created, the subframe bolts wouldn't line up (engine was tilted forward slightly).
We have our front subframe on a cart and can lower the body down - doing so, you'll need to position the subframe 1-2 inches in front of the subframe studs on the body in the wheelwell. Once the body is level with the subframe studs, the subframe will be pushed back into the pocket and lowered the rest of the way. It's a tight fit, but I think we only had to test fit it 2-3 times.
Reply
0
0
01-15-2016, 07:23 PM
#17
Newb
Join Date: Jan 2016
Posts: 21
Total Cats: 10
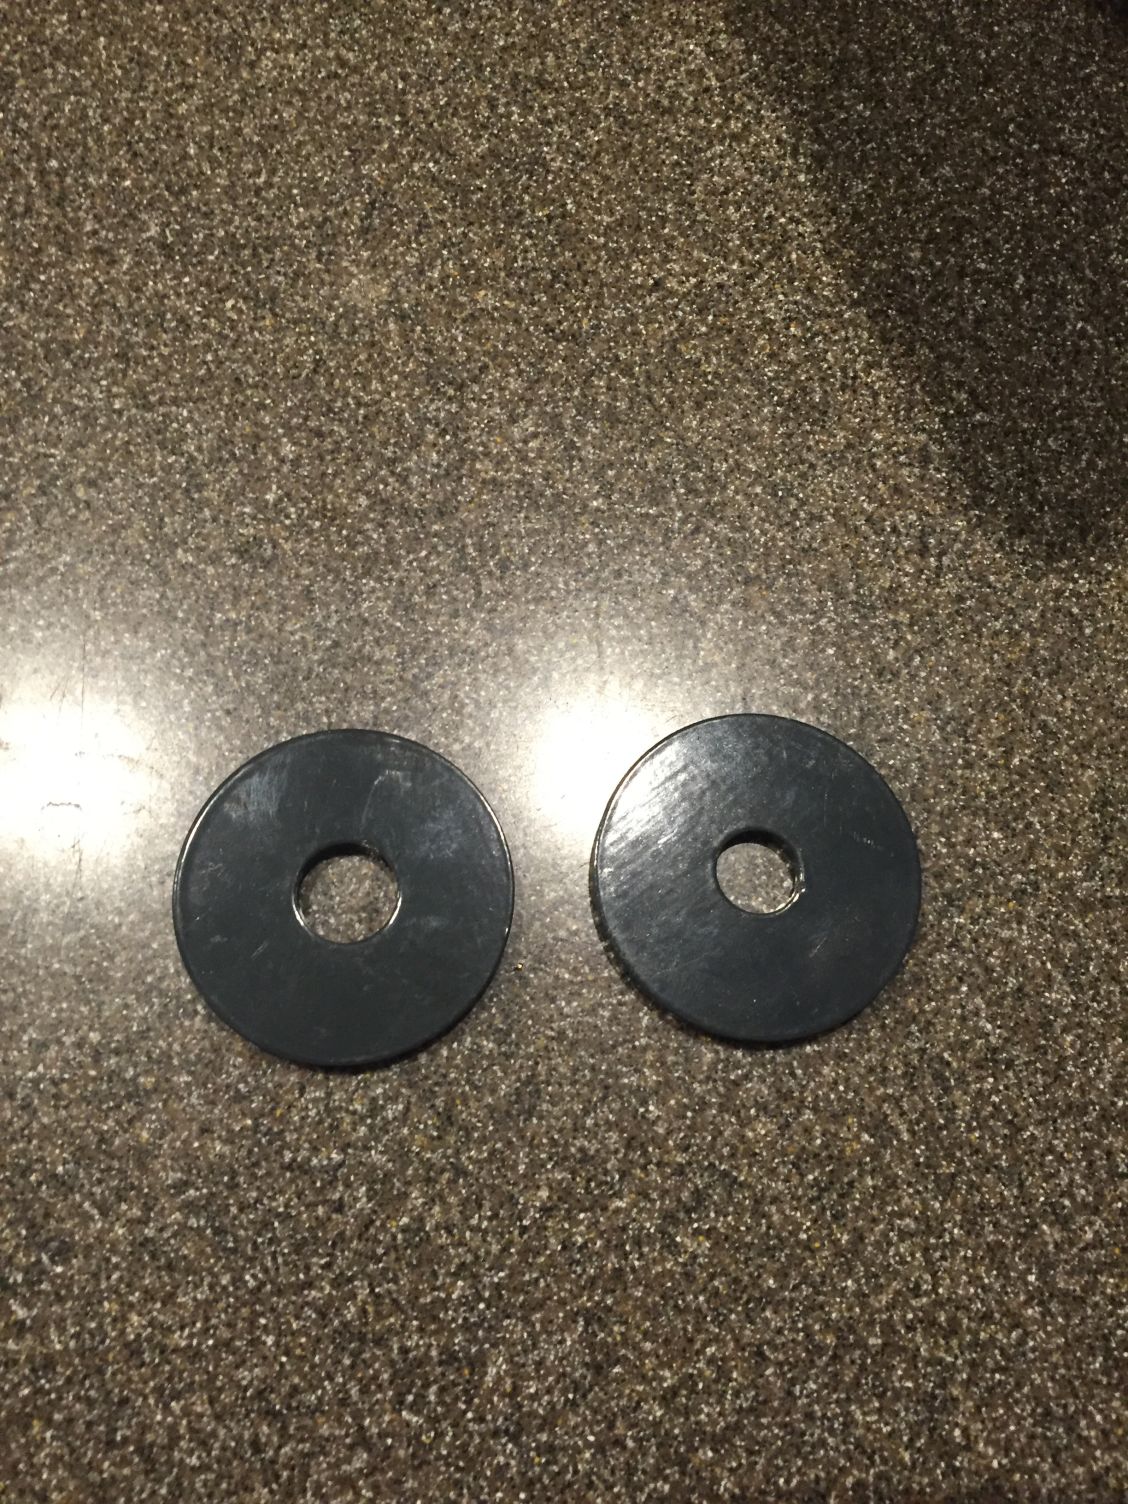
With work today, missed my opportunity to call V8r, and with no instructions...wondering where these two washers that they provided with the engine mounting kit go? Haven't seemed to need them yet when test fitting the engine, but haven't hung the front suspension yet either. With the holiday weekend, was hoping to put the drivetrain back in once and for all.
Thanks,
Thanks,
Reply
0
0


