SJP's "paint by numbers" build
 01-16-2013, 09:37 AM
#1
Junior Member
Thread Starter
iTrader: (7)

Join Date: Mar 2012
Location: Gilbert, Az
Posts: 356
Total Cats: 31
I figured it's about time I posted up my build/progress.
I started out wanting a super reliable car that's fun and wouldn't break the bank. Debated picking up a 2012 5.0 Mustang, but decided I really, really didn't want more car payments. Kicked around the idea of picking up a Miata instead, so I shopped around until I found this little guy:


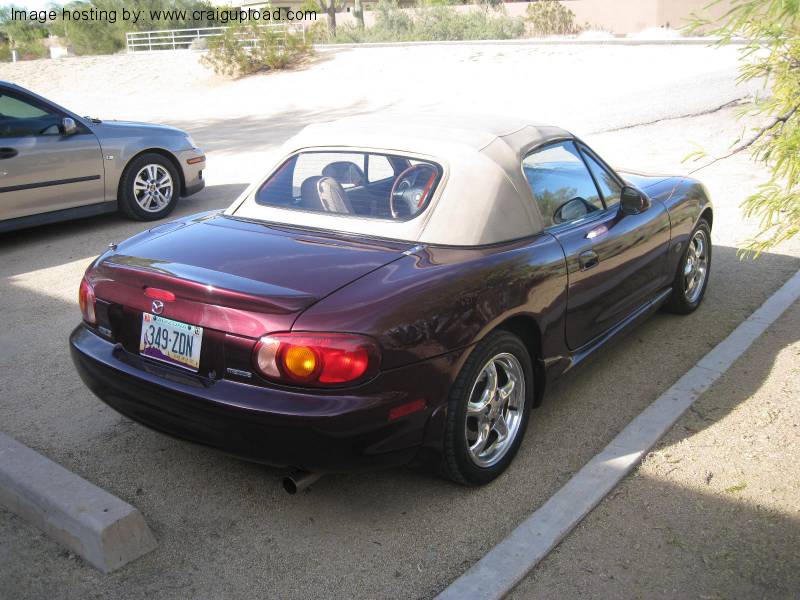
It was a fairly clean, 100% stock, just under 100k miles 2000-SE. That meant 6-speed transmission, LSD, 15" wheels (uber bling!), and lower compression (for the eventual turbo). My only minor quibble was the color, but I decided the benefits of the parts was worth the hazing I'd receive from the closet homos at work later.
After picking it up, it had just about every repair/correction necessary for a Miata with 100k miles owned by the average pedestrian owner, so I spent the first couple months doing boring stuff like changing shifter boots/hardware, changing fluids, replacing timing belt + associated seals/pump/whatever:

btw: that trick of holding the cams pictured here with the wrenches didn't work for me. Won't bother with it again.
I started out wanting a super reliable car that's fun and wouldn't break the bank. Debated picking up a 2012 5.0 Mustang, but decided I really, really didn't want more car payments. Kicked around the idea of picking up a Miata instead, so I shopped around until I found this little guy:
It was a fairly clean, 100% stock, just under 100k miles 2000-SE. That meant 6-speed transmission, LSD, 15" wheels (uber bling!), and lower compression (for the eventual turbo). My only minor quibble was the color, but I decided the benefits of the parts was worth the hazing I'd receive from the closet homos at work later.
After picking it up, it had just about every repair/correction necessary for a Miata with 100k miles owned by the average pedestrian owner, so I spent the first couple months doing boring stuff like changing shifter boots/hardware, changing fluids, replacing timing belt + associated seals/pump/whatever:
btw: that trick of holding the cams pictured here with the wrenches didn't work for me. Won't bother with it again.
Last edited by SJP0tato; 01-16-2013 at 09:20 PM.

Reply
 4
4

4
 01-16-2013, 09:48 AM
#3
Junior Member
Thread Starter
iTrader: (7)
Join Date: Mar 2012
Location: Gilbert, Az
Posts: 356
Total Cats: 31
My first "real" mod was the ECU. In the name of reliability I knew I didn't want any bandaids/garbage with multiple failure points, so I picked up one of Reverant's MS2v3 ecus that had been whored around here on MT for a few months (orignal owner went V8, next owner had a change of plans, etc).
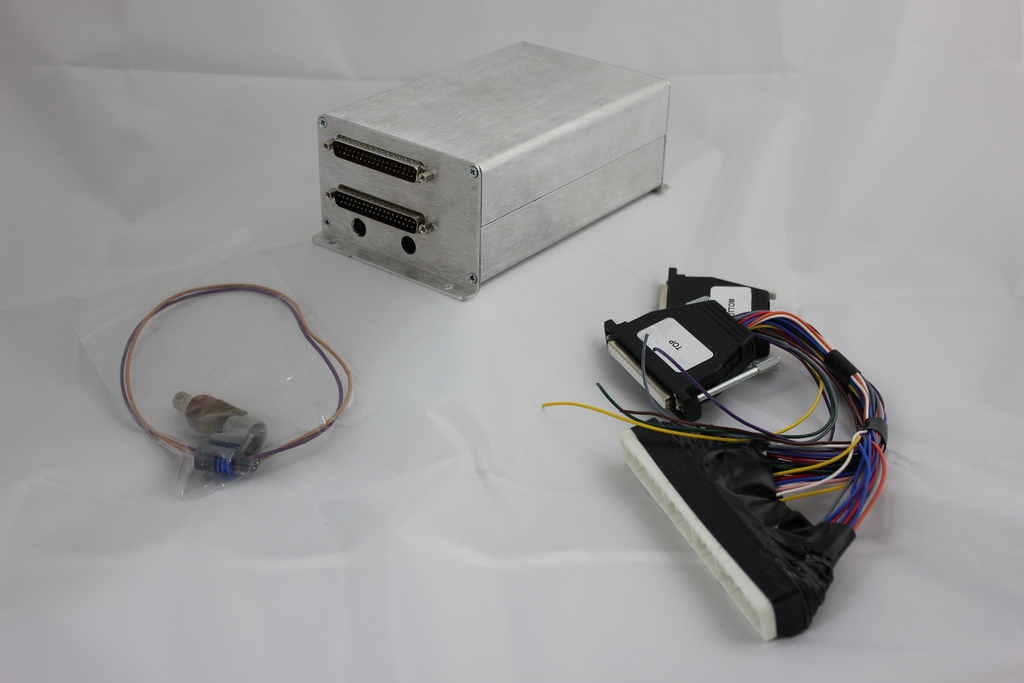
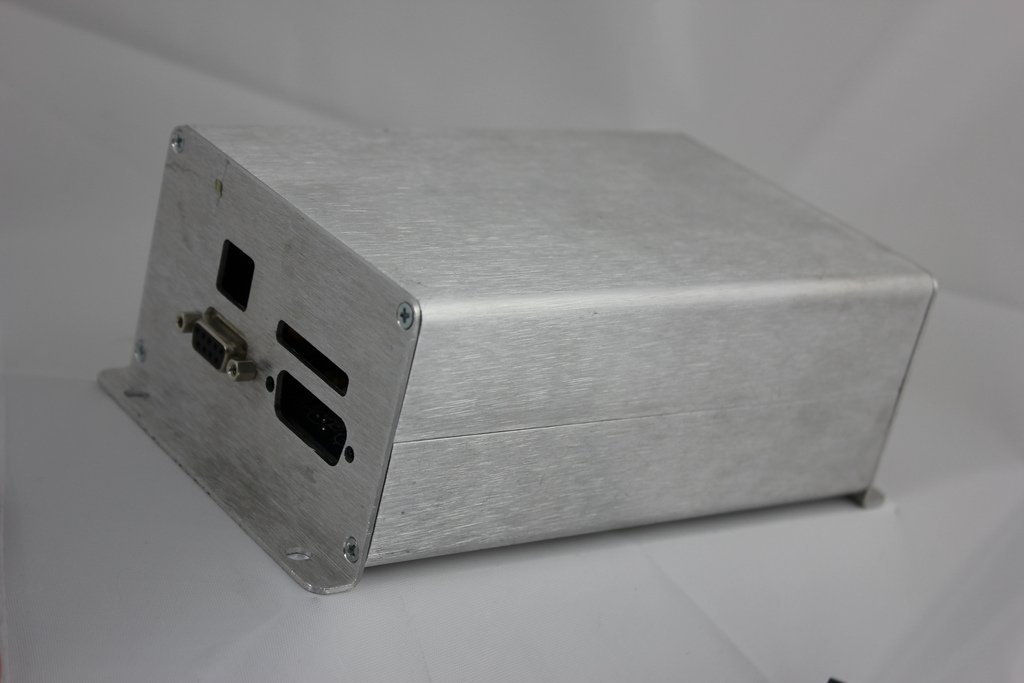
along with an Innovate MTX-L (seems like the latest/greatest from them, and free from the odd firmware quirk that the older unit comes with):

I spent the next few months driving around learning how all the various functions worked. With a little help from Dimitris getting the firmware updated to a more recent release, I was able to get things running pretty nicely on an otherwise still 100% stock Miata. My butt-dyno says I probably gained 10hp over stock just by auto-tuning the WOT areas.
along with an Innovate MTX-L (seems like the latest/greatest from them, and free from the odd firmware quirk that the older unit comes with):
I spent the next few months driving around learning how all the various functions worked. With a little help from Dimitris getting the firmware updated to a more recent release, I was able to get things running pretty nicely on an otherwise still 100% stock Miata. My butt-dyno says I probably gained 10hp over stock just by auto-tuning the WOT areas.
Reply
3
3
01-16-2013, 10:11 AM
#4
Junior Member
Thread Starter
iTrader: (7)
Join Date: Mar 2012
Location: Gilbert, Az
Posts: 356
Total Cats: 31
One mechanical problem the car came with was a light rasp at idle only when the clutch pedal was fully released. Stepping on the clutch made the noise go away, which pointed to the throw-out bearing.
Figuring I only had a few weeks/months until it catastrophically failed on the highway someplace 1000 miles from home (the best/only place that parts will fail on you) I ordered up a Flyin Miata stage-1 clutch kit.
True to my guess, a few weeks later as I rolled into work the light rasp turned into a horrible scrape/grind, so a lot of double clutching and "adventurous" driving I made it home to start tearing things down:


I think I see a problem...

Yep... that's no good. The bearings wanted to be emancipated from their life of labor and slavery. I decided to let them go... into the trash pile.

The old disc & flywheel looked pretty good. I'd guess they'd do at least another 50k if the bearing hadn't died:


While I was in there, I decided to rebuild the slave cylinder.


I got the stainless braided clutch line replacement from Flyin Miata.
Protip: Don't get the braided line replacement from FM, it's the shorter half-sized one that only replaces the rubber part of the line. That means you'll be stuck with the shitty curly part that blows chunks when trying to get the transmission re-installed later. Spend the extra $10 or whatever it is, and get the right/full sized one!
Pretty pretty, shiny shiny!!!
While I was in there I replaced the rear main seal, the couple seals in the transmission, re-goop'd up the transmission plate housing thing with RTV-gray (the 5 speed gets a gasket, 6-speed is the gasket making goop). Also loc-tite blue'd the bolts into the crank since they're open into the oil galley area there and will leak. Someone on m.net seemed to think the blue wasn't a good sealer, but it seems to be working for me.
Also installed this DEI heat shield stuff to cut down on the hot transmission tunnel crap: It seems to work fairly well, easily worth the $35 or whatever.


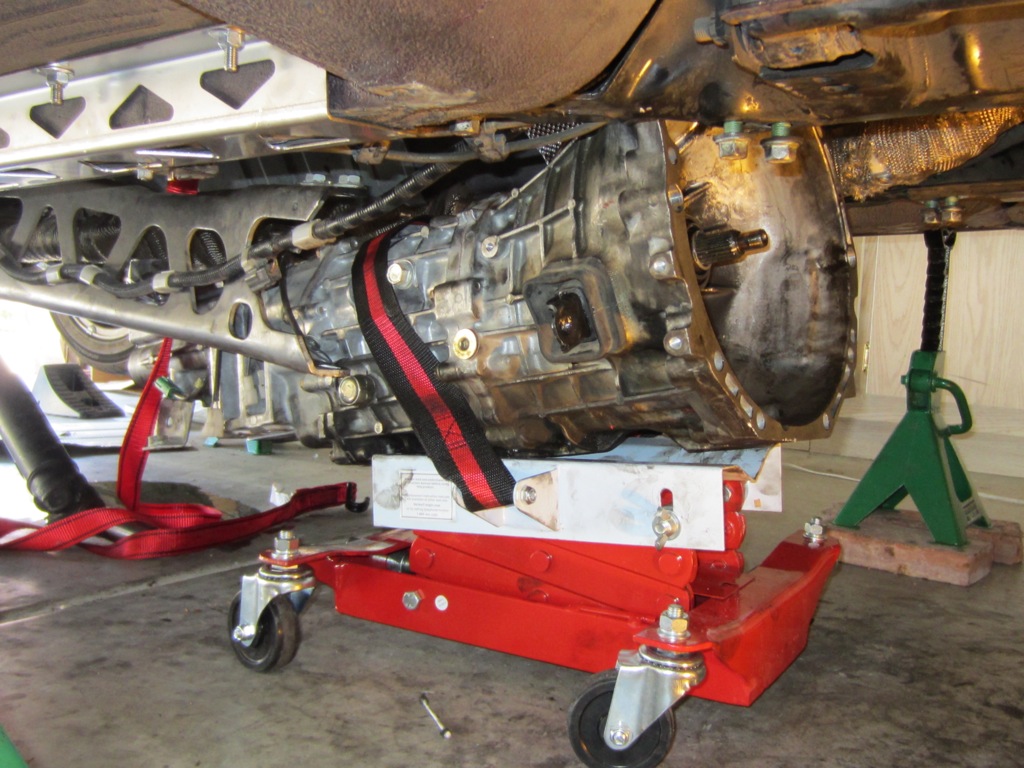
Since I was doing the job by myself in my garage, getting the transmission lined back up/re-installed was a huge PITA. I wound up running over to Harbor Freight to pick up one of these contraptions. It definitely helped, if I had to do it over again I would've had a buddy come over and lend a hand for a 12-pack though:
New clutch was/is solid. Actuation is same or even easier than stock (probably due to the longer throw that requires some adjusting of the pedal stops). I'd recommend this thing to anyone. I decided against the light flywheel mostly because "feels good man" wasn't worth the additional price premium, and this is pretty much a street car only anyways.
Figuring I only had a few weeks/months until it catastrophically failed on the highway someplace 1000 miles from home (the best/only place that parts will fail on you) I ordered up a Flyin Miata stage-1 clutch kit.
True to my guess, a few weeks later as I rolled into work the light rasp turned into a horrible scrape/grind, so a lot of double clutching and "adventurous" driving I made it home to start tearing things down:
I think I see a problem...
Yep... that's no good. The bearings wanted to be emancipated from their life of labor and slavery. I decided to let them go... into the trash pile.
The old disc & flywheel looked pretty good. I'd guess they'd do at least another 50k if the bearing hadn't died:
While I was in there, I decided to rebuild the slave cylinder.
I got the stainless braided clutch line replacement from Flyin Miata.
Protip: Don't get the braided line replacement from FM, it's the shorter half-sized one that only replaces the rubber part of the line. That means you'll be stuck with the shitty curly part that blows chunks when trying to get the transmission re-installed later. Spend the extra $10 or whatever it is, and get the right/full sized one!
Pretty pretty, shiny shiny!!!
While I was in there I replaced the rear main seal, the couple seals in the transmission, re-goop'd up the transmission plate housing thing with RTV-gray (the 5 speed gets a gasket, 6-speed is the gasket making goop). Also loc-tite blue'd the bolts into the crank since they're open into the oil galley area there and will leak. Someone on m.net seemed to think the blue wasn't a good sealer, but it seems to be working for me.
Also installed this DEI heat shield stuff to cut down on the hot transmission tunnel crap: It seems to work fairly well, easily worth the $35 or whatever.
Since I was doing the job by myself in my garage, getting the transmission lined back up/re-installed was a huge PITA. I wound up running over to Harbor Freight to pick up one of these contraptions. It definitely helped, if I had to do it over again I would've had a buddy come over and lend a hand for a 12-pack though:
New clutch was/is solid. Actuation is same or even easier than stock (probably due to the longer throw that requires some adjusting of the pedal stops). I'd recommend this thing to anyone. I decided against the light flywheel mostly because "feels good man" wasn't worth the additional price premium, and this is pretty much a street car only anyways.
Last edited by SJP0tato; 01-16-2013 at 09:28 PM.
Reply
3
3
01-16-2013, 01:28 PM
#5
Junior Member
Thread Starter
iTrader: (7)
Join Date: Mar 2012
Location: Gilbert, Az
Posts: 356
Total Cats: 31
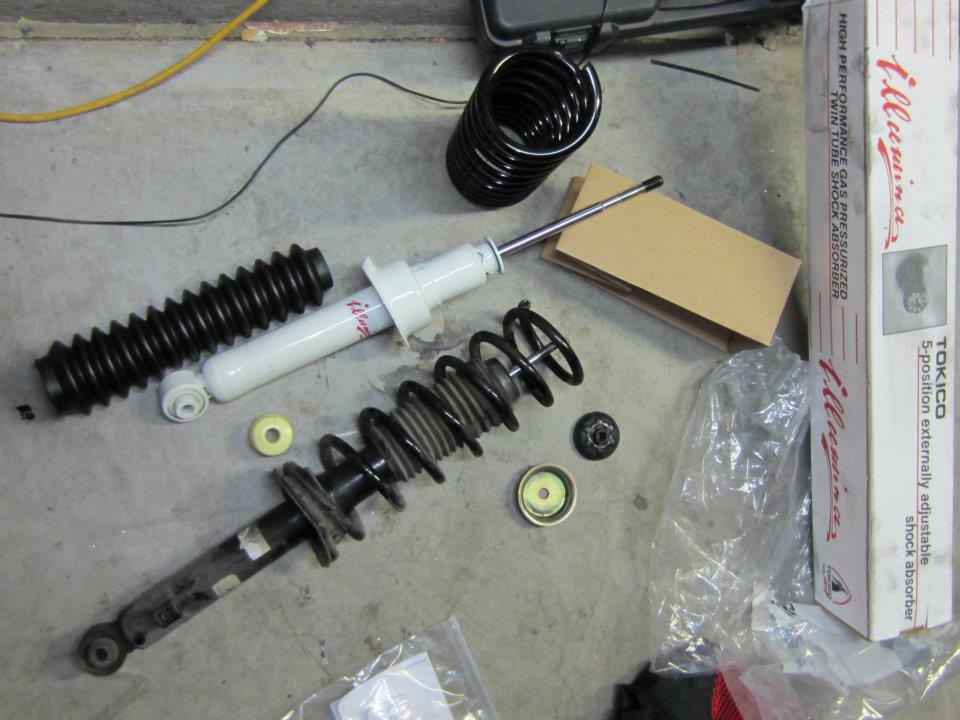
Next I had to address the suspension issue:
I decided on the Flyin Miata stage-1 and their frame rails, along with the Fat Cat 36F/46R bumpstops.


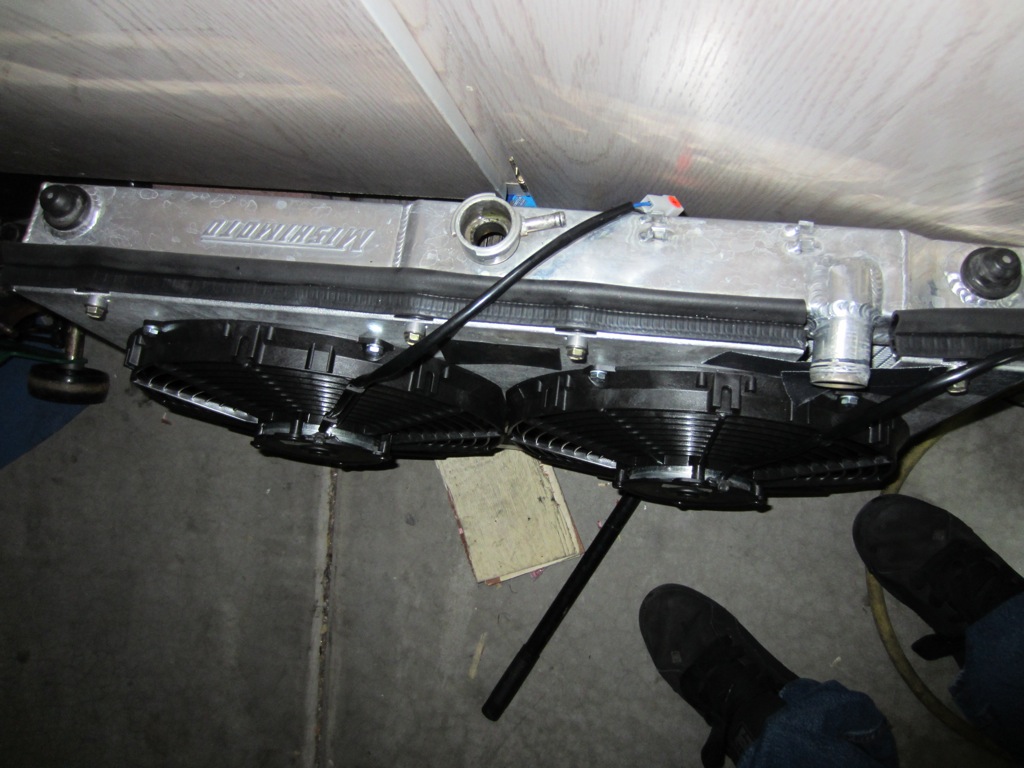
The stock cooling was having trouble keeping up with 112+ degree days with A/C running (coolant temps of 240+ were routine on the freeway), so I upgraded the radiator:


This was just barely enough to keep it from overheating on the freeway, but proper ducting was necessary as well. I decided to just be okay with 215-220 degree coolant temps the last couple months of summer, and would address the ducting once the turbo was installed.
I decided on the Flyin Miata stage-1 and their frame rails, along with the Fat Cat 36F/46R bumpstops.
The stock cooling was having trouble keeping up with 112+ degree days with A/C running (coolant temps of 240+ were routine on the freeway), so I upgraded the radiator:
This was just barely enough to keep it from overheating on the freeway, but proper ducting was necessary as well. I decided to just be okay with 215-220 degree coolant temps the last couple months of summer, and would address the ducting once the turbo was installed.
Reply
2
2
01-16-2013, 02:15 PM
#6
Boost Pope


iTrader: (8)
Join Date: Sep 2005
Location: Chicago. (The less-murder part.)
Posts: 33,015
Total Cats: 6,587
Hi, I'm a new Miata owner. I recently picked up my first MX-5. Rather than screwing everything up and then whining about it, I have obviously done some research and am presently in the process of fixing everything up the right way, the first time. I actually know how to use my digital camera, and take the time to compose clear, reasonably-sized images which are well lit and in focus, even at very short distances. I also have an excellent grasp of the English language, and am capable of posting on the web in complete sentences, using proper grammar and punctuation.
Looks like you're making excellent progress with the car. With regards to the cooling system and the overheating issue, join the club. The larger radiator is a good start, but given where you live, I would highly advise you to consider performing what's known as a coolant re-route.
The short version is that when Mazda converted the B-series engine from FWD to RWD they royally screwed up the routing of the cooling system. The real solution is to re-orient things such that it matches the original (FWD) configuration, with the thermostat and radiator feed at the back of the head. Doing this will not only reduce overall operating temperature, but also improve the distribution of temperature front-to-back across the engine.
You can buy a complete kit of parts to do this from a couple of places, such as Bell: BEGI Miata Turbo Rear thermostat coolant re-route BEGi
Reply
1
1
01-16-2013, 02:56 PM
#7
Junior Member
Thread Starter
iTrader: (7)
Join Date: Mar 2012
Location: Gilbert, Az
Posts: 356
Total Cats: 31
Thanks Joe,
I've been considering the coolant re-route. Not sure what my initial aversion to it is, I'm going to monitor temps with the turbo install during the summer and if they start creeping up as the weather warms I'll definitely be implementing it.
I've been considering the coolant re-route. Not sure what my initial aversion to it is, I'm going to monitor temps with the turbo install during the summer and if they start creeping up as the weather warms I'll definitely be implementing it.
Reply
0
0
01-16-2013, 03:20 PM
#8
Junior Member
Thread Starter
iTrader: (7)
Join Date: Mar 2012
Location: Gilbert, Az
Posts: 356
Total Cats: 31
After all the prep work over the months, I started to seriously debate what route to take with the turbo kit. Did I want to piece one together myself, or buy something pre-made (or some combination of both)?
I'm not completely new to the process of piecing together my own kit, years ago I put one together for my Honda Crx.
I decided I really wanted the reliability and convenience of not having to find that misc bolt/clamp at 2am, or figuring out just how to make certain components work together without melting/breaking/haflassing, so I went ahead with the Flyin Miata no-electronics kit.
A few extras I decided to go with in the name of reliability were their cooling fan upgrade, hard oil/water line kit, 3" downpipe/exhaust, and inconel/stage-8 stud hardware (along with a new plastic under-tray since my old one was beat to hell & back and a bit warped as well).
I placed the order, and after 4-5 weeks literally the morning FM called to say "Hey it's ready and on its way" a lady decided she wanted to turn left infront of me and occupy the same space as my car:
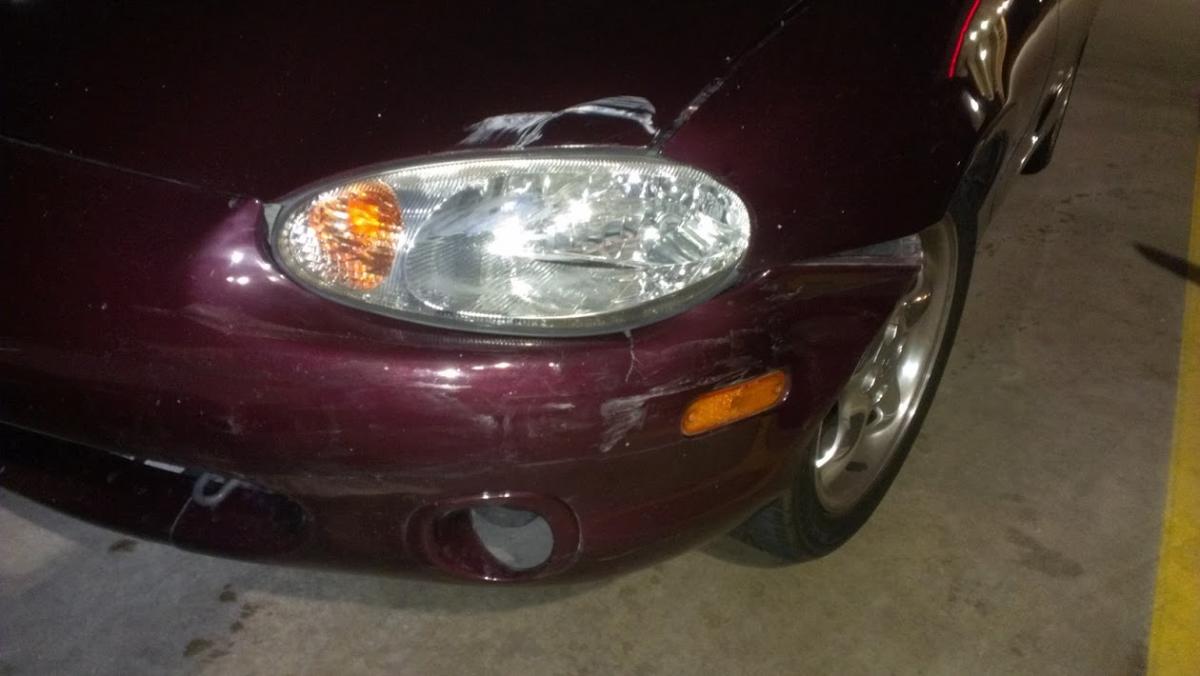
So.... after a 2 week delay for repairs, I got her back better than new:

AND the parts arrived (pictured on the right is my other daily driver, 2007 Mazdaspeed 6):


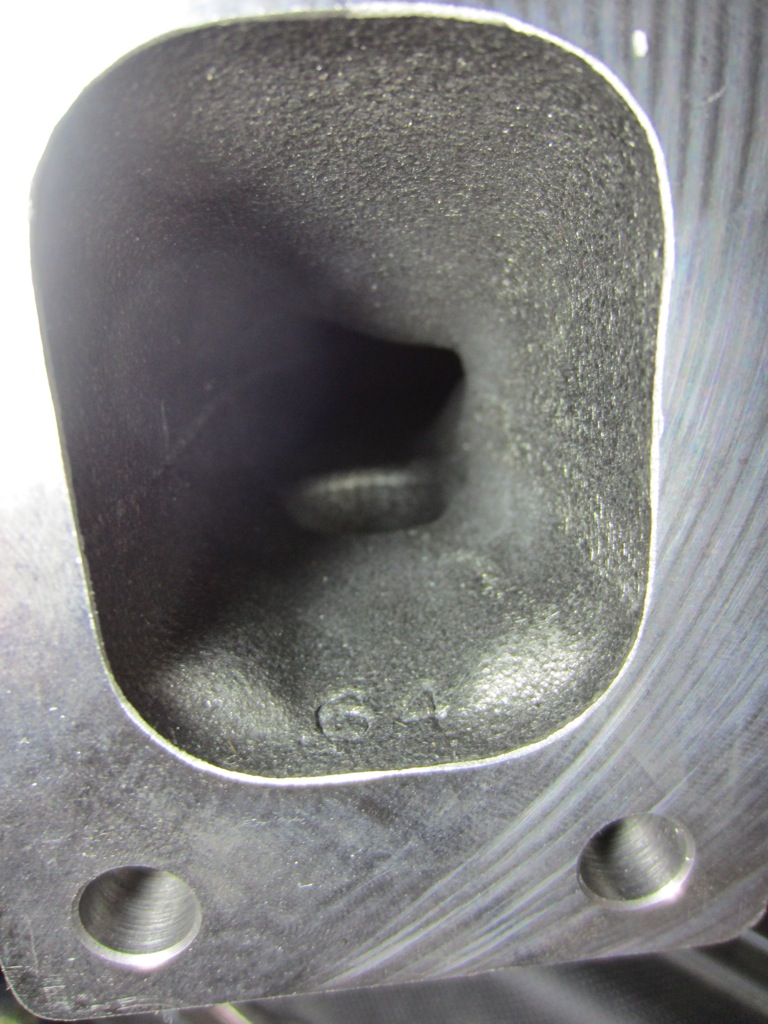
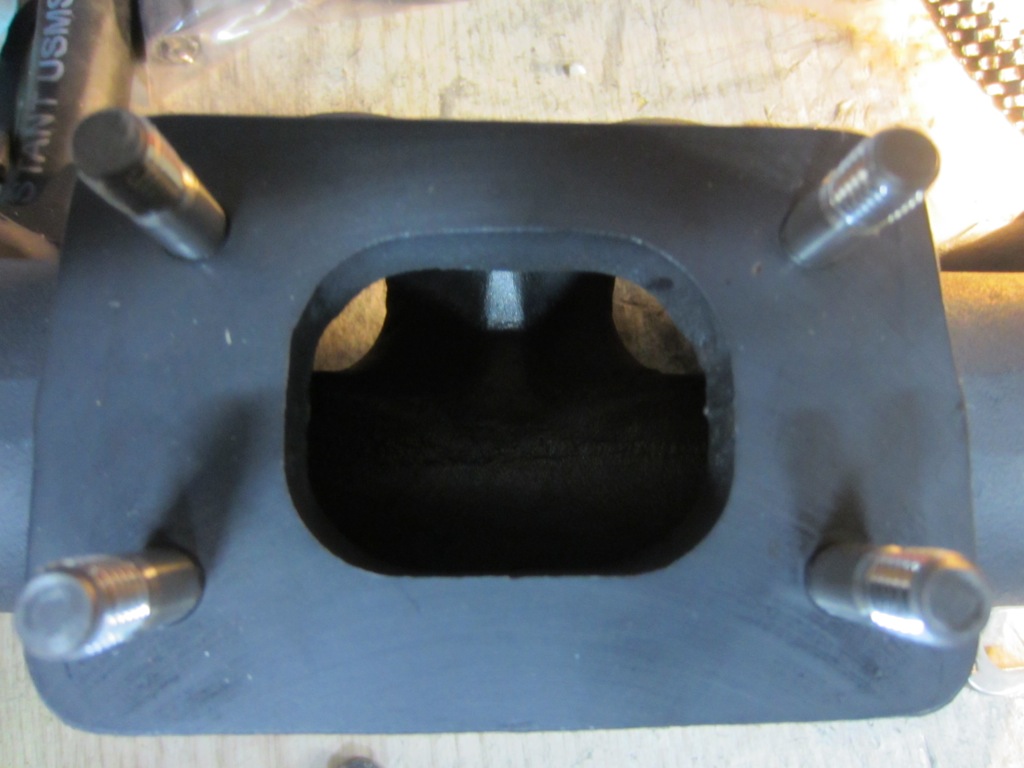
After much research, I realized the stock internal wastegate was going to have a hell of a time keeping up with the 3" downpipe/exhaust, so I decided to give it as much help as I could with a carbide bit:
Stock:
Maybe half done:

And the finished product:

In the end I probably ported it just a hair too deeply at the "bottom", which works out to be the inside edge of the wastegate flapper. It still sealed 100%, but was/is dangerously close to having enough material removed to cause the flapper to "jam" against the seating edge. I tried about 1000 variations of directions/speeds/orientations on closing the flapper valve before installing and never once could get it to bind up, so I hoped it would work okay.
I'm not completely new to the process of piecing together my own kit, years ago I put one together for my Honda Crx.
I decided I really wanted the reliability and convenience of not having to find that misc bolt/clamp at 2am, or figuring out just how to make certain components work together without melting/breaking/haflassing, so I went ahead with the Flyin Miata no-electronics kit.
A few extras I decided to go with in the name of reliability were their cooling fan upgrade, hard oil/water line kit, 3" downpipe/exhaust, and inconel/stage-8 stud hardware (along with a new plastic under-tray since my old one was beat to hell & back and a bit warped as well).
I placed the order, and after 4-5 weeks literally the morning FM called to say "Hey it's ready and on its way" a lady decided she wanted to turn left infront of me and occupy the same space as my car:
So.... after a 2 week delay for repairs, I got her back better than new:
AND the parts arrived (pictured on the right is my other daily driver, 2007 Mazdaspeed 6):
After much research, I realized the stock internal wastegate was going to have a hell of a time keeping up with the 3" downpipe/exhaust, so I decided to give it as much help as I could with a carbide bit:
Stock:
Maybe half done:
And the finished product:
In the end I probably ported it just a hair too deeply at the "bottom", which works out to be the inside edge of the wastegate flapper. It still sealed 100%, but was/is dangerously close to having enough material removed to cause the flapper to "jam" against the seating edge. I tried about 1000 variations of directions/speeds/orientations on closing the flapper valve before installing and never once could get it to bind up, so I hoped it would work okay.
Reply
0
0


 01-16-2013, 04:08 PM
#13
Junior Member
Thread Starter
iTrader: (7)
Join Date: Mar 2012
Location: Gilbert, Az
Posts: 356
Total Cats: 31
Thanks guys. I called it "paint by numbers" since there's really nothing revolutionary whatsoever in my implementation. My goal was a fun car that I didn't get carried away in a quest for "allofit/more horsepower". Just years of fun blasting around to/from work.
Brain: I'd say 90% of my information was collected from people who post with experience here, mt.net is a pretty amazing resource of helpful people. I do my best to contribute what I can where I'm able, with only occasional jackassery.
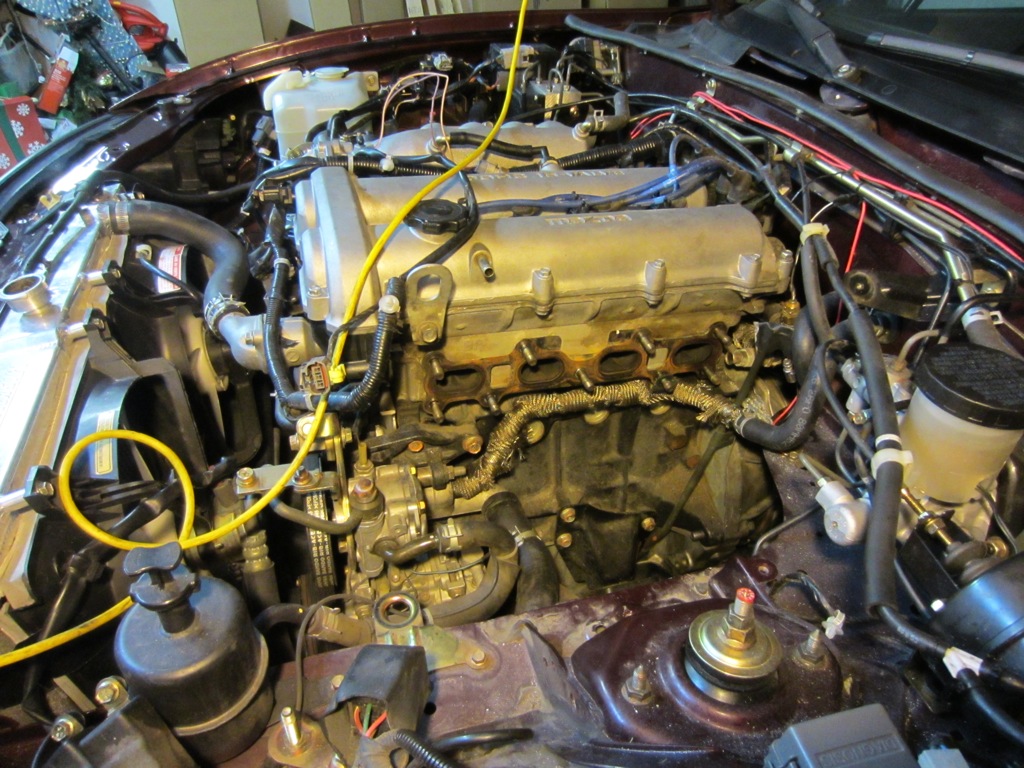
Here's the last pic of my stock engine bay before beginning surgery:

Tearing into it a bit more:
Now that the radiator was out, I decided to install the FM fans/shroud:
Stock:


It actually took a bit more hacking/fitment than I originally expected, but overall wasn't too terrible. I'm sure most of the hackery was due to the Mishimoto being a mass produced slab of aluminum. All in all it's nice to get a little bit of space back, and have higher fan output as well.
Since I was in there, I decided to replace the motor mounts with the Mazdaspeed units from Rosenthal Mazda. I debated on the durometer to use, but since it's a street car I decided against the Comps. From digging around for info, the order from softest to hardest durometer goes: stock -> mazdaspeed -> competition -> poly/misc -> suicide
Stock looks like garbage, although I guess not too bad after 100k miles:

Whoops... this is one-handed very little effort, which means the mount is 100% worthless vs any kind of lifting torque (which it is subject to):

Yeah that looks better, here's a leftover pic from when I took some measurements for another mt.net member:

Brain: I'd say 90% of my information was collected from people who post with experience here, mt.net is a pretty amazing resource of helpful people. I do my best to contribute what I can where I'm able, with only occasional jackassery.
Here's the last pic of my stock engine bay before beginning surgery:
Tearing into it a bit more:
Now that the radiator was out, I decided to install the FM fans/shroud:
Stock:
It actually took a bit more hacking/fitment than I originally expected, but overall wasn't too terrible. I'm sure most of the hackery was due to the Mishimoto being a mass produced slab of aluminum. All in all it's nice to get a little bit of space back, and have higher fan output as well.
Since I was in there, I decided to replace the motor mounts with the Mazdaspeed units from Rosenthal Mazda. I debated on the durometer to use, but since it's a street car I decided against the Comps. From digging around for info, the order from softest to hardest durometer goes: stock -> mazdaspeed -> competition -> poly/misc -> suicide
Stock looks like garbage, although I guess not too bad after 100k miles:
Whoops... this is one-handed very little effort, which means the mount is 100% worthless vs any kind of lifting torque (which it is subject to):
Yeah that looks better, here's a leftover pic from when I took some measurements for another mt.net member:
Last edited by SJP0tato; 01-17-2013 at 05:13 PM.
Reply
1
1

 01-16-2013, 06:01 PM
#16
Junior Member
Thread Starter
iTrader: (7)
Join Date: Mar 2012
Location: Gilbert, Az
Posts: 356
Total Cats: 31
I went with the Glowshift oil filter sandwich to hang the sender for my oil pressure gauge and feed the turbo (20mm 1.5 thread: http://www.amazon.com/GlowShift-Filt.../dp/B007SXGAZQ). Just make sure to use teflon paste and not tape to seal the pipe threads:

Here's the FM manifold + inconel studs before re-assembling after porting the wastegate:
Next I tackled drilling the oil pan. FM is kind enough to include a drill bit + tap with the kit, but the bit requires a 1/2" chuck which my 3/8" couldn't handle. So it was off to Harbor Freight coupon in hand to pick up the most "decent" 1/2" drill they had.
You can see some of the q-tips I used slathered in grease to collect as many shavings as possible from the inside of the pan (It took around 6-7 of them before they started coming back clean). I'd just bend them 90-degrees, and try my best to carefully swirl them around inside the pan edge doing my best to keep them from catching on any metal edges that might leave cotton threads behind:

FM recommends loosely installing the hard-line before drilling to determine where exactly the drain should wind up, which I did. Looks like I guesstimated pretty well:

Here it is with the barb installed, slathered in JB-Weld:
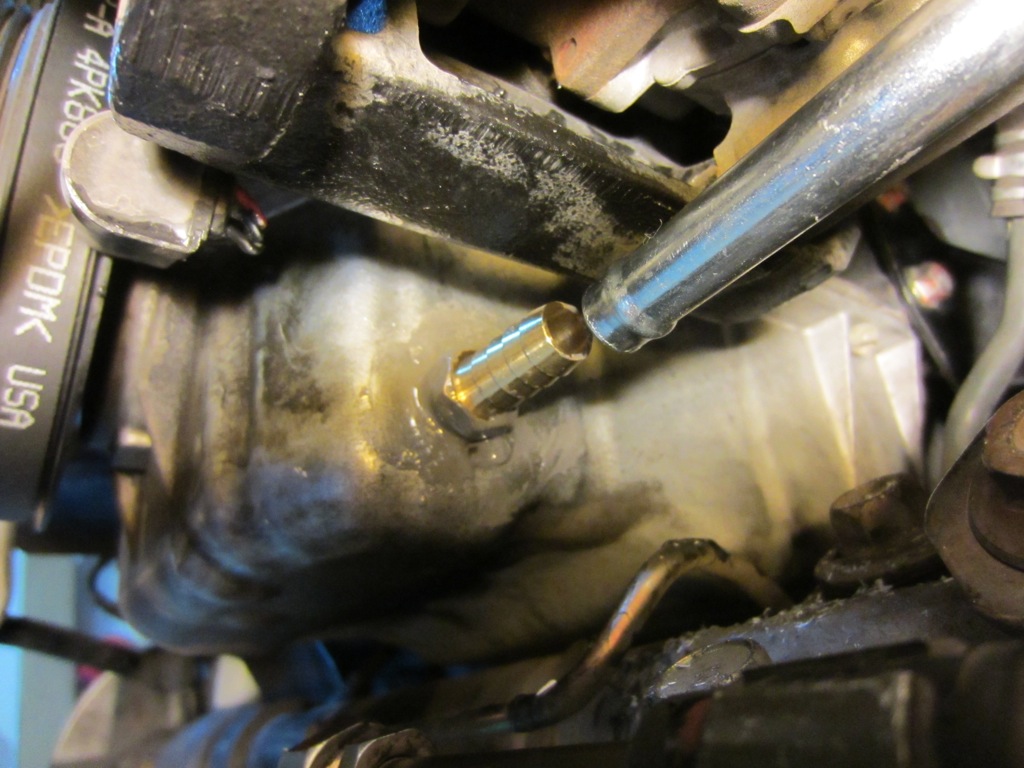

Here it is all finished up, since it's just that little portion hopefully it'll be able to go years (or probably until I need to remove it) before it has any issues:

Here's the FM manifold + inconel studs before re-assembling after porting the wastegate:
Next I tackled drilling the oil pan. FM is kind enough to include a drill bit + tap with the kit, but the bit requires a 1/2" chuck which my 3/8" couldn't handle. So it was off to Harbor Freight coupon in hand to pick up the most "decent" 1/2" drill they had.
You can see some of the q-tips I used slathered in grease to collect as many shavings as possible from the inside of the pan (It took around 6-7 of them before they started coming back clean). I'd just bend them 90-degrees, and try my best to carefully swirl them around inside the pan edge doing my best to keep them from catching on any metal edges that might leave cotton threads behind:
FM recommends loosely installing the hard-line before drilling to determine where exactly the drain should wind up, which I did. Looks like I guesstimated pretty well:
Here it is with the barb installed, slathered in JB-Weld:
Here it is all finished up, since it's just that little portion hopefully it'll be able to go years (or probably until I need to remove it) before it has any issues:
Reply
1
1
01-16-2013, 06:36 PM
#17
Junior Member
Thread Starter
iTrader: (7)
Join Date: Mar 2012
Location: Gilbert, Az
Posts: 356
Total Cats: 31
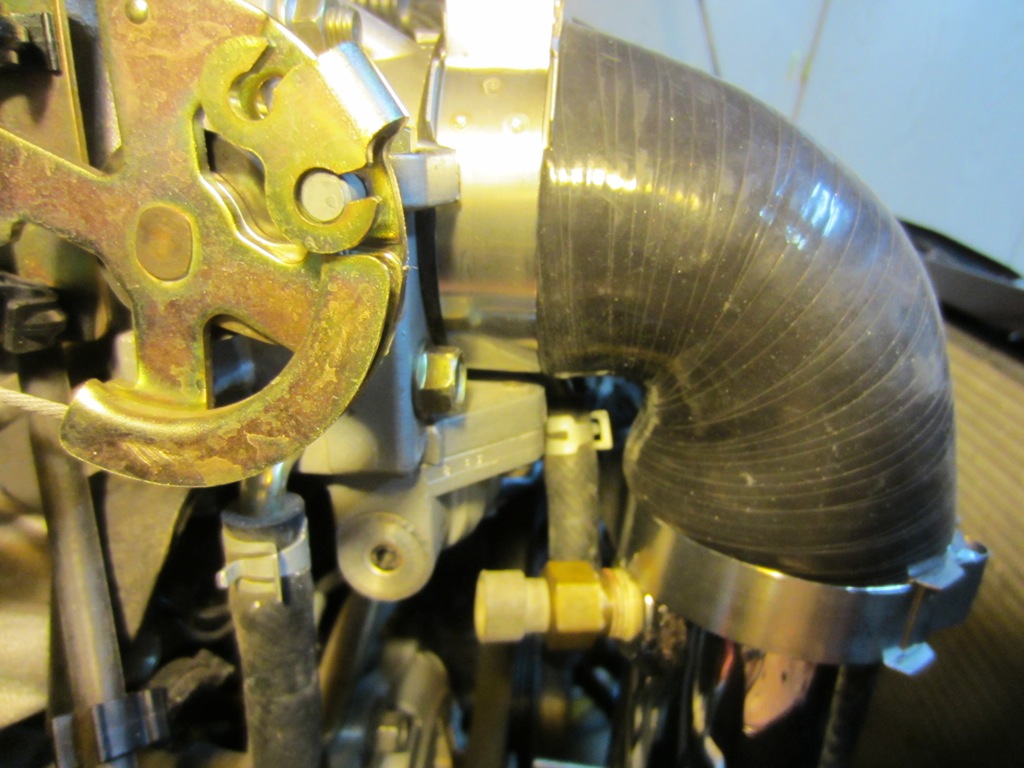
Next up I installed the water hardlines. When they come it's not at all intuitive which way they go, it's like working with a plate of rigid spaghetti. After working back from the turbo it starts to make sense how they both fit in there afterall though:


Here's how I routed my oil feed line. Wrapped it in hose so it wouldn't wear through anything, and tried to give it as gentle a bend as possible so it wouldn't kink while keeping it as far from the exhaust housing as possible:


Next up was the intercooler:


The fitment worked out very well. This is the part I was nervous about upfront since I wanted to keep my A/C. It fits in there just about perfectly though, no trouble whatsoever:

It turned out FM sent the wrong elbow with the kit (though I didn't know it at the time). It's difficult to tell from this angle, but it's fairly equal on either side; the proper elbow has one end about 1.5" longer than the other, which should hang down:
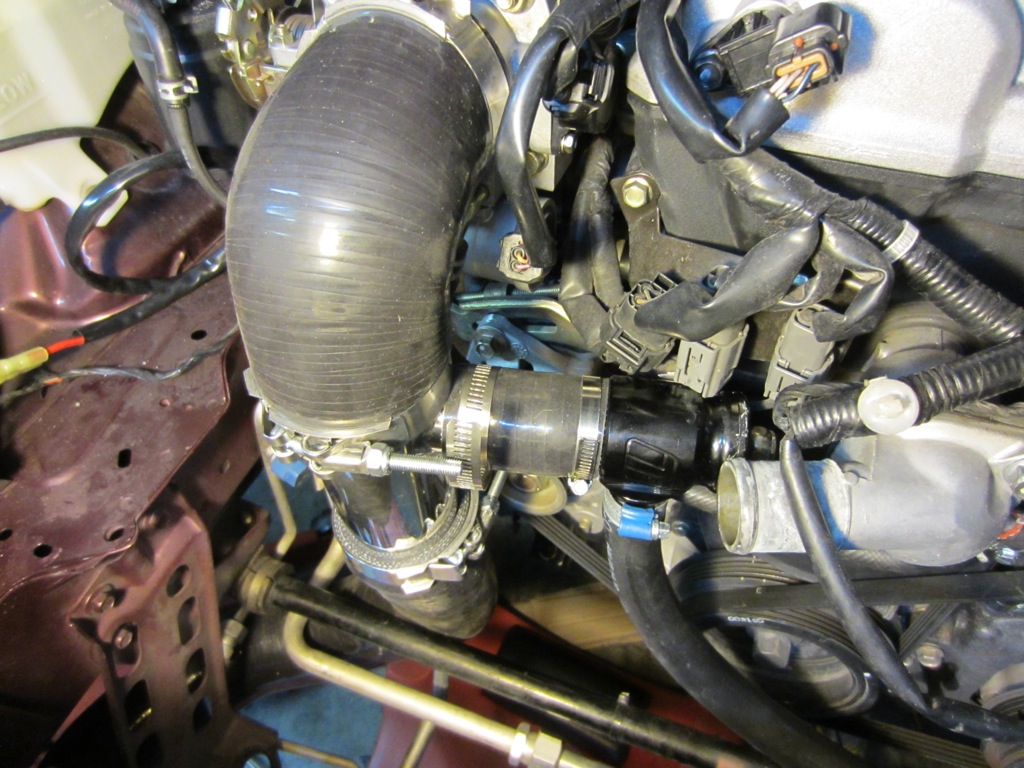
This caused the charge piping to require a lot of effort to reach up high enough to make a solid connection, and also raises up the lower half by about an inch or so, which made for a tight fitment

From this angle, you can tell from the bulge that something doesn't seem quite right:
I started this portion of the install over the week FM is out of their office between xmas and New Years, so I just ran it until I was able to call them and get things straightened out. Being FM they handled it nicely, and took very good care of getting the right part out to me asap.
After working back from the turbo it starts to make sense how they both fit in there afterall though:Here's how I routed my oil feed line. Wrapped it in hose so it wouldn't wear through anything, and tried to give it as gentle a bend as possible so it wouldn't kink while keeping it as far from the exhaust housing as possible:
Next up was the intercooler:
The fitment worked out very well. This is the part I was nervous about upfront since I wanted to keep my A/C. It fits in there just about perfectly though, no trouble whatsoever:
It turned out FM sent the wrong elbow with the kit (though I didn't know it at the time). It's difficult to tell from this angle, but it's fairly equal on either side; the proper elbow has one end about 1.5" longer than the other, which should hang down:
This caused the charge piping to require a lot of effort to reach up high enough to make a solid connection, and also raises up the lower half by about an inch or so, which made for a tight fitment
From this angle, you can tell from the bulge that something doesn't seem quite right:
I started this portion of the install over the week FM is out of their office between xmas and New Years, so I just ran it until I was able to call them and get things straightened out. Being FM they handled it nicely, and took very good care of getting the right part out to me asap.
Reply
0
0
01-16-2013, 06:55 PM
#18
Junior Member
Thread Starter
iTrader: (7)
Join Date: Mar 2012
Location: Gilbert, Az
Posts: 356
Total Cats: 31
Got the air filter box installed, including this is a nice touch from FM. It gives things a more professional look, and maybe helps keep temps down slightly. I had to do a little bending on the right side to make it fit, but otherwise it was pretty drama free:

I decided to play with building up an insulation barrier between the splash shield and the bottom of the radiator. I added these layers to the splash shield and added a layer of pipe insulation to the bottom of the radiator itself (the big foam type that wrap copper pipes from Home Depot Racing):

After install it was still about 1/2" short of sealing with the radiator+pipe insulation, I'll correct it eventually. I'm sure it must help at least somewhat now though.
Adding coolant back in I went for ~25% antifreeze/75% water ratio. The record cold temps in this area have been occurring over the past week or so, and are at worst within 5 degrees of freezing.

A few pics of the FM 3" vs stock:

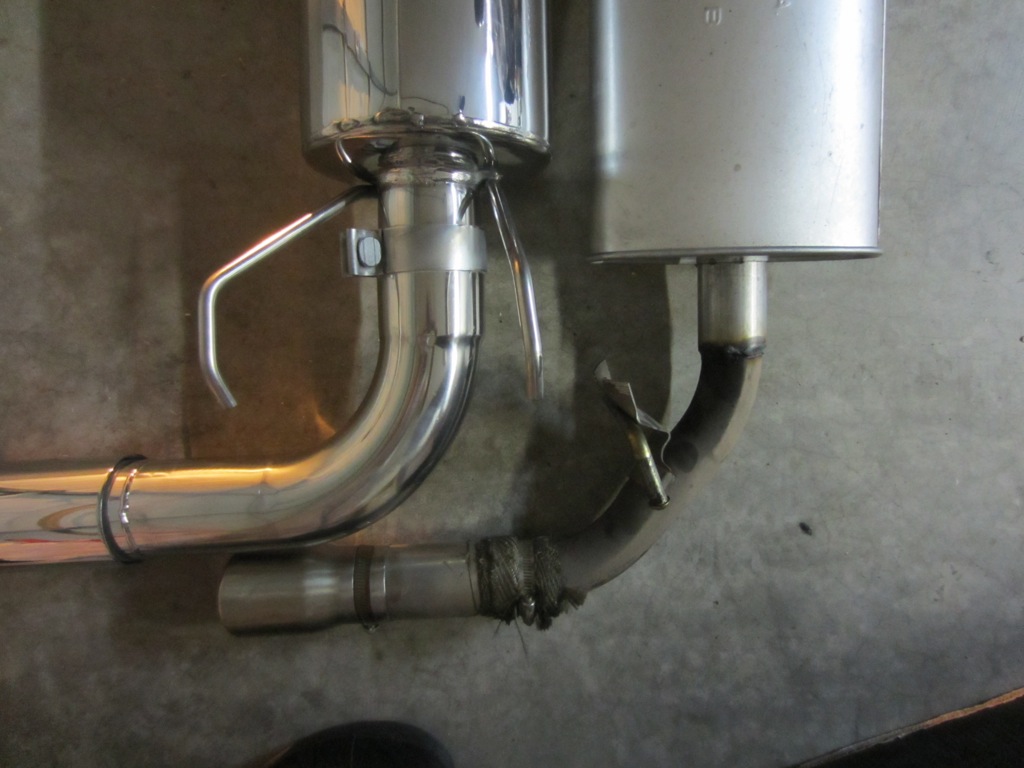
I ran into some problems with rubbing/rattling on the rear subframe bracing, and the driver's side transmission tunnel. I tried re-adjusting the exhaust itself a few times, but couldn't get it to stop with that alone:


I wound up loosening all the bolts on the rear ladder bracing, and shifting it as far as possible towards the driver's side. This bought maybe a 1/2" of additional clearance. I also bent the muffler hanger as much as felt safe to move the exhaust pipe more towards the driver's side. The most effective thing was adding a hose clamp to two of the muffler hangers though, which limits the amount of sway the exhaust has (each compressed the hanger maybe 1/4"-1/3", so not much):


Fairly ghetto, but it works okay. Maybe one day I'll get poly hangers, but there's no guarantee they'll be any different than the stock ones..
I decided to play with building up an insulation barrier between the splash shield and the bottom of the radiator. I added these layers to the splash shield and added a layer of pipe insulation to the bottom of the radiator itself (the big foam type that wrap copper pipes from Home Depot Racing):
After install it was still about 1/2" short of sealing with the radiator+pipe insulation, I'll correct it eventually. I'm sure it must help at least somewhat now though.
Adding coolant back in I went for ~25% antifreeze/75% water ratio. The record cold temps in this area have been occurring over the past week or so, and are at worst within 5 degrees of freezing.
A few pics of the FM 3" vs stock:
I ran into some problems with rubbing/rattling on the rear subframe bracing, and the driver's side transmission tunnel. I tried re-adjusting the exhaust itself a few times, but couldn't get it to stop with that alone:
I wound up loosening all the bolts on the rear ladder bracing, and shifting it as far as possible towards the driver's side. This bought maybe a 1/2" of additional clearance. I also bent the muffler hanger as much as felt safe to move the exhaust pipe more towards the driver's side. The most effective thing was adding a hose clamp to two of the muffler hangers though, which limits the amount of sway the exhaust has (each compressed the hanger maybe 1/4"-1/3", so not much):
Fairly ghetto, but it works okay. Maybe one day I'll get poly hangers, but there's no guarantee they'll be any different than the stock ones..
Reply
0
0
01-16-2013, 07:11 PM
#19
Junior Member
Thread Starter
iTrader: (7)
Join Date: Mar 2012
Location: Gilbert, Az
Posts: 356
Total Cats: 31
After I got everything bolted up and double/triple checked it was time to prime the oil system. I pulled the main relay in the fuse box under the hood and cranked about 7-8 seconds at a time. After 4-5x of doing this oil pressure started showing up on the stock gauge. At this point I felt good enough to put the relay back and fire it up. My aftermarket electric oil pressure gauge went right up to ~60 psi at cold idle, so everything looked to be working well.
I purchased an electronic boost controller from DIYPNP, but I wanted to run off wastegate boost the first couple weeks to see what the limits of the system were (since the EBC can only add boost, not reduce it).
After tuning for a week or so, I found the boost would ramp up quickly to ~7psi, then creep slowly to right around 9psi at ~7k rpms.
Here's a datalog of the phenomena. You can see the duty cycle gets a little high for only 9psi at 88% (450cc RX8 injectors), but it was tuned way overtly rich at that rpm range in the ~10.5 AFR range which has since been corrected:
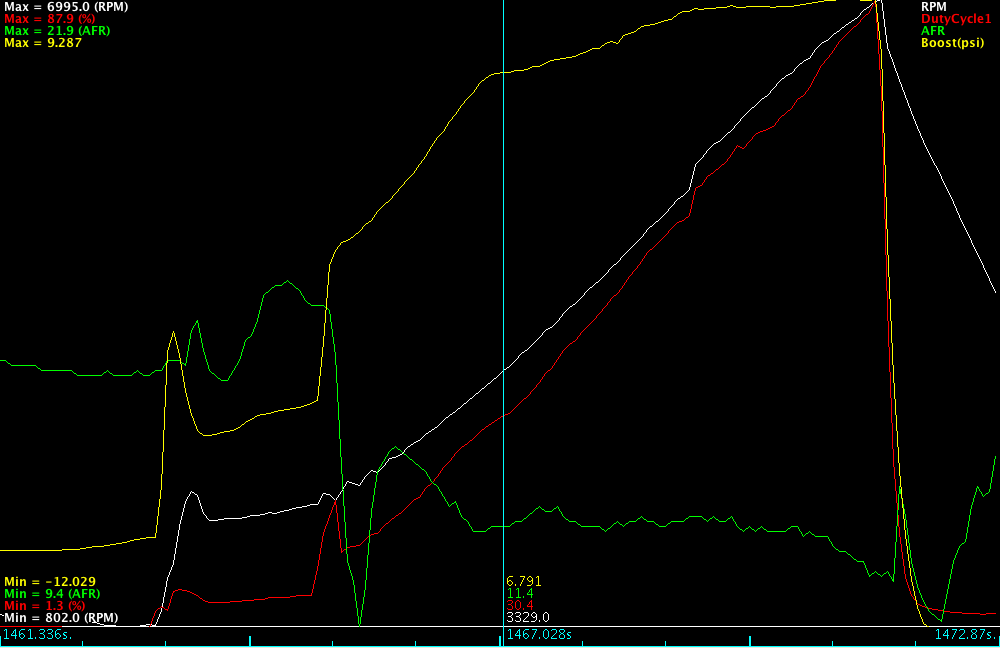
And an accompanying VirtualDyno example of a 3rd gear mechanical wastegate pull that tops out at 8.9psi at max rpm. Not too bad for the super slow boost onset. I think the dip in torque near the end is due to the ridiculously over-rich AFR:

I purchased an electronic boost controller from DIYPNP, but I wanted to run off wastegate boost the first couple weeks to see what the limits of the system were (since the EBC can only add boost, not reduce it).
After tuning for a week or so, I found the boost would ramp up quickly to ~7psi, then creep slowly to right around 9psi at ~7k rpms.
Here's a datalog of the phenomena. You can see the duty cycle gets a little high for only 9psi at 88% (450cc RX8 injectors), but it was tuned way overtly rich at that rpm range in the ~10.5 AFR range which has since been corrected:
And an accompanying VirtualDyno example of a 3rd gear mechanical wastegate pull that tops out at 8.9psi at max rpm. Not too bad for the super slow boost onset. I think the dip in torque near the end is due to the ridiculously over-rich AFR:
Reply
0
0


