93' Miata stolen and flipped build thread


 02-17-2014, 05:49 AM
#1224
Elite Member

Join Date: Oct 2013
Location: Cedar City, UT
Posts: 2,764
Total Cats: 951
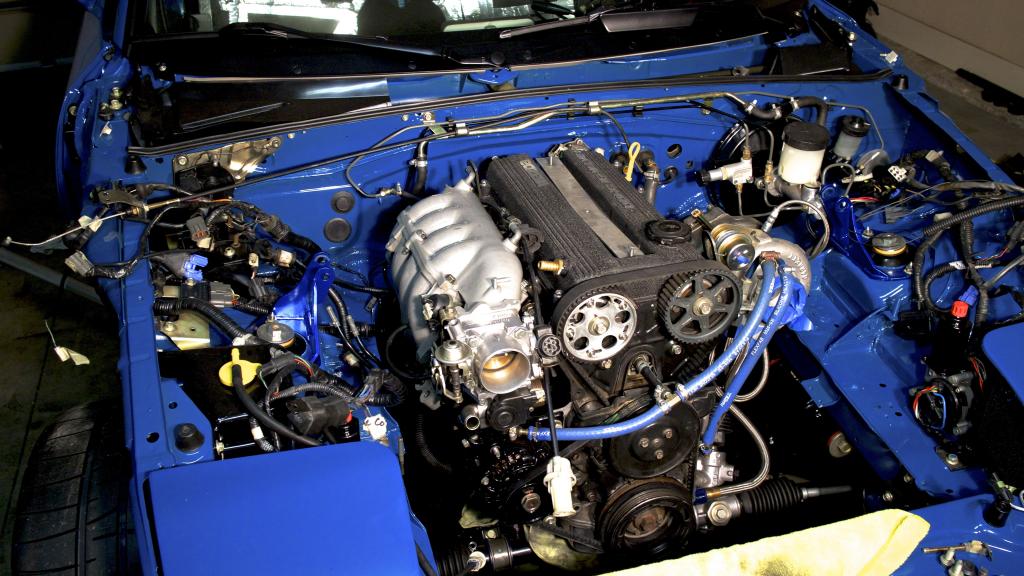
Well that wasn't fun. I still need to put on the passenger motor mount and then go to the hardware store to find a 14mm flare nut. I cant seem to find one with the right thread pitch and diameter.
Also need to install the PPF, but Ill do that tomorrow.
But it is in, and I did it solo for better or worse. Sorry for no pictures, it was a stress-filled hour trying to get it in with out damaging anything in the process. I should have waited for my brother tomorrow....but, for some reason I wanted to do it by myself. I have done the rest of the car myself, might as well make life harder and do this myself!
First time I dropped it in I didn't realize that it wouldn't fit with both motor mounts still attached to the engine. So after winching it back up and removing the passenger mount, it dropped right in.
So weird that I can't find that other 14mm flare nut.

Last edited by Jeffbucc; 02-17-2014 at 06:00 AM.

Reply
 3
3

3


 02-17-2014, 01:16 PM
#1231
Elite Member
iTrader: (13)

Join Date: Dec 2006
Location: Taos, New mexico
Posts: 6,603
Total Cats: 564
I've said it before, but this thread has gone from impressive to disgusting. I love you Jeff, but i really don't know how you will even enjoy this car with your level of OCD. Good luck, lol.
In for first start :P
In for first start :P
Reply
0
0
02-17-2014, 01:57 PM
#1232
Elite Member
Join Date: Oct 2013
Location: Cedar City, UT
Posts: 2,764
Total Cats: 951
The restoration part? Yeah, that was crazy even for me.
I've already said it multiple times but I'm only being this OCD once. I'll maintain things and clean them and detail them as I own the car over its life, but I won't go to this detail ever again until something needs to be replaced or fixed.
I was talking to my dad about this earlier this week and he agreed it is better to do it this way when you are "in that mode for restoration and cleaning" since you have no rush to do it, and you might as well do it while you have the part out of the car already.
The problem with restoring a car is you have to pick your baseline. if you start restoring your car at 6/10ths you have room to fluctuate between that and perfection.
When you start at 10/10ths, you have to keep adding to the craziness since the parts that you DON'T do perfect become an eye-sore to otherwise perfect surroundings.
Saying that, as much as I know I have to put the seat belts back in. I really don't want to tear apart the roll bar since it is such an awkward job for one person.
Saying all that, this is how I feel after a session of working on the car.


Reply
2
2
02-17-2014, 02:03 PM
#1233

I've been doing the "OCD" cleaning myself, including the washing of the seatbelts so I absolutely understand why you are doing this. You've made much more progress in a much shorter time than I have, that's for sure.
It's good to see someone who hates a dirty piece of equipment as much as I do.
This is officially my favorite thread.
It's good to see someone who hates a dirty piece of equipment as much as I do.
This is officially my favorite thread.
Reply
0
0
02-17-2014, 02:09 PM
#1234
Elite Member
Join Date: Oct 2013
Location: Cedar City, UT
Posts: 2,764
Total Cats: 951
Thanks Diesel, crazy understands crazy. 
So I have a question about the timing of the engine. Do I need to worry about timing being off at all, if I have never removed the timing belt? Just want to make sure.
So I have a question about the timing of the engine. Do I need to worry about timing being off at all, if I have never removed the timing belt? Just want to make sure.
Reply
0
0
02-17-2014, 03:27 PM
#1237

Doesn't hurt to check timing at this stage. Do the following:
1. Turn the cranshaft bolt clockwise until the mark on the damper lines up with 0 degrees.
2. Verify that the camshaft sprockets are in the correct relationship to the indentations on the rear, sheet metal shield (I next to I, E next to E). They aren't? Then turn the crankshaft bolt on full turn and look again.
3. Remove the #1 spark plug, stick your dipstick into the hole (i.e., the engine's dipstick into the spark plug hole you perv), and verify the piston is at TDC.
All of the above good? Then proceed with confidence. And, once you're running, double check that MS's timing is correct.
Reply
1
1
02-17-2014, 06:22 PM
#1238
Elite Member
Join Date: Oct 2013
Location: Cedar City, UT
Posts: 2,764
Total Cats: 951

You know how I always say I never go into a project thinking I'm going to fully tear it apart and rebuild it so it is perfect?
.
.
.
This one was on the "list" for a long time but I didn't want to do it until I was ready to install it due to it being scratched up a ton just sitting in the garage.
Wet sanded with 400
Wet sanded with 1000
Copious amounts of aluminum polish
2 layers of Menzerna Powerlock sealant
This is my "bling" for the bottom of the car. I know it will only last a couple drives but it made me happy to do it; so...that is all that matters!
Before

After


Reply
8
8