build thread (TII drivetrain swap, built motor, cage, widebody, blah blah)


 10-30-2009, 04:33 PM
#203
Senior Member
Thread Starter
iTrader: (9)

Join Date: Jun 2007
Location: NH
Posts: 1,013
Total Cats: 21
Nah I already have that hooked up, thanks though!

Reply
 0
0

0
11-14-2009, 05:38 PM
#204
Senior Member
Thread Starter
iTrader: (9)
Join Date: Jun 2007
Location: NH
Posts: 1,013
Total Cats: 21
did a little bit today, spent more time running around than actually working on the car.
Installed my beatrush untertray. I had to get creative as from my understanding, these are supposed to be installed with out the r-package lip. Here's what I did. I got some 1/4" threaded rod, cut to fit, and sandwiched the undertray with bolts and washers, as well as the original mounting spot on the bumper. For the rear mounting, it wants you to use the space in the lower control arm bracket that my underbrace bolts to. The tray and the racing beat brace overlapped, so I just bolted the brace over the tray to hold it down in place.
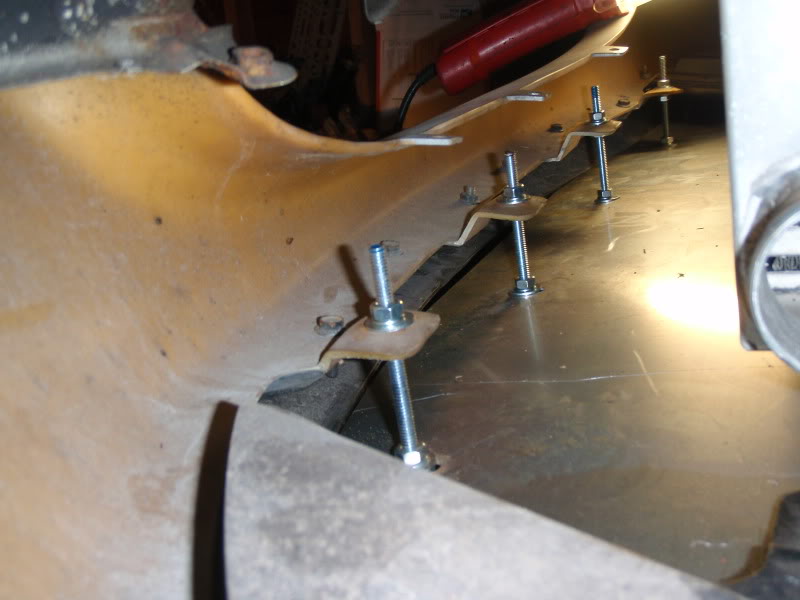
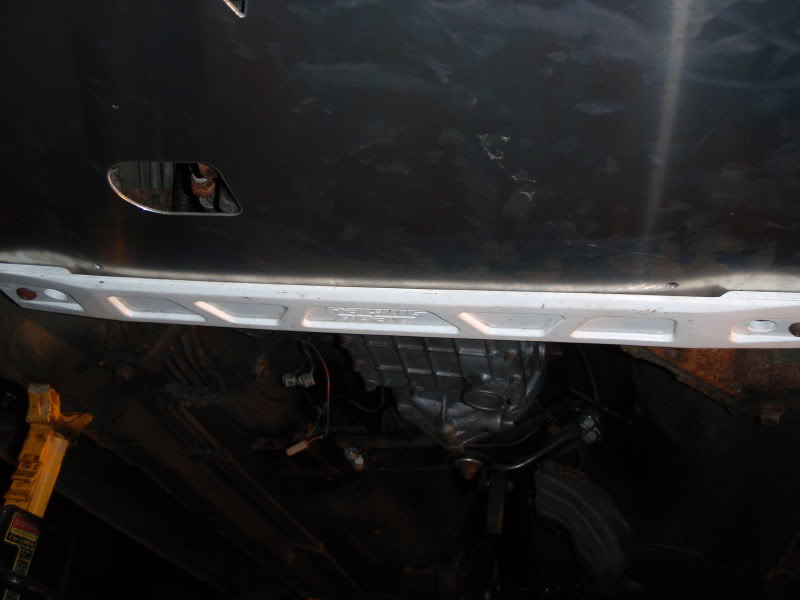
Now it sits level with the bottom of the lip, and the brake duct holes can still be used
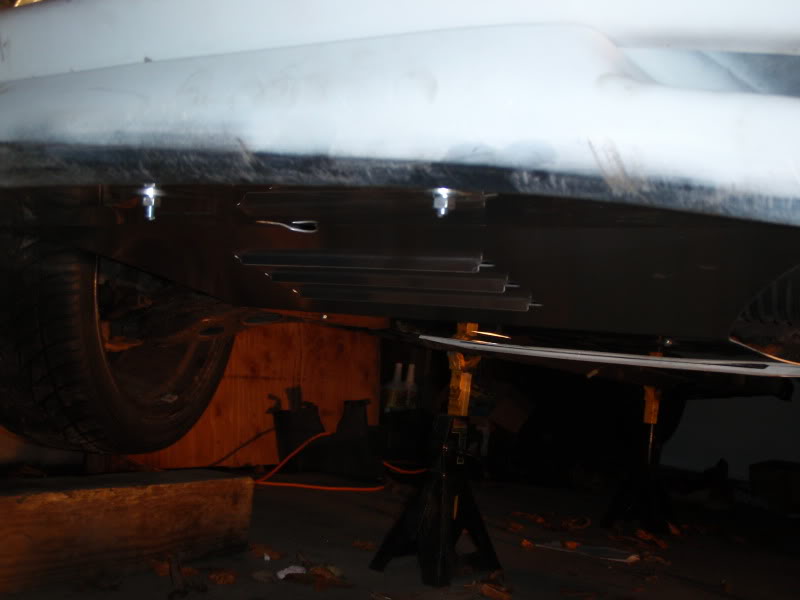
Most likely going to pack the car up tomorrow and get it ready to take to the exhaust shop hopefully this week, but we'll see.
Installed my beatrush untertray. I had to get creative as from my understanding, these are supposed to be installed with out the r-package lip. Here's what I did. I got some 1/4" threaded rod, cut to fit, and sandwiched the undertray with bolts and washers, as well as the original mounting spot on the bumper. For the rear mounting, it wants you to use the space in the lower control arm bracket that my underbrace bolts to. The tray and the racing beat brace overlapped, so I just bolted the brace over the tray to hold it down in place.
Now it sits level with the bottom of the lip, and the brake duct holes can still be used
Most likely going to pack the car up tomorrow and get it ready to take to the exhaust shop hopefully this week, but we'll see.
Reply
0
0
11-30-2009, 10:52 AM
#205
Senior Member
Thread Starter
iTrader: (9)
Join Date: Jun 2007
Location: NH
Posts: 1,013
Total Cats: 21
installed all the new gauges, and also put in a 13 hour day with 3 of my good buddies to finish all the bodywork, and we got a coat of laquer primer on the car, and installed the rear flares. I will be calling my painter in a little bit, and if all goes well, it's off to paint friday! Pics to follow....
Reply
0
0
12-02-2009, 07:02 AM
#206

Many of the parts you have painted look as if they still have pounds of rust in them, and also many areas on the car chassis, engine, fenders etc. Just because you spray like crazy and coat it with paint does not mean the rust will go away.
I went through your thread and can spot many rusted parts, you have cut a lot of corners on NOT sandblasting suspension, engine parts. The last you did, I think it was the water pump pulley, looks horrible, if I recall well the alternator looks nasty.
We dont have to tell you, that car is a rust bucket, I would have chosen a much cleaner platform for such a project.
So some parts of your project look awesome but then you kill it with a spray can.
Welding A+
Painter F-
You asked!
Reply
0
0
12-02-2009, 12:10 PM
#207
Senior Member
Thread Starter
iTrader: (9)
Join Date: Jun 2007
Location: NH
Posts: 1,013
Total Cats: 21
Many of the parts you have painted look as if they still have pounds of rust in them, and also many areas on the car chassis, engine, fenders etc. Just because you spray like crazy and coat it with paint does not mean the rust will go away.
I went through your thread and can spot many rusted parts, you have cut a lot of corners on NOT sandblasting suspension, engine parts. The last you did, I think it was the water pump pulley, looks horrible, if I recall well the alternator looks nasty.
We dont have to tell you, that car is a rust bucket, I would have chosen a much cleaner platform for such a project.
So some parts of your project look awesome but then you kill it with a spray can.
Welding A+
Painter F-
You asked!
I went through your thread and can spot many rusted parts, you have cut a lot of corners on NOT sandblasting suspension, engine parts. The last you did, I think it was the water pump pulley, looks horrible, if I recall well the alternator looks nasty.
We dont have to tell you, that car is a rust bucket, I would have chosen a much cleaner platform for such a project.
So some parts of your project look awesome but then you kill it with a spray can.
Welding A+
Painter F-
You asked!
It is what it is I guess. I'm doing the best I can with the materials/tools I have available. I wirewheeled the crap out of everything I've painted, hit it with metal primer, and then 2 coats of paint. If the rust comes back, it comes back and I'll deal with it then. The water and crank pullies I used that hand-hammered paint, which is why they look the way they do. I'm well aware that this isn't a show car, but hey that's not why I'm building it. I appreciate the feedback regardless.
Reply
0
0
12-03-2009, 11:35 PM
#208
Senior Member
Thread Starter
iTrader: (9)
Join Date: Jun 2007
Location: NH
Posts: 1,013
Total Cats: 21
teaser pic:
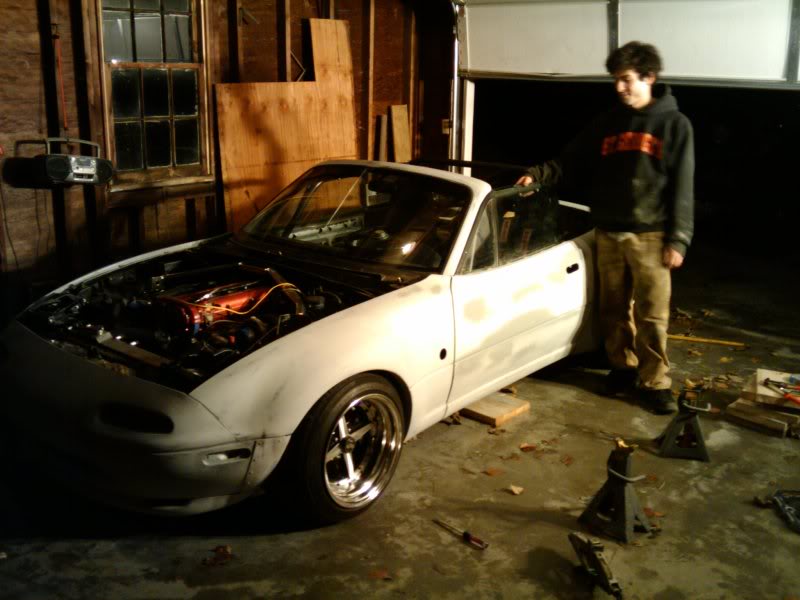
This was after all the bodywork/primer was finished. I measured the ride height, and it's currently at 11.25" from hub center to fender. Def have to raise it up some, I can't even get a screwdriver in between the tire and the fender. I'm also going to trim the lip on the flares for some more clearance too. That's me standing next to it.
This was after all the bodywork/primer was finished. I measured the ride height, and it's currently at 11.25" from hub center to fender. Def have to raise it up some, I can't even get a screwdriver in between the tire and the fender. I'm also going to trim the lip on the flares for some more clearance too. That's me standing next to it.
Reply
0
0
 12-04-2009, 10:51 PM
#210
Senior Member
Thread Starter
iTrader: (9)
Join Date: Jun 2007
Location: NH
Posts: 1,013
Total Cats: 21
there's plenty of better examples than mine, I didn't do any of the major wires as I want to start the car first. Once I know it starts and runs then I'll do it all completely.
Reply
0
0
12-05-2009, 10:45 PM
#211
Senior Member
Thread Starter
iTrader: (9)
Join Date: Jun 2007
Location: NH
Posts: 1,013
Total Cats: 21
bled the brakes and the clutch today, however I believe the slave is bad as the system doesn't seem to be building pressure. I bled all the air out of the lines. It sat for about a year w/o any fluid in the system.
Reply
0
0

 03-01-2010, 11:36 PM
#216
Senior Member
Thread Starter
iTrader: (9)
Join Date: Jun 2007
Location: NH
Posts: 1,013
Total Cats: 21
It hasn't been sold, don't worry. I've been traveling a lot with work lately, and been doing projects around the house, so it's been on the backburner.
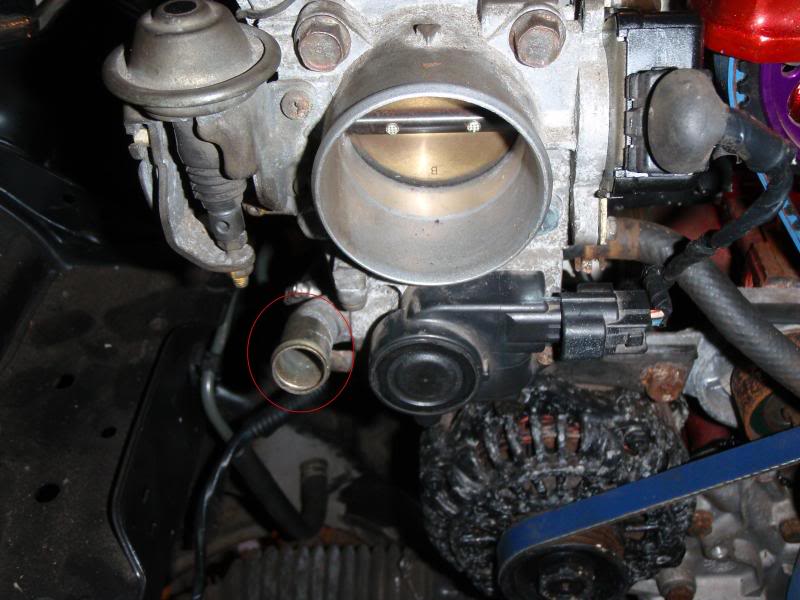
Question though- what does this do? I know it hooks back into the intake piping, but I'm wondering if it's necessary and if I can get rid of it? I'll be running megasquirt pnp for those who don't feel like reading all the old stuff.
Been trying to set up an appointment with the exhaust shop, his and my schedule's haven't aligned just yet, hopefully it will get there soon.
Reply
0
0


