When you click on links to various merchants on this site and make a purchase, this can result in this site earning a commission. Affiliate programs and affiliations include, but are not limited to, the eBay Partner Network.
I wouldn't. It's there for a reason and you already have everything apart. You'll be kicking yourself in the *** when it leaks down the road and you have to take off everything to get back to it. Remove the pump, clean everything really well, re-install.
Yep, agreed.. I'd prefer to not come running back into the engine bay.
Originally Posted by Forrest95M
where does said o ring go? I'm replacing my pump and lars was talking about one, does he mean the fat rubber bushing on the block? or it there another oring I am missing?
Originally Posted by psyber_0ptix
The oil pump outlet near the prime hole has an oring. Also, the oring that is shown in the picture above shoes the location. The fat *** incorrectly sized oring is over the hole.
Drill that **** out. If I can do it, you can too. Center punch, drill, dremel, and keep drilling until you meet the minimum drill size for that size bolt. Chase original threads. This is one thing you DO NOT WANT TO RUSH because you'll breach the waterjacket. I ended up putting a stud in place with some extra heavy duty thread sealer since I didn't want to apply torque on already tender threads.
Lol planning on picking up the legit o-ring from Mazda with the oil pickup tube gasket today. I'm going to go through and remove the pump again - I'm hoping that i can get at the broken bolt easier.
Originally Posted by shuiend
How low do you have your car, or how big are the speed bumps? Sorry the end of the exhaust drags a little bit. I try to keep them up sort of high, but trying to avoid the 2 piece axles, diff, and rear bar make it sort of hard. Don't feel to bad about those scrapes. My Enthuza exhaust that I ran for years would occasionally scrape in the same spot.
Originally Posted by shuiend
I also use hose clamps on my hangers to help hold the weight. You are unlucky with your first setup as I figured out the extra exhaust hanger after I already sent yours out.
Wouldn't say my car is too low, When i had the lip on it would scrape everywhere though - I'll have some measurements hopefully as soon as i can put this together
If it means anything to you, I never had an easy out work for me. I tried using one in this application and it ended up breaking. This worked for me:
1) First, get a spring loaded center punch and try to mark as dead center as you can. Take a tiny as drill bit to pilot the hole, but go slow, and also check very frequently. You want to make sure it's going in straight and at no angle so you may need to adjust here and there, have a friend check you while you're drilling from the side to make sure it's straight. This is probably one of the most important parts because this will guide all the remaining drill throughs. Don't go too deep. Check the depth against the other hole on the other side and mark your drill bit. Do not drill to meet up with that line, just keep it as a reference and drill shorter.
2) Step up your drill bit size literally one size at a time. Don't take out a lot of material at once, just essentially bore out the hole. Lubricate as you go. In the end, you want to finish with a size J (exact), Q (close) or an S (okish). Priority in that exact order. That's specific to M8 thread. You might be able to get the drill bit with a tap if you don't have a kit already.
3) By this point I was able to see some of the original thread. I used the tap to chase the threads out and recover what I could. By the end of it, the small "plug" of material that I didn't drill through actually just came out with a pick. So I didn't come close to breaching the jacket. Mine was for the water pump, maybe you have more leeway for the oil pump.
Note:
When **** hits the fan like it did with me when I tried to use an easy out, I had to dremel the crap out. I used stone grinding bits and one carbide. The center of my drilling would deviate so I corrected it by manually dremeling areas of more material to allow the drill bit to recenter.
Be careful dude. Not impossible, but as fast as your build is going, this part takes patience, or you may end up just looking for a new block. It honestly took me two afternoons, but morale was low overall (took almost 6 months for me to touch my car to start rebuilding after it died)
If it means anything to you, I never had an easy out work for me. I tried using one in this application and it ended up breaking. This worked for me:
1) First, get a spring loaded center punch and try to mark as dead center as you can. Take a tiny as drill bit to pilot the hole, but go slow, and also check very frequently. You want to make sure it's going in straight and at no angle so you may need to adjust here and there, have a friend check you while you're drilling from the side to make sure it's straight. This is probably one of the most important parts because this will guide all the remaining drill throughs. Don't go too deep. Check the depth against the other hole on the other side and mark your drill bit. Do not drill to meet up with that line, just keep it as a reference and drill shorter.
2) Step up your drill bit size literally one size at a time. Don't take out a lot of material at once, just essentially bore out the hole. Lubricate as you go. In the end, you want to finish with a size J (exact), Q (close) or an S (okish). Priority in that exact order. That's specific to M8 thread. You might be able to get the drill bit with a tap if you don't have a kit already.
3) By this point I was able to see some of the original thread. I used the tap to chase the threads out and recover what I could. By the end of it, the small "plug" of material that I didn't drill through actually just came out with a pick. So I didn't come close to breaching the jacket.
Note:
When **** hits the fan like it did with me when I tried to use an easy out, I had to dremel the crap out. I used stone grinding bits instead of a carbide since I didn't want to chew too much material at a time. The center of my drilling would deviate so I corrected it by manually dremeling areas of more material to allow the drill bit to recenter.
Be careful dude. Not impossible, but as fast as your build is going, this part takes patience, or you may end up just looking for a new block. It honestly took me two afternoons, but morale was low overall (took almost 6 months for me to touch my car to start rebuilding after it died)
Day Started out great once i removed that broken bolt, Went to mazda and picked up the oil pickup tube gasket and the oil pump o ring.
This is how i left my leaky motor after pulling it - no mounts, its sitting on the subframe lol
This is what my timing cover looked like.... Its impossible to clean and horrific to deal with when trying to keep a clean environment
o-ring comparison to what i had previously.. Im sure it would've worked but i wanted to be safe.
Couldn't get new bolts so took it from my old motor and hit them with the wire wheel a bit also after putting rtv on the baffle i ran out of black rtv so i used red for the pan.. not 100% sure if this is okay. both were high temp
planning on going back and cutting the excess after it cures a bit.
Also got my cams, bearing caps, cas re-installed and torqued to spec. Need to go back to replace the Cas O ring though.
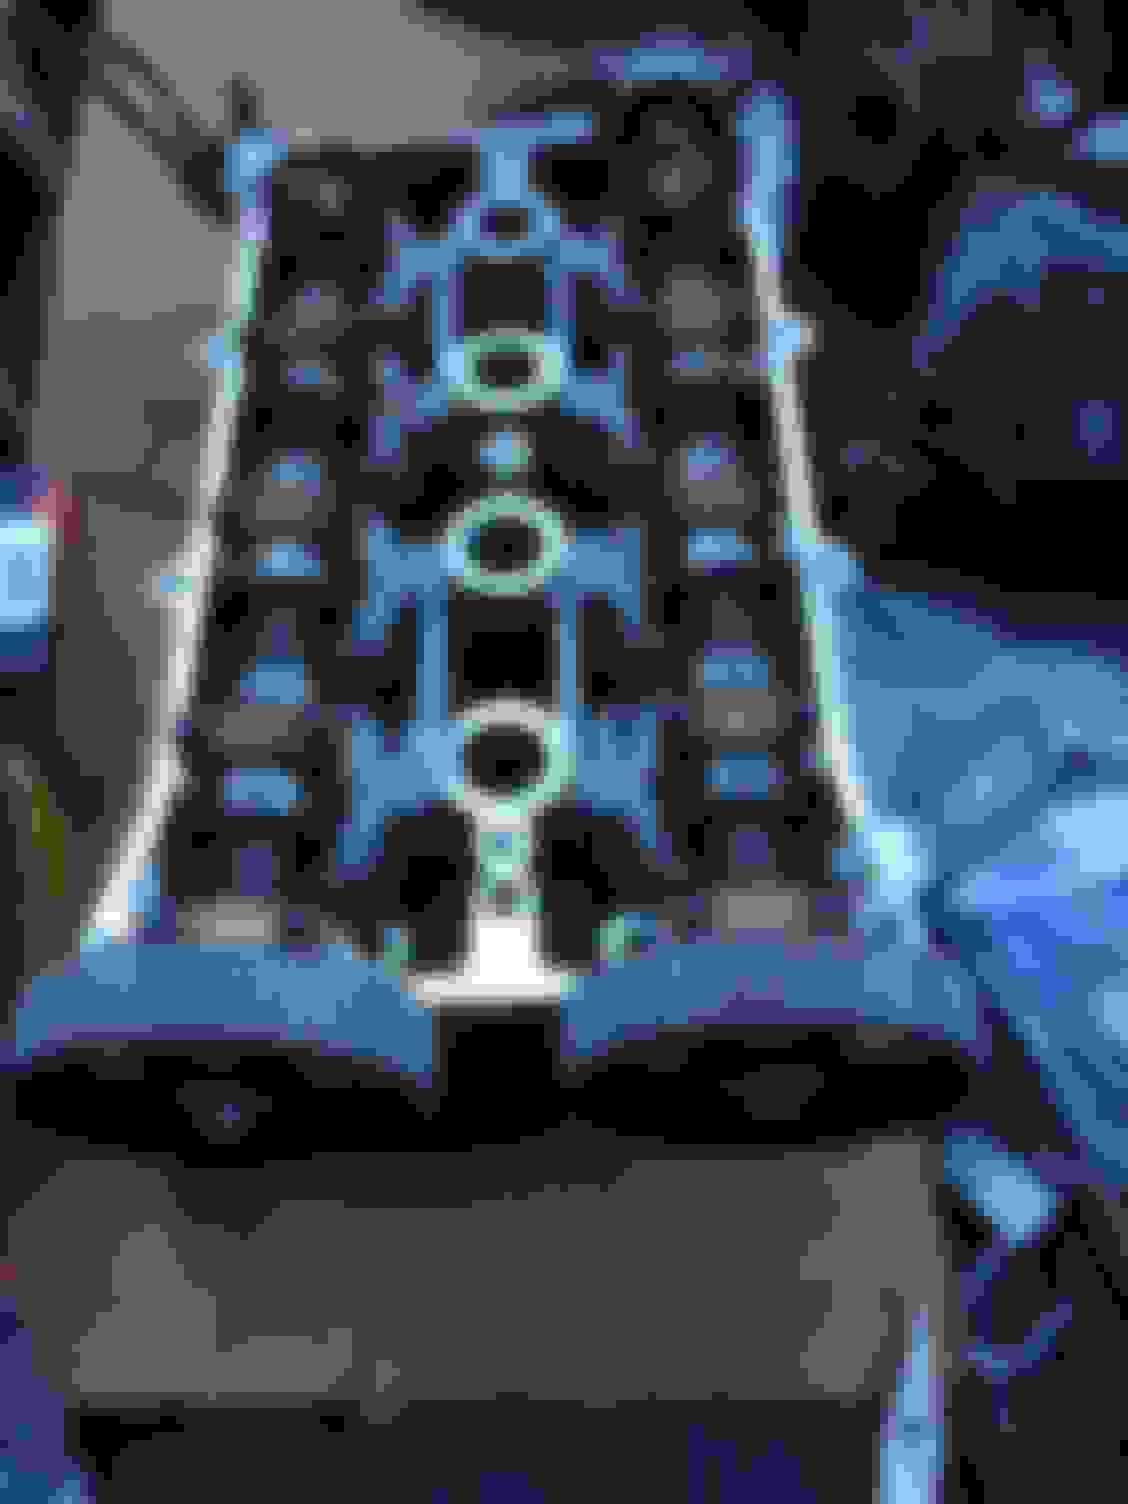
Found my oil leak issue. Not only is my oil pan seal non existent but so is the oil pump gasket / rtv - Can anyone spot the other issue?
And a chewed up keyway and main seal leak it looks like....
I actually found the main seal on the floor today - I must've removed it when i pulled the pan and didn't realize, regardless that keyway is pretty screwed
Got the engine bolted up on the trans side in the morning will be trying the motor mount side this weekend to get the clutch and tranny in
Arp head studs / head install.
As you can tell from the backround i had alot more planned for the day..
Unfortunately I had to stop after installing the water pump because the damper installation kicked my ***.
after going to autozone 3 times to get a harmonic damper puller (first one broken),and i didn't have the installer , i was using a impact gun and the old bolt key per the directions and the keyway was just slightly off and i wasnt able to push it in.
I used the puller and got it out successfully but have no clue if the installer is even compatible.
Hopefully i can get it done tomorrow.
Done today: Cas o ring, arp head studs, headgasket, Head install, waterpump, tensioner / idler almost timing belt. :(
This is my first time doing any of this..so im kind of expecting this to take till the end of the weekend to drop it in or the very beginning of next week.
If you had the 949 damper I would let you borrow my install tools for it. I don't think they work for the ATI damper.
I used
OEMTOOLS� 27144 Harmonic Balancer Installer
Had to go to home depot for some type of spacer because i wasnt able to move the nut as it was INSIDE the damper... I picked this up and slid it between the installer and bearing / nut.
It was a pain and the copper tube actually ended up bending and got to the point where i couldn't tighten anymore because of the way it was being squashed. So i pulled the installer out and went back to my torque gun, i got pretty far before the battery died - I'm thinking it needs to go in just a little bit more? Someone please confirm this as i will be doing it in the morning.
Here's a few pics.
Valve cover, Timing belt / coolant reroute have been installed - as well as the ati damper which might need to be pushed in a bit more.
Also started cleaning the engine bay a bit - i dont have words for the amount of gunk i have removed so far.. there is so ******* much of it.
Atleast i can see my steering rack and subframe a bit now, Hoping to have alot more done tomorrow.
One of my friends will be helping hopefully - an extra hand always keeps me on track.
I have been taking my time with this...like all my time.. clocked in about 12 hours yesterday figuring out what i needed from the old engine. Got the crank position sensor moved over, still need to gap it correctly. - Couldn't get the timing cover with timing marks installed correctly even after all the trimming i did I'm going to give that another shot.
pretty much just the tranny needs to go on at this point and the turbo
Haha. didnt realize i forgot the plate that goes inbetween the flywheel and rear main seal , had to go back and fix it all..
Trans / engine loaded in.
Engine is finally in - all that's left to do is connect the clutch slave cylinder to the transmission and finish connecting the wiring, I started late today and i actually thought i would be able to start it up. Tomorrow it should be a for sure thing.
I am really surprised i wasn't able to start the car today.. I didnt realize how long this crap takes when you're trying to do it right the first time.
Slave cylinder was a pain to get in and get the lines connected, got it bled relatively easy after i figured out there was no fluid in it.
Started verifying all hoses / connections, still need to clean a bit but it is 3000% better then when i had my leaky engine in there, i will almost dare to work without gloves.
At this point.. I need to fill the transmission up, coolant, oil and align the turbo correctly... also need to figure out what I'm going to do with the timing marks on the cover to set timing - i believe the ati damper is too big? i literally trimmed all the way around the timing marks on the cover and left one bolt hole, it appears to fit but not sure if it'll rub.
Tomorrow.. For certain... hoping i can get her started early and to start break in / break down
Did you mark your cas before you pulled everything apart? I've forgot to do that and it was tricky to get the timing in the ballpark for first start. You can check timing while cranking, but you might need to burn a beer favor.
Have you pulled spark plug wires to make sure they are sparking? Are you getting fuel? You can play with adjusting the CAS and trying to crank. Is the timing belt on correctly?
Did you mark your cas before you pulled everything apart? I've forgot to do that and it was tricky to get the timing in the ballpark for first start. You can check timing while cranking, but you might need to burn a beer favor.
I mean this could probably be it.. i let the shop know that way they wont have to do much running around if this is it.
Originally Posted by shuiend
Work is totally over rated.
You're telling me... but how can i get more parts without a job?.. I have a feeling my power goals are not going to be met, but let's see how i feel about it first.
Tomorrow in the morning i should know more.. I just wanna drive it.. honestly lol
Problem is no spark - Timing belt has been verified on both the damper side and head., The Crank Position sensor was moved over and i took some datalogs of the tooth wheel but i honestly don't know what I'm doing
What do i need to look for ? New spark plugs and im using the ati damper with the 4 tooth trigger wheel installed correctly have verified that much.
need some direction here - i took some datalogs while cranking but i am not sure how helpful they will be - let me know whats needed and i will try to provide it as soon as possible.
When cranking with the timing light the mechanic said the light was no where near tdc.
 10-05-2016, 08:59 AM


 0
0