Skidude builds a turbo miata. Again.
 03-26-2011, 09:44 PM
#1
Elite Member

Thread Starter
iTrader: (3)

Join Date: Apr 2008
Location: Outside Portland Maine
Posts: 2,023
Total Cats: 19
I built my first turbo miata a little over 3 years ago and I drove it for a couple years and then sold it last September. I went very cheap on that build, and it was more of a learning experience than anything else. I learned a lot and now I am building another. It is going much more smoothly.
The car (before):
-2002, white, black cloth interior
-5-Speed, Open diff
-Koni Sports with Koni Coilovers
-15x8 6ULs (silver first-gen)
-Bald Dunlop Star Specs
-Biggest Racing Beat Sway Bar
The project (after):
-GT2560 � la S15 Silvia
-AbsurdFlow Begi Replacement manifold version 2
-AbsurdFlow 3" Downpipe
-Enthuza 3" exhaust with 18" magnaflow
-Ebay intercooler kit with 2.25" pipes and a 22x5x2.5"
-FM Stage 1 Clutch
-3.9 Torsen rear end
-Megasquirt 3 and 3x (home-build)

Reply
 0
0

0
03-26-2011, 09:57 PM
#2
Elite Member
Thread Starter
iTrader: (3)
Join Date: Apr 2008
Location: Outside Portland Maine
Posts: 2,023
Total Cats: 19
I would like to say the megasquirt build went smoothly, but then I would be a liar.
I bought the kit and followed the instructions Brainiak posted up, but I missed a couple steps and forgot all of the input circuits. I didn't think much of why the inputs weren't registering in megatune when I was on the stim, and started building the alternator control circuit. That went alright, and I tested it on the board, but I forgot to test the actual connections on the DB37 connector. I fixed the input circuits and installed the megasquirt and completely forgot to verify the alternator voltage in the car, and started driving. I got about half hour away (so many things wrong with that, I know) and the car died. I figured out the problem almost immediately, but I had to have the car towed home so I could fix it.
I eventually fixed the alternator circuit problem and the car ran well and I started tuning. Had some hiccups, but with the help of some awesome forum members here, they remained just small hiccups. The cooling fans, AC, and VSS don't seem to work, but I am slowly working on fixing those while installing and tuning the car, since it will drive fine in this weather without cooling fans.
Reply
0
0
03-26-2011, 10:13 PM
#3
Elite Member
Thread Starter
iTrader: (3)
Join Date: Apr 2008
Location: Outside Portland Maine
Posts: 2,023
Total Cats: 19
Sorry guys, still no pictures in this post, but the next one will have some I promise!
The first hardware upgrade for this build was a clutch. I bought the FM Stage 1 clutch. My last car had a cheap Ebay 6-puck and I hated it because it would chatter all the time, so I spent a little more and went with a full face unit this time. A great decision.
The shop I work in here is a perk of working for the military (civilian DOD). It's pretty much a 6 bay garage where two bays are a service shop and the other 4 can be rented by the hour (or day if you're friends with the techs ). They have a lift in every bay, and every tool you could want in a service station, except an alignment machine and a leak down tester (those are the only things in the last 18 months I've asked for and they didn't have). It's wicked awesome. The only down-side is that I have to conform to their hours, and those aren't that great.
Anyway, the clutch. I went to the shop after work on a Friday, and started taking things apart. I rounded off one nut where the exhaust manifold connects to the downpipe and then I spent a lot of time trying to get the transmission out with the exhaust still in. That added at least two hours to the project. Eventually got the transmission out and replaced the clutch, and of course, had some trouble getting it back in past the exhaust. Eventually got it, but the whole job took about 6 hours longer than it should have for a total of about 8 hours over two days. Not my proudest moment, but the new clutch drives better than the stock one, and I'm very happy with it.
The first hardware upgrade for this build was a clutch. I bought the FM Stage 1 clutch. My last car had a cheap Ebay 6-puck and I hated it because it would chatter all the time, so I spent a little more and went with a full face unit this time. A great decision.
The shop I work in here is a perk of working for the military (civilian DOD). It's pretty much a 6 bay garage where two bays are a service shop and the other 4 can be rented by the hour (or day if you're friends with the techs
). They have a lift in every bay, and every tool you could want in a service station, except an alignment machine and a leak down tester (those are the only things in the last 18 months I've asked for and they didn't have). It's wicked awesome. The only down-side is that I have to conform to their hours, and those aren't that great. Anyway, the clutch. I went to the shop after work on a Friday, and started taking things apart. I rounded off one nut where the exhaust manifold connects to the downpipe and then I spent a lot of time trying to get the transmission out with the exhaust still in. That added at least two hours to the project. Eventually got the transmission out and replaced the clutch, and of course, had some trouble getting it back in past the exhaust. Eventually got it, but the whole job took about 6 hours longer than it should have for a total of about 8 hours over two days. Not my proudest moment, but the new clutch drives better than the stock one, and I'm very happy with it.
Reply
0
0
03-26-2011, 10:53 PM
#4
Elite Member
Thread Starter
iTrader: (3)
Join Date: Apr 2008
Location: Outside Portland Maine
Posts: 2,023
Total Cats: 19
Ok, now there will be some pictures... if I can remember how to properly load them in.
I took some days off from work to take advantage of the open hours of the garage. Starting yesterday I took 6 days off for a total of a 10 day vacation. I won't need the whole thing (I really hope) but I needed a vacation anyway.
Yesterday was the first day of the major build, and it was mostly used for pulling the car apart and installing the turbo and manifold.
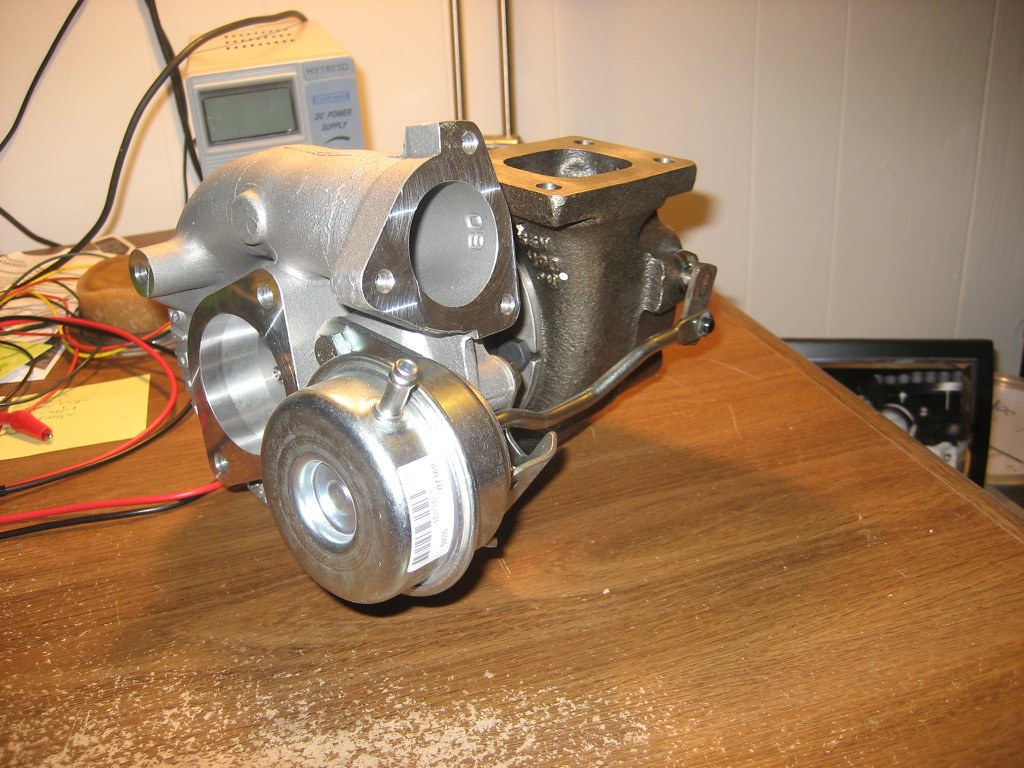
Here's the magic power adder. Pretty standard, really.
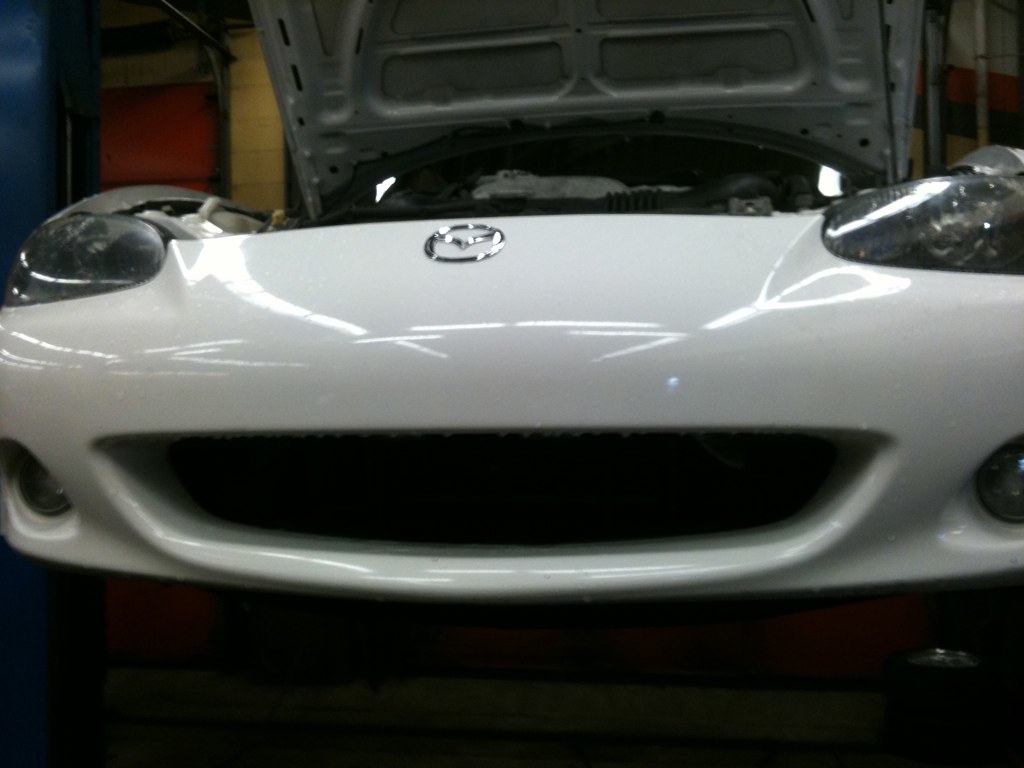
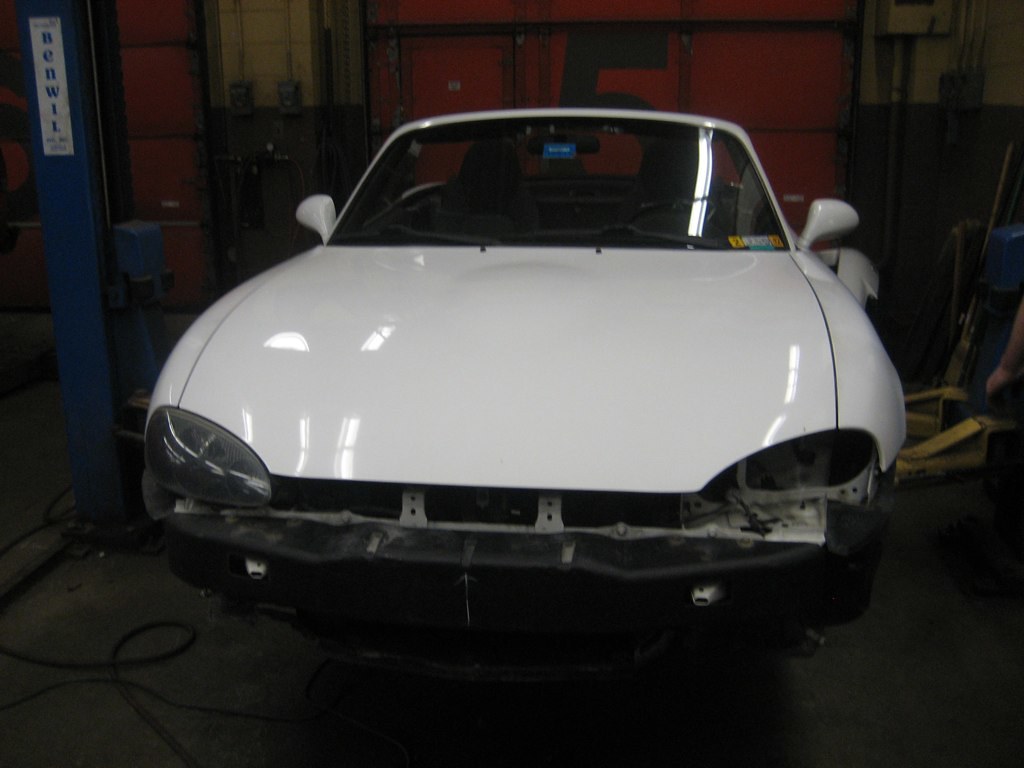
Here's the car before. I'm going for an 18psi-esque look if you hadn't noticed. I'm going for a stealthy look on the outside, so it should look exactly the same when I'm finished.
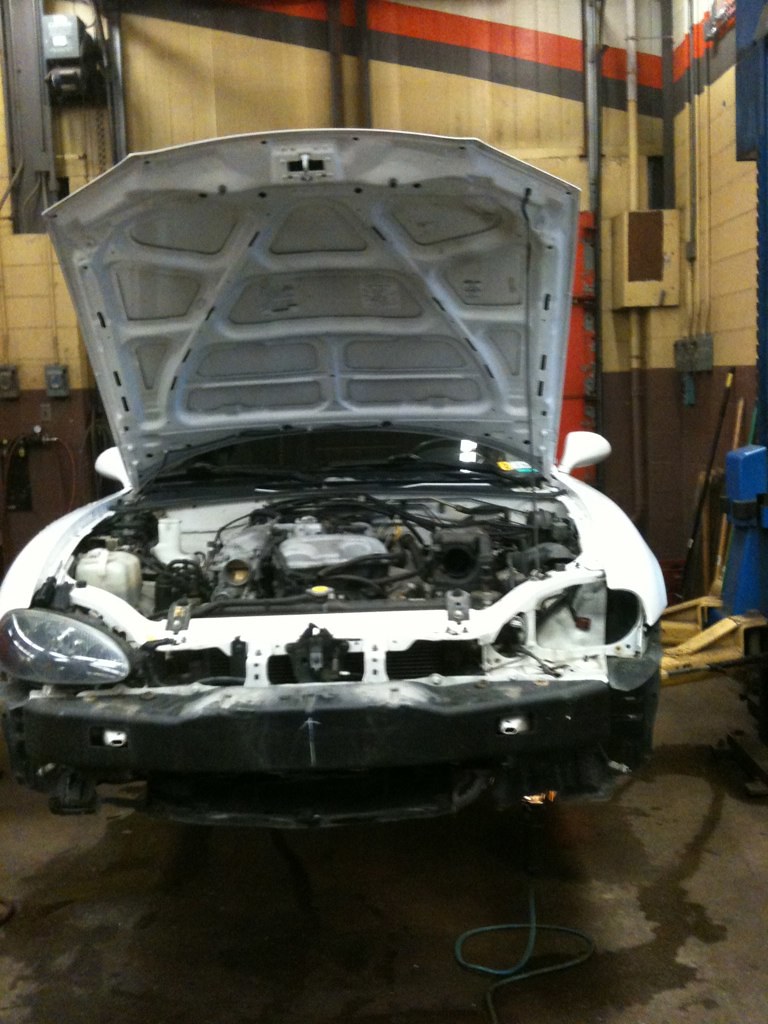
Here's the car an hour later. I've never taken a car apart this far before, so hopefully I can remember how to put it all back together.
Look at that beautiful tubular manifold! It's almost a shame to rip it out and sell it.
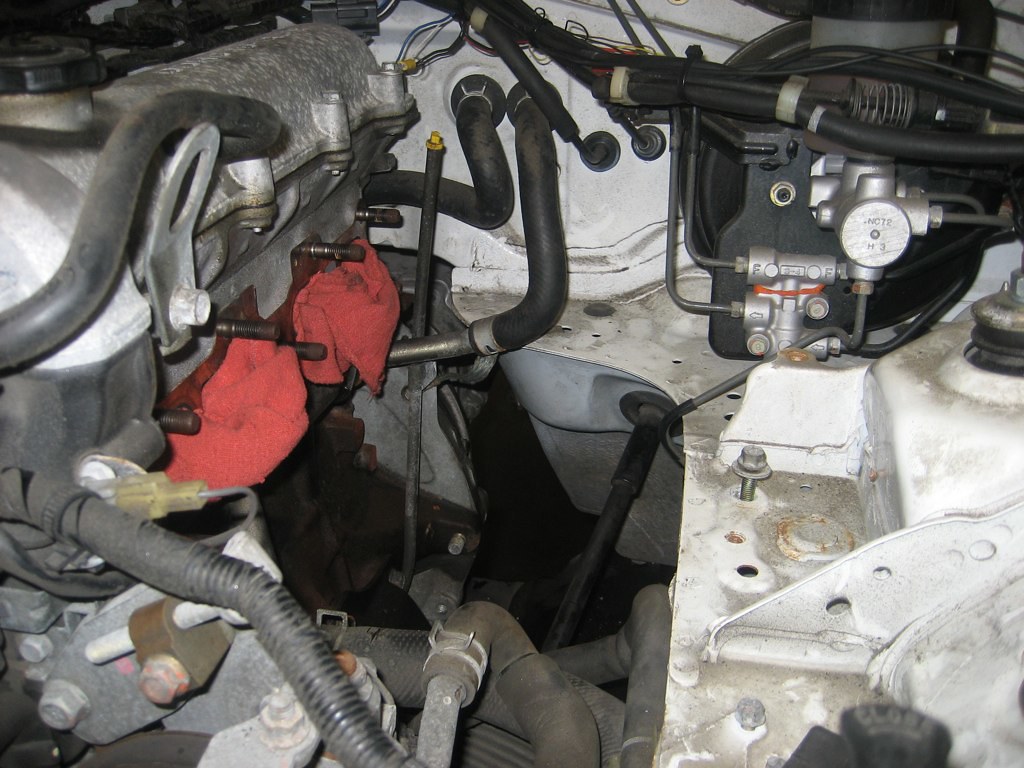
Look at all that space now that the air box and exhaust are out of the way! Just begging for a turbo. I think I'll give it one.

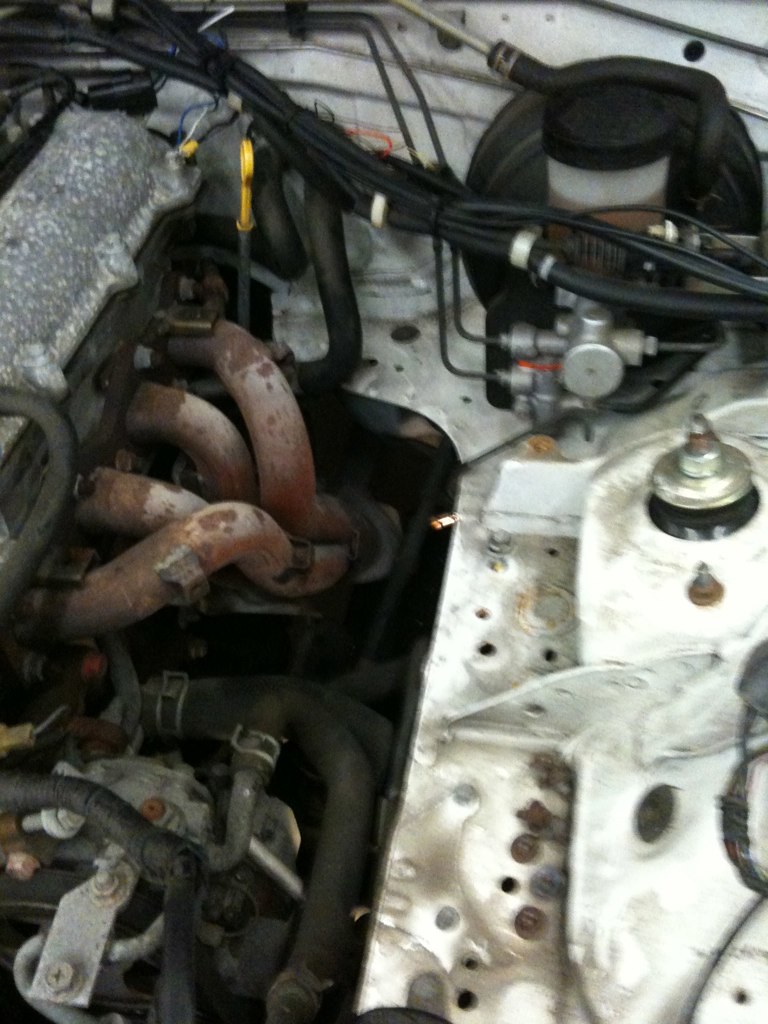
Here is that beautiful exhaust manifold. Every time I look at it I get a little tingly in my no-no region. You can see the massive downpipe as well, though I forgot to take any good pictures of it out of the car.
I had to cut a notch in the shelf to fit the downpipe, but it didn't require much. A couple of the bolts were pretty obnoxious to tighten, but with some help from a friend, we got them all nice and tight for the manifold and downpipe.
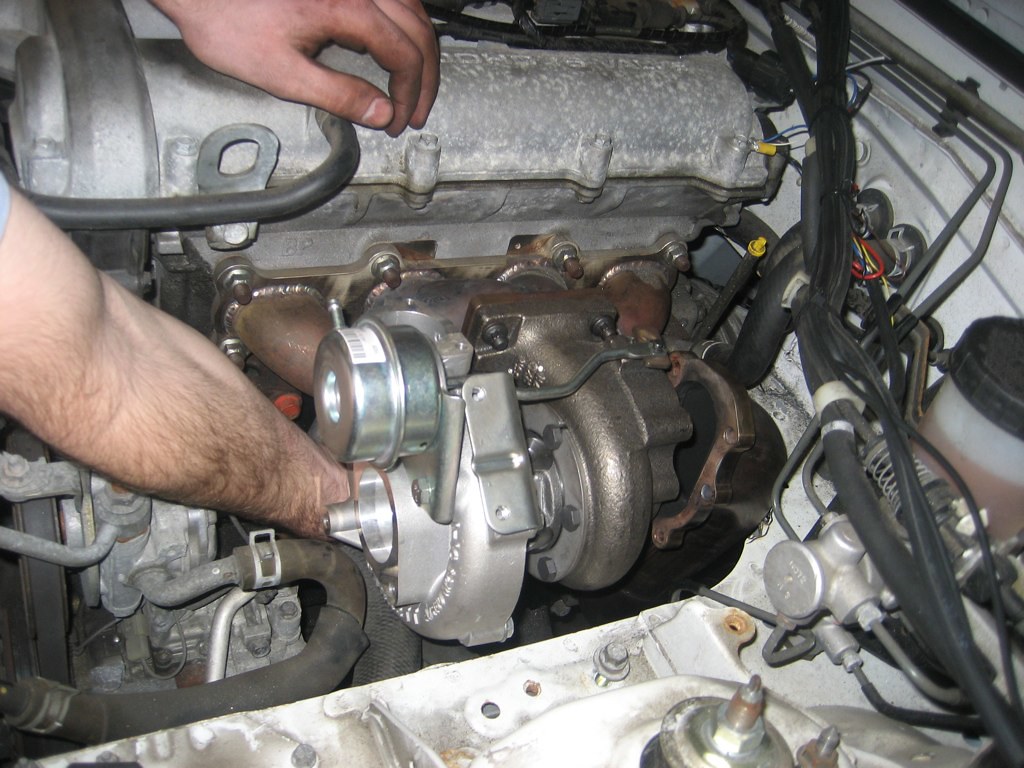
And here's the turbo in the car. Fills that space nicely I think.
Now that the turbo is mounted, I closed the hood and went for a drive like this. Didn't really, I haven't even hooked up the oil lines yet.
I took some days off from work to take advantage of the open hours of the garage. Starting yesterday I took 6 days off for a total of a 10 day vacation. I won't need the whole thing (I really hope) but I needed a vacation anyway.
Yesterday was the first day of the major build, and it was mostly used for pulling the car apart and installing the turbo and manifold.
Here's the magic power adder. Pretty standard, really.
Here's the car before. I'm going for an 18psi-esque look if you hadn't noticed. I'm going for a stealthy look on the outside, so it should look exactly the same when I'm finished.
Here's the car an hour later. I've never taken a car apart this far before, so hopefully I can remember how to put it all back together.
Look at that beautiful tubular manifold! It's almost a shame to rip it out and sell it.
Look at all that space now that the air box and exhaust are out of the way! Just begging for a turbo. I think I'll give it one.
Here is that beautiful exhaust manifold. Every time I look at it I get a little tingly in my no-no region. You can see the massive downpipe as well, though I forgot to take any good pictures of it out of the car.
I had to cut a notch in the shelf to fit the downpipe, but it didn't require much. A couple of the bolts were pretty obnoxious to tighten, but with some help from a friend, we got them all nice and tight for the manifold and downpipe.
And here's the turbo in the car. Fills that space nicely I think.
Now that the turbo is mounted, I closed the hood and went for a drive like this. Didn't really, I haven't even hooked up the oil lines yet.
Reply
0
0
03-26-2011, 11:02 PM
#5
Elite Member
Thread Starter
iTrader: (3)
Join Date: Apr 2008
Location: Outside Portland Maine
Posts: 2,023
Total Cats: 19
The shop hours on Saturdays are limited, so I didn't get to start until around 11, and they closed at 6, so it was a sort of short day. I got the intercooler mounted and the pipes all cut though.
I'm going with the awesome NB intercooler piping option that you suckers with NAs can't use. I had some trouble with the power steering cooling loop getting in the way, but I bent them up out of the way and I think it will work. I forgot to take pictures of that part, I'll try to remember to do that on Monday (garage is closed on Sundays).
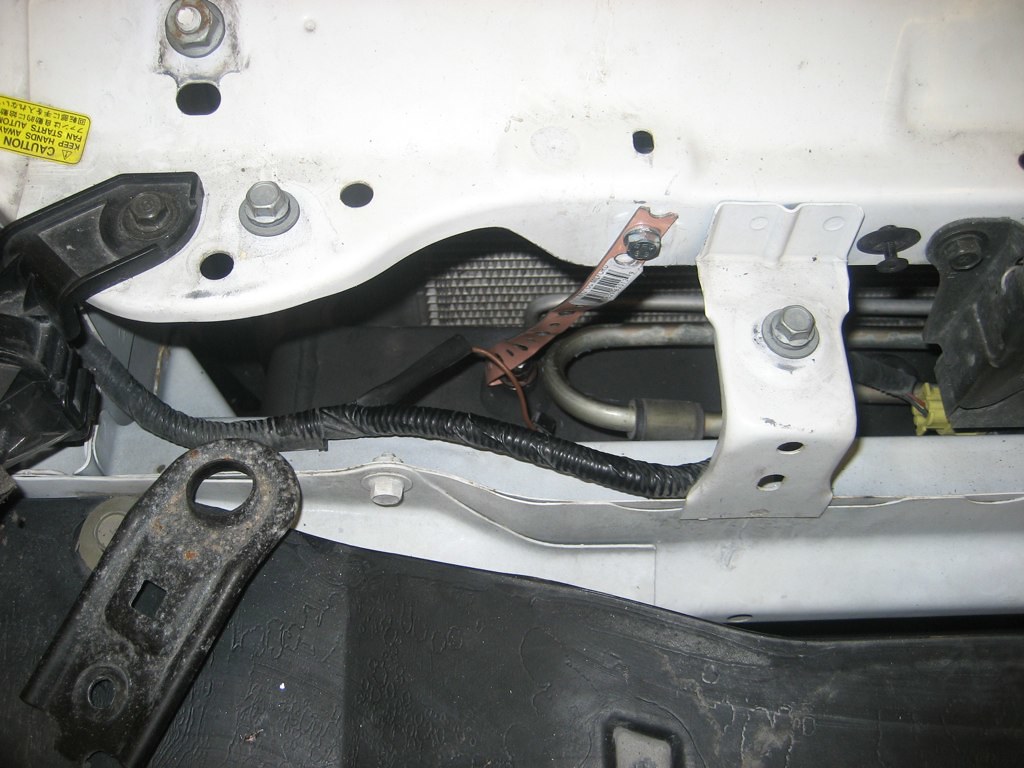
Here's the awesome and not-at-all-ghetto intercooler mount I made. It pretty much just hangs there. I had some more stable mounts but they wouldn't play nice with the bent-up power steering loop.

The intercooler is mounted. Can you see it? Stealthy, eh? I think it will be all but invisible once the bumper is back on. The only indication of mods from the outside will be a slightly larger exhaust tip. And the 6ULs.
I forgot to take any pictures of my routing, so sorry for that, but I will try to take a bunch more pictures on Monday when I go back for Day 3.
I'll be interested to hear what you guys think of my build so far.
I'm going with the awesome NB intercooler piping option that you suckers with NAs can't use. I had some trouble with the power steering cooling loop getting in the way, but I bent them up out of the way and I think it will work. I forgot to take pictures of that part, I'll try to remember to do that on Monday (garage is closed on Sundays).
Here's the awesome and not-at-all-ghetto intercooler mount I made. It pretty much just hangs there. I had some more stable mounts but they wouldn't play nice with the bent-up power steering loop.
The intercooler is mounted. Can you see it? Stealthy, eh? I think it will be all but invisible once the bumper is back on. The only indication of mods from the outside will be a slightly larger exhaust tip. And the 6ULs.
I forgot to take any pictures of my routing, so sorry for that, but I will try to take a bunch more pictures on Monday when I go back for Day 3.
I'll be interested to hear what you guys think of my build so far.
Last edited by skidude; 03-26-2011 at 11:23 PM. Reason: Forgot a picture
Reply
0
0


 03-29-2011, 12:12 PM
#9
Elite Member
iTrader: (9)
Join Date: Jun 2006
Location: Chesterfield, NJ
Posts: 6,892
Total Cats: 399
Very nice. For future if needed, mount the turbo to the manifold off the car. It makes reaching the little nuts on the bottom of the T2 flange so much easier. After the turbo/manifold is bolted to the head, the downpipe comes up from the bottom with a twist with the car on jack stands. Install the one lower downpipe bolt first and hang the downpipe on it while you climb out from under the car (the bolt that is used on that slot in the flange). It's a 1 person job cause...I'm one person and have to make the stuff install and remove that way 
Lookin' good! You will *love* that setup.
Truth!
Lookin' good! You will *love* that setup.
Truth!
Reply
0
0
03-29-2011, 02:58 PM
#10

Looks like a solid build, and it's always nice to have a lift and endless supply of tools. I'm jealous of the absurdflow goodies every time I see someone else with that setup *sigh*
And I can totally relate to that sentiment. I just pulled my car apart last week and had the same thought.
And I can totally relate to that sentiment. I just pulled my car apart last week and had the same thought.
Reply
0
0
03-29-2011, 07:24 PM
#11
Elite Member
Thread Starter
iTrader: (3)
Join Date: Apr 2008
Location: Outside Portland Maine
Posts: 2,023
Total Cats: 19
I worked about 12 hours yesterday and about 8 today, and the car looks not a lot different than before except it has a bumper now. I did a lot though, just nothing that felt quite as substantial as actually installing the turbo.
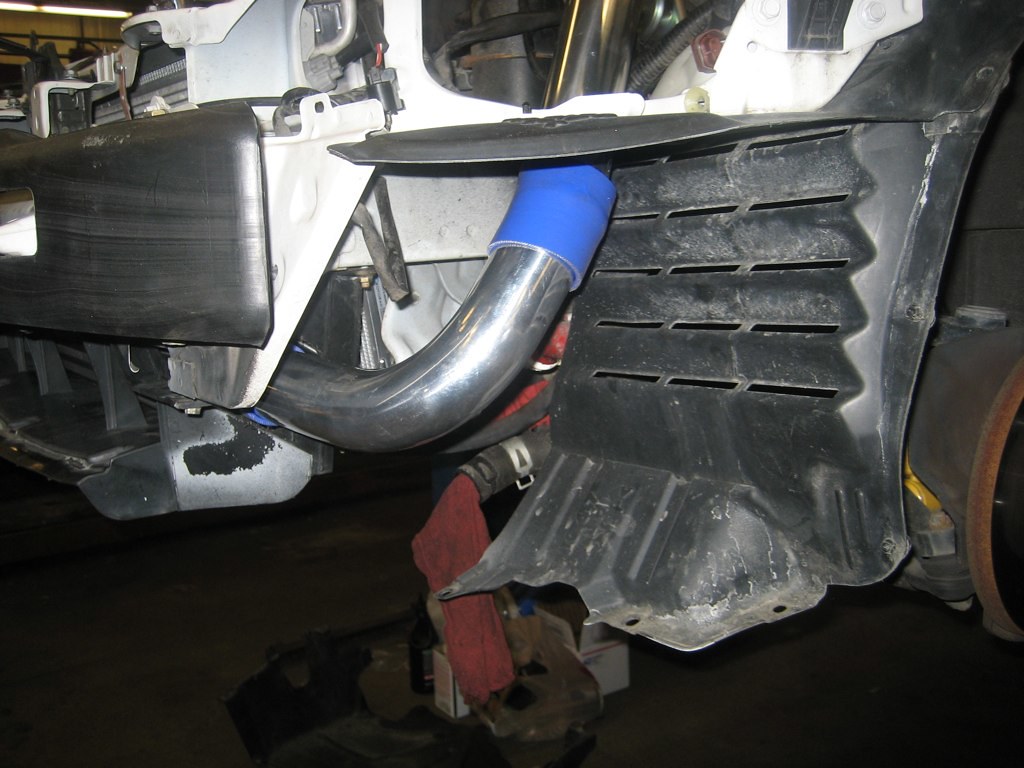
Fitting up some intercooler pipes, here's the warm side coming through the void in the bumper.
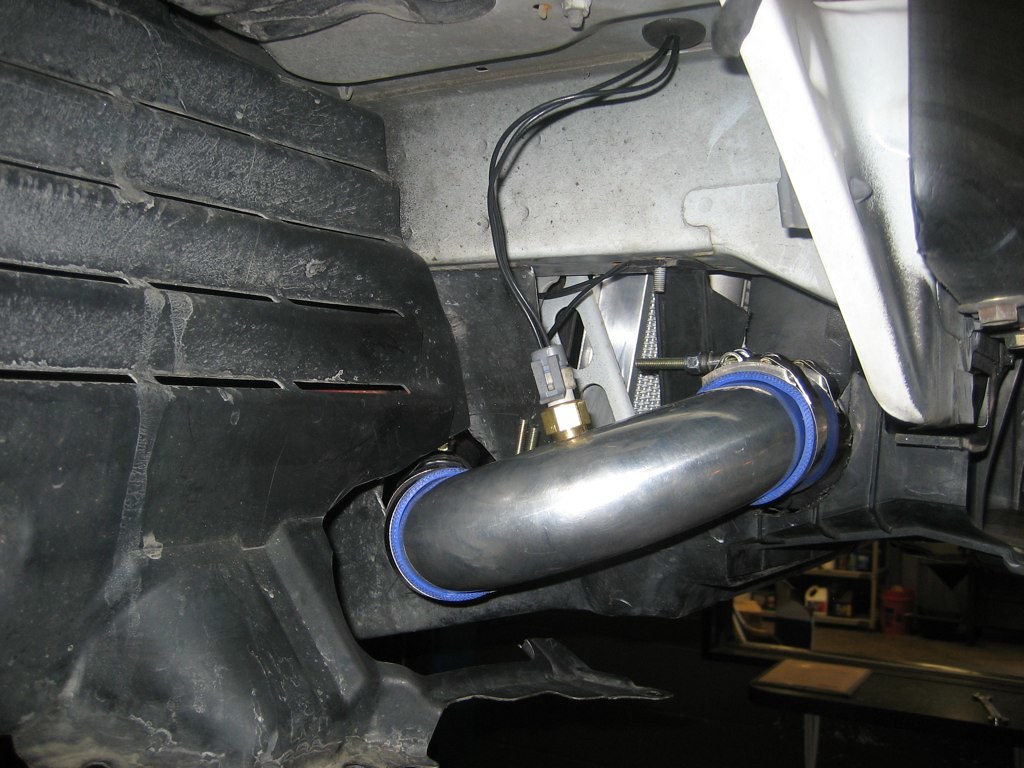
Here's the cold side doing a similar thing, though it leaves through the back instead of the top of the void. This one also has clamps and an IAT sensor in this picture.
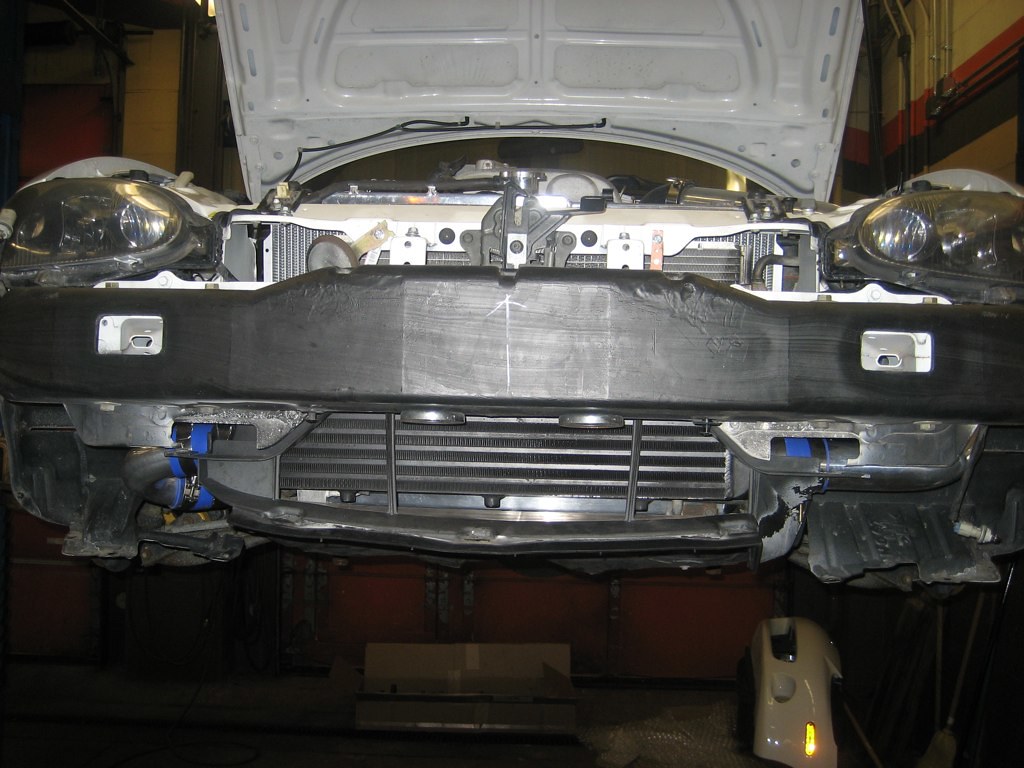
Here is the front of the car, all put together on the inside, but missing the bumper. I put the driver's side headlight back in also. I think this is about when I noticed that my warm side intercooler pipe didn't play nice with my fog light. I ended up trimming that pipe a little, and then putting a small dent in it so I could put the bumper back on.
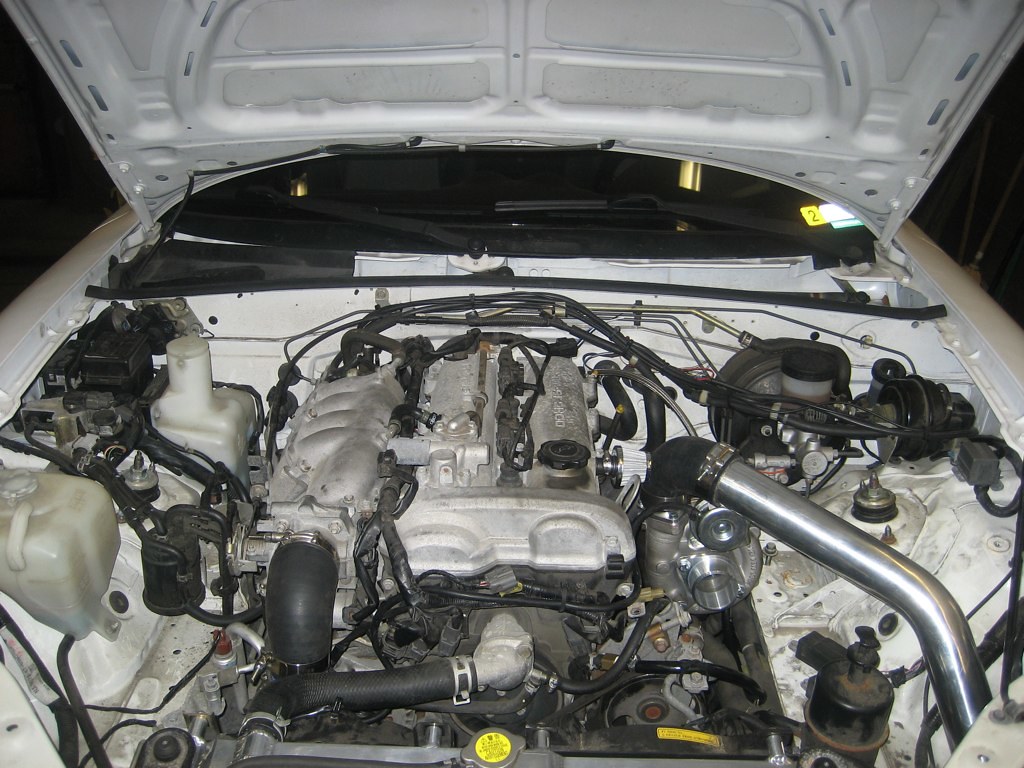
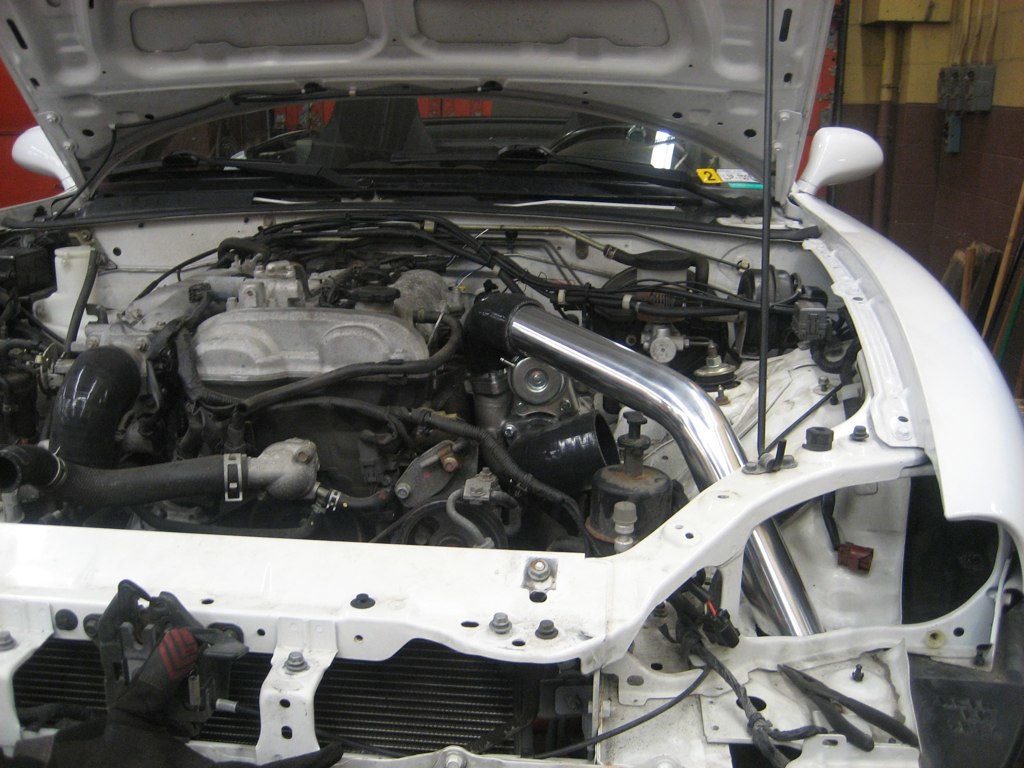
Here's the engine bay as it sits right now.
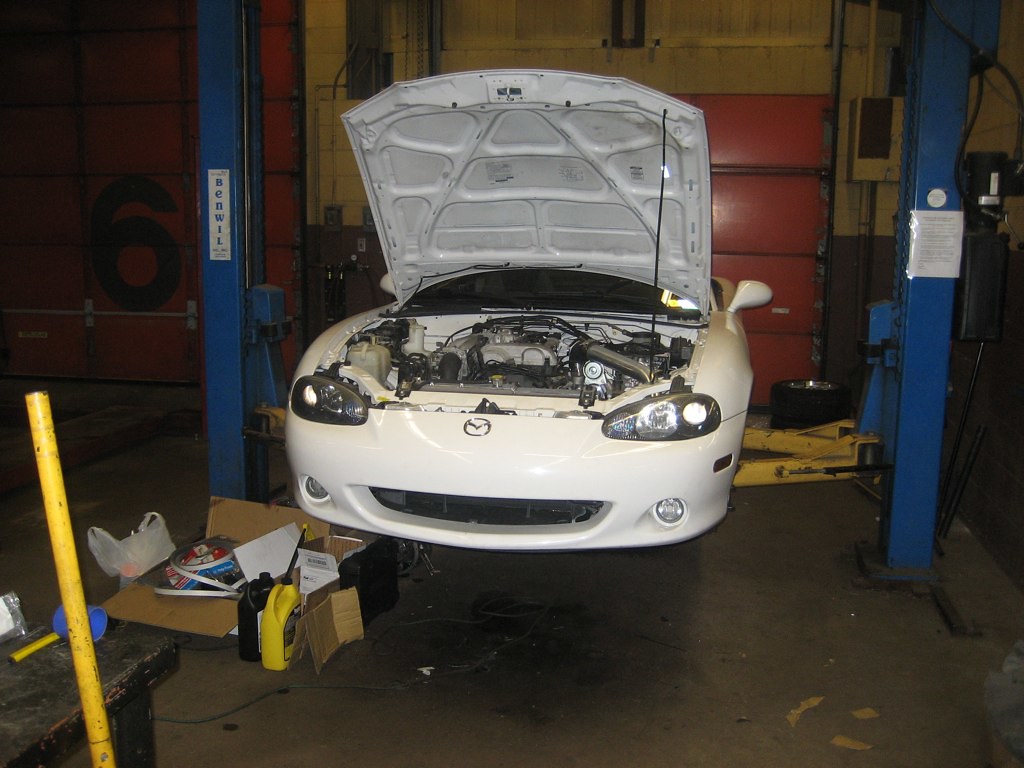
I got the front clip back on, and that intercooler is amazingly stealthy. I'm very excited about it. With the hood closed nobody will know what they're messing with.

We can see here the massive racing beat sway bar and koyo radiator. I'm not a fan of the long screw ends on all the T-Bolt clamps, but I'm not sure what to do about it.
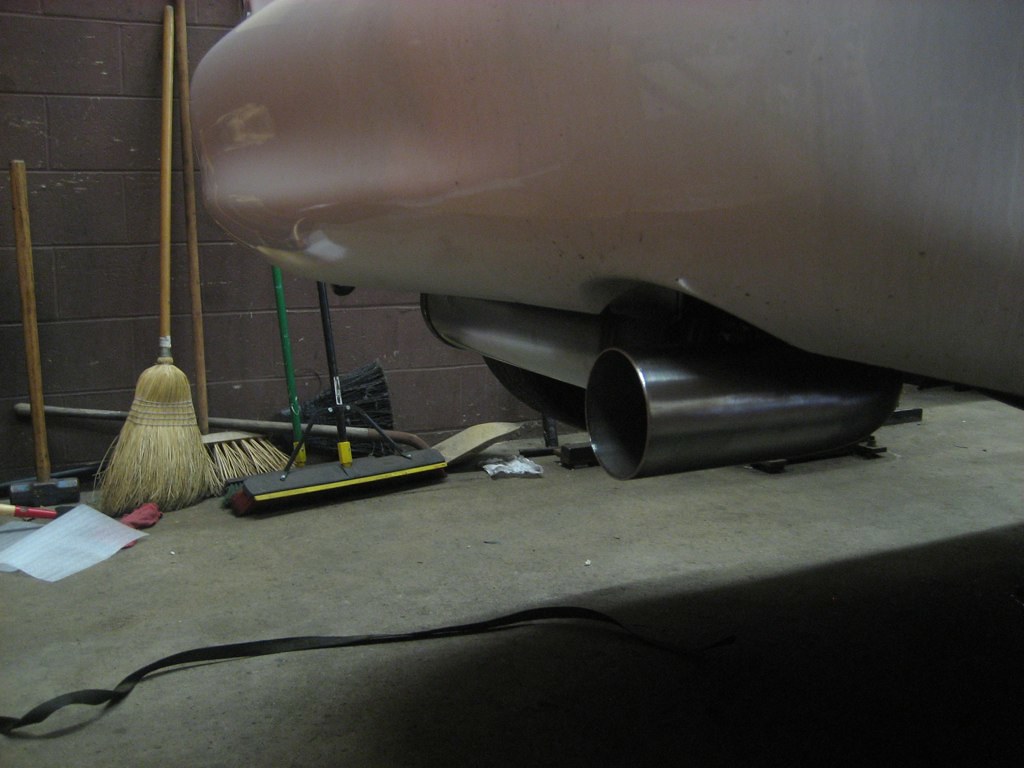
This is the tip on the Enthuza exhaust that showed up today. I love the tip! I'm not sure how I'll make the rest fit with the downpipe, but I'll figure that out tomorrow. The downpipe from Tim is pretty long and just ends, and the enthuza exhaust begins with a flange about 12 inches forward. I am thinking I will just cut off the last 6 inches of the downpipe and then cut off the first 6 inches of the midpipe just in front of the cat and they'll go together nicely. It does make me nervous to start hacking into my shiny new exhaust before a single breath of exhaust has gone through it, but I have to make it fit somehow.
Fitting up some intercooler pipes, here's the warm side coming through the void in the bumper.
Here's the cold side doing a similar thing, though it leaves through the back instead of the top of the void. This one also has clamps and an IAT sensor in this picture.
Here is the front of the car, all put together on the inside, but missing the bumper. I put the driver's side headlight back in also. I think this is about when I noticed that my warm side intercooler pipe didn't play nice with my fog light. I ended up trimming that pipe a little, and then putting a small dent in it so I could put the bumper back on.
Here's the engine bay as it sits right now.
I got the front clip back on, and that intercooler is amazingly stealthy. I'm very excited about it. With the hood closed nobody will know what they're messing with.
We can see here the massive racing beat sway bar and koyo radiator. I'm not a fan of the long screw ends on all the T-Bolt clamps, but I'm not sure what to do about it.
This is the tip on the Enthuza exhaust that showed up today. I love the tip! I'm not sure how I'll make the rest fit with the downpipe, but I'll figure that out tomorrow. The downpipe from Tim is pretty long and just ends, and the enthuza exhaust begins with a flange about 12 inches forward. I am thinking I will just cut off the last 6 inches of the downpipe and then cut off the first 6 inches of the midpipe just in front of the cat and they'll go together nicely. It does make me nervous to start hacking into my shiny new exhaust before a single breath of exhaust has gone through it, but I have to make it fit somehow.
Reply
0
0
03-29-2011, 07:31 PM
#12
Elite Member
Thread Starter
iTrader: (3)
Join Date: Apr 2008
Location: Outside Portland Maine
Posts: 2,023
Total Cats: 19
Very nice. For future if needed, mount the turbo to the manifold off the car. It makes reaching the little nuts on the bottom of the T2 flange so much easier. After the turbo/manifold is bolted to the head, the downpipe comes up from the bottom with a twist with the car on jack stands. Install the one lower downpipe bolt first and hang the downpipe on it while you climb out from under the car (the bolt that is used on that slot in the flange). It's a 1 person job cause...I'm one person and have to make the stuff install and remove that way
Lookin' good! You will *love* that setup.
Truth!
Lookin' good! You will *love* that setup.
Truth!
I got the enthuza exhaust today and the downpipe ends right in the middle of where the cat is so I know I have to cut a little bit off the end of the downpipe.
Reply
0
0
03-29-2011, 07:41 PM
#13
Elite Member
Thread Starter
iTrader: (3)
Join Date: Apr 2008
Location: Outside Portland Maine
Posts: 2,023
Total Cats: 19
I couldn't find a garage to do the project in, since I can't rent the one I'm using for months at a time. I am sort of glad, too, since I don't think I actually had enough money saved up for the V8 swap.
Reply
0
0
03-29-2011, 07:57 PM
#14
Junior Member
Join Date: Oct 2009
Location: Springfield, MO
Posts: 492
Total Cats: 3
Nice build, I just did mine last week and ran the same ic piping route. Mine was 2.5 though, looks like I had to cut out a crapload more than you did behind the drivers headlight. idk maybe the 01+ headlights are different. Anyway good looking build, what about the bov?
Reply
0
0
03-29-2011, 08:38 PM
#15
Elite Member
Thread Starter
iTrader: (3)
Join Date: Apr 2008
Location: Outside Portland Maine
Posts: 2,023
Total Cats: 19
I don't have a BOV yet. I bought one and I bought a pipe-mounted flange for it but when it showed up it was 2.5" instead of 2.25" so it doesn't fit and they don't have any of the right size. I'm not sure what to do. I can't weld aluminum and I don't really know anybody who can, but I may see if I can get a flange welded into a real pipe sometime soon anyway. I'm only going to run 6psi for the first couple weeks until I get it all tuned anyway so I'll just have to deal with some compressor surge until my weld-flange shows up and I find somebody who can attach it for me.
Reply
0
0
03-29-2011, 09:27 PM
#17
Elite Member
Thread Starter
iTrader: (3)
Join Date: Apr 2008
Location: Outside Portland Maine
Posts: 2,023
Total Cats: 19
Yeah, it's only just hanging there right now. The car is also about 4 feet up in the air, so with the perspective the muffler looks a lot lower than it really is. It will be better when I get the whole exhaust all fitted together.
Reply
0
0
03-29-2011, 09:39 PM
#18

I don't have a BOV yet. I bought one and I bought a pipe-mounted flange for it but when it showed up it was 2.5" instead of 2.25" so it doesn't fit and they don't have any of the right size. I'm not sure what to do. I can't weld aluminum and I don't really know anybody who can, but I may see if I can get a flange welded into a real pipe sometime soon anyway. I'm only going to run 6psi for the first couple weeks until I get it all tuned anyway so I'll just have to deal with some compressor surge until my weld-flange shows up and I find somebody who can attach it for me.

Reply
0
0
03-29-2011, 09:47 PM
#19
Elite Member
Thread Starter
iTrader: (3)
Join Date: Apr 2008
Location: Outside Portland Maine
Posts: 2,023
Total Cats: 19
I didn't remember that piping, the welds look fantastic. There are some really awesome welders at work but I will have to see if I can get them to take on a small personal project for me. If I can't then I will definitely ask for your help finding somebody who can stick that in there.
Reply
0
0


