Ready.... BOOST!
 09-22-2008, 11:54 PM
#1
Elite Member

Thread Starter
iTrader: (3)

Join Date: Apr 2008
Location: Outside Portland Maine
Posts: 2,023
Total Cats: 19
After what seems like forever, I have some boost, and so I will make a build thread.
Basics:
Car - 1994 C package with 155k miles. Red, obviously.
Turbo - 14b from an Eagle Talon
Intercooler - Starion/Conquest Front Mount with modified end tanks
Fuel/Spart - Megasquirt; Standalone with fan mod and eventually EBC
More Info:
Exhaust - Complete 2.5" Stainless Mandrel Bent with cat and magnaflow muffler
Intercooler Piping - 2.5" aluminum ebay kit.
BOV - RFL (Sounds like god sneezing every time I shift!)
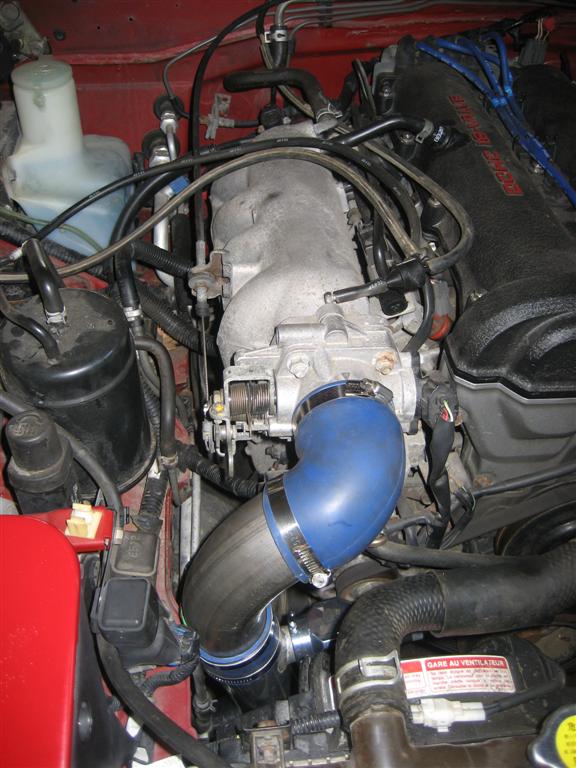
Manifold - Custom stainless log manifold
The Build:
We started with the exhaust, from the back. Check out that tip!

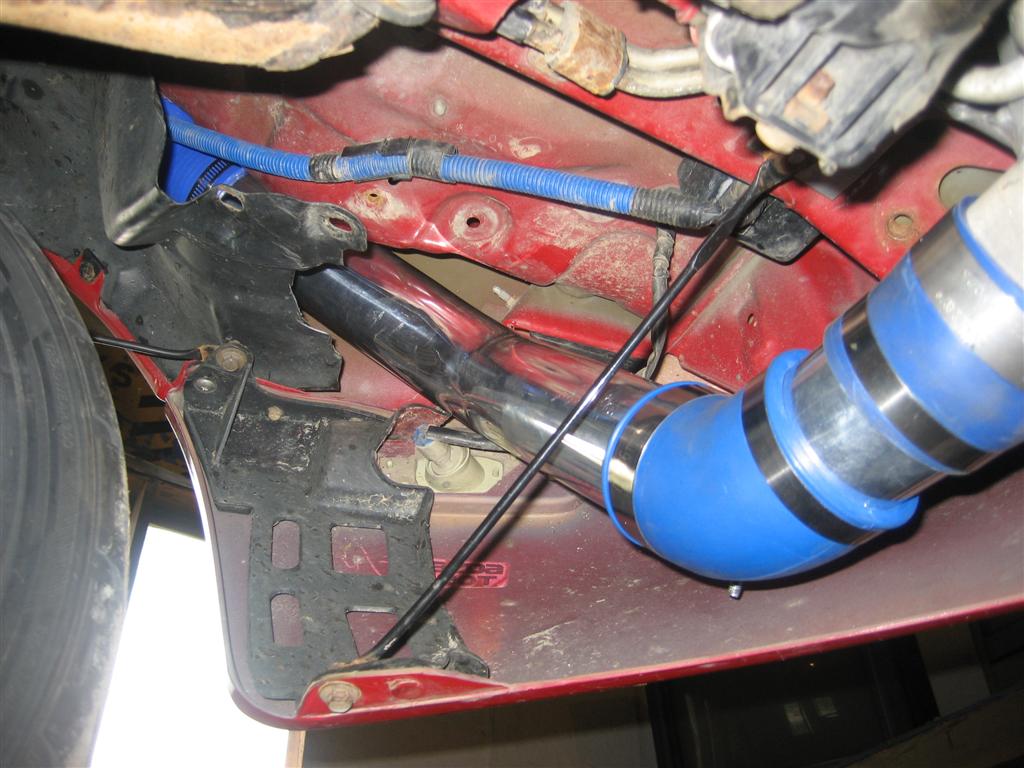
Once the back third of the exhaust was done, we hooked it into the stock exhaust and worked on the intercooler piping. (This is my only car and we couldn't finish the whole project in one weekend)
Cold Side standing under the engine looking up toward the passenger/front corner of the car:

Top view of that section:
Here's the intercooler from the front:

We didn't finish the hot side that weekend because we were missing a couple necessary couplers. Here's what we ended up doing with the hot side when we got the right couplers (Thanks for the idea TurboTim!):
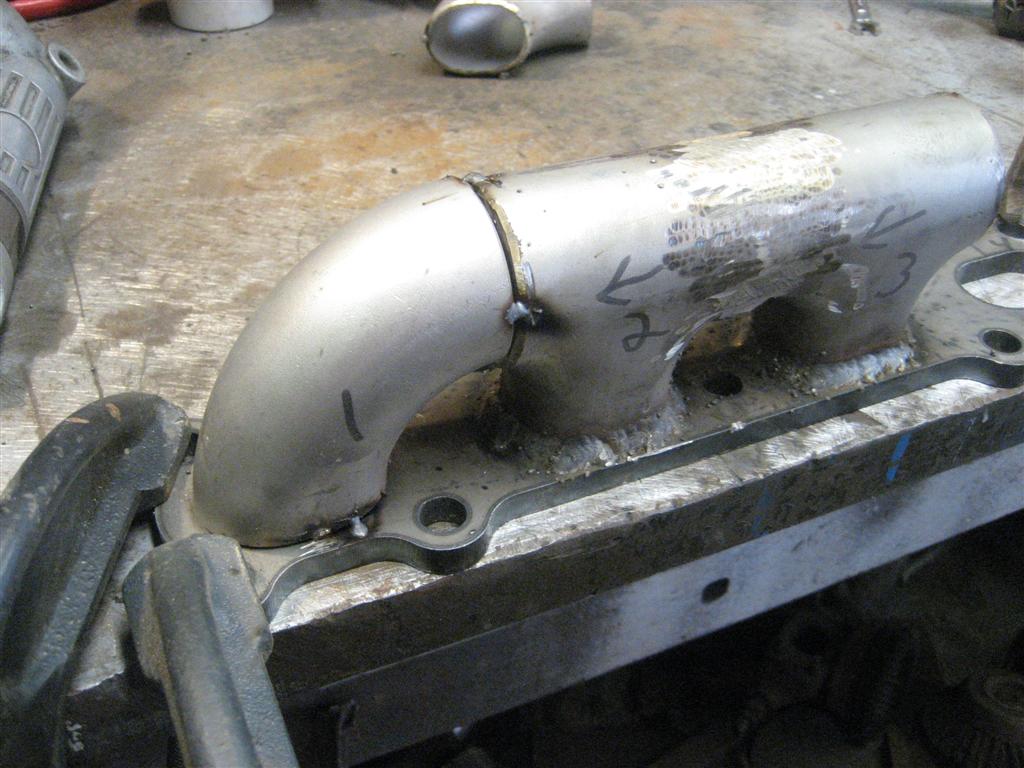
Once the flange came, we could start making the manifold. I can't weld for crap so my friend did all of the welding and made me do the grinding (which I am also pretty bad at).
Here is a work-in-progress of the log manifold:
And a test fit before we cut the turbo-hole in it:

Test fitting the turbo (I was practically jumping up and down to see the turbo sitting in my engine bay):

Once the turbo was located, work could begin on the downpipe. Here's the dump flange with the first bits of the downpipe welded on. I call it the dump but I doubt that's right:

And the downpipe. It hasn't been ground yet, but that's on the list of things to do:

And the turbo, all installed and ready to run (I put a filter on it before it left the garage, don't worry). The oil line had to go up over the motor for now because I didn't have a fitting to fit on the driver's side. I'm going to find one and then the oil line will be routed properly:

Here's the garage my friend has at his house with my car all hoisted up for surgery:

I guess it's not a very detailed build thread, but I felt like I was taking a TON of pictures when we were doing the install. I do have more but they're not as good, or they're more angles of the same thing.
The Conclusion
Right now, I'm running wastegate pressure, which is about 7psi. The flanges all leak because they need to be machined and have gaskets, so combined with the wastegate spring the spool isn't as quick as I'd hoped. Doesn't matter though, I have nothing to compare to so it's all good and will only get better when I fix those two issues.
The car has been turbo'd for ALMOST 24 hours now. The tune is still pretty rough but it gets better each time I drive it. I have no idea how I'm going to tune the spark table though.
There are still a few things that need to be finished up, obviously, but they are minor or cosmetic and so will wait a couple weeks. If you notice anything besides grinding welds and painting, and leaking flanges let me know and I may add it to my list if I think it is important.
Ok, discuss. What do you see that is wrong, and what do you like? What do you want more pictures of? And how do I make this post only show the pictures once?
Basics:
Car - 1994 C package with 155k miles. Red, obviously.
Turbo - 14b from an Eagle Talon
Intercooler - Starion/Conquest Front Mount with modified end tanks
Fuel/Spart - Megasquirt; Standalone with fan mod and eventually EBC
More Info:
Exhaust - Complete 2.5" Stainless Mandrel Bent with cat and magnaflow muffler
Intercooler Piping - 2.5" aluminum ebay kit.
BOV - RFL (Sounds like god sneezing every time I shift!)
Manifold - Custom stainless log manifold
The Build:
We started with the exhaust, from the back. Check out that tip!
Once the back third of the exhaust was done, we hooked it into the stock exhaust and worked on the intercooler piping. (This is my only car and we couldn't finish the whole project in one weekend)
Cold Side standing under the engine looking up toward the passenger/front corner of the car:
Top view of that section:
Here's the intercooler from the front:
We didn't finish the hot side that weekend because we were missing a couple necessary couplers. Here's what we ended up doing with the hot side when we got the right couplers (Thanks for the idea TurboTim!):
Once the flange came, we could start making the manifold. I can't weld for crap so my friend did all of the welding and made me do the grinding (which I am also pretty bad at).
Here is a work-in-progress of the log manifold:
And a test fit before we cut the turbo-hole in it:
Test fitting the turbo (I was practically jumping up and down to see the turbo sitting in my engine bay):
Once the turbo was located, work could begin on the downpipe. Here's the dump flange with the first bits of the downpipe welded on. I call it the dump but I doubt that's right:
And the downpipe. It hasn't been ground yet, but that's on the list of things to do:
And the turbo, all installed and ready to run (I put a filter on it before it left the garage, don't worry). The oil line had to go up over the motor for now because I didn't have a fitting to fit on the driver's side. I'm going to find one and then the oil line will be routed properly:
Here's the garage my friend has at his house with my car all hoisted up for surgery:
I guess it's not a very detailed build thread, but I felt like I was taking a TON of pictures when we were doing the install. I do have more but they're not as good, or they're more angles of the same thing.
The Conclusion
Right now, I'm running wastegate pressure, which is about 7psi. The flanges all leak because they need to be machined and have gaskets, so combined with the wastegate spring the spool isn't as quick as I'd hoped. Doesn't matter though, I have nothing to compare to so it's all good and will only get better when I fix those two issues.
The car has been turbo'd for ALMOST 24 hours now. The tune is still pretty rough but it gets better each time I drive it. I have no idea how I'm going to tune the spark table though.
There are still a few things that need to be finished up, obviously, but they are minor or cosmetic and so will wait a couple weeks. If you notice anything besides grinding welds and painting, and leaking flanges let me know and I may add it to my list if I think it is important.
Ok, discuss. What do you see that is wrong, and what do you like? What do you want more pictures of? And how do I make this post only show the pictures once?

Reply
 0
0

0
 09-24-2008, 09:25 AM
#4
Boost Czar

iTrader: (62)
Join Date: May 2005
Location: Chantilly, VA
Posts: 79,493
Total Cats: 4,080
**** me. If you are going to attach images....don't go back in and edit your post and insert them into your post....upload them to photobucket or tinyimage and link from there.
wtf is up with the 15' long tip? what tiny turbo is that?
wtf is up with the 15' long tip? what tiny turbo is that?
Reply
0
0
 Where's the pic showing the hot side pipe through the fender? Put a slit hose around that ac line and save it from the wrath of IC pipe.

 09-24-2008, 12:31 PM
#8
Elite Member
Thread Starter
iTrader: (3)
Join Date: Apr 2008
Location: Outside Portland Maine
Posts: 2,023
Total Cats: 19
The tip ended up being a little longer than I meant to buy, but it fits alright so I kept it.
The turbo is a 14b from a DSM.
I'll fix the pics at some point. Didn't know I had to link to them from an outside source.
I have to do something about my intercooler pipes. I keep blowing them off. I guess I need to get some better clamps, or something.
The turbo is a 14b from a DSM.
I'll fix the pics at some point. Didn't know I had to link to them from an outside source.
I have to do something about my intercooler pipes. I keep blowing them off. I guess I need to get some better clamps, or something.
Reply
0
0
09-24-2008, 12:35 PM
#9
That tip is way too big and long, and looks like ***. How many feet does it stick out pass the bumper? But otherwise a good build. Those hose clamps you are using are JUNK though. They make some heavy duty SS worm clamps that are a lot beffier. Lowe's used to sell them, now Ace is the only place that has em. Either get the better clamps or get T bolts.
Reply
0
0
09-24-2008, 01:39 PM
#11
Elite Member
iTrader: (15)

Join Date: Dec 2007
Location: San Antonio, Texas
Posts: 4,847
Total Cats: 27
+1 on t-bolt clamps. They are much better for sure. I am running 10 psi on 2.5"-3" intake tubing, no flares on the pipe ends, using t-bolt clamps on all of the couplers. No signs of impending separation at all. I bought the clamps (and couplers) here:
http://www.siliconeintakes.com/
I have also read that hair spray on the outside of the pipe for the portion overlapping the coupler helps, though I have not had to try this one yet. Spray some on and assemble quickly before the hair spray dries.
http://www.siliconeintakes.com/
I have also read that hair spray on the outside of the pipe for the portion overlapping the coupler helps, though I have not had to try this one yet. Spray some on and assemble quickly before the hair spray dries.
Reply
0
0
10-22-2008, 08:12 AM
#13
Elite Member
Thread Starter
iTrader: (3)
Join Date: Apr 2008
Location: Outside Portland Maine
Posts: 2,023
Total Cats: 19
Most of the silicone bends came with the ebay intercooler kit. I had to buy one 45, and a random 90 degree 2.5" to 2" reducer. The rest came with the kit for like $60
Reply
0
0
10-22-2008, 09:12 AM
#14
agreed, good **** IMO. Painting the dp bbq black is way quicker than grinding all those welds, and I bet you're better with a rattle can than grinder.  Better get that ac line off the IC pipe. You can just split a heater hose and wrap it around the ac line with a zip tie to keep 'em from rubbing.
Better get that ac line off the IC pipe. You can just split a heater hose and wrap it around the ac line with a zip tie to keep 'em from rubbing.
Reply
0
0
10-22-2008, 03:02 PM
#15
Elite Member
Thread Starter
iTrader: (3)
Join Date: Apr 2008
Location: Outside Portland Maine
Posts: 2,023
Total Cats: 19
Yes, I need to put something on that AC line, and I need to get a heat shield or something on the turbo to protect the cruise control cable. Any suggestions on that?
My to-do list is relatively short but includes important things:
AC line
Heat Shield
Protect water lines through firewall
Find coolant fittings and hook them up
Get T-Bolt clamps
Tune EBC and Spark and fix accel enrichments
Paint stuff
My to-do list is relatively short but includes important things:
AC line
Heat Shield
Protect water lines through firewall
Find coolant fittings and hook them up
Get T-Bolt clamps
Tune EBC and Spark and fix accel enrichments
Paint stuff
Reply
0
0
10-22-2008, 03:22 PM
#16
You can use some 20 ga. scrap sheet metal for a heat shield. I used a panel off my old home hvac unit. Just made sure there's some good air space around the turbo. Put a couple of "buttons" on the end of the IC pipes with the welder so they work like a bump to help keep the clamps from sliding off.
Reply
0
0

Thread
Thread Starter
Forum
Replies
Last Post
StratoBlue1109
Miata parts for sale/trade
21
09-30-2018 01:09 PM


