Ryephile's loosely guided build
 11-03-2014, 03:18 PM
#41
Junior Member

Thread Starter
iTrader: (1)

Join Date: Jun 2014
Location: Metro Detroit
Posts: 270
Total Cats: 26
Progress achieved 
*Greddy turbo and manifold removed [and is for sale if you want it for super cheap!]
*Rice-tastic Unorthodox "racing" crank pulley fell off once I removed the crank bolt. Thank goodness my keyway looks perfect.
*Original water pump had the tack-welded stamped blades. Again, thank goodness they stayed intact.
*New cam and crank seals installed. Yay FM's seal installers.
*'99 intake-side timing belt cog installed
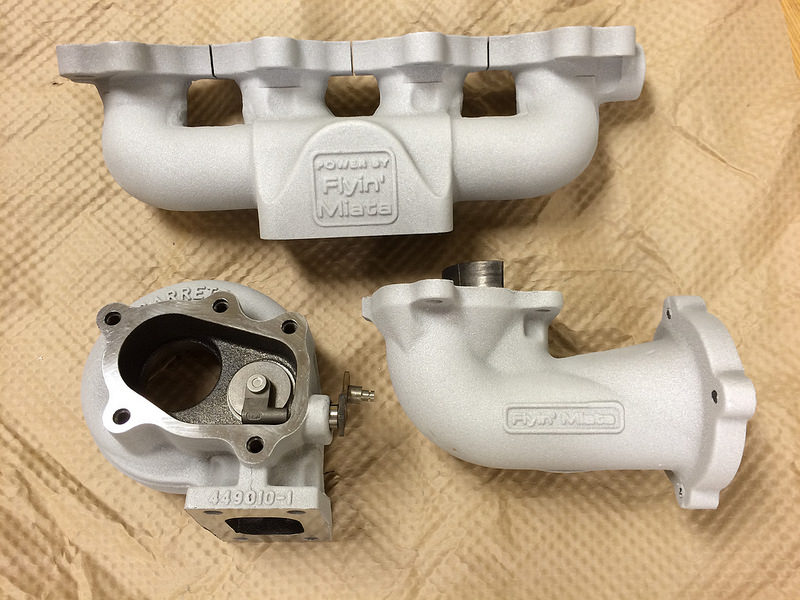
*Sexy exhaust bits from Swaintech arrived!
The more I teardown the car, the more obvious it was that it was clinging tenaciously for dear life. The radiator also had a pinhole leak on the front-side, way far away from where the boost tubes were rubbing. The downpipe nuts weren't even tight, yet somehow the gasket showed no leaks. The cam seals were leaking, and the power steering system [both pump and reservoir] were oozing black goo all over the engine and frame rail. Oh, the presumably original 22 year old timing belt had stretched so much that there was about 3/4" of vertical play between the intake and exhaust cam sprockets.
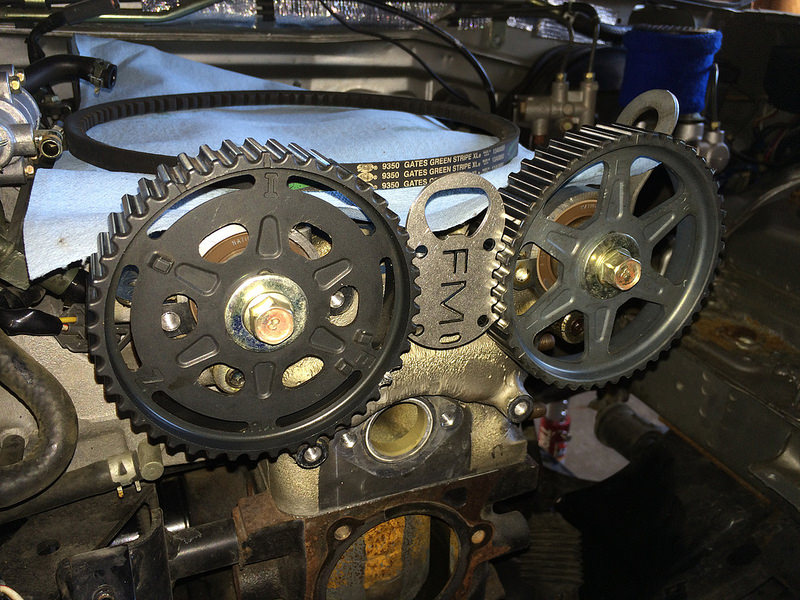 '99 intake timing gear by Ryephile, on Flickr
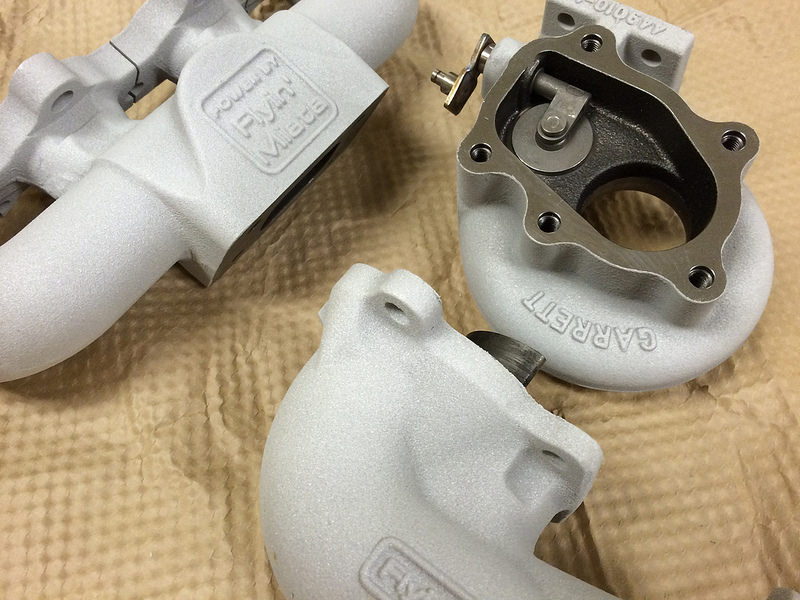 Swaintech White Lightning by Ryephile, on Flickr
 Swaintech White Lightning by Ryephile, on Flickr
Next up is to clean up the engine, install new water pump, timing belt, and ATI superdamper with 36-2 tooth wheel. Then I'll work on the mess under the hydraulics and rust-convert and paint that area.
*Greddy turbo and manifold removed [and is for sale if you want it for super cheap!]
*Rice-tastic Unorthodox "racing" crank pulley fell off once I removed the crank bolt. Thank goodness my keyway looks perfect.
*Original water pump had the tack-welded stamped blades. Again, thank goodness they stayed intact.
*New cam and crank seals installed. Yay FM's seal installers.
*'99 intake-side timing belt cog installed
*Sexy exhaust bits from Swaintech arrived!
The more I teardown the car, the more obvious it was that it was clinging tenaciously for dear life. The radiator also had a pinhole leak on the front-side, way far away from where the boost tubes were rubbing. The downpipe nuts weren't even tight, yet somehow the gasket showed no leaks. The cam seals were leaking, and the power steering system [both pump and reservoir] were oozing black goo all over the engine and frame rail. Oh, the presumably original 22 year old timing belt had stretched so much that there was about 3/4" of vertical play between the intake and exhaust cam sprockets.
'99 intake timing gear by Ryephile, on FlickrSwaintech White Lightning by Ryephile, on FlickrSwaintech White Lightning by Ryephile, on FlickrNext up is to clean up the engine, install new water pump, timing belt, and ATI superdamper with 36-2 tooth wheel. Then I'll work on the mess under the hydraulics and rust-convert and paint that area.

Reply
 0
0

0
 11-13-2014, 12:07 AM
#43
Junior Member
Thread Starter
iTrader: (1)
Join Date: Jun 2014
Location: Metro Detroit
Posts: 270
Total Cats: 26
Progress update:
*ATI damper installed. FFS I'm fairly certain I got the magical tolerance stack-up. I heated the pulley up to 235F and ambient was 33F, and even using [the awesome] OTC 4531 bearing-style installer it took a big *** 1 1/16" wrench + 2 foot breaker bar holding the crank steady/counteracting the torque. Do not buy this damper unless you also plan on buying the right tools to install it, no exceptions.
 RYE_9251.jpg by Ryephile, on Flickr
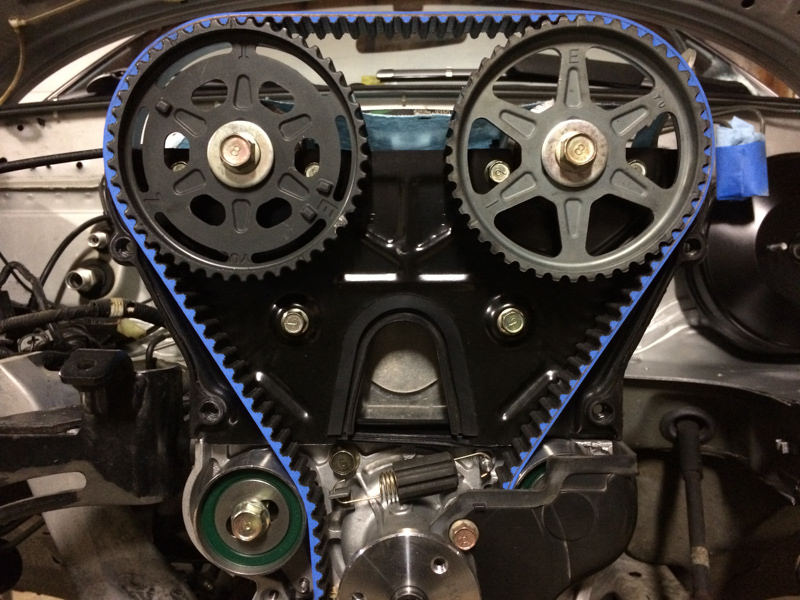
*Timing belt, idler pulleys, water pump, and TSE front water block-off w/freeze plug is all installed. You tell me if I got the cam gear alignment right, looks good on this side of the monitor.
 IMG_4855.jpg by Ryephile, on Flickr
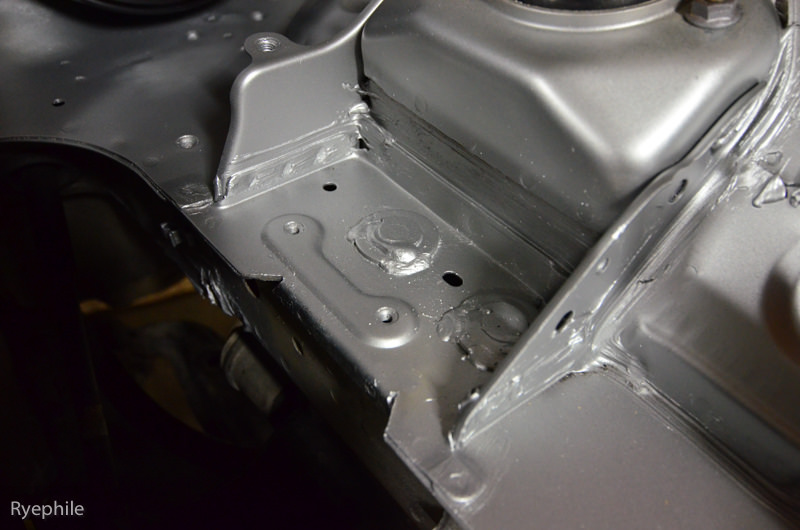
*Rust from leaking brake reservoir fixed. Wire brushed, sandpaper, 3-coats VHT Rust converter, 2-coats gray primer, 2-coats Mazda Silverstone Silver for the frame, and Mitsubishi Evo IX Tarmac Black metallic for the brake booster. No clear coat in the engine bay, just like stock.
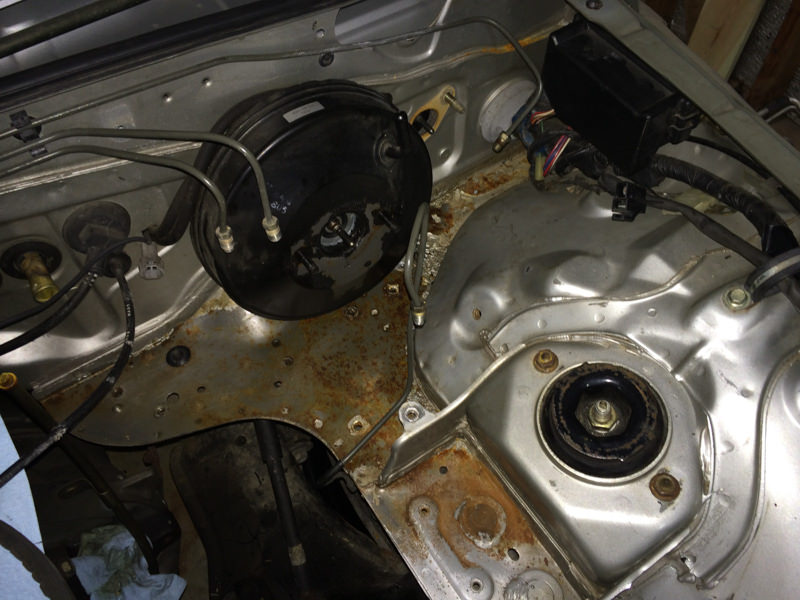 IMG_4829.jpg by Ryephile, on Flickr
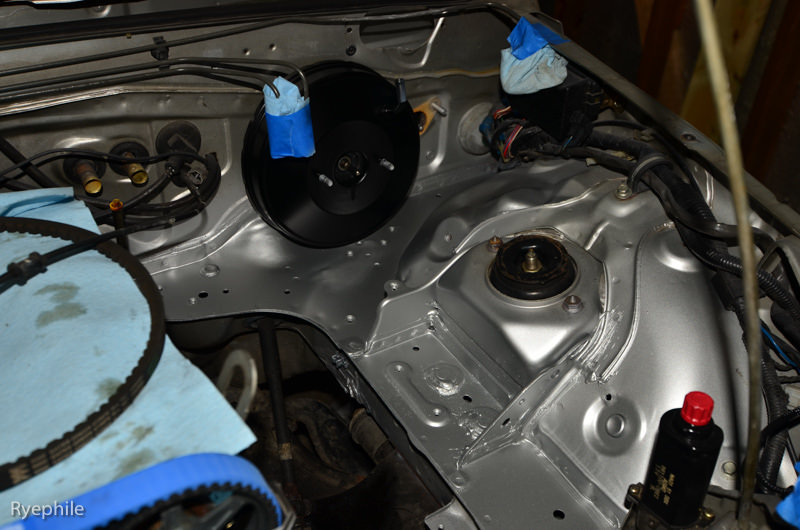 RYE_9244.jpg by Ryephile, on Flickr
*I got a 4-rib water pump pulley from Planet Miata. It arrived in a pathetically beat-up condition. I wire brushed and sanded down the whole thing, then primed, painted, and clear coated it. Looks like a salable product now, ahem.
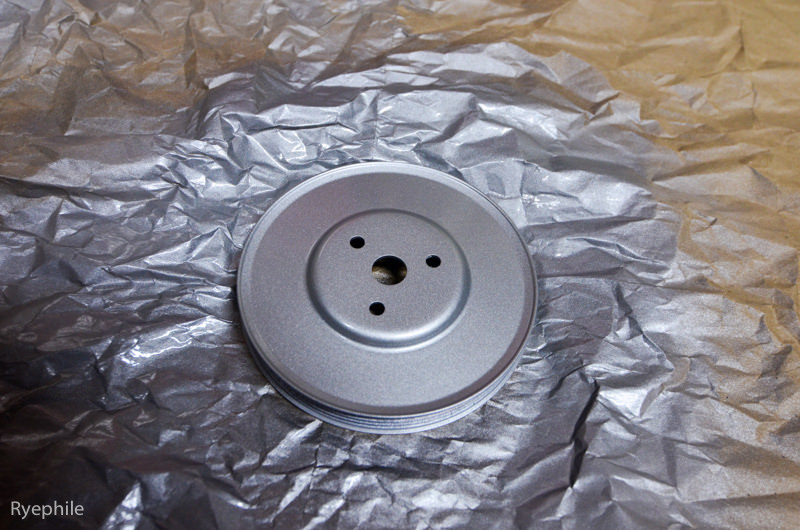 RYE_9243.jpg by Ryephile, on Flickr
*Mazdaspeed engine mounts. The stockers that I removed were torn the entire section width of the rubber. No wonder things seemed floppy under hood.
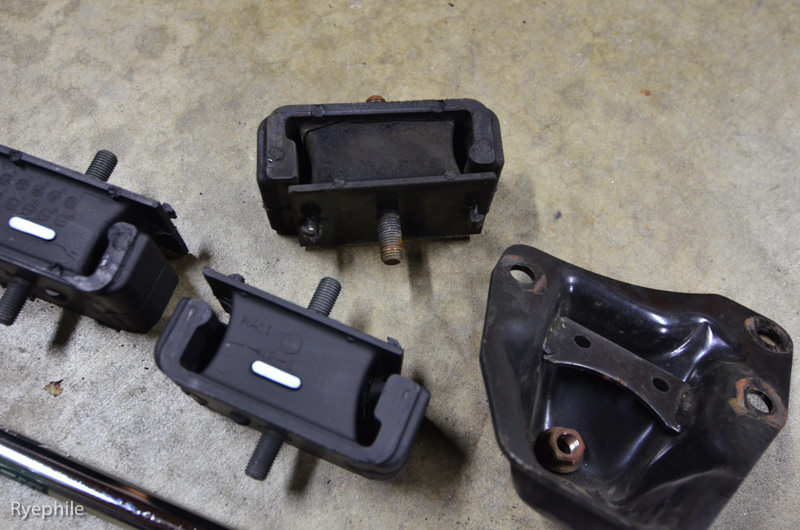 RYE_9257.jpg by Ryephile, on Flickr
*Notched the frame seam weld for the FlyinMiata install. Zip-zip with the angle grinder cut-off wheel and tap-tap with the sledgehammer and paint-paint with the touch-up bottle and it's all good.
 RYE_9260.jpg by Ryephile, on Flickr
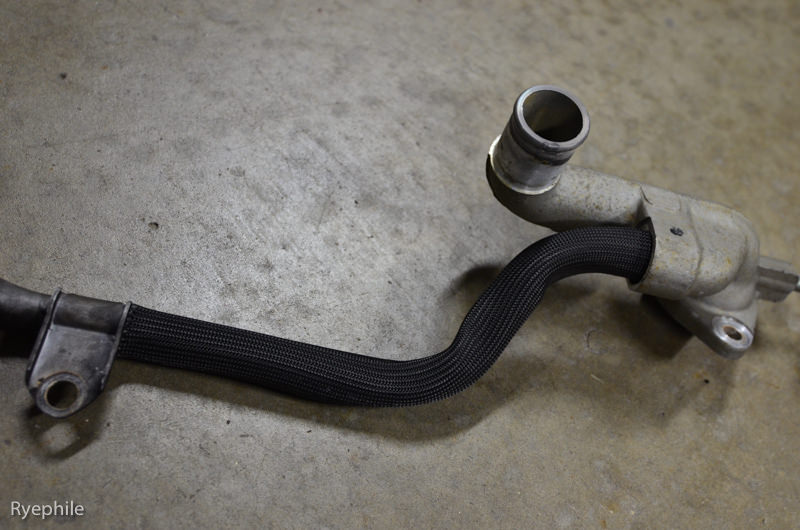
*Playing with some heat sleeving. This one is from HeatshieldProducts.com and is their treated fiberglass "Hot Rod" sleeving. It looks great, but it's no miracle product. Using a heat gun and a thermocouple, it takes a good long time to achieve even a small rise in temp within the sleeving, and once the heat source is removed it cools very quickly. It's not quite as good as the fiberglass/kevlar sleeving I bought from McMaster a while back. Curiously enough, I tried a test of the Hot Rod sleeve inside the kevlar sleeve, and that has both amazing heat rejection and very quick dissipation. OTOH, "fire shield" sleeving [with the silicone coating] had excellent initial heat rejection, but was the absolute worst for dissipation; it appears to actually keep the heat within itself, making it IMO a poor choice for oil and water line protection.
 RYE_9256.jpg by Ryephile, on Flickr
...next up: cutting apart two valve covers to make a 1.6 have a '99 cam sensor.
*ATI damper installed. FFS I'm fairly certain I got the magical tolerance stack-up. I heated the pulley up to 235F and ambient was 33F, and even using [the awesome] OTC 4531 bearing-style installer it took a big *** 1 1/16" wrench + 2 foot breaker bar holding the crank steady/counteracting the torque. Do not buy this damper unless you also plan on buying the right tools to install it, no exceptions.
RYE_9251.jpg by Ryephile, on Flickr*Timing belt, idler pulleys, water pump, and TSE front water block-off w/freeze plug is all installed. You tell me if I got the cam gear alignment right, looks good on this side of the monitor.
IMG_4855.jpg by Ryephile, on Flickr*Rust from leaking brake reservoir fixed. Wire brushed, sandpaper, 3-coats VHT Rust converter, 2-coats gray primer, 2-coats Mazda Silverstone Silver for the frame, and Mitsubishi Evo IX Tarmac Black metallic for the brake booster. No clear coat in the engine bay, just like stock.
IMG_4829.jpg by Ryephile, on FlickrRYE_9244.jpg by Ryephile, on Flickr*I got a 4-rib water pump pulley from Planet Miata. It arrived in a pathetically beat-up condition. I wire brushed and sanded down the whole thing, then primed, painted, and clear coated it. Looks like a salable product now, ahem.
RYE_9243.jpg by Ryephile, on Flickr*Mazdaspeed engine mounts. The stockers that I removed were torn the entire section width of the rubber. No wonder things seemed floppy under hood.
RYE_9257.jpg by Ryephile, on Flickr*Notched the frame seam weld for the FlyinMiata install. Zip-zip with the angle grinder cut-off wheel and tap-tap with the sledgehammer and paint-paint with the touch-up bottle and it's all good.
RYE_9260.jpg by Ryephile, on Flickr*Playing with some heat sleeving. This one is from HeatshieldProducts.com and is their treated fiberglass "Hot Rod" sleeving. It looks great, but it's no miracle product. Using a heat gun and a thermocouple, it takes a good long time to achieve even a small rise in temp within the sleeving, and once the heat source is removed it cools very quickly. It's not quite as good as the fiberglass/kevlar sleeving I bought from McMaster a while back. Curiously enough, I tried a test of the Hot Rod sleeve inside the kevlar sleeve, and that has both amazing heat rejection and very quick dissipation. OTOH, "fire shield" sleeving [with the silicone coating] had excellent initial heat rejection, but was the absolute worst for dissipation; it appears to actually keep the heat within itself, making it IMO a poor choice for oil and water line protection.
RYE_9256.jpg by Ryephile, on Flickr...next up: cutting apart two valve covers to make a 1.6 have a '99 cam sensor.
Reply
0
0
 11-19-2014, 04:53 PM
#45
Junior Member
Thread Starter
iTrader: (1)
Join Date: Jun 2014
Location: Metro Detroit
Posts: 270
Total Cats: 26
Thanks. It's a slow road, but with 10�F and snow outside so early in the season, I'm certainly not in a rush to get it back on the road.
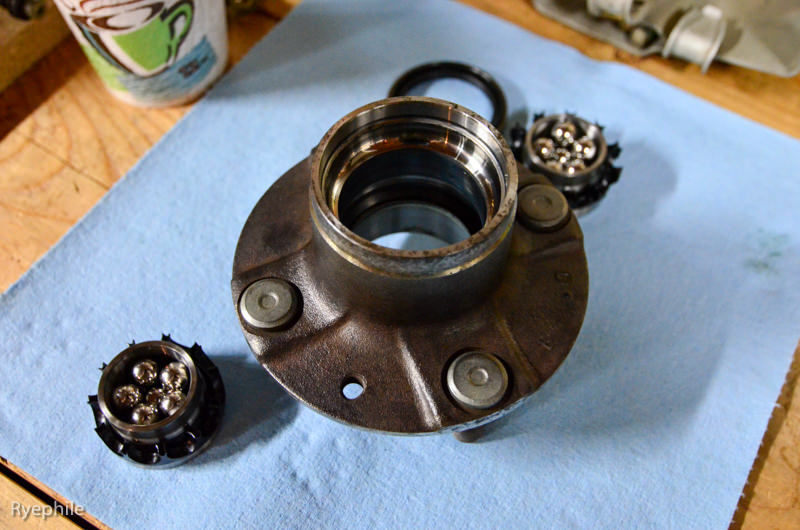
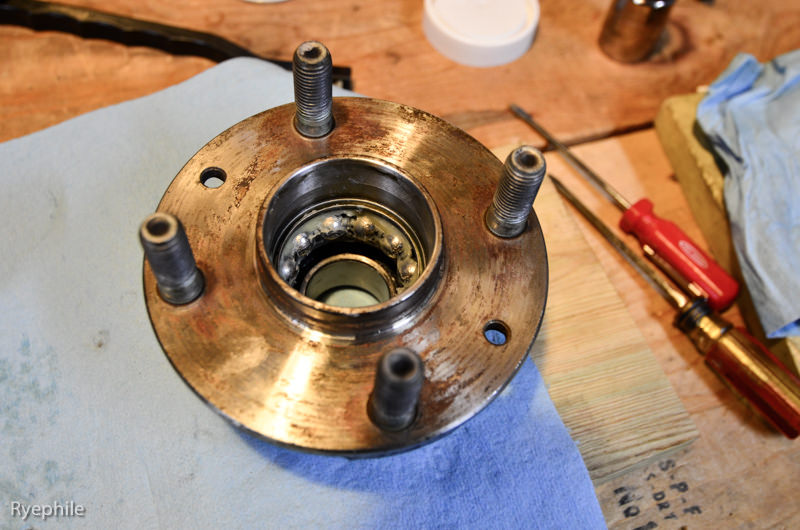
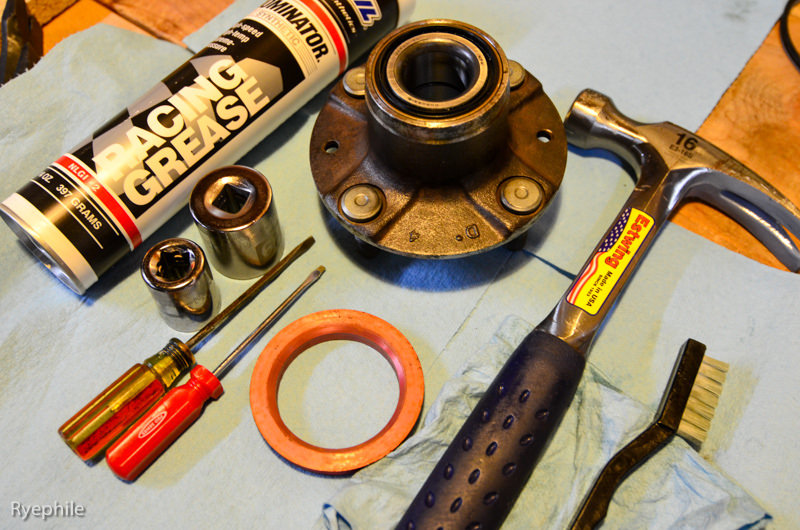
More pics! Using EO2K's fabulous How-To, I rebuilt my front hubs using AMSoil Dominator grease. The ***** and races looked perfect, and the hubs outer surfaces cleaned up fine with just a little wire brushing. Tons of parts cleaner and shop-towels to clean up the fat-people smell from the old grease. Nitrile gloves were a good decision too.
 RYE_9311.jpg by Ryephile, on Flickr
This picture was while I was packin' the grease. I fully coated the *****, races, and cage, but kept the volume between the bearings clean.
 RYE_9318.jpg by Ryephile, on Flickr
Tools used for this. Hub-centric ring worked fantastic for seating the inboard seal.
 RYE_9321.jpg by Ryephile, on Flickr
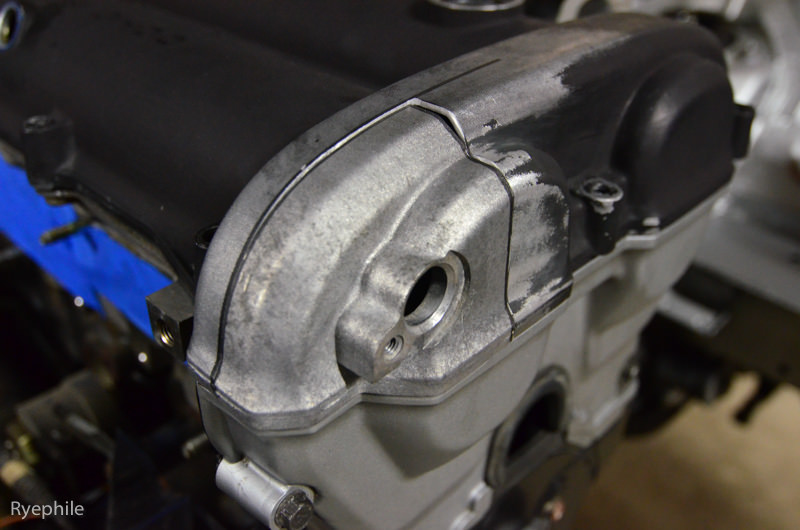
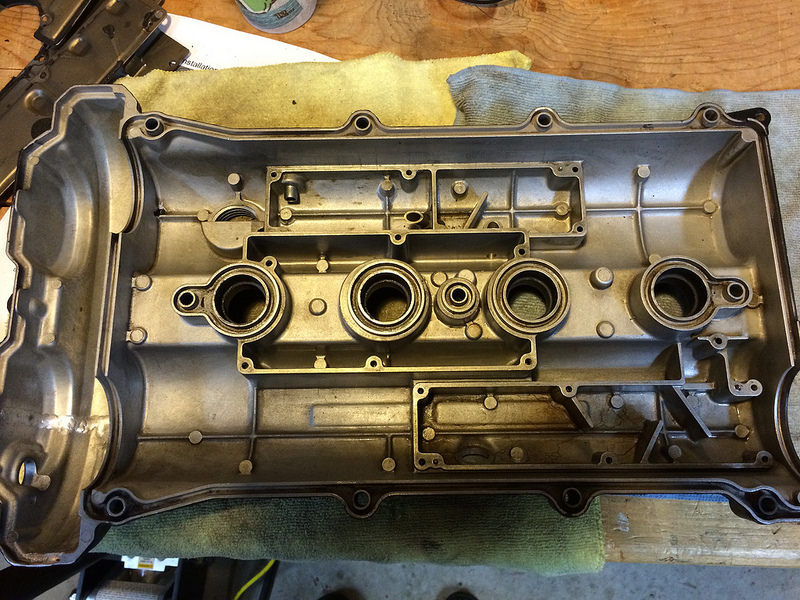
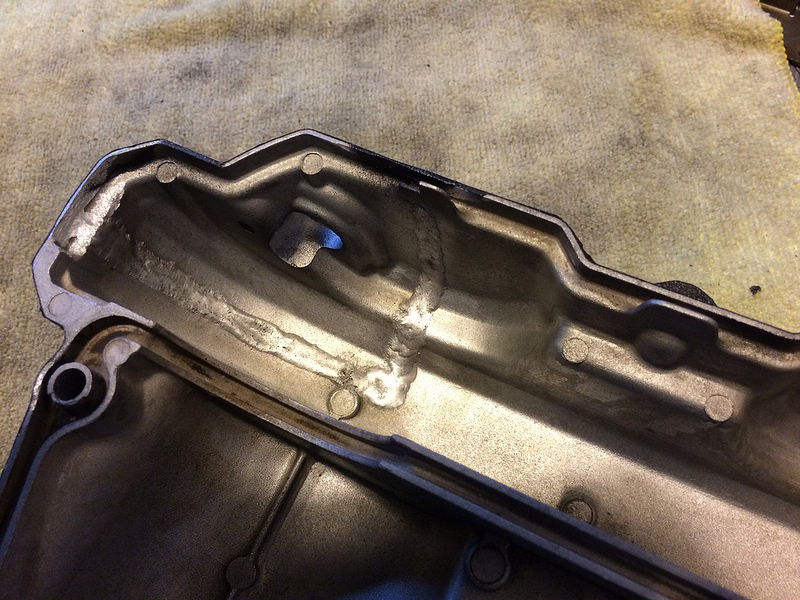
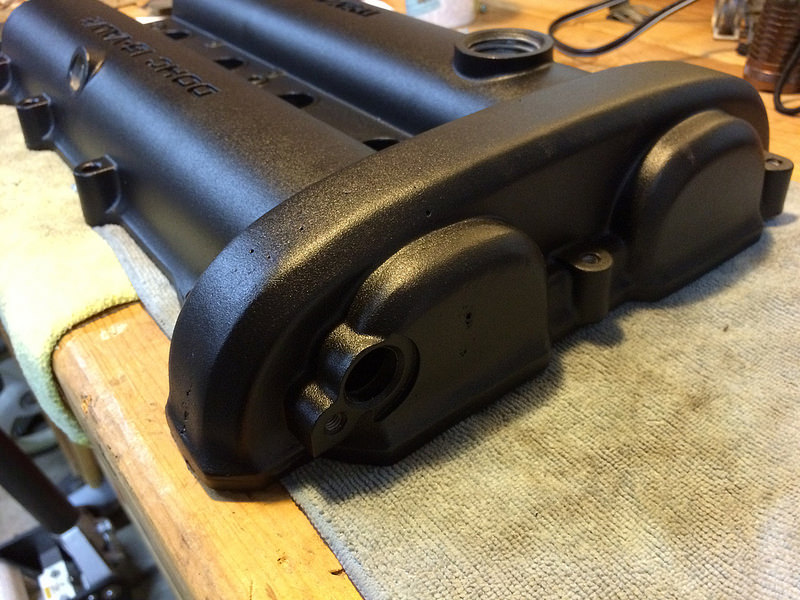
Mock-up for the '99 Cam sensor in a 1.6 valve cover. Note the slight shape differences. This is currently at the welder/powder coater being fluffled and buffed.
 RYE_9271.jpg by Ryephile, on Flickr
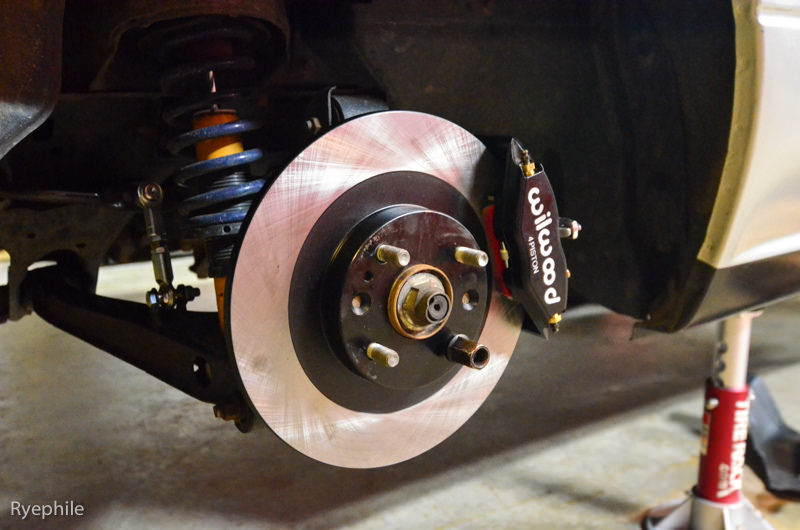
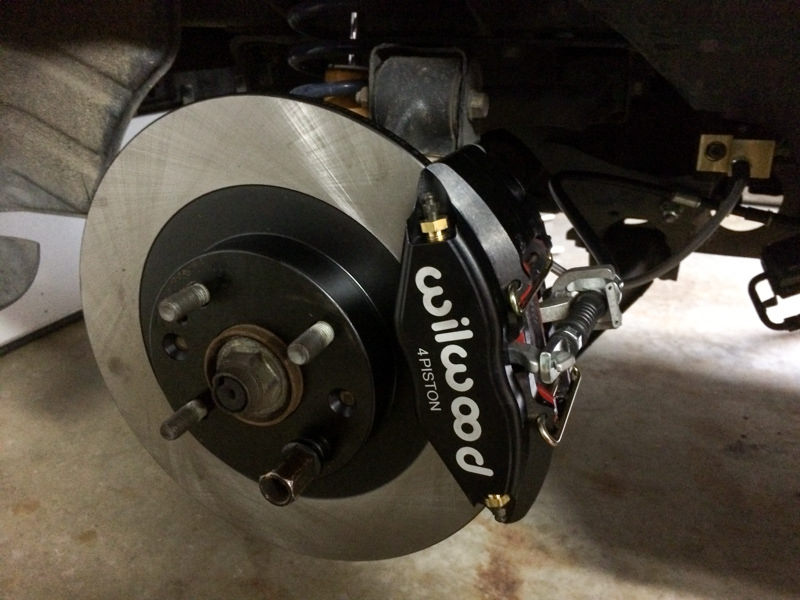
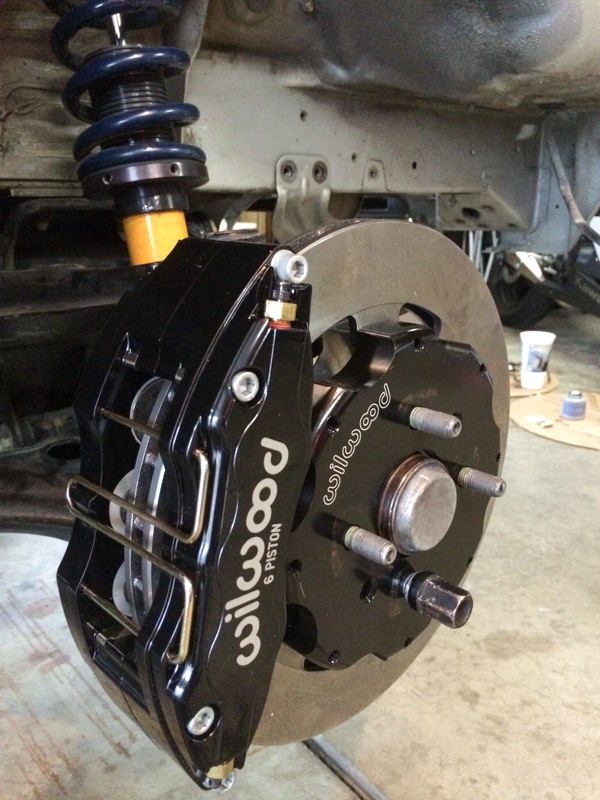
I tore off the stock 1.6L brakes and installed new hotness. TSE's 11.75 BBK w/Wilwood Dynapro 6 caliper, and FM's rear BBK using Wilwood Powerlite caliper. Carbotech 1521's for street, and come springtime, XP12 front and XP10 rear for the track. We'll see how that plays out, the inherent proportion should be not bad. Wilwood prop valve not quite installed yet.
 RYE_9308.jpg by Ryephile, on Flickr
 IMG_4866.jpg by Ryephile, on Flickr
 IMG_4875.jpg by Ryephile, on Flickr
 IMG_4884.jpg by Ryephile, on Flickr
I can now actually say that the Advanti Storm 15x8's fit under both these brake kits. The e-brake cable retaining clip on the rears must be tapped down a bit to clear the wheel hoop, but the front fits with entire millimeters to spare.
More pics! Using EO2K's fabulous How-To, I rebuilt my front hubs using AMSoil Dominator grease. The ***** and races looked perfect, and the hubs outer surfaces cleaned up fine with just a little wire brushing. Tons of parts cleaner and shop-towels to clean up the fat-people smell from the old grease. Nitrile gloves were a good decision too.
RYE_9311.jpg by Ryephile, on FlickrThis picture was while I was packin' the grease. I fully coated the *****, races, and cage, but kept the volume between the bearings clean.
RYE_9318.jpg by Ryephile, on FlickrTools used for this. Hub-centric ring worked fantastic for seating the inboard seal.
RYE_9321.jpg by Ryephile, on FlickrMock-up for the '99 Cam sensor in a 1.6 valve cover. Note the slight shape differences. This is currently at the welder/powder coater being fluffled and buffed.
RYE_9271.jpg by Ryephile, on FlickrI tore off the stock 1.6L brakes and installed new hotness. TSE's 11.75 BBK w/Wilwood Dynapro 6 caliper, and FM's rear BBK using Wilwood Powerlite caliper. Carbotech 1521's for street, and come springtime, XP12 front and XP10 rear for the track. We'll see how that plays out, the inherent proportion should be not bad. Wilwood prop valve not quite installed yet.
RYE_9308.jpg by Ryephile, on FlickrIMG_4866.jpg by Ryephile, on FlickrIMG_4875.jpg by Ryephile, on FlickrIMG_4884.jpg by Ryephile, on FlickrI can now actually say that the Advanti Storm 15x8's fit under both these brake kits. The e-brake cable retaining clip on the rears must be tapped down a bit to clear the wheel hoop, but the front fits with entire millimeters to spare.
Last edited by Ryephile; 12-03-2014 at 10:56 AM.
Reply
1
1
11-25-2014, 04:13 PM
#46
Junior Member
Thread Starter
iTrader: (1)
Join Date: Jun 2014
Location: Metro Detroit
Posts: 270
Total Cats: 26
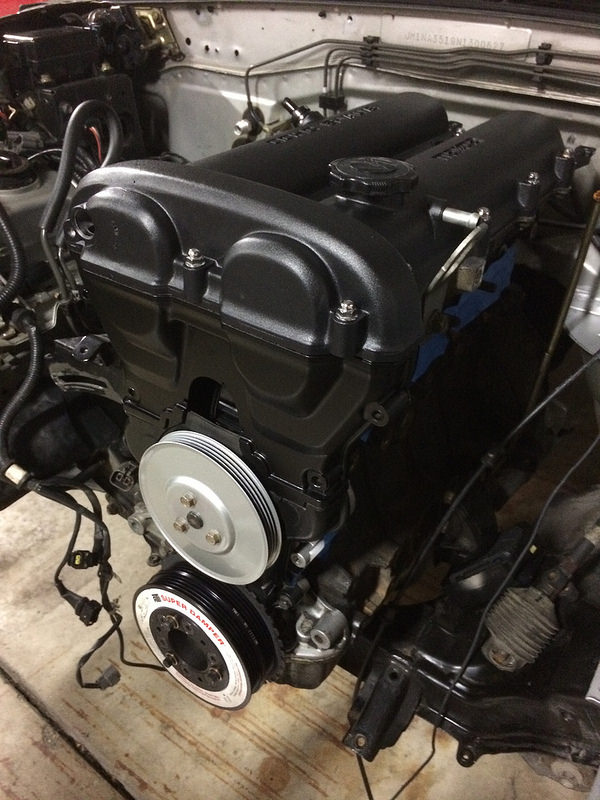
Valve Cover is finished!
 Valve cover update by Ryephile, on Flickr
 Valve cover update by Ryephile, on Flickr
 Valve cover update by Ryephile, on Flickr
 Valve cover update by Ryephile, on Flickr
Things are coming along. I also got the brake and clutch lines all buttoned up.
Next up is figuring out the BEGI coolant re-route. I've discovered the machining on my BEGI spacer is, um, random. It apears they used a 3 different sized taps for the 3/8" NPT fittings.
Valve cover update by Ryephile, on FlickrValve cover update by Ryephile, on FlickrValve cover update by Ryephile, on FlickrValve cover update by Ryephile, on FlickrThings are coming along. I also got the brake and clutch lines all buttoned up.
Next up is figuring out the BEGI coolant re-route. I've discovered the machining on my BEGI spacer is, um, random. It apears they used a 3 different sized taps for the 3/8" NPT fittings.
Reply
1
1
11-25-2014, 04:21 PM
#47
Senior Member
iTrader: (1)

Join Date: Dec 2010
Location: Farmington Hills, MI
Posts: 1,218
Total Cats: 175
That'll be just about the exact same brake set up I'll be running in the summer, except 4-pot fronts (either Trackspeed or V8R). I'm curious to hear your thoughts on them. Though I'll have likely ordered them before it get's warm here (noticed you're from metro detroit too).
What rotors are you using in the rear?
What rotors are you using in the rear?
Reply
0
0
11-25-2014, 04:38 PM
#48
Junior Member
Thread Starter
iTrader: (1)
Join Date: Jun 2014
Location: Metro Detroit
Posts: 270
Total Cats: 26
That'll be just about the exact same brake set up I'll be running in the summer, except 4-pot fronts (either Trackspeed or V8R). I'm curious to hear your thoughts on them. Though I'll have likely ordered them before it get's warm here (noticed you're from metro detroit too).
What rotors are you using in the rear?
What rotors are you using in the rear?
The rear rotors are good ole Centric.
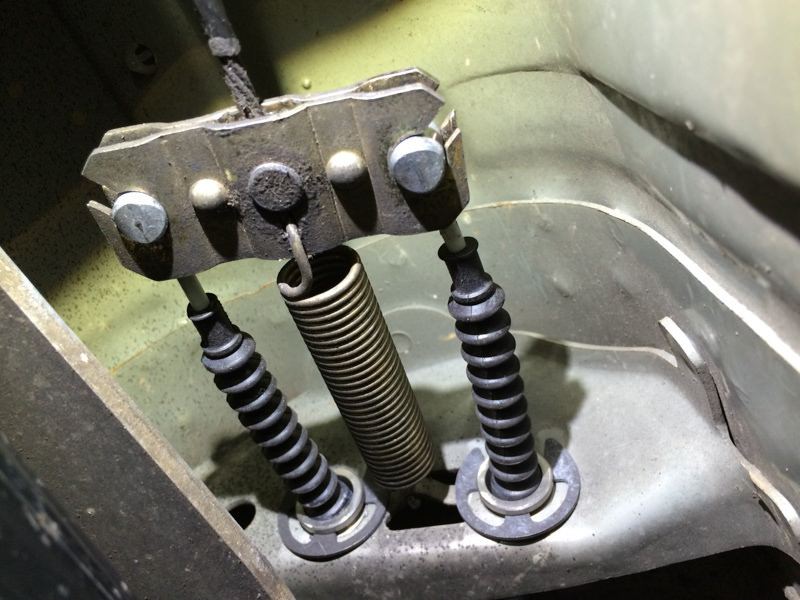
I find it useful to note that the new FM rear e-brake cables are OEM NC Miata cables. As such, they are just barely long enough to work for this application. FM notes in their instructions that the cables will stretch slightly, so I left the e-brake cranked for a weekend, and indeed it helped. Even then, there's only about 3-turns of threads on the e-brake handle adjuster in the cabin, and one click on the handle goes from free to grabbing the rotor. There's not much room for playing around.
Reply
0
0
12-01-2014, 01:32 PM
#49
Junior Member
Thread Starter
iTrader: (1)
Join Date: Jun 2014
Location: Metro Detroit
Posts: 270
Total Cats: 26
Thanksgiving weekend update! I hope everyone had a good weekend.
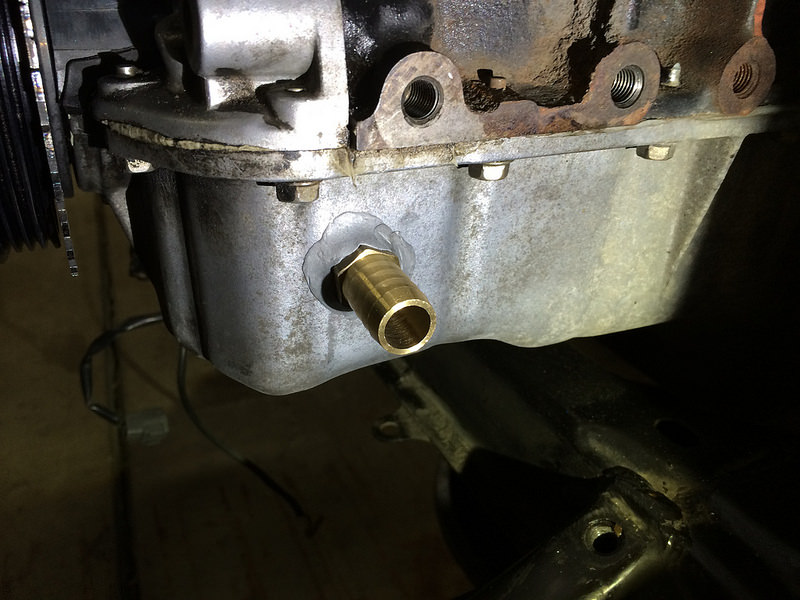
*Oil drain drilled and tapped using the 5 PSI PCV process. Aluminum shavings all up on my safety glasses. JB Weld High Temp used to seal the fitting.
 Turbo installed by Ryephile, on Flickr
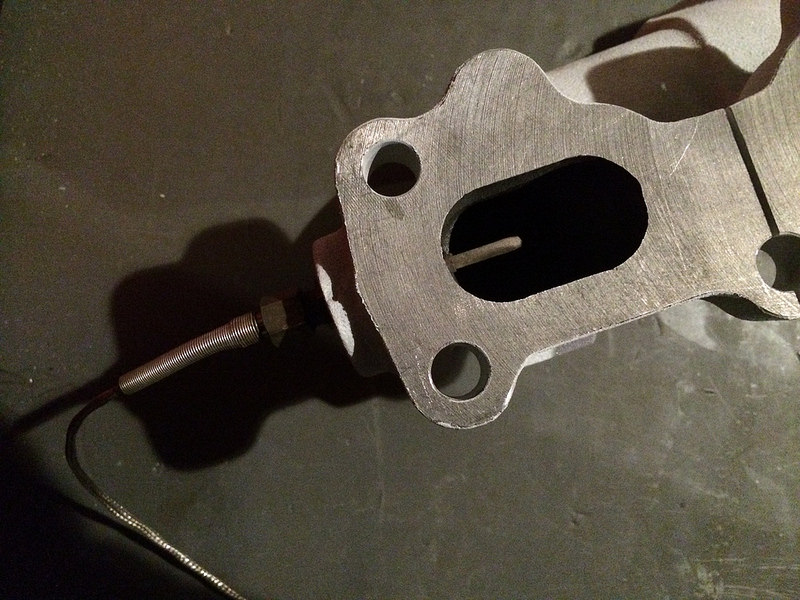
*EGT sensor drilled and tapped in the FM exhaust manifold where I presume was supposed to be the EGR area. I understand this will only give me a temp reading from the #4 cylinder, but it routes everything cleanly. EGT as you know is only a small factor in tuning, mainly for sustained load analysis. Individual cylinder tuning is not on my radar.
 Turbo installed by Ryephile, on Flickr
*Turbo assembly installed. I had to unbolt the driver-side engine mount and have helpers pull the engine to the passenger side to achieve sufficient clearance to put the manifold onto the studs. The heater hose hard line had to be nudged and bent to clear turbine outlet and FM heat shield. Heatshield products "Hot Rod" fiberglass sleeving used on all exposed portions of heater hoses, including hard line. Hot Rod sleeving within McMaster Kevlar/Fiberglass braid sleeving used on turbo oil and coolant lines. This is a killer combination for both radiant and blown-air heat resistance and internal thermal dissipation, according to my bench tests. The inboard water line is not yet installed. That'll happen eventually. The turbo will be fed from the intake manifold air valve coolant outlet.
 Turbo installed by Ryephile, on Flickr
 Turbo installed by Ryephile, on Flickr
Intercooler test-fitted with hot-side silicone hose. The plan is to build air baffles to duct air flow and reduce spill around the heat exchanger stack-up. I'm patiently waiting for the 949 Super Miata radiator to continue mocking up this area. I'm also figuring out where to mount my Setrab 19 row oil cooler.
 Turbo installed by Ryephile, on Flickr
*Oil drain drilled and tapped using the 5 PSI PCV process. Aluminum shavings all up on my safety glasses. JB Weld High Temp used to seal the fitting.
Turbo installed by Ryephile, on Flickr*EGT sensor drilled and tapped in the FM exhaust manifold where I presume was supposed to be the EGR area. I understand this will only give me a temp reading from the #4 cylinder, but it routes everything cleanly. EGT as you know is only a small factor in tuning, mainly for sustained load analysis. Individual cylinder tuning is not on my radar.
Turbo installed by Ryephile, on Flickr*Turbo assembly installed. I had to unbolt the driver-side engine mount and have helpers pull the engine to the passenger side to achieve sufficient clearance to put the manifold onto the studs. The heater hose hard line had to be nudged and bent to clear turbine outlet and FM heat shield. Heatshield products "Hot Rod" fiberglass sleeving used on all exposed portions of heater hoses, including hard line. Hot Rod sleeving within McMaster Kevlar/Fiberglass braid sleeving used on turbo oil and coolant lines. This is a killer combination for both radiant and blown-air heat resistance and internal thermal dissipation, according to my bench tests. The inboard water line is not yet installed. That'll happen eventually. The turbo will be fed from the intake manifold air valve coolant outlet.
Turbo installed by Ryephile, on FlickrTurbo installed by Ryephile, on FlickrIntercooler test-fitted with hot-side silicone hose. The plan is to build air baffles to duct air flow and reduce spill around the heat exchanger stack-up. I'm patiently waiting for the 949 Super Miata radiator to continue mocking up this area. I'm also figuring out where to mount my Setrab 19 row oil cooler.
Turbo installed by Ryephile, on Flickr
Reply
0
0
 12-03-2014, 10:51 AM
#52
Junior Member
Thread Starter
iTrader: (1)
Join Date: Jun 2014
Location: Metro Detroit
Posts: 270
Total Cats: 26
Thanks Guys. 
Ok, the following update took longer than expected. VTPS. TL;DR, go to your nearest salvage yard and score a VTPS and pigtail from an E32 BMW, OR, do it like Hornetball did in his thread.
Don't be a retard and do it the way I did. Oh, how'd I do it? I gutted the stock TPS switch, bought a Wells TPS4185, gutted that too, and then said "Oh ****" when all the parts came splashing out in a cascade of expletives and crushed dreams.
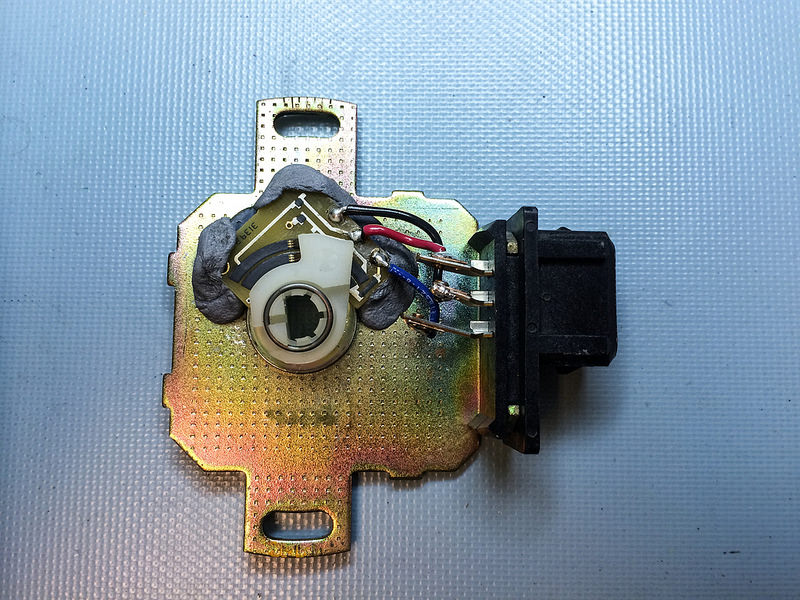
I ended up cutting down the stock TPS's brass bushing so the 4185 wiper arm would fit. Then I took some rubber bumpers to make the 4185's PCB planar, then JB Welded the PCB into position. End of the day, once mounted on the TB, it works great on the bench with my DMM. We'll see how reliable it is in the car. If it's a beeyotch I'll make a mounting plate for a hall effect sensor like a Vishay Spectrol 981HE0B4WA8H01.
 VTPS and alternator update by Ryephile, on Flickr
Here it is mounted on the TB: The TB shaft keeps the wiper arm axial and tangential to the mounting plate and PCB so the wiper arm contacts keep reasonably steady pressure on the resistive surfaces.
Not shown: Trimmed stock TPS cover hides everything and ends up looking 95% stock. heh hehe
 VTPS and alternator update by Ryephile, on Flickr
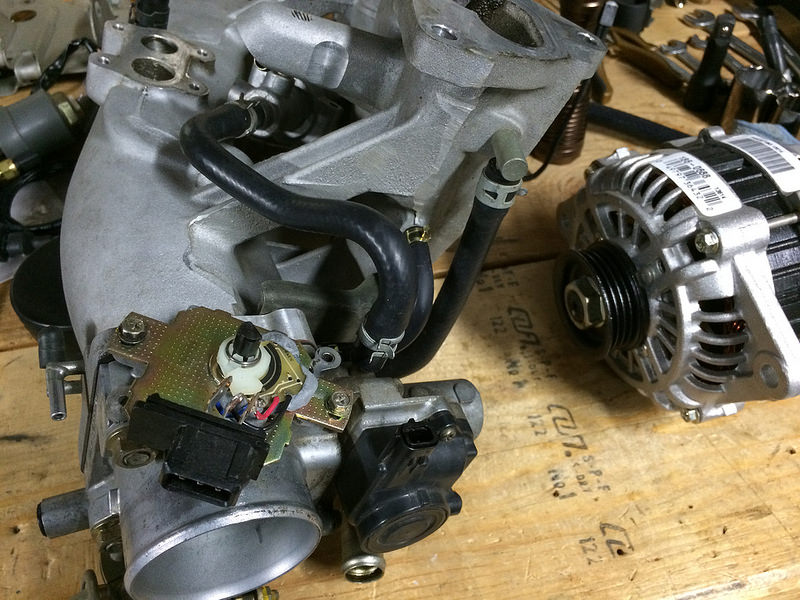
^^^New NA8 alternator awaiting installation. I also replaced all the rubber coolant hoses with new OEM pieces, and the wee-little vacuum hose under the TB with silicone tubing and spring clamps.
 VTPS and alternator update by Ryephile, on Flickr
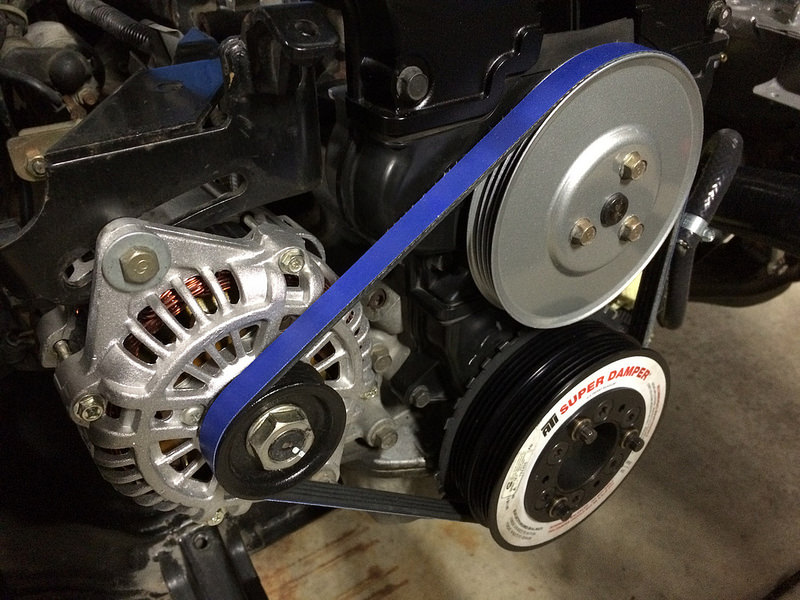
Here is the alternator installed with super awesome Gates kevlar serpentine belt. I hate that it's blue.
Of course, the upper mounting bolt between NA6 and NA8's is different. NA6 threads into the alternator, whereas NA8 uses the nut-n-bolt method. Thankfully my ever-growing hill of disused hardware came to the rescue.
Next up: Hoping the M10 to M8 step-stud I ordered through Pegasus Racing works to mount my Bosch knock sensor in the OEM knock mounting boss. Also, oil cooler hose and fittings ordered. Yay!
Ok, the following update took longer than expected. VTPS. TL;DR, go to your nearest salvage yard and score a VTPS and pigtail from an E32 BMW, OR, do it like Hornetball did in his thread.
Don't be a retard and do it the way I did. Oh, how'd I do it? I gutted the stock TPS switch, bought a Wells TPS4185, gutted that too, and then said "Oh ****" when all the parts came splashing out in a cascade of expletives and crushed dreams.
I ended up cutting down the stock TPS's brass bushing so the 4185 wiper arm would fit. Then I took some rubber bumpers to make the 4185's PCB planar, then JB Welded the PCB into position. End of the day, once mounted on the TB, it works great on the bench with my DMM. We'll see how reliable it is in the car. If it's a beeyotch I'll make a mounting plate for a hall effect sensor like a Vishay Spectrol 981HE0B4WA8H01.
VTPS and alternator update by Ryephile, on FlickrHere it is mounted on the TB: The TB shaft keeps the wiper arm axial and tangential to the mounting plate and PCB so the wiper arm contacts keep reasonably steady pressure on the resistive surfaces.
Not shown: Trimmed stock TPS cover hides everything and ends up looking 95% stock. heh hehe
VTPS and alternator update by Ryephile, on Flickr^^^New NA8 alternator awaiting installation. I also replaced all the rubber coolant hoses with new OEM pieces, and the wee-little vacuum hose under the TB with silicone tubing and spring clamps.
VTPS and alternator update by Ryephile, on FlickrHere is the alternator installed with super awesome Gates kevlar serpentine belt. I hate that it's blue.
Of course, the upper mounting bolt between NA6 and NA8's is different. NA6 threads into the alternator, whereas NA8 uses the nut-n-bolt method. Thankfully my ever-growing hill of disused hardware came to the rescue.
Next up: Hoping the M10 to M8 step-stud I ordered through Pegasus Racing works to mount my Bosch knock sensor in the OEM knock mounting boss. Also, oil cooler hose and fittings ordered. Yay!
Reply
0
0
12-16-2014, 11:33 AM
#53
Junior Member
Thread Starter
iTrader: (1)
Join Date: Jun 2014
Location: Metro Detroit
Posts: 270
Total Cats: 26
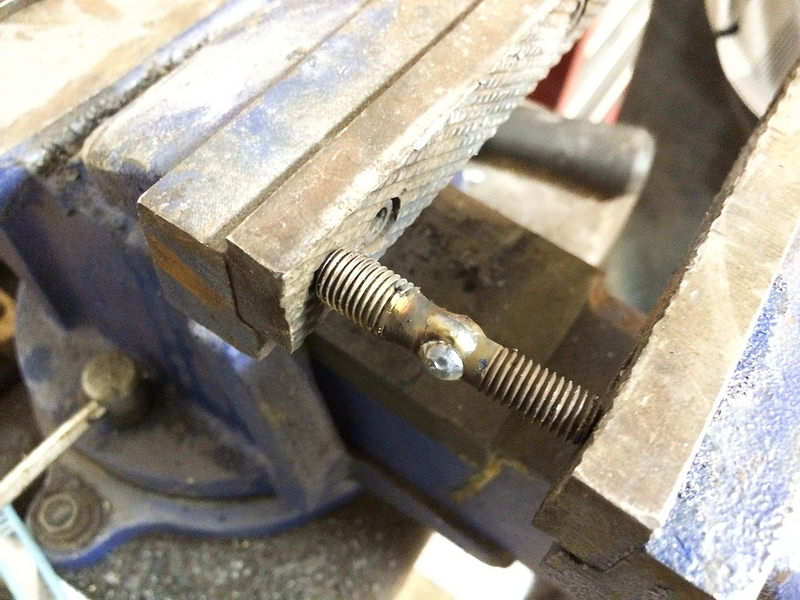
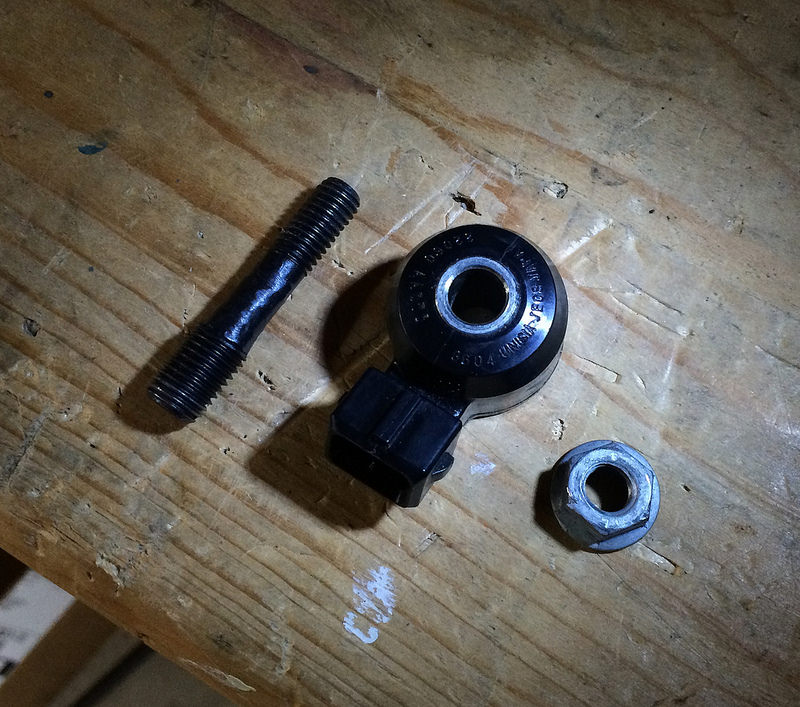
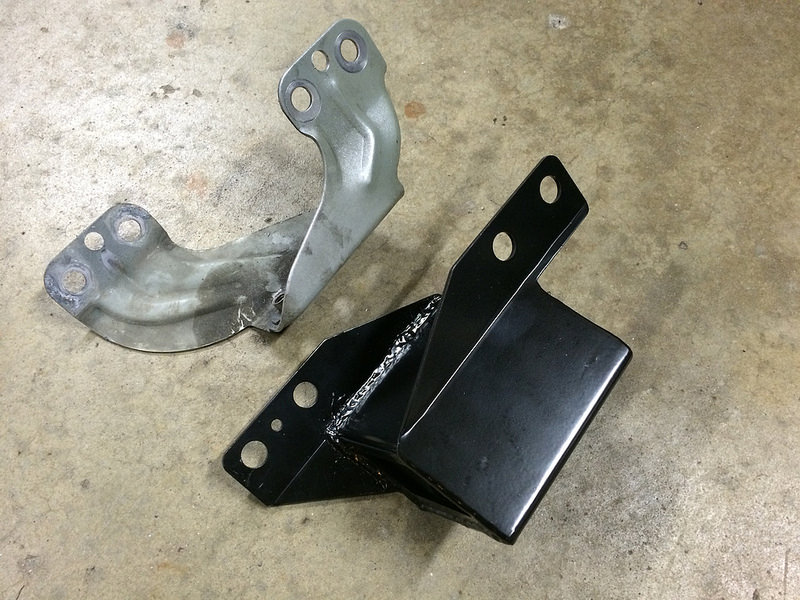
Made the knock sensor mounting stud, to mount the Bosch knock sensor (which takes an M8 bolt) to the factory location, which takes a fine-pitch M10 bolt.
The Pegasus racing step-stud was close, the length and M8 was fine, but the M10 thread pitch was too coarse. So, I cut it in half, cut apart a fine-pitch M10, ground down the extra threads to match the M8 O.D., chamfered, clamped, welded, cleaned-up, and painted. This shot shows the first try, where my voltage settings were too low and I didn't get enough penetration. I did it right and now it's solid as a rock.
 Sensor mounts by Ryephile, on Flickr
 Sensor mounts by Ryephile, on Flickr
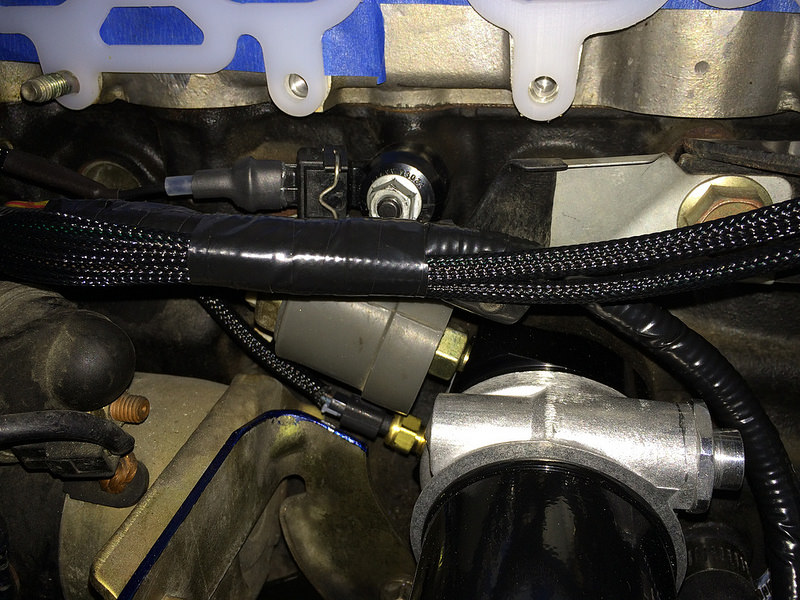
Here's the finished loom on the passenger side of the engine, showing the Knock sensor mounted, along with the Mishimoto oil spacer plate with the OEM oil pressure and an AEM oil temp sensor, Mocal thermostatic plate, and then a Wix filter. I had to trim the starter bracket to make room for the oil temp sensor. Everything tucks in there nicely.
 Sensor mounts by Ryephile, on Flickr
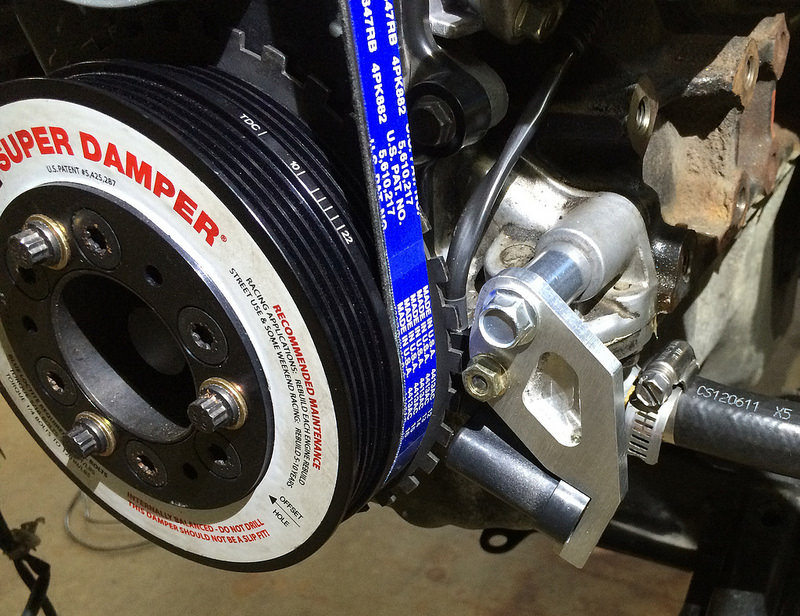
Here's the overpriced but super easy to install AutoTechnik crank sensor brace. It allowed me to bolt on the NB crank sensor using the existing oil pump mounting bolt, since my early oil pump didn't have the NB crank sensor mounting boss.
 Sensor mounts by Ryephile, on Flickr
Crank and Cam sensors loomed and clipped into repurposed loom clamps:
 Sensor mounts by Ryephile, on Flickr
....and the big news: I plugged in and comm'd with the MS3 Basic! Using good ole serial with an FTDI serial to USB going into my MBP, same as I used on the MSPNP but with a 115200 baud rate. WBO2 not plugged in yet. My TPS appears to work amazing, very responsive and no glitches.
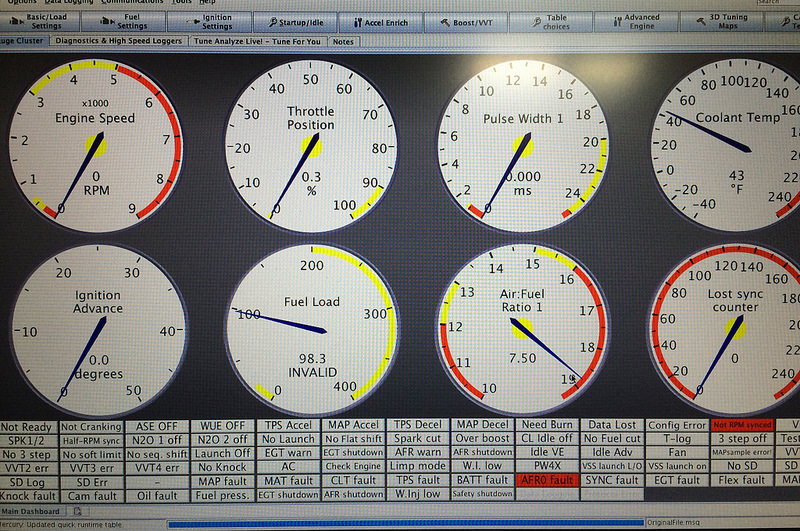 First comm with the MS3! by Ryephile, on Flickr
I still have to finish up quite a bit. IAT and EBC aren't wired in yet, and I still need to gut and clean-up the hack job that is the OP's Greddy turbo timer. Radiator still missing from 949.
I did get my steering rack back from MiataCage and it looks nice; that'll get installed shortly along with a Racing Beat big tubular front sway-bar, FM butterfly brace, and Frog Arms.
Not shown: I got the FM exhaust installed. It's pretty but I need to go back and readjust everything as it has a bit of pre-load on it and I'm not happy with the fitment yet.
The Pegasus racing step-stud was close, the length and M8 was fine, but the M10 thread pitch was too coarse. So, I cut it in half, cut apart a fine-pitch M10, ground down the extra threads to match the M8 O.D., chamfered, clamped, welded, cleaned-up, and painted. This shot shows the first try, where my voltage settings were too low and I didn't get enough penetration. I did it right and now it's solid as a rock.
Sensor mounts by Ryephile, on FlickrSensor mounts by Ryephile, on FlickrHere's the finished loom on the passenger side of the engine, showing the Knock sensor mounted, along with the Mishimoto oil spacer plate with the OEM oil pressure and an AEM oil temp sensor, Mocal thermostatic plate, and then a Wix filter. I had to trim the starter bracket to make room for the oil temp sensor. Everything tucks in there nicely.
Sensor mounts by Ryephile, on FlickrHere's the overpriced but super easy to install AutoTechnik crank sensor brace. It allowed me to bolt on the NB crank sensor using the existing oil pump mounting bolt, since my early oil pump didn't have the NB crank sensor mounting boss.
Sensor mounts by Ryephile, on FlickrCrank and Cam sensors loomed and clipped into repurposed loom clamps:
Sensor mounts by Ryephile, on Flickr....and the big news: I plugged in and comm'd with the MS3 Basic! Using good ole serial with an FTDI serial to USB going into my MBP, same as I used on the MSPNP but with a 115200 baud rate. WBO2 not plugged in yet. My TPS appears to work amazing, very responsive and no glitches.
First comm with the MS3! by Ryephile, on FlickrI still have to finish up quite a bit. IAT and EBC aren't wired in yet, and I still need to gut and clean-up the hack job that is the OP's Greddy turbo timer. Radiator still missing from 949.
I did get my steering rack back from MiataCage and it looks nice; that'll get installed shortly along with a Racing Beat big tubular front sway-bar, FM butterfly brace, and Frog Arms.
Not shown: I got the FM exhaust installed. It's pretty but I need to go back and readjust everything as it has a bit of pre-load on it and I'm not happy with the fitment yet.
Reply
0
0
12-23-2014, 03:44 PM
#54
Junior Member
Thread Starter
iTrader: (1)
Join Date: Jun 2014
Location: Metro Detroit
Posts: 270
Total Cats: 26
Update time: 
*I got an email from Emilio that the Crossflow radiators showed up at his place on Friday and he'll be shipping them out this week. I expect Christmas to put a several day delay on that, but it's great news that it's finally through customs. Once I get that I can mock up my oil cooler routing and the heat exchanger stack-up.
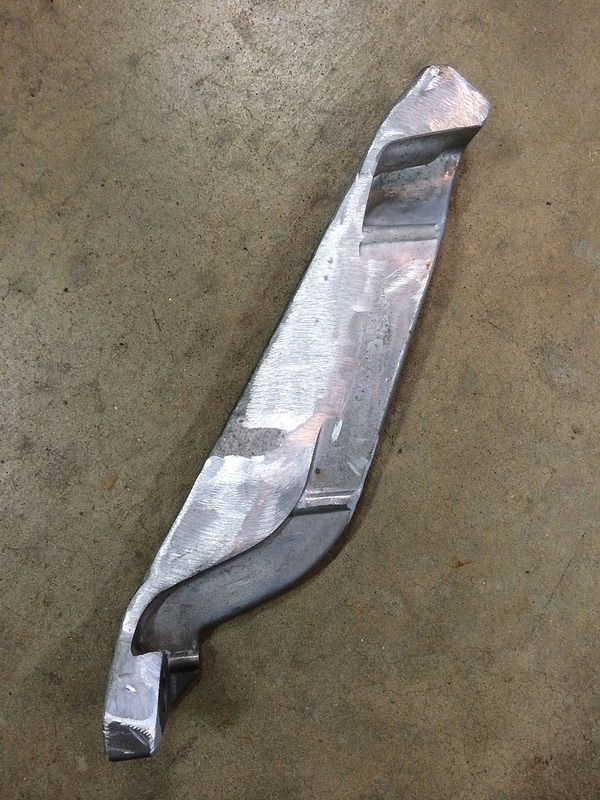
*Intake manifold back on the car, along with Hondata phenolic gasket and heavily modified brace to clear the oil plate/filter/fittings stackup. It's now just a blade, and frankly it's still strong enough to easily support the car, so the few pounds for the manifold should be a cake walk. I also found a thick washer for the bottom side of the manifold brace mount that's the same thickness as the Hondata gasket, so everything fits perfect.
 Updates by Ryephile, on Flickr
 Updates by Ryephile, on Flickr
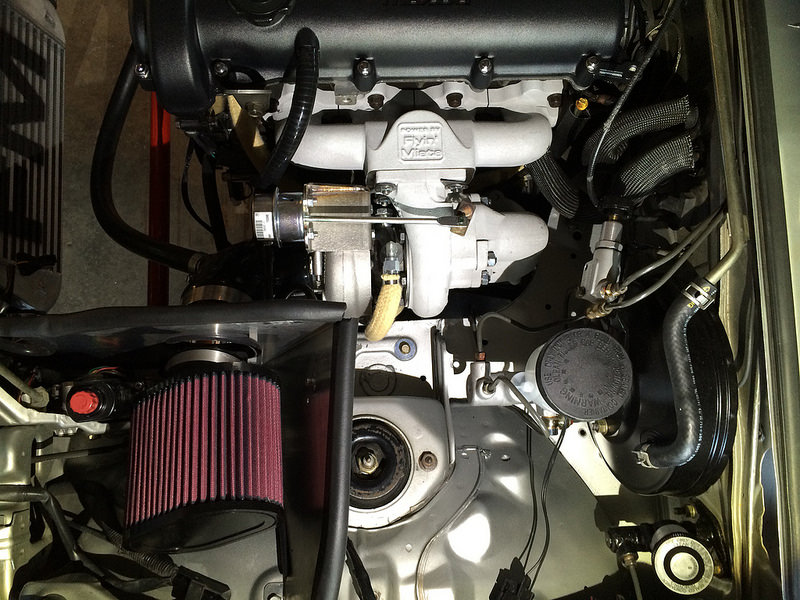
*The FM2 is now fully installed! It turns out I had to trim 1" off the cold-side lower boost tube, and 1.5" off the compressor inlet tube to achieve good overall fitment. I don't like how wiggly the top-mount-only IC + silicone tubes are, so I'll be adding a bottom mount to the IC when I do the the heat exchanger ducting to firm that all up. I bolted the EBC solenoid to the backside of the airbox heat shield. That was a good compromise for wiring length and silicone tubing length while not putting it too close to the heat. FYI I repurposed some disused wiring, the "red" wire from the AFM is now relocated from the EBC to the MS3 wastegate output, and I'm using the blue fused and switched power wire to power the EBC. I kept the IAT wires from the AFM harness and tidied them up to the new location in the upper cold-side silicone boost tube.
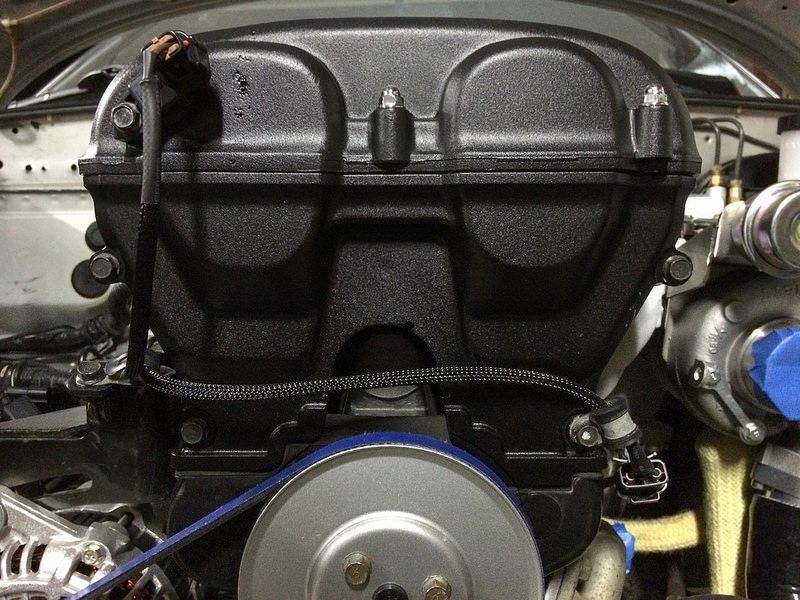
The below picture is a game of "what isn't new". Besides the sheetmetal itself and the damper mount, I think it's just the brake and vacuum hard lines on the firewall. Oh, and the valve cover bolts. Yes, the oil cap is new. No more rice-tastic billet aluminum oil cap. Oh, and the dipstick. I have a new one on the wall as a prize for when the engine has its first successful heat cycle.
 Updates by Ryephile, on Flickr
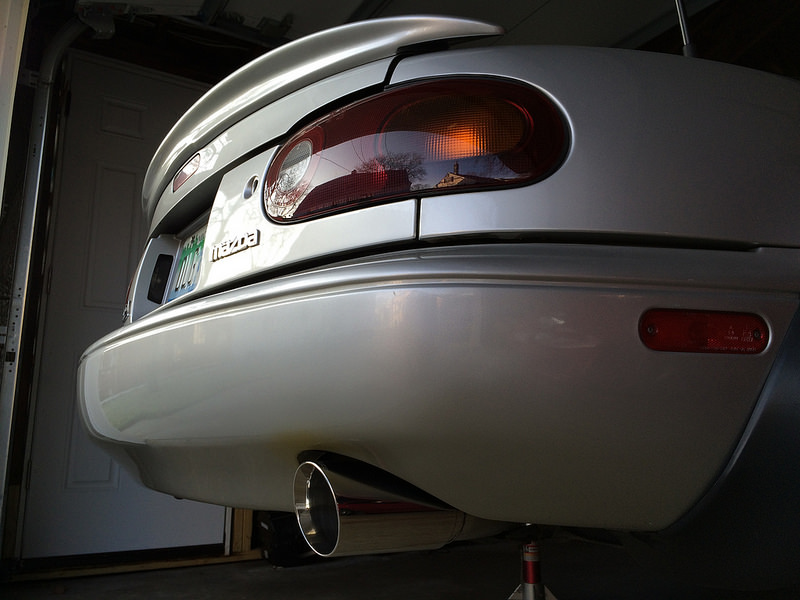
...and simple yet sexy exhaust tip.
 Updates by Ryephile, on Flickr
*Frog Arms installed. It gave me an excuse to dial-in the passenger door closure, as it was a bit saggy from the years. I felt a little dirty breaking the paint seal from the door hinge bolts, but after drilling the mounting holes for the frog arms and then having the grind down the extra sheetmetal flashing on the driver side (and painted afterwards), it's obvious more than ever the car isn't "original". Also, this is the first time I've had the hood closed since tearing the car apart in late October. Wow I can't believe it's already been almost 2 months.
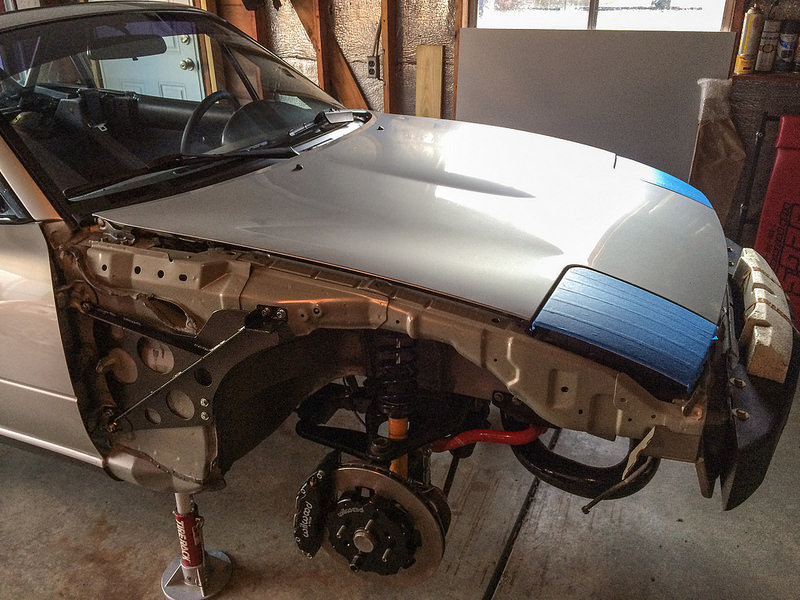 Updates by Ryephile, on Flickr
*Steering rack installed, with new inner tie rods, boots, and polyurethane bushings. Miata Cage did a nice job rebuilding the rack from what I can tell.
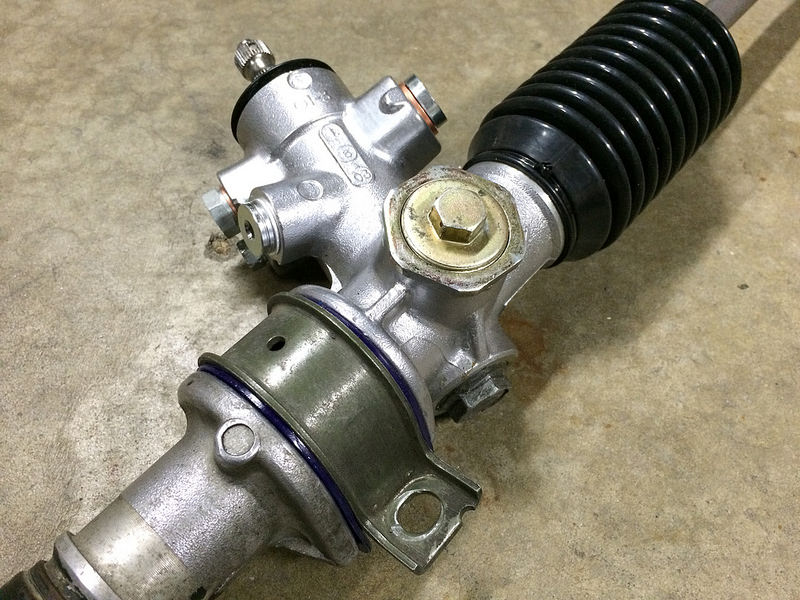 Updates by Ryephile, on Flickr
*AWR front sway-bar mounts installed along with a new Racing Beat 54107 sway bar.
 Updates by Ryephile, on Flickr
Next up: Butterfly brace install, and starting on the seat and belt mounts.
*I got an email from Emilio that the Crossflow radiators showed up at his place on Friday and he'll be shipping them out this week. I expect Christmas to put a several day delay on that, but it's great news that it's finally through customs. Once I get that I can mock up my oil cooler routing and the heat exchanger stack-up.
*Intake manifold back on the car, along with Hondata phenolic gasket and heavily modified brace to clear the oil plate/filter/fittings stackup. It's now just a blade, and frankly it's still strong enough to easily support the car, so the few pounds for the manifold should be a cake walk. I also found a thick washer for the bottom side of the manifold brace mount that's the same thickness as the Hondata gasket, so everything fits perfect.
Updates by Ryephile, on FlickrUpdates by Ryephile, on Flickr*The FM2 is now fully installed!
It turns out I had to trim 1" off the cold-side lower boost tube, and 1.5" off the compressor inlet tube to achieve good overall fitment. I don't like how wiggly the top-mount-only IC + silicone tubes are, so I'll be adding a bottom mount to the IC when I do the the heat exchanger ducting to firm that all up. I bolted the EBC solenoid to the backside of the airbox heat shield. That was a good compromise for wiring length and silicone tubing length while not putting it too close to the heat. FYI I repurposed some disused wiring, the "red" wire from the AFM is now relocated from the EBC to the MS3 wastegate output, and I'm using the blue fused and switched power wire to power the EBC. I kept the IAT wires from the AFM harness and tidied them up to the new location in the upper cold-side silicone boost tube.The below picture is a game of "what isn't new". Besides the sheetmetal itself and the damper mount, I think it's just the brake and vacuum hard lines on the firewall. Oh, and the valve cover bolts. Yes, the oil cap is new. No more rice-tastic billet aluminum oil cap. Oh, and the dipstick. I have a new one on the wall as a prize for when the engine has its first successful heat cycle.
Updates by Ryephile, on Flickr...and simple yet sexy exhaust tip.
Updates by Ryephile, on Flickr*Frog Arms installed. It gave me an excuse to dial-in the passenger door closure, as it was a bit saggy from the years. I felt a little dirty breaking the paint seal from the door hinge bolts, but after drilling the mounting holes for the frog arms and then having the grind down the extra sheetmetal flashing on the driver side (and painted afterwards), it's obvious more than ever the car isn't "original".
Also, this is the first time I've had the hood closed since tearing the car apart in late October. Wow I can't believe it's already been almost 2 months.Updates by Ryephile, on Flickr*Steering rack installed, with new inner tie rods, boots, and polyurethane bushings. Miata Cage did a nice job rebuilding the rack from what I can tell.
Updates by Ryephile, on Flickr*AWR front sway-bar mounts installed along with a new Racing Beat 54107 sway bar.
Updates by Ryephile, on FlickrNext up: Butterfly brace install, and starting on the seat and belt mounts.
Reply
0
0
 12-29-2014, 04:13 PM
#56
Junior Member
Thread Starter
iTrader: (1)
Join Date: Jun 2014
Location: Metro Detroit
Posts: 270
Total Cats: 26
^^Thank you. I'm starting to feel like the car is getting close to complete.
I managed to get a bunch done this weekend.
*Butteryfly brace installed
*Evap hard line deleted to make the rest of the hard line routing through the Butteryfly brace simpler and cleaner. The Evap line is currently a straight dump at the rear bulkhead instead of going all the way up front to dump in the front subframe.
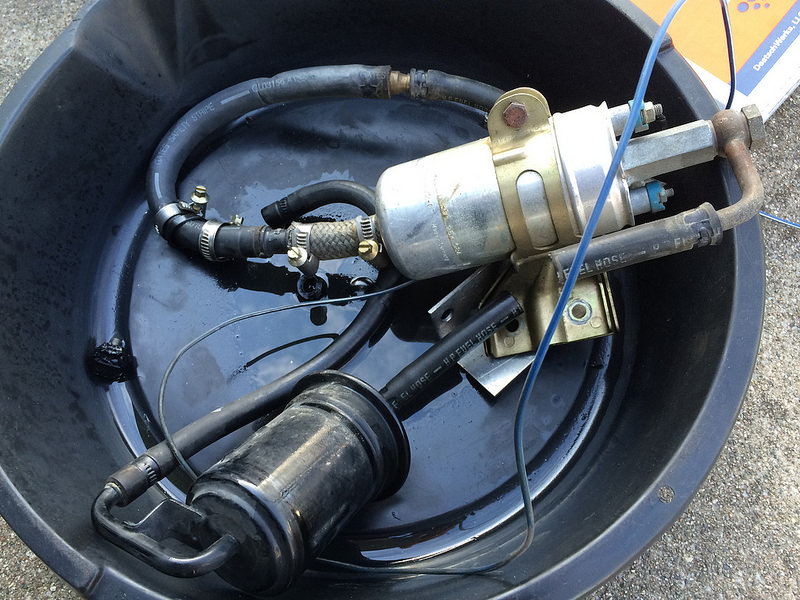
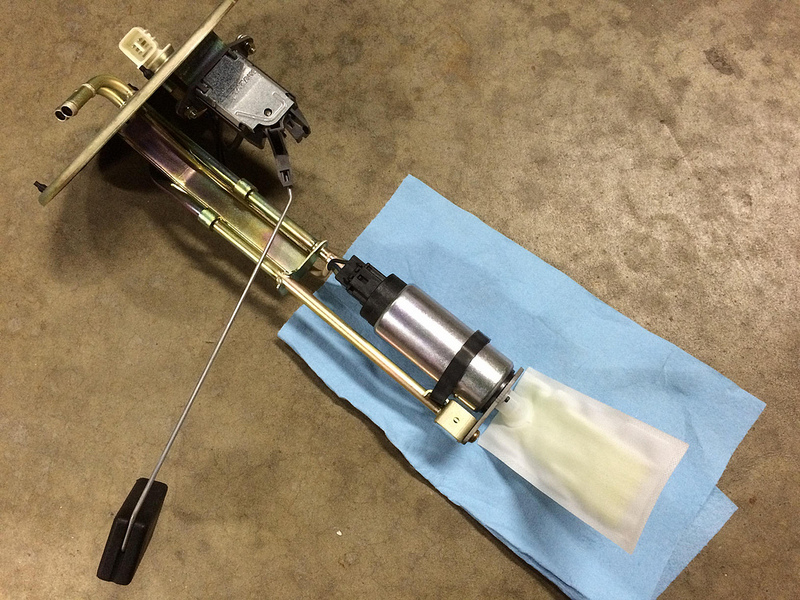
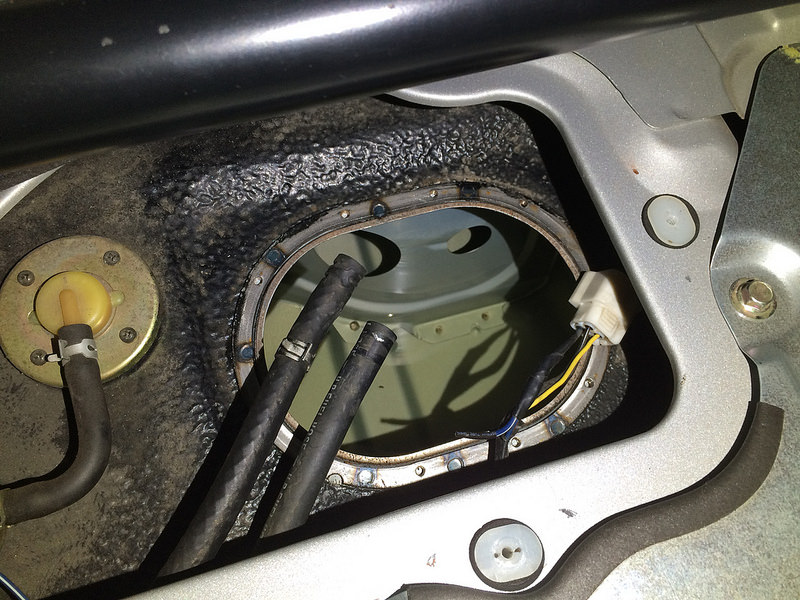
*Fuel pump catastrophe sorted. Stock pump and whatever the hell 2nd pump was ghetto rigged in there is gutted, back to stock fuel filter and a DW200 in-tank, which was so plug-n-play it felt dirty.
*Floor pan sorted for AWR seat rails & sub-belt eye-hooks. Speaking of AWR seat rails, SCREW THEM for not having a clue how to design a rail that fits the car. I had to cut the drivers inner front apart and re-weld it so it fits in the car. Thank goodness my Millermatic 210 can weld 3/16" steel no problem.
*All my holes in the floorpan were covered in automotive OEM [specifically from a Ford vendor for the Focus] mastic sheeting prior to faster installation, so they're now weather sealed nicely.
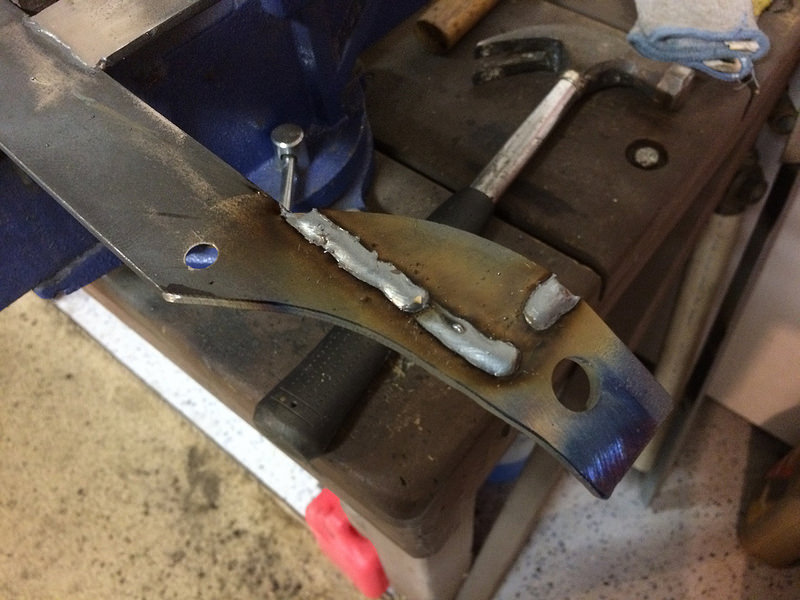
I used a spot-weld cutter to remove the rear seat mount horns to make room for the direct-to-floorpan AWR mounts. Front mount location stay stock.
 Fuel pump install by Ryephile, on Flickr
The fixed driver side AWR seat rail mount. Now it clears the transmission tunnel.
 Fuel pump install by Ryephile, on Flickr
--->So even though my Sparco Rev is mounted as low as possible, it's still pretty high, just barely lower than stock. I'm afraid getting under the broomstick test will require removing the seat foam at the track. :(
This was the wad of crap the PO installed back in the 90's. UGHK.
 Fuel pump install by Ryephile, on Flickr
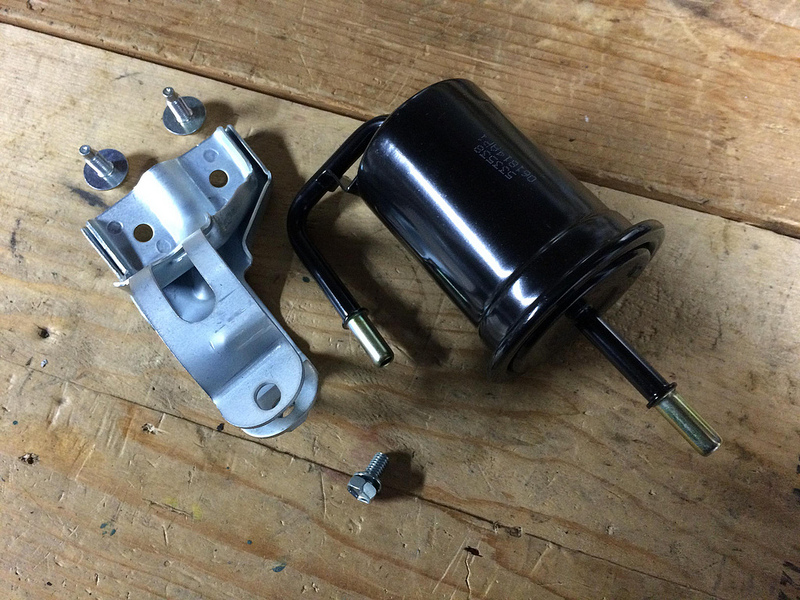
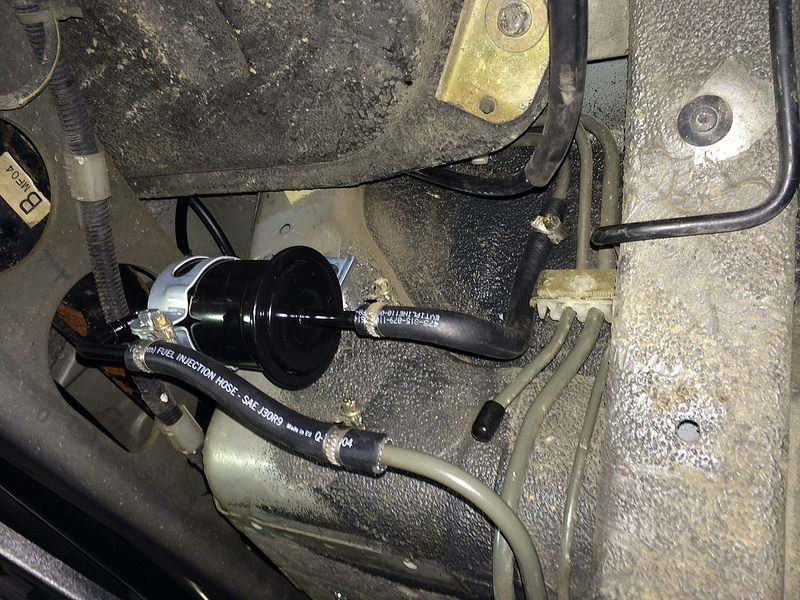
New fuel filter and mount and hardware.
 Fuel pump install by Ryephile, on Flickr
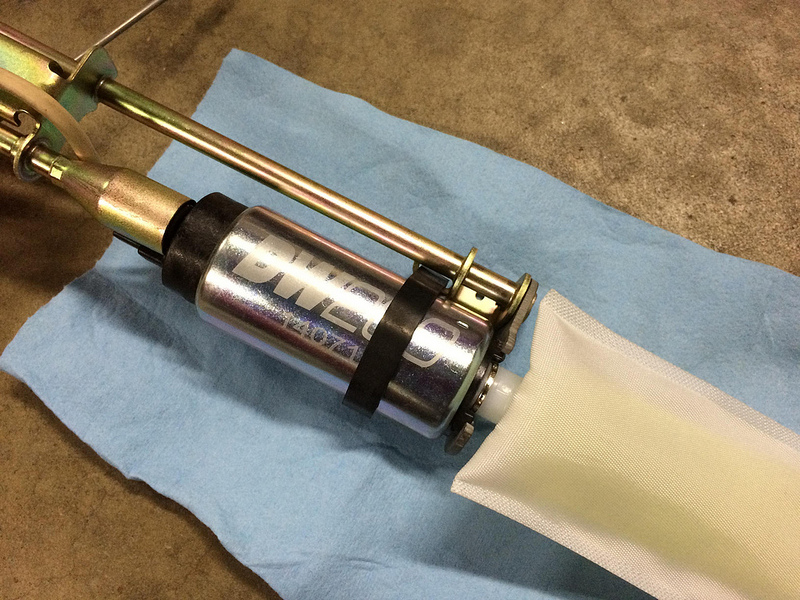
Miraculously plug-n-play DW200 fuel pump. Actually plug-n-play. I know I was shocked too.
 Fuel pump install by Ryephile, on Flickr
 Fuel pump install by Ryephile, on Flickr
I was super happy to see the inside of the gas tank squeaky clean. I guess having a solvent for a fuel helps that.
 Fuel pump install by Ryephile, on Flickr
New fuel filter and SAE 30R9 hose installed. YAY
 Fuel pump install by Ryephile, on Flickr
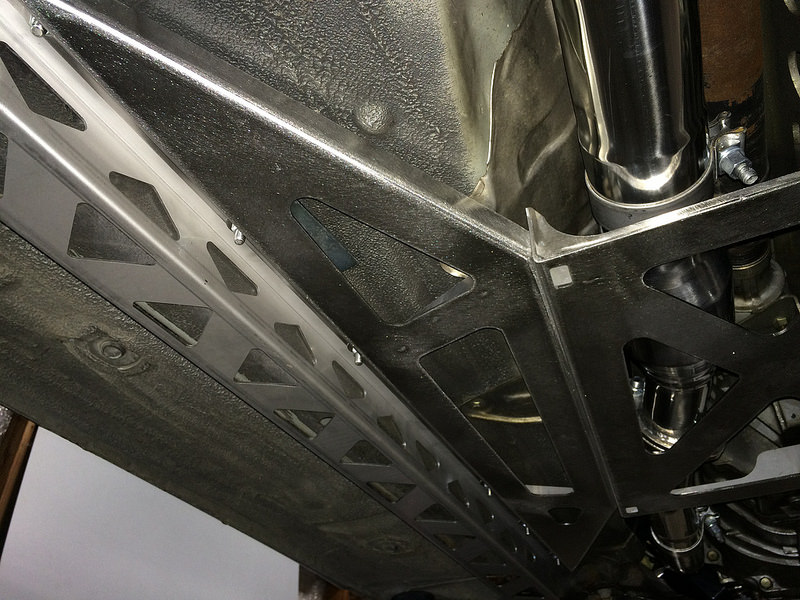
Butterfly Brace installed. I literally monkey-hung myself from the exhaust to ensure it won't contact the brace anywhere. Should be good-to-go.
 Fuel pump install by Ryephile, on Flickr
If you're an eagle-eye you'll spot my Schroth backing plate tucked underneath the driver-side "wing" of the butterfly brace. That's the inner mount for the sub-belt. The outer mount shares a mounting bolt with the chassis rail brace. This gives good geometry of the sub-belt so the anchor points are under each of your butt-cheeks.
 Fuel pump install by Ryephile, on Flickr
*Next up is finishing the Sparco seat rail to AWR mount interface, then I can bolt in the seats and harnesses. That'll be a big step as these damn seats have proven to be a beeotch to fit correctly.
I'm starting to feel like the car is getting close to complete. I managed to get a bunch done this weekend.
*Butteryfly brace installed
*Evap hard line deleted to make the rest of the hard line routing through the Butteryfly brace simpler and cleaner. The Evap line is currently a straight dump at the rear bulkhead instead of going all the way up front to dump in the front subframe.
*Fuel pump catastrophe sorted. Stock pump and whatever the hell 2nd pump was ghetto rigged in there is gutted, back to stock fuel filter and a DW200 in-tank, which was so plug-n-play it felt dirty.
*Floor pan sorted for AWR seat rails & sub-belt eye-hooks. Speaking of AWR seat rails, SCREW THEM for not having a clue how to design a rail that fits the car. I had to cut the drivers inner front apart and re-weld it so it fits in the car. Thank goodness my Millermatic 210 can weld 3/16" steel no problem.
*All my holes in the floorpan were covered in automotive OEM [specifically from a Ford vendor for the Focus] mastic sheeting prior to faster installation, so they're now weather sealed nicely.
I used a spot-weld cutter to remove the rear seat mount horns to make room for the direct-to-floorpan AWR mounts. Front mount location stay stock.
Fuel pump install by Ryephile, on FlickrThe fixed driver side AWR seat rail mount. Now it clears the transmission tunnel.
Fuel pump install by Ryephile, on Flickr--->So even though my Sparco Rev is mounted as low as possible, it's still pretty high, just barely lower than stock. I'm afraid getting under the broomstick test will require removing the seat foam at the track. :(
This was the wad of crap the PO installed back in the 90's. UGHK.
Fuel pump install by Ryephile, on FlickrNew fuel filter and mount and hardware.
Fuel pump install by Ryephile, on FlickrMiraculously plug-n-play DW200 fuel pump. Actually plug-n-play. I know I was shocked too.
Fuel pump install by Ryephile, on FlickrFuel pump install by Ryephile, on FlickrI was super happy to see the inside of the gas tank squeaky clean. I guess having a solvent for a fuel helps that.
Fuel pump install by Ryephile, on FlickrNew fuel filter and SAE 30R9 hose installed. YAY
Fuel pump install by Ryephile, on FlickrButterfly Brace installed. I literally monkey-hung myself from the exhaust to ensure it won't contact the brace anywhere. Should be good-to-go.
Fuel pump install by Ryephile, on FlickrIf you're an eagle-eye you'll spot my Schroth backing plate tucked underneath the driver-side "wing" of the butterfly brace. That's the inner mount for the sub-belt. The outer mount shares a mounting bolt with the chassis rail brace. This gives good geometry of the sub-belt so the anchor points are under each of your butt-cheeks.
Fuel pump install by Ryephile, on Flickr*Next up is finishing the Sparco seat rail to AWR mount interface, then I can bolt in the seats and harnesses. That'll be a big step as these damn seats have proven to be a beeotch to fit correctly.
Reply
2
2
01-09-2015, 05:51 PM
#59
Junior Member
Thread Starter
iTrader: (1)
Join Date: Jun 2014
Location: Metro Detroit
Posts: 270
Total Cats: 26
I love Amazon Prime. Correct NA fuel filter arrived super fast for super cheap, and had it installed that night.
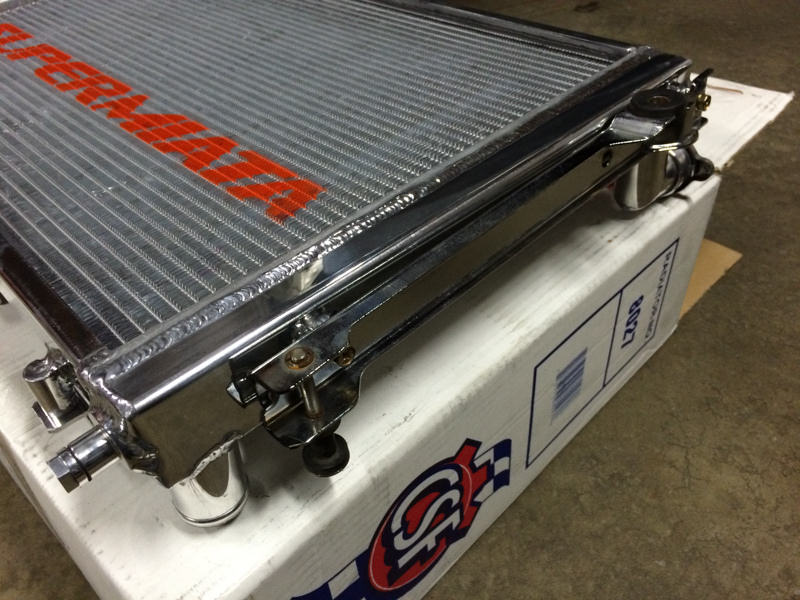
I also got my crossflow radiator from 949. Very nice packaging, very nice construction, and of course some massage to install it. It calls for OEM radiator brackets, which I don't have since I bought the car with a Koyo. So, I had the cut the Koyo brackets to make it work. Like the instructions said, I also had to do some light sledgehammering to get the radiator in, and even then, I ended up installing one of the lower retention pins after sliding the radiator into the car.
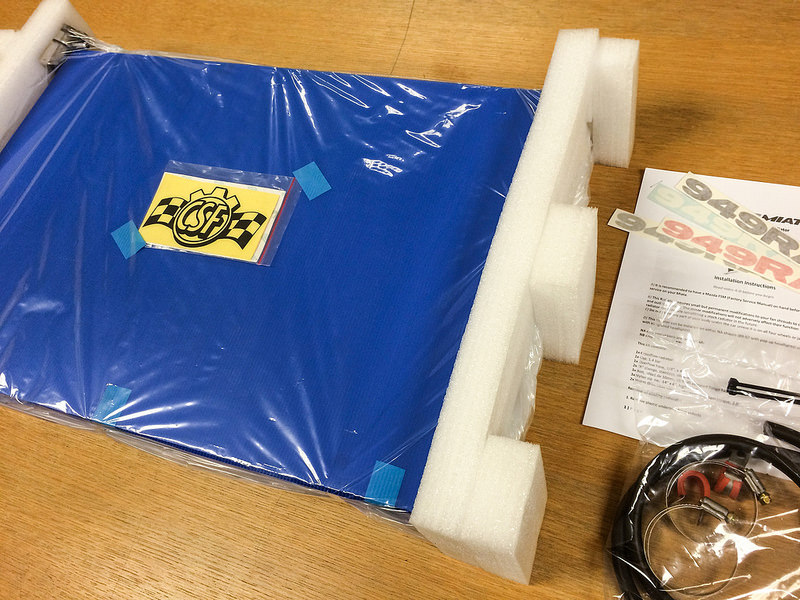 Supermiata radiator! by Ryephile, on Flickr
 IMG_5124.jpg by Ryephile, on Flickr
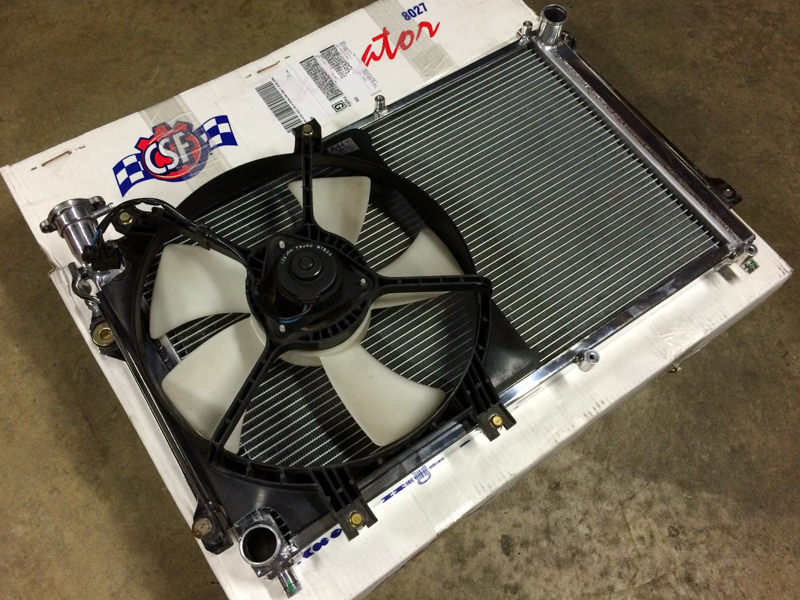 IMG_5125.jpg by Ryephile, on Flickr
I'm still screwing with the FM lower silicone radiator hose, compressor outlet silicone, oil drain, and turbo coolant feed lines, as the way FM designed the rad hose and comp outlet is poorly thought out. I've got the compressor housing clocked such that the rad hose and comp outlet tube don't touch at their first bends, but then their shape forces them to collide towards the radiator. I'll have to bundle everything together to minimize rubbing/movement/abrasion. It's just obvious FM doesn't have OEM durability testing perspective, and I'll have to make the best of it.
I'm also working on the upper rad hose for the re-route. Obviously the BEGI hoses that were included with the re-route kit I foolishly bought from them are stupid, but it looks like if I take the Escalade hose and cut-n-splice it just so, I can make it work very nice.
--->0�F forecast tonight strongly indicates a big middle finger regarding garage work<---
I also got my crossflow radiator from 949. Very nice packaging, very nice construction, and of course some massage to install it. It calls for OEM radiator brackets, which I don't have since I bought the car with a Koyo. So, I had the cut the Koyo brackets to make it work. Like the instructions said, I also had to do some light sledgehammering to get the radiator in, and even then, I ended up installing one of the lower retention pins after sliding the radiator into the car.
Supermiata radiator! by Ryephile, on FlickrIMG_5124.jpg by Ryephile, on FlickrIMG_5125.jpg by Ryephile, on FlickrI'm still screwing with the FM lower silicone radiator hose, compressor outlet silicone, oil drain, and turbo coolant feed lines, as the way FM designed the rad hose and comp outlet is poorly thought out. I've got the compressor housing clocked such that the rad hose and comp outlet tube don't touch at their first bends, but then their shape forces them to collide towards the radiator. I'll have to bundle everything together to minimize rubbing/movement/abrasion. It's just obvious FM doesn't have OEM durability testing perspective, and I'll have to make the best of it.
I'm also working on the upper rad hose for the re-route. Obviously the BEGI hoses that were included with the re-route kit I foolishly bought from them are stupid, but it looks like if I take the Escalade hose and cut-n-splice it just so, I can make it work very nice.
--->0�F forecast tonight strongly indicates a big middle finger regarding garage work<---
Reply
0
0
01-13-2015, 07:53 PM
#60
Junior Member
Thread Starter
iTrader: (1)
Join Date: Jun 2014
Location: Metro Detroit
Posts: 270
Total Cats: 26
So, gave the Escalade upper radiator hose a shot. It rubs everywhere and I also want to route the hose cleaner versus the high-n-wide method. So, I ordered some silicone pieces from Pegasus and will be doing a bad-touch-free upper rad hose routing.
While I'm waiting for that order to arrive, I decided to fiddle with the interior. To fit the Sparco seats, I needed to remove the stock 3-point belts. I'll be running the car full time with 6-points. Not ideal for the street, but that's just the way it goes as the 3-points were rendered non-functional by the seat "wings". To remove the 3-point spools, however, the roll bar had to be unbolted to gain access.
************************************************** **************
--->Do you stay awake at night wondering if gnomes are loosening your turbo manifold bolts?
--->Do you feel Tuner Studio is out to get you by randomly changing your VE map?
--->Are rouge mechanics stalking your tool chest, hunting for that embarrassing "11-n-1" multi-bit screwdriver your ex-girlfriend bought as a shitty birthday gift?
If so, then you'll be super relieved to hear that they're all true!* On top of that, you probably didn't even know that said rouge mechanic also took advantage of your roll-bar while you were sleeping and loosened ALL the bolts! It's true!
************************************************** ********************
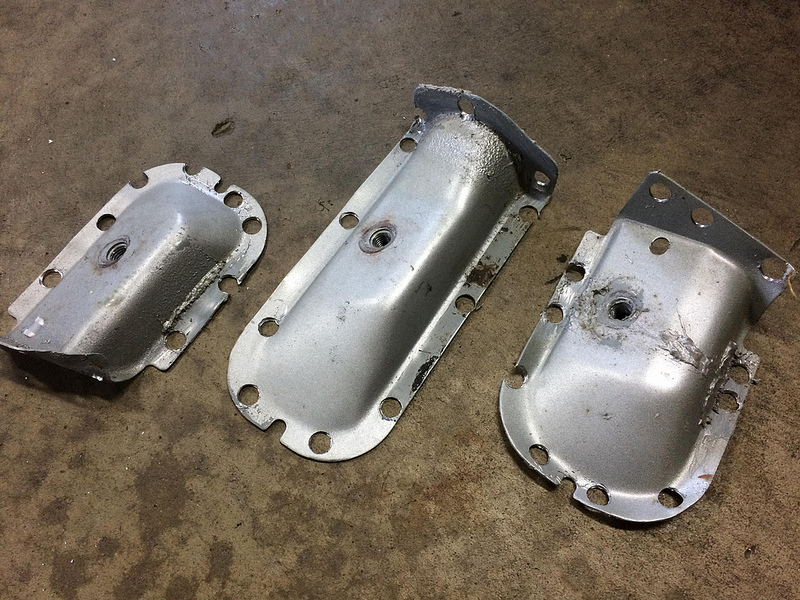
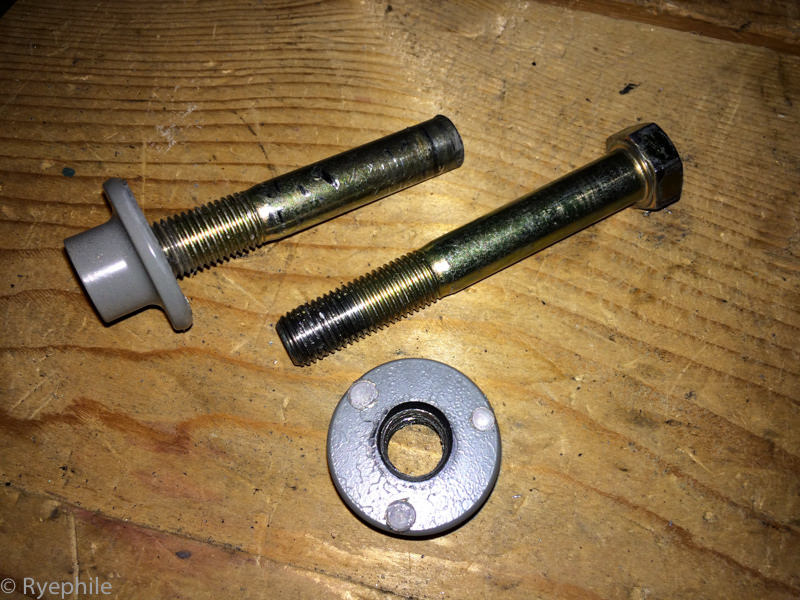
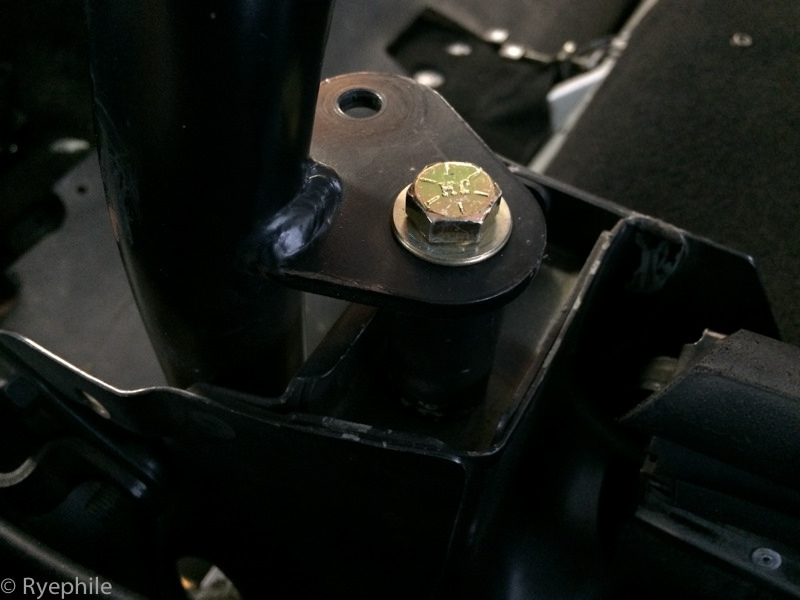
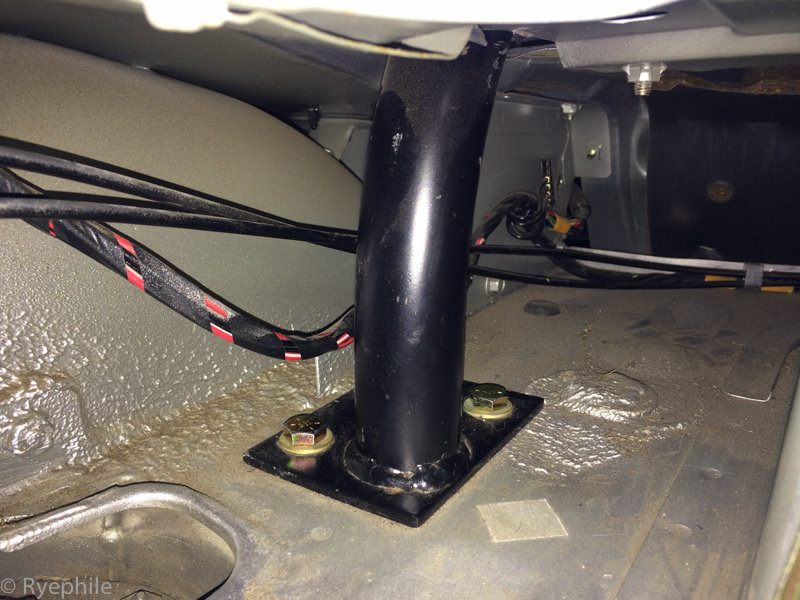
After waking from a horrible nightmare, I discovered that ALL SIXTEEN of the fasteners holding my Hard Dog roll bar were somewhere on either side of finger-tight and stripped out. The 12 bolts for the 4 "points" were all loose, the two upper seat-belt hard points were stripped out, and the two lower seat belt hard points were the wrong thread (too small) and just sitting there looking stupid.
On top of the ***** heat shielding under hood, loose manifold and downpipe bolts, and rotten fuel hose I've found doing the FM2, this thoroughly proves that whomever worked on this car in the past is utterly incompetent.
The driver-side upper seat belt bolt was somehow cross-threaded and then stripped out while within the weld-nuts in the seat-belt towers on the body. This means I had to cut off the head and then sledge the weld-nut out of the car. I repeated this on the passenger side for symmetry, as I'm not running nylon-locknuts in their place. I also picked up a complete set of new yellow zinc grade-8 hardware for all the roll-bar mounting points. $50 in grade-8 bolts, washers, and nylon-locknuts later, the roll-bar is now actually torqued properly into the car. The difference in sound as you tap and bang on the bar makes a huge difference. Funny enough, it sounds like it's actually bolted into the car now.
 IMG_5138.jpg by Ryephile, on Flickr
 IMG_5148.jpg by Ryephile, on Flickr
 IMG_5147.jpg by Ryephile, on Flickr
While I'm waiting for that order to arrive, I decided to fiddle with the interior. To fit the Sparco seats, I needed to remove the stock 3-point belts. I'll be running the car full time with 6-points. Not ideal for the street, but that's just the way it goes as the 3-points were rendered non-functional by the seat "wings". To remove the 3-point spools, however, the roll bar had to be unbolted to gain access.
************************************************** **************
--->Do you stay awake at night wondering if gnomes are loosening your turbo manifold bolts?
--->Do you feel Tuner Studio is out to get you by randomly changing your VE map?
--->Are rouge mechanics stalking your tool chest, hunting for that embarrassing "11-n-1" multi-bit screwdriver your ex-girlfriend bought as a shitty birthday gift?
If so, then you'll be super relieved to hear that they're all true!* On top of that, you probably didn't even know that said rouge mechanic also took advantage of your roll-bar while you were sleeping and loosened ALL the bolts! It's true!
************************************************** ********************
After waking from a horrible nightmare, I discovered that ALL SIXTEEN of the fasteners holding my Hard Dog roll bar were somewhere on either side of finger-tight and stripped out. The 12 bolts for the 4 "points" were all loose, the two upper seat-belt hard points were stripped out, and the two lower seat belt hard points were the wrong thread (too small) and just sitting there looking stupid.
On top of the ***** heat shielding under hood, loose manifold and downpipe bolts, and rotten fuel hose I've found doing the FM2, this thoroughly proves that whomever worked on this car in the past is utterly incompetent.
The driver-side upper seat belt bolt was somehow cross-threaded and then stripped out while within the weld-nuts in the seat-belt towers on the body. This means I had to cut off the head and then sledge the weld-nut out of the car. I repeated this on the passenger side for symmetry, as I'm not running nylon-locknuts in their place. I also picked up a complete set of new yellow zinc grade-8 hardware for all the roll-bar mounting points. $50 in grade-8 bolts, washers, and nylon-locknuts later, the roll-bar is now actually torqued properly into the car. The difference in sound as you tap and bang on the bar makes a huge difference. Funny enough, it sounds like it's actually bolted into the car now.
IMG_5138.jpg by Ryephile, on FlickrIMG_5148.jpg by Ryephile, on FlickrIMG_5147.jpg by Ryephile, on Flickr
Reply
0
0


