SJP's "paint by numbers" build
 01-16-2013, 08:39 PM
#21
Junior Member
Thread Starter
iTrader: (7)

Join Date: Mar 2012
Location: Gilbert, Az
Posts: 356
Total Cats: 31
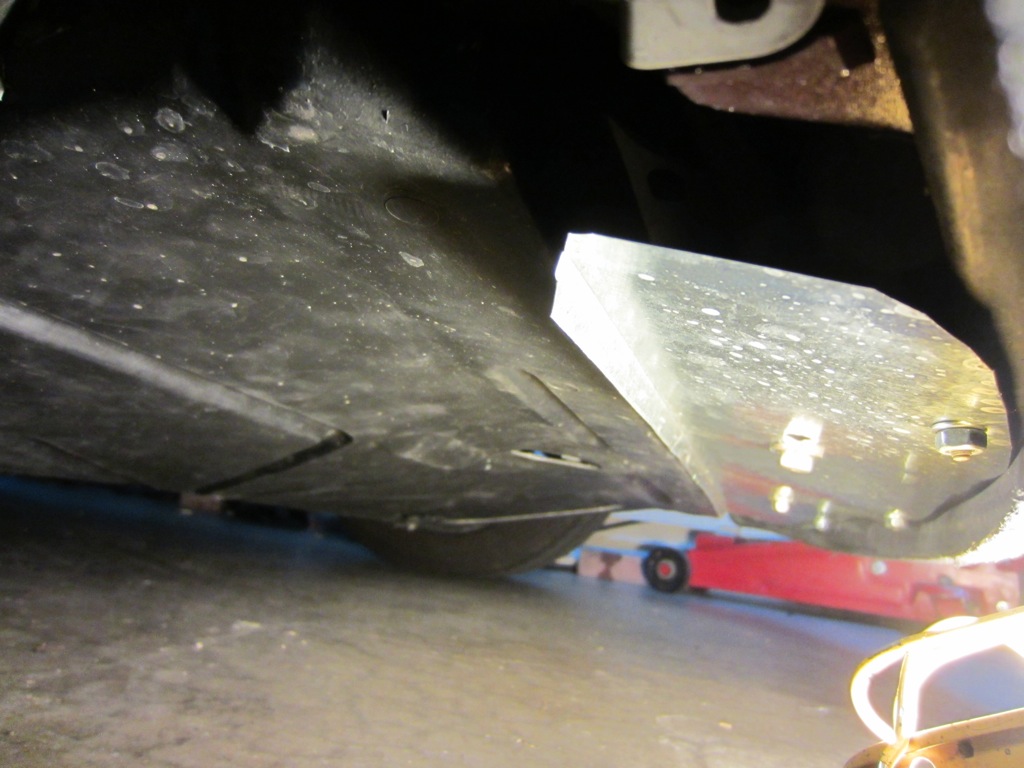
One thing I forgot: after trimming the front air-diverter that goes inside the bumper to fit the intercooler, there was about a 4-inch gap between the bumper and the splash shield. I worked up a "solution" with some ducting from Home Depot Racing and tin snips. It's secured fairly well at the rear to the two intercooler bolt holes, and at the front by the 3 10mm studs/nuts that fit under the bumper area. It isn't quite right and needs a little more tweaking, but tucks up nicely into the splash shield leading edge:
Ultimately my goal was to run around 225hp. I felt like this was enough of a safe buffer from the "wall" at 250hp. My guesstimate was it'd take about 11-12 psi to reach 225, so I want to run around 10psi until I can get it on a friend's dyno for "real" numbers/tuning.
I added a washer to the bracket holding the wastegate to the coldside housing, which moved the arm maybe 1/10th of an inch closer:
Default position of the arm with the wastegate 100% closed:
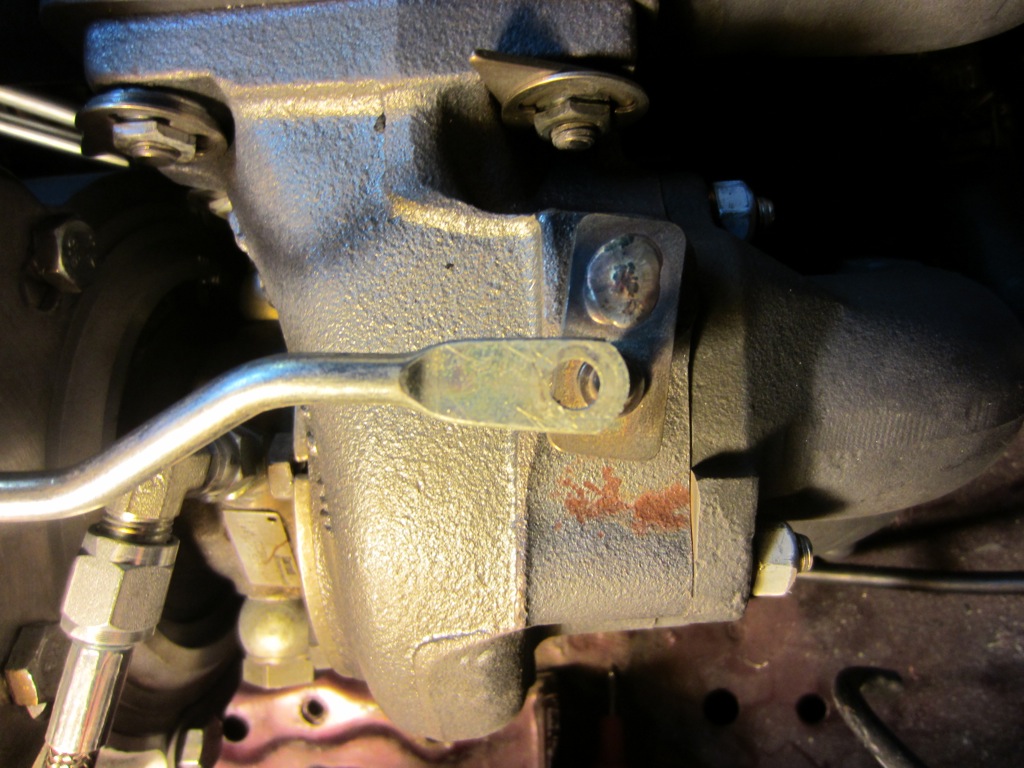
This still was enough to put a good amount of tension on the wastegate actuator off boost, and was enough to bring down the mechanically actuated boost about 1 psi, or 8-8.5 at redline.
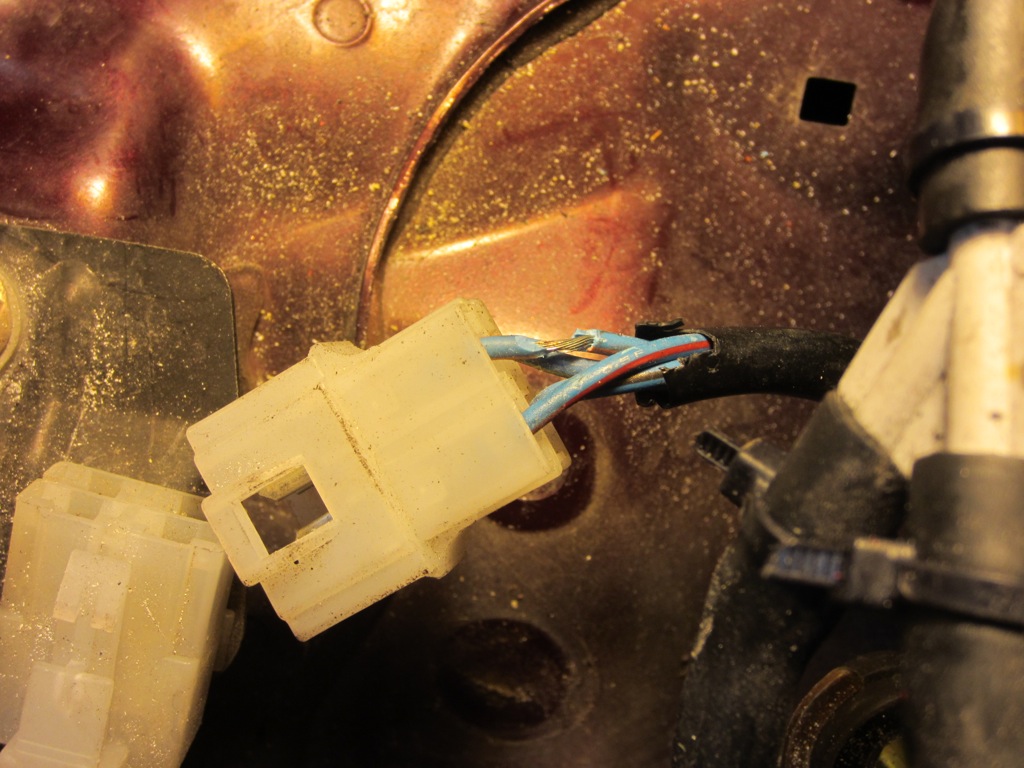
Next I installed the EBC. I debated where to tap in for power. Obviously I wanted a switched source that's +12v only when the car is on/running. I decided to use the cruise control wiring because it met the criteria of being close enough to easily run wiring, being switched with the vehicle, and being optionally turned on.
This means I can turn off the EBC at any time and run straight wastegate pressure by de-activating the cruise control. Very handy if I want to let someone else drive the car or need to valet, etc. I stripped off a bit of insulation and soldered/wrapped up the wiring on the cruise control side of the wiring. That way the stock harness is preserved and it's just an accessory I'm hacking up:
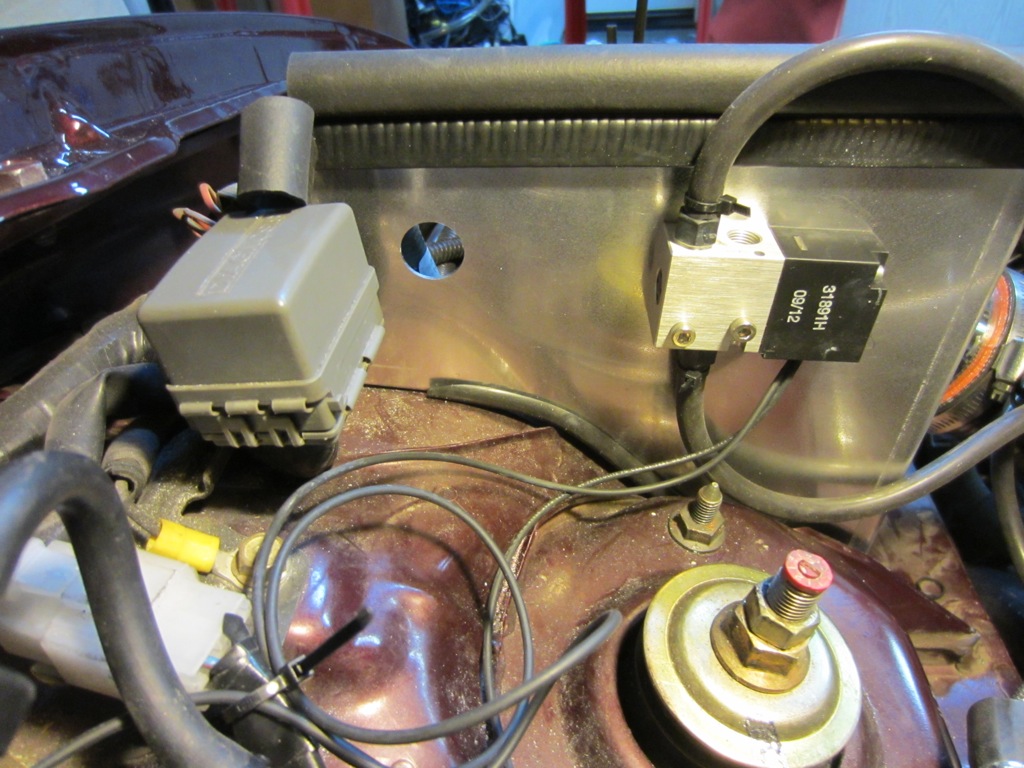
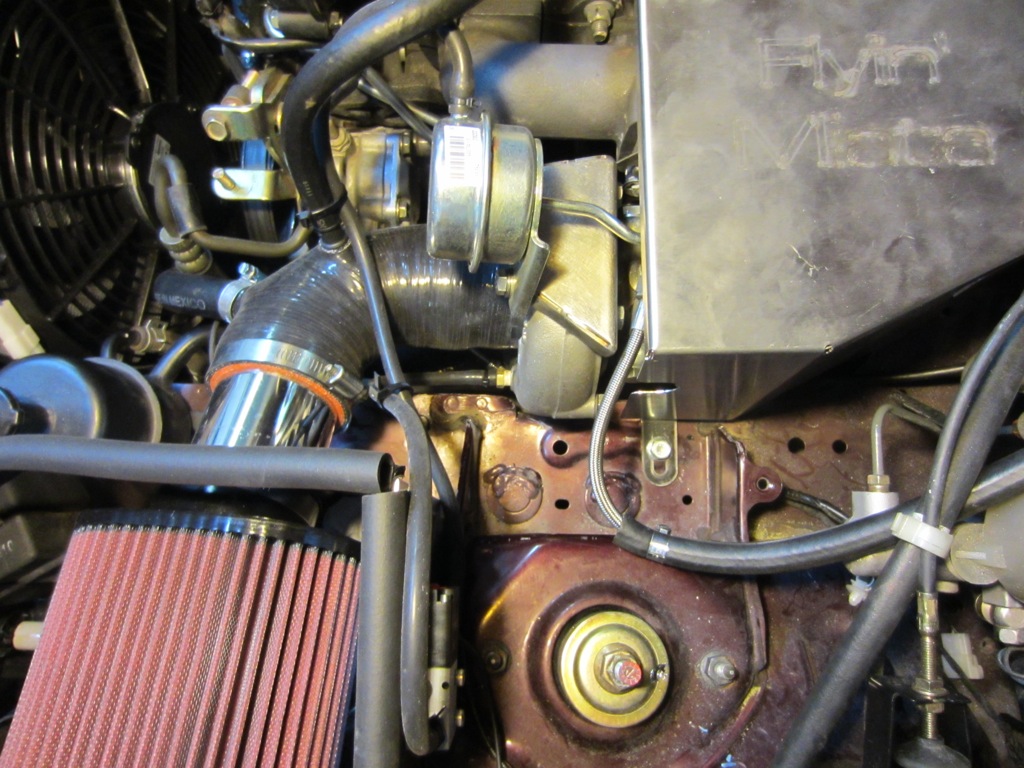
I placed the actuator on the airbox with the hope that it will stay cool. Hopefully this will preserve the life of the actuator/electronics inside:
I set out to tune the boost PID, which has been a bit of a challenge. I set my overboost at ~12psi, and my boost target across the entire map at 9.5psi. After a few days of tuning in various conditions (low 30's to lower 80's ambient temps), the PID numbers I'm using are:

It's close, but still not quite right:

I think I need a slight bit less I term, and that should also automatically increase the effect of the P term. It's hard to tell just from the picture, but the overall boost level raises by about 1 psi over the length of this pull.
I think this will keep it from creeping up boost at the end of the pull, and give it a bit more authority at the beginning to hit the target without overboosting.
I've noticed I'm using fairly low P and I values. A single point decrease in P is enough to kick the ecu into overboost. The 2.5 value I have pictured for I doesn't "stick", the ecu doesn't seem to allow this level of resolution so for now I'm going to run with it set to 2.
That catches everything up to the present.
I do have to take a moment to thank everyone who's posted/discussed/answered a technical question here for the past 5-6+ years. I've dug through some of the backlogs going back to the beginning of mt.net, and gotten 1st-hand testimony that can't be bought all for free thanks to the magic of the internet and people being willing to help one another.
I know there's details I've missed about the build, if anyone's curious how I did something feel free to ask. I'll try to keep this updated with anything interesting that happens.
Ultimately my goal was to run around 225hp. I felt like this was enough of a safe buffer from the "wall" at 250hp. My guesstimate was it'd take about 11-12 psi to reach 225, so I want to run around 10psi until I can get it on a friend's dyno for "real" numbers/tuning.
I added a washer to the bracket holding the wastegate to the coldside housing, which moved the arm maybe 1/10th of an inch closer:
Default position of the arm with the wastegate 100% closed:
This still was enough to put a good amount of tension on the wastegate actuator off boost, and was enough to bring down the mechanically actuated boost about 1 psi, or 8-8.5 at redline.
Next I installed the EBC. I debated where to tap in for power. Obviously I wanted a switched source that's +12v only when the car is on/running. I decided to use the cruise control wiring because it met the criteria of being close enough to easily run wiring, being switched with the vehicle, and being optionally turned on.
This means I can turn off the EBC at any time and run straight wastegate pressure by de-activating the cruise control. Very handy if I want to let someone else drive the car or need to valet, etc. I stripped off a bit of insulation and soldered/wrapped up the wiring on the cruise control side of the wiring. That way the stock harness is preserved and it's just an accessory I'm hacking up:
I placed the actuator on the airbox with the hope that it will stay cool. Hopefully this will preserve the life of the actuator/electronics inside:
I set out to tune the boost PID, which has been a bit of a challenge. I set my overboost at ~12psi, and my boost target across the entire map at 9.5psi. After a few days of tuning in various conditions (low 30's to lower 80's ambient temps), the PID numbers I'm using are:
It's close, but still not quite right:
I think I need a slight bit less I term, and that should also automatically increase the effect of the P term. It's hard to tell just from the picture, but the overall boost level raises by about 1 psi over the length of this pull.
I think this will keep it from creeping up boost at the end of the pull, and give it a bit more authority at the beginning to hit the target without overboosting.
I've noticed I'm using fairly low P and I values. A single point decrease in P is enough to kick the ecu into overboost. The 2.5 value I have pictured for I doesn't "stick", the ecu doesn't seem to allow this level of resolution so for now I'm going to run with it set to 2.
That catches everything up to the present.
I do have to take a moment to thank everyone who's posted/discussed/answered a technical question here for the past 5-6+ years. I've dug through some of the backlogs going back to the beginning of mt.net, and gotten 1st-hand testimony that can't be bought all for free thanks to the magic of the internet and people being willing to help one another.
I know there's details I've missed about the build, if anyone's curious how I did something feel free to ask. I'll try to keep this updated with anything interesting that happens.
Last edited by SJP0tato; 01-16-2013 at 09:48 PM.

Reply
 0
0

0
01-16-2013, 08:52 PM
#22
Junior Member
Thread Starter
iTrader: (7)
Join Date: Mar 2012
Location: Gilbert, Az
Posts: 356
Total Cats: 31
Oh, I also forgot: Here's one of my 3rd gear runs on a closed-circuit road in Mexico at 9psi EBC:
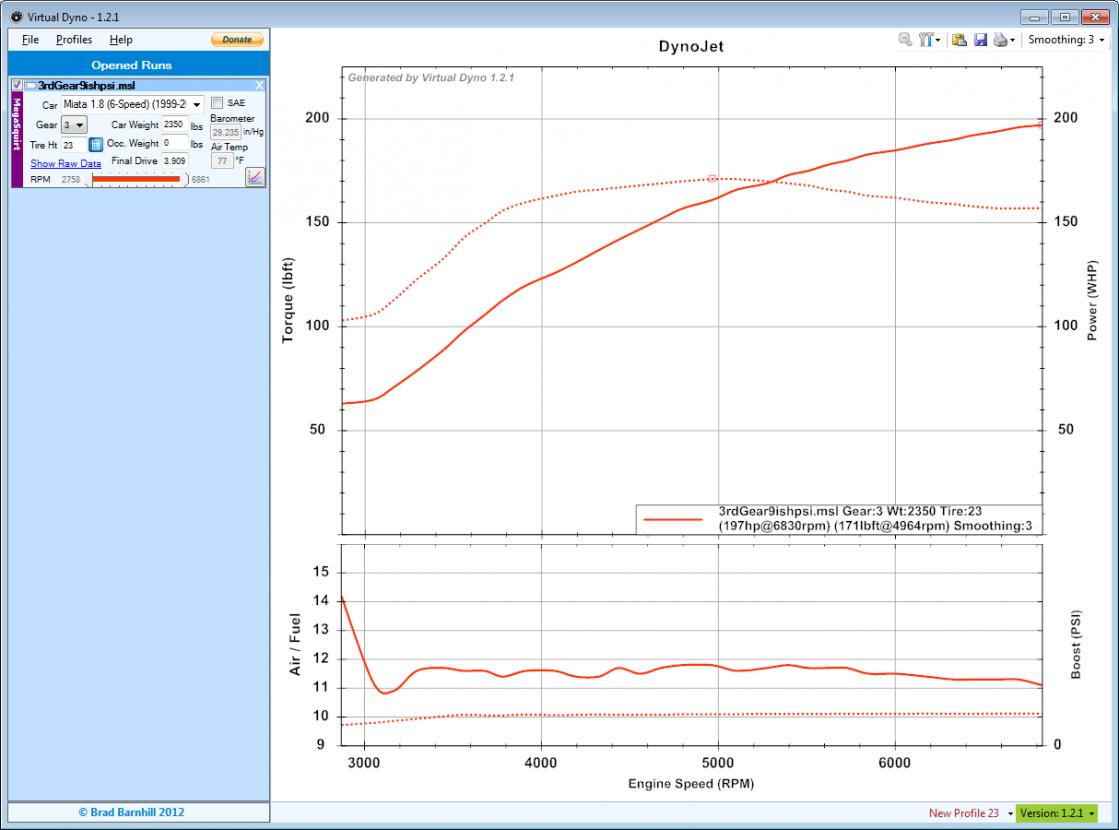
Unfortunately I haven't had a chance to get back down to Mexico to safely pull off any controlled environment un-interrupted 3rd gear pulls, but I'm sure I'll have a chance soon.
My plan for the next few days is to keep bumping the requested boost until I reach 10-11 psi. For some reason when things are working well the ecu levels things out 5-10kpa lower than my requested values. So if I have 165 across the board requested, it'll give me 155-160. Since it's consistent I'll just keep bumping the requested by 5kpa at a time until I reach my goal.
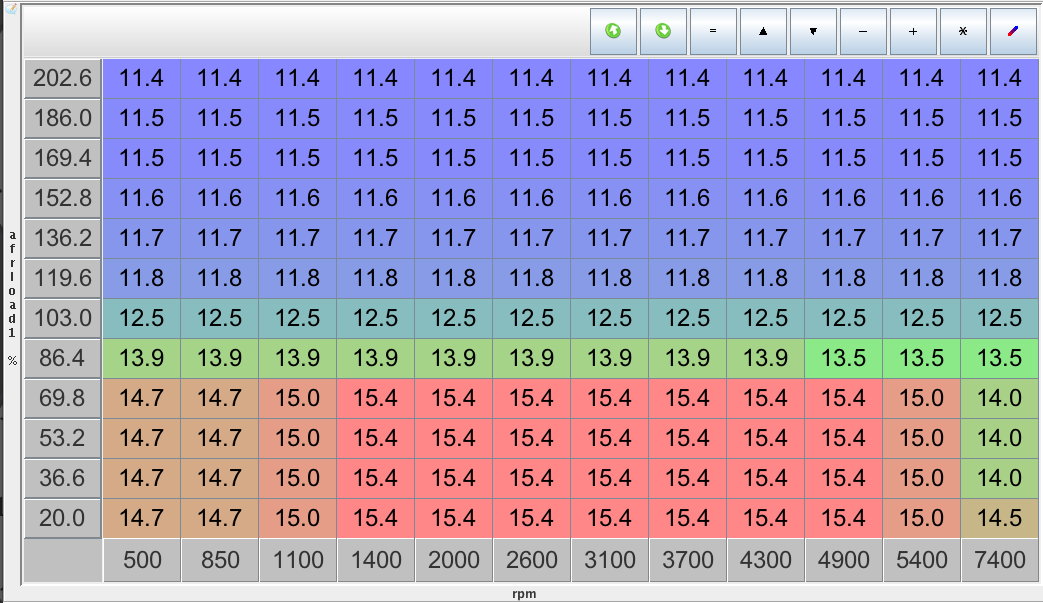
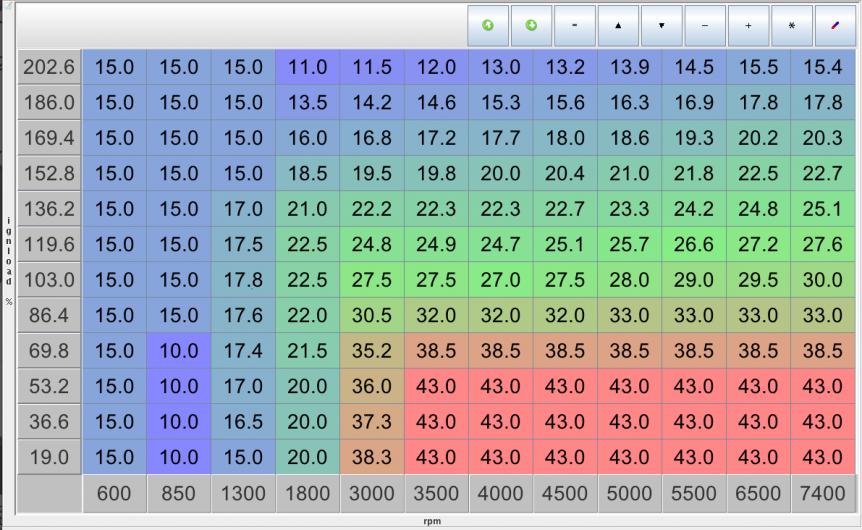
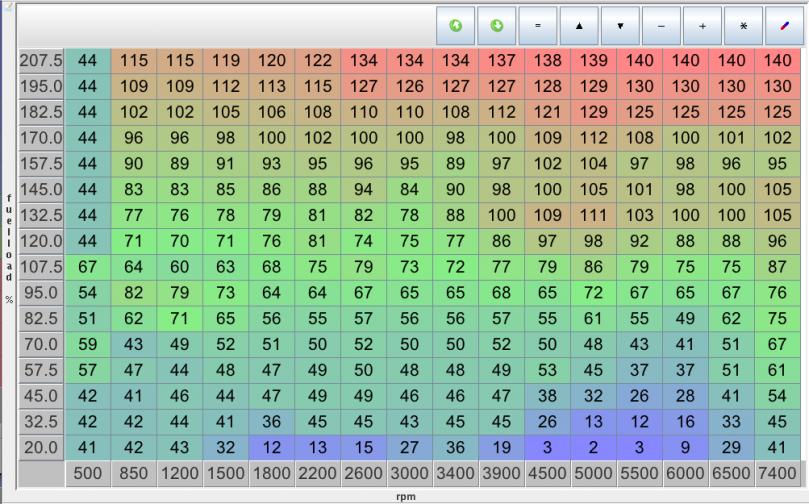
The overtly rich AFR has been mostly tuned out as well. Here's the timing/AFR tables I'm currently running. The AFR table is a mix of economy and probably overt safety. The timing map is a conglomeration of reading about 1000 posts here, and trying to come up with something that errs far into the side of safety, but not completely crippling power. Remember these are 100% seat of the pants numbers, none of these values have been verified by anything other than bachelor-frog "feels good man" tuning methodology:
And for kicks, my VE table too (I've never reached the higher boost cells, so they still have my initial over-rich values):
Unfortunately I haven't had a chance to get back down to Mexico to safely pull off any controlled environment un-interrupted 3rd gear pulls, but I'm sure I'll have a chance soon.
My plan for the next few days is to keep bumping the requested boost until I reach 10-11 psi. For some reason when things are working well the ecu levels things out 5-10kpa lower than my requested values. So if I have 165 across the board requested, it'll give me 155-160. Since it's consistent I'll just keep bumping the requested by 5kpa at a time until I reach my goal.
The overtly rich AFR has been mostly tuned out as well. Here's the timing/AFR tables I'm currently running. The AFR table is a mix of economy and probably overt safety. The timing map is a conglomeration of reading about 1000 posts here, and trying to come up with something that errs far into the side of safety, but not completely crippling power. Remember these are 100% seat of the pants numbers, none of these values have been verified by anything other than bachelor-frog "feels good man" tuning methodology:
And for kicks, my VE table too (I've never reached the higher boost cells, so they still have my initial over-rich values):
Last edited by SJP0tato; 01-16-2013 at 09:38 PM.
Reply
0
0

 01-16-2013, 09:15 PM
#25
Junior Member
Thread Starter
iTrader: (7)
Join Date: Mar 2012
Location: Gilbert, Az
Posts: 356
Total Cats: 31
I originally was going to do that, but then the lines would run through the airbox which might mean chafing since the engine movement means pulling/pushing in the direction of the airbox.
I'm sure I could line the box to keep the wear on the lines down, but it's still worrying enough to me since a pinhole in the wastegate actuator line means overboost. I guess the ecu is always there to catch it, but that's no fun. I did my best to ziptie the lines to allow for quite a bit of movement while still not touching/rubbing against anything.
I'm sure people on the freeway during my PID tuning were wondering wtf was wrong with my car chirping tires and jerking violently under WOT cause of overboost.
Reply
0
0


 01-18-2013, 12:13 AM
#31
Junior Member

Join Date: Apr 2010
Location: DC Area, VA
Posts: 71
Total Cats: 2
Whats up SJP - this is David, the guy that sold you the MS. Glad to see its being put to good use as part of an awesome build 
Funny thing is, you're basically creating the exact same build I had planned out for mine. My car is parked as I'm back in school but I'll have to pick up where I left off and use this thread as a guide. Keep it up!
Funny thing is, you're basically creating the exact same build I had planned out for mine. My car is parked as I'm back in school but I'll have to pick up where I left off and use this thread as a guide. Keep it up!
Reply
1
1
01-18-2013, 09:27 AM
#32
Junior Member
Thread Starter
iTrader: (7)
Join Date: Mar 2012
Location: Gilbert, Az
Posts: 356
Total Cats: 31
Well, a few days more of trying to tune my boost PID, and I'm still having some difficulty.
Using 26Hz for my Solenoid Frequency results in P and I values so small that single-digit increment/decrement changes have huge swings. This made trying to tune so brittle that it was nearly impossible.
I was semi-close with P=13, I=4, D=135 targeting ~10psi. Moving P to 12 resulted in an overshoot of 14+ psi, changing I to 5 would affect P to undershoot the 10psi greatly, and changing I to 3 would cause P to overshoot again. Very brittle since changing I at all worked out to a 25% increase/decrease.
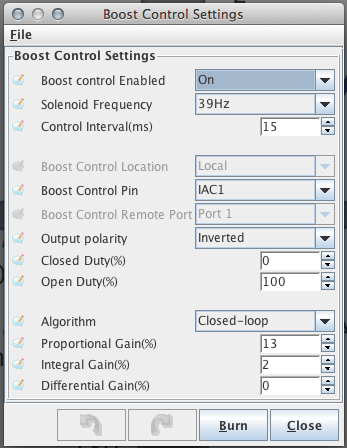
So I've gone to the standard most others are using at 19.5Hz. I've also set my Control Interval(ms) to 15, in hopes it will allow slightly larger P/I terms to allow more granular control.
I've done some tuning with these settings, but based on my testing, PID boost control seems to suffer from the same problem as using an MBC: Depending how the onset of boost occurs, it's possible to way over/under-shoot your intended boost target.
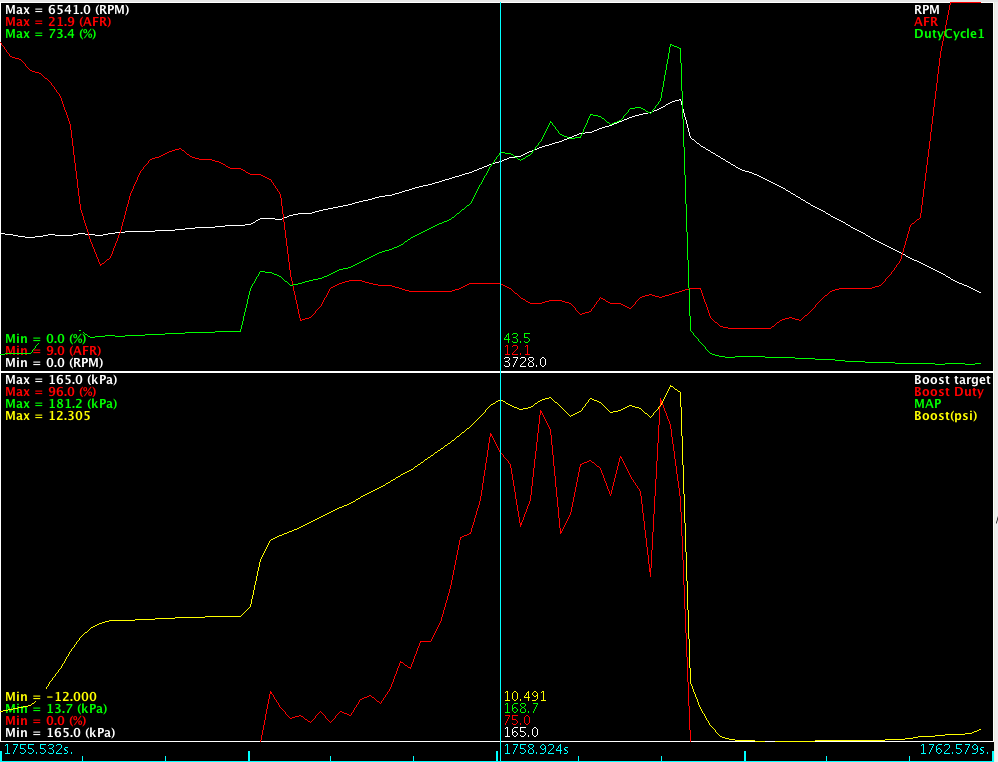
For example: I'm working on getting just the P perm tuned. (P=13, I=0, D=0). With these figures I get the following boost onset in 4th on the highway. As you can tell, I slightly overshoot my target boost of 165kPa and get some oscillation afterwards, both of which are expected with I/D set to 0:
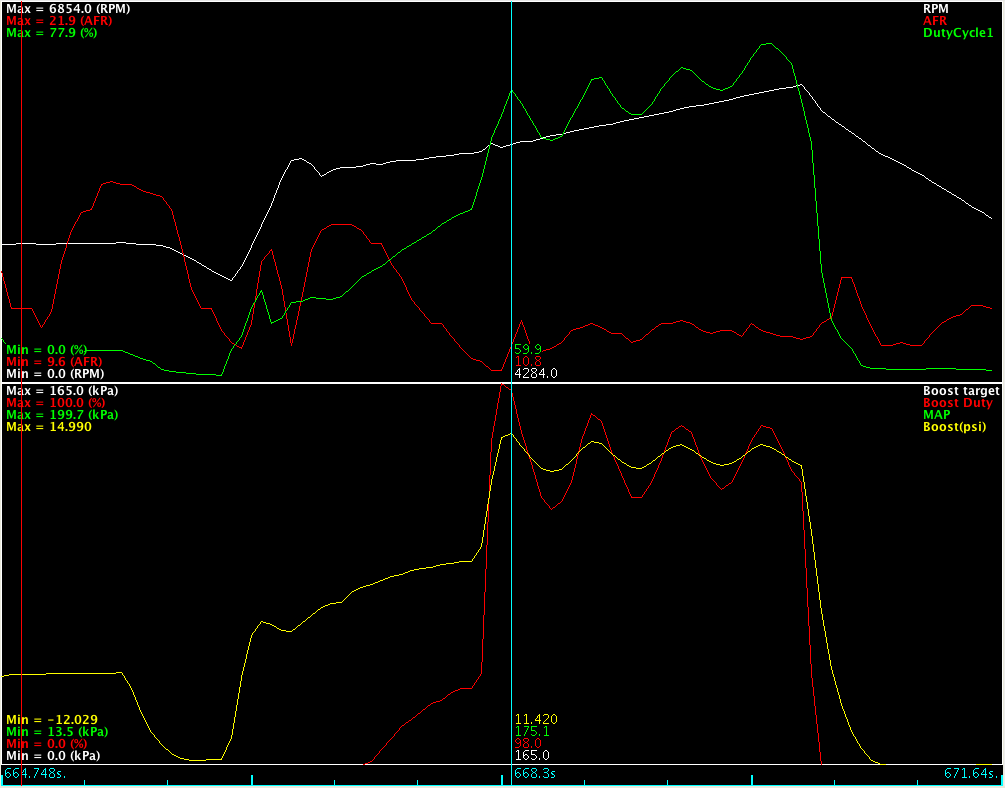
From previous turbo experience, 3rd/4th gear highway pulls are usually the fastest onset of boost, and hardest to "catch" before overboosting (vs straight 1st/2nd gear pulls), so this seems like the best/safest method to tune P/boost-onset.
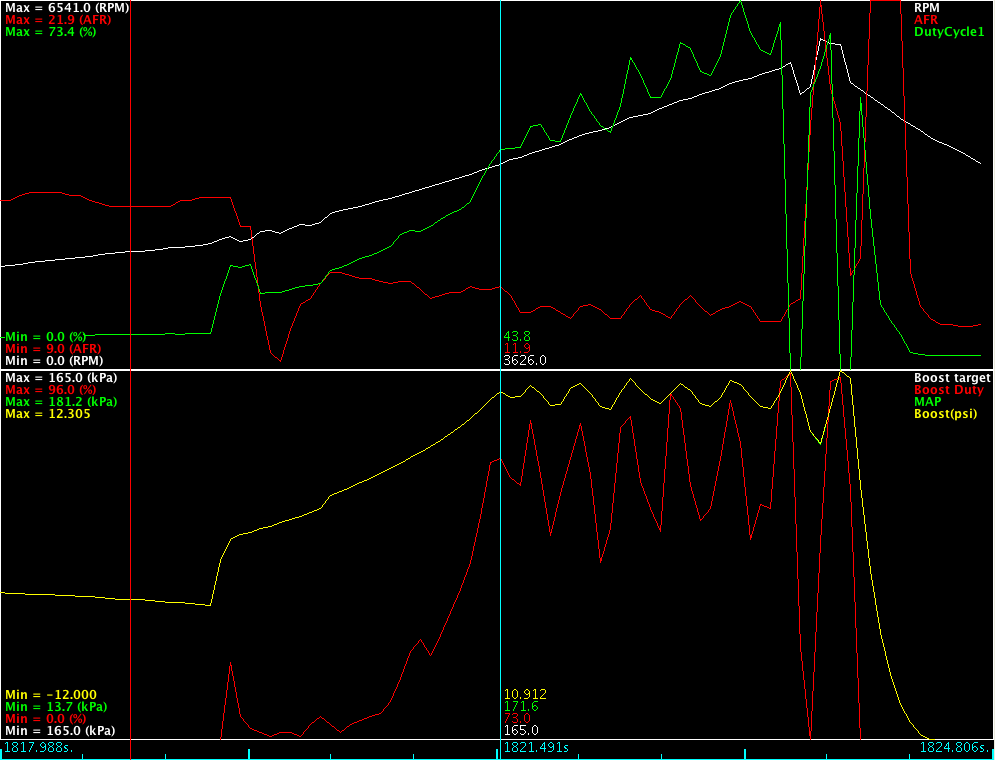
Now the exact same settings for a 3rd gear pull starting from ~2200 rpms. This one the boost onset is much slower which is expected, but the P term means it's over-eager to correct the boost onset, and results in a peak of 154kPa from the target of 165kPa. This is the exact same behavior as I'd expect if I used a manual boost controller to result in 10psi on a highway pull: it'd result in less peak onset boost in lower load conditions:
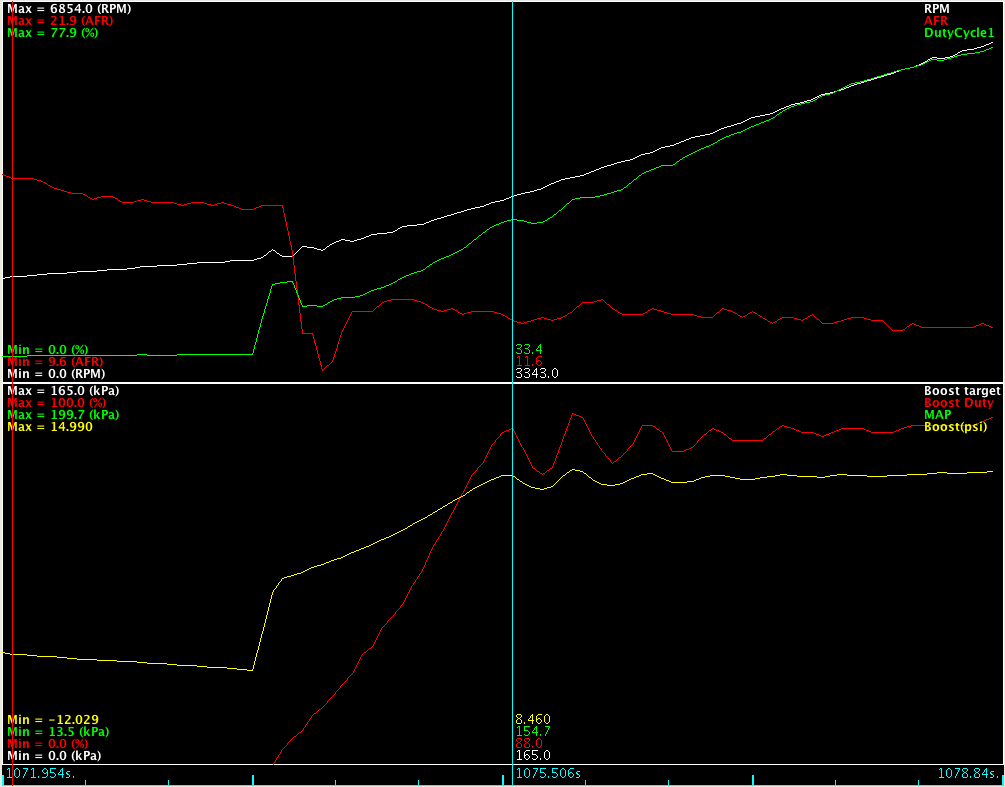
This is the behavior I was hoping EBC might be able to "fix", but based on my previous tuning results at 26Hz, and now again at 19.5Hz, I don't know if it's possible to have my cake and eat it too. If I lower my P-term further I can easily get the boost onset to hit at/above my requested kPa target for a 3rd gear pull starting from low RPMs as in the 2nd graph, but that means a pretty large spike (15+ psi) for a 4th gear freeway pull.
The way I understand from reading is increasing I-term will cause a closer movement to target over time, and D-term will help dampen/smooth the results out. So I'm not sure what settings might help the over/under-shoot issue I'm wanting to fix.
I'm not sure if this is just "the nature of the beast", or if there's a better way to tune things to get good results from either condition. I'll keep hacking away, and report back with any information/progress that might be helpful.
Using 26Hz for my Solenoid Frequency results in P and I values so small that single-digit increment/decrement changes have huge swings. This made trying to tune so brittle that it was nearly impossible.
I was semi-close with P=13, I=4, D=135 targeting ~10psi. Moving P to 12 resulted in an overshoot of 14+ psi, changing I to 5 would affect P to undershoot the 10psi greatly, and changing I to 3 would cause P to overshoot again. Very brittle since changing I at all worked out to a 25% increase/decrease.
So I've gone to the standard most others are using at 19.5Hz. I've also set my Control Interval(ms) to 15, in hopes it will allow slightly larger P/I terms to allow more granular control.
I've done some tuning with these settings, but based on my testing, PID boost control seems to suffer from the same problem as using an MBC: Depending how the onset of boost occurs, it's possible to way over/under-shoot your intended boost target.
For example: I'm working on getting just the P perm tuned. (P=13, I=0, D=0). With these figures I get the following boost onset in 4th on the highway. As you can tell, I slightly overshoot my target boost of 165kPa and get some oscillation afterwards, both of which are expected with I/D set to 0:
From previous turbo experience, 3rd/4th gear highway pulls are usually the fastest onset of boost, and hardest to "catch" before overboosting (vs straight 1st/2nd gear pulls), so this seems like the best/safest method to tune P/boost-onset.
Now the exact same settings for a 3rd gear pull starting from ~2200 rpms. This one the boost onset is much slower which is expected, but the P term means it's over-eager to correct the boost onset, and results in a peak of 154kPa from the target of 165kPa. This is the exact same behavior as I'd expect if I used a manual boost controller to result in 10psi on a highway pull: it'd result in less peak onset boost in lower load conditions:
This is the behavior I was hoping EBC might be able to "fix", but based on my previous tuning results at 26Hz, and now again at 19.5Hz, I don't know if it's possible to have my cake and eat it too. If I lower my P-term further I can easily get the boost onset to hit at/above my requested kPa target for a 3rd gear pull starting from low RPMs as in the 2nd graph, but that means a pretty large spike (15+ psi) for a 4th gear freeway pull.
The way I understand from reading is increasing I-term will cause a closer movement to target over time, and D-term will help dampen/smooth the results out. So I'm not sure what settings might help the over/under-shoot issue I'm wanting to fix.
I'm not sure if this is just "the nature of the beast", or if there's a better way to tune things to get good results from either condition. I'll keep hacking away, and report back with any information/progress that might be helpful.
Reply
2
2
 01-18-2013, 10:21 AM
#35
Junior Member
Thread Starter
iTrader: (7)
Join Date: Mar 2012
Location: Gilbert, Az
Posts: 356
Total Cats: 31
Thanks Brain, I'll give that a shot. I don't know if this will solve the "hits target boost under some, but not all conditions" issue, but let's see what happens.
Last edited by SJP0tato; 01-18-2013 at 11:34 AM.
Reply
0
0
01-18-2013, 07:04 PM
#36
Junior Member
Thread Starter
iTrader: (7)
Join Date: Mar 2012
Location: Gilbert, Az
Posts: 356
Total Cats: 31
A small increment of progress:
I'm using Brain's suggestion:
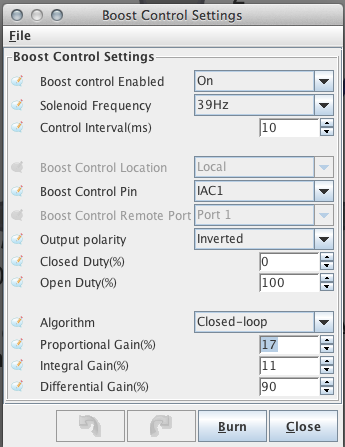
I started decreasing P from 30 eventually settling on 18. This seemed to just overshoot my target of 165 kPa by about 5-8 units. I started working on increasing I until the oscillations averaged out to more or less level around my target of 165 kPa which also lowered the initial onset boost. Because of this I dropped P by 1 to settle on 17. Then I started adding in D 15 units at a time until I arrived at what you see in the previous image.
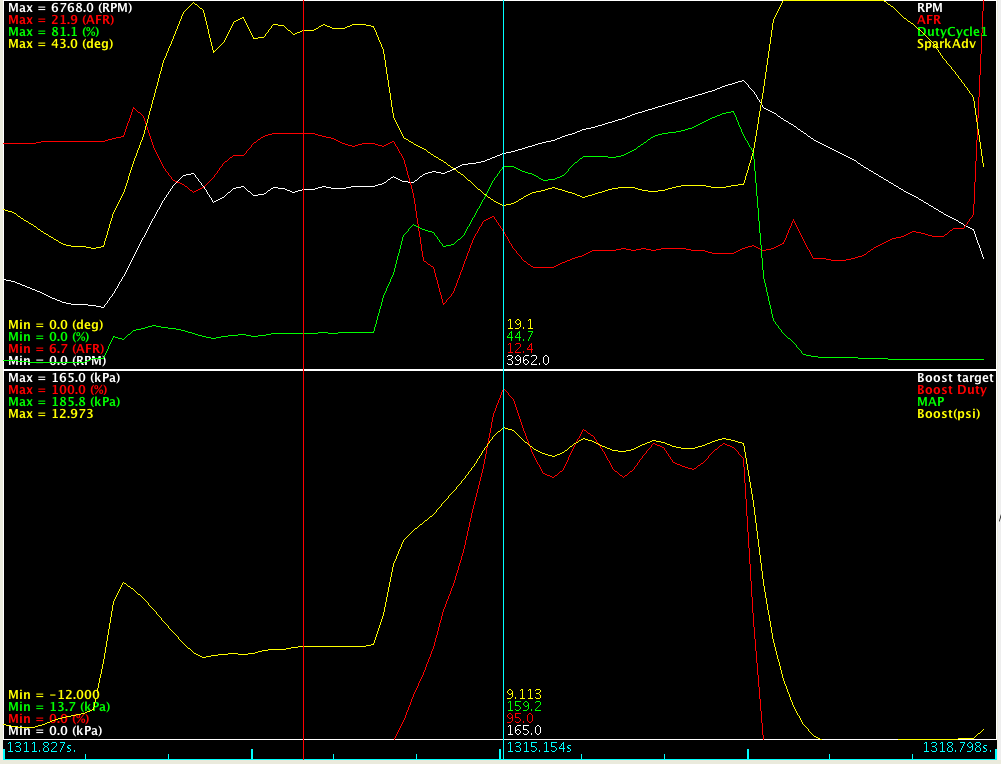
For some conditions it's working pretty well with a bit of oscillation (2nd gear pull):
For other conditions I think maybe my I-term is a bit too high, it starts out pretty good but the amplitude starts building until overboost cutoff set at 178 kPa (3rd gear pull):
I think the next step I'll take is lowering I by 1-2 and seeing how level a curve I can get. It looks like I'm going to need a lot more D, or a change to the Control Interval to break up the increasing amplitude sine wave that's resulting from my current settings.
I'm using Brain's suggestion:
I started decreasing P from 30 eventually settling on 18. This seemed to just overshoot my target of 165 kPa by about 5-8 units. I started working on increasing I until the oscillations averaged out to more or less level around my target of 165 kPa which also lowered the initial onset boost. Because of this I dropped P by 1 to settle on 17. Then I started adding in D 15 units at a time until I arrived at what you see in the previous image.
For some conditions it's working pretty well with a bit of oscillation (2nd gear pull):
For other conditions I think maybe my I-term is a bit too high, it starts out pretty good but the amplitude starts building until overboost cutoff set at 178 kPa (3rd gear pull):
I think the next step I'll take is lowering I by 1-2 and seeing how level a curve I can get. It looks like I'm going to need a lot more D, or a change to the Control Interval to break up the increasing amplitude sine wave that's resulting from my current settings.
Reply
0
0
 01-19-2013, 07:00 PM
#38
Junior Member
Thread Starter
iTrader: (7)
Join Date: Mar 2012
Location: Gilbert, Az
Posts: 356
Total Cats: 31
Well, I've spent about 2 hours trying to get boost PID worked out, but I can't seem to get anything better than "not really close whatsoever" to my boost targets.
I decrease P until I start to overshoot my target by ~1-1.5 psi. Then I start to bring I in. But the increase in I starts to cause more oscillation, starting around +-0.5psi, and on up as RPMs increase. If I raise the P value the oscillations will calm down, but the initial target is never reached, and overall boost is way under my target (like 7.5psi when I'm targeting 10).
If I lower P initial target is hit, but the huge oscillations start again. I tried varying the ratio of P/I from 13/2 up through something like 38/15, and they all result in the same problem.
I also tried changing the Control Interval, but it didn't seem to have much effect on anything.
I finally gave up, started over with:
Which results in:
This seems kinda/maybe reasonably close to my boost target. The initial boost doesn't reach target, and it never reaches target for the length of the run. Should I lower P, increase I? Leave it be & call it good enough? It seems like trying to be more aggressive with either P or I from this point is where the ecu starts to over-correct, and the boost oscillation problem comes back.
I'm starting to wonder if the huge oscillations I'm getting are a result of my setup in some way.
Last edited by SJP0tato; 01-19-2013 at 08:32 PM.
Reply
0
0


