When you click on links to various merchants on this site and make a purchase, this can result in this site earning a commission. Affiliate programs and affiliations include, but are not limited to, the eBay Partner Network.
Logs showed it to be the overboost protection kicking in. My turbo is only set for 7.5psi and I had overboost setting at 150kPa with 10kPa hysteresis so it would hit peak boost then stop spark for 1/2 second while MAP dropped to 140kpa then back on til peak boost then stop for 1/2 second again etc.
Worth checking. I since set my overboost to 170kPa with a 1kPa hysteresis so I can turn up the boost to 10psi gradually.
Cheers
Stot
Good idea Stot, but mine only has one option in Overboost Protection and it is PSI, which is set at 15.
I connected the Megasquirt MAP sensor to a vac pump. -10psi and 34kPa showing on the Megasquirt is actually -15psi on the vac gauge.
Engine off, the Megasquirt shows 64kPa and -.9psi. WTF is going on here?
I tried switching settings between 115kPa, 250kPa and 400kPa and the gauges didn't change. How do I calibrate the MAP sensor? I couldn't find a setting for it.
I got a capacitor from RadioShack and installed on the power wires to the COPs but didn't help.
Made another test run data log. Ignore the idle change in the "idle cut" log and skip to the end. This is where it had that weird idle hickup. Wondering if they are related.
Not to throw more confusion in the mix but I may have heard a click under the dash when the idle hickup occurred...
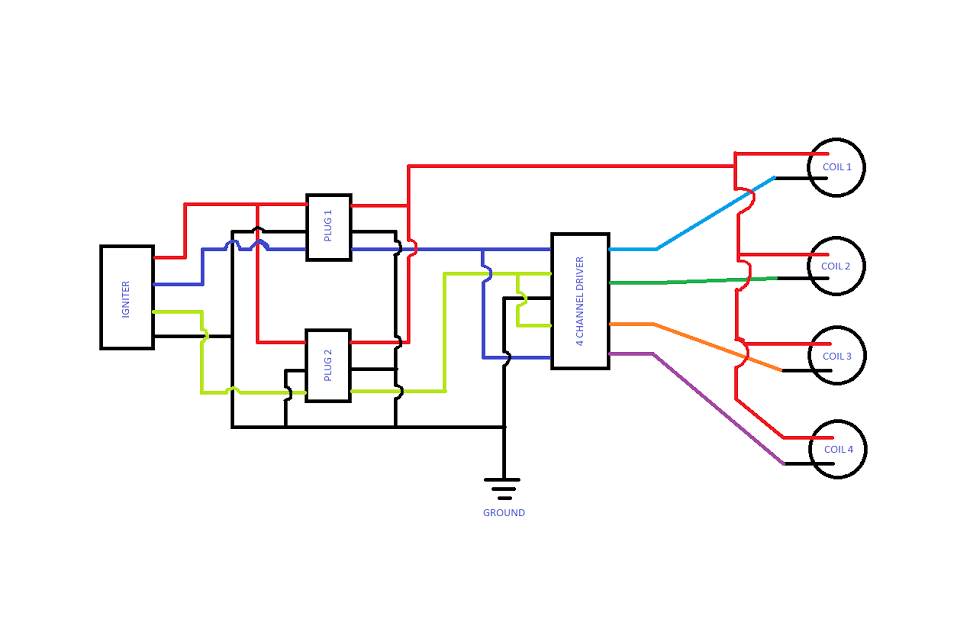
I just made this wonderful paint drawing of how to wire up coils that are dumb (ignitorless) such as the denso pencils you get in the fab9 kit and such. I got my coils from a junkyard off a gsxr 1000 and the 4 Channel driver is a bosch piece from a 1.8t audi a4, part no: Bosch 0 227 100 211.
this is the wiring for a 90-93 1.6 car, and i showed the igniter and coil plugs so you can choose where you wire from. I am doing mine to be completely reversible, using a crap coil to get the plugs for easy installation.
hope you like
FYI colors are not what is in the harness, ill update this thread when i get the pinout of what color wire corresponds to the colors here.
Obviously red is +12V and black is Ground. the lime and purple are the triggers for (1 and 4) and (2 and 3)
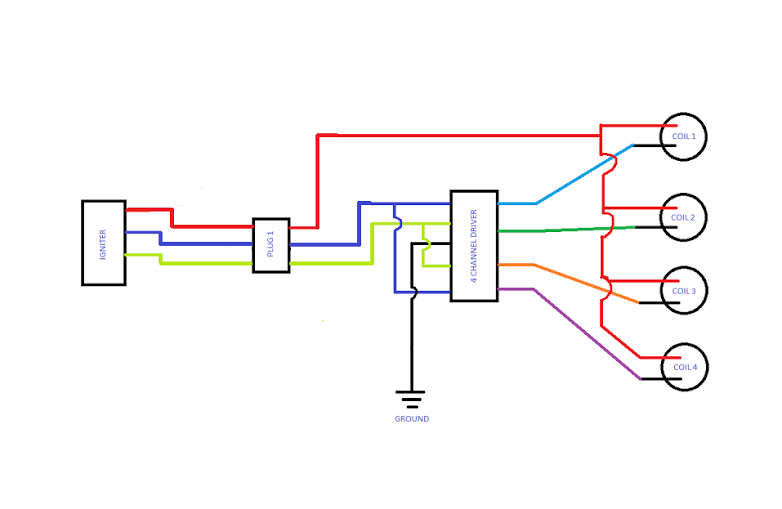
OK people, i just got it all wired up and installed, but its not starting. This diagram I made a derp in that I made 2 plugs at the oem coils. Looking at my car its just 1 plug with 3 wires. The 2 signals (1 and 4) and (2 and 3) and the +12V. Ill update the drawing tomorrow. But still from the wiring diagram I made it should fire and run, but I am getting nothing. :/ Ill be doing some diagnostics this week.
My issue was that I was leaving the stock power igniter plugged in (derp). You can use the 3 pin plug near the coil, but to do so, you must just outer 2 pins on the 8 pin stock igniter plug. This allows the trigger signal to be sent to the 3 pin plug, making the wiring shorter, and no need to hack up your stock parts
After more testing, I plan on getting all the exact wire dimensions, part numbers, etc. and making a diy, not to undercut the fab9 pieces (they are quite nice), but to undercut the fab9 pieces (they are quite pricey) and for those who dont want to have to hard wire in their plugs. (reversibility is a nice thing ) I was also depressed by the lack of information on wiring for these types of coils in the miata community. Going else where and just looking at how they operate was how I did it, but having a nice DIY will help others who dont like nor want to use the toyota coils.
remember that when using these coils, you need plugs that have the screw off head, since these are originally motorcycle coils (smaller accepting point in coil). Denso makes some good ones.
Hello guys...I received the Fab9 COP kit which I proceeded to install to my car that was already having coil pack problems(had swapped mine with a friends one and most of issues went away).
* The car is 1991 with an DIYAutotune MSPnP *
The kit was great quality, followed the instructions(after doing the stupid mistake on wiring them to...nowhere once) and the car was now starting and running smoothly. Drove the car hard for literally 24h and I now have to issues:
a) The RPM/tach signal doesn't work. Connected the 1k Ohm 0.25 Watt resistor exactly as the diagram asks but I get no tach signal at all RPM is dead.
All wires are hardwired after the 8 pin igniter connector directly to the car's harness and all cop related readings and operation feel and look fine.
b) After 24h with the car running with cops the alternator light came on and apparently the alternator is not charging. This could be random failure but since the only thing changed -from the electric side of things- was this wanted to know if it could be somehow connected.
Tried to contact Fab9 about the RPM/tach signal issue that shouldn't actually exist since wiring is following instructions to the letter but no success...
Ok, well, not to dig up an old thread but I wanted to post some PDF's for anyone that wants to make a braket to hold down the coils. Also here are some rough measurements as well.
Valve Cover Bolt size - ~7mm diameter
Spark plug hole size - ~1in
Front of Valve Cover to 1st bolt - ~1.5 inches
First bolt to first plug - ~35mm
Between each plug hole - ~85mm
Between SP hole 2 and bolt 2 - ~43mm
Between bolt 2 and SP hole 3 - ~43 mm
Between SP 4 and bolt 3 - unknown (see below)
- Used a 1x5 in by 36" piece of flat bar aluminum from Home Depot
- I created this in illustrator (first time doing it) and put it on two 8.5x11 sheets of paper. Printed those out, and aligned them in the window and then verified 85mm between SP hole 3 and 4.
- Taped and used a center punch to mark the holes, then drilled the 4 SP holes using a 1" hole saw (not great, seemed to of destroyed the 1" bit, but it worked)
- Rather than drilling the VC bolt holes, I did a method mentioned earlier. A dab of grease on the 3 bolt heads, and pressed the flat bar down to mark the holes (see photos) While not great,and not producing a 100% square bracket/mount, again it works
Someone sells this bracket for $40 + shipping (trackspeed maybe?) I am $30 into it after the flat stock and hole saw, and still need some hardware. Probably should have just bought it from TS, but if you have the hole saw and or flat stock already this may help.
The ZIP file contains the Illustrator files as well as the PDF's
If you want to use this as a starting point and make it better, please do!
So, reading through the thread I'm noticing bits and pieces of LS coil information, but not a ton. Maybe i missed it! anyway, i was wondering if anyone has made the LS coil a coil on plug, i used a protege boot and a Miata stock boot together and it fits nice and snug. But i can't help but think someones already done it and has a better way. Google only pulls up the FM and SadFab style mounts. Does this look familiar to anyone else coil setup?

 01-07-2015, 01:56 PM


 0
0


 )
)

 ) I was also depressed by the lack of information on wiring for these types of coils in the miata community. Going else where and just looking at how they operate was how I did it, but having a nice DIY will help others who dont like nor want to use the toyota coils.