Dropping the subframe to change the pan gaskets...
 06-16-2016, 02:22 PM
#1
Newb
Thread Starter

Join Date: Oct 2013
Posts: 11
Total Cats: 0
Hey guys I'm just a lurker around here, but I'm in the middle of a project and part of this project I will need to replace pan gaskets/RTV and while I am at it I was thinking about being proactive and go ahead and drill/tap for a return line.
Is this a good idea, bad idea? What fittings would be best to use (done right) to allow me to "plug" it until FI is installed?
I use the "while I'm here" mentality and my projects usually turn into much longer one.
My running log of the project here >> As Time allows, this BRG NB2 will get off the lift REPAIRED (pics) - MX-5 Miata Forum
Thanks guys

Reply
 0
0

0

 06-16-2016, 05:58 PM
#4
Elite Member

Join Date: Mar 2007
Location: Santa Clara, CA
Posts: 5,165
Total Cats: 855
I was about to post to say that I've done it and it was a major PITA and it's easier to pull the motor. Then I noticed you have the car on a 2-post lift, and that might well change the equation.
--Ian
--Ian
Reply
0
0
 06-16-2016, 07:34 PM
#6
Senior Member

Join Date: Nov 2010
Location: Pittsburgh PA
Posts: 1,163
Total Cats: 12
Issue being: The engine mounts directly to said subframe. IF you were gonna pull the trans, and lower the SF while having the engine suspended by an engine crane or support, that's one thing. It would also be a pain using a cherry-picker, so unless you have an engine support bar, and want to pull the trans first....
I didn't enjoy lining up the motor mounts in the subframe when I dropped in my VVT engine. Even with a 2 post lift, pulling it out the top would be faster. Additionally, reinstalling the subframe will likely change your toe angles. If you can afford to tie up a rack for a while, drop the front/rear subframes, with drivetrain attached. That's the "have access to everything, get it 100% done now, and paint parts" option.
Realistically, take it out the top. Unlike many FWD cars, there's no time to be saved with moving subframes in and out.
Reply
0
0
06-16-2016, 10:49 PM
#7
Newb
Thread Starter
Join Date: Oct 2013
Posts: 11
Total Cats: 0
Thanks guys, my original thought was to pull the motor rather than drop the subframe for the fact if it's on the stand it will be easier to have gravity as my friend placing the seals and doing the work in general.
You guys have a cheat sheet for removing all components, any tips or tricks for the ones that have pulled these motors before?
Having it out will give me a better look at all things too in case I decide something else needs changing.
And....Where is optimal placement for a oil return line, I'm going to go ahead and tap the pan too while it's out and place a bung and plug on there. Then when time and money allow move on to FI. Once I finish the shop addition and move my 1950 Studebaker truck in its new home
Reply
0
0
 06-17-2016, 02:10 AM
#9
Elite Member
Join Date: Mar 2007
Location: Santa Clara, CA
Posts: 5,165
Total Cats: 855
And....Where is optimal placement for a oil return line, I'm going to go ahead and tap the pan too while it's out and place a bung and plug on there. Then when time and money allow move on to FI. Once I finish the shop addition and move my 1950 Studebaker truck in its new home
This is my drain hose:
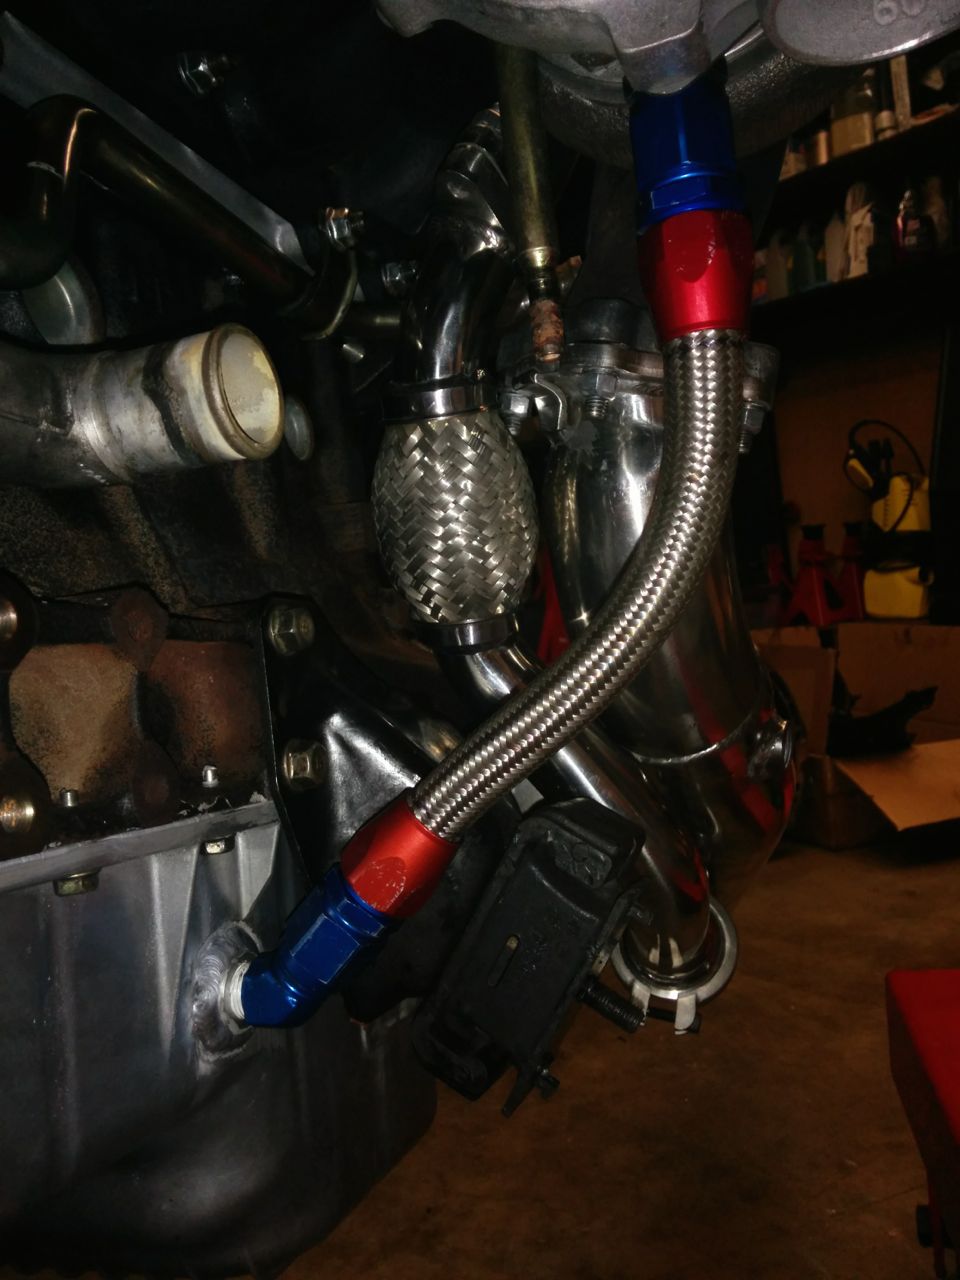
Thinking about the 2-post lift thing some more, yeah, I see what you mean. Dropping the motor out the bottom on the subframe requires all the same prep work as taking it out the top (which is really what takes all the time), plus you have to disconnect suspension, steering, and brakes.
--Ian
Reply
0
0
06-17-2016, 07:31 AM
#10
Junior Member

Join Date: Sep 2014
Location: Canton, GA
Posts: 153
Total Cats: -84
I did it by dropping the subframe, however the trans was still in the car, although I don't think that really makes it easier or harder either way you decide to do the oil pan.
The determining factor for me was that I had already done every seal on the car except the leaky pan seals. So I had no other reason to pull the engine other than the pan seals.
It went like this:
-Support engine from above (I have a bridge support bar)
-Remove brake calipers, suspend from strut/springs.
-Remove rotors (because no set screws and they would likely fall off anyway)
-Disconnect sway bar end-links.
-Remove lower shock mount bolts.
-Remove steering rack mounting bolts and spline, tie steering rack forward to give more pan clearance.
-Remove engine mount "nuts" from the studs
-Remove sub-frame mounting bolts, lower sub-frame out with jack
-Let the cleaning/cussing/oil pan shenanigans begin.
I did have the car on my 2-post Rotary, and air tools. Before removing the sub-frame I drilled 1/4" locating holes through it into the chassis rails. Installed 1/4" pins on re-install to make sure it didn't mess with the alignment.
Total time took 7 hours and some change, including cleaning up the shop after.
Reply
0
0
06-17-2016, 08:23 AM
#11
On an optioned street car a lift is the game changer for dropping IMO. Access to the things that need to be disconnected are easier and there's less of them. I've got a stout caster-equipped table that I lower the car down too (after following NBoost's list), then just back off the subframe hardware, raise the lift and done.
Reply
0
0
06-17-2016, 10:04 AM
#12
Newb
Thread Starter
Join Date: Oct 2013
Posts: 11
Total Cats: 0
Standard location is on the side at the front, but that's because you can drill it on the car. IMHO, if you have the pan off, you're better off putting the drain port right in front of where the motor mount attaches. Also, if you have the pan off, you really want to get a bung welded into the pan rather than drilling/tapping. You should probably also weld in a port for an oil temp sensor.
If so that's another reason to pull the trigger on my spoolhead attachment for my Hobart. I have a smaller Lincoln set up for aluminum but it's not ideal. My spoolhead option would be ideal.
Reply
0
0
06-17-2016, 10:07 AM
#13
Newb
Thread Starter
Join Date: Oct 2013
Posts: 11
Total Cats: 0
I think I have decided to pull the motor. I can take my time and get some good pictures. Do the timing belt and WP/seals. Maybe paint the valve cover and clean up around firewall.
I honestly looking for an excuse to hold off on laying the hardwood floors the wife bought... hehe
I honestly looking for an excuse to hold off on laying the hardwood floors the wife bought... hehe
Reply
0
0
06-17-2016, 12:06 PM
#14
Elite Member
Join Date: Mar 2007
Location: Santa Clara, CA
Posts: 5,165
Total Cats: 855
I never paid much attention, I assume since yours is welded these are not cast aluminum pans. Are they milled?
If so that's another reason to pull the trigger on my spoolhead attachment for my Hobart. I have a smaller Lincoln set up for aluminum but it's not ideal. My spoolhead option would be ideal.
If so that's another reason to pull the trigger on my spoolhead attachment for my Hobart. I have a smaller Lincoln set up for aluminum but it's not ideal. My spoolhead option would be ideal.
--Ian
Reply
0
0
06-20-2016, 10:37 AM
#16
mkturbo.com

iTrader: (24)
Join Date: May 2006
Location: Charleston SC
Posts: 15,177
Total Cats: 1,681
One of the first real things that I TIG aluminum was a bung onto my oil pant. I cleaned up both sides the best I could then welded a bung on. It was not that bad at all. I cleaned up the welds with a wire brush and they came out looking pretty good. I would not consider TIG welding the oil pan as hard to do.
Reply
0
0
06-20-2016, 01:07 PM
#18
Elite Member
Join Date: Mar 2007
Location: Santa Clara, CA
Posts: 5,165
Total Cats: 855
One of the first real things that I TIG aluminum was a bung onto my oil pant. I cleaned up both sides the best I could then welded a bung on. It was not that bad at all. I cleaned up the welds with a wire brush and they came out looking pretty good. I would not consider TIG welding the oil pan as hard to do.
I dunno, I'm very much a beginning welder, and I don't even have a TIG machine.
--Ian
Reply
0
0
06-20-2016, 02:13 PM
#20
Junior Member
Join Date: Aug 2005
Location: Cayman Islands
Posts: 440
Total Cats: 17
I was told that aluminum oil pans are usually porous, making it difficult to get all of the oil out of it, and that this would contaminate the weld and make it harder to achieve a water-tight seal.
I dunno, I'm very much a beginning welder, and I don't even have a TIG machine.
--Ian
I dunno, I'm very much a beginning welder, and I don't even have a TIG machine.
--Ian
Reply
0
0

Thread
Thread Starter
Forum
Replies
Last Post


