
How to degree your cams
 05-02-2015, 01:39 PM
#1
Junior Member
Thread Starter
iTrader: (6)

Join Date: Apr 2008
Location: Goodrich, MI
Posts: 189
Total Cats: 5
Hi, I needed to degree my cams because my head and block have been decked and I bought new Kelford cams. I searched all over and couldn't find a decent write up on how to do this, so i decided to try and put one together for other people trying to find information.
What you need:
Feeler gauges
Drop indicator
Magnetic base or solid way to mount the indicator
Degree wheel
Extra lifters to convert to solid
Piston stop
Piece of wire to use as a pointer and extension for indicator
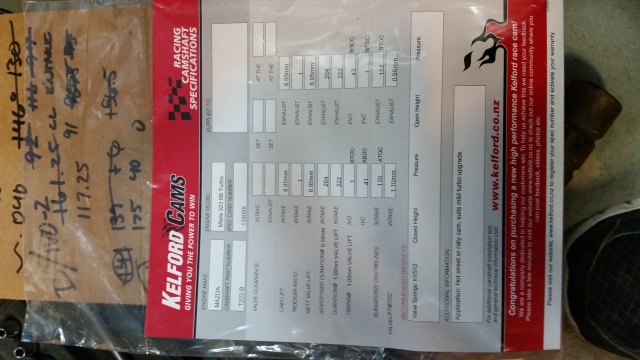
Cam card for set up
Adjustable cam gears
Basic tools
A good reason to do this
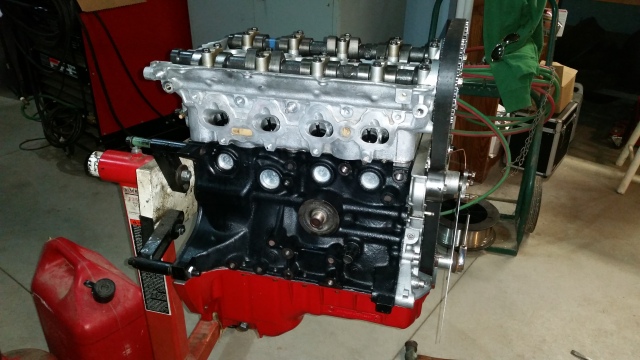
The first thing you need to do for hydraulic motors is remove two lifters from cylinder one and convert them to solid lifters. I made mine adjustable so i wouldn't have to shim them.
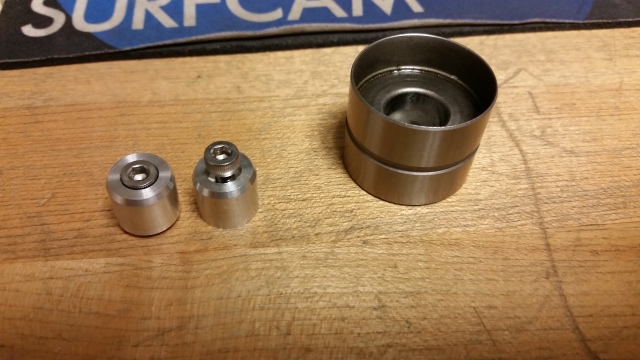
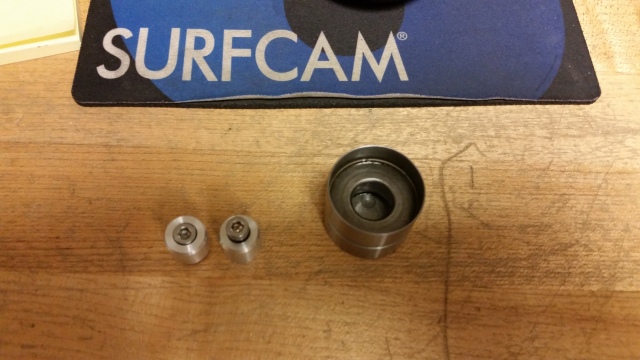

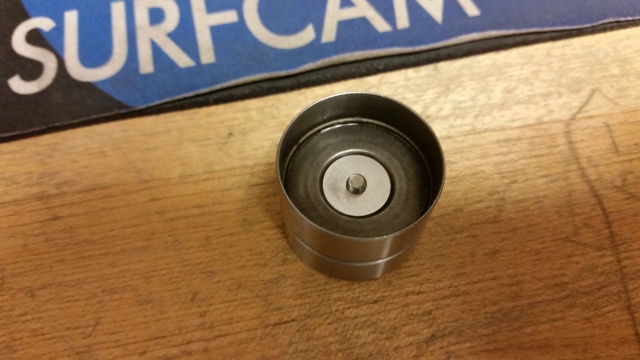
I went on the lathe and made a new inner piece then put a M3 screw in the bottom with clearance for the head of the bolt. The lifters need to be adjusted to 0 with a feeler gauge.
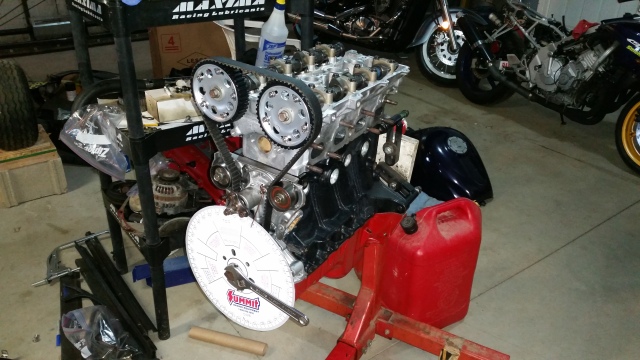
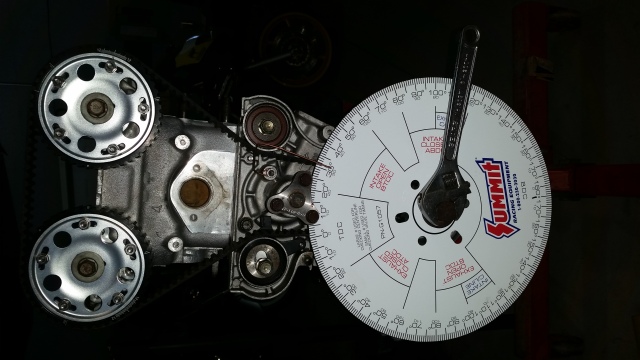
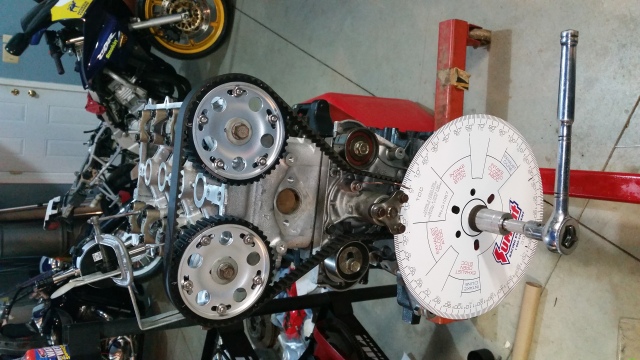
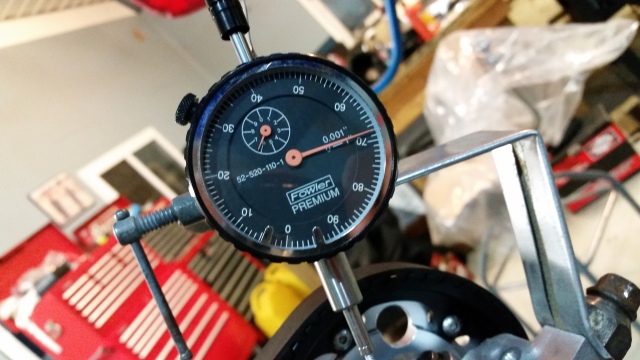
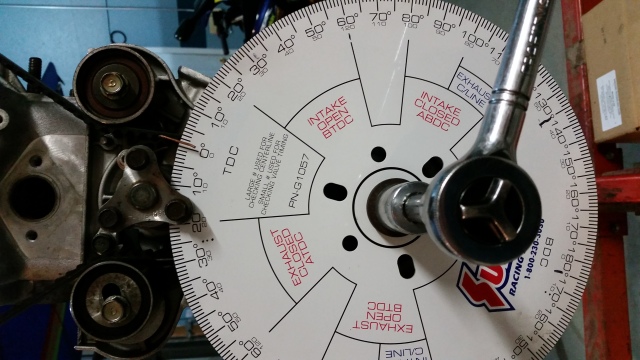
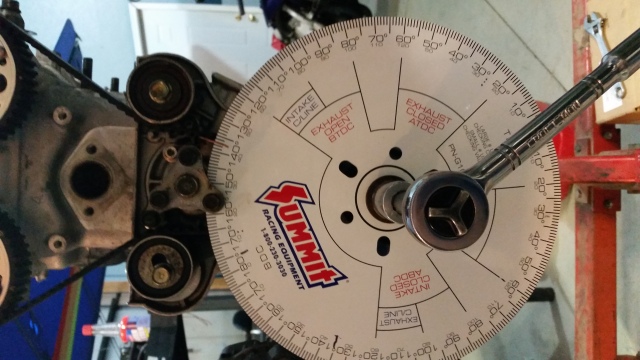
Once they are set up in the head on cylinder one, you can get started. The degree wheel I used came from Summit racing along with the piston stop. Mount the degree wheel to the front of the engine. Install the pointer so that you can easily read the degrees on the wheel as you rotate the engine.
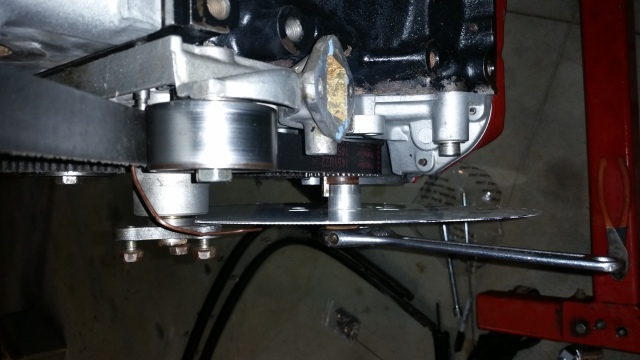
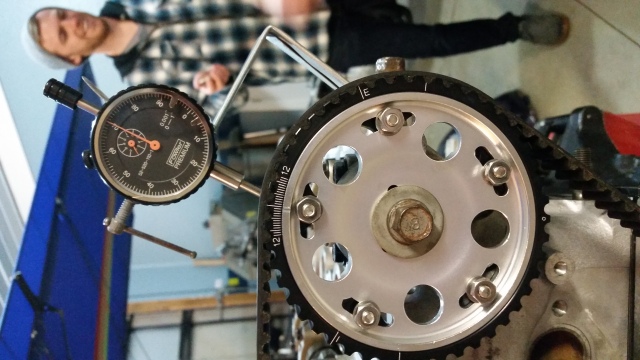
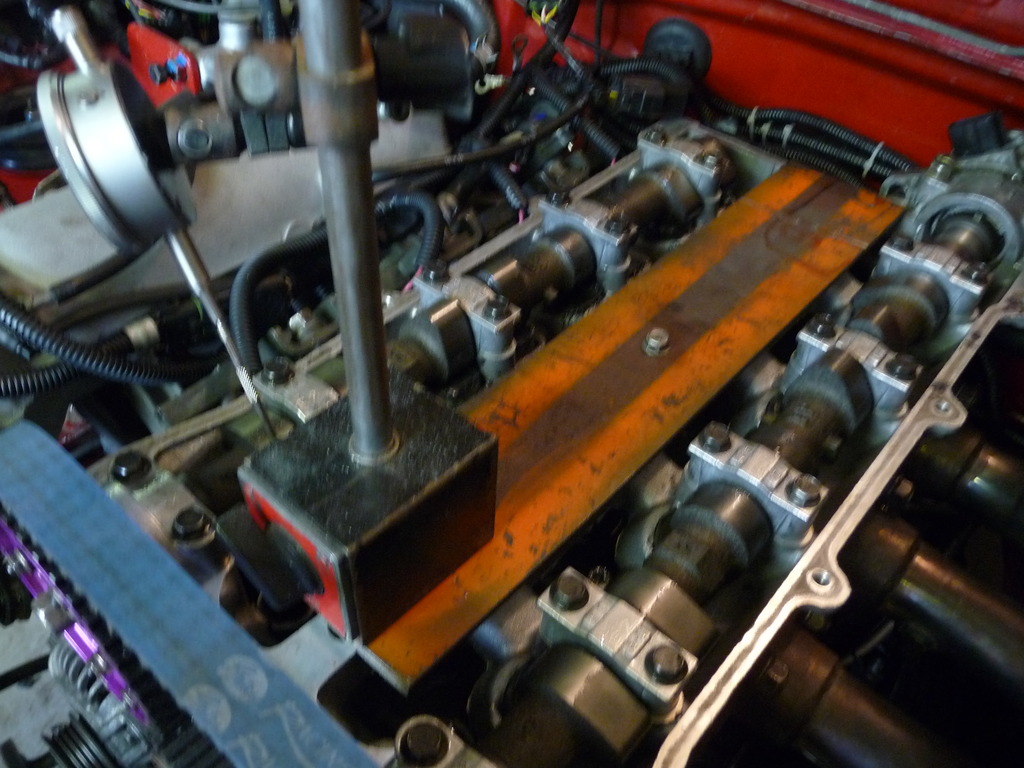
Once you have this ready you need to set up the indicator. You need to measure right off the solid lifter with the indicator parallel to the bucket and valve. In order to do this you need to make an extension to screw into the bottom of the indicator so you can get around the cam and to the lifter. I used a piece of aluminum tig welding rod I cut and bent and then threaded the end. I used the smallest die in my set and it seemed to be a decent fit.
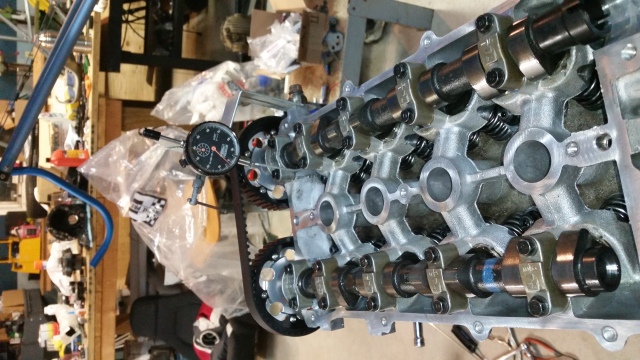
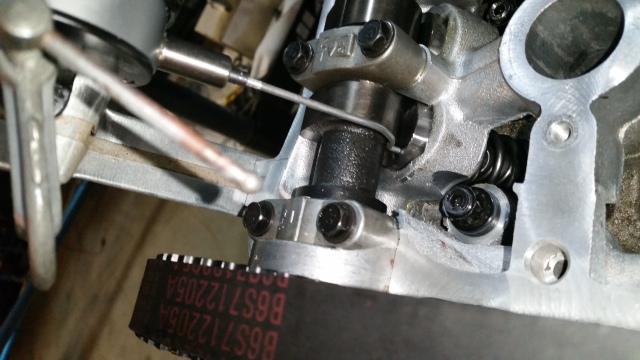
Set up the indicator on the intake side and so that there is enough pre-load to move all the way down with the lifter bucket and still have tension. Verify this by spinning the engine. The extension cannot hit anything while moving, make sure it is far enough away from the lobes and cam.
Next rotate the engine close to top dead center with the factory marks on the engine and timing belt gear. Make sure the timing belt is the proper tension before moving on.
Next move the engine so the piston drops well enough below top dead center to install the piston stop. Install the piston stop and proceed to rotate the engine clockwise until the piston rests against the stop. Record the degree on the wheel.
Now rotate counter clockwise until the piston again rests against the stop. Record the degree that you read on the wheel. Remove the piston stop and split the two degrees you just recorded. Rotate the engine to this point, you have now found top dead center. Rotate the Degree wheel so that you are now at 0 on the degree wheel. Be sure not to rotate the engine.
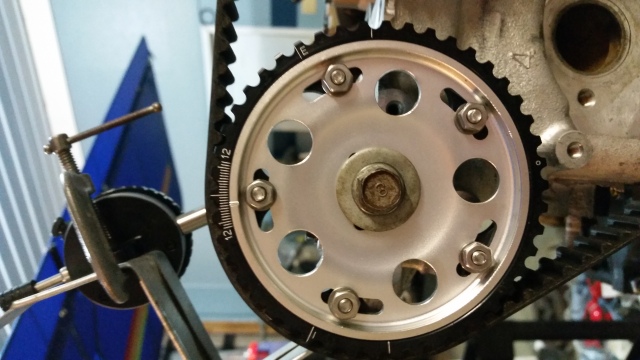
Rotate the engine so the cams above cylinder one are on there base circle. Set your indicator to 0.
Grab your cam card and take note of the IVO and IVC for the intake. For my cams it is IVO:1 IVC:41 . Rotate the engine slowly watching the lobes above cylinder one until it is close to hitting the bucket. Look at your indicator and keep spining the engine slowly until you get 1mm or 0.040in on the indicator.
My lifters ended up having 0.008in between the base circle and lifter on both exhaust and intake.... In order to compensate this i only went to 0.032in on the indicator. I would recommend setting your lash to 0 to make this easier and more accurate than what I did.
Record the degree on the wheel. According to the cam card, the IVO should be 1 Degree. Adjust your cam gears until this matches.
Now spin the engine taking note of the peak lift of the cam on the inticator, checking it with the cam card. Rotate to just before the lobe is off the bucket, measuring 0.040 on the indicator (0.032 in my case). Look at the degree on the wheel, it should match the IVC from the card, 41 Degrees.
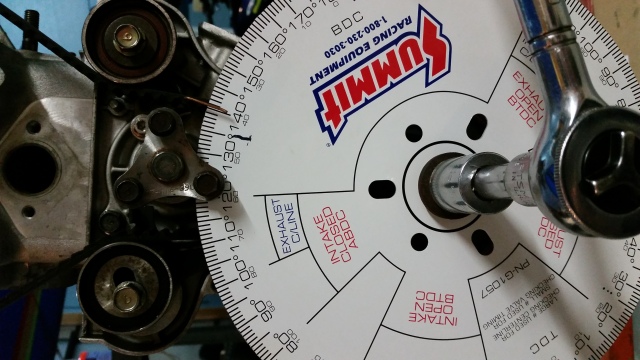
Now swap the indicator to the exhaust cam. Follow the same process to degree the cam to the cam card specs. EVO:43 and EVC:1 according to my cams.
I didnt take pictures of the final set up for the exhaust but you get the idea. Check the centerlines of the cams and triple check everything you have done. I used Kelfords method from this link: Sole Purpose of Degreeing Your Cam - Kelford Cams.
This ended up being a lot easier than i thought it would be, hopefully the pictures can help someone else out. If I made any mistakes feel free to critique or post the correct way.
Thanks,
Mike
What you need:
Feeler gauges
Drop indicator
Magnetic base or solid way to mount the indicator
Degree wheel
Extra lifters to convert to solid
Piston stop
Piece of wire to use as a pointer and extension for indicator
Cam card for set up
Adjustable cam gears
Basic tools
A good reason to do this
The first thing you need to do for hydraulic motors is remove two lifters from cylinder one and convert them to solid lifters. I made mine adjustable so i wouldn't have to shim them.
I went on the lathe and made a new inner piece then put a M3 screw in the bottom with clearance for the head of the bolt. The lifters need to be adjusted to 0 with a feeler gauge.
Once they are set up in the head on cylinder one, you can get started. The degree wheel I used came from Summit racing along with the piston stop. Mount the degree wheel to the front of the engine. Install the pointer so that you can easily read the degrees on the wheel as you rotate the engine.
Once you have this ready you need to set up the indicator. You need to measure right off the solid lifter with the indicator parallel to the bucket and valve. In order to do this you need to make an extension to screw into the bottom of the indicator so you can get around the cam and to the lifter. I used a piece of aluminum tig welding rod I cut and bent and then threaded the end. I used the smallest die in my set and it seemed to be a decent fit.
Set up the indicator on the intake side and so that there is enough pre-load to move all the way down with the lifter bucket and still have tension. Verify this by spinning the engine. The extension cannot hit anything while moving, make sure it is far enough away from the lobes and cam.
Next rotate the engine close to top dead center with the factory marks on the engine and timing belt gear. Make sure the timing belt is the proper tension before moving on.
Next move the engine so the piston drops well enough below top dead center to install the piston stop. Install the piston stop and proceed to rotate the engine clockwise until the piston rests against the stop. Record the degree on the wheel.
Now rotate counter clockwise until the piston again rests against the stop. Record the degree that you read on the wheel. Remove the piston stop and split the two degrees you just recorded. Rotate the engine to this point, you have now found top dead center. Rotate the Degree wheel so that you are now at 0 on the degree wheel. Be sure not to rotate the engine.
Rotate the engine so the cams above cylinder one are on there base circle. Set your indicator to 0.
Grab your cam card and take note of the IVO and IVC for the intake. For my cams it is IVO:1 IVC:41 . Rotate the engine slowly watching the lobes above cylinder one until it is close to hitting the bucket. Look at your indicator and keep spining the engine slowly until you get 1mm or 0.040in on the indicator.
My lifters ended up having 0.008in between the base circle and lifter on both exhaust and intake.... In order to compensate this i only went to 0.032in on the indicator. I would recommend setting your lash to 0 to make this easier and more accurate than what I did.
Record the degree on the wheel. According to the cam card, the IVO should be 1 Degree. Adjust your cam gears until this matches.
Now spin the engine taking note of the peak lift of the cam on the inticator, checking it with the cam card. Rotate to just before the lobe is off the bucket, measuring 0.040 on the indicator (0.032 in my case). Look at the degree on the wheel, it should match the IVC from the card, 41 Degrees.
Now swap the indicator to the exhaust cam. Follow the same process to degree the cam to the cam card specs. EVO:43 and EVC:1 according to my cams.
I didnt take pictures of the final set up for the exhaust but you get the idea. Check the centerlines of the cams and triple check everything you have done. I used Kelfords method from this link: Sole Purpose of Degreeing Your Cam - Kelford Cams.
This ended up being a lot easier than i thought it would be, hopefully the pictures can help someone else out. If I made any mistakes feel free to critique or post the correct way.
Thanks,
Mike

Reply
 1
1

1
05-02-2015, 05:30 PM
#2
Newb

Join Date: Sep 2010
Location: Brisbane Queensland
Posts: 10
Total Cats: 0
Good write up Mike,
Can I suggest a couple of different setting up procedures?
I use a flat plate bolted down to the head so I can use a magnetic dial indicator base,
Also the dial indicator must be on the same angle as the buckets direction of travel re same angle, or your readings will be out,

different way to mount up degree wheel, more accurate due to larger seating area and you can rotate wheel 6 degrees either way as the pin and bolt holes are slotted.

Last but not least, a trick taught to me by another engine builder, use a push bike spoke for your pointer, they bend sorta easy but don't flex and the thread is spot on for a Kingchrome dial guage.
Thia can be a s&*t job in the car but is the only way to do it properly.
Terry
Can I suggest a couple of different setting up procedures?
I use a flat plate bolted down to the head so I can use a magnetic dial indicator base,

Also the dial indicator must be on the same angle as the buckets direction of travel re same angle, or your readings will be out,

different way to mount up degree wheel, more accurate due to larger seating area and you can rotate wheel 6 degrees either way as the pin and bolt holes are slotted.


Last but not least, a trick taught to me by another engine builder, use a push bike spoke for your pointer, they bend sorta easy but don't flex and the thread is spot on for a Kingchrome dial guage.
Thia can be a s&*t job in the car but is the only way to do it properly.
Terry
Reply
0
0

Thread
Thread Starter
Forum
Replies
Last Post
Der_Idiot
Engine Performance
14
09-16-2015 09:30 PM
AlwaysBroken
Engine Performance
4
09-04-2015 01:35 PM


