
M-Tuned Coolant Reroute Replacement Seal
 11-22-2011, 02:40 AM
#1
Junior Member
Thread Starter
iTrader: (3)

Join Date: Apr 2010
Location: San Antonio, TX
Posts: 410
Total Cats: 1
Hey everyone, been struggling with a coolant leak the past month and finally got the issue cleared up tonight. Back in February I called M-Tune to ask what the replacement thermostat and seal were on the M-Tuned coolant reroute kit and they told me Stant 13959 (thermostat) & Stant 25280 (seal). I got them, it worked until October when I started smelling coolant. Found out it was leaking at the bottom of the remote thermostat housing at the back of the motor. I had purchased 2 seals back in February so I replaced it again and not 1 week later it was leaking again. I e-mailed Stant asking about the part numbers that were given to me and he said...
He recommended Stant 25270 for the seal and possibly Stant 45368 for the thermostat if I wanted the flange OD 0.1" larger.
Back in October I replaced the thermostat with Stant 13958 (centered core rather than offset) and it's fine so I just purchased the Stant 25270 seal and it seals much better just from looking at it and it looks pretty much identical to the one that comes in the kit.
Just thought I would share this info in case other people came across the same issue.
To paraphrase, get these... Stant 13958 (thermostat) and Stant 25270 (seal)
If you want to get one at a CarQuest, NAPA, or Gates place, here are identical part #s... http://www.stant.com/modules/partLoc...m.cfm?id=25270
Incorrect seal:
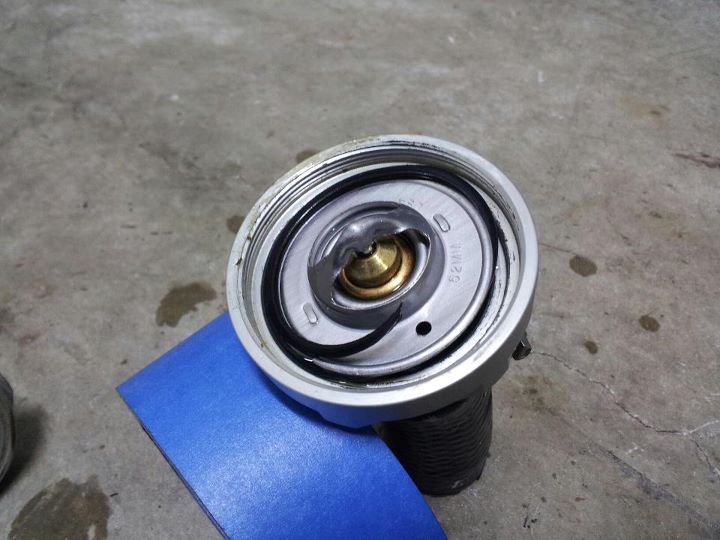
Correct seal on the left:

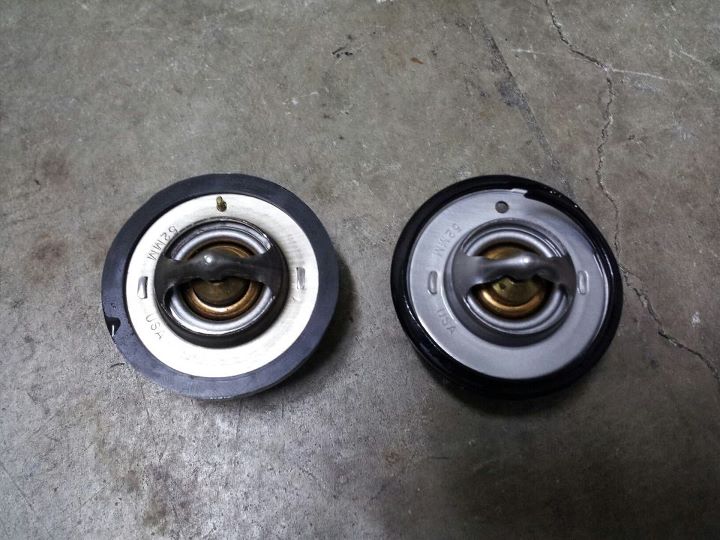
I am not sure why you have selected the thermostat and seal combo. The thermostat measures 2.04" diameter at the flange and the seal has an OD of only 2.0" so you must be stretching it to fit. This may be causing some of your problems.
Back in October I replaced the thermostat with Stant 13958 (centered core rather than offset) and it's fine so I just purchased the Stant 25270 seal and it seals much better just from looking at it and it looks pretty much identical to the one that comes in the kit.
Just thought I would share this info in case other people came across the same issue.
To paraphrase, get these... Stant 13958 (thermostat) and Stant 25270 (seal)
If you want to get one at a CarQuest, NAPA, or Gates place, here are identical part #s... http://www.stant.com/modules/partLoc...m.cfm?id=25270
Incorrect seal:
Correct seal on the left:

Reply
 1
1

1
11-22-2011, 11:52 AM
#2
Senior Member
iTrader: (4)

Join Date: Jan 2008
Location: Falls Church, VA
Posts: 1,361
Total Cats: 17
My M-tuned remote housing leaked when it was first installed. I noticed the t-stat seal seemed a bit cheesy and inadequate, but it's been a couple years and I don't remember which of the pictured versions I have. It's such a pain the the *** to R&R that housing from behind & below the head that when I pulled it out I decided to just give it the "**** you" treatment. Thin layer of RTV on the t-stat gasket, teflon pipe dope on the housing threads, and when it's all back together, RTV the gap between the two halves of the housing. **** don't leak anymore.
Reply
0
0

 02-04-2012, 10:38 PM
#5
I took the thermostat housing apart today to put in the new Stant parts. I found a different problem. With the housing screwed tightly together, the thermostat was still a bit loose inside even with the larger Stant gasket. The thickness of the gasket is less than the minimum gap between the two halves of the housing. I found a silicone gasket from a toilet flapper valve that was about the right size for a "shim". Only a little trimming was necessary. Then, after screwing the housing together the thermostat was tightly seated with no play and no leaks (so far).
The wrench is a 2.5 inch size from the plumbing department at Home Depot, inexpensive. It is easy to tighten the housing with one side in a vise and the wrench on the other.
The picture shows another gasket and the amount that I trimmed off of the first one.
Barry

The wrench is a 2.5 inch size from the plumbing department at Home Depot, inexpensive. It is easy to tighten the housing with one side in a vise and the wrench on the other.
The picture shows another gasket and the amount that I trimmed off of the first one.
Barry
Reply
0
0
 04-11-2012, 06:16 PM
#7
Newb

Join Date: Apr 2009
Location: Bay Area, California
Posts: 4
Total Cats: 0
It sure would be nice if the suppliers of these kits placed a list of applicable parts w part numbers in with their instructions. That way when it comes time to replace something, it's easy...
190 deg thermostat is this, 180 deg is that one, Here's the o-ring size, etc...
190 deg thermostat is this, 180 deg is that one, Here's the o-ring size, etc...
Reply
0
0
 04-11-2012, 07:58 PM
#9
No leaks since I posted the last comment. Make sure that the thermostat is not loose inside the housing when the 2 halves are screwed back together (on your workbench). The leak that I had was around the thermostat and out through the threads of the housing. The gasket at the edge of the thermostat must be thick enough to contact both halves of the housing.
Reply
0
0
04-12-2012, 06:04 AM
#12
Elite Member
iTrader: (21)

Join Date: Jun 2007
Location: Rochester, NY
Posts: 6,593
Total Cats: 1,259
The kit is nearly $350, and it's even 80 bucks more than the Begi one. For that much money (what is it, a couple of machined pieces, some hose and hardware?) it better not leak, or have to have parts added or modified.
Reply
0
0
04-12-2012, 11:21 AM
#13
Junior Member
Thread Starter
iTrader: (3)
Join Date: Apr 2010
Location: San Antonio, TX
Posts: 410
Total Cats: 1
Mine hasn't leaked since I replaced the gasket in the thermostat housing. HOWEVER, the gasket on the back of the head started leaking. I was lazy about it for a month or so and finally got a slow weekend to fix it and it didn't take that much time.
Unhook coolant hoses, remove EGR tube. I ended up taking it out completely. Use a deep-socket ratchet to remove the tube that goes from the block to the heater core. I think it was a 14mm?

Remove two screws holding the reroute piece on with an allen-key...
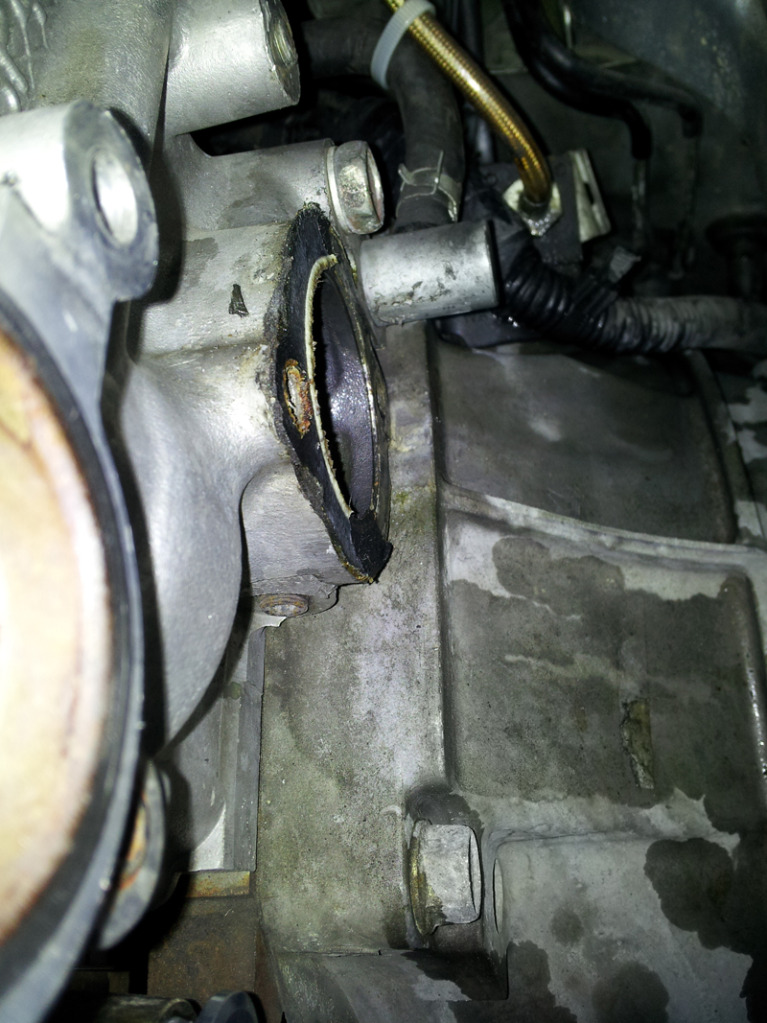
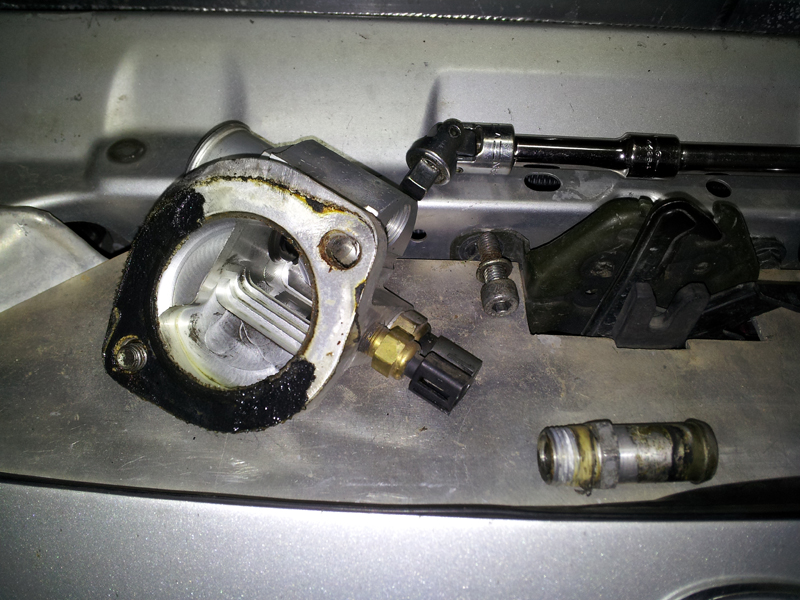

Scrape most off with a razor blade. Start sanding the rest with a block of wood and sandpaper...
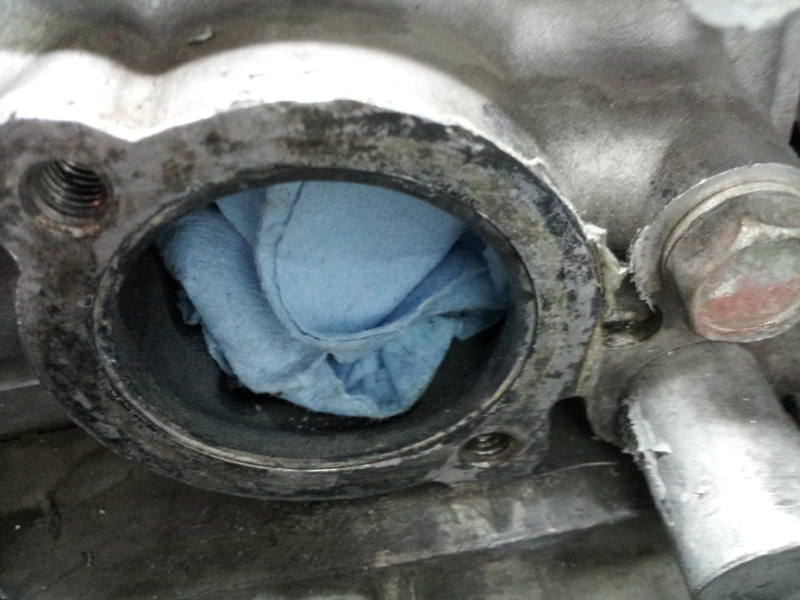
All clean...
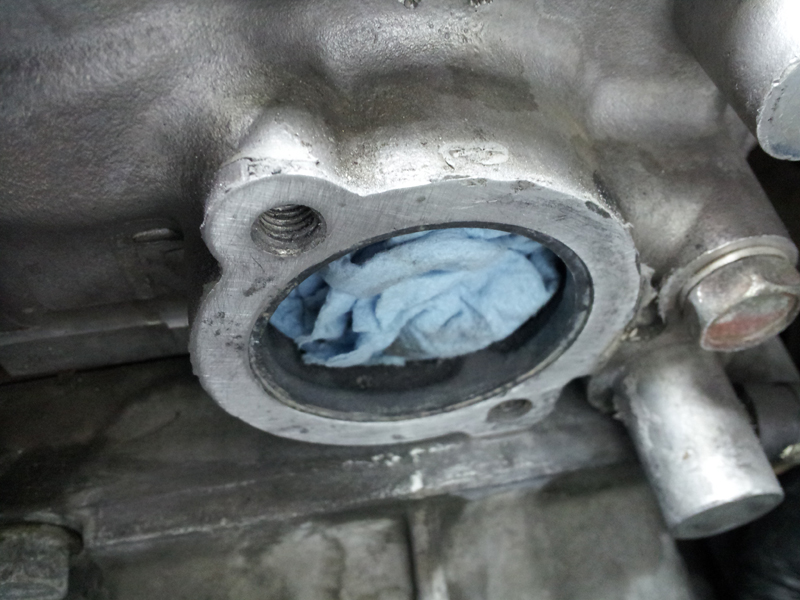
I installed a new gasket that I coated in RTV. I let the car sit for 24 hours before filling it with coolant and running it again.
Unhook coolant hoses, remove EGR tube. I ended up taking it out completely. Use a deep-socket ratchet to remove the tube that goes from the block to the heater core. I think it was a 14mm?
Remove two screws holding the reroute piece on with an allen-key...
Scrape most off with a razor blade. Start sanding the rest with a block of wood and sandpaper...
All clean...
I installed a new gasket that I coated in RTV. I let the car sit for 24 hours before filling it with coolant and running it again.
Reply
0
0
04-12-2012, 05:01 PM
#15
Newb

Join Date: Jan 2010
Location: wakefield UK
Posts: 20
Total Cats: 2
I've had the pleasure of replacing the gasket on the housing after 4 weeks of it being installed. The quality of the silicone hose is also poor given the price to the point it developed a small nick/leak caused by the poor quality of the hose clips. Both since replaced with quality kit as I don't fancy it giving out on track. The thermostat housing also needed silicone to get it water tight.
It's a shame given the design and quality of the actual housing, sorting the above by M tuned might be worth their while and providing the correct replacement seals, hell for what they cost why not supply a spare set!
It's a shame given the design and quality of the actual housing, sorting the above by M tuned might be worth their while and providing the correct replacement seals, hell for what they cost why not supply a spare set!
Reply
0
0
04-12-2012, 05:05 PM
#16
Junior Member
Thread Starter
iTrader: (3)
Join Date: Apr 2010
Location: San Antonio, TX
Posts: 410
Total Cats: 1
I've had the pleasure of replacing the gasket on the housing after 4 weeks of it being installed. The quality of the silicone hose is also poor given the price to the point it developed a small nick/leak caused by the poor quality of the hose clips. Both since replaced with quality kit as I don't fancy it giving out on track. The thermostat housing also needed silicone to get it water tight.
It's a shame given the design and quality of the actual housing, sorting the above by M tuned might be worth their while and providing the correct replacement seals, hell for what they cost why not supply a spare set!
It's a shame given the design and quality of the actual housing, sorting the above by M tuned might be worth their while and providing the correct replacement seals, hell for what they cost why not supply a spare set!
Reply
0
0
04-12-2012, 05:22 PM
#17
Elite Member
iTrader: (21)
Join Date: Jun 2007
Location: Rochester, NY
Posts: 6,593
Total Cats: 1,259
I would double check the thermostat seal they gave you because you should not need silicone to seal the external thermostat housing. Did you cover the gasket that goes on the back of the head with RTV? Neither location has leaked for me since I got those both fixed and I have tracked the Miata several times without any issues.
If I had to pick only 2 chemicals in my garage, they would be the IHS and nev-r-sez.
Reply
0
0
04-12-2012, 05:30 PM
#18
Junior Member
Thread Starter
iTrader: (3)
Join Date: Apr 2010
Location: San Antonio, TX
Posts: 410
Total Cats: 1

You should only need the rubber gasket for the remote housing.
You should use RTV with the paper gasket that goes on the back of the head.
Never heard of the IHS stuff; will have to check it out.
Reply
0
0
04-12-2012, 11:43 PM
#19
The BEGI kit is the same basic reroute. I'm not sure what others have experienced with that one.
If I has known about the leaking issue in the housing ahead of time, it could have been corrected during initial installation and saved a lot of labor. Not an expensive repair, just a lot of extra time. I called M-tuned early on and they told me to use teflon tape on the housing threads. I did that and the leak continued, since I had not fixed the actual defect. Maybe my housing dimensions were unique; it was not possible to screw it together tightly enough to capture the thermostat gasket.
So far, the gasket at the back of the engine is holding up OK. The car has been on the track twice with this setup and the temperatures have been fine.
Barry
Reply
0
0
04-13-2012, 12:37 AM
#20
Boost Pope


iTrader: (8)
Join Date: Sep 2005
Location: Chicago. (The less-murder part.)
Posts: 33,026
Total Cats: 6,592
?
The Bell rear-thermostat reroute isn't quite as pretty and shiny as the M-tuned package, however it's a much better design.
Beyond the fact that it uses a conventional flat gasket as opposed to a rubber o-ring, it is a much better design in that it retains the placement of the thermostat inside the head, and in an area where it is exposed to a constant flow of coolant. Specifically, the coolant going out to the heater core flows directly past the thermostatic element, thus ensuring that the action of the thermostat does not lag behind the true engine temperature, as is the case when the thermostat is located some distance away from the engine in an external enclosure. This is the closest thing to the original design of the FWD B-series cooling system presently available in a commercial package.
Reply
0
0


