
The custom fabrication thread! (Post pics of stuff you have made)
 12-11-2012, 09:29 AM
#81
Elite Member

iTrader: (5)
Join Date: Oct 2011
Location: Detroit (the part with no rules or laws)
Posts: 5,677
Total Cats: 800
Wow, some of the advice in this last page is completely mind boggling. While most of it is good advice and correct some things are major no no's.
Never put the tungsten in the drill to spin it on a grinding wheel. If you have your glove on while using the grinder in the first place you need your hand sucked into it. You want to spin the tungsten slow. Plus the tungsten should only stick out of the cup as far as you ground it, no more than 1/4" MAX. Try to make a smooth transition into the point. No angles. The whole no filler suggestion is dumb. Unless you're trying to run a bead on a FLAT surface, sure don't use filler. I also highly recommend just trying to run a few beads on a flat piece if you're first starting. Don't even try welding two things together yet. Once you learn control, and get a nice puddle going, then try with filler, then go to a butt joint. Always tack your ends. 2mm away? No, just try and get as close as possible you're going to burn up tungsten in the beginning but that's learning. I try and never ever lay the cup on the metal. That's the quickest way to run into a little burr and scerw your weld up. Start off real small and real slow. Don't mash the pedal straight to the ground and go for it. Aluminum likes to get real warm at the end of a weld, and if you're not careful you can end up with a puddle twice the size you started with and completely melt in your ends. Which is hard to recover from.
Wall of text. Everything else that was said is good. Clean the metal. When tig welding with AC, it's really not that important IMO, unless it has a ton of oxides and crap on it. I have spent the last 3 years in school for welding, and i am certified in a few different things. High pressure pipe 4g, stainless tig up to 1/4" 3g, aluminum tig 3g, 1/4", mig 1" 3g. Plus i do this every day.

Reply
 0
0

0
12-11-2012, 09:35 AM
#82

You really should try the drill trick. I've never made a tungsten so round with such perfect longitudinal grind marks before I tired it. Having a drill that is variable speed and capable of going very slow is a must. And you should also try grinding a 1 inch long tungsten for the shorty cap without gloves on and tell me how much you like it. If you really dont like the drill trick, drafting pencils work great as tungsten holders, buy one in the size tungsten you use.
Reply
0
0
12-11-2012, 09:53 AM
#83
Elite Member
iTrader: (5)
Join Date: Oct 2011
Location: Detroit (the part with no rules or laws)
Posts: 5,677
Total Cats: 800
As long as it's understood that the drill has to spin slow. I've noticed people have been trying the drill trick more and more. Setting the drill to max and the trigger at WOT makes me cringe. Longitudinal grind marks are critical for a good arc. Perhaps my hands are just used to getting hit with sparks. I've just seen gloves get sucked into grinding wheels and it's not pretty. I also like a smooth transition from the flat rod to grinding, instead of an angle. I've noticed it makes a little bit of a difference in arc flow.
With all this being said. Everyone is different and they should do what they feel is best and gives them the best outcome. Take all this information with a grain of salt, and apply it yourself. See what works best, that's the best advice i can give you.
With all this being said. Everyone is different and they should do what they feel is best and gives them the best outcome. Take all this information with a grain of salt, and apply it yourself. See what works best, that's the best advice i can give you.
Reply
0
0
12-11-2012, 10:40 AM
#84
Junior Member
Thread Starter

Join Date: Jun 2010
Posts: 176
Total Cats: 4
It was a suggestion to help with practice. It will help you learn to keep your arc short and teach you better puddle manipulation. If you practice this way, and then start welding with filler, it will accelerate the rate at which the welds progress.
I also agree using the drill for sharpening tungsten is rediculius unless its going 10rpm or less.. The lines need to be straight up the tip, not doing a helical swirl thing.
I also agree using the drill for sharpening tungsten is rediculius unless its going 10rpm or less.. The lines need to be straight up the tip, not doing a helical swirl thing.
Reply
0
0

 12-12-2012, 04:25 PM
#86
Junior Member
Thread Starter
Join Date: Jun 2010
Posts: 176
Total Cats: 4
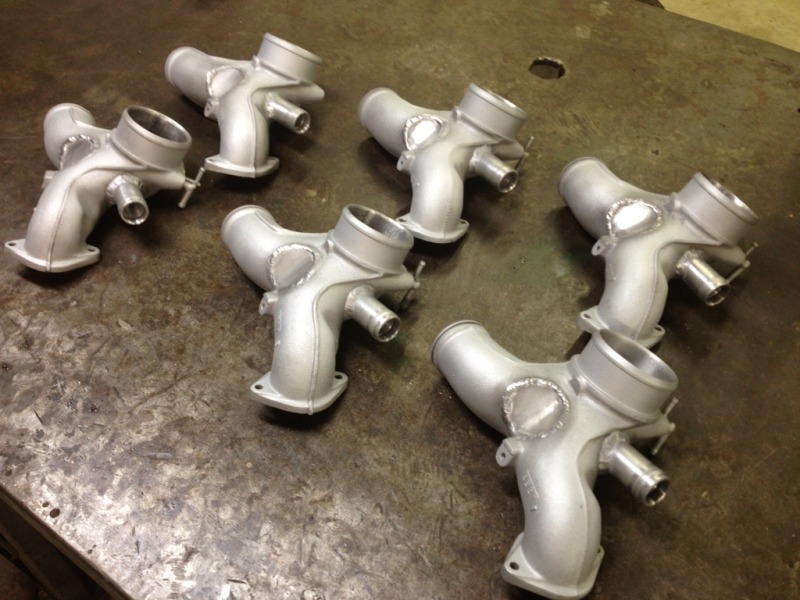
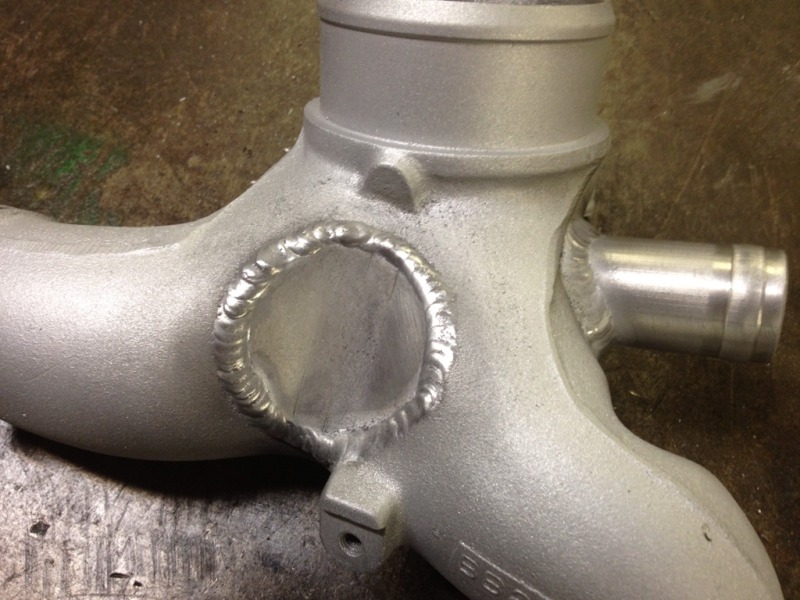
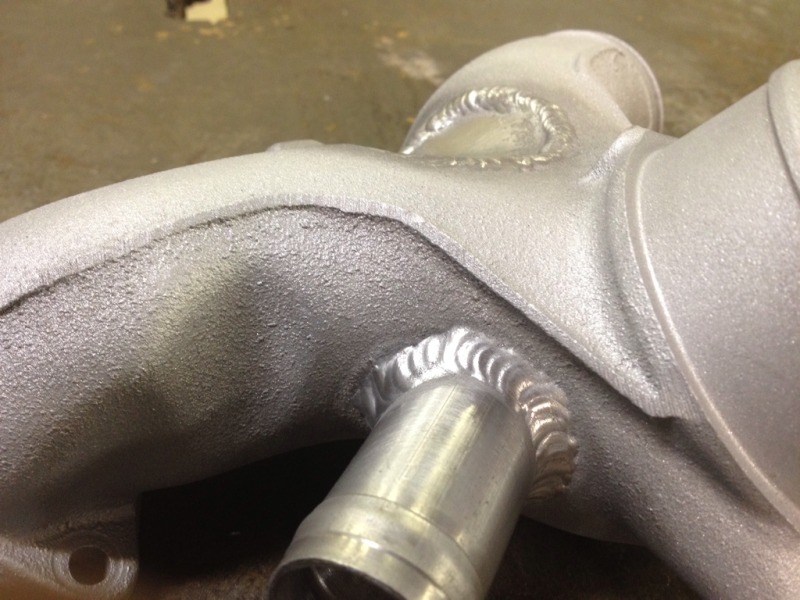
Here's some aluminum parts I welded up today here at Pettit racing. It's called a hi-flow y pipe, and offers a decent improvement over the stock piece. For a fd3s rx7's 13b-rew.
Thought they came out pretty nice for being cast to 6061
Thought they came out pretty nice for being cast to 6061
Reply
0
0
12-13-2012, 09:54 PM
#87
Senior Member

Join Date: Dec 2012
Location: Charlotte, NC
Posts: 538
Total Cats: 64
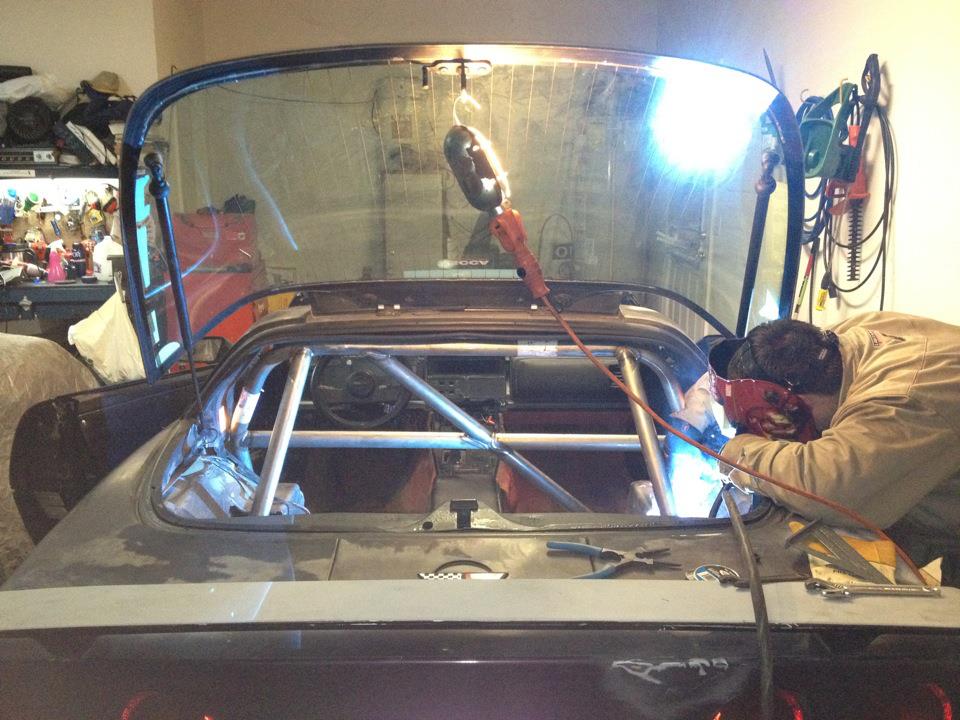
I'm terrible at remembering to take pictures of anything I make, but here are a few from my buddy's C4 Corvette roll bar I installed for him. Was a little rusty, hadn't run short arc GMAW in quite some time prior!
[IMG]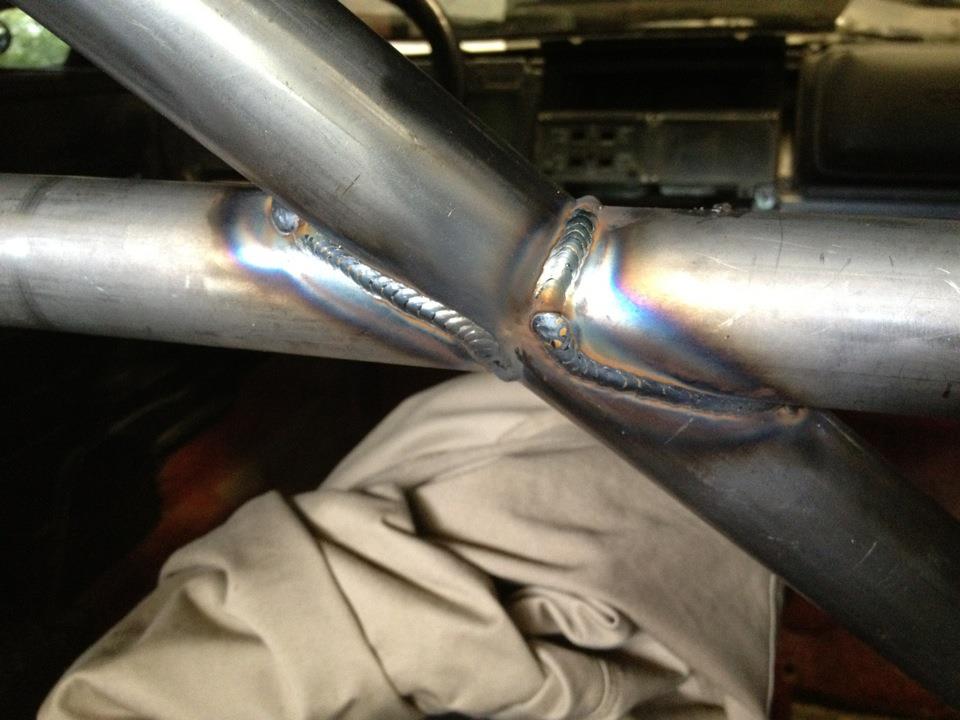 [/IMG]
[IMG]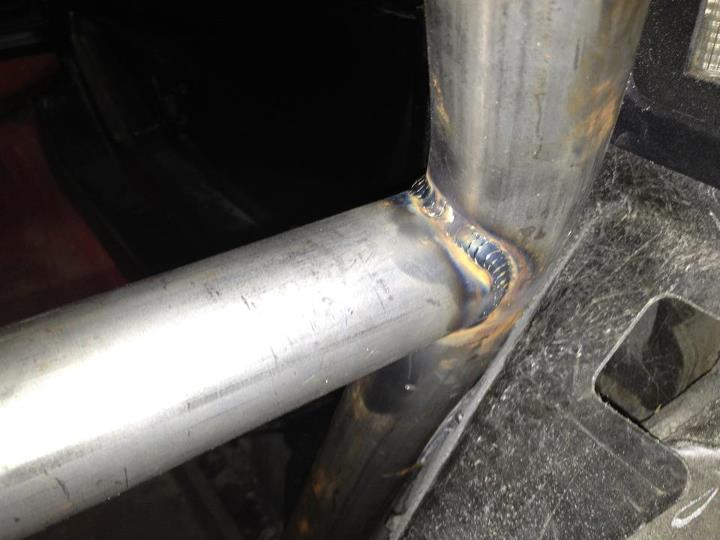 [/IMG]
[IMG]
[/IMG][IMG]
[/IMG]
Reply
1
1
 12-15-2012, 11:29 AM
#90

great work, +1 on posting high quality pics.
The aluminum Y pipes look superb. I do not weld, but have taken aluminum parts to get done, and usually the problem welders have is matching the old with new aluminum. Had a aluminum oil pan that the welder cracked, took it to another welder, and same deal.
The aluminum Y pipes look superb. I do not weld, but have taken aluminum parts to get done, and usually the problem welders have is matching the old with new aluminum. Had a aluminum oil pan that the welder cracked, took it to another welder, and same deal.
Reply
0
0
12-15-2012, 02:44 PM
#91
Senior Member
Join Date: Dec 2012
Location: Charlotte, NC
Posts: 538
Total Cats: 64
Thanks guys. Those welds were done with a little Hobart Handler. I'm a welding engineer by trade in the power construction industry, but used to do chassis work for a while back when I was living in CT. Most of my days now are buried in Code books and nuclear regulations, so actually being able to fit in any welding I can is a pleasant change of pace!
Reply
0
0
12-15-2012, 04:25 PM
#92

Thanks guys. Those welds were done with a little Hobart Handler. I'm a welding engineer by trade in the power construction industry, but used to do chassis work for a while back when I was living in CT. Most of my days now are buried in Code books and nuclear regulations, so actually being able to fit in any welding I can is a pleasant change of pace!
Reply
0
0
12-22-2012, 08:34 PM
#94
Junior Member
Thread Starter
Join Date: Jun 2010
Posts: 176
Total Cats: 4
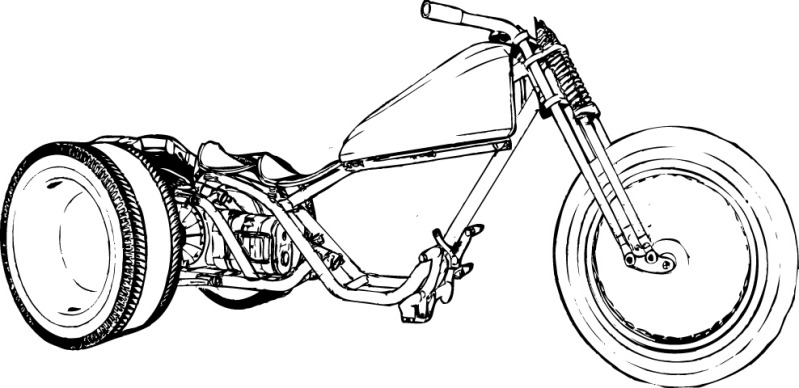
Ok, here's a big project I've been working on.. These are obviously just drawings/computer renderings but we are actually making it very soon, as the pre-production prototype. This is kind of a first preview you guys get to see it just because It hasn't gone public yet. I'm part of a team of guys developing a new company called Tantrum motors, the product of course will be this leaning trike. And yes it really feels like a motorcycle, is safer, faster stopping, and faster through a turn, than any conventional trike or motorcycle of equivalent power to weight.
Here's the proof of concept prototype (was in my first post if you didn't see it)
And some drawings/ computer enhanced drawings for our soon to be completed official book for the pre production prototype. The reason for the new configuration is to add a rear seat while making it shorter and lighter.
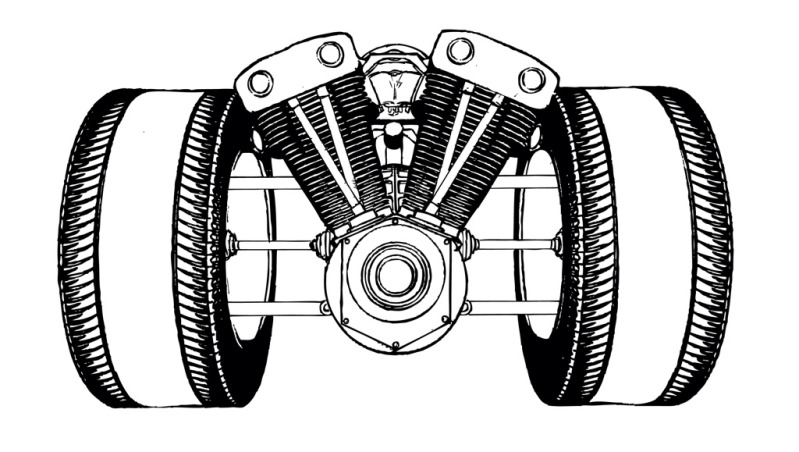
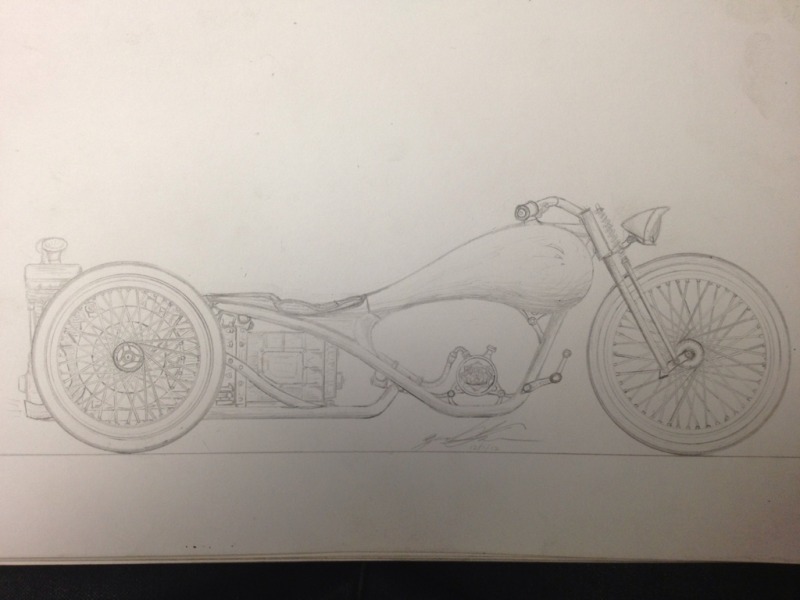
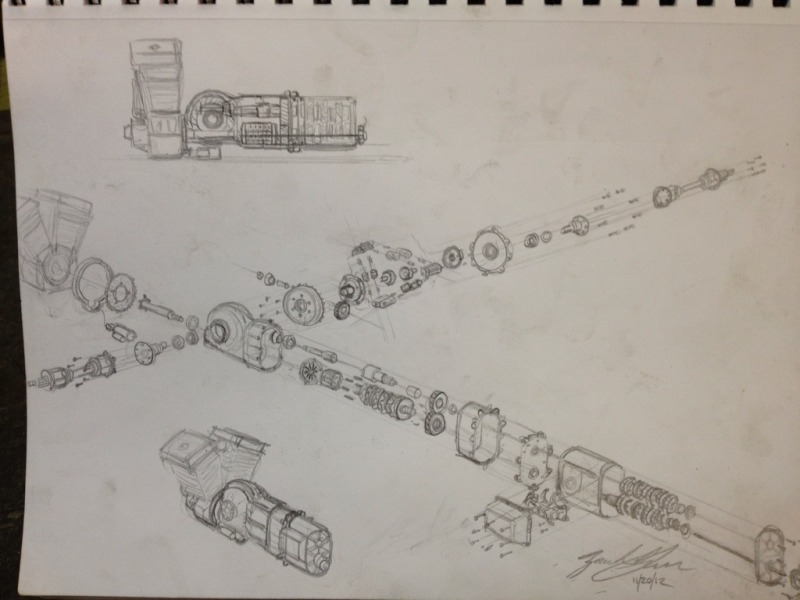
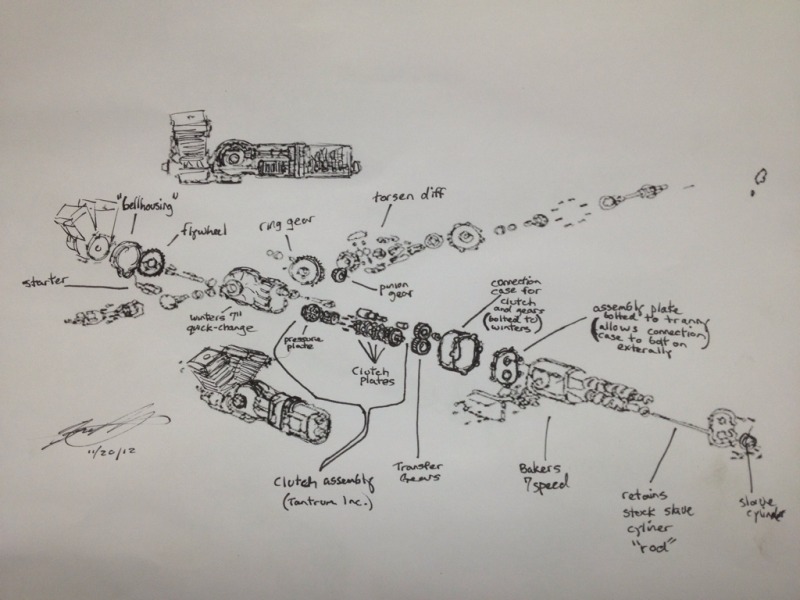
We've all been very busy on this. When we start building it ill be sure to post some pictures
Here's the proof of concept prototype (was in my first post if you didn't see it)
And some drawings/ computer enhanced drawings for our soon to be completed official book for the pre production prototype. The reason for the new configuration is to add a rear seat while making it shorter and lighter.
We've all been very busy on this. When we start building it ill be sure to post some pictures
Reply
0
0
 12-25-2012, 08:03 PM
#96
mkturbo.com

iTrader: (24)
Join Date: May 2006
Location: Charleston SC
Posts: 15,177
Total Cats: 1,681
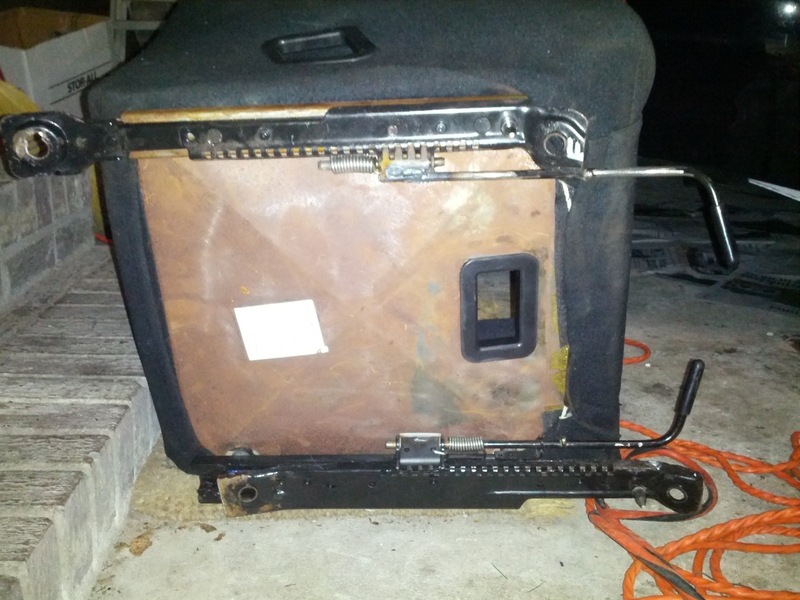
So if anyone has even looked at how the stock seat rails move back and forth you have seen the stupid wire that pulls the one side down. When attached to my momo seats they have never worked as well as I would like. So this past weekend I picked up a second set of rails from my local pick and pull. Armed with my welder I attached an additional handles to each side of the seat rails. So now moving the seat back and forth is easy and smooth.
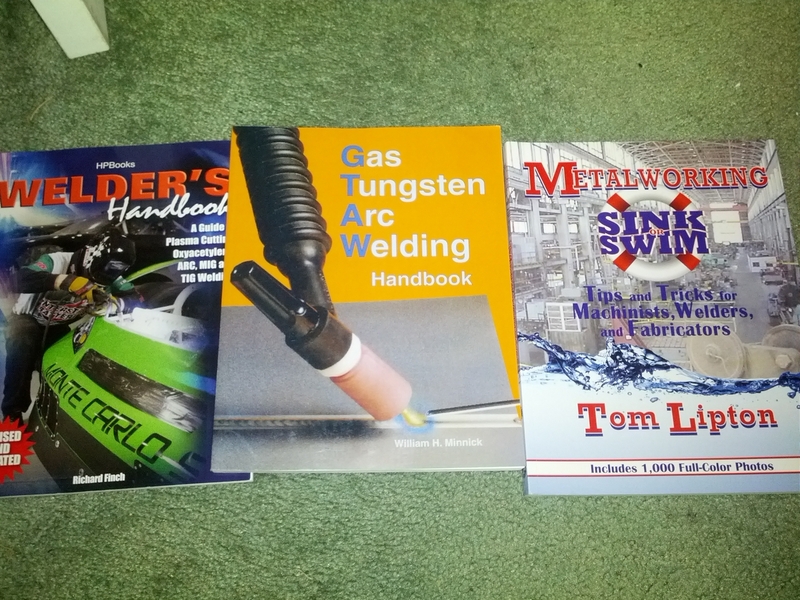
I also got a few new books for Christmas.
I also got a few new books for Christmas.
Reply
0
0


